
Daniel Lea (AKA 99pppo)
-
Posts
229 -
Joined
-
Last visited
Content Type
Profiles
Forums
Articles
Gallery
Downloads
Events
Posts posted by Daniel Lea (AKA 99pppo)
-
-
A lot of fun actually! :D
Boy, that looks like it was a lot of fun! Good for you! -
Sure was mate! :)
Boy, that looks like it was a lot of fun! Good for you! -
On Saturday Alec Steele from Great Britain was visiting his grandparents in the near of Dijon and his uncle was kind enough to drive him buy so we three could work together a little bit. Unfortunately we had only three hours or so because I had to leave for traveling back to Germany early midday already.
First Alec showed me a pretty cool technique on forging a one-heat-horsehead he learned from Brian Brazeal, which can be easily applied on a lot of items for decorative purposes. Here is a video of it:
Then we where forging a gigantic nail to practice striking in a triad. The bar first was drawn out on the power hammer and then we upset the head in the swage blog by hand. Here you can see a video of that process:
The front one in serpentine shape is the one we made that day:
All in all I had a great time during these days and I really enjoyed my trip. There was some really great craftsmanship with Julien and Alec and I am keen to repeat this someday. Thanks again also to Julien´s wife who kept me fed well and drove me to the train station(s).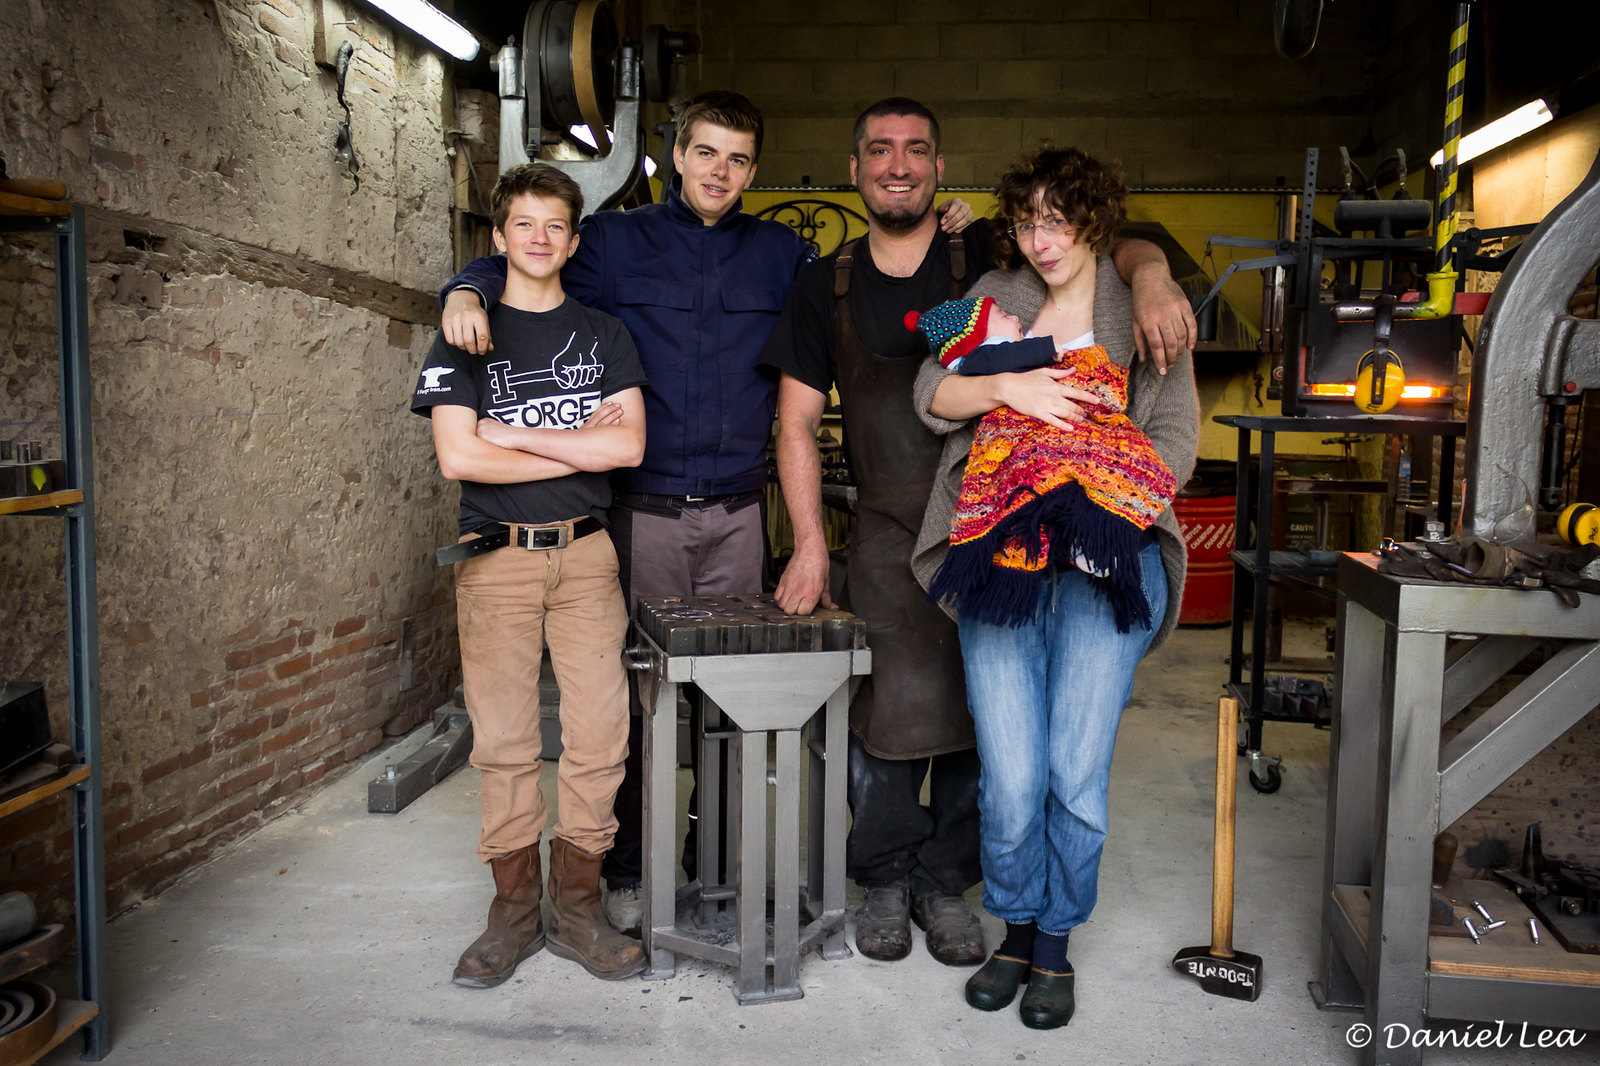
Soo this was my little travel diary. I hope you enjoyed it!
You all take it easy guys!
- Daniel -
Hey Guys,
during my autumn holly days I paid Julien Puy a visit in his shop near Dijon in France. I stayed with his family for four days. I helped him out in the shop, therefore he showed me some cool new stuff. He used to be a blacksmithing instructor for four years and did a lot of traveling around the world especially USA, the Netherlands, Germany and the Czech Republic.
On the first day we made this clothes hanger: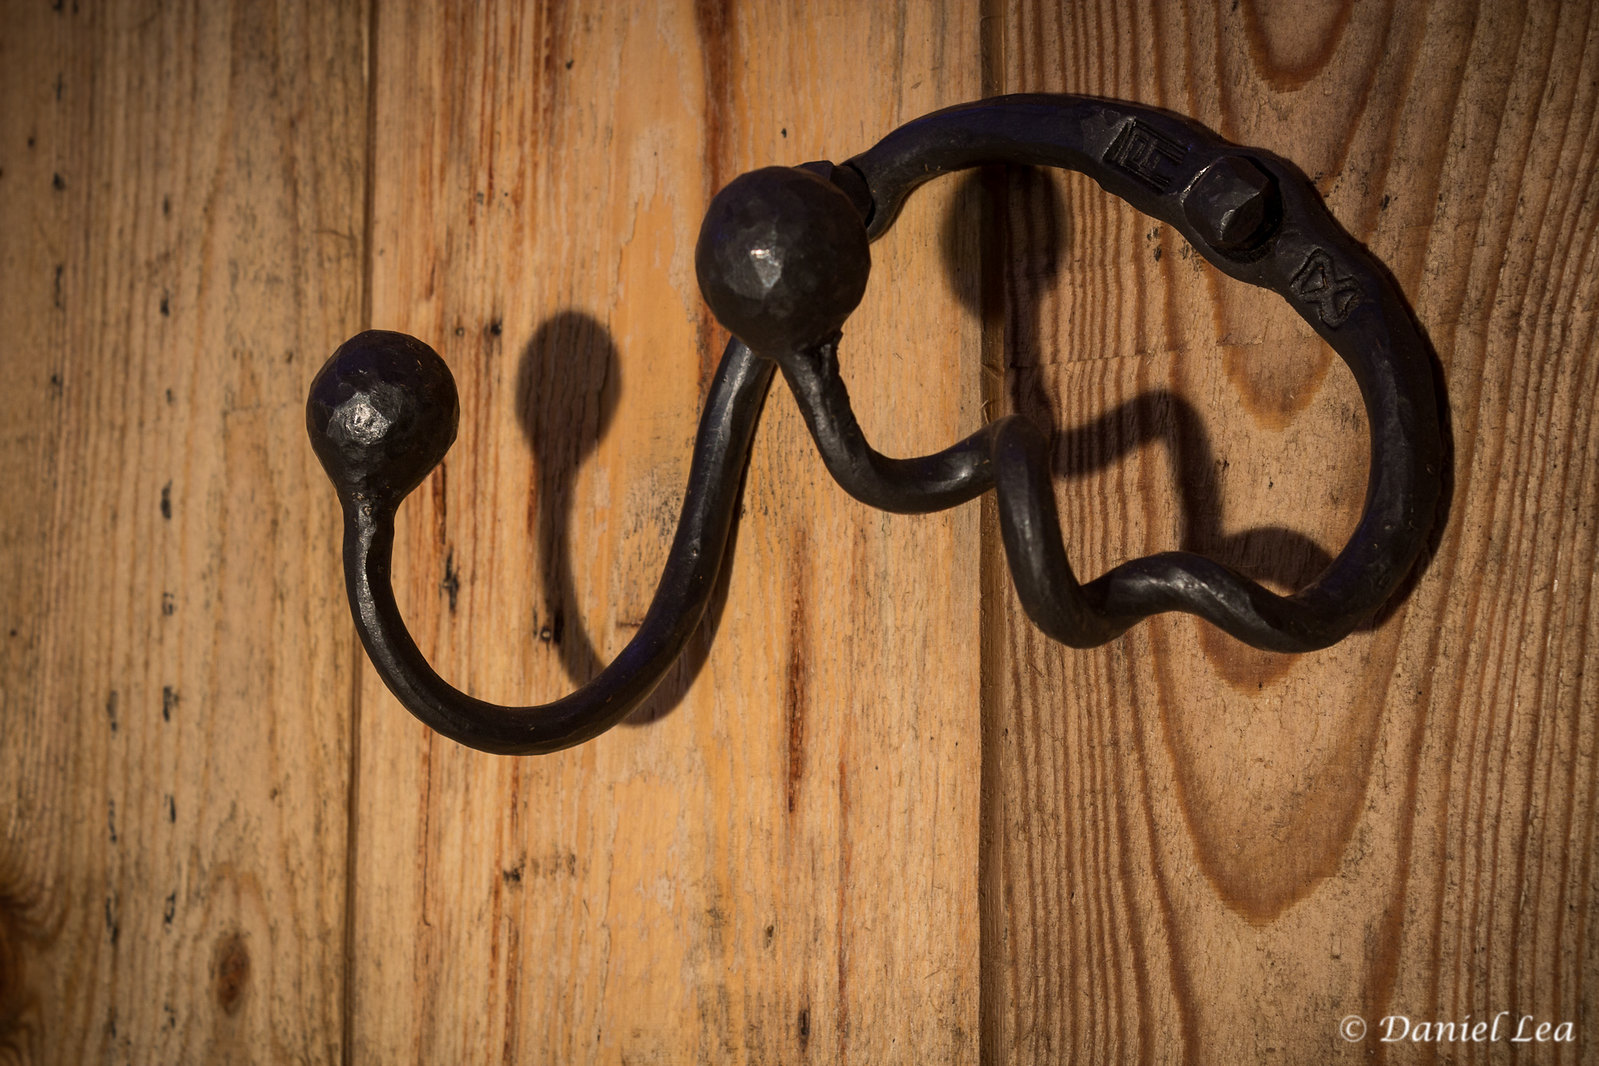
The second day we made two Brazeal style rounding hammers. One was for a customer of Julien, he was forging and I was striking. Here you can see a video of it:
After that we made a second one for me. I forged and he striked. Unfortunately there is no video of it... Toolsteel with a carbon content of 0,48% was used, pretty similar to 1045 or C45 steel. The handle I made myself from African hardwood. The hammer head ways somewhat around 3lbs. It is hardened and partially tempered at the cheeks. The all-in-all price for that one was 150€ (~200$).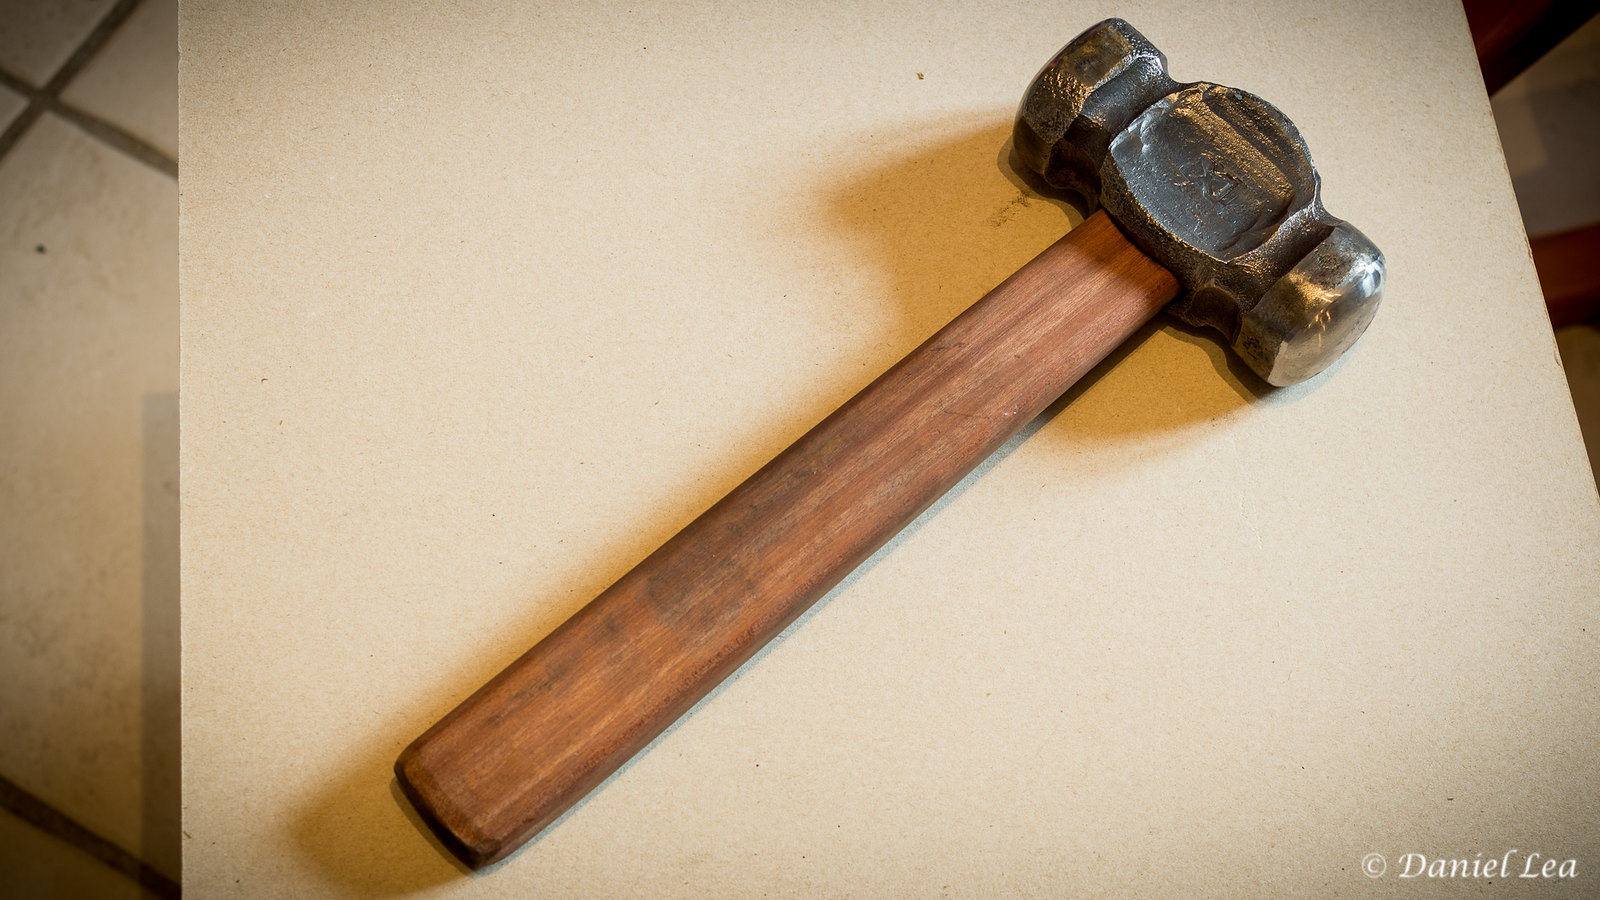
The next day we made inter alia this axe blank from pure iron I will weld in a cutting edge and finish it soon: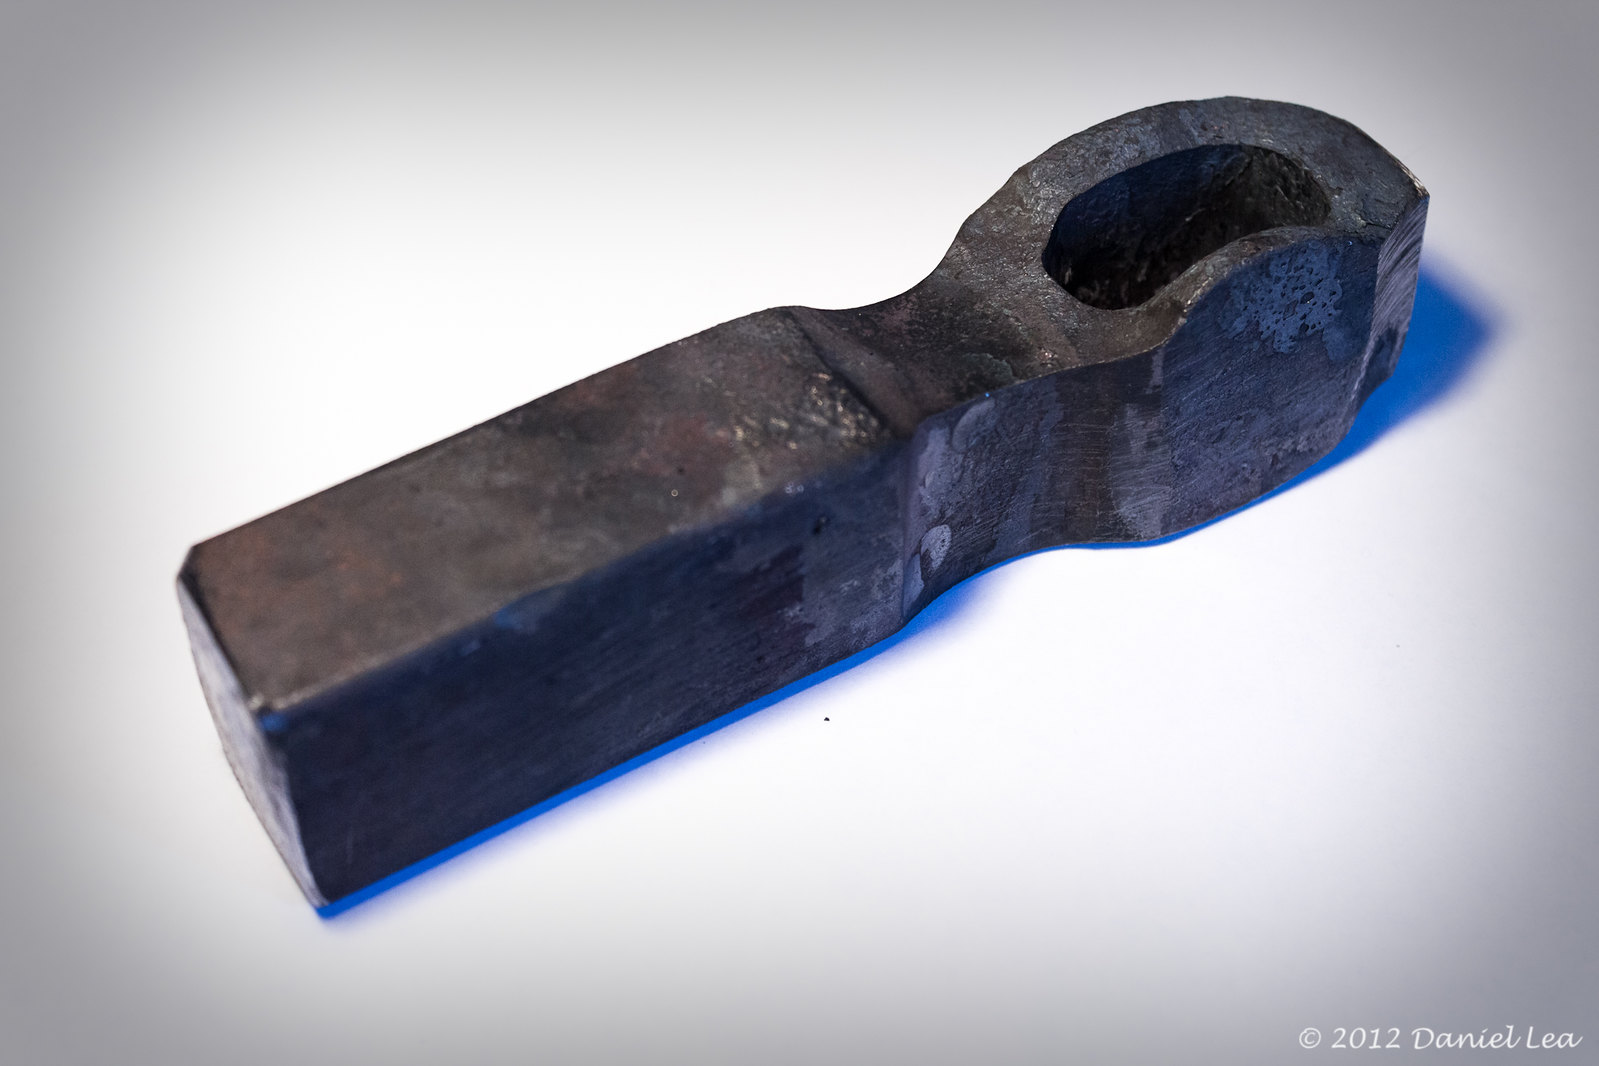
-
Wow very nice exspecially for a "first project"!!
-
Nice! share your result then! :)
I'm going to give that a try this weekend - looks great - thanks for sharing 99 -
Haha yes good tool for Zobie apocalypse^^. Julien and I made an axe blank for a viking axe from pure iron I will soon weld a cutting edge in and finish it.
Gnarley axe PPPO, it has a certain character that'd probably sell well to the "zombie apocalypse warriors" and such. Practice will produce results, this is a decent first attempt, more will be better. RR spikes aren't the easiest stock for axe blades.
Frosty The Lucky. -
For a first pair they are quite good. It is usable, my first wasn´t, my second neither. Now I can make most of the tools I need myself. It is great, you start with very few and make more and more tools and become very well equipped with the time.
-
That was a very nice comment. Thank you!
Make someone a present like 99 said. And it will be here long after we are gone. A ten minute job On a piece and your momma or whoever will treasure that thing and make sure it goes to someone That appreciates it when They pass away.
But of course. I try to not highlight That it only took me 30 minutes to make That banana tree holder or less on the spring stock I turn into bread baskets to set on the dinner table.
We live in a throw away world nowdays. And a gift like 99's candle holder. That type item will Be cherished When we are all gone.
Someone will say " my daddy or uncle made that " hopefully helping to keep the craft alive in the future. Just my thoughts. But _I may be biased seeing how I'm 5 th generation in the trade as a profession.
But people love this stuff. The ones that Don't. Well. They get something that probably want Be around 10 yrs from now. Women are easier to make stuff for anyway. As gifts. Those old uncles usually have something to say. So they get a gift card if I draw their name at Christmas. Lol
Need To be working on stuff right now. But I get so many Good ideas from folks on here. I gotta keep checking y'all work.
Thanks for sharing. 99. -
Nice that it seems "alive" to you!
Looks good, a little animalistic like the flower wants to grow legs and take a walk. Wistful in other words.
Frosty The Lucky. -
A gift that you wrought with your own hands and that has a usefull purpose and will last over the next 300 years definatelly is a good one!
Great gift idea. And as someone said, its a Good design to teach. I need to get my butt in gear on Christmas presents. Cause it's post Like this that give me alot more ideas and makes me think of who to give them too.
Don't want to give everyone a Fredericks cross. At least Not at the same time. Scared They will compare the mistakes between them. So I Like to give everyone something different. They can swap later if one decided They had To have a certain piece.
Keep posting the Good work. -
I actually first forged out a fishtail shape with the peen of my hammer, then folded the socket, then forged out the stem on the horn, then cut of about 5cm of the stock material with the cut of hardy already leaving the tip tapered, then tapered a bit more and formed the leaf out also with the peen of the hammer. After that flattened the surface with the flat face of the hammer. Having that done I chiseled in the veins of the leaf, folded up the stem and the socket, a bit tweaking around making it stand stable and then some wire brushing and as the final step I burnished the surface with WD-40.
Thanks for the idea. My students need projects like this. I have them make leaves, but they cut them off and draw out the stems. This approach will allow them to learn to make a socket. :rolleyes: -
I am very glad that so many people like my design and want to try it out! :) I am curious how you will put it into practice so I´d be very happy if you can post pictures or even videos of your tries.
-
Cool that my ideas are taken so good. I think I will also come up with a tutorial video soon.
Thanks for the idea. My students need projects like this. I have them make leaves, but they cut them off and draw out the stems. This approach will allow them to learn to make a socket. :rolleyes: -
Hey Guys,
today I forged this candleholder with a leaf as a base plate. It is forged in one piece out of 20mm round stock.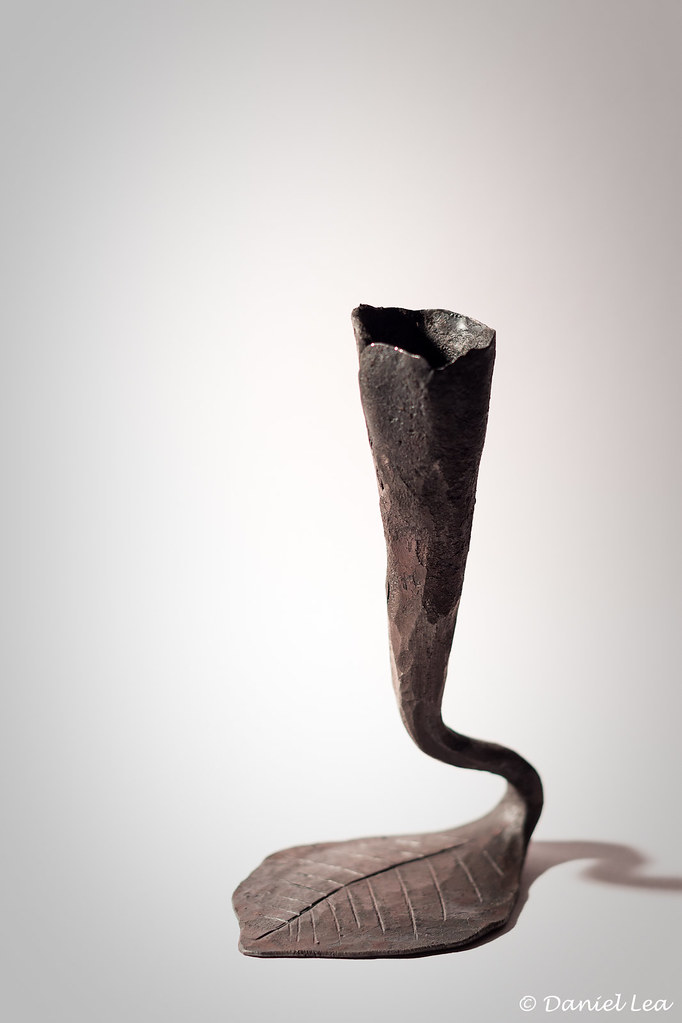
Regards
- Daniel -
Try try and try again I just can say! Every time it will turn out a bit better and after some while you will do that when I wake you up 03:00am! ;-)
Looks a heck of a lot better than my first tomahawk attempt. I was so depressed by my poor showing that I haven't dared to make another try. ;) -
Hey Guys,
today Henrick and I forged our first rail road spike tomahawk. It has a welded-in cutting edge from coil spring steel. It is hardened and tempered. It has some welding failuirs in the blade but it holds firmly and has a very sharp cutting edge.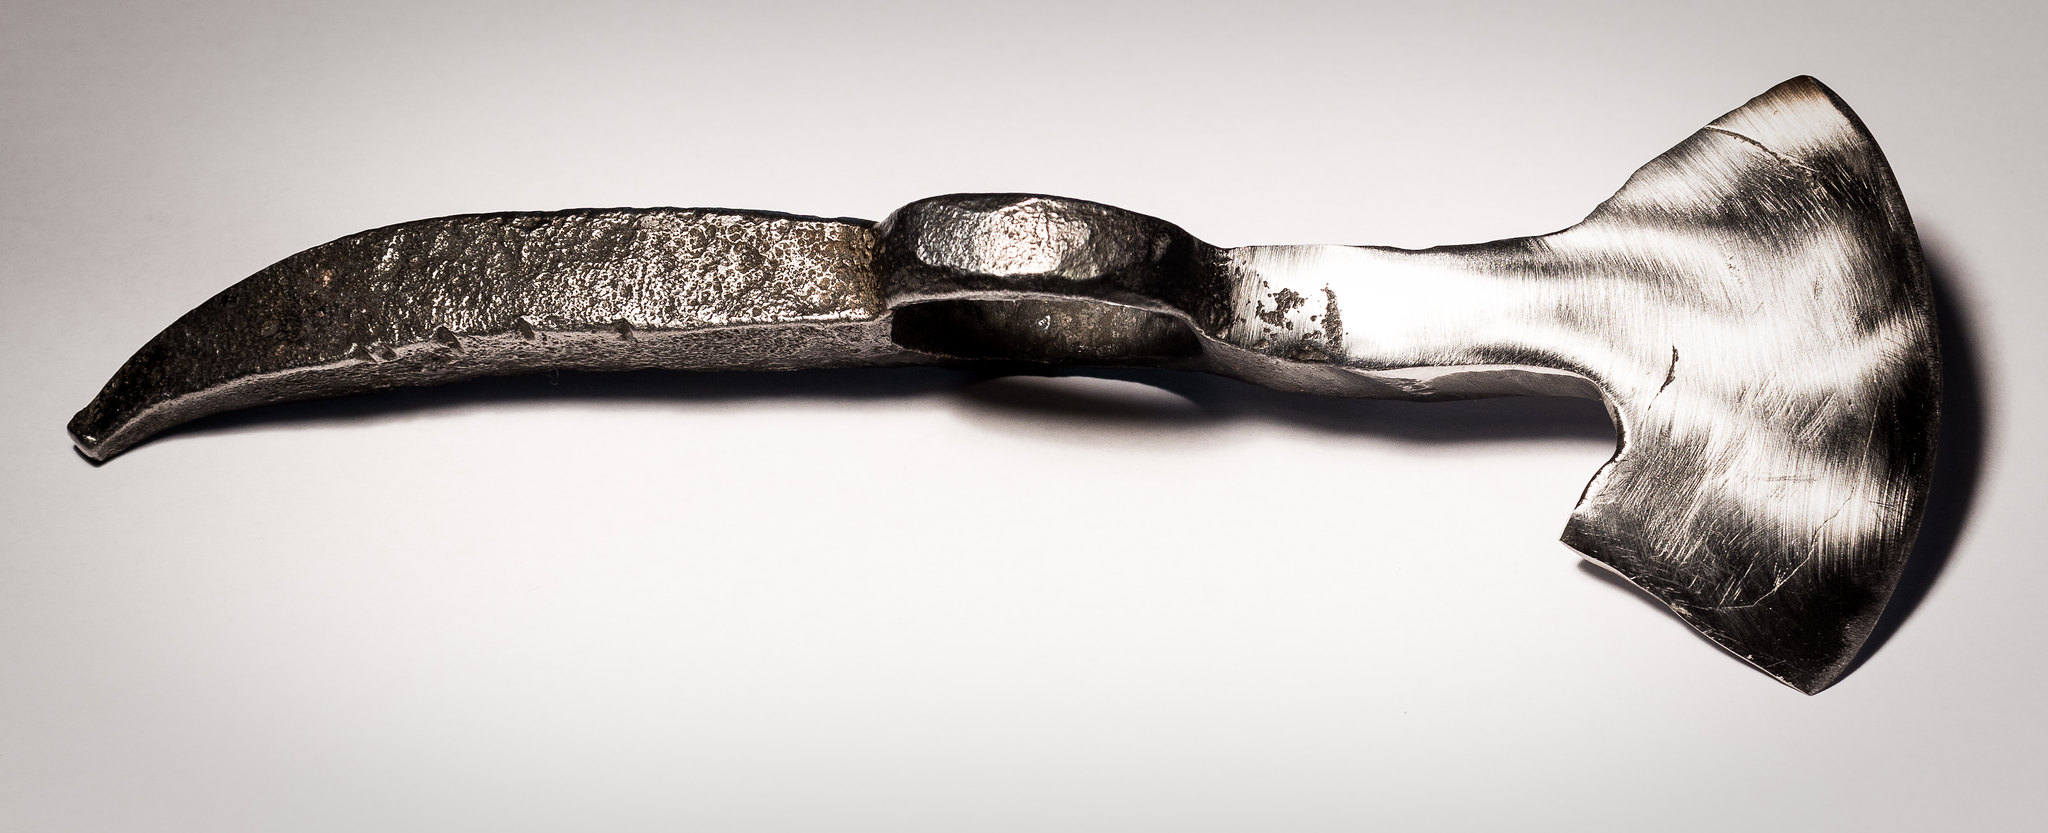
Bare with us, as I said this was the first tomahawk he and I made.
Take it easy guys!
- Daniel -
Imperfections just show that it is a unique piece. Wrought be hand. There is a difference between bad quality and the blatancy that it is hand made.
Interesting thought came to mind. When I look at work done by others I actually like the rough or imperfect parts of the work. When I look at my own work I see the rough parts as somewhat ugly or a result of poor technigue/skill. They stand out as glaring problems and somewhat ugly. I just found it interesting that I am more critical of my own work than of others. I beleive I could make a broach very similar to this. BUt if I did would I just see the imperfections? Probably... -
That is one awesome idea!!!
Nice progression from the first post, both in form as well as function.
One small suggestion would be to add a little color by making the pin out of brass or bronze. Just one way to make your work stand out from the rest. -
Ahh that explains a lot! Thank you for sharing this information!
A nice piece. I've not made anything like this in iron, however my first metalworking was with silver and gold and I did make a fair number of brooches. Some of these were in old styles such as Celtic, Roman, Saxon and later 'Pilgrim' badges.
I was initially surprised by the size of the pins used in the original brooches, but I put that down to the fact that the fabric used then was coarser so a larger pin was not a problem. Wrong!
A lady at the British Museum set me right... the fabrics were of a perfectly good quality; there were permanent holes (usually emroidered around, like a modern buttonhole) through which the pins passed, usually securing the two sides of the garment together. She believed that for most people the same brooch would have used on all the garments they owned. -
Thanks for the credit and the good tip!
G'day 99, nice piece of work.
Following on from Sam's comments, if you want to get the pins smoother, try a wooden Hammer.
Make a hardwood hammer/mallet and when you get the pin as smooth as you can with your steel hammer, take another heat and belt it with a wooden hammer and you'll find it helps smooth it even more. Sometimes a piece of wood to hit on is good also, but with these pins being so thin, they may just burn into the wood too fast and the anvil may be better.
Anyhow, something to try. Keep up the good work -
I made that pin as smooth as I could get it. The pictures is extremely over-sized and small blemishes may appear way bigger than the actually are. I tested it on different fabrics and it worked fine.
I like it well done , However , a bit more time and it could be a bit smoother on the pin even with that it is a nice piece .
Sam -
Hi fellows,
after so many people gave me so many useful tips on my last post about a Viking-ring-brooch I forged things came really clear to me. Today I forged a new one regarding all the new knowledge I gathered.
This is what came out: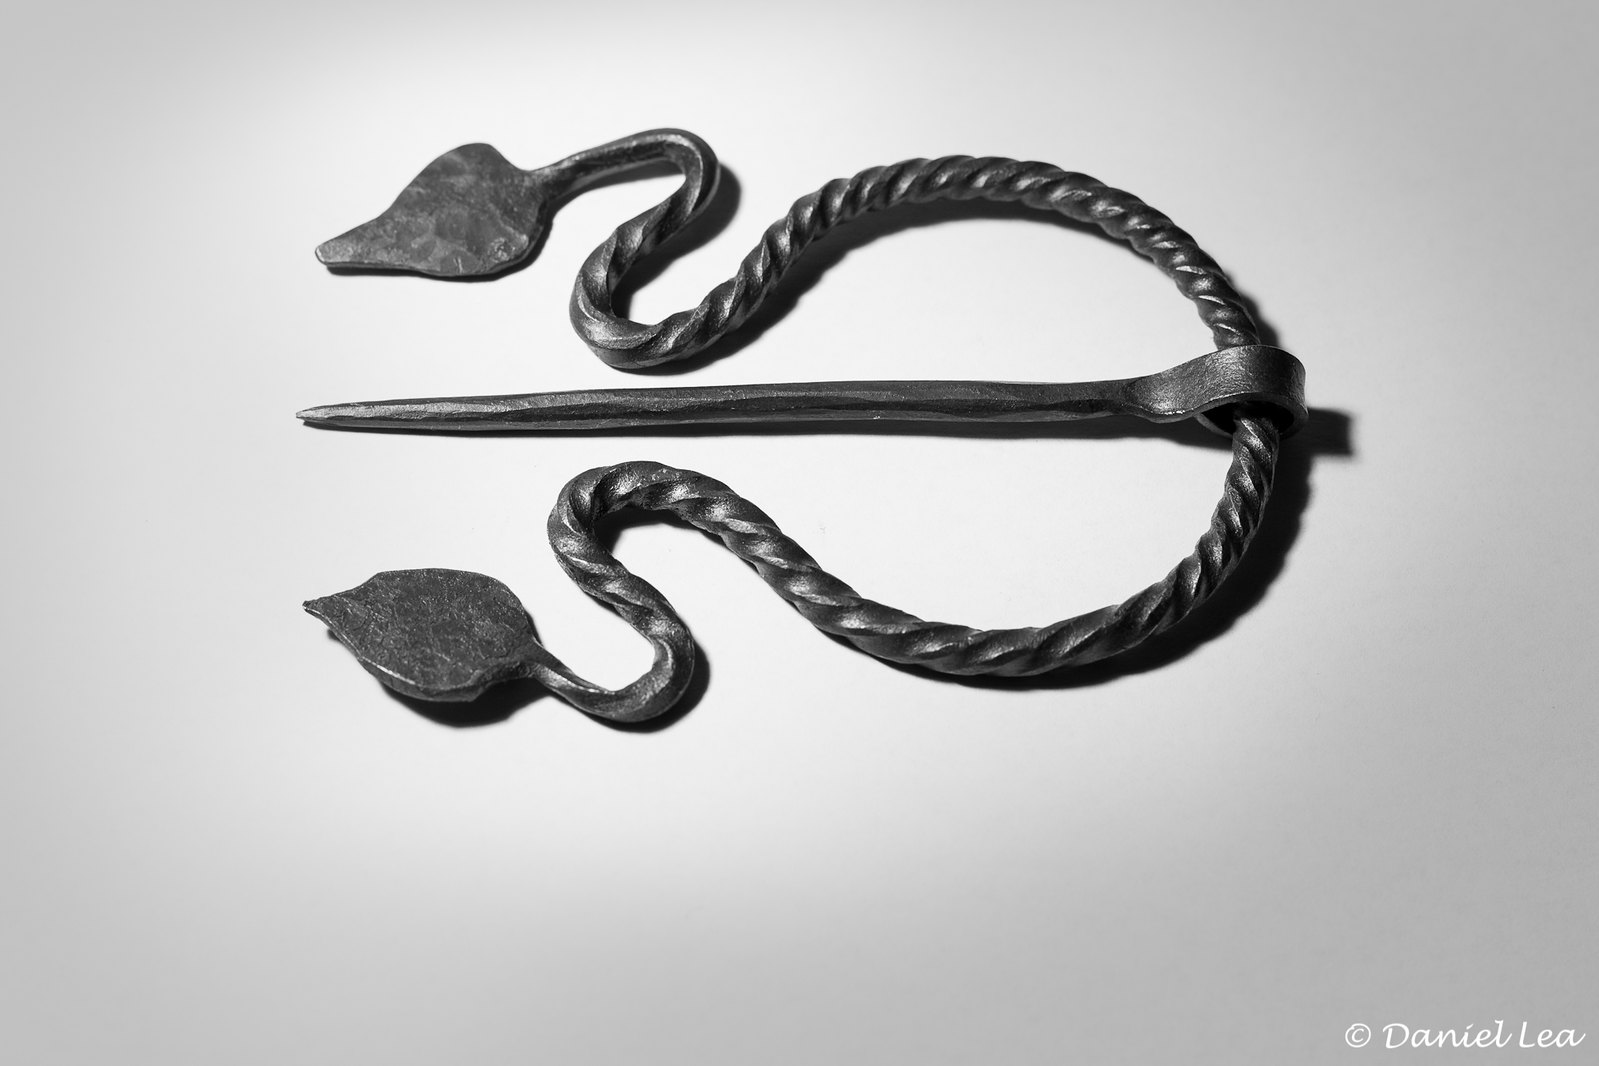
Thank you guys again for sophisticating me. I´d be glad to hear your opinion about it.
- Daniel -
I will go out in my shop tomorrow and will make a new one, regarding all new knowledge I gathered about broochs! Thanks for your comment!
For my fine woven tunics I use a sewing bodkin to make eyelets and stitch around them like a button hole to have a dedicate penannular brooch fastening location. For my coarse wool brats they work fine as is.
Do tone down that twist though the pin should slide easily through the fabric and not "file it"
My trip to Julien Puy´s shop in France
in Blacksmithing, General Discussion
Posted