

iron quake
-
Posts
162 -
Joined
-
Last visited
Content Type
Profiles
Forums
Articles
Gallery
Downloads
Events
Everything posted by iron quake
-
Oil or grease on a hammer slide
iron quake replied to Syd Partridge's topic in Power Hammers, Treadle Hammers, Olivers
Update to my power hammer lubrication. I mentioned that I would report back if my rebuilt 100 pound LG hammer slide seized up while using way lube. Well in fact the slide has galled up and I think I just wasn’t oiling it enough. I was putting a small squirt of lube in the oiling cups every time I ran it and a few drips across the top of the dovetail as well. I think it was too small a volume to run across the entire sliding contact surfaces, keep them wet and flush out debris. In any event I have reground the surfaces and will put it back together today. I’m going to use chain saw bar oil this time, a lot more of it and re-oil several times a day. I think the way oil was fine, but given how much more I’m going to use now, bar oil seems like a better choice to me. The hammer was working so well that it’s sad I’ve had to stop and rework it again. Live and learn I guess…..I’d love to live a little more, and learn a little less some times. -
How to tell if you, are a purist
iron quake replied to iron quake's topic in Blacksmithing, General Discussion
I love this kind of salty feedback! Your favorite double has exposed hammers an bored 28 gauge. Your trout still go into your wicker creel and you wade wet or not atall. You spit only once and only at the start of the day into your slack tube. Your files have only wooden handles. -
How do you all make your layouts for large projects? I've been drawing them on my shop floor. I have some nice saw cut lines in the floor to use as a gauge or baseline and some at right angles that work pretty well. Is there a better way of doing this? I spent a few hours today making a 5' compass for drawing arcs on the floor. You folks who make huge gates and furniture have this all figured out I'm guessing.
-
The process of making tools (step by step)
iron quake replied to zord's topic in Heat Treating, general discussion
Phil how do you process the spring? Do you heat it up and unroll it or cut sections out and then heat and straighten them out? -
The process of making tools (step by step)
iron quake replied to zord's topic in Heat Treating, general discussion
Bigfoot I stand corrected $6.00 not .60. serves me right typing things after midnight when I should be in bed. You might take a look at this heat treat link. I think its pretty much on the money and easy to follow. http://tidewaterblacksmiths.net/2.html -
How to tell if you are a purist; You only pull hot metal from a forge heated by coal. Drilling requires you spin the bit by hand, like starting a fire with a bow string and a stick. You still fly fish with a hand spun bamboo rod and your patterns are hook, thread and feather ONLY. You still use hickory shafted golf clubs with a forged head, that looks rather like a butter knife. Cut plug like “days work” is still the only way you fly. If it don’t have points in the ignition system or it has a xxxx computer chip in it, it ain’t worth drivin. Any more of these, and I’m not poking fun I’m headed this way myself.
-
The process of making tools (step by step)
iron quake replied to zord's topic in Heat Treating, general discussion
Here is my take on the subject of making tools. If you are going to the trouble to make a tool you must need it and it should be of good quality. To start with, making tools from mild steel or a steel that you’re unsure of the alloy, is a potential waste of time. A 6’ length of 4140 1” square bar costs me about $70.00, that’s about 60 cents for 6” long piece. If you are going to grind it, drill it, file it, mill or forge it to some shape, you should be able to heat treat it after words to get something worth having. The cost of the steel is little compared to your time. McMaster sells slow or fast quench oil for $18.00 a gallon and it will last a long time. They sell tool steel as well (they are expensive) buy from your local steel company if you can. I like 4140 and S7 a lot. You can heat treat S7 to 1800f and let it air cool to quench, and if it’s not a delicate part use it as quenched, without annealing or stress reliving. All I’m saying is do it right the first time. I heat treat all my tools in a small gas forge, quench in air or quenching oil and anneal in the kitchen oven for 2 hour soak. In my past life we never did any heat treat in house, we always sent it out. I’m rather enjoying doing the whole process myself now, along with everything else. -
Nice work Beth. I don't know how they will sell in the UK but in my area, they would go over very well.
-
I have never tried this but I was told or read that you can partially restore a dull file by rusting it any way you like, spray it with salt water, stick it in the dirt, anything that starts the file rusting will do. I don't know how long you let this process take place but might be worth a try. I myself keep them cleaned up with a card file and pitch them when they wear out.
-
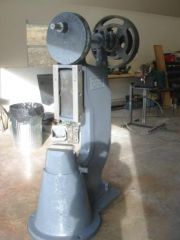
Here are a couple pictures of the brake I made. I purchased the band from Peacock and it works well. http://www.iforgeiron.com/gallery/image/36331-brake-band-attachment/ http://www.iforgeiron.com/gallery/image/36330-brake/
-
Spring Tool Joint Question
iron quake replied to iron quake's topic in Power Hammers, Treadle Hammers, Olivers
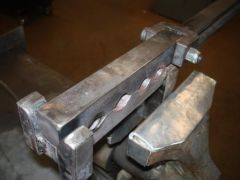
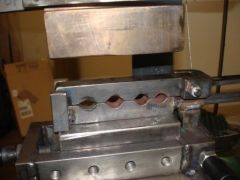
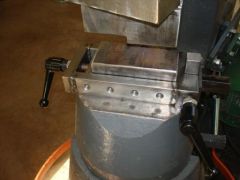
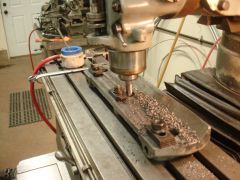
Here are a couple pictures of the tenon tool. I think it worked great, will it last any longer, I guess I'll see about that. http://www.iforgeiron.com/gallery/image/36333-tenon-spring-tool/ http://www.iforgeiron.com/gallery/image/36332-tenon-tool-with-a-2nd-joint/ -
From the album: Iron Quake
-
From the album: Iron Quake
-
From the album: Iron Quake
-
From the album: Iron Quake
-
From the album: Iron Quake
-
From the album: Iron Quake
-
From the album: Iron Quake
-
From the album: Iron Quake
-
From the album: Iron Quake
-
From the album: Iron Quake
-
From the album: Iron Quake
-
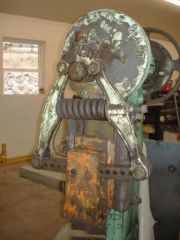
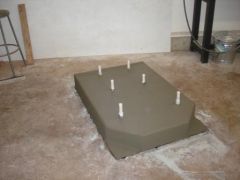
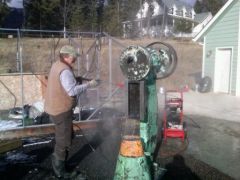
concrete for a 250 little giant
iron quake replied to hillsideshortleg's topic in Power Hammers, Treadle Hammers, Olivers
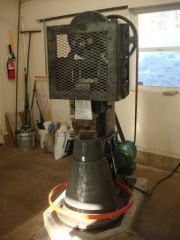
I’m on the same type of clay / decomposed granite fill that you are on. We used a fantastic concrete contractor in the Spokane / Coeur D Alene area who poured a bunch of concrete for our house, 9’ basement walls on 3 foot wide footings plus all the slabs in and outside. He has been pouring in the area for 30 years. He knows our soils and climate and told me this about your situation. Clay settles back to compaction in most circumstances in 5-7 years. That being said, to be sure your hammer stays in place he suggested auguring down to native and pouring 3 pillars with lots of bar in a seven sack or better mix and then pouring the big chunk on top of that You won’t need any sona tubes if the clay doesn’t cave in and stays in place. How you get a 10 foot auger inside your shop is an issue perhaps. Peacocks idea might be better. In setting my 100# LG hammer I removed the fill and got down to native soil which happened to be at about the 24” and took the concrete down to 36” I flared the bottom of the hole and then welded up a cage from 5/8” rebar. I’m very happy I put in the extra effort because the hammer would have been through my 5” shop floor by now. A couple things to consider that I think made mine work out well. Raise the hammer up a 6” or a 2 x 6 width perhaps that is not needed for a 250 I don’t know. Put 45’s on the front corners so you can get a tread bar extension down to the floor easily. Make a steel template to locate the ties rods and use that to position them by welding them to the cage. Put a PVC sleeve around the upper 6” of tie rod so you have some play if you need it. I put caps on 1 ½ PVC and then put a threaded hole in it to match the rod size and then it was easy to screw them up and down to the correct height for the final pour. My former boss and mentor told me “Do the very best job you can and it will be bad enough then” applies in this instance for sure I think. -
Spring Tool Joint Question
iron quake replied to iron quake's topic in Power Hammers, Treadle Hammers, Olivers
Machined, welded, heat treated the tool today. I ran one part this evening after the tool came out of the oven and I think its an improvement. The top half of the tool being able to get level at all four tool positions takes most of the stress off the upper spring. I'll run a part and post a video or some pictures tomorrow. -
Spring Tool Joint Question
iron quake replied to iron quake's topic in Power Hammers, Treadle Hammers, Olivers
Ok I'm going to make a spring tenon tool with a butcher today and I'll try this joint idea out. The top half will be "1.25 longer and stick out past the die area. I'll ream a .501 hole in that end for a hardedend shoulder bolt and machine a yoke to match and attach to the top spring. I'm going to put a couple ears on the other end of the die set to retain the top half from moving out of position in the axis of the tenon holes. I'll let ya all know how it comes out. The real proof may take some time I guess.