
steponmebbbboom
-
Posts
101 -
Joined
-
Last visited
Content Type
Profiles
Forums
Articles
Gallery
Downloads
Events
Everything posted by steponmebbbboom
-

Send Me Your Anvil Pics...
steponmebbbboom replied to cbl4823's topic in Anvils, Swage Blocks, and Mandrels
it would be great if you could upload those same pictures to our gallery. from my gallery, here's a picture of my NASH new pattern anvil when i first received it, on its custom stand. 119# -
Little help ID'ing my anvil
steponmebbbboom replied to maidenfan's topic in Anvils, Swage Blocks, and Mandrels
those are some nice crisp edges on that anvil. as time goes by you will memorize the small chips on the edge and use them to your advantage to bend different corners on pieces. a well-worn anvil can often be better than a new one, some of the worst ones can pull double-duty as swage blocks! :o -
making metal rust.
steponmebbbboom replied to chocolateducttape's topic in Blacksmithing, General Discussion
you can also try sourcing ferric oxide in powder form from an industrial supplier---try the thomas register. for those who mightve clicked on this thread thinking it was about patination techniques---i did---there is a product that has been available on the market for quite some time now: Patinas *this is not a plug* modern masters also markets a similar product. this is basically a coating with different metal alloy inclusions and reactor chemicals to simulate different metal surface patinations like rusted iron and oxidized copper, etc. this type of surface treatment would be especially useful if you are forging a piece whereby you want a consistent patination effect over the entire surface of the piece, even if you have cast lead elements or even plaster or clay elements included, similar to what Hofi describes here: How do you forge this detail? just coat the entire piece, distress it with the patina reactor chemicals, and it all looks like one evenly rusted single piece. the attached image is from sculptnouveau's website, a ceramic piece with the brass coating. Copyrighted image removed and a link placed into the text instead. -
I had better get my money together! Hofi I was not expecting you back at iceforge until october! So sorry to miss your last class, i will try hard to make it this spring!
-
what a thread! retitling this thread seems in order as i had no idea what i was walking into here and it might make it come up in websearches easier.
-
Clay as a modeling medium
steponmebbbboom replied to Ferrous Beuler's topic in Blacksmithing, General Discussion
ive often thought how i could model out projects, would clay not sag when using long spans of it? id rather there be some sort of "gumby" product available, bendable wire with a plastic casing for scarfing and tapering ends. perhaps a really stiff clay would do. itd sure help me out... -
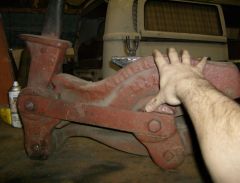 Edwards shear #5A, marked albert lea minnesota.
 -
 Edwards shear #5A, marked albert lea, minnesota.
 -
this is an edwards #5A shear, albert lea, minnesota. picked up a few months ago for $100. cuts perfectly. she's a big one...
-
Show me your mechanical hammer
steponmebbbboom replied to Glenn's topic in Power Hammers, Treadle Hammers, Olivers
hang on to those skills; with energy prices as they are, plows may just make a comeback! ;) -
hi ron, why do you think a plate should be over the clinker breaker? if it's the original firebox and it is a champion forge plate, there will be three slats in the bottom of the firebox. if you see holes or bolts around the opening, those are to hold the tuyere in place. some coal fines will pour through into the tuyere, but really those holes need to be there so the air can get through. the clinker will tend to settle at the bottom and plug the holes, when this happens give the breaker lever a wiggle to clear them, or just dig in with a poker and pull them out. im not familiar with the blacksmith primer, perhaps others are but i have my own favorite books, the new edge of the anvil was my textbook and it goes pretty deep into the getting started end of things. round that out with the complete modern blacksmith and youve got a pretty good start. one thing that i do differently from most texts ive seen is that i keep my coal wet when i burn it. i find this helps with dust control, and seems to reduce smoking when it is on the side coking up. the crappier coal also seems more forgiving when its wet. ive never had the fire pop once yet. your mileage may vary. take a look at the pictures in my gallery, does yours look the same as mine? are you sure your firebox is integral with the forge plate? could it just be overly rusty and hiding the seam? i dont think its a problem mind you, if it is in otherwise good condition you probably wont ever have to replace it.
-
dinner triangle
steponmebbbboom replied to saintjohnbarleycorn's topic in Blacksmithing, General Discussion
from answers dot com, bell: Definition and Much More from Answers.com scroll down to the howitsmade bit. most musical instruments these days are constructed of non ferrous metals to avoid corrosion, but i really dont think that is your issue here. some metals and alloys are marginally better than others but the key is to find a resonant frequency that has a pleasant tone. with the standard smithed dinner bell, its more trial and error than anything, but i think youll find after playing with lengths and thicknesses of the legs, youll find some combination that rings true. yes keep the legs apart, hang with a wire or something that wont absorb vibration but try varying the length and thicknesses of the legs and try to keep them as equal as possible. good luck! -
my only concern, and i dont really want to say it, is that with a hammer that heavy i would be worried about a corner of the face breaking off and hitting someone with the grooves that close to it. i dont want to say it because the hammer looks so great! i seem to remember a hammer in the gallery with copper wire wrapped around the handle just under the head, rthibeau's i think. you got any more plans for it?
-
 an updated shot of the forge after the firebox was set over the opening. i have cut fuel consumption by two-thirds doing this. unfortunately the firebox is just sitting loose now, but the upside is that very little heat is being born by the forge plate anymore. now i just have to profile cut the steel stack to draw the fumes away.
 -
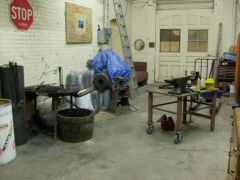 the layout table has been moved out for some bending work.
 -
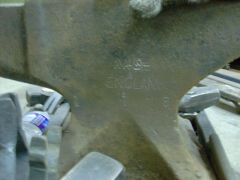 a view of the identifying markings. i believe 119 is the hundredweight or weight in pounds, possibly a date code. anybody?
 -
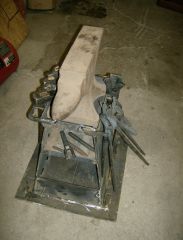
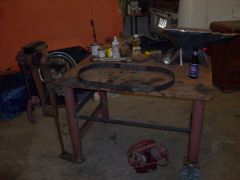 this layout table incorporates a one inch thick steel top, leg braces that double as a shelf support, heavy duty casters, an additional brace on the opposite end to be used with a coupling dolly and one leg has an adjuster bolt to allow for variations in floor surface up to two inches. the post vise is removeable, the strap has been modified to bolt to an upper mount with a 90 degree swivel so the entire vise can be twisted and solidly locked in place, or completely removed if required. the anvil pictured is of unknown origin, it is very crudely cast with a top plate welded to it; it is cracked and useless. the hoop in the center of the table is the beginnings of a pot-rack.
 -
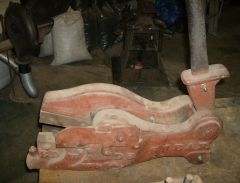
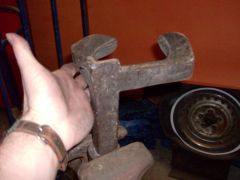 used for making shoes. no identifying markings. "D" shaped hardie spike, not sure what it was meant to attach to. cast iron with an angle iron cast into the upright.
 -
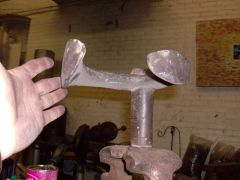 another view of the anvil.
 -
ron, that sounds exactly like the forge i have. champion all the way. if yours is like mine, it is rounded on one side, the other side has a little depression in it for coal or slack. on the rounded end you can see holes drilled on the rim, this was for a smoke hood. personally, i decided to butt the square end against the wall so i could use the handcrank blower more easily. mine is permanently attached to the forge plate with a cast arm. unfortunately it is in a left hand configuration, so i have to crank with the left hand and switch the steel to the left hand when i go to the anvil. i used a new firebox and tuyere from a local foundry in town. the forge came with a champion whirlwind firebox that was paper-thin. i chose not to grind and paint the forge plate; why bother? it will be filthy after the first five minutes, and its older than i am, so why hide the age of it. it wont rust significantly if it is left indoors. as for your champion 400 blower, i would use 80W90 gear oil as that's what is in it, gears. 30W may give you a bit less drag, but not enough to really notice. lighter oil will leak more. if youre doing everything right you will be turning the handle slowly when everythings up to temp. no the gearbox does not have a gasket, mines never been apart. if theres any water in the housing nhow, get it out of there. flush it out with brake cleaner aerosol, available at your favorite auto parts store. if youre lucky, youve still got the brass oil cup on top of the cover plate. an oil can spout will fit perfectly in it. with the cover off, fill to about an inch below the top, put the plate on, and give it a few squirts once in awhile if it leaks. again id use 80W90 oil for this task. check slop in all bearings, use channellocks to take the steel caps off, adjust till you feel the nut bottom and leave it finger tight. you just want to take the slop out of the bearings so the gears will mesh properly. let us know how everything works out and take pictures if you can.
-
anealing rr spikes
steponmebbbboom replied to saintjohnbarleycorn's topic in Blacksmithing, General Discussion
why not just place it in a bucket of vermiculite? available for peanuts at the garden center, insulates better than sand, no preheating necessary. i use it for punches, chisels, hammerheads, anything i need to anneal for grinding/filing before heat treating. -
This is my anvil stand and anvil.
-
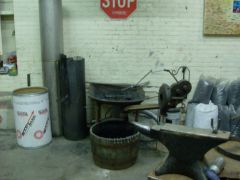
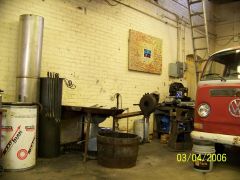 champion 400 forge setup with lefty blower arm and brand-new firebox and tuyere by Newman Forge and Foundry, hamilton, ontario. blower is connected to tuyere with galvanised flex hosing and stainless seal clamps. there is also an adaptor between the hosing and tuyere, all sourced from a custom exhaust shop. forge was bought for $300CDN, firebox and tuyere for $500 CDN, hosing and clamps for $80. slack tub is a $25 item from a garden supply centre. an old whiskey barrel cut in half. future plans include scroll cutting the steel pipe to fit the back of the forge body, and continuing with the stainless pipe up to the welding hood just out of frame. the 14 inch diameter and 6 inch backspacing should create a natural draw.
 -
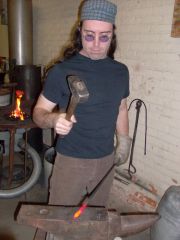 this rake was originally 36 inches long, i am reforging the rake end to a 30 inch length for better proportion. you can see another 36 inch proof in the background. the hammer is a 3# stanley french pattern cross peen with a slightly rounded face. the anvil is a NASH 119# new pattern, bought for $100CDN from stoney creek welding, the same supplier who designed and constructed the anvil stand.
 -
 NASH new pattern anvil and custom stand designed and fabricated by stoney creek welding, hamilton, ontario. quarter inch steel plate construction with three sixteenth angle iron support and one-half square bar tool holders. shown clockwise from lower left are 3# stanley french pattern cross peen with redressed face; and right and left hand flat hot sets, ball peen hammer, cutoff hardie, V hardie for fullering corners, three eighths spring fuller, five eighths spring fuller, quarter inch and half inch ring tongs, quarter inch round stock tongs, one inch square bar tongs, all handforged by me. fork hardie and hot and cold chisels on upper shelf.