
steponmebbbboom
-
Posts
101 -
Joined
-
Last visited
Content Type
Profiles
Forums
Articles
Gallery
Downloads
Events
Everything posted by steponmebbbboom
-
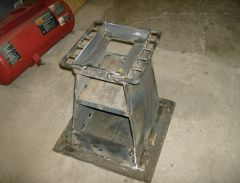 stand pictured without any tooling. you can easily see how it is constructed. support is meant to hold piece of plywood to absorb shock. designed and fabricated by stoney creek welding, hamilton, ontario.
 -
thats a steal actually. moving forward, i think that getting the smith around the shop isnt so much a problem as making sure that his/her controls can be left unattended and (s)he can be fixed in place and have leverage; and that (s)he can transition from one step to the next as quickly as possible. as far as the chair itself, i think any rail arrangement should have a captive roller underneath so the chair cant be wrenched off the rail, kind of like a rollercoaster car. id look there for inspiration, and even for sourcing parts. also, further to that idea, any part of the chair that is movable for the purpose of positioning the body (including the wheels and rails) should not be able to coast, like for instance if the chair is to swivel as i think it should, it should have a clutch/brake on it so it locks as soon as you let go of the control. having to manually lock anything will use valuable time. and for the most part this technology already exists, manual chain hoists for instance. i could probably source parts if someone has an idea or specific need for something, but im not an engineer or draughtsman. my only input in that regard is that i would shy away from any powered implements as although i think they would be efficient and compact, cost would be a problem unless you could get it from military/avionic surplus, and even then youre likely working with odd voltage requirements. maybe its just as simple as making every operation more conducive to have an unskilled shop hand just helping with positioning and bracing. :confused:
-
i dont have to. one of my clients is a wheelchair van manufacturer; i also have two clients that manufacture industrial robotics. i am well aware of the costs, and robotic arms... those vans would be peanuts in comparison, and not to mention that theyre necessary for basic survival. sorry to be a wet blanket here but the reality check bears underscoring. that said, perhaps since the smith needs to be held from twisting, and means of getting him/her around are not simple to say the least; perhaps instead of a work triangle, fixing the smith in one position and placing the anvil, water bucket and forge on a lazy susan arrangement that locks in place may be more workable.
-
let us not forget cost limitations. robotic arms and halftrack machines would reach stratospheric cost. the only thoughts i have at the moment would be as/re lunar rover tires, this could be accomplished using crosshatched aircraft cable of a sufficient diameter to support the weight of the smith and still provide some cushioning. it would be woven much as the nylon plies in a bias/ply tire. also, any fixture to support the smith in an upright position would be out as it would be near impossible to securely support the smith without compromising circulation to the femoral arteries. my thinking would be to bring the knees slightly above waist height and cover with a fireproof drape to prevent pooling of any slag or debris in the crotch area. i have often wondered what it would be like to harness myself to the electric bridge crane at work and fly around the shop with it. i think this would be the most practical solution, however still astronomically expensive and a means for securing the headache ball so it cannot twist sideways and installing a servo motor to allow yaw control would be needed. and lastly, how can the smith move himself with this contraption when both his hands are occupied with his forging work? perhaps a mouth fixture? grip the joystick with the teeth and move the head to fly aropund the shop, a toggle on the end for the tongue to lift/lower and roll the teeth sideways to yaw/turn? im getting a headache just thinking about it. and im not even going to bother to pick up a calculator.
-

tennis elbow and other RSIs
steponmebbbboom replied to steponmebbbboom's topic in Safety discussions
thanks glenn, note the anvil face is currently at knuckle height; the length of iron i am holding is approx. 30" long and i am holding it at a 5* angle; anvil itself is approx. 15" from my leading hip. i will block up the stand four inches and see if that makes a difference. thanks again. -
glenn, tom; i finally have some pictures of the firebox and tuyere as mounted to the champion 400 forge body. the firebox and tuyere are made by newton forge & foundry right here in hamilton, ontario.
-
tennis elbow and other RSIs
steponmebbbboom replied to steponmebbbboom's topic in Safety discussions
ok guys, i took an action shot while working at the open house today. sold two pieces, grin. let me know if you see anything wrong, like i said thumb and forefinger tight, the rest just falling into place and snap just before striking. thanks -
tennis elbow and other RSIs
steponmebbbboom replied to steponmebbbboom's topic in Safety discussions
by the way guys, i call dibs on said attached picture for an avatar once my year of mourning is up. ROFL. -
tennis elbow and other RSIs
steponmebbbboom replied to steponmebbbboom's topic in Safety discussions
great discussion. thanks guys. glenn and rich, see attached picture for holding technique. i believe mine is currently a #3, i found the #2 french transmitted too much shock up the handle for how hard i had to hit it. johnw, id love to. see sig line. czar, thanks for the blueprints, will study. perhaps proper throwing technique will allow a smaller hammer. tom, will definitely see a specialist, perhaps some of you can weigh-in with experiences as/re sports medicine/therapy. would not want to cause any permanent damage. again many thanks. -
hello, i am looking for advice on prevention/coping strategies. i suspect i have the beginnings of a repetitive strain injury on my hammer arm. take your right arm, wrap it around your stomach and place your palm on your stomach, at the elbow there should be a point facing forward. there is a thin line of tenderness extending from that point about an inch toward my hand. i dont think im gripping my hammer excessively hard. this has developed after an uncharacteristically long production run. thanks.
-
hey all, was curious if any of you have a champion 400 forge with original firebox that could weigh-in or perhaps point me to some pictures? i didnt see any in the gallery... thanks.
-
thanks glenn and tom. unfortunately my camera was stolen shortly after the firebox was mounted so they will have to wait. the original firebox was clearly designed to mount to the forge body in a specific way. the opening in the forge body is smaller than the flange boss under the opening. so it appears the original firebox was inserted into this recess. my replacement firebox can only sit on the bottom of the flange boss, so when assembled, looking into the opening, you can see a channel shaped hollow running around the interior perimeter. this is why i think the firebox is too low. unfortunately the upper flange of the new firebox just does not have enough meat on it to have a notch cut around the perimeter to bring it far enough upward. i think going this route, some of the forge body flange will have to be milled, and a smaller notch routed around the firebox to bring it up. regarding clinker, after a couple hours of forging i typically only get a handful of clinker all told. most of the time the biggest clinker i find when the coke cools is no bigger than a macaroon and only once when i forged all day long i pulled a clinker the size of a calzone from the firebox. the quality of coal i am getting is quite good. and i always jiggle the breaker until the fire roars. i have never accumulated enough ash to block up the tuyere. it would be nice if i could find a quicker way to separate ash and clinker from coke before firing up---i hand separate at the moment but i digress. i really need that fire to come up. thanks again.
-
Mike, i lift the fire by rotating the clinker breaker. generally it helps quite a bit with airflow but does not bring the fire high enough. i also dig clinker out of the fire periodically and feed coke from the outside in as the green coal is burned down. thanks for the response.
-
thats what im finding Tom, i can hump on that blower all day and never get beyond dull cherry until i dip the iron about an inch down. im using bituminous coal, piled about two inches over the opening, cant get the fire up less than an inch and a half below the opening. to respond to your comment Ian i have considered using refractory mortar to bring the bottom end up but i cant see it staying in place long without cracking or lifting, and of course the clinker breaker is now that much further down and the shape of the firebox is now different, and refractory mortar is not that cheap. of course milling the firebox and flange isnt cheap either. in any case i have to do something as i am wasting a lot of fuel trying to get my iron hot. thanks for the advice.
-
hello everyone. i have a champion 400 forge with a new aftermarket firebox. this firebox is made of cast iron and is bolted to the bottom of the original flange on the forge body. in the hours i have been working with this forge i have found the fire never seems to come high enough and i am wondering if it is because the flange on the body sets the top of the new firebox a good inch and a half down, and its flange is over an inch thick itself. so the clinker breaker is a good eight inches down? i think. perhaps more. well how deep should my firebox be? i can mill either the firebox or the flange to bring it up higher, but i cant bolt the firebox in from above as the opening is too small. thanks for any input.