

Unforgivun
-
Posts
208 -
Joined
-
Last visited
Content Type
Profiles
Forums
Articles
Gallery
Downloads
Events
Posts posted by Unforgivun
-
-
I'm familiar with PCB BLUE, but I've seen a few tutorials online showing the same basic thing using a regular transparency film. IF the transparency film works that would lower the cost of a "printed" design significantly as they only cost around US$0.30 each.
-
HEY! You're in the same boat as me! You'll fit right in.
-
That one is pretty rough, and like Thomas said, it may benefit well from repairs. That being said, its hardly a door stop. I agree that spending good money for good equipment is a sound logic, but when necessary there is something to be said about making do, with what is at hand. What is at hand there is an anvil. A pretty large one at that, and I think if you follow the Gunther repair method you will be just fine and can fix that anvil up like a restored old hot rod.
It can be found HERE -
So yesterday Jeff and I tried our hand at etching copper. I wanted to share my experience here so that others do not make the same mistakes I did.
For those of you not familiar with the process its pretty simple. Basically you have an etchant that eats into the metal that you're etching. Then you have a resist, the resist protects the metal from the etchant so that a design can be etched into the piece.
Etchant solutions can be comprised of strong salt solutions or they can be acids that eat at the copper itself.
The etchant we used was Ferric Chloride. We used it on a small piece of 18 gauge or so copper. The resist we used was plain old sharpie markers.
Here is what we learned. Fresh Ferric Chloride works FAST. After 40 minutes of etching, the design was fairly pronounced. Its important to sort of "swish" the piece in the solution to allow the bits to sort of fall off. I can't comment on any other etchants at the moment as we haven't tried them.
The resist we used was plain old Sharpie markers. What we learned about the sharpie markers as resist is that they aren't all that reliable. The design itself held fine, but the edges deteriorated a lot. That made the design sort of rough around the edges.
Anyway, you have to disable the etchant once you remove the piece. We used ammonia, but we have since read (didn't try it) that soapy water will do that.
Once the piece was done we cleaned it in a mild sufuric acid solution to clean it up, and then pickled it in liver of sulfur (sulfurated potash).
Here is the final result. Noticed the design edges where the sharpie eroded rather than resisted.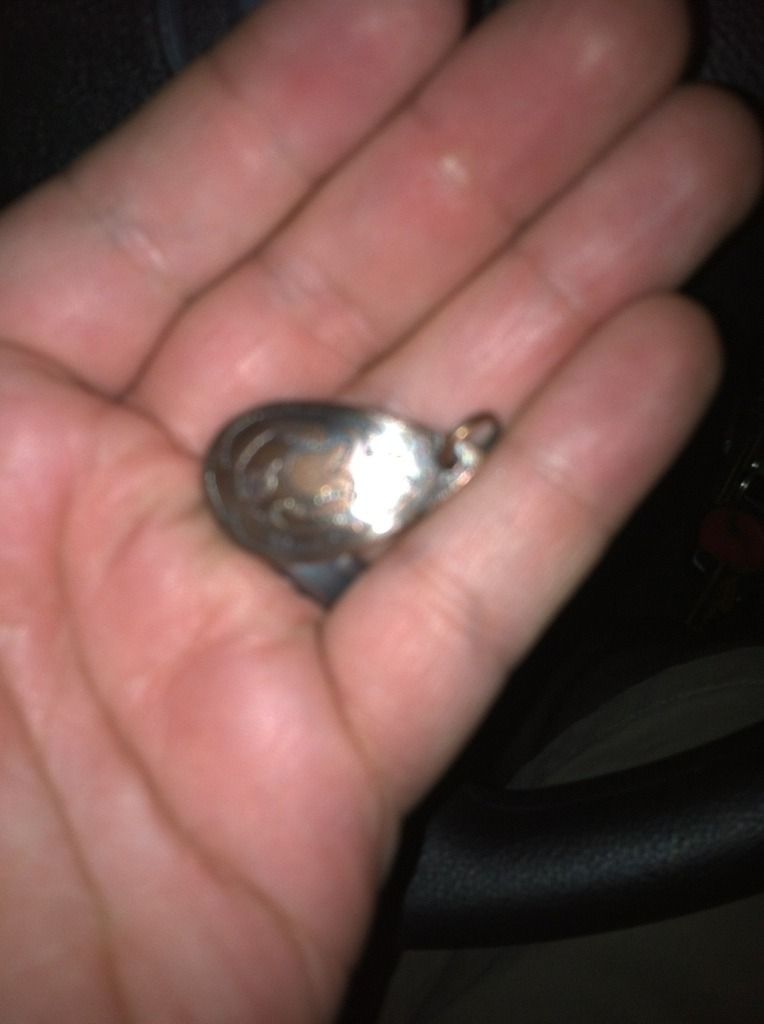
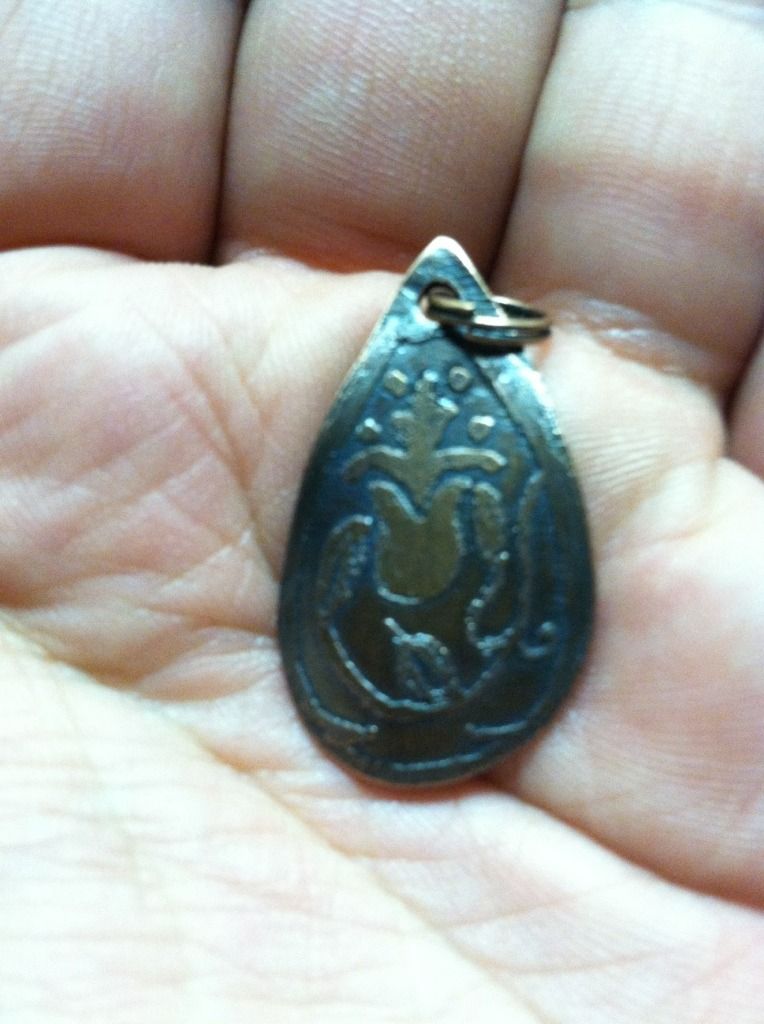
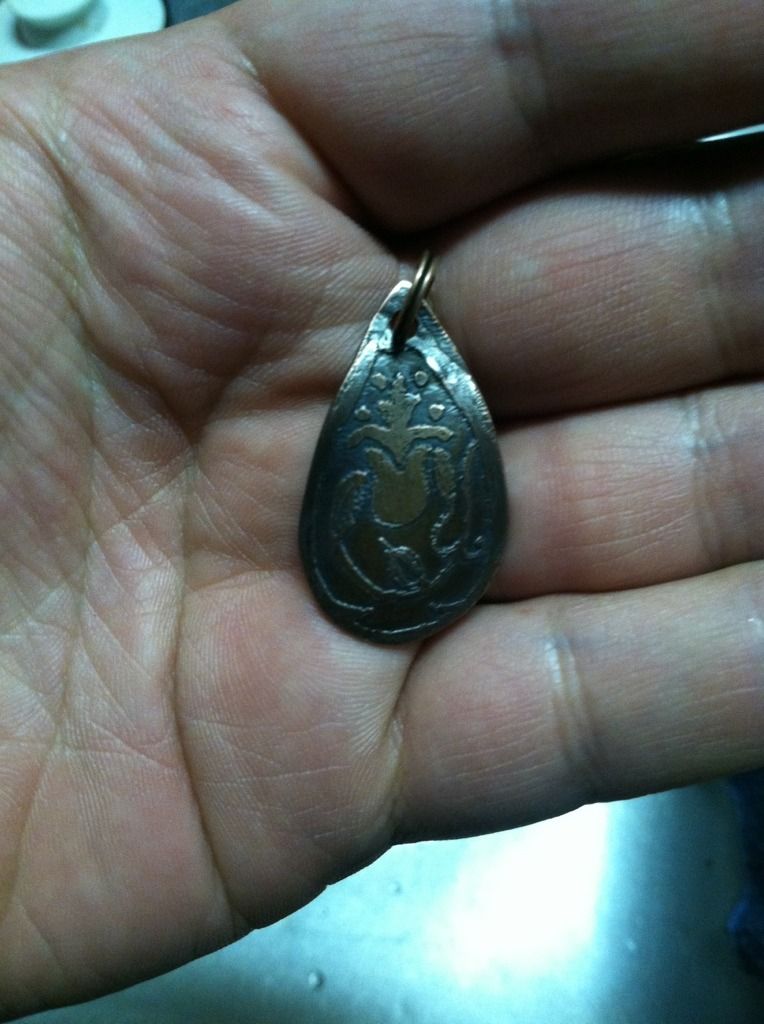
The next attempt will use either oil based paint sharpie, a toner transfer, or an acrylic paint as resist. -
Besides the structure of the stand itself being solid. I feel like the height is of great importance. I for instance don't like to really "bend" over the anvil. I'm fat. It makes my lower back hurt etc. the way I determined the height of my stand was I stood holding a tape measure and measured the distance from my hand to the ground. Then I measured my anvil height and subtracted that. That told me how tall my stand should be. That being said, I've been told my stand is too tall because you can't hold tongs between your legs and use it.
-
Many of them are available at hardware stores, jewelry supply stores (and websites), and pharmacies. There are a few chemical supply stores online that carry all of them. Just have to search around
-
Ok, some of us chat regularly and know a few of us who will be attending, but I thought it would be good to have a post so we would all have a good idea as to who we might get to meet by attending.
My brother in law and I will be there. We plan to bring a few tools (we may have to make some) to teach (to the best of Jeff's ability) the process on how to make small copper boxes. -
I know there are many many posts on different copper patina's. I would like to sort of condense them. Often times you'll see someone mention "you can use BLAH BLAH BLAH and it will give you a green patina". But then they don't tell you HOW to use that chemical in order to get the desired results.
Triw posted a link to a website with a BUNCH of patina formulas that I feel deserves to be posted here as well. I have done so and provided a few notes to make them a bit easier to understand.
For people that aren't used to pints, tsp, tbsp etc.
1 quart= 2 pints
1 pint = 473ml (roughly 16oz) "A pint is a pound, the world around!"
1 tbsp = 3 tsp
1 tsp = 5ml
1ml = 1cc
1oz = (approx) 30gm weight/30ml volume
1 grain is approximately 30mg, so 33 grains is roughly 1 gram
So if a formula says 1/4 oz you need to weigh out 7.1gm of something.
Please, when using any powder, WEIGH the powder using a scale if the instructions read as a weight. Measuring by weight is much more accurate than by volume. You'll get a better patina and be happier with the result. So if the formula says to use 1/2 teaspoonful, by all means use a measuring scoop that reads either 2.5ml or 1/2 teaspoonful, but if it says to use 8oz, please do not use a 1 cup measuring spoon.
1. Light to Dark Brown
Ingredients- Ferric Nitrate.. 1/2 tsp
- Distilled Water... 1 pint
Process
Heat metal and apply liquid. (Red to reddish brown has also been reported using this recipe.)
2. Brown to Black
Ingredients- Sulfurated Potash - grape sized lump (crushed).
- Distilled Water - 1 pint
Process
Hot or cold process. Use fresh solution each time.
3. Blackish Brown
Ingredients- Ferric Nitrate.... 2 oz
- Distilled Water... 1 pint
- Sulfurated Potash.... 1/4 oz
Process
Hot process. Mix in the order given.
4. Florentine Brown
Ingredients- Ferric Chloride... 1 tsp
- Ferric Nitrate... 1/2 tsp
- Distilled Water... 1 pint
Process
This old Italian formula produces a rich brown patina.
Apply evenly with a brush, sponge, or sprayer and let it dry. When a light brown rust color appears rinse well with cool water.
Dry with newspaper - it is very important to use newspaper. You may want to use a slightly damp paper.
Burnish the surface with steel wool or wire brushes. Leave over night
Repeat the process for darker result.
When finished, wax over the patina to darken and set the color.
5. Antique Green
Ingredients- Ammonium Chloride.... 1/3 oz
- Cupric Sulfate.... 3oz
- Distilled Water... 1 quart
Process
Hot process. Solution hot (180 to 190°F), metal hot (200°F), cold wash water applied after metal has cooled to around 100°F. Wash solution over metal surface, let dry, then wash piece in cool water. Repeat until color develops.
6. Basic Green
Ingredients- Cupric Nitrate....1 tsp
- Distilled Water... 1 pint
Process
Hot process, semi-transparent patina. Heat metal and apply a fresh mixture for each coloring.
7. Blue Green
Ingredients- Sodium Thiosulfate... 1/4oz
- Ferric Nitrate.... 2 oz
- Distilled Water... 1 quart
Process
Hot process. Solution hot (180 to 190°F), metal hot (200°F), cold wash water applied after metal has cooled to around 100°F. Wash solution over metal surface, let dry, then wash piece in cool water. Repeat until color develops. For Yellow Green, dip in dilute nitric acid, then wash and dry.
8. Cold Process Green
Ingredients- Cupric Nitrate... 40 gm
- Ammonium Chloride... 40gm
- Calcium Chloride... 40gm
- Distilled Water to make 1 liter
Process
A cold process, opaque patina. Frog green results after several applications, 1/2 hour intervals. Color is not satisfactory alone. Combines well with most brown and black cold process patinas.
9. Light Green
Ingredients- Ammonium Chloride... 16 units
- Sodium Chloride... 16 units
- Cupric Sulfate... 16 units.
- Ammonium Hydroxide... 16 units
- I'm not really sure what they mean by UNITS, but it doesn't really matter, its equal parts of everything.
Process
A cold process, opaque patina which should be applied at 12 hour intervals for several days. For deeper green add 16 units of cupric sulfate.
10. Green
Ingredients- Sodium Thiosulfate... 8oz
- Lead Acetate... 1 to 3 oz. (Trial and error for certain levels)
- Distilled Water... 1 gal.
Process
A cold process that is said to work well on brass
11. Green - Blue (Flemish)
Ingredients- Sodium Thiosulfate... 8oz
- Lead Acetate... 1 to 3 oz
- Distilled Water... 1 gal.
Process
Temperature at 170 to 190°F, a hot process especially for brass.
12. Purple to Light Green
Ingredients- Sodium Chloride... 5 parts.
- Ammonium Hydroxide... 4 parts.
Process
Parts by weight. Early stages of this recipe produce purple. Additional applications and chemical action turn the metal light green.
13. Transparent Blue
Ingredients- Sodium Thiosulfate... 60gm
- Nitric Acid Concentrated... 4gm
- Distilled Water... 1 quart
Process
A transparent, dip process patina. A preservative such as paste wax or polyurethane is necessary. May produce a grey blue when tap water is used.
14. Blue
Ingredients- Sulfurated Potash... 15gm
- Ammonium Chloride... 200gm
- Distilled Water 1 quart
Process
Brush onto surface.
15. Straw Yellow
Ingredients- Ferric Nitrate... 1/2 tsp
- Distilled Water... 1/2 pint
Process
Heat metal and apply hot liquid.
16. Golden Yellow
Ingredients- Sodium Thisosulfate... 1/4oz
- Ferric Nitrate... 2oz
- Distilled Water 1 quart
Process
Heat solution to a boil. Dip.
17. Deep Rust Red
Ingredients- Cupric Nitrate... 48 grains (1.44gram)
- Ammonium Chloride... 48 grains (1.44 gram)
- Calcium Chloride... 20 grains (0.6 gram)
- Cupric Sulfate... 10 grains (0.3 gram)
- Nitric Acid 10% soln
- Distilled Water... 4 oz
- Not sure why they specified grains, so I wrote the conversions in grams as well.
Process
Brush to surface for color. Then dip into diluted (1 acid:8 water) Nitric acid for 1/2 hour, remove, wash and dry.
18. Purple
Ingredients- Sodium Chloride... 5 parts - DO NOT USE TABLE SALT - If you use table salt you will not achieve the desired affect as IODIZED salt has iodine in it. KOSHER salt with no additives is available at most markets and will work for this.
- Ammonium Hydroxide... 4 parts
- Ammonium Chloride... 5 parts
- Glacial Acetic Acid... 4 parts
- Distilled Water... 32 parts
Process
Parts by weight. Brush to surface.
19. Antique White
Ingredients- Bismuth Nitrate... 2 tsp
- Distilled Water... 8 oz.
Process
Heat metal and apply liquid. Variations of this formula add a pinch of Sulfurated Potash, Ferric Nitrate, or Cupric Nitrate for a slight coloring effect.
Formulas Suggested for Specific Metals.
20. Red - semi-matt (for Copper & Copper Plate)
Ingredients- ("A") Cupric Sulfate... 25gm
- ("B") Ammonium Chloride... 0.5gm
- Distilled Water... 1L
Process
Boil immersion ("A") 15 min.
Boil immersion ("A")+("B") 10 min.
Immerse in boiling cupric sulfate solution about 15 min. or until color well developed.
Remove to hot water while ammonium chloride is added to the cupric sulfate solution. Then immerse about 10 min. Remove and wash in hot water. Dry and finish.
Important note: In general, chemically induced finishes are unsuitable for use on articles to be used with food.
21. Dull Pink (for Copper & Copper Plate)
Ingredients- Cupric Nitrate... 1 tsp
- Nitric Acid 10%... 100ml
- Distilled Water... 1L
Process
Hot immersion - 5 min.
Immerse in hot solution (140-158°F, 60-70°C) which etches surface. Remove after 5 min., wash in warm water and air dry. Wax finish.
22. Red-Purple Satin (for Cast Bronze and Brass)
Ingredients- Cupric Sulfate... 25gm
- Distilled Water... 1L
Process
Boiling immersion (10 to 30 min.)
Immerse in boiling solution. A reddish orange color begins after 2-3 min. and deepens with continued immersion. When a reddish-purple color is attained from 10 to 30 min. remove and wash well in hot water. Dry and wax finish if choose.
23. Orange-Brown (for Cast Bronze and Brass)
Ingredients- Cuprice Acetate... 25gm
- Cupric Sulfate...
- Distilled Water... 1L
Process
Heat immersion (15 min)
Immerse in hot solution (176°F, 80°C). Color develops gradually and remove after 15 min. Wash and dry wax finish if choose
24. Black - semi-gloss (for Cast Bronze and Brass)
Ingredients- Sodium Thiosulfate... 50gm
- Ferric Nitrate... 12.5gm
- Distilled Water... 1L
Process
Hot immersion (20 min.)
Immerse in hot solution (140-158°F, 60-70°C). In one minute the surface is colored blue-purple. This recedes to a brown color, then changing to gray. After 20 min., remove, washing in hot water and dry in air. Handle as little as possible.
25. Blue Green (for Cast Bronze and Brass)
Ingredients- Cupric Sulfate... 20gm
- Cupric Acetate... 20gm
- Ammonium Chloride... 10gm
- Acetic Acid (6% soln).. to form a paste
Process
Applied paste - several days.
Using a mortar and pestle, grind ingredients to a creamy paste with the acetic acid. Apply paste to object with a soft brush giving a thick coating. Dry for one day. Wash dry residue away under cold water using a soft brush. Apply a thin layer of paste with a soft cloth and dry again for one day. Wash off residue again. Apply thin layer and dry until good variegated patina is achieved. When treatment completed, dry thoroughly. May be waxed.
26. Golden Yellow (for Cast Bronze and Brass)
Ingredients- Cupric Sulfate... 50gm
- Ferrous Sulfate... 5gm
- Zinc Sulfate... 5gm
- Potassium Permanganate... 2.5gm
- Distilled Water... 1L
Process
Boiling immersion (15 min.)
Immerse object in boiling solution. A dark brown layer forms on surface after 1-2 min. Remove object and bristle-brush under hot water. Re-immerse and repeat process after 2 min. if necessary. Immerse again to approximately 15 min. remove and wash thoroughly in hot water using a bristle brush if necessary. Dry and wax finish of choice.
27. Blue Green - semi-matt (for Cast Bronze and Brass)
Ingredients- Cupric Acetate... 20gm
- Ammonium Chloride
- Distilled Water... 1 L
Process
Applied liquid.
With mortar and pestle, grind ingredients with a little water. Then add to remaining water. Dab and wipe on sparingly with soft cloth, to leave an evenly moist surface. Allow to dry in air. Repeat procedure once a day for several days as color develops. Dry for several days during which time the patina develops further. When there is no more surface change, wax to finish.
The most important part is to let it dry throughly between applications and up to two weeks before waxing.
28. Brown - Greenish Yellow (for Cast Bronze and Brass)
Ingredients- Cupric Nitrate... 80gm
- Nitric Acid 10%... 100ml NOTE - if you have nitric acid, you can use distilled water to make a 10% solution. 10ml of nitric acid and 90ml of distilled water =100ml of 10% soln.
- Distilled Water... 1 L
Process
Immerse in hot solution (140-158°F, 60-70°C) to cause etching of the surface and gradual darkening. After 5 minutes remove and wash in warm water. Allow to air dry. When dry, wax finish.
29. Reddish Brown (For Cast Bronze and Brass)
Ingredients- Cupric Sulfate... 125gm
- Sodium Acetate... 12.5gm
- Distilled Water... 1 L
Process
Boiling immersion (10-15 min)
The color will develop after 10 - 15 min. Remove and wash in hot water. Dry thoroughly, wax finish.
30. Black (For Cast Bronze and Brass)
Ingredients- Sodium Thiosulfate... 6.25gm
- Ferric Nitrate... 50gm
- Distilled Water... 1 L
Process
Heat immersion - 1 minute.
When article is immersed in hot solution (120-140°F, 50-60°C) a succession of colors is produced. It changes to a purplish color after about 45 seconds. The color darkens quickly and the article is removed after about 1 minute. Wash thoroughly in hot water and air dry, wax finish.
31. Variegated Gold-Brown (For Cast Bronze and Brass)
Ingredients- Potassium Permanganate... 10gm
- Distilled Water... 1 L
Process
Hot immersion (3-5 min.)
Immerse in hot solution (194°F, 90°C). A golden lustre develops within one minute and becomes more intense. When lustre color is fully developed in 3 - 5 minutes, remove and wash in hot water, which is also a cooling process. Finally, wash article in cold water. Dry carefully first by blotting excess moisture with absorbant tissue paper and then air dry. Wax finish when dry.
32. Red (For Cast Bronze and Brass)
Ingredients- Cupric NItrate... 8oz
- Oxalic Acid... 8oz
- Distilled Water... 1 gal
Process
Heat metal and apply hot liquid
Additional Formulas
Rustic Blue Copper
INGREDIENTS- Ammonia - Store bought
- Kosher Salt
- Distilled Water... 1 gal
1) Start with a large plastic container with a lid and a small plastic container that fits inside the large container.
2) You will also need a rack to place over the small container -hardware cloth (stiff metal screen) can be cut to fit in the big container. Rabbit screen may work as well
3) Fill the small container half way with ammonia. Place the small container inside the large container and place the rack over the small container.
4) Next you will need salt water, metal and sand paper. Sand the metal. Rinse the metal with warm salt water. NOTE - if you make your own salt water please use only kosher salt, as the iodine in iodized salt will not work.
5) Place the metal on the rack. Sprinkle metal with salt.
6) Cover the container with a lid.
7) Wait a few hours and uncover
This finish is somewhat inconsistent and may be splotchy. Gives a nice country feel.
Dark Brown
INGREDIENTS- Ammonia - Store bought (optional)
- Acid
- Steel Wool
- Distilled Water... 1 gal
- Liver of Sulfur (sulfurated potash)
1) Clean copper with an acid and steel wool to bring it back to a nice bright "pink"
2) Dissolve 1 pea sized nugget of liver of sulfur in 1 cup of water. A very hot solution will oxidize your copper dark brown. The temperature of the L.O.S. solution is very important in determining the finished results you'll get with the patina.
3) By adding 1 teaspoon of ammonia to the solution, you'll get a very black patina. Too much ammonia, and you'll get a slightly reddish patina.
Please feel free to add your own formulas to this thread, but PLEASE post full instructions on how to use each suggestion. -
Lots of Alabamian's here. I'm in Concord/Hueytown, Jeffro1205 is about the same area, CVMikeRay is up in Columbiana. Lots of us :) I like the anvil. Congrats.
-
hmmm... Found what anvils?
-
Had a few people asking who did what, so I figured I would clarify. I did the upright and the copper portion of the flower. Jeffro1205 did the cross bar, the milling, and textured the upright and crossbar. We did the center brass knob together. Our father in law produced the base, made from eastern red cedar.
-
TY, Not just my work though, was a family effort :) Jeffro1205 is the other member with a hand in this one.
-
So a cousin of my wife is getting married. My wife and I used a unity cross in our wedding. The cross we used can be seen via a google search for the term Unity Cross. It worked just fine for our ceremony but I will say that it was very flimsy (it actually cracked when we were putting it together during the ceremony). At any rate, the cousin asked my wife if my brother in law and I could make her a unity cross. To which both of our wives said YES without either of them consulting us :) And soooo this project began.
Our version of the Unity cross has 3 parts... The first part represents the Groom, to be strong and upstanding, but supporting of his bride. The 2nd part represents the Bride, To be supporting by the groom but also completing one another, forming the whole. The 3rd part represents the Divine. To be bound together by God's grace.
The concept was this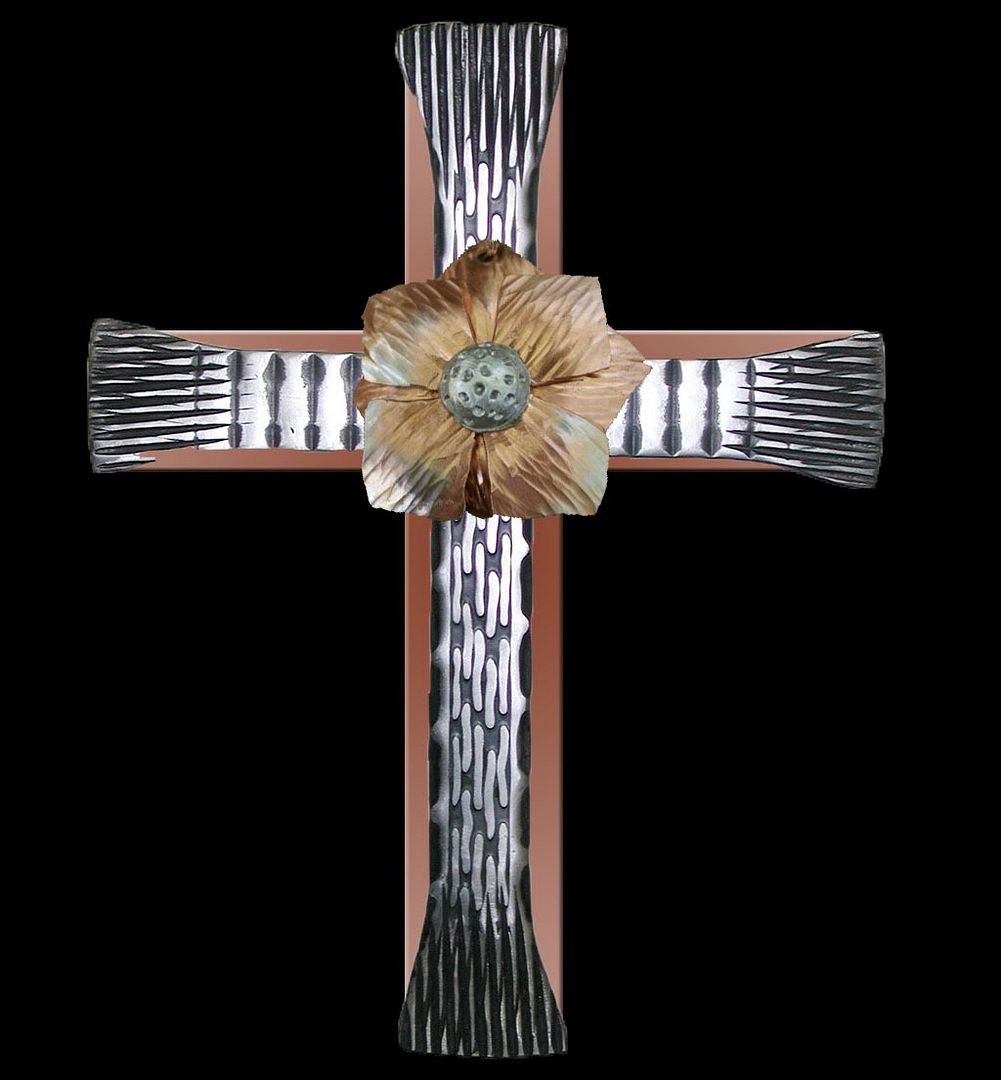
That translated to the first part being made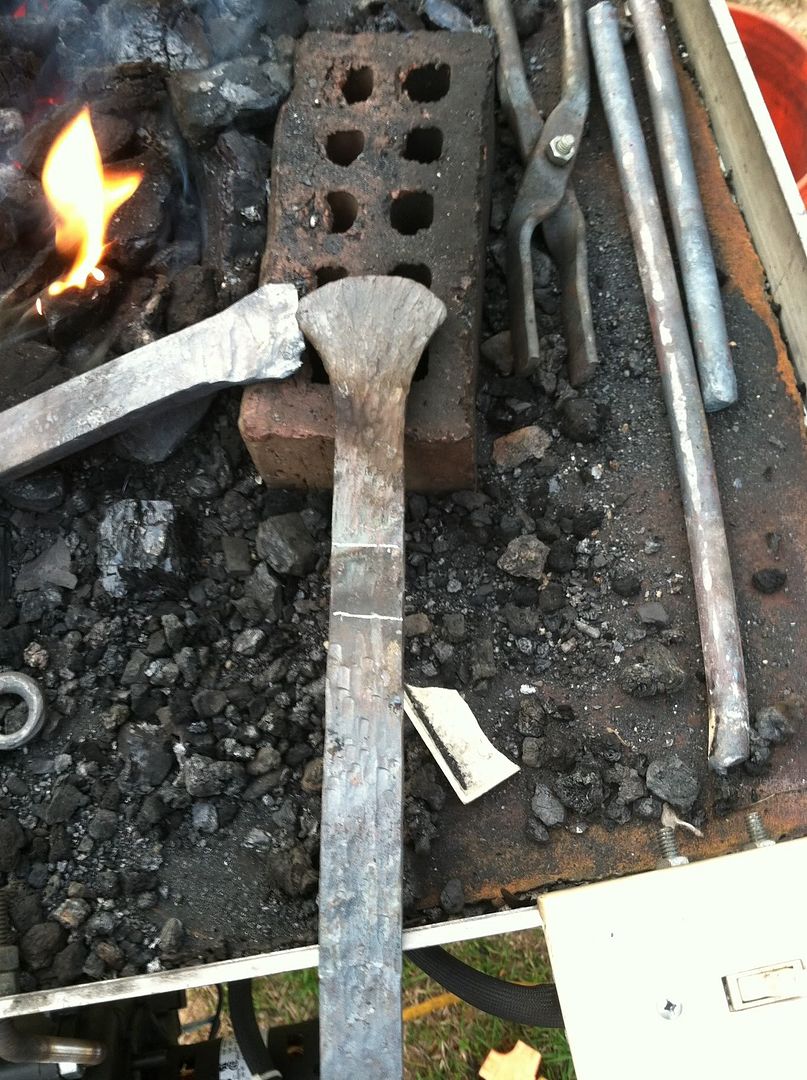
Then the 2nd part was made.
Then the 2 pieces were taken and milled for a half lap joint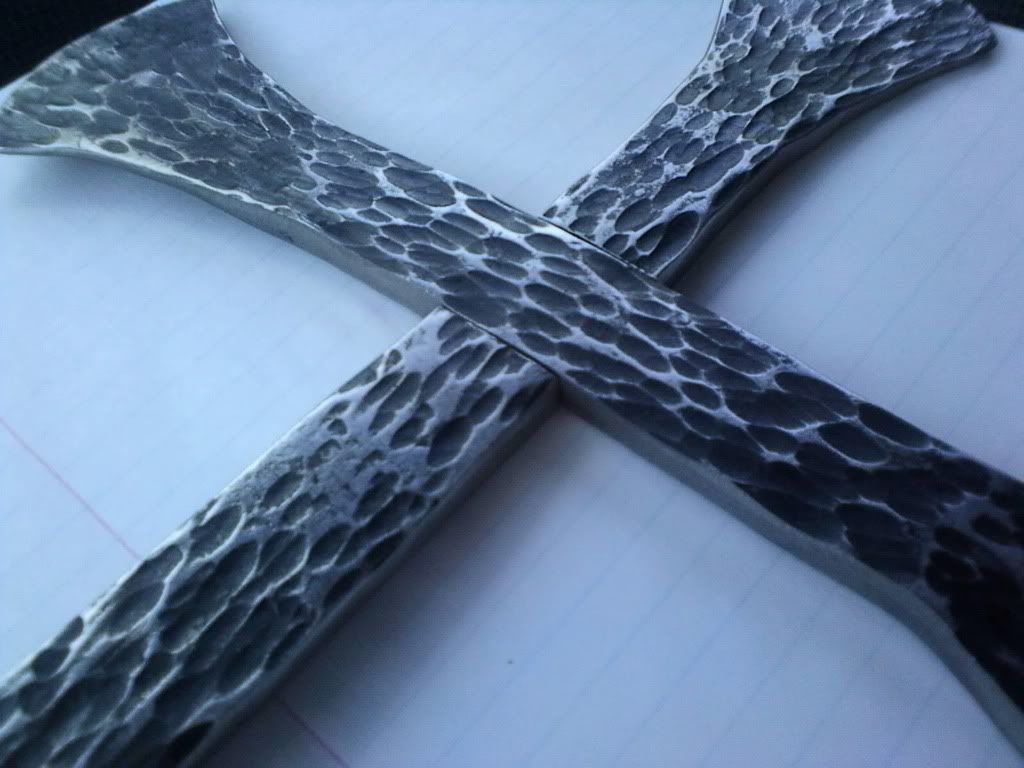
Then we made a small copper flower based off of the flowers I've seen of Mike Tanner's making.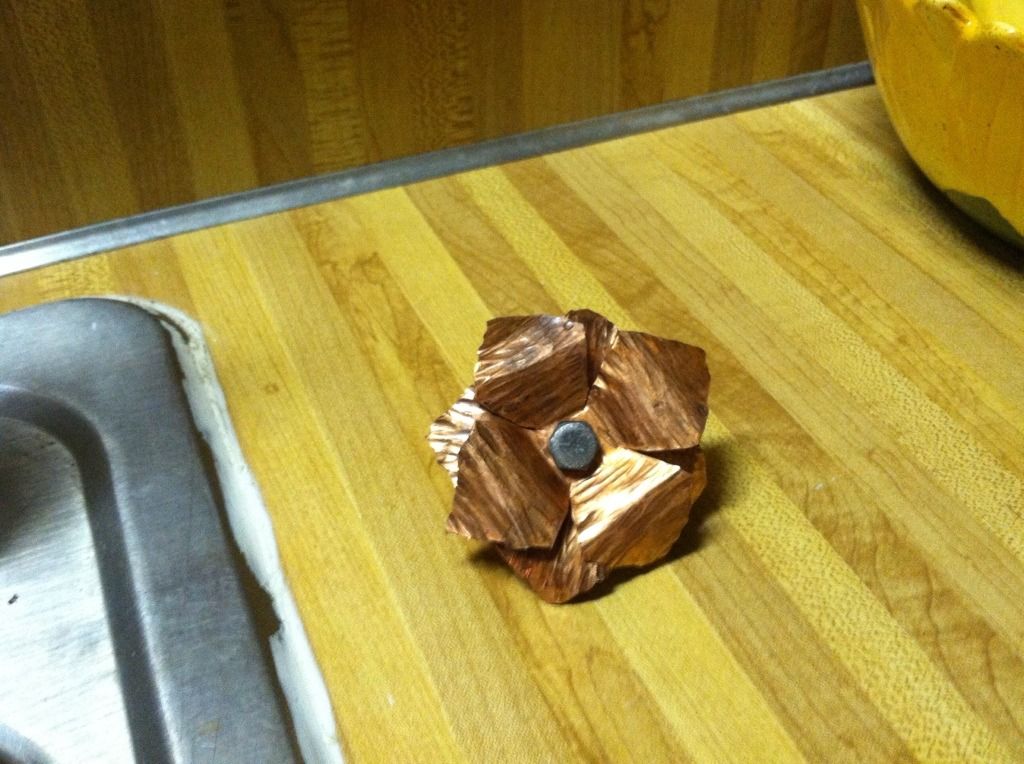
After that, we had to make a center for the flower, we upset 3/8" brasing rod and drilled the cross.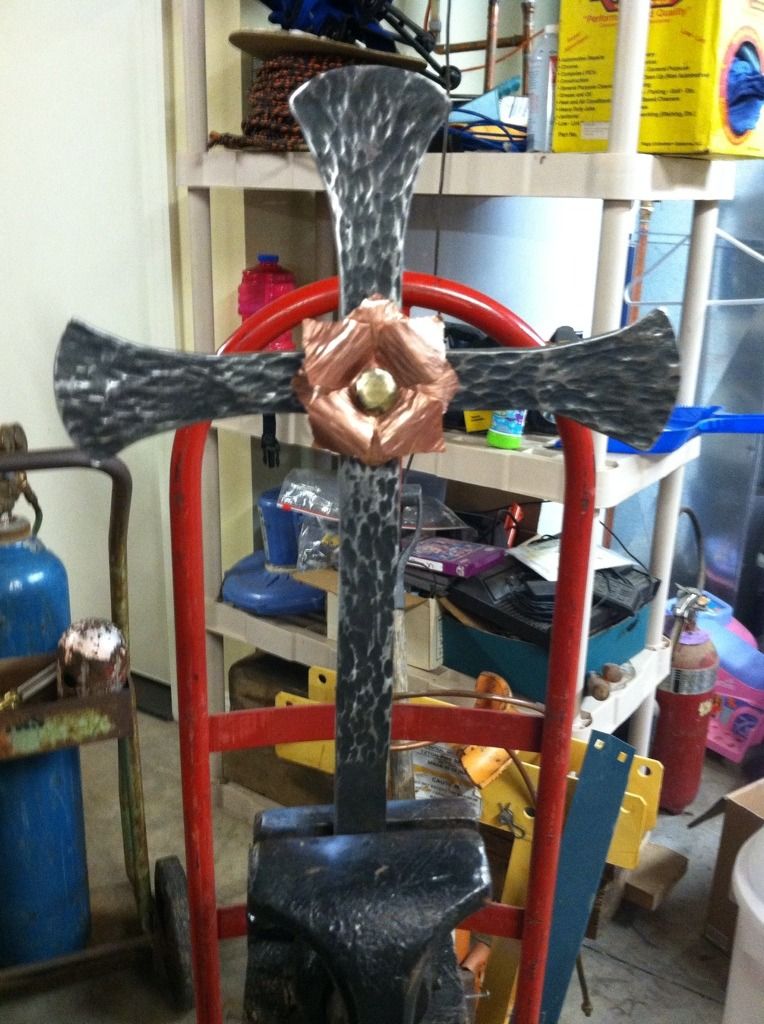
The flower is braised to the center. The back sticks out only slightly and has a small pin that drops into a hole that was drilled on it. The flower petals themselves act as a spring and provide tension for the whole thing to stay together.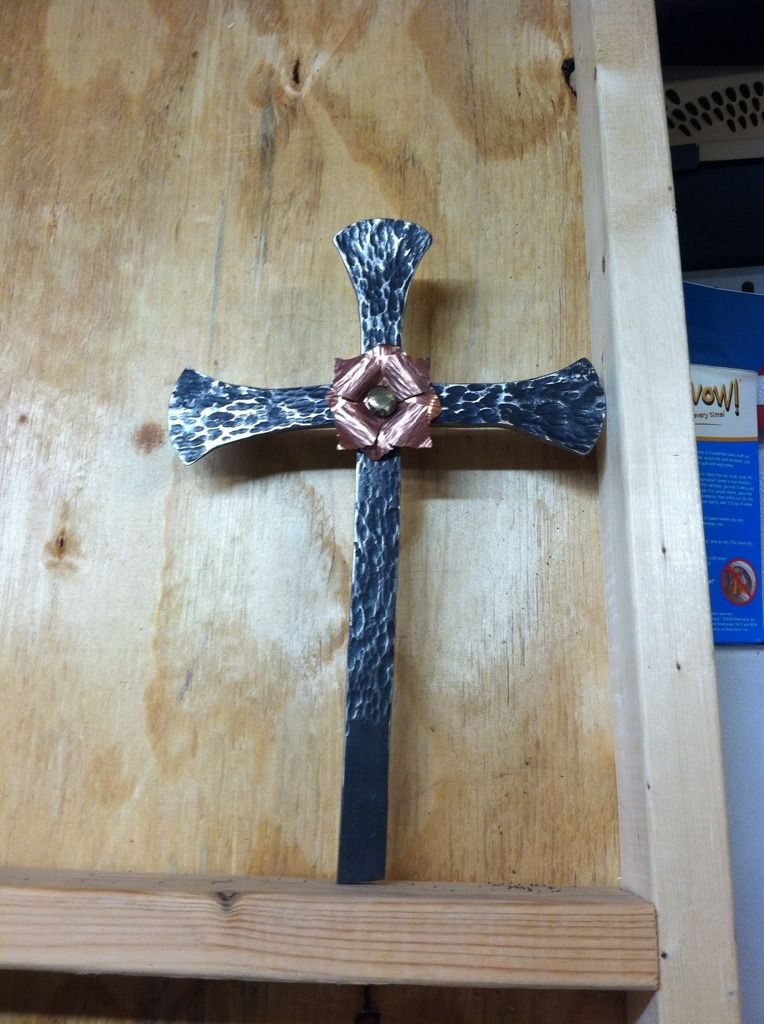
My father in law made a base for us using cedar. All in all it turned out quite well.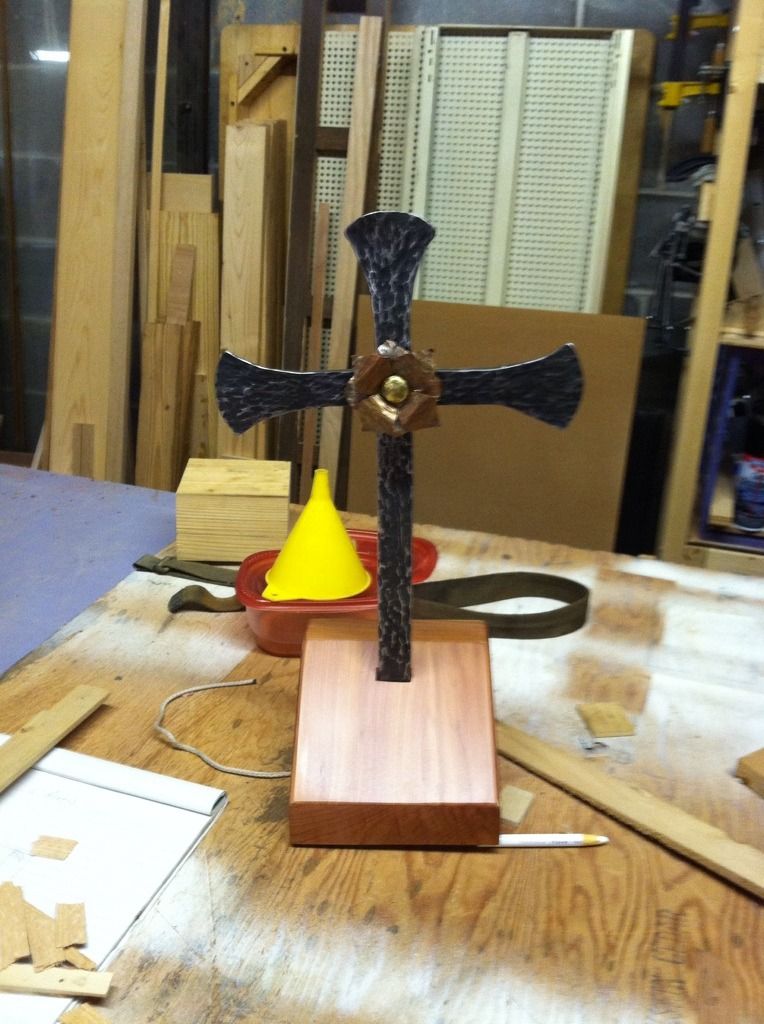
-
A friend of mine posted that link to my facebook for me to read it. I was just coming here to make sure it got shared with the rest of the IFI community. Really enjoyed the article, glad its being shared with everyone.
-
Just a reminder that this Saturday, May 5 Alabama Art Casting has a pour behind the blacksmith shop in Tannehill State Park
-
I can't comment on those specifically but I can tell you that one evening while talking to Grant Sarver on here about repairing an anvil face he suggesting cutting dovetails in it. He did so when I asked how to reface a fisher as well (I thought jokingly because of his anvil) But he said that if you had an anvil that didn't quite fit your needs he saw no problem with cutting a dovetail or multiple dovetails in them so that you could slide in tooling for specific tasks. Flats, fullers, Swages etc.
Now, I'm hardly an experienced smith and I am certainly not knowledgeable enough to comment on those anvils specifically but I believe Grant was quite knowledgeable and when those people tell me how to do something I generally try to pay attention. I wouldn't be surprised if whomever had those anvils had the same ideas that he did once upon a time and this is the result. Very nice haul IMO.
I think this will be a very interesting thread. -
Not a Alabama Forge Council event, but on May 5 Alabama Art Casting is having an iron pour from 6pm to 9pm at Tannehill State Park.
-
I don't know that it is worth $250 but that depends on who is buying it and what it is worth to them. I will say I can't remember people on this site being all that fussy about the "edges" of an anvil in the past. In fact when I was thinking of researching how to repair the edges of my HB I mentioned it in chat and multiple people told me that those edges could be very useful for different shapes and radius. There are many plans out there (and I'm sure on this site) about making a bridge or saddle that sits across the anvil or in the hardy to use for crisp hard lines.
We have this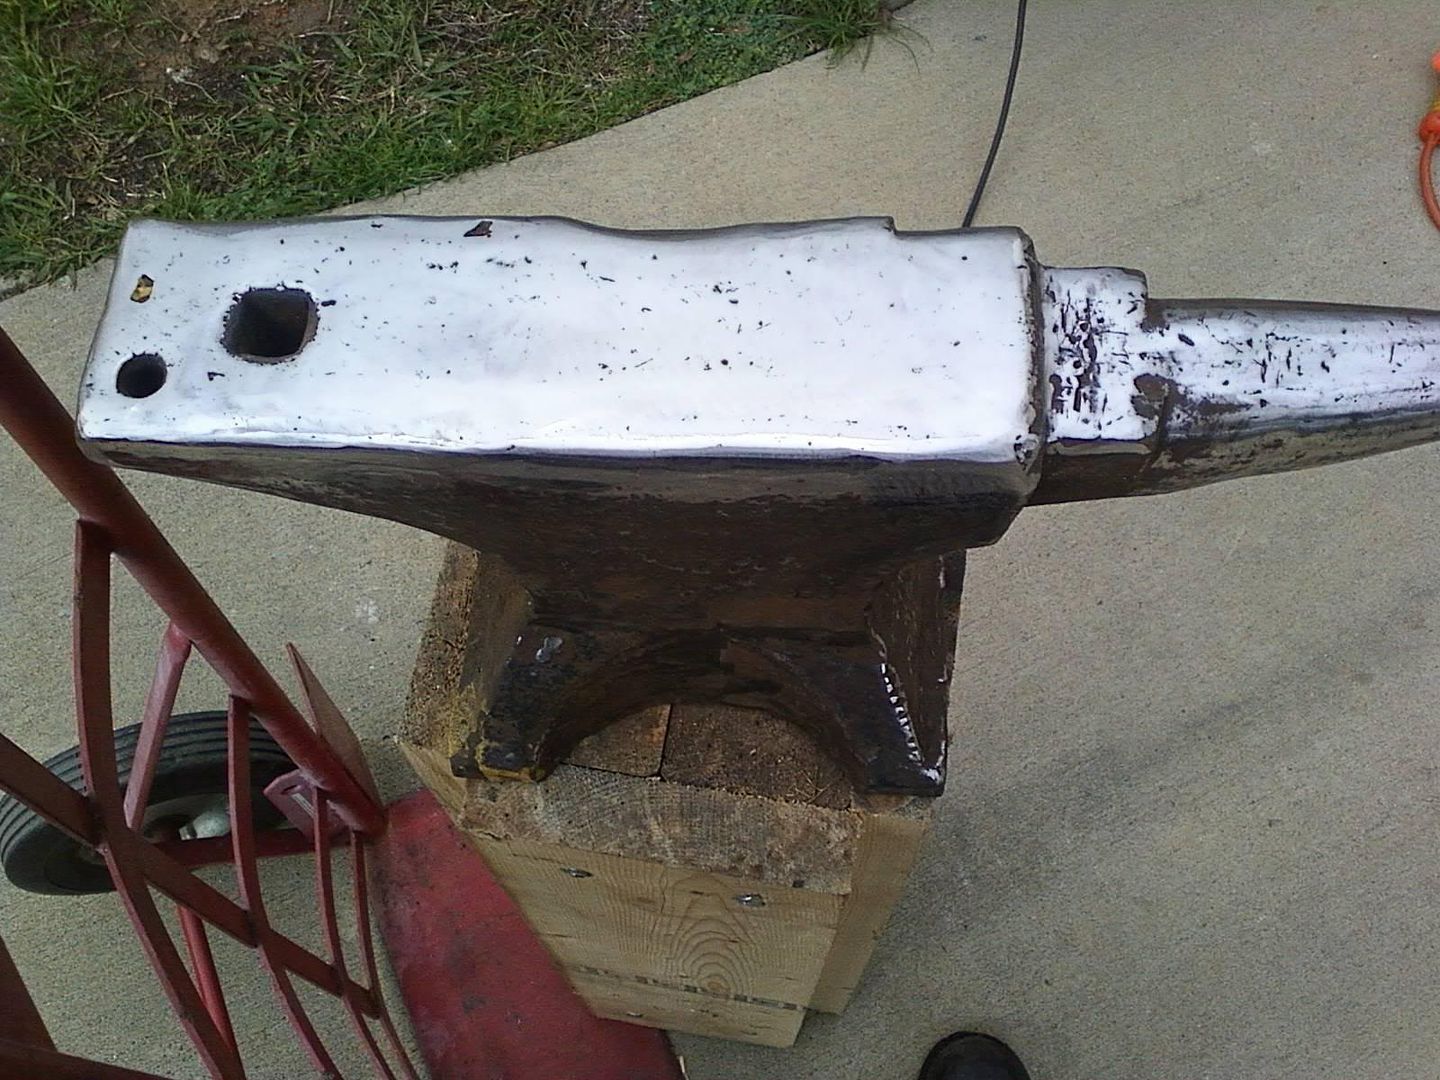 that has edges that might well be worse than that anvil.
I'm with bent on this one. For around $550 you can just get a brand new one and be done with it if edges are that important. There are nice used ones out there, they just take a while to find. -
Just a reminder that the Batson Blade Symposium is this weekend at Tannehill State Park in McCalla Alabama.
Please visit www.alaforge.org for more information or directions. -
Mike.. where does this project stand?
-
I did not, the holes where there when I acquired the steel. We're currently talking about converting this little anvil to 2 small striking anvils since we've acquired some other anvils that better suit our needs since the creation of this and it is a bit on the small side at 66lbs. The rebound is mediocre at best (40% or so).
It served its purpose for me, it served it well, and by converting it I hope that it will continue to do so. -
I think I would make it where the flag stand was just like what is in the picture as far as shape and presentation. I would then take Phil's idea and make both front and back "windowed" so that the case can be sat in the center of a table if desired and the flag seen on both sides.
Then do like Smoothbore suggested and possibly use some light scrolls across the bottom of the case. Possibly incorporate the scrolls into a stand of sorts that the case sits down into. Personally I can say this but lack the vision of what I would do via the scrolls so I think I would just put feet on the bottom panel.
Make the bottom panel removable via screws since they only have to support a flag this should be fairly easy. A hinge can be used if desired but I think it would need to be secured via a screw so that anyone moving it didn't accidentally drop the flag out.
If any Names or DOB-DOD type things are requested I believe I would accomplish that with a stencil and glass etching solution/spray or glass frosting paint and just put it on the glass. There are tons of scroll stencils for painting on small things like this that you could use.
For other ideas it might help to know if this flag is of any significance I.E. are they from a fallen soldier? A retired soldier? A flag that was flown during a mission and given to a friend etc. I don't know about anyone else but this translates how I might design it. If its not a fallen soldier I might use the bottom of old shell casings as feet, but I wouldn't do anything of the sort if it were a memorial design, I just think it would be in poor taste then. Also, if its not a memorial design you might create stencils or dip the piece in wax and scrape off a design and etch the case itself with a vine or something.
Hope this helps. -
Apparently Wesley is a "right to know" kinda guy :D
I don't know enough on the subject of crossbows to offer advice in one direction or another. I do know that in Alabama they made it legal to use a crossbow throughout the entire deer hunting season, this revision is only 4 or 5 years old at this point.
In the case of Ramsies he often seems to aim high. I'm not saying that is a bad thing. But when you're talking about someone making a powerful weapon I think confirmation of parental consent is a reasonable request. Some parents are strictly against guns, bows etc, even toy ones. That in itself is overstepping to some degree.
Anyone that has ever shot a bow or crossbow knows the force they have. The possibility of an improperly tempered piece of steel is one that I personally would not be willing to test. An accidental dry fire disaster. Who knows. Also, I feel pretty confident that I wouldn't want my child making something that I myself would not be comfortable with. -
I believe that is if you are going to be attending demo's or other events. Just to walk about and get a feel for it I don't believe you would have to pay. There will be plenty of campers/spectators coming through.
Welcome to the Alabama Forge Council
in Alabama Forge Council
Posted
James is the blacksmith at Tannehill, the blacksmith group meets behind the Tannehill smith's shop the 2nd Sunday of each month.