scrapartoz
-
Posts
343 -
Joined
-
Last visited
Content Type
Profiles
Forums
Articles
Gallery
Downloads
Events
Everything posted by scrapartoz
-
WOW! Michael, I am impressed with the quality of your work and the array of marvelous toys in your workshop. Is this sculpture for you (for enjoyment) or is it for work and a waiting buyer?
-
WOW! Michael, I am impressed with the quality of your work and the array of marvelous toys in your workshop. Is this sculpture for you (for enjoyment) or is it for work and a waiting buyer?
-
Thanks Gibbo for the compliment , Im glad U like the stuff I do!
-
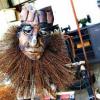
Here is a bit more of the rider. With the wire I can "draw" the thighs , hips and buttocks. Once happy that I am in "the Ballpark" I start adding bits and pieces:
-
Thanks for the Tips Seldom. I acknowledge you have a far greater knowledge of horses than me. The rider and horse are based on 5 actual jumping photos of Taylor and her horse Jaffa. In each of those photos the stirrup , feet, knee and buttocks are very close to the position I have created . So Im working with what I see not what may be more correct in a equestrian event. I really dont know the correct positions for each of these key points but I have noted that (looking at many internet images) when the horse initially "kicks off" in a jump the forward momentum of the horse causes the riders feet (and stirrup) to move rearward like a pendulum, away from the position you describe. I guess that as the rider gains equilibrium with the horse (a second or so later)the riders feet will return to the position you describe. I thank you for your input and If you see any glaring errors Please let me know as I am a complete novice in these matters. Whirly............ Thanks mate!
-
Thanks for the interest Whirly . I have had a few dramas to sort out (OK now) and I am now working on the rider. Legs mount to horse via ankle , stirrup will be added later to give illusion that rider is standing in stirrups. Note the fully articulated joints on the heavy wall 1inch box internal frame. This allows unlimited adjustment. Each leg fits into a vertical housing at pelvis that can be separated.The arms can also be removed. These housings are locked by a nut and bolt.. Once gesture is finalised all 'uni' joints are welded up. I used 2 ropes to set and adjust pelvis and shoulder height. Horizontal movement can be made by sliding the rope forward or to the rear on the rail suspended from roof. Once I am happy with the internal frame it is dissasembled and reassembled on a work table at a convenient height. cheers!
-
Hi Sam , very nice work. Please excuse my ignorance, but do you have to heat your table top before you engrave it them fighting irons?
-
Sorry Mitch I meant MRobb not Mc Robb (I must have thought you had Scotish origins!
-
thank you Seldom and McRobb. I have to go back and reposition the girth strap to a more correct position as my father says its wrong. after "spitting the dummy" and feeling my 'art' was not appreciated ( would you ask Leonardo to shift mona's nose up a bit) I had a reality check : The buyers also noted the position of the girth strap and asked me to change it. After a few internal swear words I realised i was ignorant of 'horse stuff' and if you are asked to build a nag with all the trimmings accurately ... then thats what you must do. cheers
-
Here is some more progress . Note the saddle base joins to a central square post that fits in a vertical housing. The finished saddle lifts off like the real thing. I am not sure about the bridle and harness. These are a requirement of the buyer.. Im thinking some of the beautiful lines in the horses head are now lost. what do you think?
-
Thank you Beth ChefTJCook Seldom Whirly and knots. my aim is to give the viewer some happiness. If you guys like it, then I am happy with the result. cheers.
-
Thank you Greg.!
-
Finally finished the horse . Next :the saddle & Bridle
-
thank you David , I hope that when finished, this work will not evoke sad thoughts about a tragety but rather happiness and posative ideas and an escape for those who wish they could ride but for reasons beyond their control ...can not.
-
Thank you Michael, I am not a' horse' person so am unfamiliar with terms and descriptions. The horse is called Jaffa and the rider was Taylor . I appologise for saying the saddle was Taylors, what I meant was that she rode on that saddle and used that bridle. (My error).cheers andrew
-
Thank you Tim for those kind words
-
Here is some progress. The buyers visited recently and seemed happy with the work. It was a little emotional as we fitted the saddle and bridle thatTaylor used. I was entrusted with her spurs and personal artifacts also things belonging to her friends and family for inclusion in the sculpture.
-
Yes Woodsmith it is very hard to see what the hell they are talking about. I often think it is like the story of "The emperors new coat" everyone running round saying how nice , the colour , texture style , shape etc , when in reality they all secretly know its nothing. I have tried very hard to keep an open mind and "see" the new coat, and I cannot and Im not going to pretend (like so many others) that I can.
-
Thank you Seldom for those kind words. I have always tried to make my art accessible to the public and I get no greater reward than when i see the smiles and laughter in both adult and child as they pose for a family holiday photo with my works. I cannot understand an artist that want to produce work that is not understood (and sometimes hated ) by 90% of the viewing public. If its all about ' them' (the artist) and the art snobs who consider themselves elite ,I think they should leave their work in a darkened room behind locked doors.
-
YES farmweld I agree that the seat is too big . I will have to look at something else. Its just such a great shape. I disagree with those that think I shouldnt 'waste' this artifact on a sculpture . i personally think that there could not be a more worthy location for any previously horse drawn artifact. each to his own view!
-
-
Thank you Cliff and Beth, I have not studied equine anatomy but rathet the 2D profile shapes and curves that make up the various parts of any animal. If you get a drawing or photo and measure the distance between the leg joints then multiply that distance by your scale multiplier you can make a skeleton that 'works'. if you can then bend and adjust it ,the battle is nearly won. The adjustment is necessary as the scrap artifacts themselves may cause a deviation from the measured plan, the position of the limb may be correct as per the photo but it 'just doesnt look right' If you have done that you must then look at filling in the 3d shape. Take a human lower leg. if you have it the correct length and bent /adjusted to a recognisable (very important) stance. then look at the curves involved. the shin side is concave and the calf is convex. If you look for a curved piece of scrap, cut it to length then weld weld it on you cant stuff it up. all that is important is the curves go the right way. If the curve is exaggerated or diminished it wont matter. Sometimes exaggeration looks even better. so.......... I just look for a basic shape which i trim to length and weld/ bolt / pin it on. The time it takes to 'find' the right piece gets less and less with practice. There are critical areas you must get right such as body curves / creases / major muscle goups but once those areas are done you can add any item and it will look ok. It is very helpful if you can open your mind up and when you look at an object :think of multiples (eg: two of the same object back to back) or halving to get the desired shape. An example of this is the curved rear end behind the legs of the horse .This shaped area was made from a single truck rim locking ring: firstly cut in half , then cut in half again and welded back to back. This gave the desired rounded quarter circle shape where before it looked nothing like the desired shape. I hope this is of some help. i will post more photos in a 2 days time. thanks for your interest andrew
-
Great photos Bulle!!!!! , what year were they taken? (1978?) How did you find the traditional footwear .Do they give you enough protection from burns / spatter? welcome .. can you show us some of your work please? cheers Andrew
-
thank you Michael and MagGeorge Sorry guys I must have misled yooz: The horse will stay rusty looking ,its the right colour for Jaffa (the horse being portrayed) I will paint the central pole matt black. this I hope will make it (the pole )be less obvious. I do not like the idea of painting the scrap artifacts (though I have seen some painted scrap art done well) The real risk is the public clamouring over it. I made another horse in 2009 it now has a fence around it which I think detracts a bit. But you cant stop idiots effected by booz going for a photo oportunity. bit of a shame really!
-
thanks all for the intresst you show in this horse and rider (yes i have to do a rider yet!) Iron Woody- yes I must try to capture some sort of stylish beauty in the tail Im thinking of using square chain from old grain harvesters. I have some in different sizes and dont know yet if they will work together. motorbike chain was another option but with many so strands and each link needing a weld or two I dont think I have enough beer or persistence to make that one fly. Chyancarreck yes 'the focus' is critical to being able to do this. I cant "see" the next piece of scrap I need to use unless I have the right frame of mind. When I have pushed on (without focus) I have always had to cut that part off and start again when I saw it the next day. I dont know how some of you guys n girls do this for over 8 hours a day but Im mentally exhausted after about 4-5 hours Ithen must to some mundane brain resting task like cleaning up the mess ive made . Michael - The mount : well I know that it would be better to have some sort of curved base pole (so it doesnt "halt" the percieved forward motion of the horse) but I think I will go with what you see. I may cut a birdsmouth in the 4x4" box and bend / rotate the horse into more of an upward incline. I will also raise it by 2foot (600mm).I want the public to be able to reach out and touch the horses mouth. given the subject (horse) I think I may be forgiven for the simplicity of the mount if people are reminded of the carousel '(merry- go -round') horses they rode as a child at the circus. when painted matt black Im hoping the mount will disapear into insignifigance when the viewer comes closer and is lost in the detail that the many artifacts provide. ...........we shall see!