
rstegman
-
Posts
75 -
Joined
-
Last visited
Content Type
Profiles
Forums
Articles
Gallery
Downloads
Events
Everything posted by rstegman
-
his metal working diary started 07-07-07 05-35-08 Sunday It has been a long time since I posted to this link. Our schedules and projects prevented any metal working. We had a holiday, birthday, BBQ, preparation for hurricanes, get-together on Memorial day. I was prepared for carving but had an idea for metal working. It really depended on what was planned and the weather. The boring bar I made previously has worked perfectly, but because it is straight, there is a limit to what kind of cutting I can do. I decided that I would like to make an attachment that a friend showed me. It allows me to turn the bit on an angle for cutting. When I arrived, my brother said he had no projects planned, which is great. I am free to do some metal working. I said what I wanted to do, and my brother gave me as if I had spoken in an alien language. I then took a piece of paper and drew four sketches of what I planned to do. the first one showed the metal bar. with the cuts I wanted, the second showed it split, the third showed the two pieces together, and the forth was a view showing how it would be used. He got the idea. We found an appropriate piece of metal, the last of that size. We sawed off the right sized chunk with the power hack saw my brother made.We cut it a bit longer than needed. Note, with this kind of piece we were making and the way we did it, cutting it to the size needed would have been better. I have done enough of these to know how to set it up for the work I was doing. He had the cutting bit already in there so I just had to fit the metal into the chuck and tighten it down. My first step was to finish off both ends. The next step was to make the tenon that fits into the boring bar.A couple measurements gave me the size needed and I got to work. The first tenon I made was a bit too small. We cut that off and started over. I got it right this time, just fits. I then turned the piece around and drilled the hole in the end to take the cutting bit or a new tenon. My original plan for the piece was to use the band saw to cut the flats for the parts to pivot together on. My alternate plan was to use the grinder. Now was something new for me. My brother's lathe is a SMITHY and it has a milling machine built into it. The model he has requires him to pull a gear in or out to switch between the milling machine and the lathe. the next model up had separate motors. Of course, the gears did not want to change. He set up the milling machine and set my piece into the parts holder. He then had me flatten the tenon. He then had me flatten the bearing surfaces for the joint. He said that by doing it this way, all three surfaces and all the drill holes, will be in line. My job, again, was to move the part back and forth under the spinning bit, then lowering it slightly, then doing it again. It did a beautiful job. Now I have to admit that we flattened the tenon way to much. It should only have been a flat spot, but we went down nearly half way. My brother removed the milling bit and inserted a drill chuck and drilled the holes into the parts. He then drilled all of them. Finally, he made the cuts with a sawzall and I had a part. The part that holds the cutting bit was a bit long. I mentioned about a holding a flat cutting bit and the long length of the part holding the regular cutting bit. By this time, I had been on my feet too long. My brother's friend was harnessed to do the work of moving the tools and parts back and forth this time. They had two flat areas in their design. One was for the joint, the other was a flat area to hold the flat cutting bit. They also made a new bit reciever that was a lot shorter than what I made. Somehow, I lost the Allen screw that fits my boring bar to hold the parts so I have not had an opportunity to try the boring bar attachments out, but the parts are better than I expected. I do need more tenon pieces so I can simply swap piece sets, rather than unscrew them to swap between bits, but these attachments make my boring bar a real tool now. It was fun working in metal again.
-
One answer to how long it took to make it, eight years and one hour. Use your real experiance. in years. When asked what that figure meant, say that it took you eight years to get to the point where it would only take you an hour to make it. Another is "Any two year old can do this, with eight years experiance...."
-

Happy Earth Day (a week late...)
rstegman replied to the_sandy_creek_forge's topic in Everything Else
I heard about a guy who made furnature from pallet woods. Some of the woods would be expensive if purchased. Each country uses whatever junk wood that is in their area. I regularly use the three by threes and four by fours for my wood turning and wood carving projects. Roger Earth First We'll strip mine other planets later... -
The difference betweeen a craftstman is the language. A craftsman will say "this is a vase." An artist will say "This is entitled 'The swirl of an oncoming tornado." and then he will say "I intended to emphasize the inhumanity of nature against man, to invoke the impotant uselessness of mankind's works.". While my example is rather weak, as I am not yet an artist, but the language is really the biggest difference between an artist and a craftsman. The artist, though, will go well beyond the simple form into pure art, which tends not to be "useful" but instead pretty. I read in a wood working magazine an analysis of some work at a show. a lot of the discriptions started with SEAMED TO ENVOKE. or some similar phrasing. An artist will have imaginative titles for their pieces "sympathies in blue" or "Arganston's revenge." The title will envoke the sense that it is not simply a vase.
-
My brother had the same consideration. For him, time was the biggest concern. He just did not have the time to do real construction. The advantage of building your own, is that when you are done, you can make just about anything. You will have had the experience needed. Look at the end of my note in the WOODWORKING LATHE note and see the link to the David Gingery web site. They have books on making different kinds of lathes. One book my brother has, tells about how to have the lathe build itself. All you need is a drill and being able to cast metal. Most of the books assume that you don't know how to weld. If you weld with some skills, more design options open for you. The big advantage of buying a lathe is that you get started and fast. the best suggestion is to buy the best lathe you can afford,. Even a bit more than you can afford. Whatever you get is not going to be good enough. My brother ended up with a SMITHY https://www.smithy.com/ The bigger the machine, and the more it has going with it, the better in the long run. There are times when my brother said he wished he went up one step higher in the line of machines they had. Having the lathe is only part of the job. One then needs the tooling and appliances so that you can do real work. My brother has made many of them, but has a long ways to go to do serious work. Good luck.
-
My main art is wood. I have read where one makes a "mock-up" in a easier material such as clay. How you intend to make the heads does make a difference in how you make your mock-up. If you make it with sheets of metal bent, formed, shaped for just the outside, one might use plastic sheets and heat them to get them to the shape. Or one could use some of the poly clay that can be baked to hold their shape. Solid heads could be made with a block of clay or shaped out of wood. It is good to have a nice model of a head, possibly an artist's positionable horse models or simply a toy. A lot depends on how well you can see and work in three dimensions. Good luck.
-
Wood working lathes make full use of speed ranges. Generally, one works as fast as the work or process will allow. A lathe made to use pens, because the diameter is small, needs to spin at rocket speeds, while a lathe designed to spin tire sized bowls will run quite slow. there are times when rotating the work really slow, one rpm, is to an advantage though only top end lathes spin that slow. Rough wood will be spun slower due to weight and lack of balance, than a finish piece will be spun which will be lighter and more even, usually. Finishing, like sanding, is best done as fast as the piece can handle. You want the surface to pass the sandpaper at a really fast speed. ****** There are two designs of lathes. Basically, one with a tailstock and one without. The tailstock allows you to work between centers. Some applications, such as bowl turning, does not need that feature as the work is usually attached to the face plate with screws so the bed to hold the tail stock is unnecessary and possibly disadvantage as many people turn bowls are bigger than the bed will allow.. For general turning, working between centers is an advantage as one can prepare the stock to attach to a chuck, or work with between center projects. There is an advantage if the head of the lathe can either rotate on the bed to aim sideways or backwards, or if you can slide it on the bed. Either action will allow the lathe to handle projects with a bigger diameter than the bed would allow. Hang the work over the end and one can spin the work as big as the lathe can turn, though it might be frightening fast if the motor does not slow down enough. For big projects like that, slowing down to nearly nothing is an advantage. **** Whether a lathe is made of wood or metal, the lathe should be stiff. That is why most lathes you buy are made in cast iron. The tailstock should lock tightly and not slip under pressure. The same for the head if that moves. It is not fun to have a nearly finished piece come loose from the live center and break. A big lathe can do anything a small lathe can do, but a small lathe cannot do big things. Many turners have several lathes of different sized or capabilities. If one is making a treadle lathe, The flywheel design is generally the best. If it has a lot of mass, such as solid material, it will continue to spin even when one is not pumping or a heavy cut won't slow it down quite as much. Continuous spin is preferred unless one is doing a period piece. Changing speeds, like with pulleys is a good idea. Most woodworkers will change speeds according to the needs. A wide treadle has advantages over a narrow treadle in that one can change position to the work. I have a book on lathes, based on a 1880s catalog. I don't have it here right now so I cannot give you the title. it has cast iron treadle lathes, drills, saws etc. They even have them for metal working with screw feeds and other accessories. One should look at David J Gingery Publishing he publishes a catalog of how to books. I think he publishes the books too. He has plans for all sorts of kinds of lathes that might be used as a guide.
-
Since the swage block is usually used in forming curves and other forms, I would not think that the finish would be quite so important. Finishing would be done with other tools and at another time. Would flaws in the swage block really make that big a difference?
-
As Red Skelton said in one of his bits, "I used the chase anything in a skirt, until I ran into that Scottsman...."
-
I know about the older real copper pennies being fine, but I am wondering about working the modern ones, which I have thousands of. how do they work, and what are the problems of the zink contents? Thanks
-
With the zinc they put into pennies, are they worth exploring for copper working type projects? The idle thought crossed my mind about playing around with copper and I do have a lot of pennies, but I know they are not pure copper and might not work properly or look good when done.
-
harley The real question is whether you are designing knives for function or looks. Those wonderful curved knives with jagged edges and multiple surfaces are beautiful to look at, but they cannot do everything one might wish a blade to do. One must consider functionality, what will the knife be the best choice for. A bread knife is not going to be good at digging out bullets from trees because the blade is too long and flexible. A survival knife is not going to be the best knife for slicing paper thin fillets because it is too stiff. One must know the purpose of the blade before you start with your design. I happen to make something similar to those "parallel lines with a clip point knives". For wood carving where you are cutting wood in all directions to create figurines, they are exellent. That clip point does not jab through protective gloves as the sharp point knives I learned from. It also "wedges" wood apart when jabbing into the wood, a design inspired by chip carving knives. They are perfect for what they are used for. They are not intended to be knives that one shows at a party and everybody goes all googaly about. A carver using the knife would might take pleasure in it after USING one. but they are not going to get hot about them. A knife is designed for function. A knife to make people googaly will is, in itself, a compromise. Copy existing knive designs, then have the knives USED. Then modify the design based on your experiance, or the experiance of others who are actually using the knives. Makers develop names because of experiance they applied to older designs.
-
Here are a bunch of my carving knives. The one at the front is an older knife I have used for a few years. The two knives at the back have not been tested at the time this picture was taken. I would carve the wooden sheiths as the test to see how the blade was set up. I don't recommend this, but on the back for knives, I used a strip sanding attachment on my angle grinder (harbor freight). I sanded from the back to the edge and it got rid of grinding errors beautifully, giving a pretty good edge. Of course I used a stone to grind the edge further and then stropped each of them. These were the best blades I have made in a long time.
-
 This is a series of carving knives I made. The blades are made by grinding files. The handles are made with band saw and sander. The front knife is my oldest knife. The two knives at the back were not yet tested for the condition of the blade. I carved the wooden shieths to make them interesting and to test the blades.
 -
Neophyte Metal Diary - 1 this metal working diary started 07-07-07 08-30-07 Thursday I had did some metal working several weeks ago, but have not had the chance to talk about it till now. Until we build a forge, black smithing will be far and few between. It is expensive to heat metal with a torch. Instead, I will be doing machining. The day before my last metal working session, I had the opportunity to work with one of the mentors my wood turning club. I was learning how to work with a skew, one of those tools that are a real pain to learn to use. I learned a lot, especially not to use that tool on anything really important until I master it... He showed me many of the tools he made recently and that he works with. He pointed out some techniques used in making tools. In wood turning, the handle really does not handle a lot of force. It is held in the hand and a light touch is usually far more effective than horsing the bit into the wood. Because of this, one can use prettier, but weaker woods for handles. One can have some really special looking handles for rather ordinary tools. I read something where a man had such good technique that he went into the forest with an ax with a broken handle and used it for quite a while. when he returned, the ax was still in that condition. Most of use don't have good technique with our hammers or other tools. One might definitely need to concentrate on stronger wood for handles, rather than go with a pretty wood. A different kind of wood for the handles will make your tools recognizable. I have no idea the type of patina a well used tool handle might get. What the wood looks like might not make any difference at all. Along with my instructions, my mentor also gave me some aluminum which I immediately handed to my brother. He can use it either in the form we received it, or melted down into metal castings, if we ever get the casting table and forge built... The previous week, My brother and I made a boring bar. I need to make a handle for it and a number of other add-ons. This week I made an attachment to go into the boring bar. With the boring bar, I trued the end, then drilled out the hole that the bits would fit into. I then drilled and threaded a allen screw to hold the bits. my brother helped me on every stage on making the bar. This time, I made one of the fittings to be used with the bar. I took a small piece of the same metal and finished both ends. The only help my brother gave me was to pick out the bits and tell me what to do. After finishing the ends, I bored out one end so it matched the end of the boring bar. My next step was to thin down the opposite end so it would fit inside the hole of the boring bar. We then drilled and tapped a hole to hold a bit. Our final step was to bend the piece so it would bore out the sides of a project. We stuck the piece in a vice and he took the torch to it. Stuff I read about black smithing explained a lot of what was going on. My brother pulled torch away to let the heat soak in to the center, which was something I read about when it comes to forging and forge welding. I finally took a pipe and used that as a handle to bend the piece to give me the angle I needed. I actually went a bit too far. I was told later that it will dig in really aggressively at that angle. My brother wants to make several more at increasingly shallower angles. After the metal cooled enough for us to handle it, we checked the thread of the set screw. The hole warped slightly. He promptly dropped his tap, and it was gone. It either went under a lot of stuff, or went inside something. WE all know how small needed objects travel time. Months later, it will be right there in plane sight, especially if one moved everything to find it. We had to go out and buy a whole new tap and die set just to replace that one missing tap. As mentioned, I had to decide what to do, how to do it. My brother simply gave me the cutting bits to fit in the tool holder, the successive bits for the Jacobs chuck, the drill bit and tap for the allen screw. I had to do the work and figure things out myself. Being a neophyte, there is some thrill and a sense of accomplishment to have that much control on something like this.. I had some metal cutting bits with my lathe stuff and a couple weeks later, I tried out the straight boring bar. I ground the end of a metal cutting bit so it had a rounded nose, and an angle up to the cutting edge. I used this on several pieces of wood and it ate the wood better than anything else I had. I have not had the chance to use the angle piece as I have not worked with any wood project that required it. It is for getting inside the work, past the neck of a vase where the middle expands out. Those are hard to reach and this makes it easier. The cutting bit I am using is too long but I am not ready to cut it in half or otherwise yet. I had some strangler fig wood that is spalted. This is where the first signs of rot appear, where fungus spreads through the wood and gives interesting shades and color to the wood. it has not yet started getting punky. I do my woodworking outside so I am less endangered than one who works in a basement or garage, but spalted wood is dangerous to work with. That fungus will grow in the lungs if you breath much of it in. Outside, I am lucky that the dust does not linger long enough to be breathed in. I decided to make a tool handle out of it. This is beautiful wood and softer than pine. I rough shaped it, then took a brass nut to be the ferrule, the metal around the tool end to prevent it splitting when the bit is driven in. I shaved the place the ferrule would be until it was just small enough for the nut. Since it was a nut, I screwed it in to make it stay on easier. After the nut was in place, I finished some extra shaping, and then, using my speed steel bowl gouge, I turned off the high points of the nut. Soft metal like copper and brass can be worked by hand held tools. Satisfied with the handle, I decided it was finished. When measuring the handle for the bit I was making it for and found I did not have enough wood to keep from splitting out. The nut was too small for the bit I was going to use. I decided I will use a different bit for that handle. This gives me an excuse to make another handle. I am thinking of a large number of bit designs I can make use of, or make from scratch. Speed steel, as used in metal working, is best as it requires less sharpening on wood. Wood can be quite abrasive. I generally work with my brother on his metal working only when my mom is out of town. I might get a chance to work with him this weekend, or I might not be able to do much metal working till November when My mom goes on a trip. I hope it is sooner. It is a lot of fun.
-
Rambling of an idiot - Knives - 1 The Title will tell you everything you need to know Many of us use wood handles. The way to get the super fine finish everybody oo's and awes about, is to sand properly. First, dull sandpaper is NOT a finer grade of sandpaper. Sandpaper is crystals of rock glued to a paper or cloth base. When the sandpaper is dragged across a surface, the sharp edges of the crystals will score the surface. When sandpaper gets dull, the edges of these crystals actually break off, become rounded, lose their grinding power. Some sandpapers use harder stone and glue them stronger to the base. The harder stones last longer and are held firmly until they get rounded. Others will use a softer stone and weaker glue so that the highest stones will eventually break off the base, allowing smaller stones to work. once all the grains are rounded, the sandpaper loses the cutting power. When sanding, the grit scores the surface. Since sandpaper grit is all about the same, they will leave a given depth score based on the grit of sandpaper. What one does is to sand until the entire surface has an equal level of scoring over the surface. You start out with a grit just strong enough to remove any tool marks in the wood, or metal. Then one goes to the next grit sandpaper and remove all the scoring of the previous grit of sandpaper, making the surface with an equal amount of scoring over the entire surface. It is best to work with sandpaper grits of the same manufacturer, as the grit, the glue holding the grit, and the screens used to filter the grit are different for every manufacturer. When you are working with 32 grit, to 80 grit, the scoring almost hurts the eye. It is important to get the sanding even over the entire surface. You only use these grits when you need to shape the piece or remove tool marks. Grits 100 220 are fine tuning grits, You are removing the damage of the previous grits and preparing the surfaces. Grits of 320, 400, 600 (don't skip grits) are your finishing grits. With these, you will see a fine finish appear and the piece really starts to look good. Really hard woods can be finished beyond 1000 grit without any wax or varnish. Softer woods could use a protective coating to bring out a shine. One can also buff such woods with a soft buffing wheel once you get to 600 grit and really built up a fine finish with some woods. I do wood-turning, making bowls, vases and such. The way I finish these is to sand to 600 grit, then use wipe-on poly varnish. you apply it with a varnish dampened cloth (those lint free cloth based paper towels are good) and rub the varnish on the surface until it is completely dry. By rubbing it till it is dry, you won't get drips or nibs on the surface. Sand lightly with 600 grit and apply again. Even with rather poor looking wood, you will end up with a fine looking finish. It should be noted that some woods have a strong oil in them. To finish these, shellac the surface, then add your varnish. The shellac seals the oils inside the wood and gives the varnishes something to bind to. I've not dealt with oily wood so I am going by memory of what I’ve been told several times. .
-
Neophyte Metal Diary - 1 this metal working diary started 07-07-07 08-05-07 Sunday Could not work at my mom's house. I went to work with my brother, which meant working metal. Yes! My brother welded up a shelved cart for his wife to use at work. He had two of the legs about an eighth to a sixteenth off. What he did was to put the torch onto the upright and when he got it nice and red, I pounded on the corner to upset the metal slightly to get rid of the wobble in the car as it rolled. We had to upset two opposite legs. I did not do too bad at pounding. At no time did I hit the wheels which were right where I was pounding. There is still a little wobble but with all the different floor surfaces they are rolling on, and once it is fully loaded, no one will notice. He did not have a pipe bender small enough, so he cut a whole bunch of pieces of the pipe with a slight angle on both ends, and then welded the pieces together to make the bends of the handle he was after. I helped him sand his weld job before he painted it. The paint hid the mistakes. It was said to be in the 90s in some places in the area. We were working under a spreading oak tree. it is surprising how much heat the tree soaks up. While it was still hot, it was not like sitting out in the sun, or under a metal awning or something like that. We started a bar-b-q and tried to heat the end of a metal bar. We got a little flattening, but not too much. My brother tried some pounding and found his elbow could not take the effort. Unless we get a power hammer, we doubt he will do any black smithing. My brother had to cut some metal. While he had the torch out, we decided to heat the end of the metal properly and pound on it. It was kind of fun and the end of the bar was nicely flattened. I do see that I have to learn to hit the metal flat. I have a bunch of corner hits, making it rough. We hung onto the piece of metal and the end is in the metal rack, the humiliated end sticking out so we can find it again. Seeing the metal going really flat was kind of exciting. Results. The problem is that the gas we used is too expensive for this purpose. Have to build a forge. I have a key cutter I got from a friend. This is a belt driven cutter to make copies of keys. I brought it with the suggestion of using it as the basis for the treadle lathe my brother is making for me. Instead, it gave him an idea of how to build it. Simpler, easier, and solves some problems. We even dug out a piece of metal for the shaft and the sleeve it will be spinning in. He has to get some bearings before he can really get started. Most wood lathes use a tube with a thread on the end, and a morris taper on the inside. What we will do is to use a key way on the shaft and have everything fit the shaft and allen screw in place. We can make the thread for the accessories such as chucks to stick on the end of the shaft. This is kind of like the system that the SHOP SMITH uses. I will be able to make all sorts of parts for that lathe. There is a cutting tool system I wanted to make for the wood lathe. I decided to make it. It uses a main bar as the center of the system. The bar has a hole to fit the small metal cutting bit. There is an allen screw that synchs down the bit in the end of the bar. One can make accessory handles and outriggers for stability, and inserts that hold flat style bits, at different angles and distances. Everything is interchangeable and adjustable. Anyway, I decided to make one. I intended to use the drill press to drill out the end, but my brother chose to use the smithy. He slipped the bar right through the machine and clamped on the end with his three jaw chuck. I had to finish off the end, then drill it out in stages. Once I got that part made, he helped me set it up in the drill press and drill out the hole for the allen screw. He then guided me in tapping the hole, using the drill press to center the tap so it went in straight. The bar is done. Now I need to make an outrigger, which will require a bit of welding, along with bending and drilling. And to make a few bit holders to hold flat bits for working on the inside of my projects. I have the start of a system that would normally be expensive. I am not someone who actually is known for doing things. It is exciting to actually accomplish some projects, even if I am helped in the setup. This is fun. I have another Sunday session at my brother's house next weekend. Will see what trouble, I mean fun, I can get into.
-
habu68, A popular method of starting charcole files is the chimney which is like the coffee can you discribed. These chimneys have a screen on the bottom, and a handle. You put in some paper and your briquets and light the paper. In a very short time, you have well started coals. I personally have problems trying to get matches lit......
-
Generally, a blade, when it is discontinued, is at its perfection. The cavelry sword when it was stopped being used, was the ultimate in design for stabbing from a horse and not losing the blade. Many working knives are at their ultimate design now, or when they were discontinued. All blades are compromizes between strength, hardness and flexibility. Of course, today, a lot of our blades are made purely for design, for the looks. They are not really utilitarian for what they appear to be designed for.
-
Rambling of an Idiot-knives-1 The title tells you everything you have to know. I am a wood carver. I learned how to make my own knives from files. When you purchase a commercial product, one is afraid of damaging it, so one does not want to make any changes whatsoever. Making one's own knife allows you to understand when and how to make repairs or corrections in the design. This actually goes for any tool or equipment you use. If you built it once, you can build it again, better usually. Knives generally use two kinds of edges. Each has their advantages and disadvantages. One type has a generally steady slope, then sharp angle at the edge, usually twenty five degrees. This is a strong edge that is not likely to chip or break. It wedges materials to the side. an overall use knife like a pocket knife will do well with this type of edge. This edge needs to be sharpened often as there is very little depth to the "sharp" part of the edge. The other type of edge is a continuous slope to the edge. This edge slices through materials. It is a fragile edge and will chip easily, but it can cut for a long time without having to be sharpened. the cross section that one would consider acceptable sharpness is quite long. Again, this is weak material too. In my experience, I can never hold a consistent angle to a blade. sometimes it will be fifty degrees, other times it is ten degrees and sometimes the different angles in the same edge. Because of this, I personally avoid this type of edge. On the other hand, the continuous angle is easy to sharpen. Lay the blade flat on the sharpening stone and stroke. the flat of the knife keeps the angle consistent. All my knives are sharpened this way, in spite the weak edge. Now when sharpening a blade, I prefer take several strokes on one side, then flip it over and take several strokes. Usually no more than five on each side when I start sharpening, and down to one or two when I am at the edge I am after. The reason for this is that the media draws some of the metal along the surface of the blade. This excess metal goes past the edge of the knife and becomes a "wire", a ridge of metal that tends to curl up. This wire, when it becomes big enough, can break, taking away your sharp edge. By flipping the knife over every few strokes, the wire is worn down on each side until what is left becomes your fine edge. You save sharpening time. I have a general preference of "trying to cut the stone" kind of stroke, where the edge leads across the stone. This also reduces the wire, leaving a sharp edge. After the stones get the knife to the right shape, one needs to polish the edge so it will not catch. A leather strop or a metal strop is used for this. some people will use a rouge, which is a grit, to add teeth to their leather. I learned that this is not needed. The leather itself will smooth out the surface and remove the saw tooth profile the grind stone created. Once a blade is sharp, for example when carving, one simply strops the blade when you stop to do something or set the blade down. The edge will remain for a long time. Eventually, though, because leather has give, the leather will round the edge and one will have to grind the surface again to straighten it out. Grind stones, like sandpaper, are rated to the size of the grit. Basically they make a screen with a given number of fibers per inch of surface. they usually have several screens. A grit is classified as any grit that won't go through the screen. A sixty grit sand paper contains any grit that will go through a mesh with thirty fibers to an inch, but not go through a mesh with sixty fibers to the inch. An eighty grit will then have anything that will pass the sixty but not the eighty. A hundred will have any grit that passes through eighty but not a hundred. They will go beyond a thousand grit sand paper in some product lines. Old grind stones were simply sand stone or similar product chipped into shape. Nowadays, grindstones have some form of glue holding the stones in place. The strength of the glue and the hardness of the stone is indicated by numbers on each grind stone. Course grind stones remove material fast, great for shaping. fine grindstones are great for creating fine finishes. When using power grinders on blades, place your fingers on the back side of the blade, If the blade gets too hot to hold your hand on the surface, quench. this will prevent one losing the temper from the blade, if you are using files or something else as your material. Enough rambling for now.
-
My brother built a power hacksaw he found plans for in a book. It is basically a saw connected to an arm connected to the shaft. (think of the arm of a steam engine) He has it set to cut on the back stroke, when the spinning arm points down. With just a bit of cuttng oil, it will eat stainless or any other kind of metal like nothing. We were cutting a four inch round stock and it just kept cutting on its own when we were doing other things. It cut through in about an hour, without a lot of noise, or any sparks and the surface was fairly clean. My brother has to square things up, otherwise it would be a square end too. He tried that same bar with a henrod torch and a cut off saw and was not getting results worth the effort.
-
ApprenticeMan, Excellent knife. As a woodworker, I like that stump too... ******************* Neophyte Metal Diary - 1 this metal working diary started 07-07-07 07-15-07 Saturday high 80s, mostly sunny, light breeze, 94 under the awning. Rain arrived hours after I got home. I never do work at home, other than sanding and varnishing some wood working project. I do my work either at my mom's house or at my brother's house. At my mom's house, the equipment is under an awning. It might be 83 degrees out in the shade, the heat radiated down from the metal awning makes it over 90 degrees. Since the thermometer is under the edge of the awning, I give the awning temperature compared to what the weather report might say. I tackled my new carving knives. The first knife with a handle was the closest to being done. I sat with the sharpening stone (in this case a cheap diamond plate) and worked the blade. I eventually got it where I could stop the knife, and get it sharp enough to shave the hairs on my arm. It worked as a carving knife. I took the second knife I made and cleaned the glue off the handle, first with my first new knife, then with sandpaper. I then took to the blade. I have it fairly close, but it still needs to do more grinding. I scraped the third knife of glue, but did not do any more. I still have to make a handle for the fourth knife. I held off on making the handle of the fourth knife in case I needed to make new handles for the two that cracked. The one I am nearly done with is Ok so I will leave it as it is for now. I might leave the other knife as it is. I will know when I start dealing with that. It is not hard to make new handles so that is not a serious problem. If I decide the blade is wrong, I can replace the handle fast. Part of the problem with the new knives, is that they may be too broad for comfortable carving. Then of course, a little more grinding in one spot compared to another might case thin spots on the cutting edge. I need to use the knives, get them to the right profile, and edge. There are as many sharpening methods as people doing it. If using a regular sharpening stone. I found that soap is the best medium with a stone. It does not build up like oil does when it dries, and if the stone gets filled up with grit and such, wash it in water and the stone is sparkling clean. I use whatever liquid dish soap is on hand. I got consistant, excellent results that way. Clean up of your hands is simple, just add water... Now one thing I need to do soon, is to make a shieth for the knives. The way I make them for the carving knives, is to take a piece of wood, split it in half. I then lay the knife blade over one half of the wood, and trace it. I then gouge out the wood until the knife is flush with the top. I will then glue the two pieces together. Warning, if you use white glue, let it dry completely. White glue has vinargar in it, which will rust your steel. I learned that the hard way, (several times, by the way). When you shove the knife into the shieth, it will fit tightly to the knife. A rap on the end will lock it in place. My brother was cutting some boards for a scroll saw project. Some stuff on the table saw was blocking the path for the band saw, so I pulled that stuff back out of the way. AS I was putting things back, a 4x4 slipped out of my hold and fell, end straight down, onto my left big toe, right on the toe nail. I was lucky. This board was red cedar, which is comparatively light, rather than, lest say, black walnut. Light as the wood is, it still hurts. My toe is black and blue behind the toe nail and it is swollen. It is a dull pain, but does hurt if I flex it. It will definitely hurt if I bump it against something. It hurts to walk. I will be working my knives more next weekend. It is a good project when it is too hot to be out and about, or when the weather looks threatening. Will see what else I will be doing next weekend.
-
Neophyte Metal Diary - 1 this metal working diary started 07-07-07 07-14-07 Saturday 90 degrees under the awning, sunny with partly clouds, none seemed to hide the sun enough to be noticed. Light breeze, though a fan helped at one point. I ground on the knives, shaping them, getting them close to being sharp. I used the water stone, which is messy. The Harbor Freight grinder I have has a speed stone and a vertical water stone. I work where the stone rises out of the water. I had to refill the basin several times as a lot of the water ended up on the ground. There are several advantages of this stone. One is that it is wider, and larger in diameter, which makes for a flatter grind. The water keeps it cool so I can leave the blade against it for extended periods of time. The speed stone heats the metal so fast that it is hot almost as soon as you get it positioned right. I got all four blades almost right. I decided that I can add handles and then finish the blades with better control. I picked out a one by two mahogany piece and traced one of my existing carving knives onto it. I then bandsawed the rough shape out. I then used the disk sander to round the corners and final shape it. It would be better to use a belt sander, especially if you can work around the roller of the sander, but had to use what I had. I then cut a curf in the end, up and down, on the blade end of the handle. I then went to the drill press and drilled out a hole in the center of the curf to take the tang of the blade. I hand sanded the handle a bit. I finally used Gorilla Glue into the hole, on the tang, and in the curf, and drove the blade into the handle. I later scraped off the worst of the Gorilla Glue foam up, but have more cleanup to do. I then tried making a yellow pine handle and it started splitting out while driving the tang in. I then made two black walnut handles and they also started splitting out as the tang was driven in. It was while I was cleaning off the excess glue that it dawned on me that the bit I drilled the tang hole with, was way too small for the tang. It helps to measure. the glue does most of the holding, though the shape of the tang helps, along with the blade in the curf. With one blade, the tang is only half way into the wood. Not really good design. Tomorrow, I might break apart the handles to free the blades and make new ones so I can make them fit properly. The last two handles went fast, so It won't take too much time to make new handles, and I actually will be able to use the yellow pine for one of them. I will finish sharpening the knives later. One thing with carving knives, is that they have to be used to be fine tuned to carve perfectly. Slight errors in grinding can give one headaches.
-
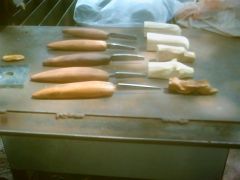
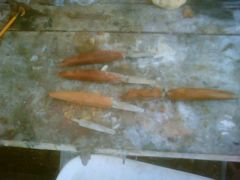 These carving knives are in a rough stage. The handles are added to them to make final shaping on the grinder easier. The Gorrilla glue is the mess seen on them, and that will be cleaned off in final work. After the knives are sharpend to a carving edge, they will have to be used to fine tune the desgin.
 -
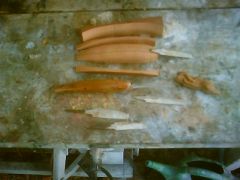 This picture shows the cuts needed to create a blank to make a carving knife handle. The cuts were on the bandsaw and the remaining shaping will be done on a disk or belt sander. There is a finished knife to show a comparison.