
LarryM
-
Posts
283 -
Joined
-
Last visited
Content Type
Profiles
Forums
Articles
Gallery
Downloads
Events
Posts posted by LarryM
-
-
Fred,
I really like the clutch setup on your hammer beautiful hammer almost to pretty to work on. :lol: -
I'm with Frank on this one tombstone stick. Like the one I have will do alot. You just have to have right electrodes. Small diameter for light material. Migs are nice to have, but they require more comsumables. (tips, gun liners, gas, etc.)
Larry -
Chris that's not a buy that's a steal for that price. :o The power unit is worth twice that much alone.
Larry. -
You could alway come over to my house. I have alot stuff you could haul off. :) :)
Once you get bitten by the bug you will be suprised at the places you will find steel, to beat on. -
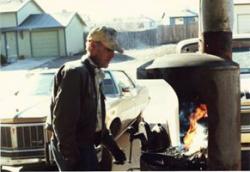
This are few pictures of my power hammer. The ram weight is about 45#. I've stolen ideas here and there on web. The tire clutch and drive works really well. The tire has a brake setup, so when let your foot off the treadle the hammer stops. This let's me hit one hard stroke at a time with hand held tools. I have two sets of dies one, flat one combination. The dies are 2 1/4" X 5". Lots of clamp on dies.


-
You may no longer be a youngster if:
You watch them tearing down school, and college buildings, that you watched being built when you were young. -
Iron,
Wire it up to 220 volts A.C. It will run cooler. Motors don't like low voltage. The controller you have has a built in shunt, and A.C. to D.C. inverter. The 220 volts won't be a convenient as 110. The dynamic braking feature just means that the unit reverses current in the motor field windings acting like a brake, to slow or stop the motor. Just my two cents.
Larry -
Eric, They're most likely made of cast iron. Being that they are from Prius they're probably not big enough for fire pots. But you can use them to make stock stands to hold long material being forged,or heated in a forge.
Larry -
Glenn, Here is a video of my melting furnace. I have been using waste oil quite some time now this is my third furnace. It has a 10" bore which is about 12" in height. My crucible is 6" X 9" well casing pipe. This furnace will melt twenty pounds of aluminum in twenty minutes from a cold start. The flame out is caused by not enough preheat, and to much air. Another thing when you start to add oil, do it very gradually, or you will flood to furnace. A needle type valve is a must because you need have fine adjustment on the oil. You can preheat with wood, or charcoal but the ash blowing out afterward is messy. I prefer to use propane for the preheat, because it is quicker, and a lot hotter. I only hope the forge dose as well.
Melting Furnace
Hope this helps
Larry -
Here's another link you might find interesting. Not really a post vise but looks kinda neat. I like the cam tightening lever
Upsetting vise
Larry -
Like Phil, and Frosty, I have several of David Gingery's Books. The centrifugal fan book is very good. I have built several fans using this book. Home brew furnace refractory recipes can be found in the charcoal foundry book.
Larry -
Dale, Sorry to hear about horrible thing that just happened to you and you wife. Just so you know we all will be thinking about you two.
Sincerely
Larry and Family -
Norseman, First of all what recipe are you using. Second home-brew refractories are not going to be as durable, or Hi-Temp as the commercial mixes. One thing you can do to improve the lining after firing it is to wet the lining, Then brush on a mixture of water, silica sand,and fire clay, Then re-fire the lining. You also can buy furnace putty to coat the interior of the forge. Or a combination furnace putty,and fire brick.
Larry -
2-- ? * are you filtering you're wast oil for a cleaner fuel if so how ?
* and are you using a elec pump to sup oil to forge or gravity tank set up ?
OK 3 ? lol when forge is up to temp do you turn propane off and run on just wast oil ?
in the shop I have a wast oil wood stove gravity feed onto a chunk of wood with air blown into fire, its primitive but dose get stove red hot & cut are use of wood down considerable
and once to temp no smoke out of stack, would like to make 100% oil one day have lots of wast oil and like a warm shop in the winter
yes when its running post a pic COOL
It's a Moya burner! Very similar to the one I made. You'll get plenty of heat out of that. Might have a little trouble tuning it. At least I did. If it floods when the forge is at temp, it'll look like a plane crash. Guess how I know. lol!
IronWolf,
Yes I do plan to filter my oil the filter I use is designed for diesel fuel, or gasoline filter. This filter unit acts as a water separator to. It will not have a paper filter element, just a fine screen. To answer your question yes once the interior is red hot, and the oil has been adjusted, shut off the propane. I usually turn the propane back on, oil off, for shut down, to help burn the remaining oil out of the forge. The oil feed will be gravity fed to the burner. There are quite few waste oil designs for shop heaters on the internet. Some I like some I don't.
Matt,
You are right this burner is designed after the Moya burner. I have one similar to it that use in my foundry furnace. It uses propane preheat as well. Thanks for the replies I will get more photo as I get it up and running.
Larry -
These are some pictures of my waste oil burning forge burner. Along with a couple of pictures of the forge. The bent tube entering the rear of the 1 1/2" pipe tee, is the waste oil inlet. Propane preheat enter through the brass elbow on the side of the tee fitting. The blower will be hooked to the barbed 1 1/2" fitting. I'll get more pictures when I fire it up.
Larry


-
Robert,
Its sad that folks have to be so high and mighty as to feel they have to talk down to less experienced ppl that just want to learn as well as share. I have been dumped on in the past as well. BTW, the burners you made are very much like a version of (yes, the tried and true) Ron Reil EZ burners. They were modified with the injector tube by a man in Oregon named Jack Davis. I used them for 4 or so years without issue and I welded in a castable lined forge. Robert, don't let guys here get you down. For the most part, there are some great guys. There are just a few that feel, If you don't do it their way, its wrong and I say THAT's wrong. There are about as many ways to do almost everything as their are blacksmiths. The horn does NOT always have to be on the left
Edit: Oops. I guess I should read all posts before posting. Anyway, The attached burner worked. Sorry to have butted in. My apologies .
Robert,
I'm with Dodge on this one. Unless we try new stuff whether in theory, or otherwise we never advance. I do have a question what program did you use to edit the labels in the one picture. I was impressed with the labels.
Keep on hammer'n
Larry -
What rod depends on what type of welder that you have. AC only, AC/DC, and how many amps? If you have DC reverse capabilities I would say 7018 due to how smooth it runs, and how it has less possible slag inclusions than say 6010/6011. 6011 will work in an AC machine, is available at many locations, and is pretty easy to make work. Splatters big time, so protect the surrounding area, and any tools in range.
Which ever rod you use prep the joints so that you can get a 100% weld. In reality I don't think you will have any problems using 3/8"-1/2" steel. I have an old Buffalo forge that has a stamped sheet steel pan that is around 16-14 gauge. If you line the firebox with a refractory it will help protect the steel.
YEA what he said plus this might help get you started Welded Fire Pot Drawing
Hope This Helps
Larry -
Welcome Ben, You've come to the right place. I live on western slope of Colorado near Grand Junction. Lots of good information on this site. Friendly people to.
See Ya Around.
Larry -
This is one that I built last winter. It's made like the ones on the Zoeller Forge web site. The burner is fabricated, from 2" pipe for the bell fitting. The burner jet is a .030 MIG welding tip. The rest of the burner is 3/4", and 1" pipe. The bolt you see with the wing nut, going into the side is an air choke. There are more pictures in Iforge gallery.

Btw it only took short time to make and didn't cost much to build. -
I agree with the above posters 100%. All good advise. One thing that works till you get the hang of vertical up, is to tack the plate back away from you at a slight angle instead of a full 90 degrees up. Then as you get the hang of it tilt it back toward you as you practice on different welds.
Hope this helps
LarryM -
I use soup, coffee, juice, etc cans to store stuff in like the rest of you guys. But the one use that is very useful, is to use them as molten aluminum molds. If you have leftover aluminum after pour. It makes real good turning material, because it's already round. One idea I haven't tried yet, but will soon is to prop a piece shafting vertically inside the can then pour around it. That way you have the shafting cast to aluminum disk. This could be used to build a belt grinder drive shaft and wheel. The coffee cans will make 6" diameter wheels. Depending on how deep you pour the aluminum as to how wide the wheels will be. Just and idea.
Larry -
Steeltoe, Here is a link that might help you out.
http://www.iforgeiron.com/forum/f56/post-my-picture-8974/#post86091
Hope this helps
Larry -
Hey, Chris do yourself a favor move that new jacket I see hanging in the photo a little further away from where you are working. It won't look near as nice with a hole burned in it.
BTW the hinges look real nice. Keep them photo coming.
Keep on Hammerin'
Larry -
This is a fire brick forge that I recently finished. So thought I would share a few photos. See what you think more photos in the gallery. That's home made reducing bell on th burner so i don't have a lot of money invested to build this forge.


Welder's beginers course
in Welder's beginers course
Posted
Sounds like a plan to me!! I'll help if I can.
Larry