December 22, 200817 yr First off, let me say that I have enjoyed reading and watching how Mark Aspery and Gerald Boggs have developed this format for constructive criticism. So much that I Edited December 22, 200817 yr by TimothyJD
December 22, 200817 yr Tim, Can you give me a description or a photo where the heel bar connects with the hinge style please? Do you have a heel tenon? Do you have any issues with the gate sagging at all or being 'whippy' when opened?
December 22, 200817 yr Tim, It looks like a fine commision, you and the client should be pleased. On the fixed side panels, why did you not include the dog bars as you have on the swinging front panels? It just appears to be a out of balance compared to the front. The overlap joints are a nice detail. I am not sure about the heel bar corner connections. Do you anticipate any sagging? Did you preload the gates or build in sag adjustement? Some shops build the big gates considerably out of square to beat the sag.
December 22, 200817 yr Author Mark, I would have liked to make the bottom Heel bar with an upset and use a heel tendon, but my skill level is not good enough to do that. I was originally planning on making just a plain square corner bend on the bottom bars, but that did not work well. So I had to go to plan B, which was to just bend them, and leave the radius. I hope that makes sense. The pictures should show what I did. I attached each side of the bars with two 1/2" rivets. As far as sag goes there is none, or very little, right now. But I will see what happens in the long run. I'm not quite sure I understand your "whippy" term, could you explain what that is to me? I forgot to ad some dimensions so you know what size this thing is. Each leaf of the gate is around 2-1/2'. Making the over all gap around 5'. It is 2' deep, and stands about 10' tall. Thank you for the comments so far.
December 23, 200817 yr Tim, My overall impression is that I like the gate and pillars. I have made a couple of arrows on your jpeg. My first thought was that the middle upright marked 'A' should have been taller. But upon reflection, it is in keeping with the hinge style of the gate. That made me think that the arch should then have been a little lower, but that is probably pedestrian height. So I think the scale of the gate could have been bigger. I like the way you have continued the circle through the overthrow or arch and on into the gate. I would like to have seen a few more cross bars in the overthrow. 2 more actually - for a total of 5. I like the detail marked 'C'. It could have been used a bit more on the side pillars. I would have liked to see the bars textured with their corner broken, but - again looking at the fencework surrounding the gate - it is in keeping. All in all a nice piece - the clients should be very happy for the money.
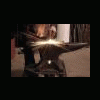
December 23, 200817 yr I would have liked to make the bottom Heel bar with an upset and use a heel tendon, but my skill level is not good enough to do that. I'm not quite sure I understand your "whippy" term, could you explain what that is to me? Here is a picture of a heel tenon that I did for my first (still unfinished gate) From the looks of your work Tim, you have the skill to do heel tenons. In My Opinion. I "think" what Mark means by whippy, is flex, does it flex when you open it or is it completely rigid?
December 23, 200817 yr After looking at the work you guys post here, if I didn't know better I'd doubt my own ability to tie my shoes let alone 'smith. I think your gate is outstanding and especially enjoy your exibit of joinery. I'm not one to shy away from criticizing others , but I don't have the technical expertise to be of much use here. Asthetically, I think the arch could have used a bit more "weight". More crosses as has been suggested would probably fit the bill. More importantly, I would have prefered to see the tennon joints used on the lower section used on the top as well. If I had built this I'd have it posted anywhere and everywhere I could. So, my criticisms are only offered in an attempt to further the exercise. The mention of budgetary constraints leads me to the question, "What would you have done differently with an additional 10%-20% in the budget?" Since you didn't have any particular design constraints from the client why did you stop where you did? This is asked purely for my own edification.
December 23, 200817 yr As a newby I do not have much to add but you asked. In the photo's much of the stock looks like it was milled ( look at the last of the pictures you posted where the arch is attached you can see the milling marks). If this was being built for me I would like to see more texture on the steel. This is an amazing piece of work. What would you have done differnetly if you had an extra month to work on it.
December 23, 200817 yr I saw some comments above about calculating for sag. I remember a formula I saw years ago that recommended 1/8" per foot, but 1) my memory is not reliable, 2) that might have been for some specific gate. Is there a place to turn for guidance before bending metal?
December 23, 200817 yr Author Thank you everyone for the comments. StrongBack, these questions are really good and I will try to answer them. If my budget was aloud to go 10%-20% more I would have liked to do more work on the top of the arch. I originally was planning on doing the top a little different but I ran into a couple problems that keep me from doing that, (mainly time) Secondly I would have liked to play with the bottom bars of the gate, changing them a little. I also would have liked to have a different type of latch system, then what I finished with. I don’t think that I would have done any major design changes. However, in hindsight I would have charged a little more so I could have made money on it Doug C, If I had an extra month to work on I probley would have done some of the things mentioned above. Element, I agree with you the top is not very exciting and not very much detail. I really like Mark’s idea of adding to more bars along the top. However, in a couple years there should be some kind of plant, growing over the whole thing so that’s why I didn’t spend a lot of time on the top of the arch. But if I would have had more time I would have done the top differently. I have a question, I got to thinking about what Mark, and Doug C said, about texture. I have textured little things before but not something so big. I find when I break the corners it causes the bar to curve, or bend. If I was to texture each bar of the gate it would be a really big thing to straighten out every bar after texturing them. So what I’m wondering is, is there a way to texture bars and not have them bend or curve on you? So that you don’t have to straighten them out after. Again thank you everyone. Tim
December 23, 200817 yr Ah, I didnt think of the plants that would take over. This will look very nice when its overgrown to an extent. eric
December 24, 200817 yr the 1/8" per foot for sag rule of thumb, I read in the english rural craftguide last night in the section of making an ornimental gate.
December 24, 200817 yr Tim, You are quite right, texturing and chamfering large bars can result in some curves and twists. The curves are fairly easy to get out by hammering the stock over a void. For smaller bars we would use the hardy hole. For large bars, I use a swage block. Actually I have some dies for my fly press that really get after taking curves out of bar. Twists on the other hand... Twist are really pilot error or tooling miss-alignment. Best to not get them in there in the first place. Large (I mean 4 ft long) twisting bars are the way to go here. I have a large 'V' swage for under my power hammer that supports rectangular stock while I chamfer its edges. This seems to work well. The twisting bar is a good investment of time. When you start curved stair rails, you will be very happy to have one to pre-twist the stock prior to curving.
Join the conversation
You can post now and register later. If you have an account, sign in now to post with your account.