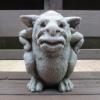
ripleycopa Posted May 16, 2015 Share Posted May 16, 2015 I decided to try forging a dragon head for the first time in several years; my earlier efforts left me unsatisfied and I moved off into other projects that I felt better about. This effort began with using a 30 inch length of 1/2 inch square stock I had left over from a class project. I gathered up a number of chisels and punches and found a slanted head frame for my vise. I used the standard technique of cutting and forging the horns, bending them back on the bar and faggot welding the overlapped bar to provide mass for the head. Half faced blows established a nose. After that it was working with the chisels and punches. I liked the result this time but it still needed something so I tried to forge dragon scales on the neck using a texturing hammer, but it did not stand out very well. I finally decided to try a pineapple twist on the neck before I forged the head and the result is quite satisfying. I am thinking about scaling it up to 3/4 or even 1 inch square stock but without a power hammer that may be a bit much for me to attempt. Quote Link to comment Share on other sites More sharing options...
DSW Posted May 16, 2015 Share Posted May 16, 2015 Nice. I'm thinking about maybe trying something like this is I take a class again this summer. Quote Link to comment Share on other sites More sharing options...
Frosty Posted May 16, 2015 Share Posted May 16, 2015 That turned out pretty darn nice. I like to break the edges on the snout and head a little. It makes the face a little more lifelike and really makes the nostrils stand out.I've been wanting to try a pineapple twist to make scales but tighter maybe 2-3 x as many twists as yours shows is what I was aiming for. I've twisted the bar off a couple times now but haven't given up.Nice dragon heads, well done.Frosty The Lucky. Quote Link to comment Share on other sites More sharing options...
Michael Posted May 16, 2015 Share Posted May 16, 2015 (edited) Nice!Especially the pineapple twist. A couple of cuts with a narrow chisel, between and over the eyes, along the snout, make things more reptilian. Never been able to make horns that long, we'll done. With a chisel? Edited May 16, 2015 by Michael wrong picture Quote Link to comment Share on other sites More sharing options...
Frosty Posted May 16, 2015 Share Posted May 16, 2015 The trick to the horns is the same as adding mass to the head without upsetting. Simply shoulder and draw a little of the end of the bar to a square point, then fold the bar back on itself with the shoulder inside for the head. Split the taper and there are your horns. A little finish shaping and it's a done head.Trying to chisel horns out of a bar is a major PITA with plenty of opportunity to increase your scrap pile. I don't even like chiseling out ears.Frosty The Lucky. Quote Link to comment Share on other sites More sharing options...
ripleycopa Posted May 16, 2015 Author Share Posted May 16, 2015 Michael, I like your chisel cuts on the snout and will use them from now on along with Frosty's suggestion of rounding the edges of the snout. The horns and head are done after the pineapple twist; I leave enough room at the end of the bar to slit the bar in half for about two inches and then draw them out with a square taper and then put them back together in line with the bar. The bar is then folded back onto itself with the end of the horn split lined up about even with the beginning of the pineapple twist. The doubled bar Is then faggot welded to form the head. Half faced blows near the end of the welded bar with the horns down then forms the snout. The horns are left in line with the bar until the head is finished and bent over. You have to be careful not to distress the pineapple twist during all this process. Quote Link to comment Share on other sites More sharing options...
Frosty Posted May 17, 2015 Share Posted May 17, 2015 Try this version of the method and see what you think.First isolate the mass for the horns on a radiused edge of your anvil and draw it down and split like you did. Do nothing to the head and while they're still in line with the bar form the horns. If you don't have an anvil bridge now is the perfect time and reason to make one. I made one quick and dirty because I needed one right then I just cut a piece of 2 1/2 sq. heavy wall pipe (because I had it handy) about 3-4" long and welded a piece of 1" sq tubing to the side as a shank. It took me all of 10 minutes because I ground the burs off and put a long bevel on one end so I could get right to the bottom of forks. While it really helps you don't need the shank, you can use the step on the anvil to trap it. This isn't perfect but it works.With the horns split and sticking straight off the end of the bar pretty them up and put a cut in the bar so you can fold the horns and head back faggot fashion. REMEMBER the shoulder you used to isolate the head and horns folds to the inside. Fold it tight BEFORE taking a welding heat, the horn ends will melt they're so much thinner. Brush, flux and weld. Another cool feature of doing it this way is what happens to the cut you made in the bar to fold. the cut opens up a little like an angry animal's mouth. Hmmmm? I SHOULD have let you discover this, happy surprises are fun to watch but I just couldn't resist. Now you have the horns and they're out of your way so it's easy to shape and incise the features into the head, it's all straight on the end of the bar so it's never in an ackward position. Lastly form the horns to the profile you like, brush and finish.This really is a LOT faster and produces a nicer finished head. Once you get this basic technique down it's a small, VERY small leap to turn it into a" ram, mtn. goat, long horn steer, ox, musk ox. Deer, elk and moose are a little harder as the antlers are more complex but it's the same process.Oh, one more thing I do differently. I found a smooth transition from twists to square or forged bar looks much nicer if the twist is done first and I just forge it into a smooth transition. That's something to try later if you like.This entire post is just how I do heads. Your dragon heads look very nice as you do them now.Frosty The Lucky. Quote Link to comment Share on other sites More sharing options...
Recommended Posts
Join the conversation
You can post now and register later. If you have an account, sign in now to post with your account.