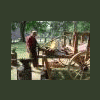
December 23, 201114 yr I have had several guys ask me, lately, for instructions on my pipe candle holder. Although it is in the IFI BPs somewhere, I'm not sure where. So I thought that I'd post it again on the forum. Here goes.(photo 1)I start with 9" of 3/4" black pipe. The die to make the lip on the cup can be made from the end of a tire iron.(photo 2&3)Heat one end of the pipe and place it over the flanging die. Tap the cold end of the pipe and roll the pipe on a slight angle all around until you have the amount of flange or lip that satisfies you. It may take more than one heat. (photo 4)I mark about 1 1/4" on top of my anvil, for easy reference. Mark down from the top 1 1/4" on the pipe.(photo 5)I use a guillotine tool with top and bottom fuller dies. Fuller the ring around the pipe at the 1 1/4" mark. This separates the candle cup from the body. Cool the pipe. Be VERY careful, if putting in quench to cool. Steam WILL shoot out the end of the pipe like the exhaust on a jet engine!! I hold the pipe from the side.(photo 6&7)Measure 6" up from the bottom and mark the pipe all the way around. Now, divide the bottom 6" into four equal width legs. Cut the four lines up to the 6" mark. I use a 4 1/2" angle grinder with a thin cutting disc, to make these cuts. I cut only one cut at a time, to prevent the pipe from pinching the blade. (photo 8)Now spread all four legs open over the tip of the anvil horn.(photo 9&10)File all of the flashing away from the cuts. This is also when I stamp my touchmark on one of the legs, as shown in photo 10. (photo 11)Heat and draw out the end of each leg. Try to keep them all the same length.(photo 12)When you have all of the legs drawn out to the same length, scroll the tip only TO THE INSIDE of the pipe. Don't scroll to the outside or it will be backwards when you scroll/roll the legs.(photo 13)I use a 1 3/4" OD pipe to roll the legs around. It's easier for me to use a small vice grip to clamp it to the pipe and then roll it around. After you have it rolled, look at it to see if you need to straighten it back in line with the body.(photo 14)After I get all four legs rolled, I set it on a steel plate and make sure that it sets straight, without rocking around. I usually have to take a board and use a hammer to "Tweek" the legs so that they are all setting on the plate straight and that the body of the candle holder is standing up straight.(photo 15)You can put what ever kind of finish on that suits you. I use burned on bee's wax. Watch out for the flames.(Voice of experience). But it makes a very nice finish.(photo 16)Finished product!!By the way. This IS NOT my original design. I saw it in the newsletter for the Illinois Valley Blacksmiths Association a few years back.
December 23, 201114 yr Author Not sure why, but photo #3 is at the bottom of the BP instead of where it should be. I tried to move it back up. But no success. :(
December 24, 201114 yr George had sent me this BP many moons ago. I have made many of these and they sell well. Great BP, easy to follow and very well explained. Great job George! Mark <><
March 6, 201214 yr Great step-by-step and photos George. I saw your BP a while back and thought I'd give it a try. Here's my variation of the candle holder.
March 6, 201214 yr Author You did a nice job on that one. I'm glad that some folks are able to use the info. :)
Join the conversation
You can post now and register later. If you have an account, sign in now to post with your account.