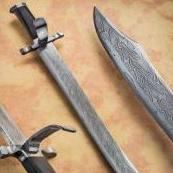
kevin (the professor) Posted July 4, 2009 Share Posted July 4, 2009 Hello Everyone, I have been working on this one for a couple of weeks. It is my first attempt at a pattern-welded seax. It is also the first time I have ever tried to weld together two long bars. The results were pretty good. I have a lot of room for improvement, but this was a big challenge given my level of ability. So, I have learned that: 1) I need to have the bars meet better before I try to weld them. 2). I should learn to estimate how much stock I need to account for loss of material (I couldn't grind all of the weld flaws out because I had less material at the end than I planned. 3). I may try a larger hammer to see if that helps. 4). I need to learn more about etching and presenting to bring out best of this type of material. Still, I am really pleased overall, it is cool. My ancestors would be proud (Northern European Germanic by way of Northern England / Southern Scottland). Blade is 10.5" x 1.5" x .125" 1095 and 15n20 spine (about 25 layers) 1095 edge edge-quenced in heated canola (I may not do this with simillar blades in future, it sort of obscures pattern - too much at once). tempered 400F, two one-hour trials Brass bolster and cap no idea what wood, just looked better than most of what I have. long, flat oval cross-section to handle Through tang, peened, large and sturdy. As usual, I appreciate comments, encouragement, advice, etc. I really pushed my skill set with this one, and many of you may see obvious areas for improvement in my future work. Thanks for looking. Kevin Quote Link to comment Share on other sites More sharing options...
Finnr Posted July 4, 2009 Share Posted July 4, 2009 We vikings are repellent, repugnant , reprehensible, rowdy, and generally repulsive. Now that I have covered or good points I have to say that you have done a beautiful job again! Nice form and flow! pretty handle material and a very well done blade. Finnr Quote Link to comment Share on other sites More sharing options...
divermike Posted July 4, 2009 Share Posted July 4, 2009 Somehow, even though I'm part swede, that knife is not repelling, so you failed.... I want it! Quote Link to comment Share on other sites More sharing options...
kevin (the professor) Posted July 4, 2009 Author Share Posted July 4, 2009 Finn and Mike, Thanks for the compliments. I like this class of blade a lot. If I am correct, it would actually be historically accurate for the inhabitants of Northern England and Scandanavia as well as much of North-Western Europe. The shape may change ever so slightly, but the same basic approach (the continental versions were more likely to be spear pointed, according to a couple of sources I have read). these are fun, now I just need to learn how to twist a billet once it is welded. Oh yeah, and I need to practice welding more, with bars that meet better when I begin. One thing I forgot to mention, when I started the weld of billet to edge, I had the edge still attached to a long bar to use as a handle. I put the layered billet on top. As I worked my way down the seam, welding them together, they would bend due to the impacts. The bending of the lower bar (handle/edge piece) would rip the weld seam back open. This is one of reasons for weld flaw that happened. In the future, handles go in middle of stack, not on the bottom! Now, if I can only learn to twist these things... Kevin Quote Link to comment Share on other sites More sharing options...
Jose Gomez Posted July 4, 2009 Share Posted July 4, 2009 If you want to twist you need to get your layer count where you want it (between 100 to 400 layers usually), forge the bar to a uniform cross section (IE 1inch by 1 inch, or whatever size you can comfortably work), chamfer the corners of the bar, heat uniformly, clamp one end in a vice and twist. Stop twisting when the bar drops below bright red or you risk tearing welds apart (always work pattern welded steel at or near welding heat). repeat the heat/twist cycle untill you have your twist as tight as you want it. After that you can go in a hundred diferent directions. Most people usually pound it flat, grind it, and go with it, but I enjoy leaving the bar round (as twisted and cutting the center out of the twisted bar which reveals the cross pattern in the center of the bar. Here is a pic of a cross pattern cross, and a flattened twist kife made from key stock and nickel. Keep up the good work, stay after it, and remember that when things go wrong its not a failure, but the lesson of the day! Quote Link to comment Share on other sites More sharing options...
kevin (the professor) Posted July 5, 2009 Author Share Posted July 5, 2009 Jose, those are really attractive. I am not big on religious icons, but the cross looks really well done. The wire is a good touch, too. I am going to keep your words here, and give twisting a try soon. I will post here if I get something worth looking at. thanks, Kevin Quote Link to comment Share on other sites More sharing options...
Recommended Posts
Join the conversation
You can post now and register later. If you have an account, sign in now to post with your account.