

K. Bryan Morgan
-
Posts
1,017 -
Joined
-
Last visited
Content Type
Profiles
Forums
Articles
Gallery
Downloads
Events
Posts posted by K. Bryan Morgan
-
-
http://www.abana.org/resources/chf.shtml
26 lessons in downloadable PDF format from The Artist-Blacksmith's Association of North America (ABANA)
Do each lesson until proficient. You will then have most of the skills of a Journeyman Blacksmith. This is part of the National Curriculum from the ABANA.
-
downloaded and saved. Thanks for your contributions to the smithing community. You're an invaluable resource.
-
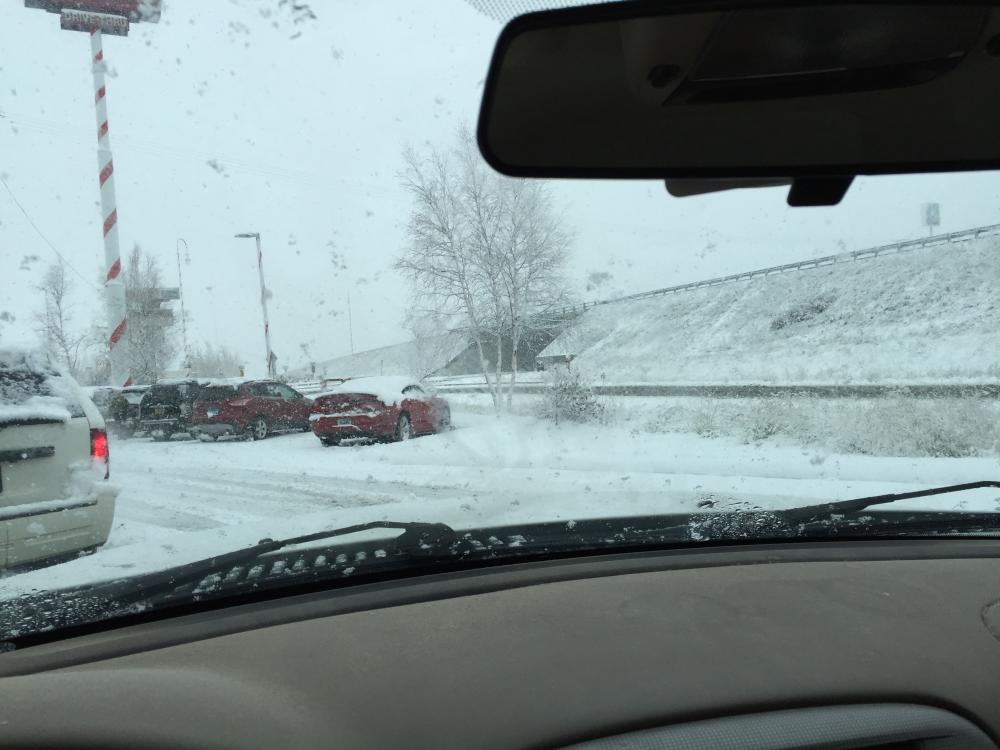
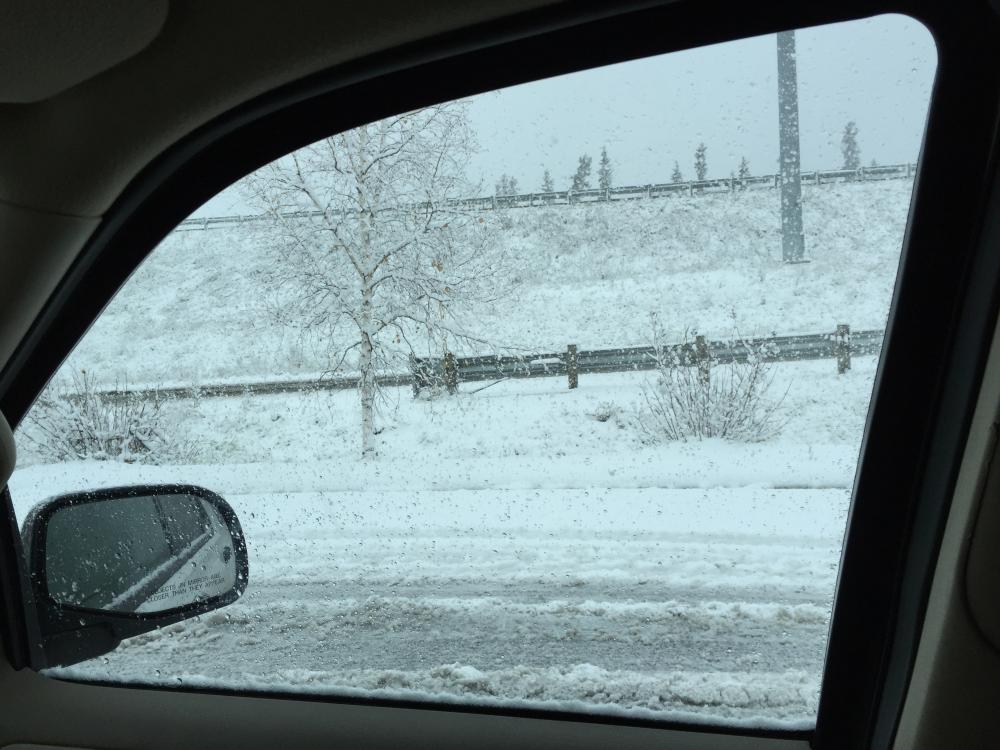
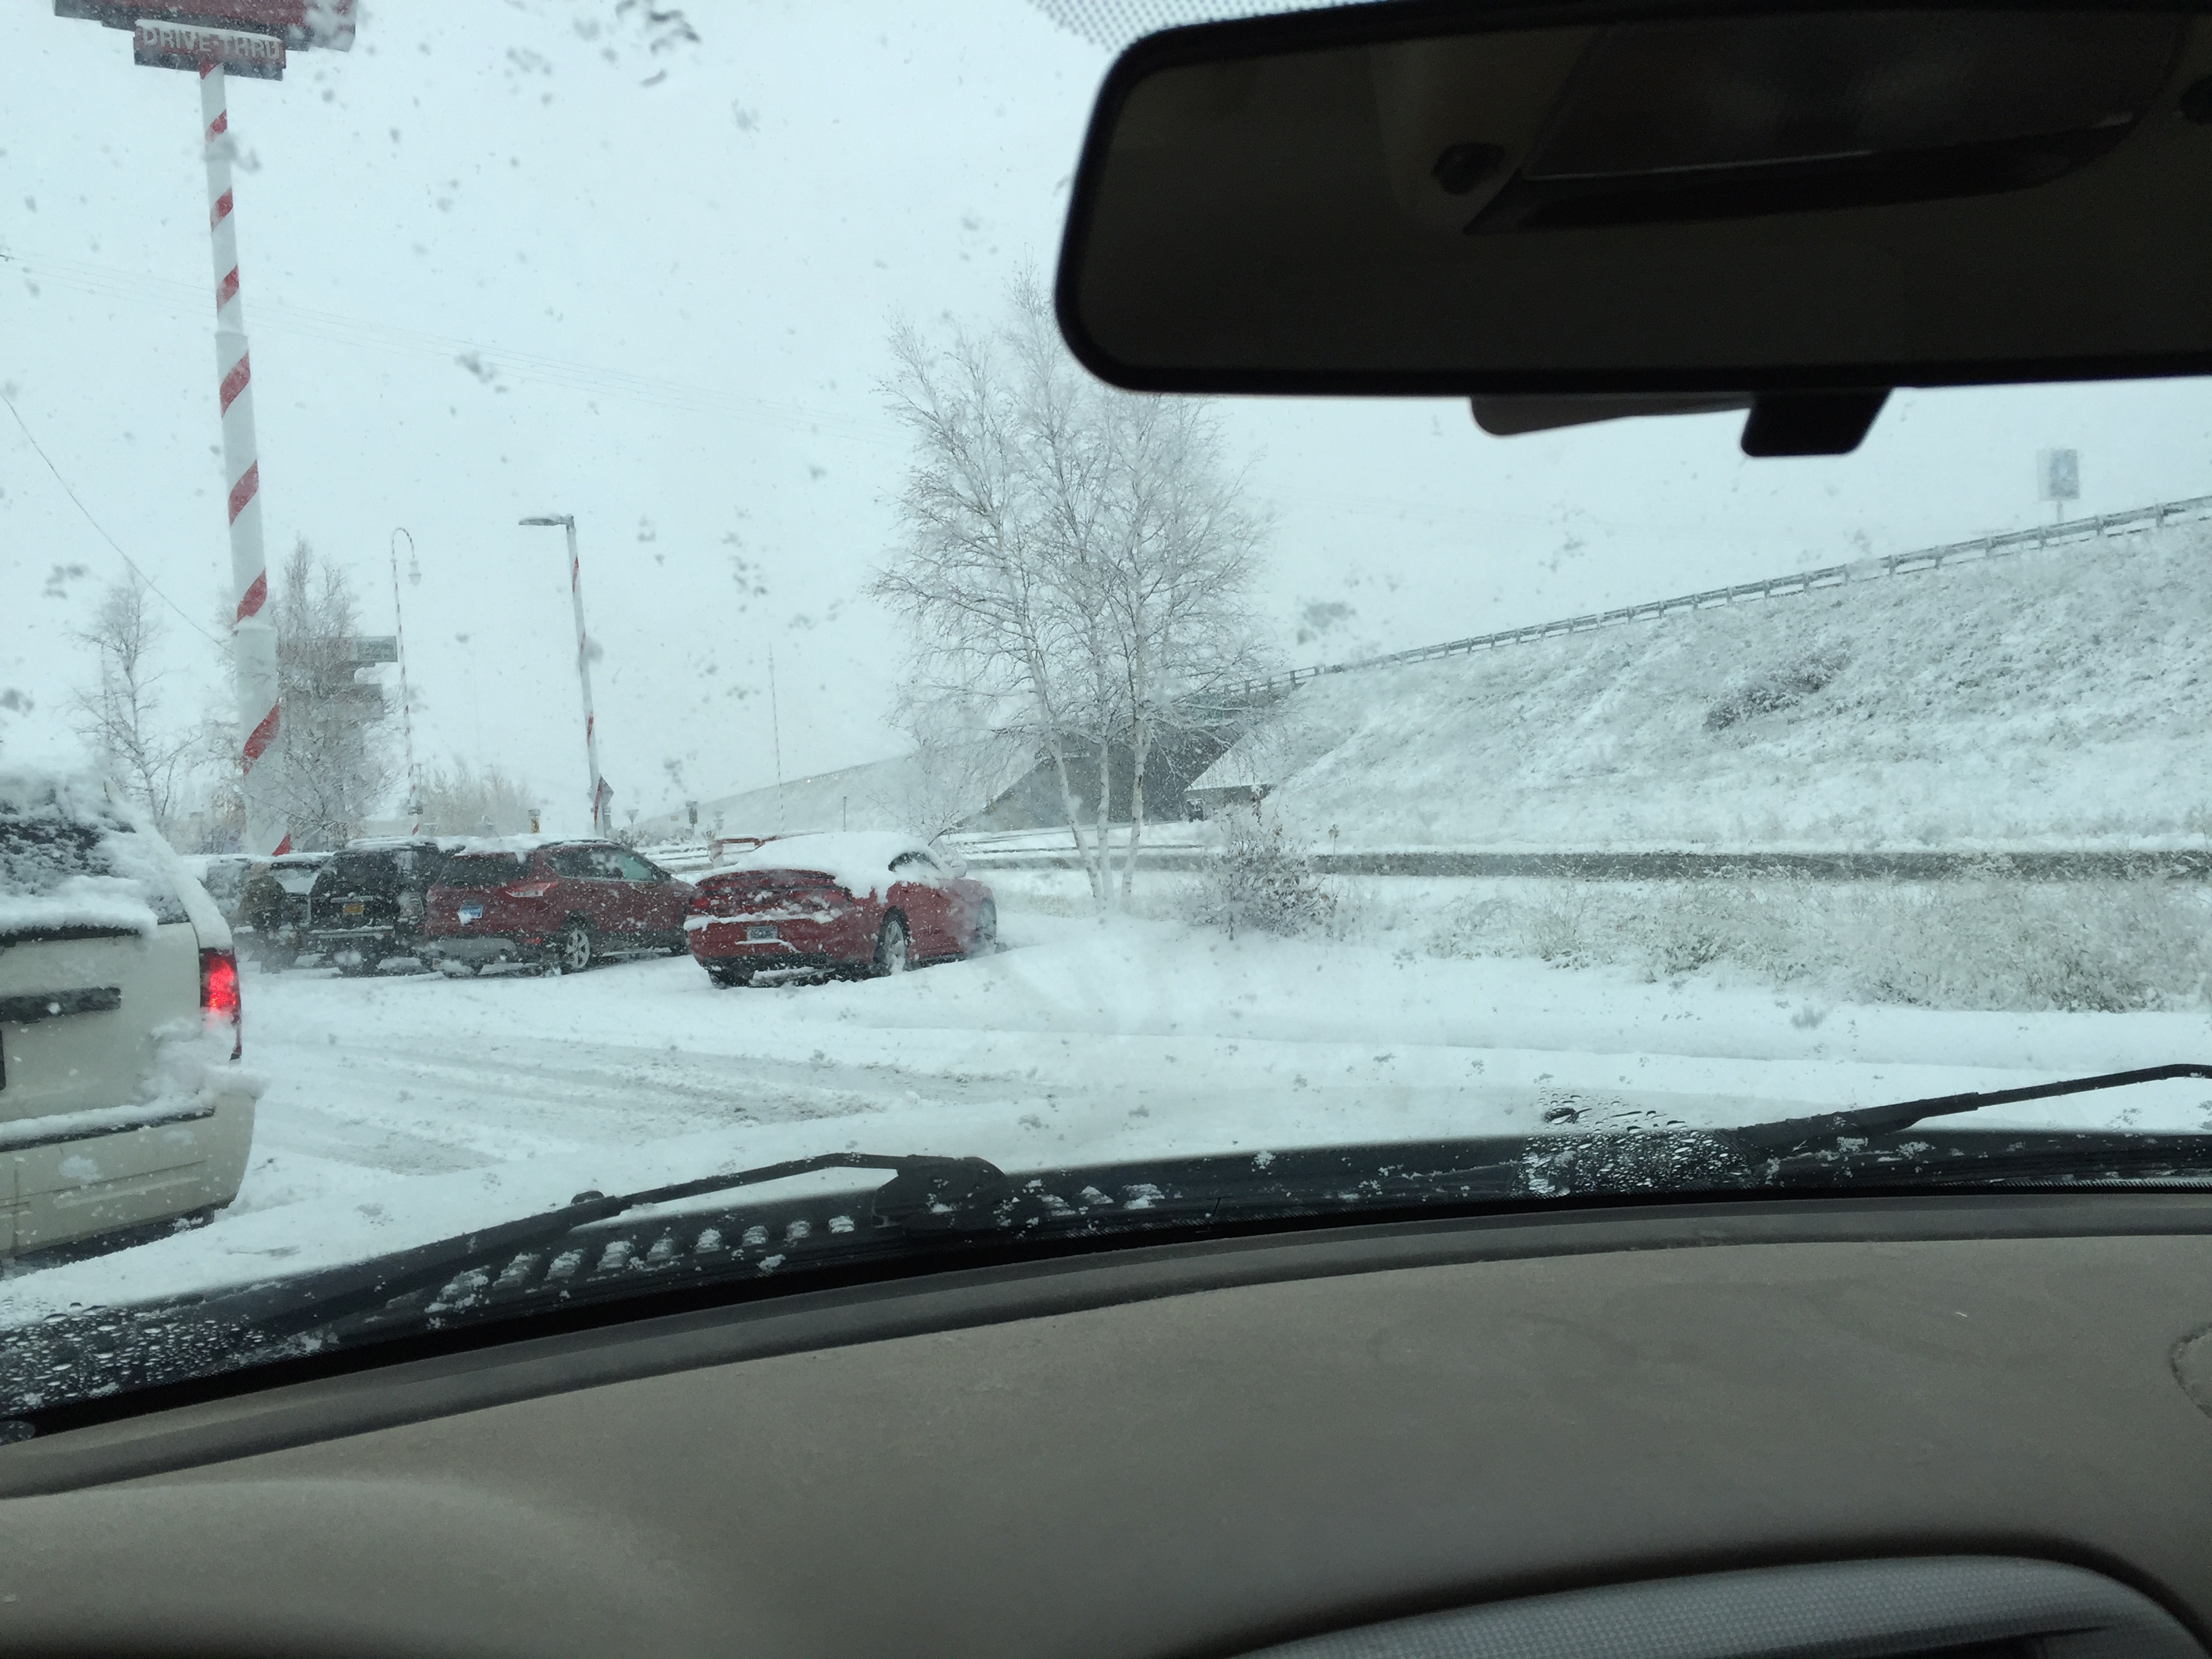
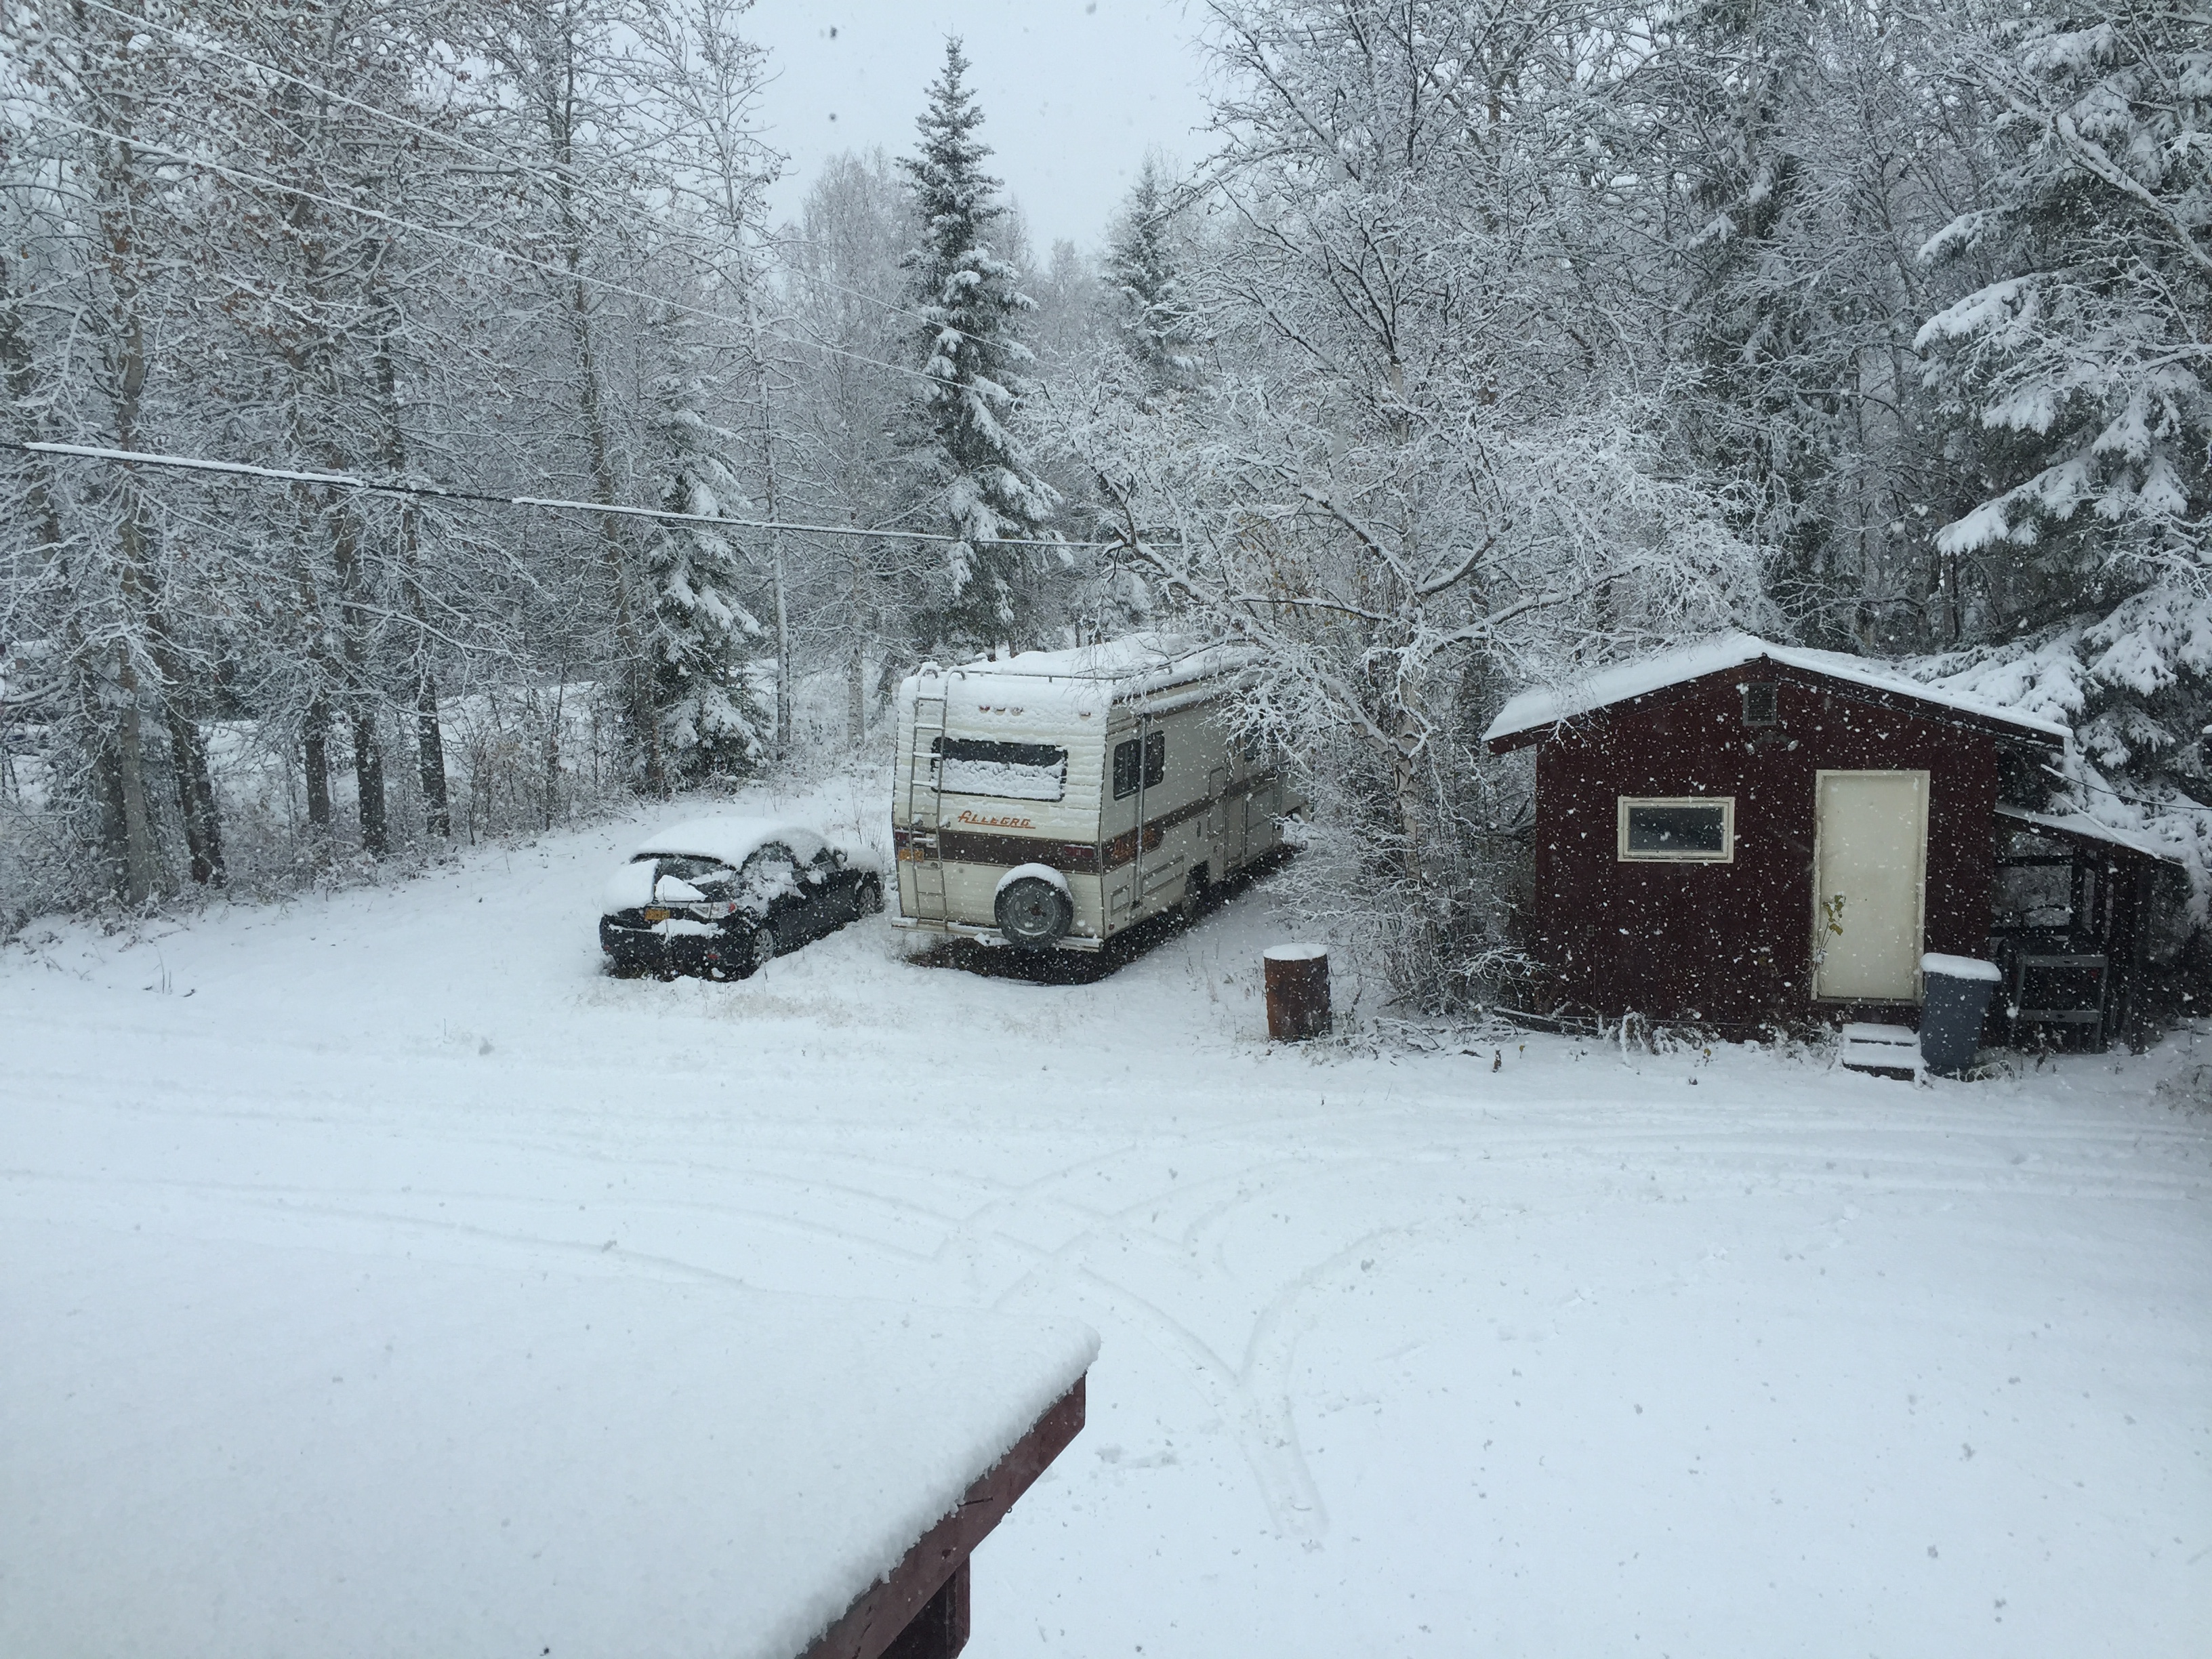
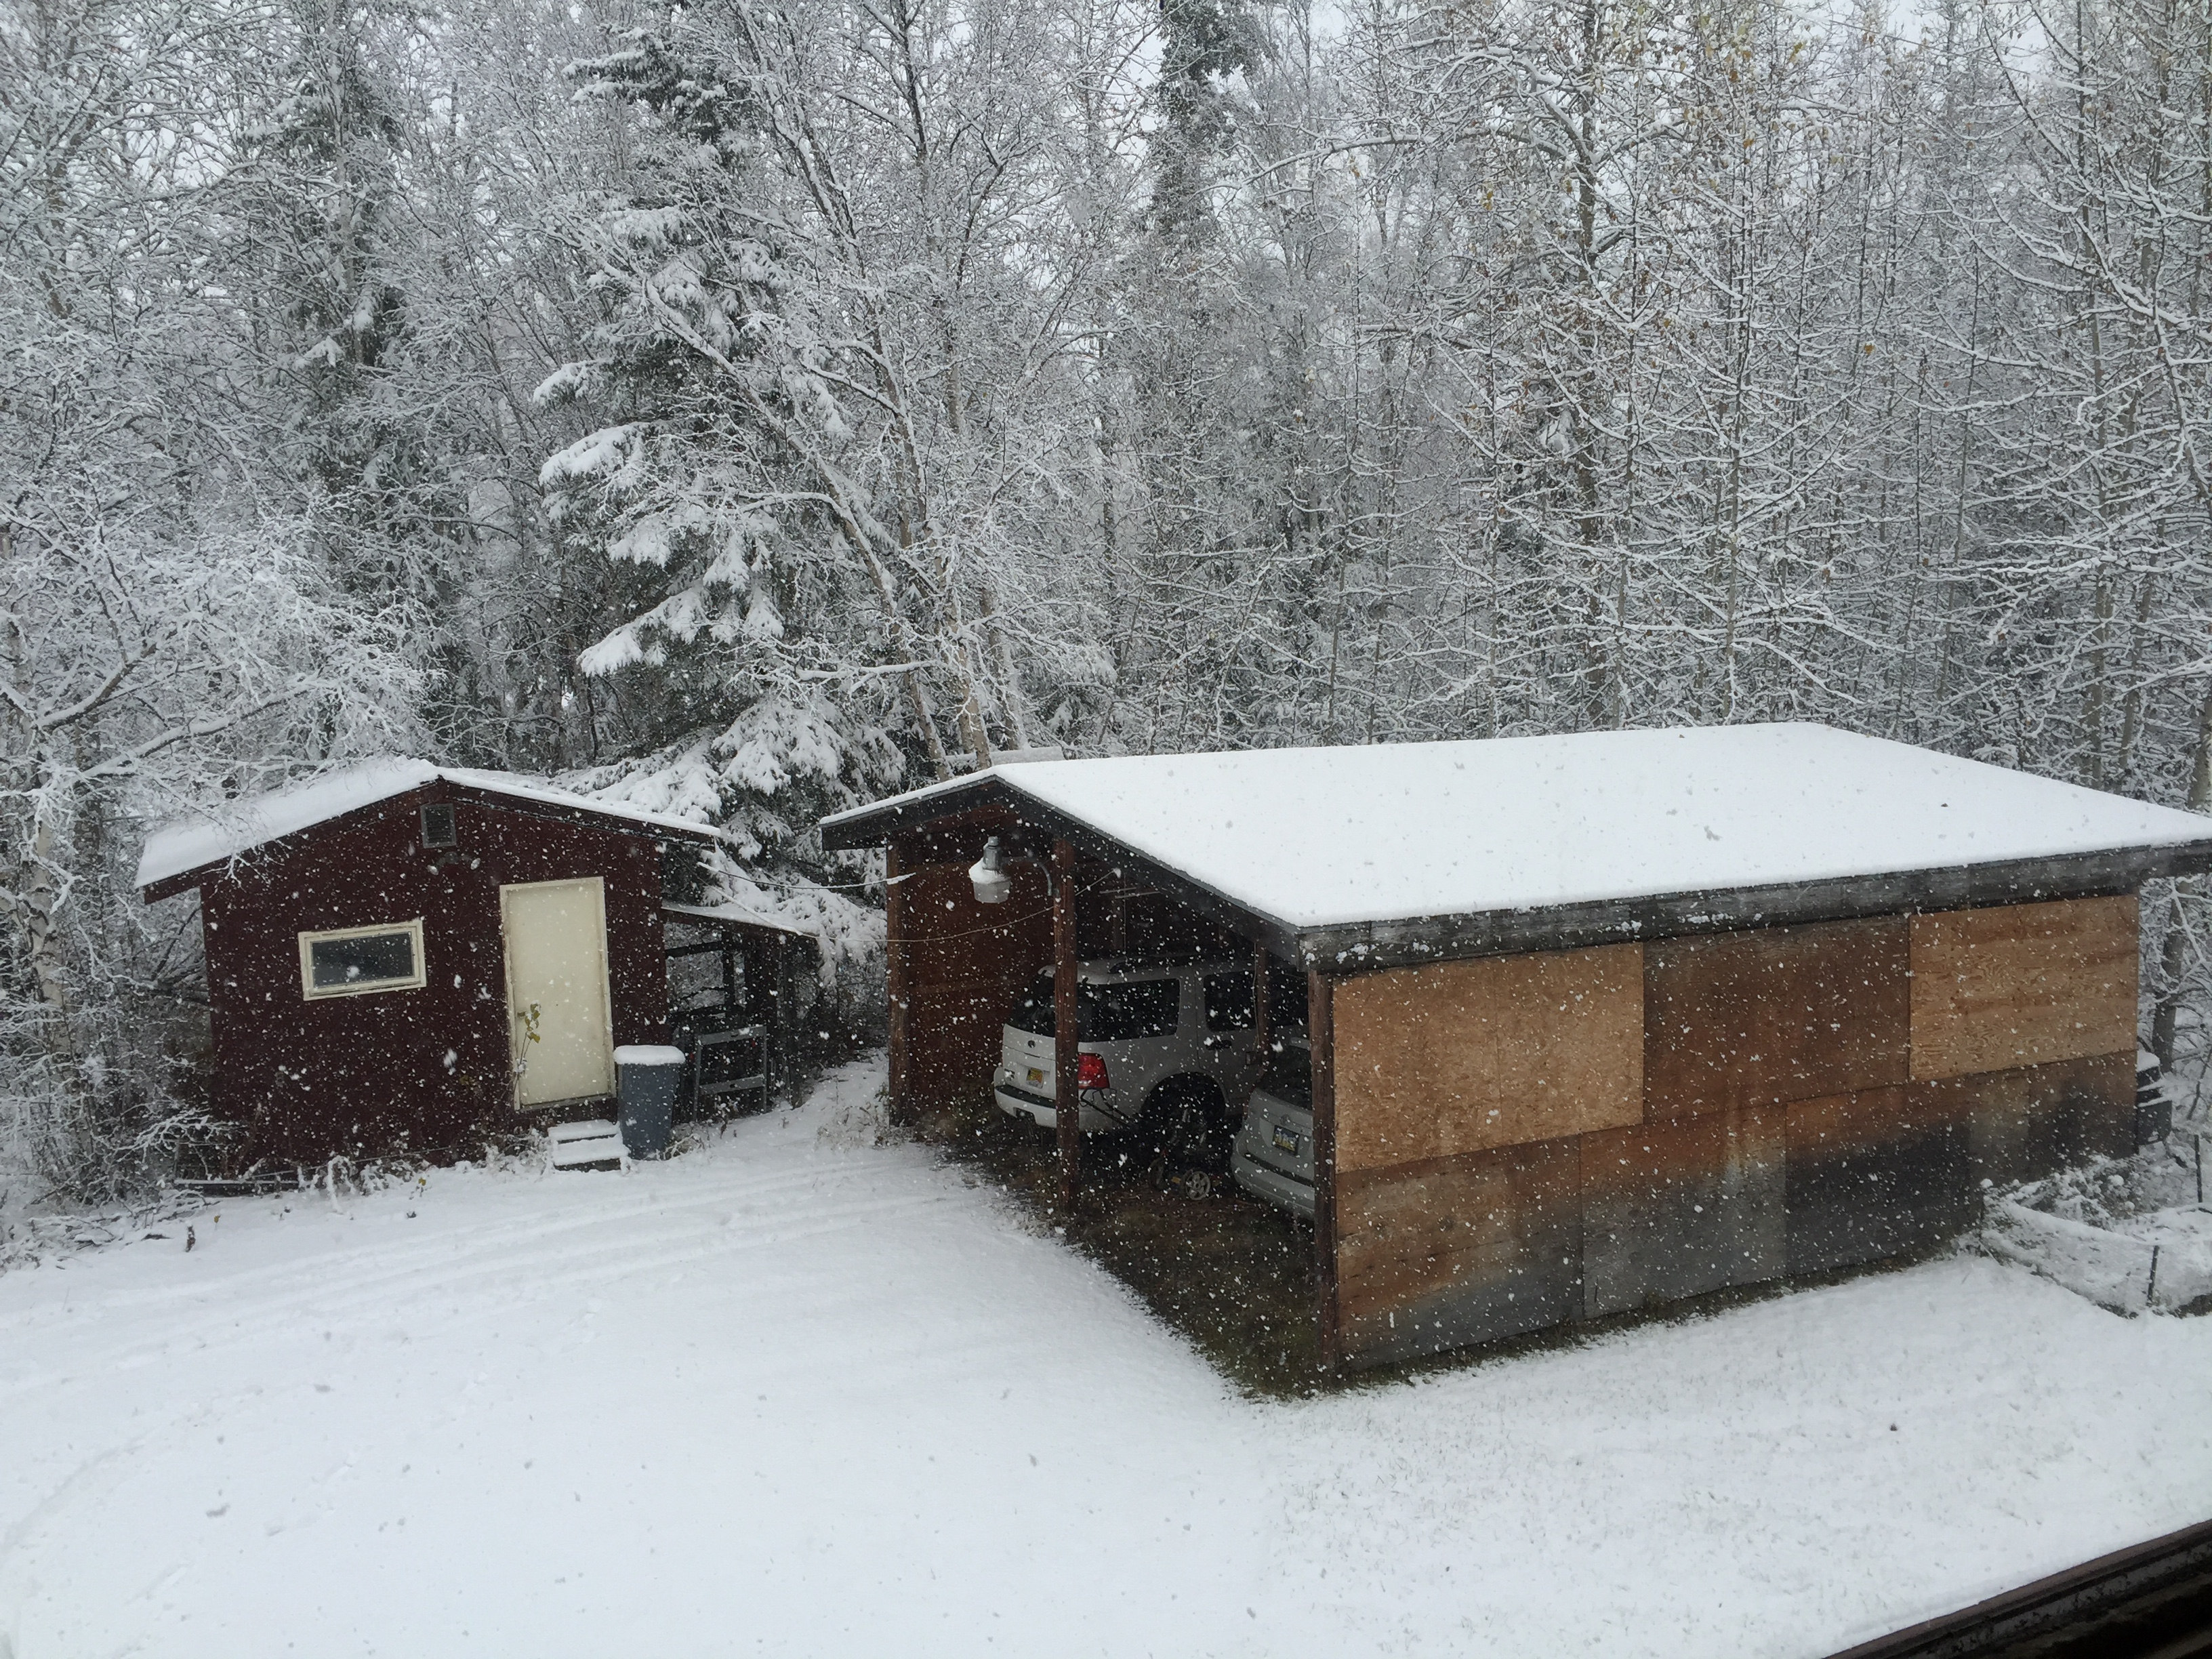
Well the snow's all melted off now and tomorrow we have another winter advisory for about a dozen or so inches of snow. Supposed to snow for 2 or more days. We'll see. This is an early winter for us. Usually it comes about mid to late October.
I've seen a bunch of wrecks and a couple of them were severe. People from Eielson AFB. One guy went clean across 2 lanes of traffic, the median, another 2 lanes of traffic and ended upside down in a ditch. And it wasn't even that bad really. The roads weren't even icy. Just slush. I do love the onset of winter here. Come May I will be well tired of it though. But that's just part of the deal with living here.
I'll make sure that Santa gives everyone coal for Christmas. After all we're all blacksmiths and that means we've been naughty.
-
I absolutely love it here. But the adult cocoa and watching the snow with the wife will have to wait till later tonight. I have to go drive in it for a while. Which, while I don't like that so much, I do because I must. But the rest I love.
-
Winter is here.


-
For me it was an easy choice. My mom's inheritance gave me the opportunity to buy the things I needed to set up a small shop. I'm strictly amateur. I do it for fun. Once in a while I sell a cowboy cook set or a camping tripod. Things like that. For a little bit I was going hard at those. I couldn't keep up. Anyway. Naomi's Forge. I got a free program and made my logo. Its my avatar. I did the whole thing from scratch using a tutorial I found online as the basis. Oh and the program I used is GIMP. If I were to do it over I would just have my wife do it for me on Photoshop. She's very good with that. But at that time it was important to me to do it myself.
-
Rebar makes great camping tripods and cowboy cook sets.
-
Hanging out with Frosty is some of the most fun I've had. He has a great shop and I wish I could go down and hang out with him and Deb more often. You won't go wrong and the few times I was able to go I learned so much. Thank you Jerry for your hospitality and friendship. You're a great guy and I am proud to count you among my friends.
-
Just so you keep it straight if the time comes. I wonder how it'd work removing a nose ring?
Frosty The Lucky.
That sounds absolutely painful.
-
Thanks for the suggestion, but I have $0 to my name and no job, so buying anything is out of the question. What I do have is nothing but free time, a yard full of scrap and a few hundred pound of coal. Not to mention, I'm too cheap to buy anything even if I did have money.
Can't make things too easy for myself.
Thanks for the link!
I completely understand being broke. But go to them anyway. Ask to look through their trash and recycle bin. Make them some bottle openers, drive hooks, and give them to the people in the office. Then say, mind if I look through your drops. I bet you will get pieces for free or next to fee. Also scrap rebar is alright to fiddle with. I use it often for things like tong racks or big staples in my stump to hang my handy tongs from. I do buy grade 60 rebar from time to time and if I get lucky and get some decent pieces they will even harden for me. I think the last piece of 20' grade sixty cost me $12. That's a lot for a little and you can make a whole bunch of hooks with a 20' piece of 5/8" rebar.
P.S. Just common rebar will work fine it doesn't have to be grade 60
-
I'm going to suggest some blacksmithing heresy. Get rid of the junk steel that you have no idea what it is, go to your local steel supplier and buy 1018 mild steel. When I was first getting started one of the best bits of advice I ever got was. "Use known steels." You will be able to predict what it will do with only a little bit of experience with it. Also from the ABANA website down load the following 26 forging lessons.
https://www.abana.org/resources/chf.shtml
The lessons are at the bottom of the page in PDF format.
Have fun.

-
Uh HUH, you look I want a taste. A hamburger crust pizza has a certain a peel.
Frosty The Lucky.
Bahahahahahaha.......
-
I don't think I've ever had two bottle openers that look even close to the same. You have cool toys. Well done!
-
I am a firm believer in using known materials. Scrap and rebar is good for some limited items. I use for the most part, 1018 and A36 for general use forged items. I know how it will act. I understand its properties and I don't have to guess, test or worry. For some things I use acquired springs. And while I may not know its exact composition. I can give a good guess based on past experience. Some of the best advice I've gotten over the years is, "Use known steels." My two Kopecs worth of advice.
-
I used to drill glass with a drill bit actually designed to drill glass. Used to get them at the hobby stores when I lived in an area that actually had them The looked suspiciously like a concrete or stone bit. Maybe because that's exactly what they were. Carbide. Easy pressure, take your time.
-
Well we are a very informal group of mostly knife makers. I'm the lone blacksmith I think. I know Mark had blade and knife classes from time to time through a local teaching group. The last one I was aware of they made tomahawks. But those are all pay for events. I wish there was a local blacksmithing group. But people here have a real aversion to organization for some reason. I know there was some sort of educational grant to offset costs for this event. It was very expensive to do. I know we have a couple of Second Lieutenants in our group, 5-6 very good knife makers and me. The core of the group stays pretty much the same people with some other coming and going from time to time. Right now I'm working on making dividers... because I want to. I really want to make blades at some point though.
-
These were iron sands from a gold mine. So I don't know if it was magnetite or not. I know it was magnetically sorted. Other than that I don't know.
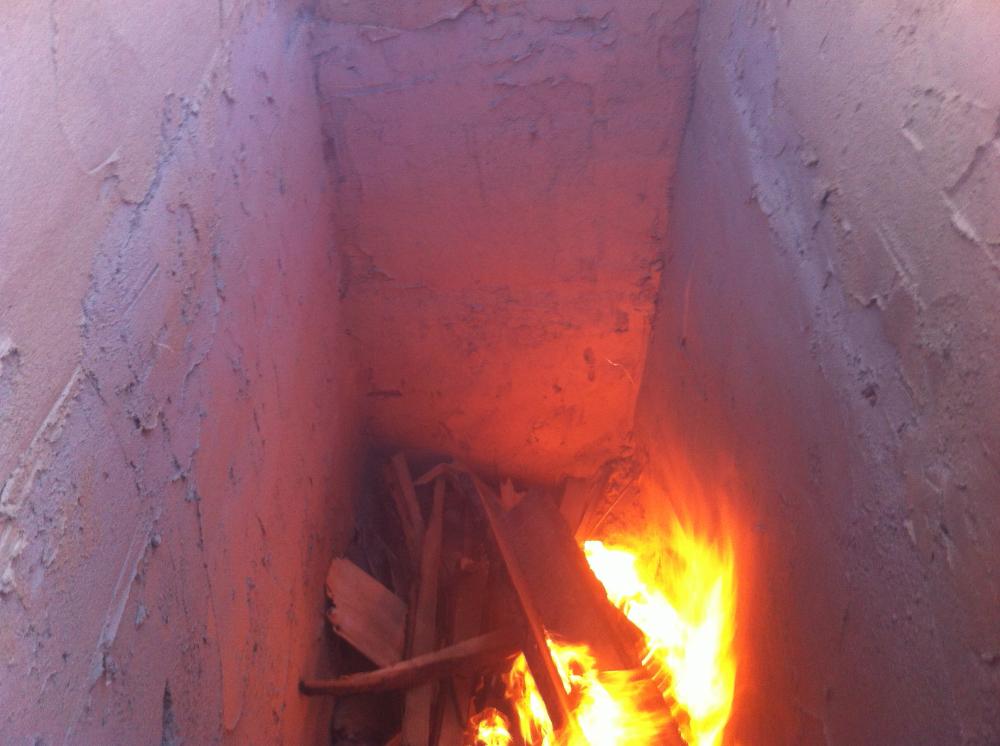
The one pipe that blocked up was really blocked up they had a piece of 1/2 mild they were using for blockages and usually it would clear with no problem. This one blocked up tight. And yes we unscrewed the plugs to check the air flow to do that.
-
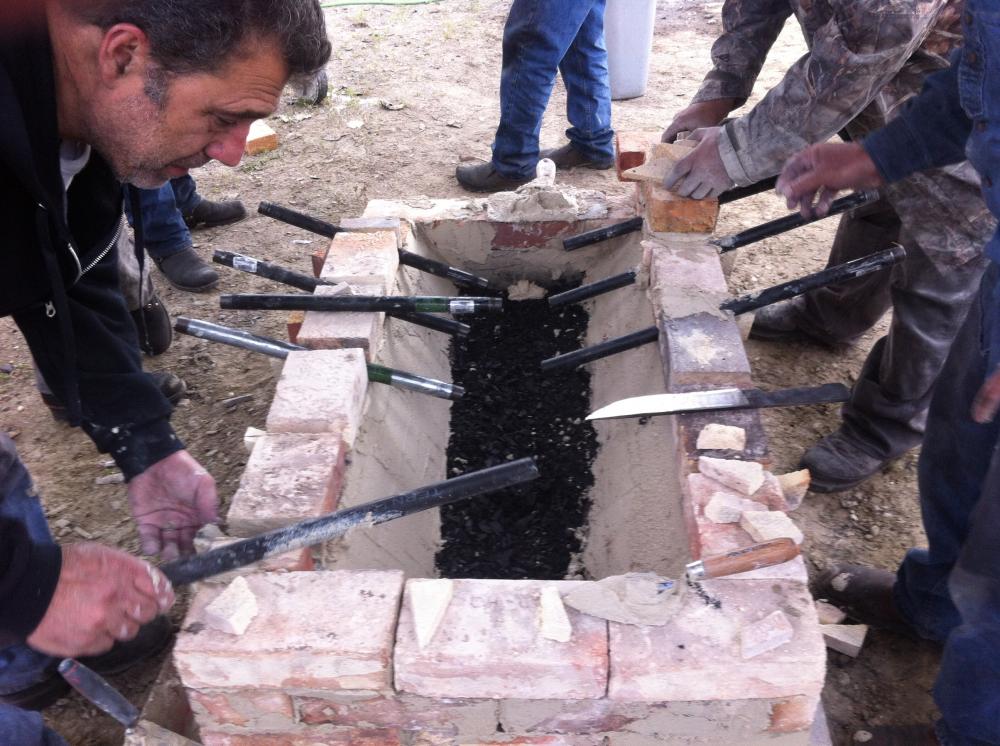
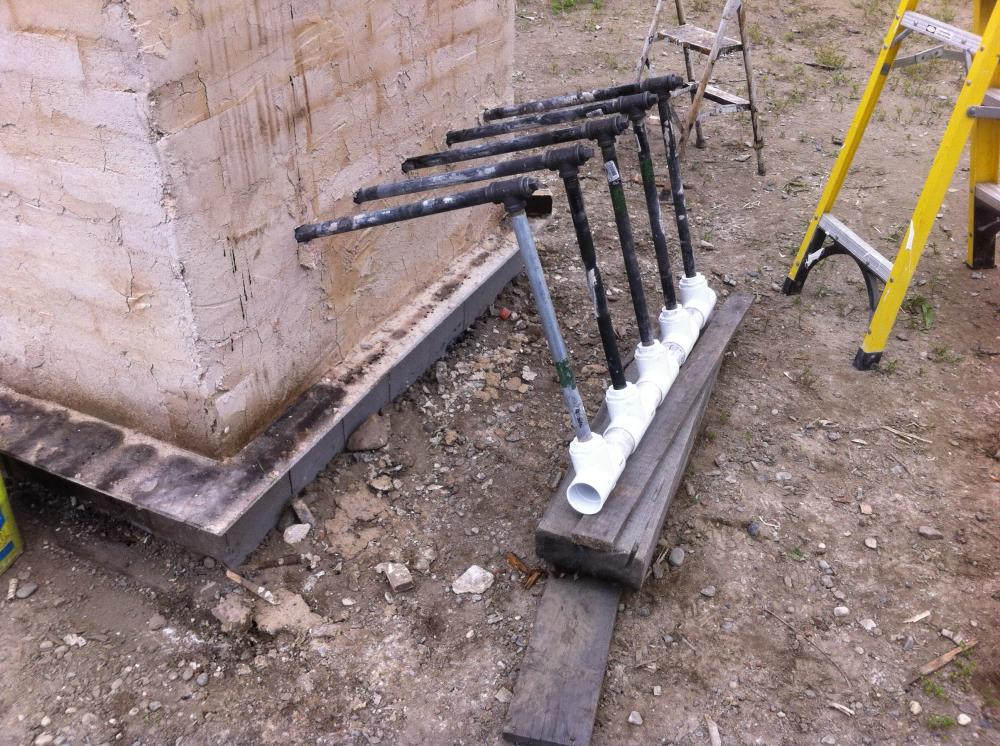
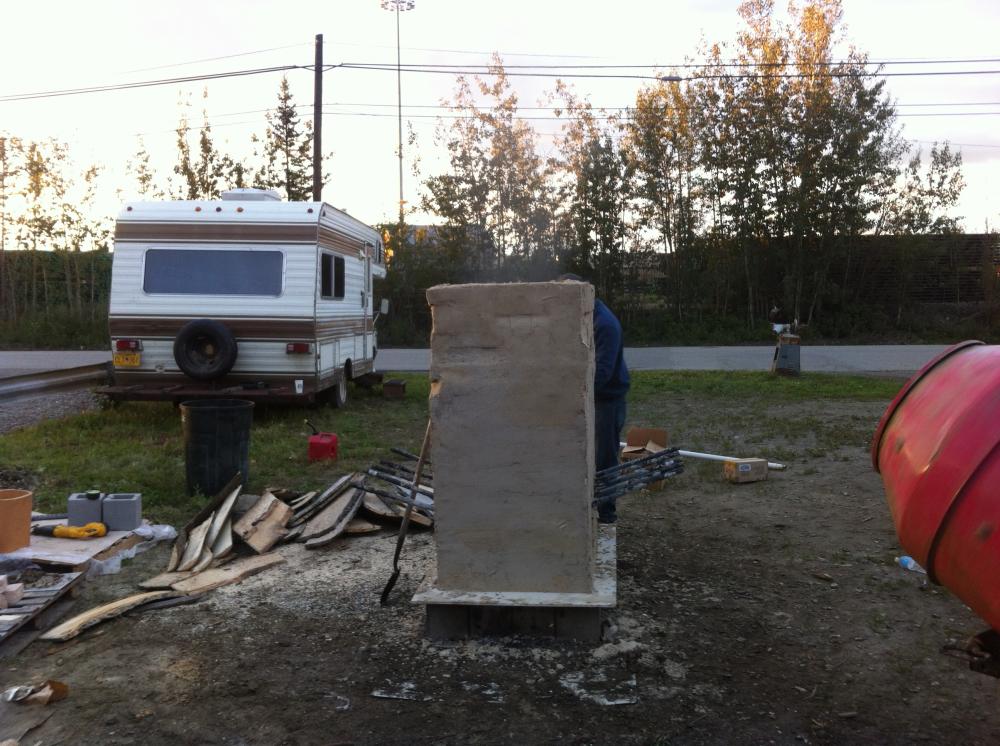
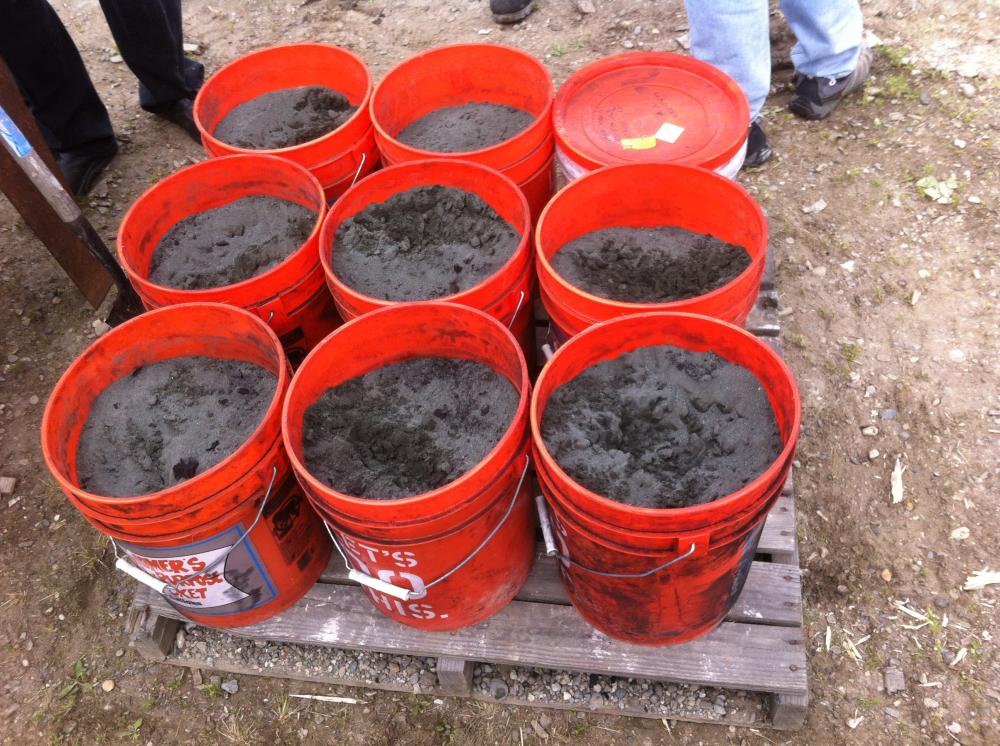
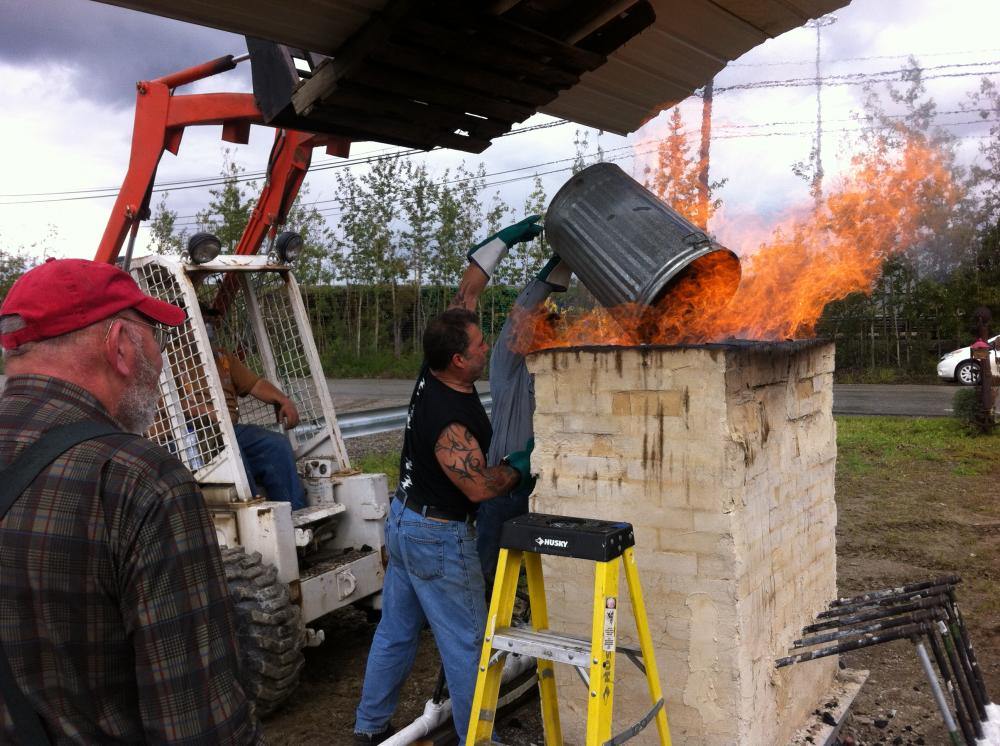
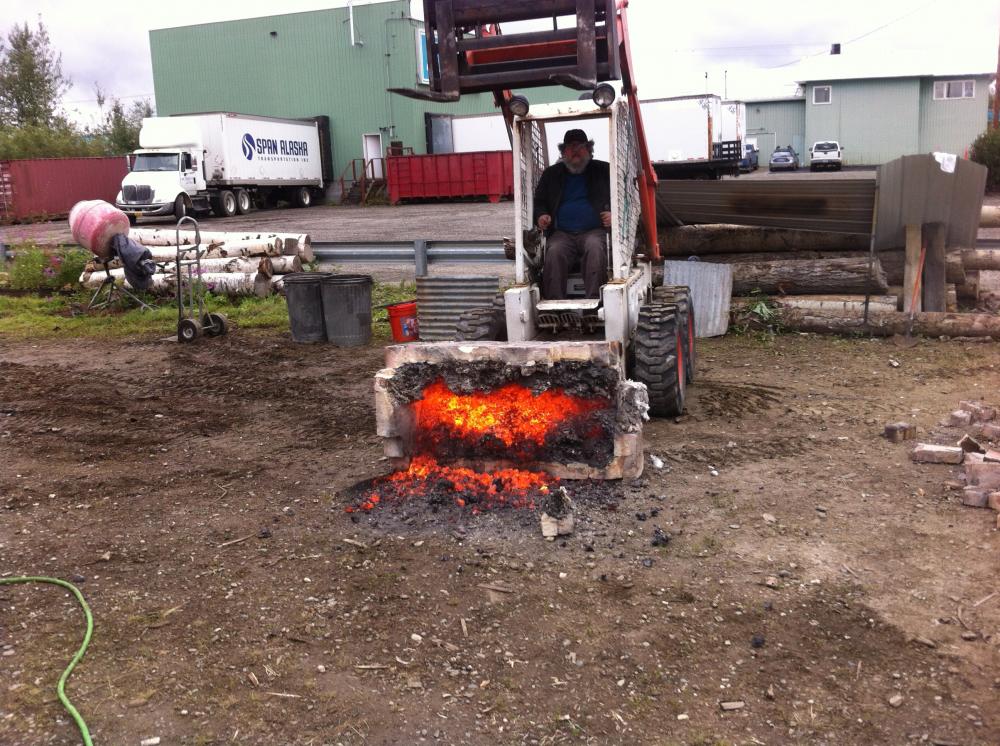
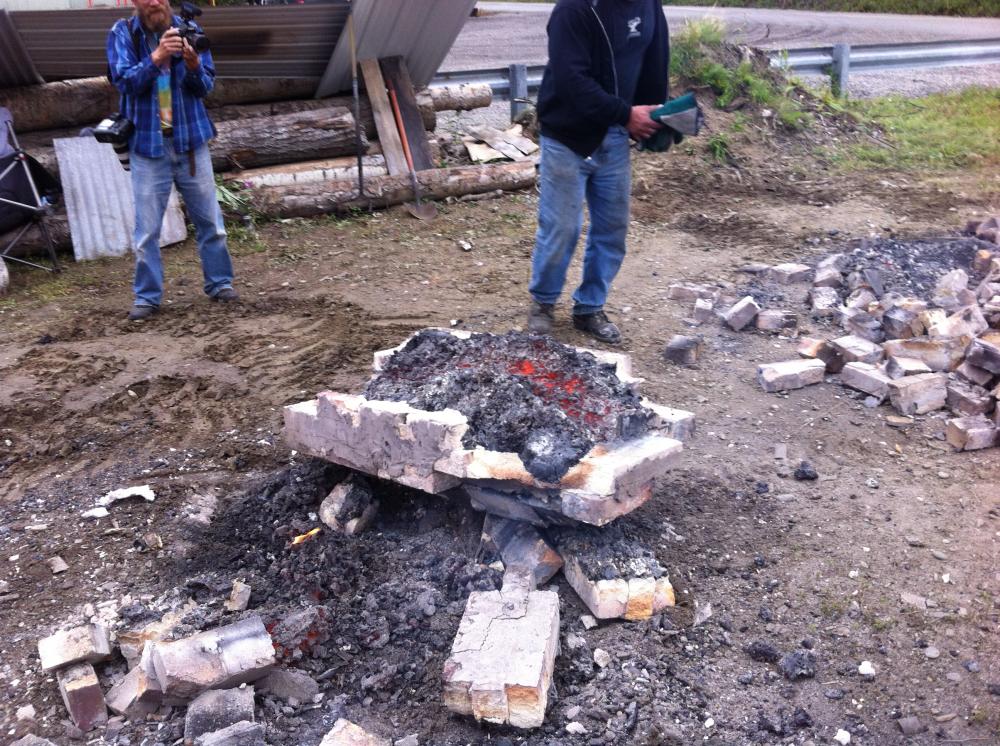
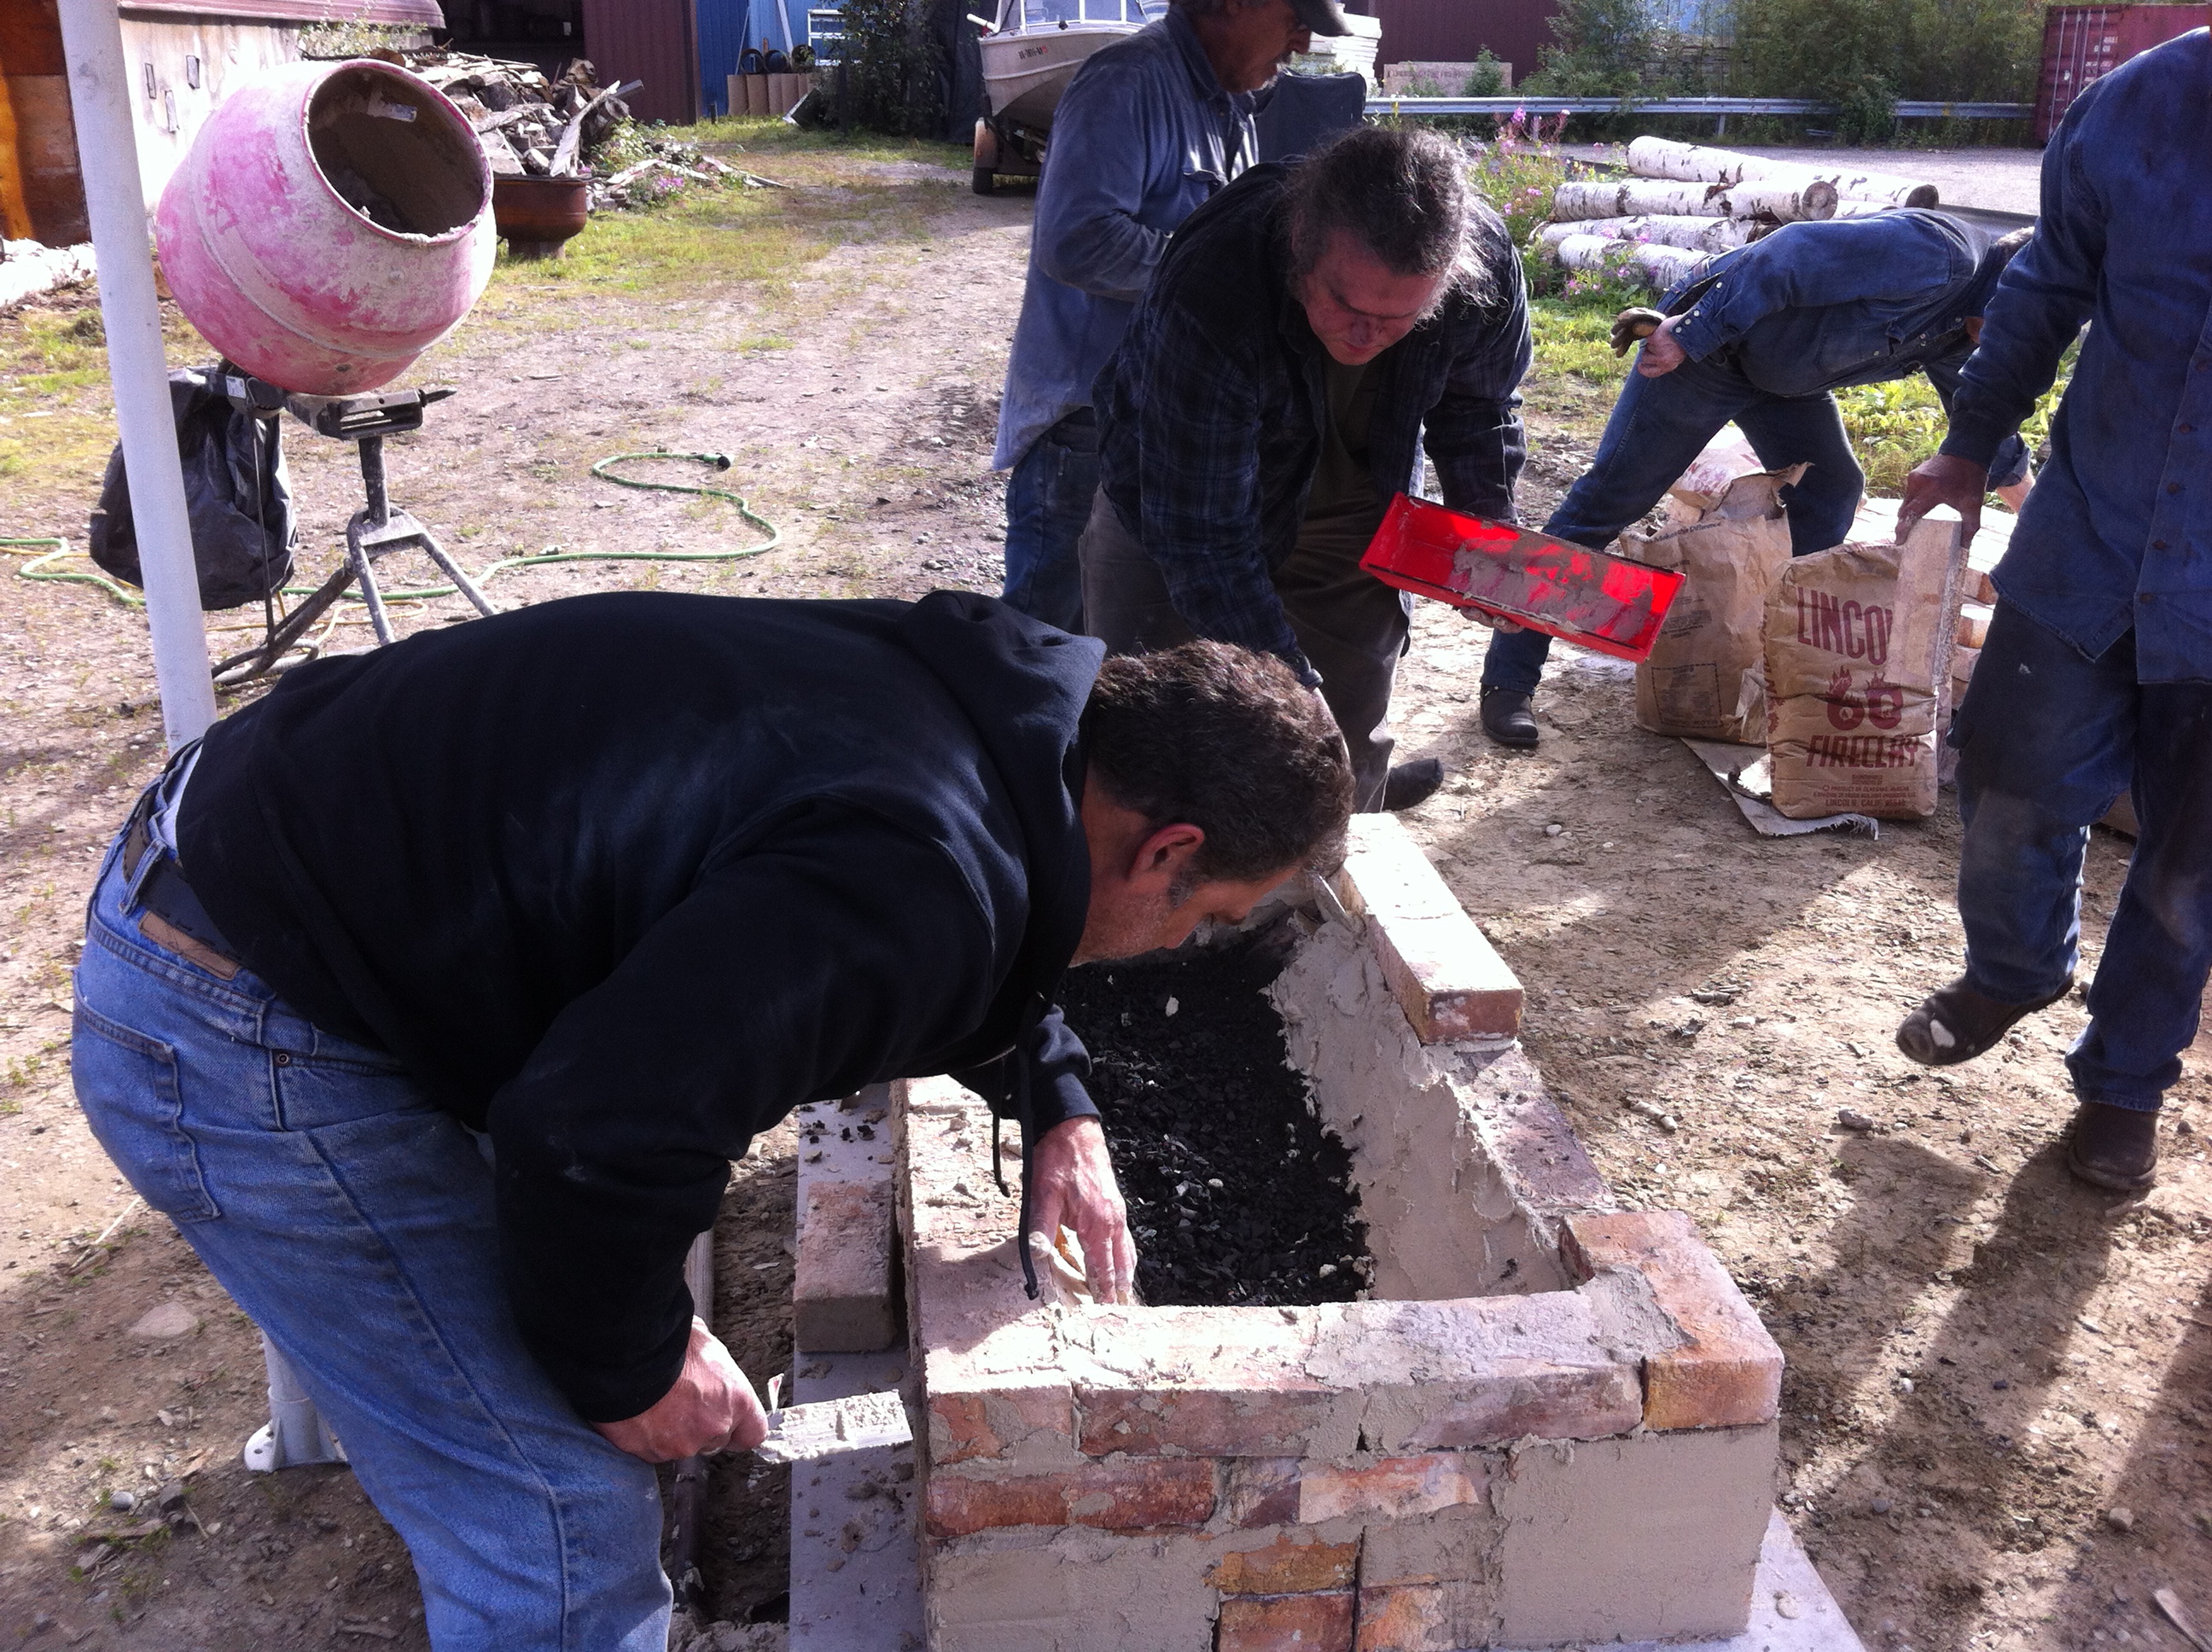
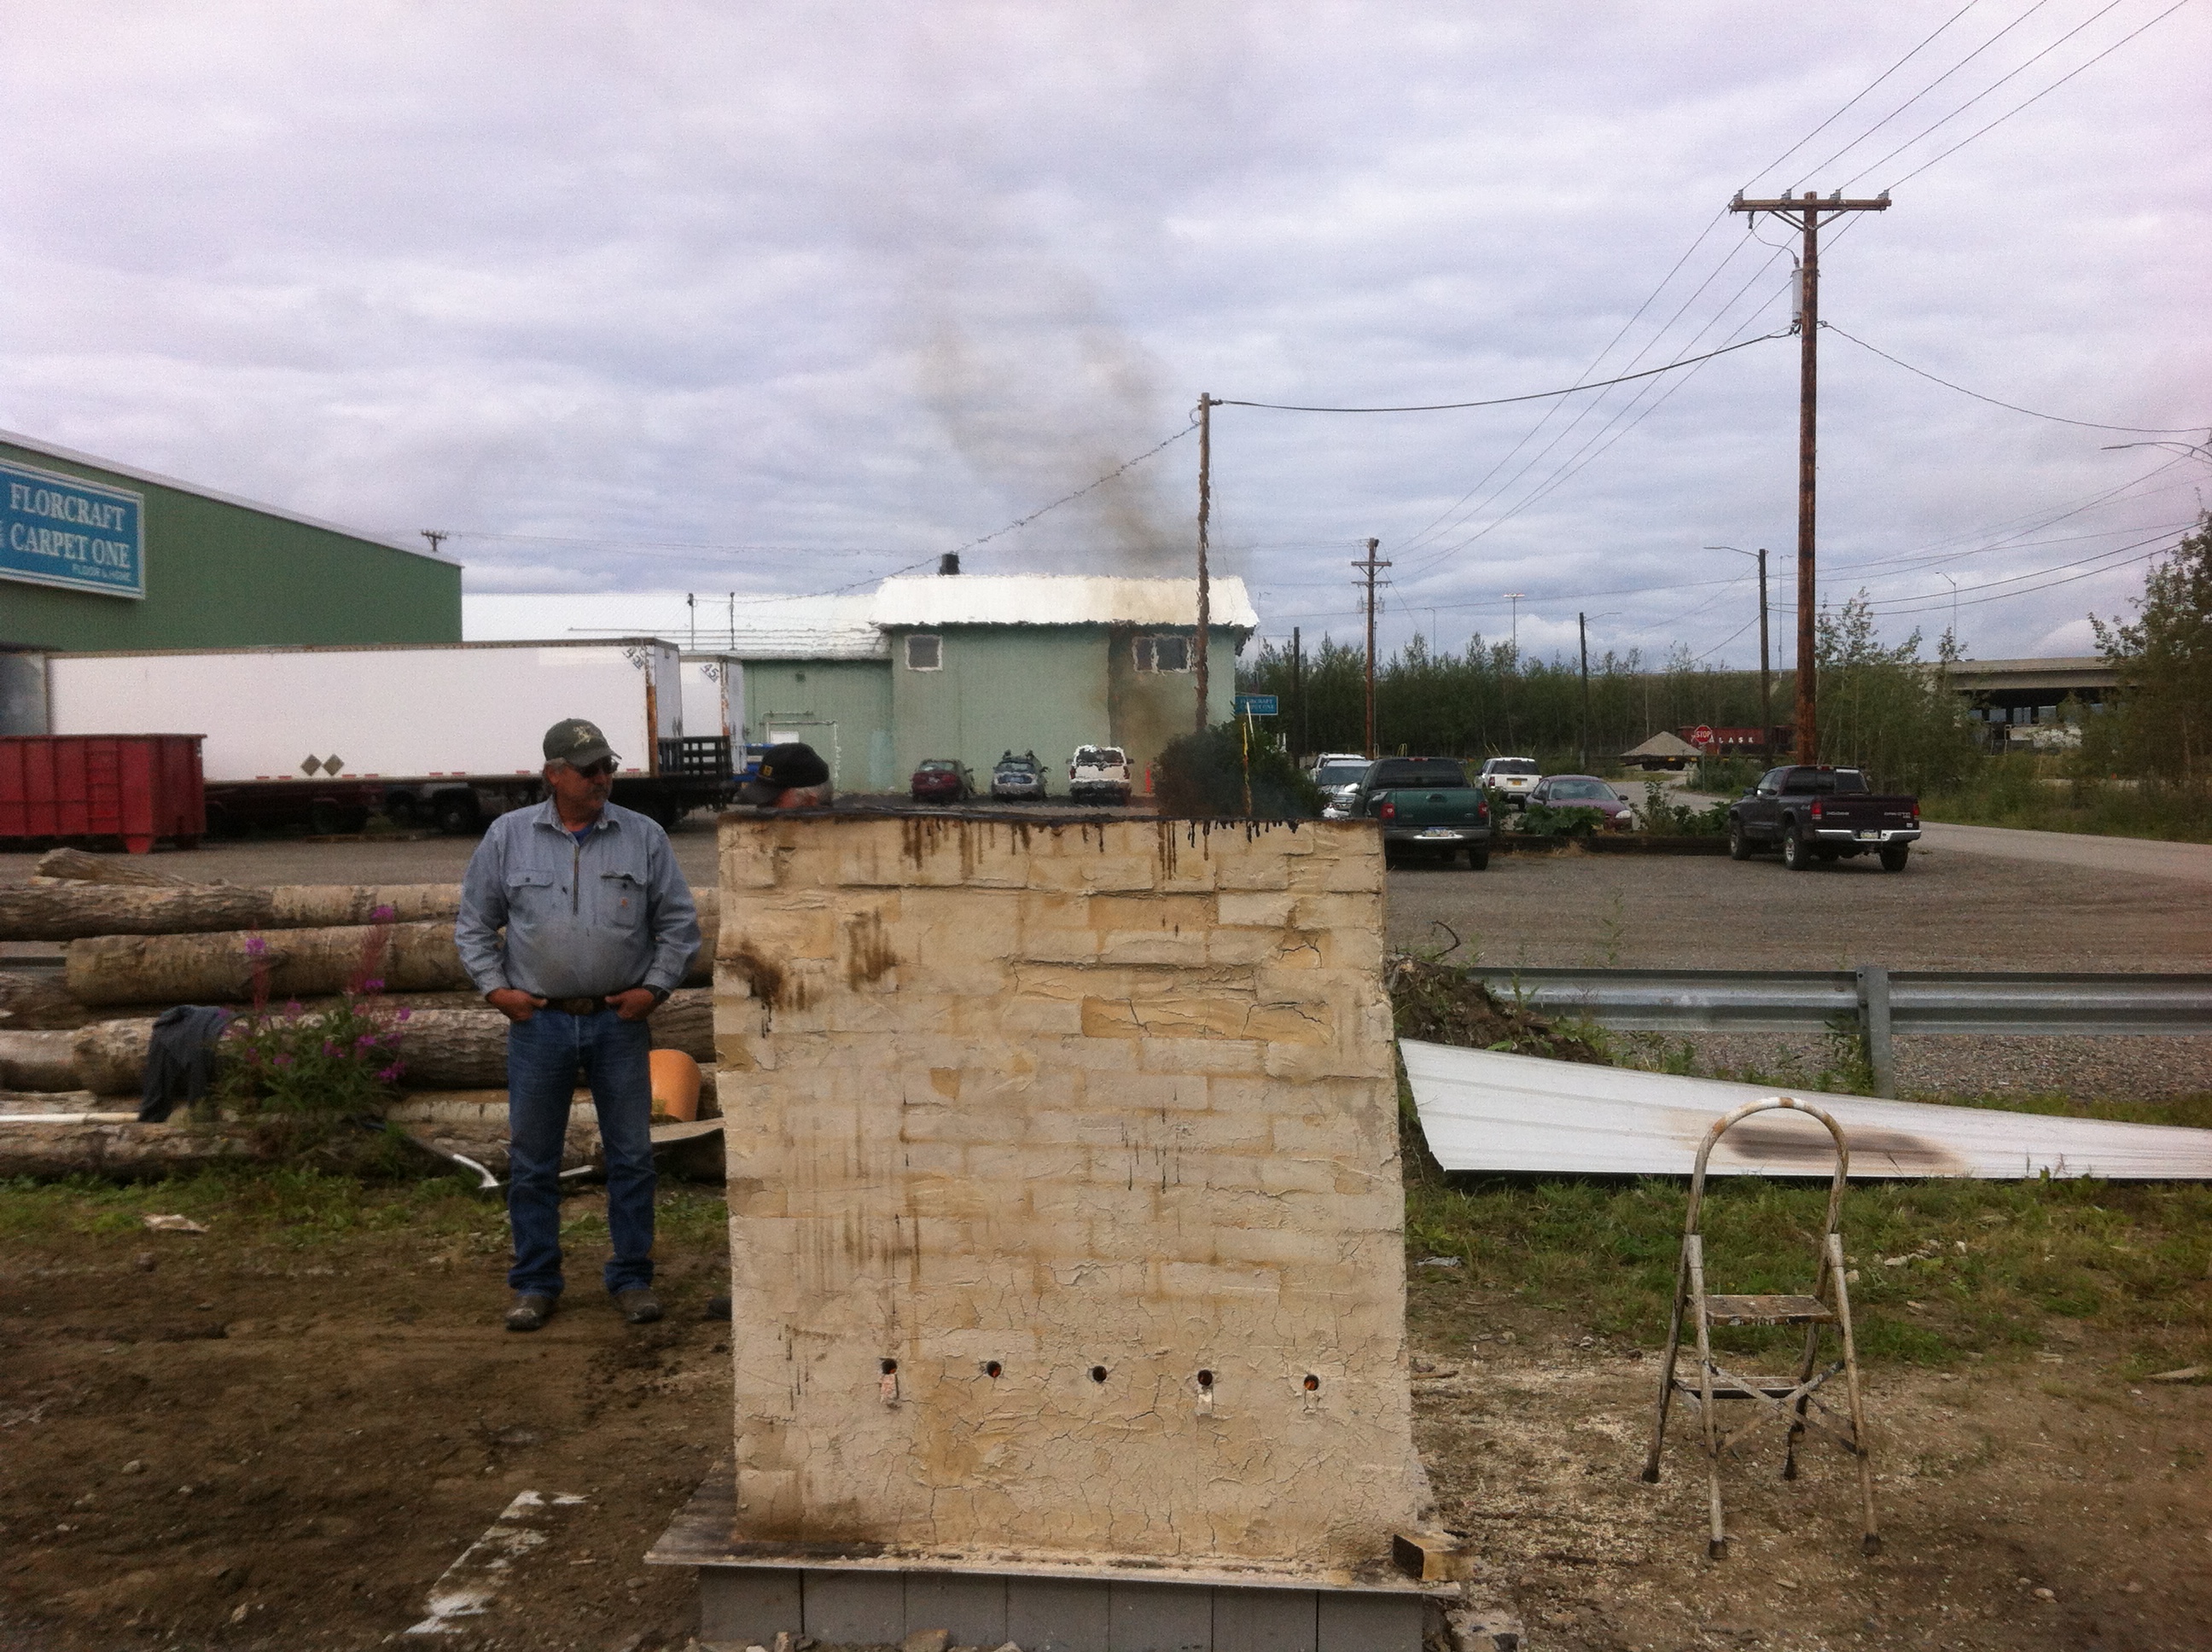
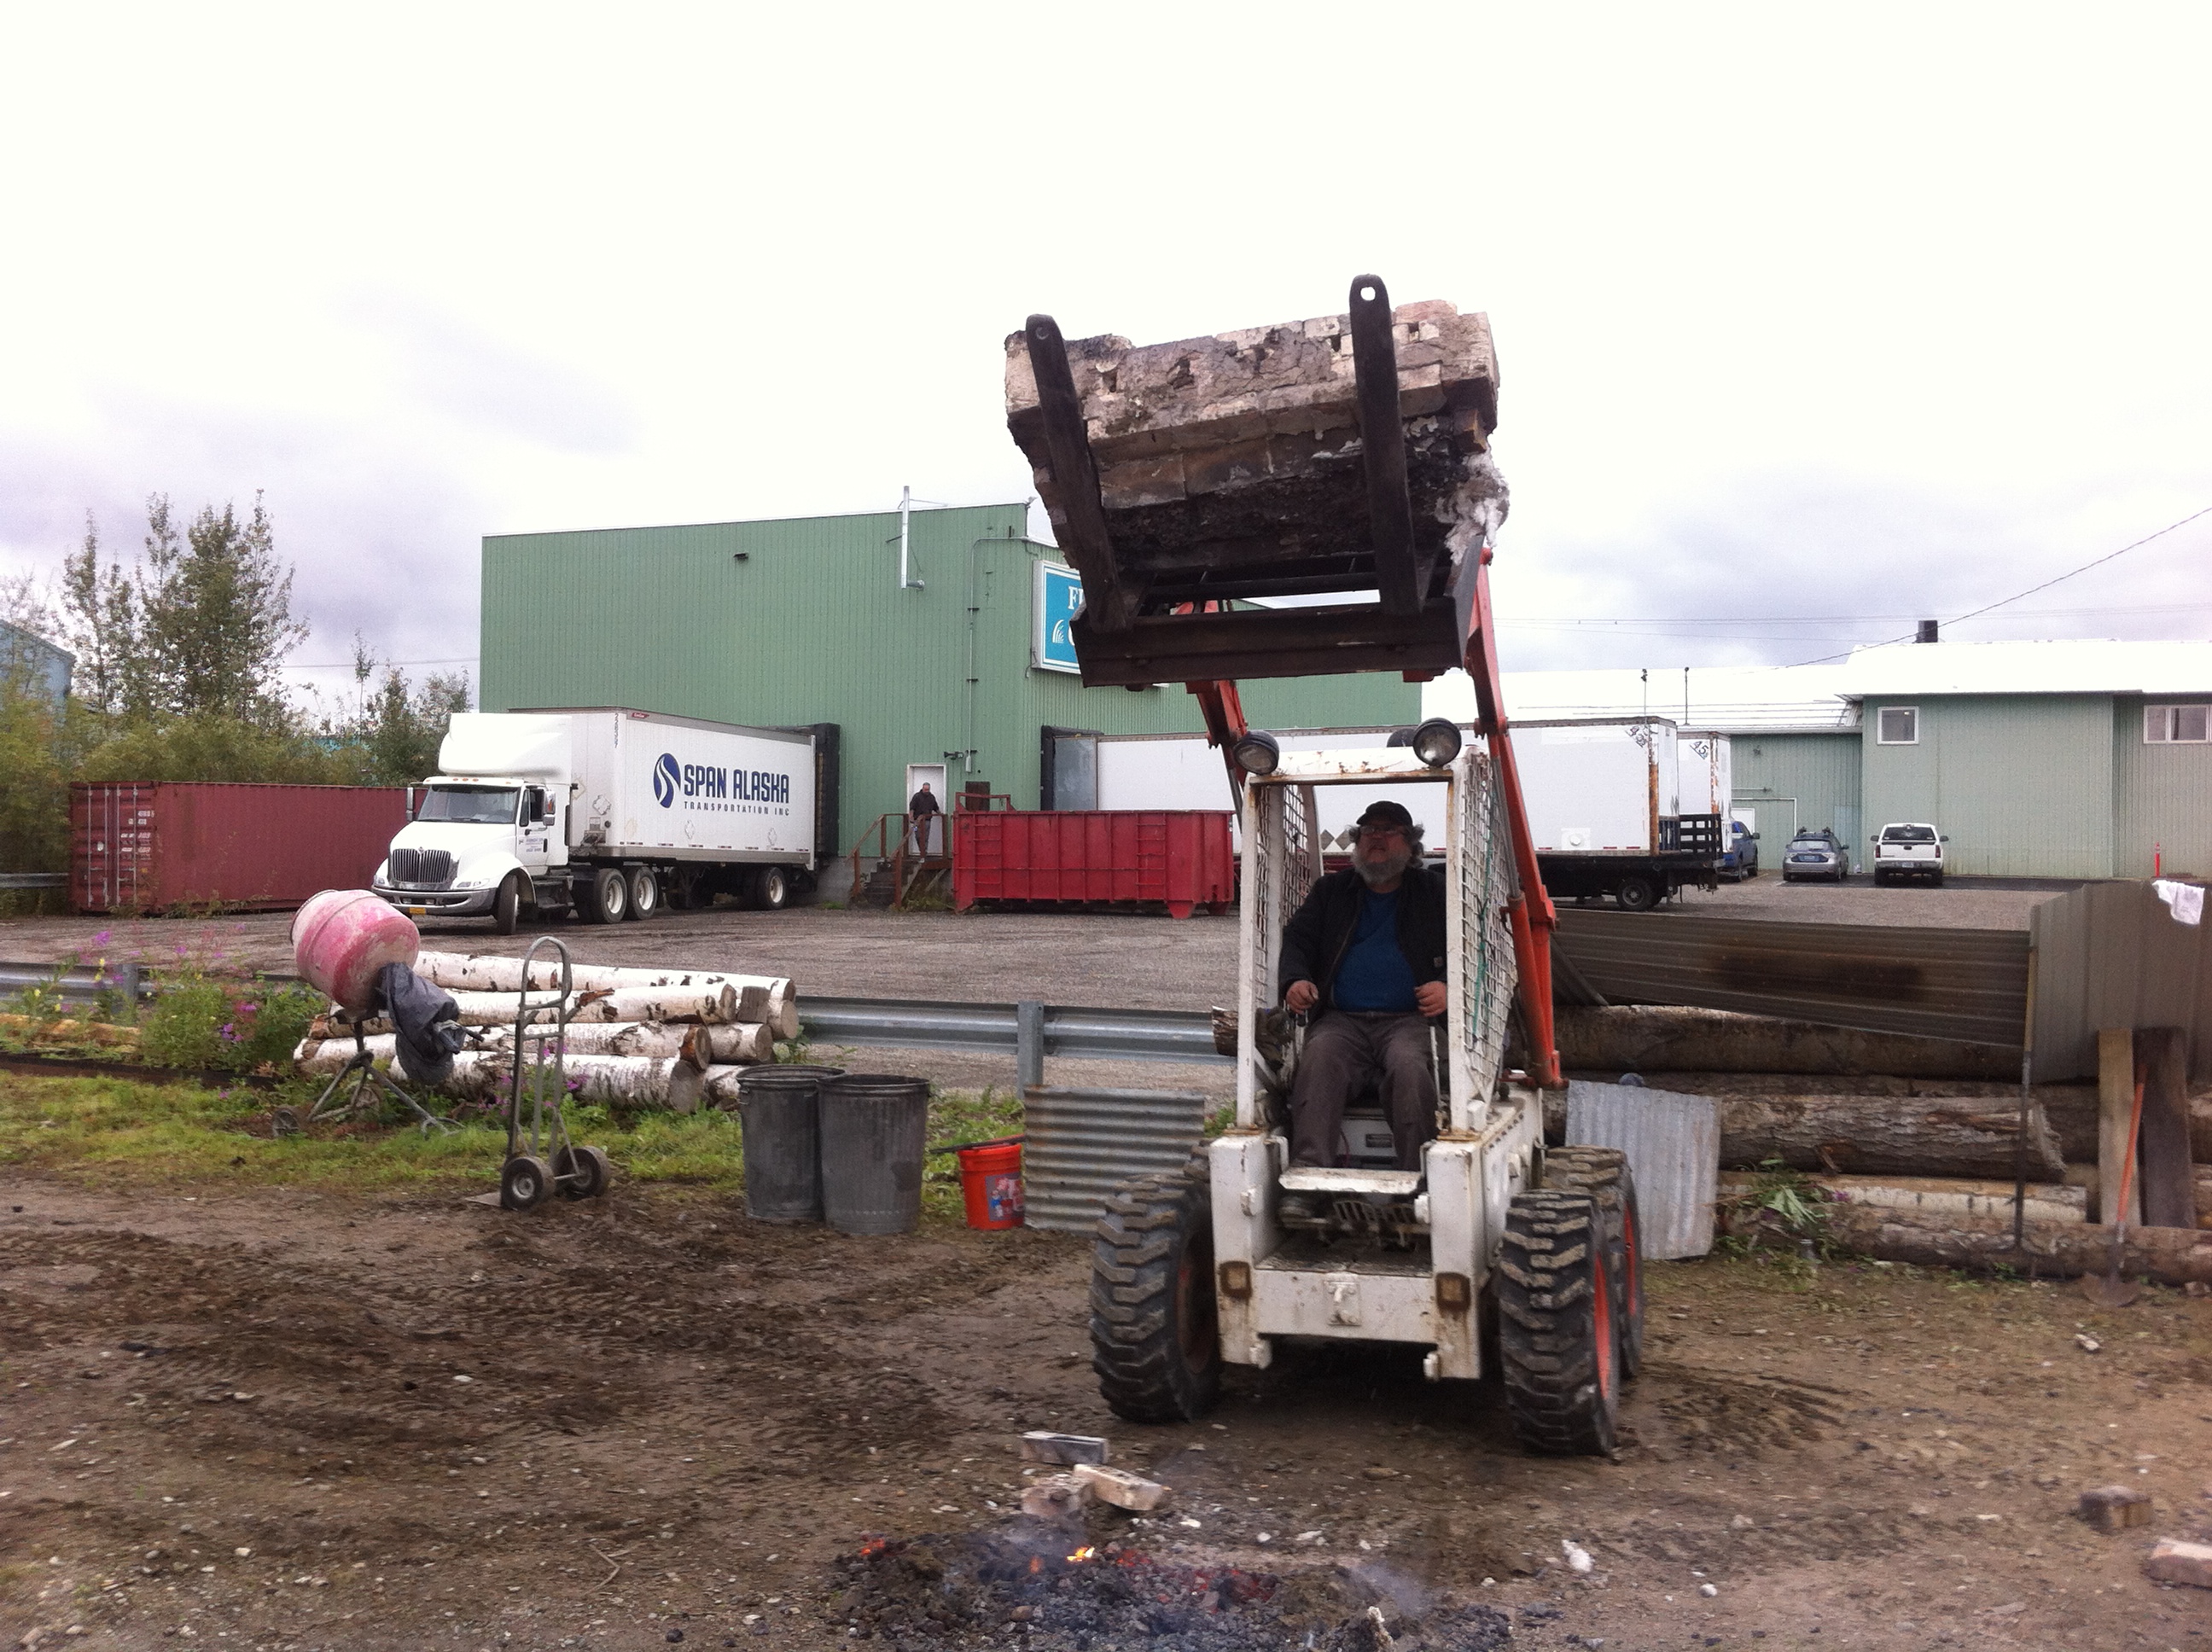
Phabib, yes doing it using flue tiles is possible. We ended up with about 20-25 lbs total. I have more pics to post as soon as I find my phone. Now where did I put that? So yes. Terra cotta flue tiles and a shop vac blower. The largest expense for the project was the 4000 lbs of charcoal. Now it was hardwood charcoal not soft wood. I don't know if that made a difference. The ore was untested. It came from SE Alaska and was all sorted by magnate. All 600 lbs of it. We used approximately 400 lbs.
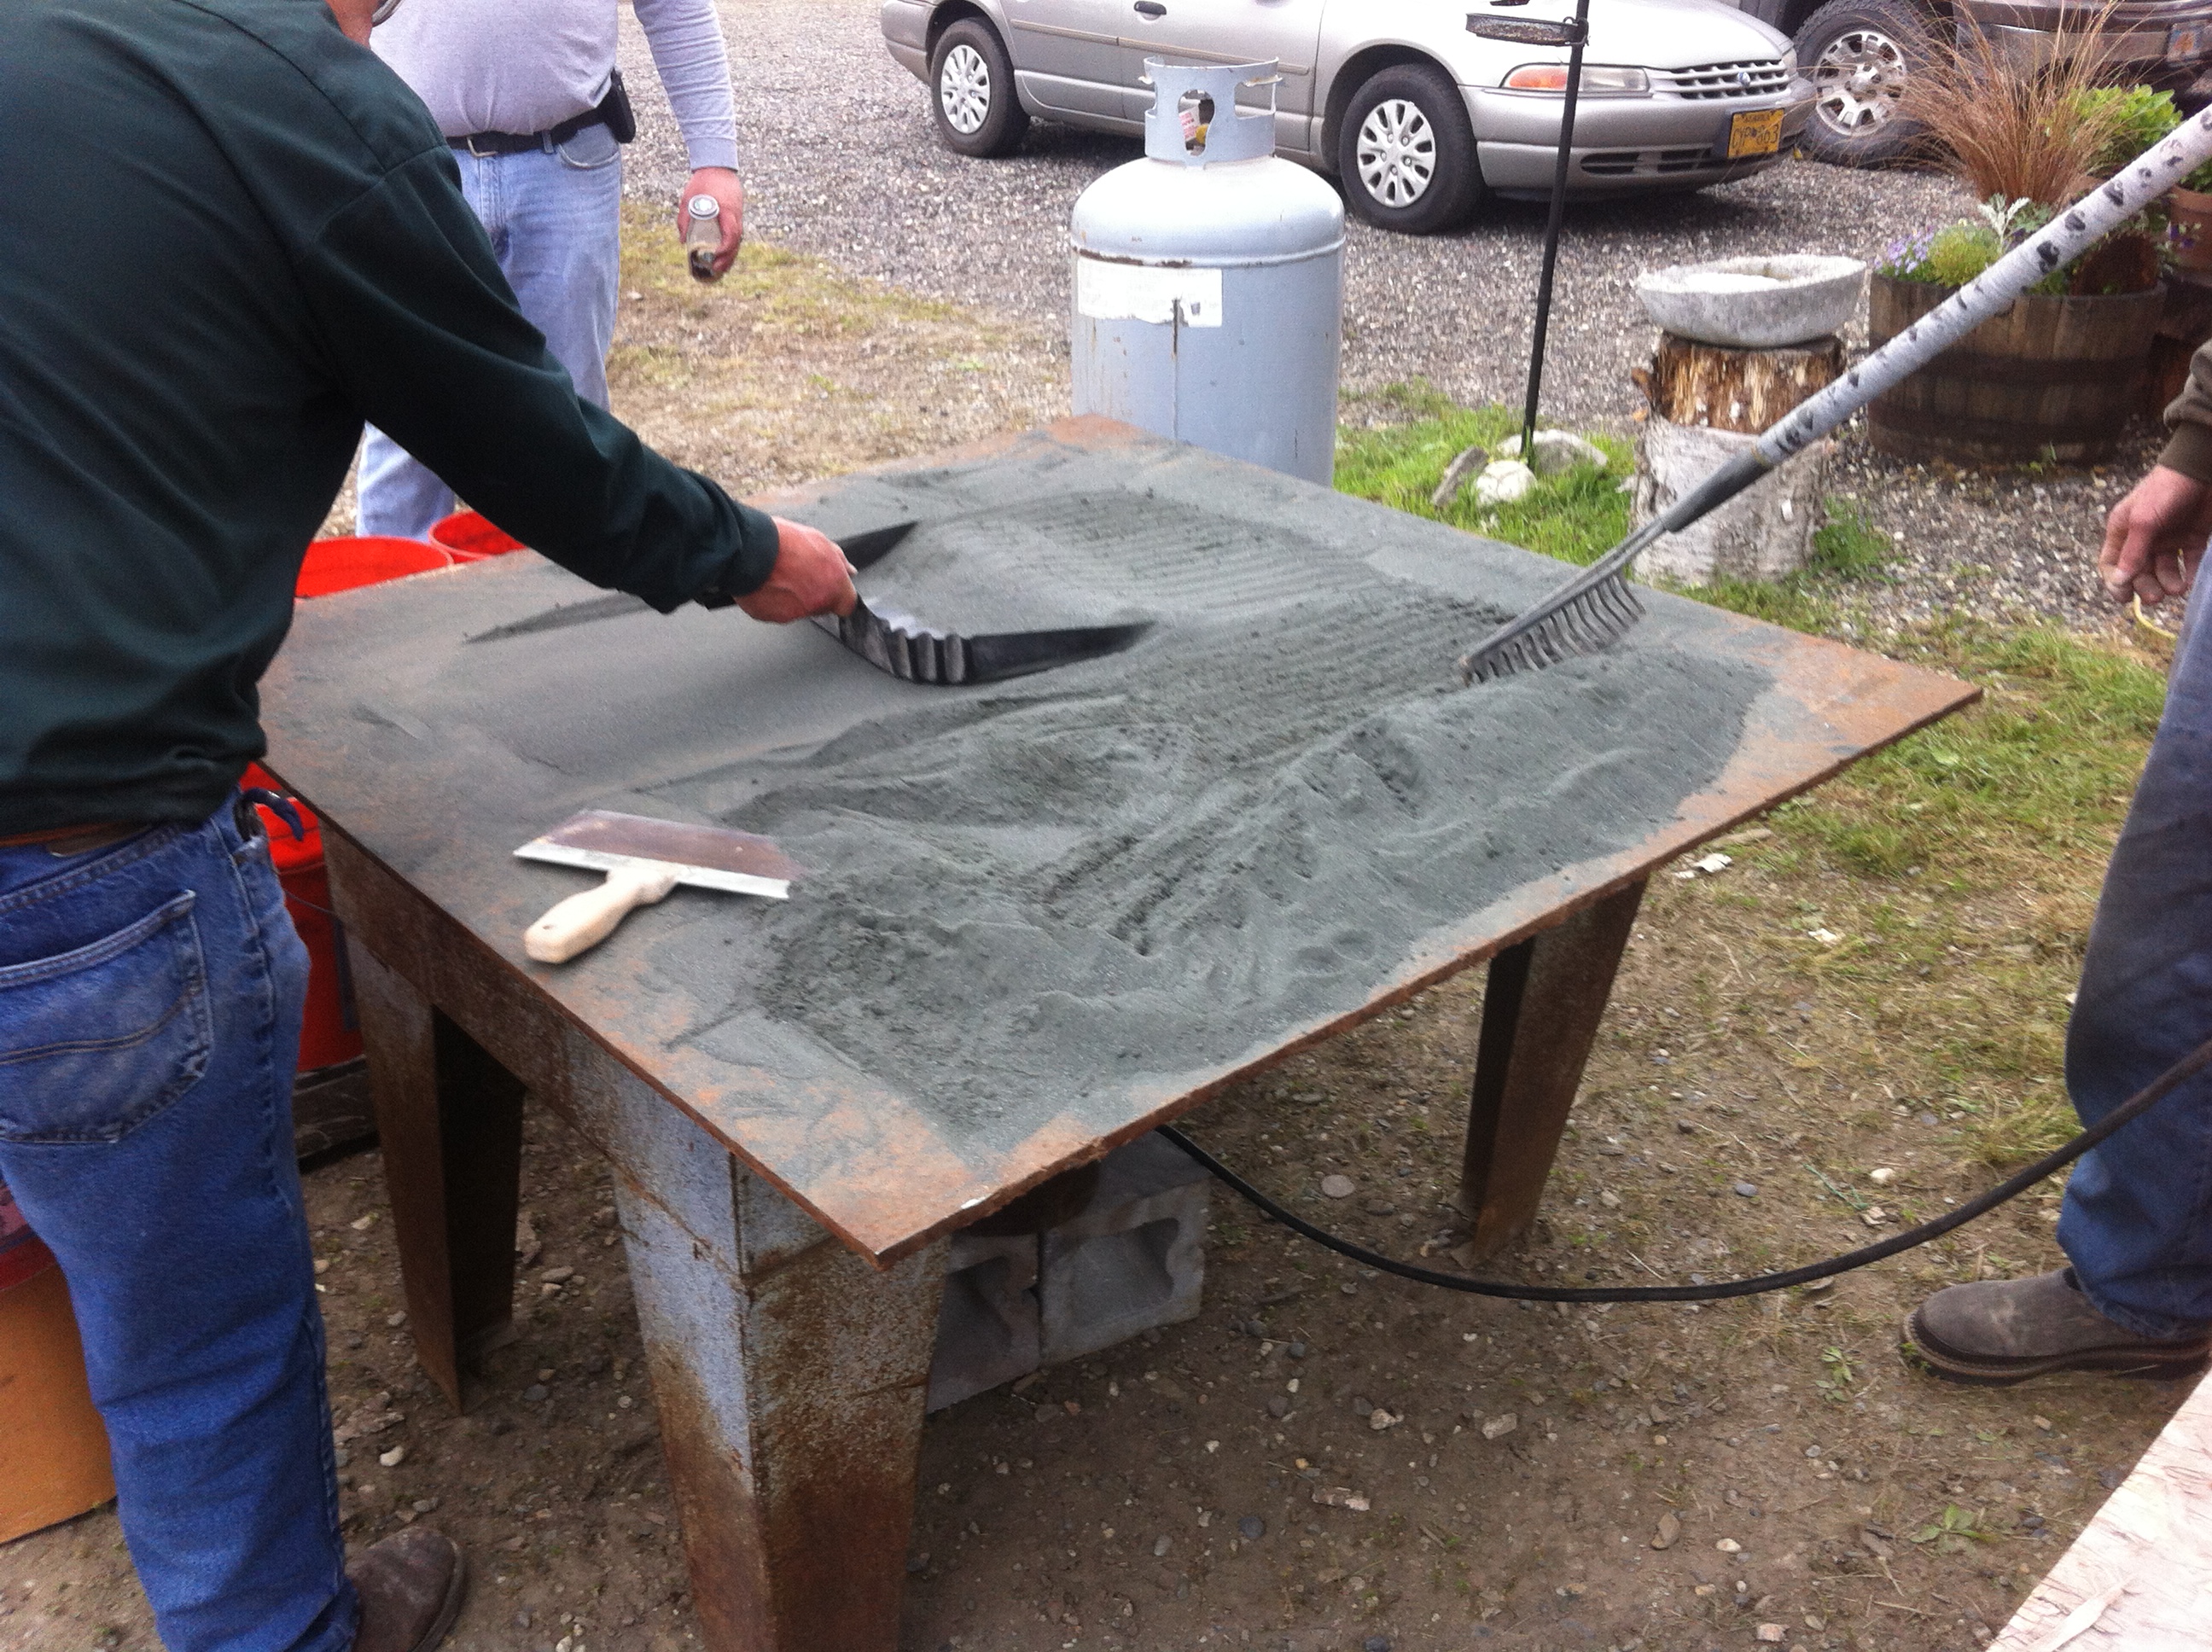
Frosty, yes we dried it out on a big bit of 3/8" plate with a turkey burner under it. We dried it out. I don't know if that's what you mean by roasting it, but that's what we did. Bill Burke has done this about a dozen times. We did get very usable material and it was forged into a blade. I don't have pictures of that particular blade but everything else. He used the tamahagani method. Sorting and stacking, smashing folding and welding. No rice paper, no rice straw just borax. It all stuck very well and the steel had a very good grain structure.
The location was at Mark Knapps shop, The Cutting Edge, in the rail yard. We were basically in town. Hoodoo brewery is right next door. We have a small group of artists, knife makers and blacksmiths who meet there monthly. Well one blacksmith anyway...lol. Mark is super talented.
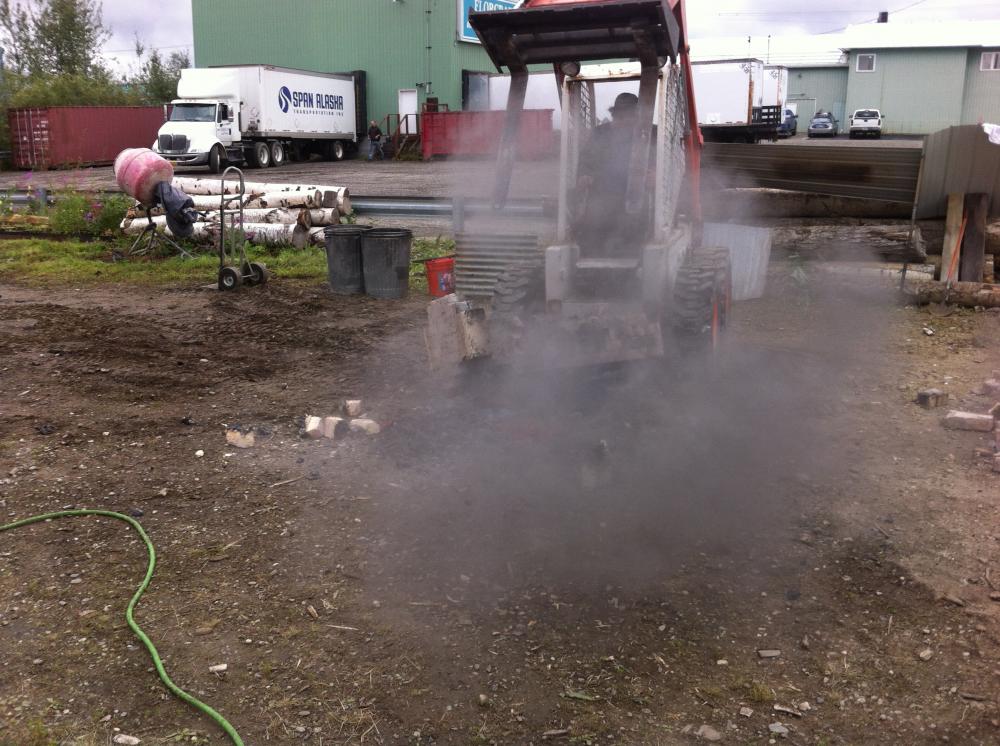
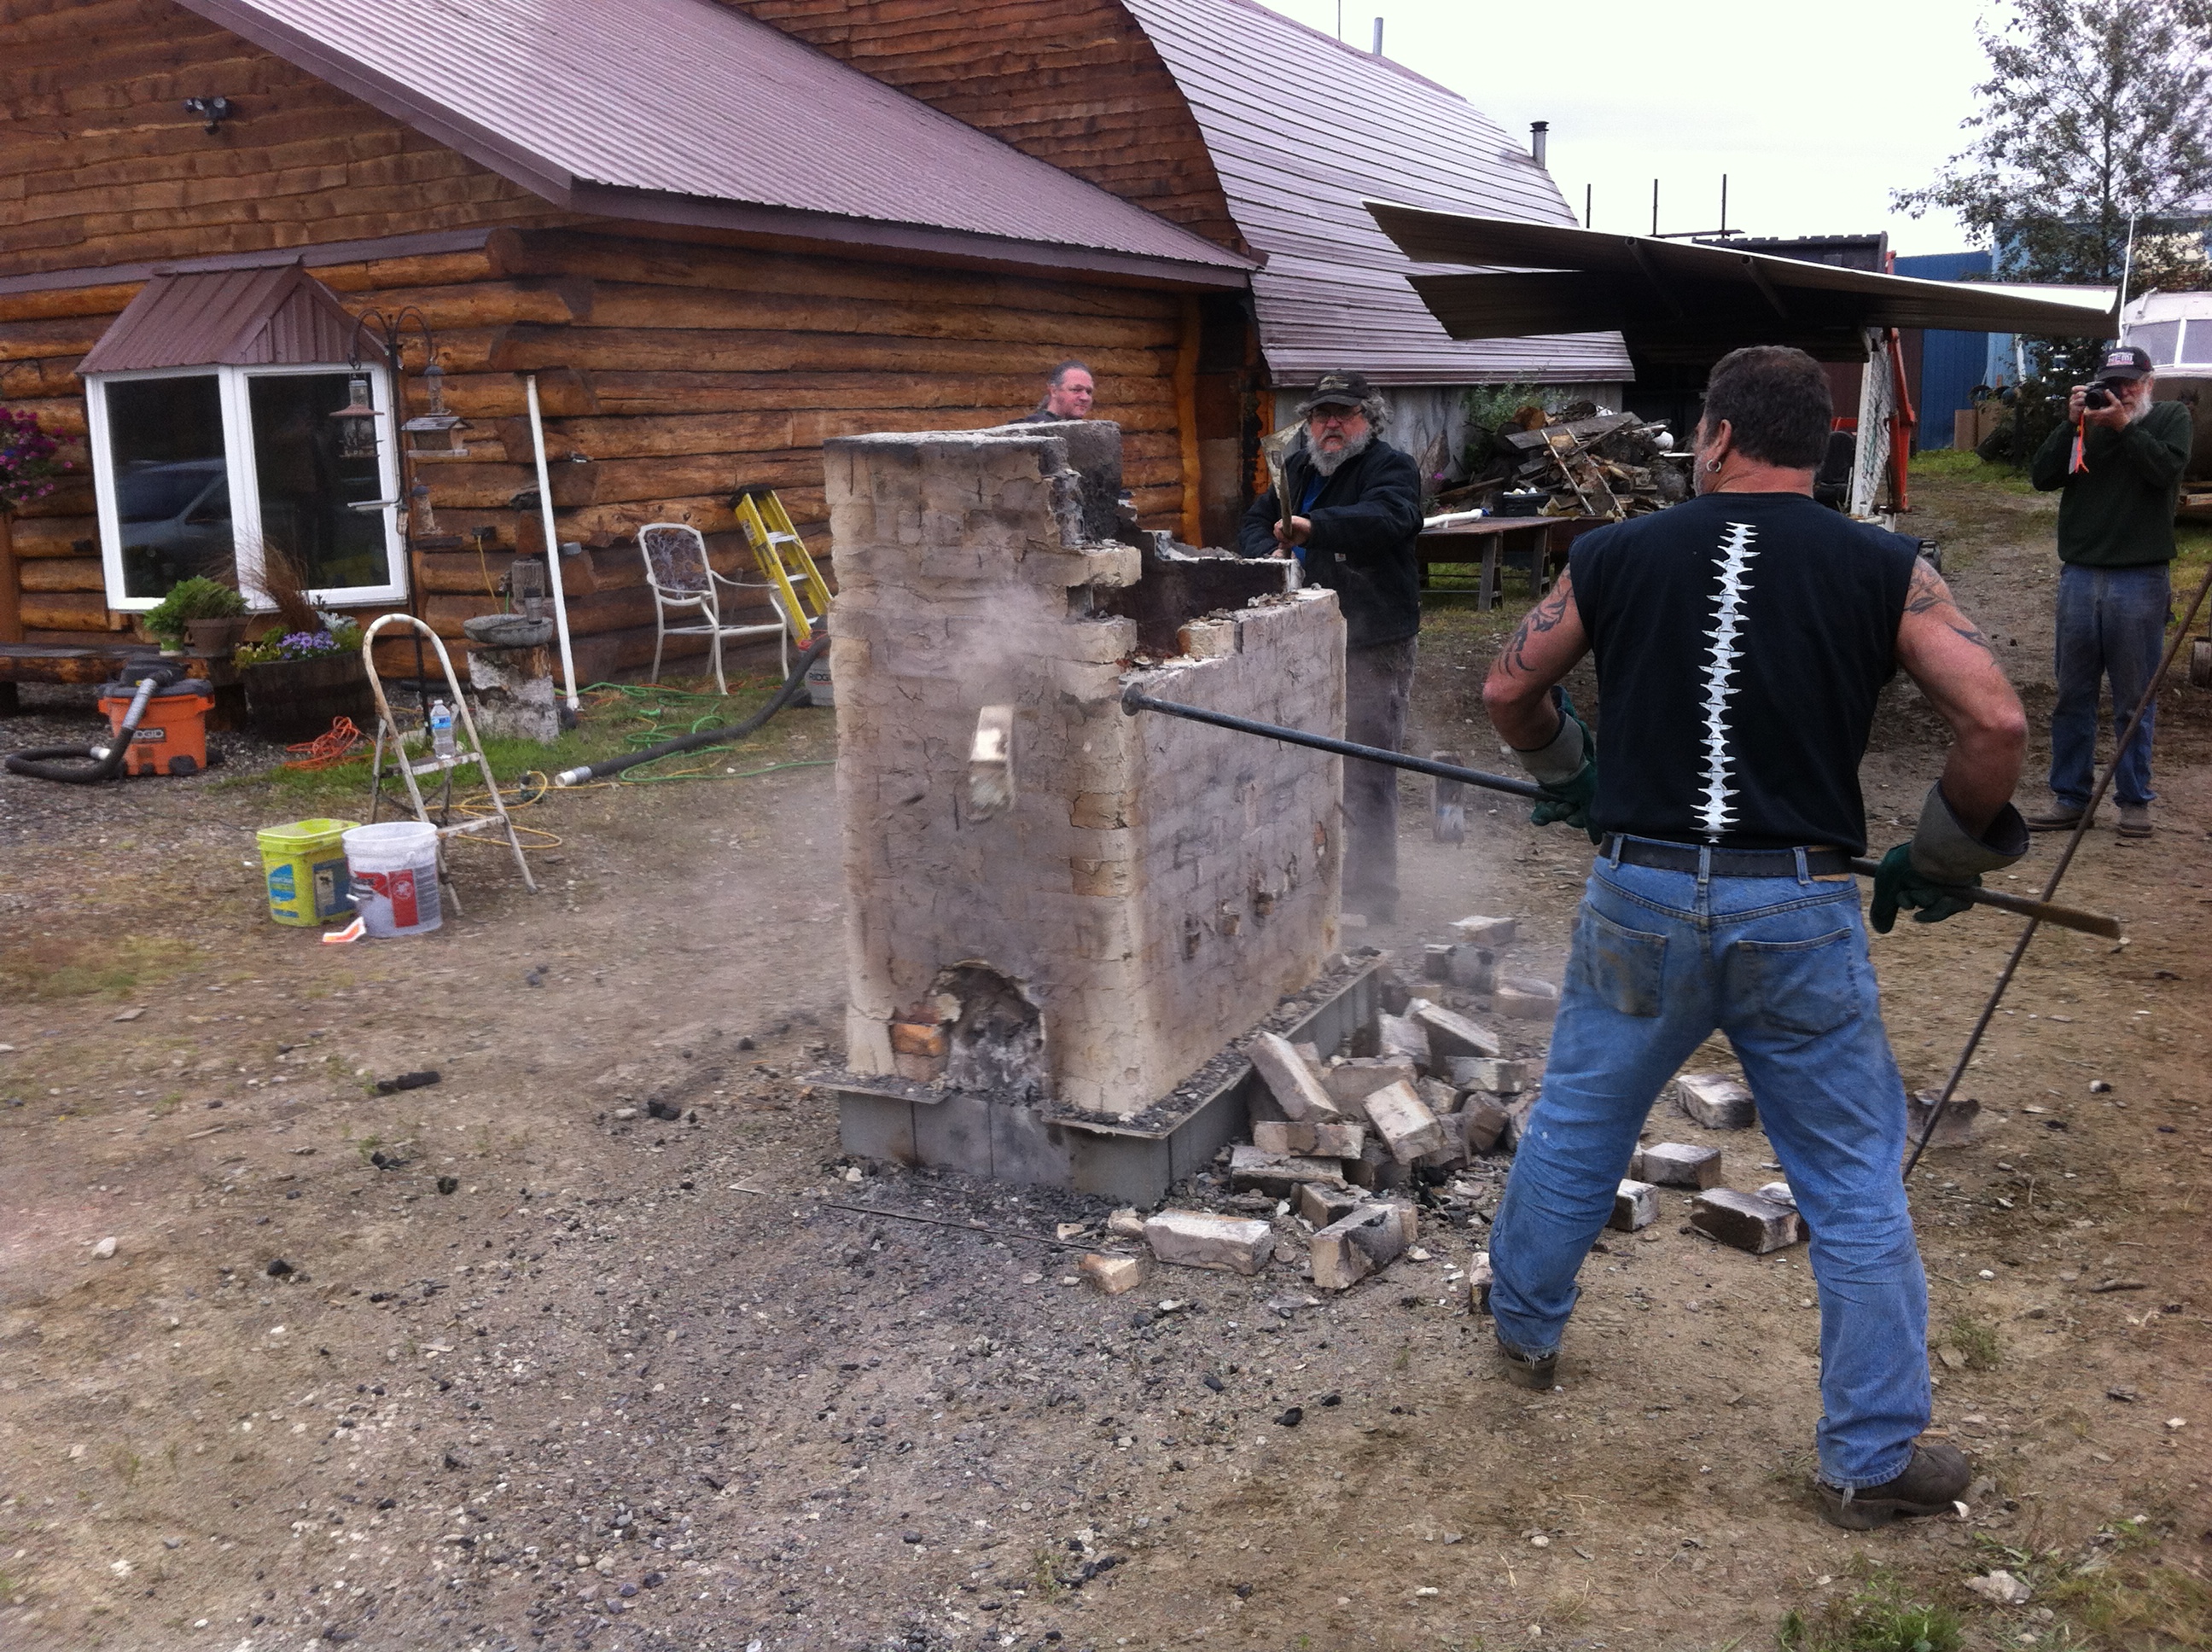
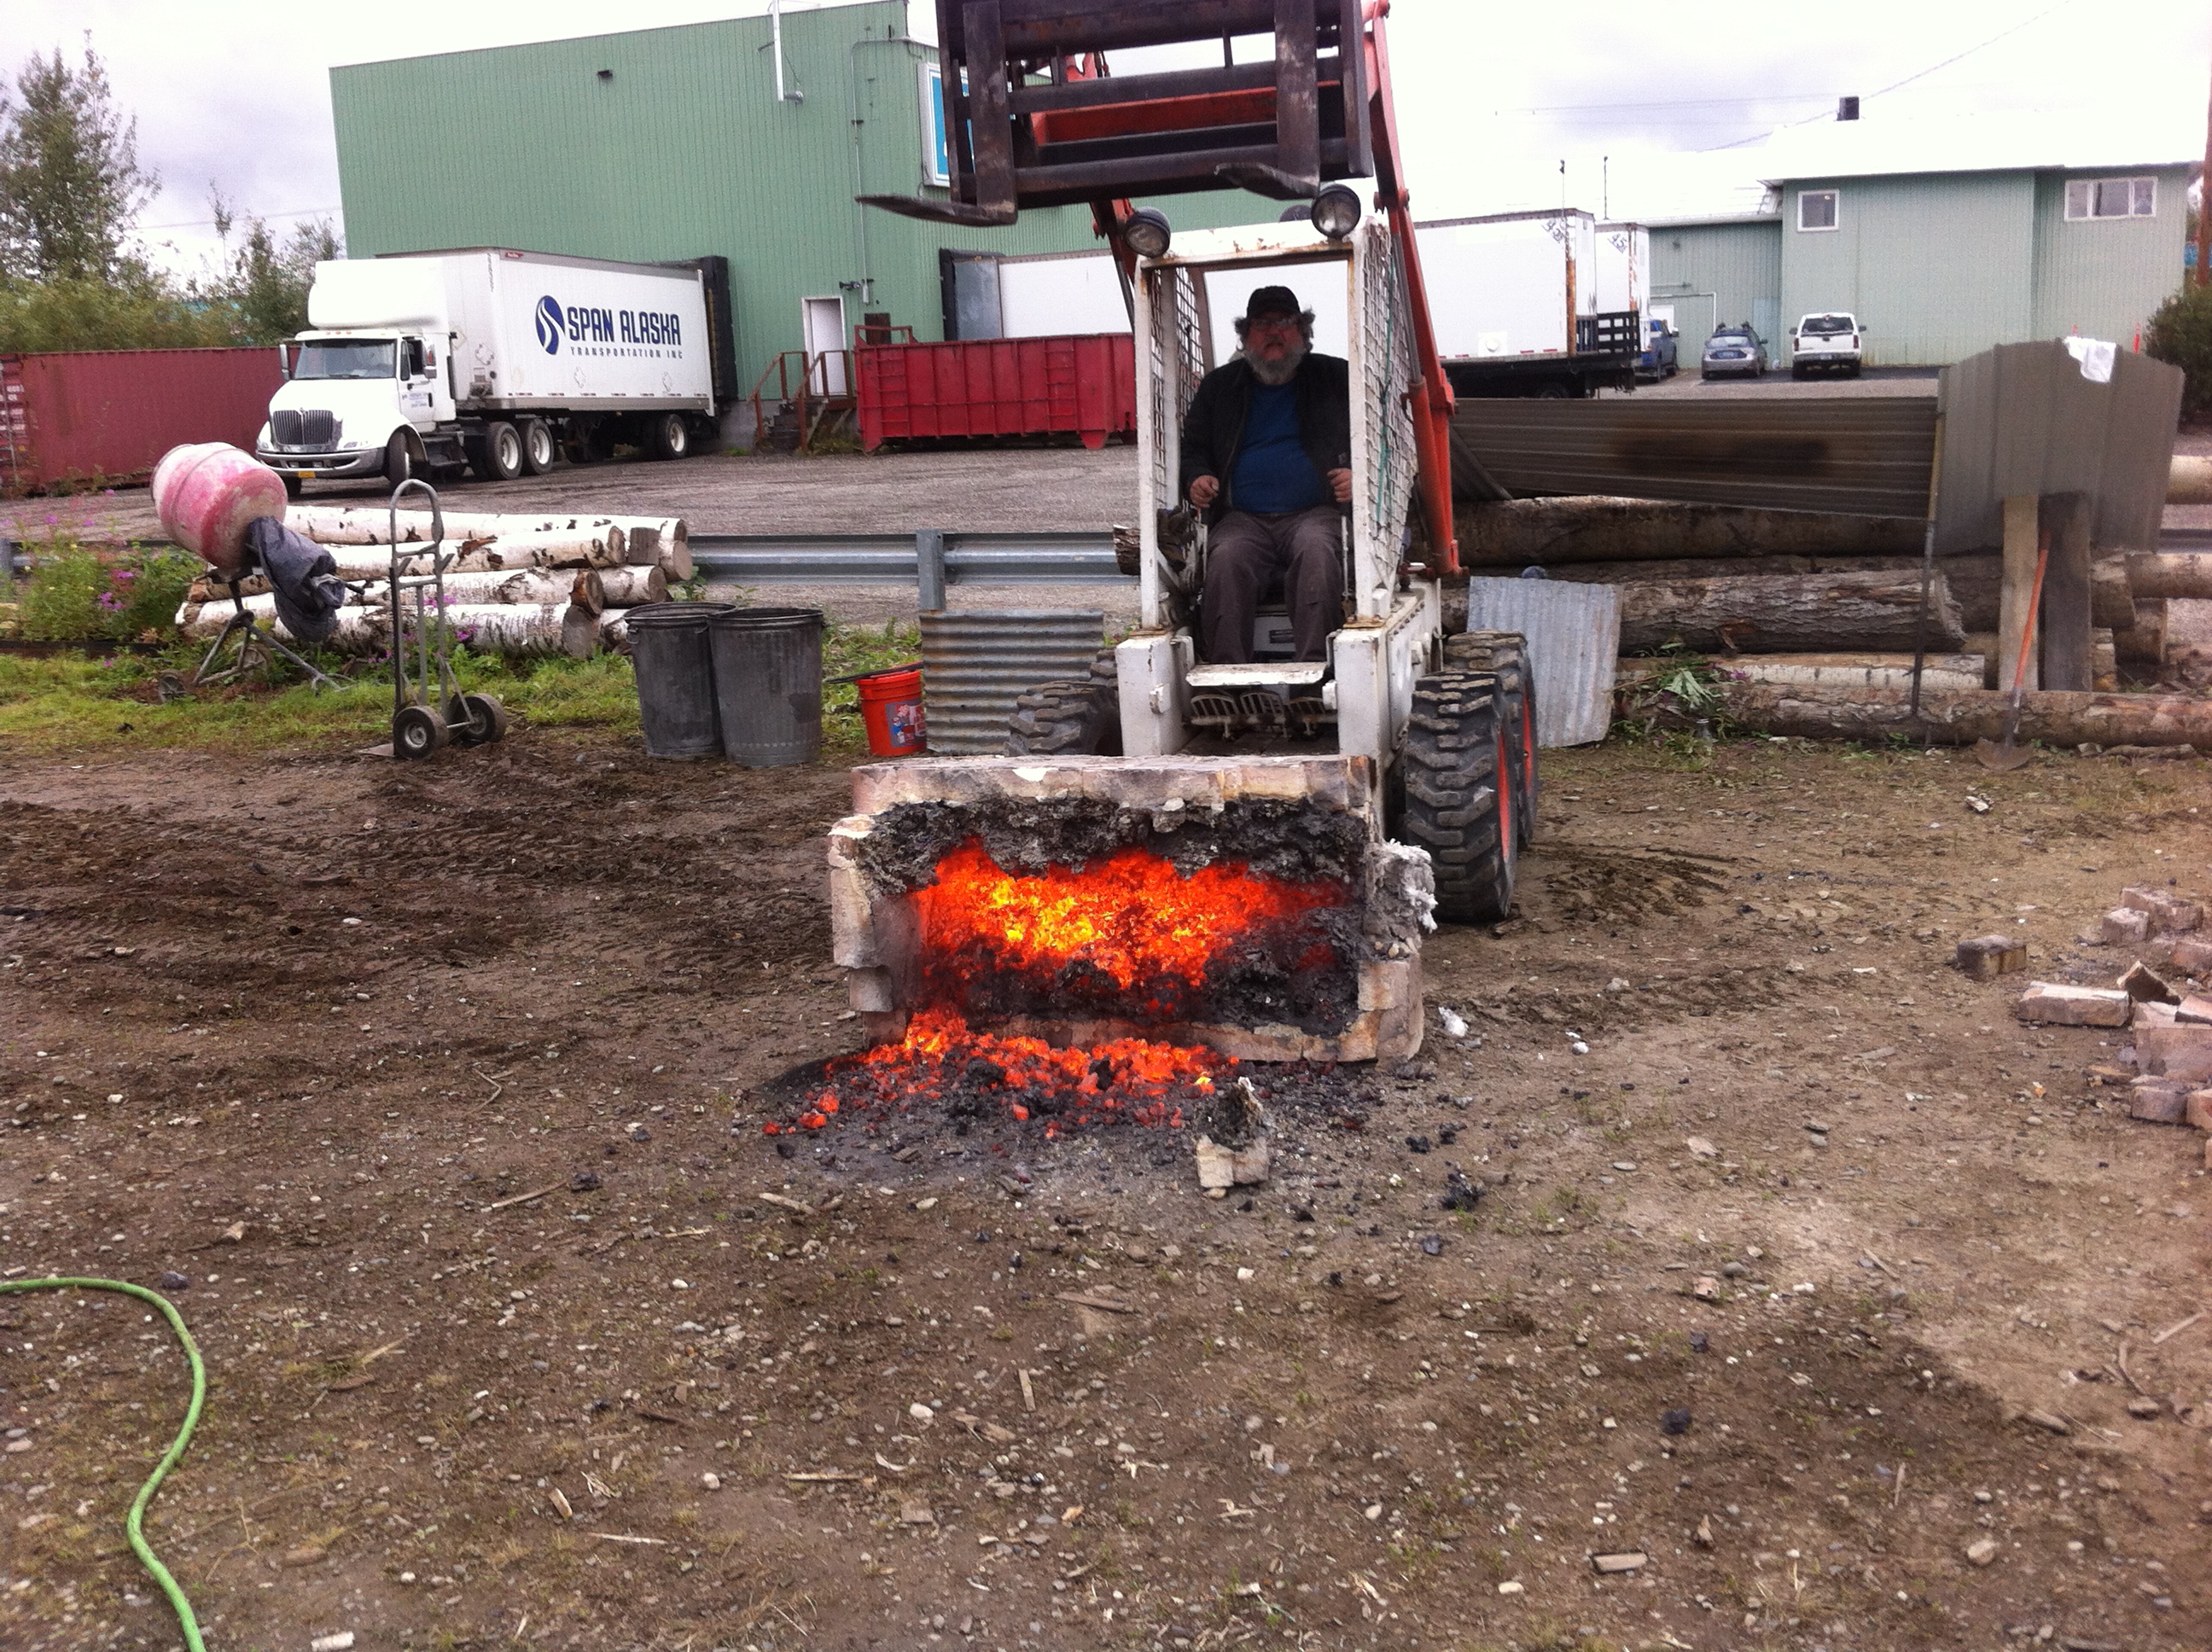
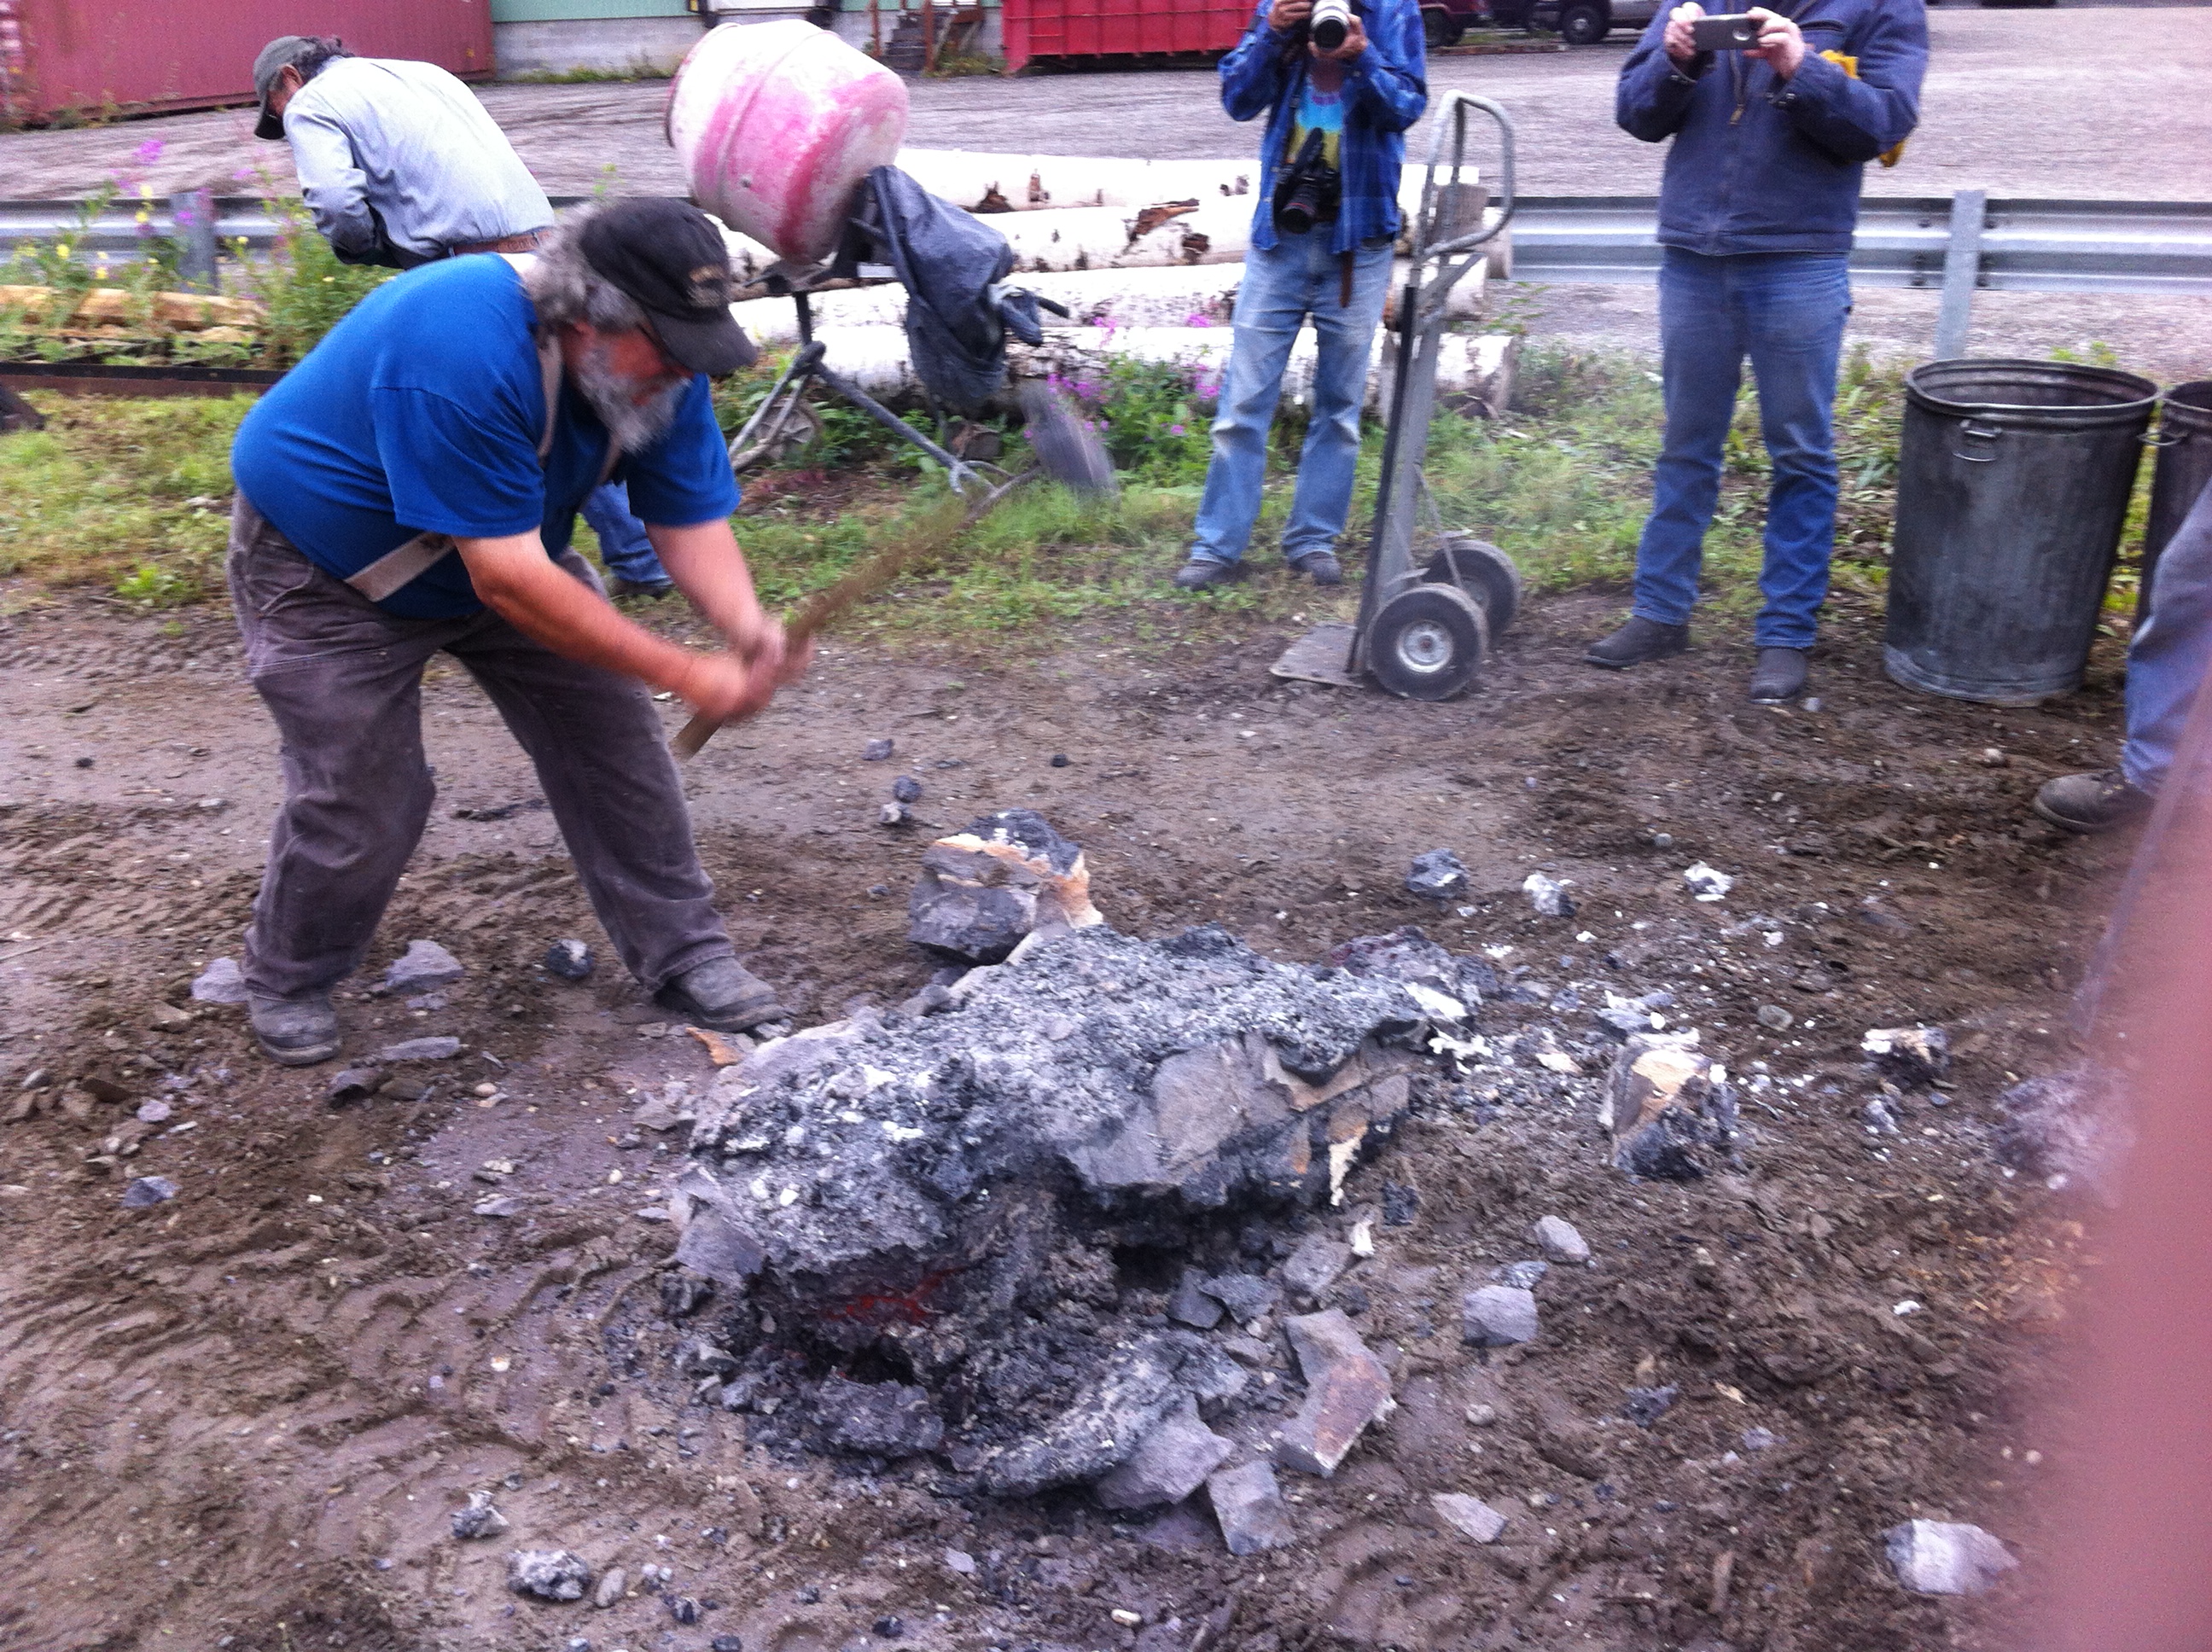
Everyone was very excited to try this and we had a wonderful time. I mean fire, steel, large hammers, how much better does it get? We were disappointed by the small return, but then its the first time we've ever done this and the first time this particular ore was ever used for this purpose that I know of. So there were several unproven factors. We had a sheet steel vapor barrier between the bottom of the furnace and the ground. An airspace made with concrete block, a hardy board barrier, then fire brick mortared with sand, clay and grog, with sawdust mixed in. We fired the furnace and then covered it over night letting it dry out. The next morning it was still just a little bit damp on the exterior but the interior was quite dry. We began filling the furnace with charcoal and started the blast. Filling it to the top.
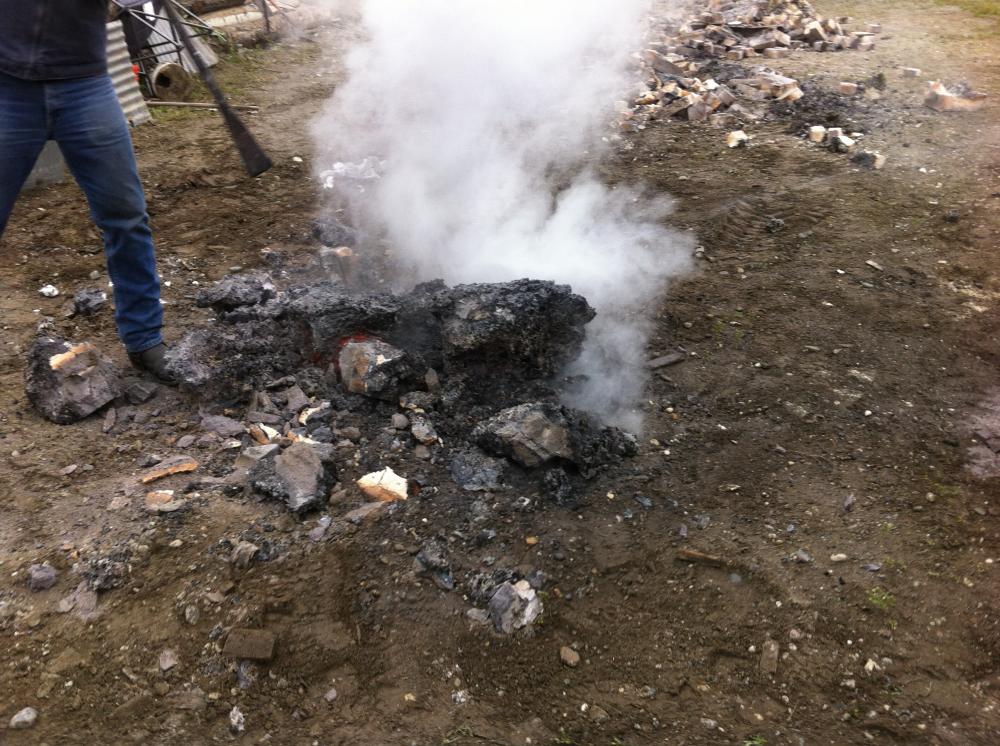
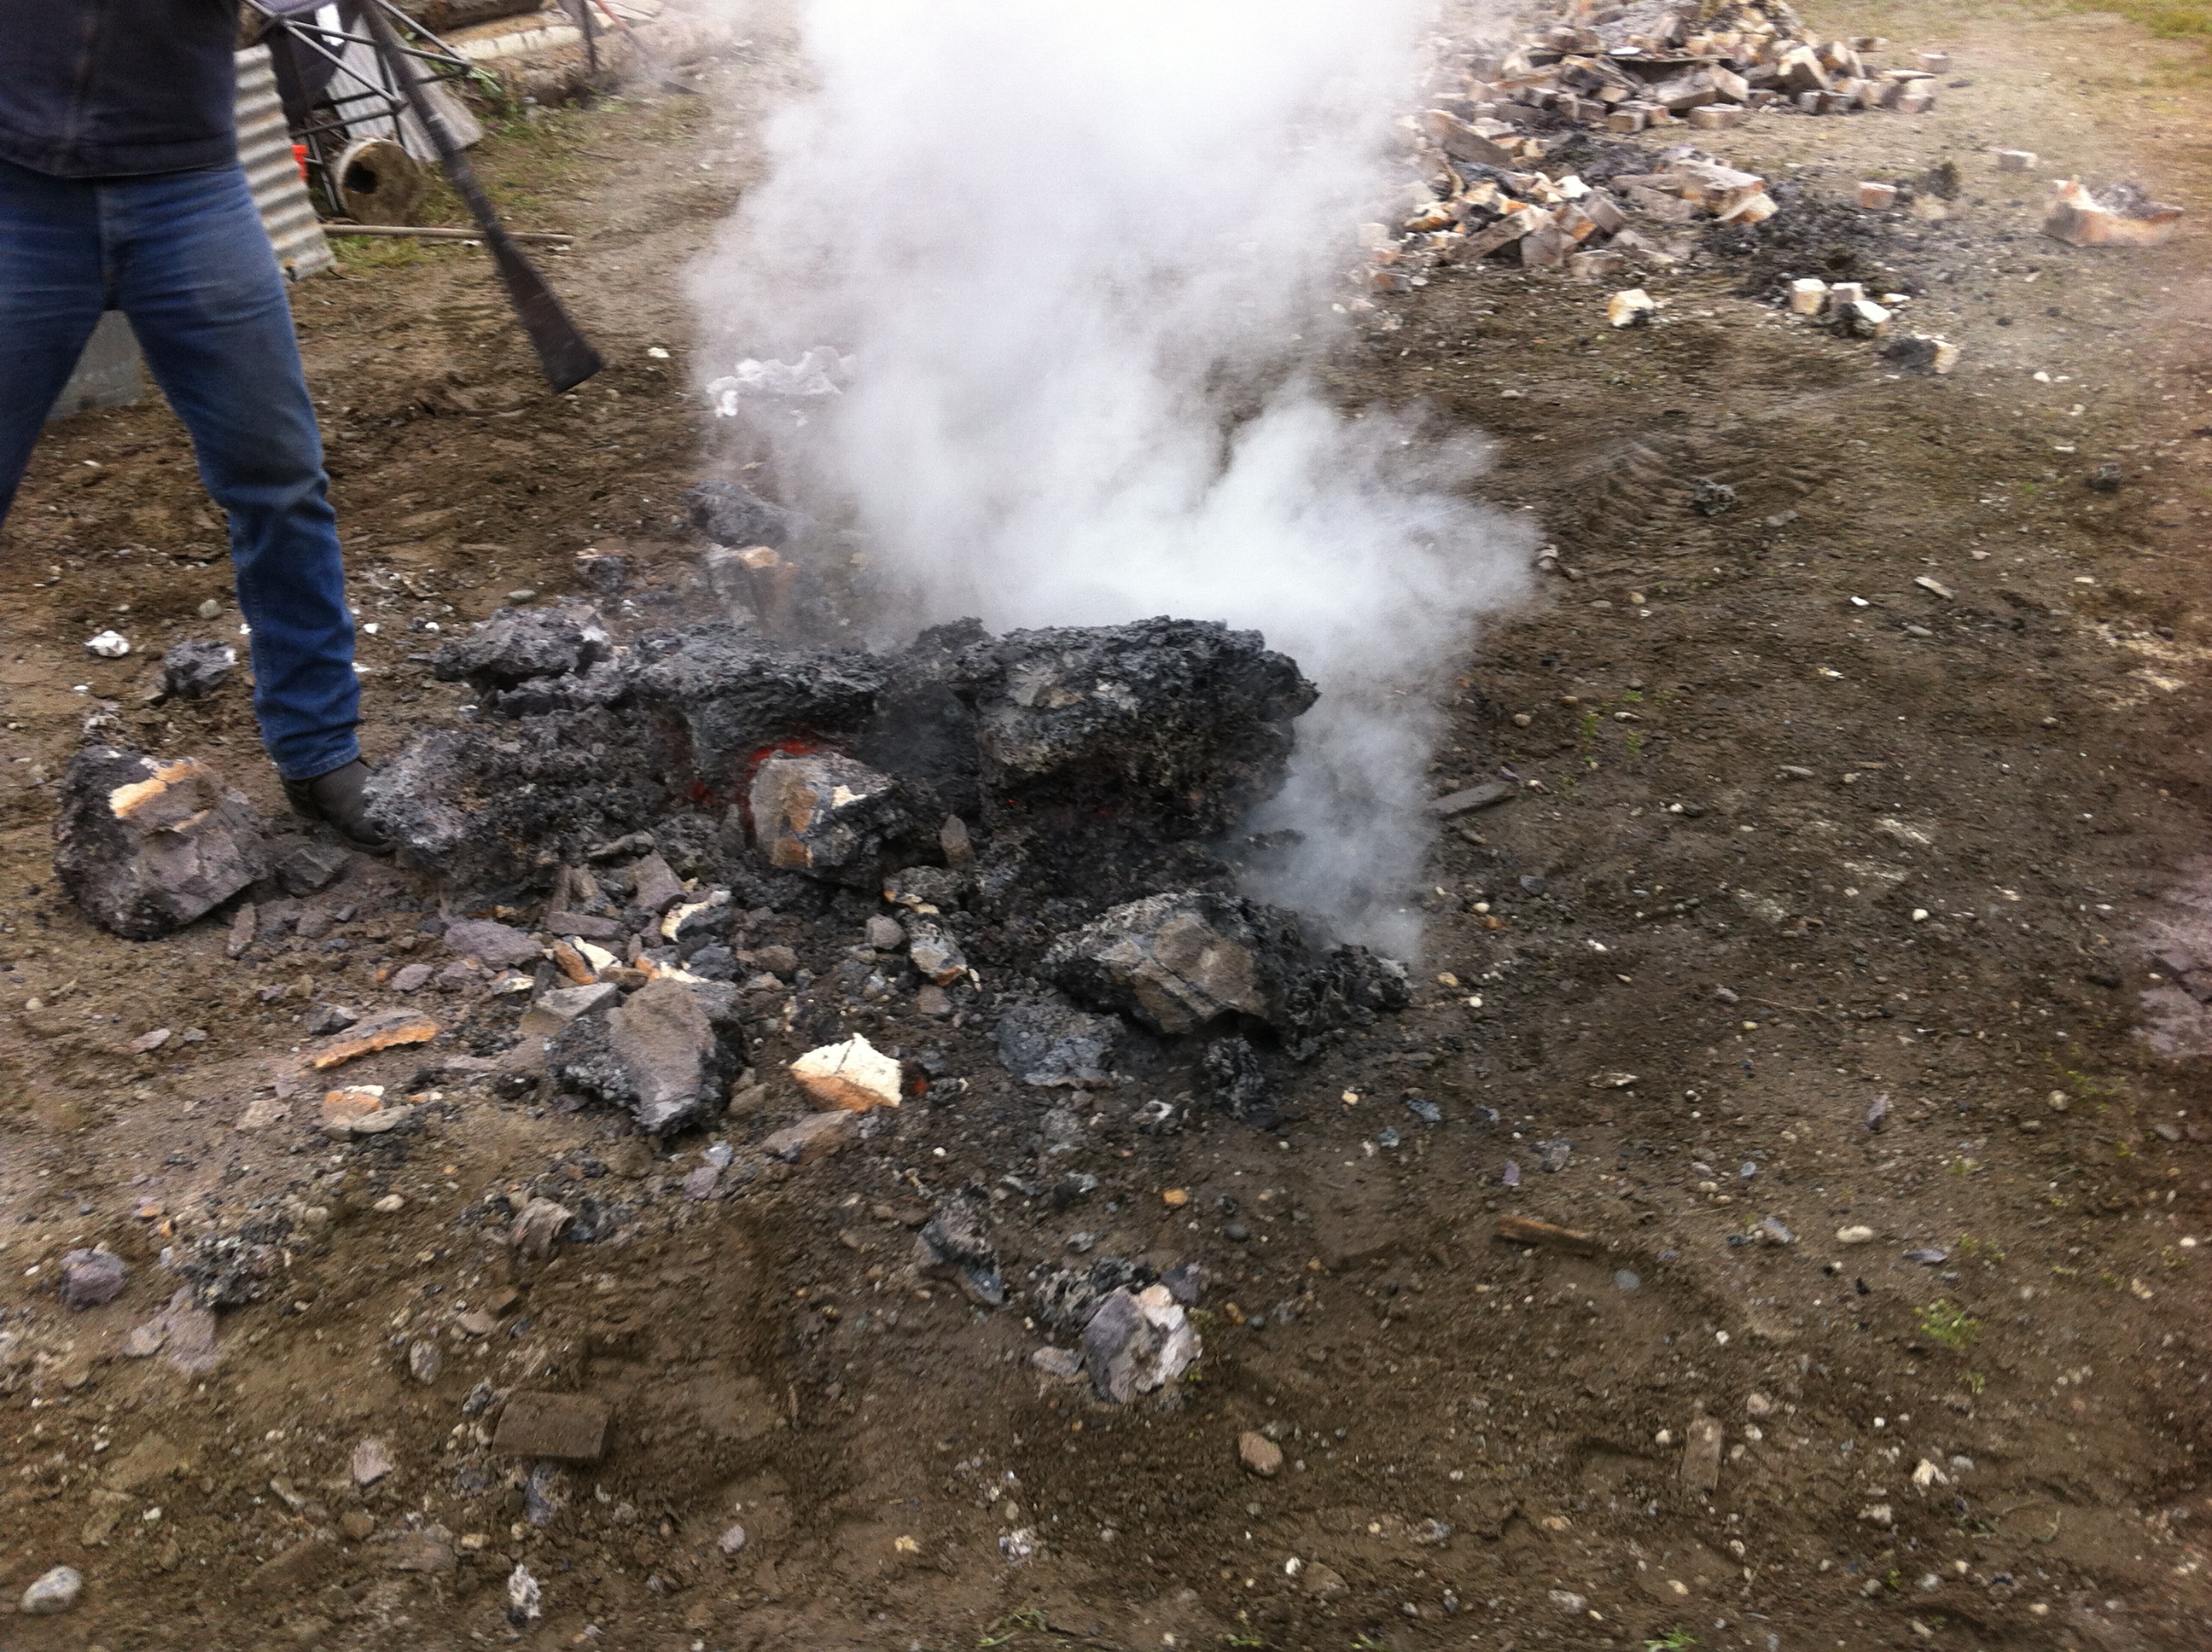
When it was full we started adding the dry iron sands, one coffee can for every 25-30 gallons of charcoal, wait 12-15 minutes and repeat. That was done for about 24 hours. Durring the night one of the tewyars blocked up and was removed. The next day we let it burn down to the lump and started taking it apart. When we first saw it we were very hopeful but as we broke things up it became apparent that we hadn't had very good success.
All that said we did have a very good time doing it all. Bill was very knowledgeable and was happy to answer questions. We got lots of people from next door at the brewery coming over and asking questions. One guy even started chopping charcoal up. His guest from Germany asked lots of questions and we were happy to accommodate.
-
A project that I've been working on since Tuesday. Some friends and I worked on making steel. We had ABS Master Bladesmith Bill Burke to head the project. After many hours of hard work we broke apart the furnace and found....not much. It was a terrible disappointment. We had hoped for about 300 pounds of usable tamahagane steel. The leaders of our team are very experienced and knowledgeable, however many variables can contribute to a poor outcome. Weather wasn't great. The iron sands were from an unproven source. It could have been any number of things that lead to the less than hoped for result. After going through 400 lbs of iron sands and two tons of charcoal we estimate that we ended up with about 7-10 lbs of material that will have to be can welded to be usable. Getting together one more time tomorrow to see what can be done and to salvage what we can. Still, I would totally do it again.


-
Lots of great advice here. My personal opinion is to get some iron hot and hit it on the anvil. The rust won't really matter. If its just a matter of aesthetics, I used vinegar and a wire brush then a solution of baking soda. Cheap and effective. Then I wipe everything down with a rag that has vegetable oil on it.
-
Learn this stuff first.
https://www.abana.org/resources/chf.shtml
26 PDF format lessons you can download.
-
I have done some research about that anvil type and it is forged steel from India. How hard it is I have no idea. That shape has been on the market for several years. I tracked down the manufacturer back when and looked at their website. Yuppers its steel. Just not a shape people are used to seeing here in the US. Now all that being said, is it a good anvil? I have absolutely no idea. It could be soft as butter. It might not. I don't think I would take a chance.
How big of an anvil do you need? I've been told by people who know these things that a 10-1 ratio is a minimum. So on a 20 lb anvil. A 2 lb hammer is your maximum use size. Rebound, energy transfer, you know physics stuff.
I have personally used a 20 lb anvil. And made an axe on it. It will do the job. If you have nothing else. Use what you have. Personally I really enjoyed working on the little fella. He sure was cute.
-
I ordered some fireplace screen from King Metals. I got it, in Alaska mind you, in two days. I was flabbergasted. I figured at least a week to ten days. I was very happy.
-
READ! Watch! Listen! Since most time spent at the anvil is devoted to thinking about what to do next, it really helps if you do a lot of the visualization before you even buy your first hammer.
Back when I started in the mid '70's, there were not a lot of books on 'smithing let alone videos, youtubes, etc. I thought I had a handle on the process but the most humbling moment of my life was standing next to the anvil, work and hammer in hand and thinking to myself, "Now what?"
ABANA, PABA and other relatively local (to you) groups like MASA, BGOP, etc.are great places to get to see and talk to other smiths. I started in a real vacuum.
There are many articles and videos out there on minimalist set ups. For a absolute beginner, the major advantages are size and affordability. Remember the rule of hammer weight to anvil weight is about 1:10. For a 2 pound hammer all you need is 20 pounds worth of "anvil". My first anvil was 135 pounds and I have yet to pick up a 13.5 pound hammer.
A close by resource is Hopewell Furnace, NHS. From West Chester it is 100 N to 23 W to 345 N. I am the Master of the Blacksmith Shop. Sheep Shearing is in early May and Living History starts about mid-June. The best way to contact me is the call Hopewell and have them get in contact with me.
I know smiths that drive Mercedes, I know smiths that can hardly feed themselves. I have a day job, thank God. I do not take commissions as I pass the work on to other smiths who really need them. It is a great hobby, it is a path to a career. The best path is to stay in school and work you way into it.
This to the 1,000,000th power of ten.


Making knives from old tools
in Knife Making
Posted
I'm going to make a suggestion, that in some circles is unpopular because it goes against the grain of blacksmiths using scrap for every thing they make. Use a known steel. You will simplify your life.
Using known steel eliminates several steps. You won't need to test for hardenability. You won't need to spark test.
It will react to hardening and tempering in a predictable manner.
Most of the knife makers I know have said this over and over again.