Adam H.
Members
-
Joined
-
Last visited
-
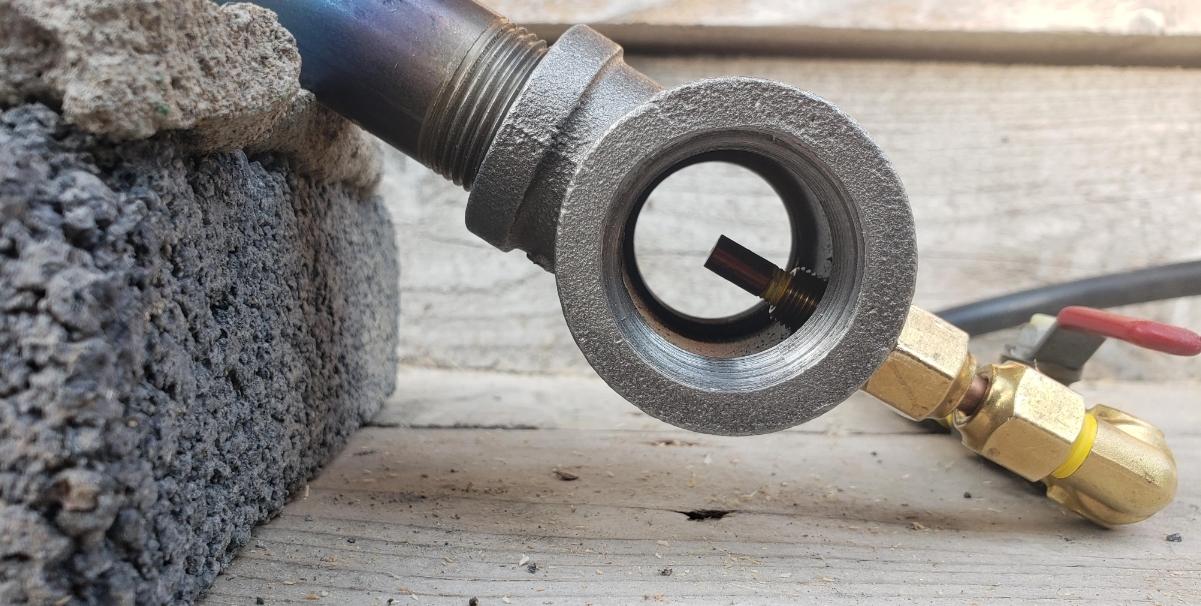
Oh, okay! I mistakenly thought those were just another take on a Venturi. I had no idea the different designs did different things, neat! The regulator, I'm afraid. I thought everything was sufficiently covered, but as it turns out, it wasn't. The mig tip I made certain was clear of obstruction after cutting and filing down, but I've read today that teflon tape can end up being cut to ribbons that hang outside of the threads on the inside?
-
Can you explain a little more what you mean by a linear design? Between the two, a new burner would be way more preferable!
-
Welp, looks like there's nothing left to do but go back to the drawing board on this one. That's a bummer, it's going to be a real crunch to finish this project in time, but I think I can pull it off. Thank you everyone for the input! Next try will be better.
-
Ah! My apologies, I had been combing through so much it all just sort of mushed together. I left the burner at work, so I can't get a measurement right now, but I want to say it's 1/4" ID pieces? Would it be possible to re-use the brass pieces and get some more black iron pieces to downsize to, say, a 1/2" burner, while also expanding the interior of the forge body? Short of that, I may have to go back to the drawing board with this one, and order more brick like you said.
-
I may have to go with the latter option and enlarge the interior, then. I was planning on doing so eventually anyway, after getting through this one project. I remember in my research that you had stated the smaller the burner the harder it gets to make correctly; I tried my darndest to get everything perfectly neat and straight with this one, but to my eye I am not entirely sure I succeeded. I'm sure it'll function, but it'll never be flawless. How thin do you think I can afford to have the walls of the chamber be, when I go and enlarge the interior?
-
Hello all, I have a few projects I would like to share, so I figure I would just make a thread for all of them instead of posting multiples. Most of what I make is simple stock removal projects, made from oven-softened files or saw blades gifted to me by friends. I also re-work the occasional old knife into something new (after doing my best to confirm it isn't a valuable antique!). ^First up, a file knife. Olivewood, copper, and buffalo horn from a dog chew. Full flat grind blade, just over 3" long, about 7 and 3/8" total. ^This tiny knife was based on this knife found in a glacier melt in Norway. The original used birch for the handle, while I again used olivewood. No sheath was found, so I made one like you would for a puukko, with a carved wood core wrapped in veg tan leather. I thought it ended up looking like an acorn, so I tooled oak leaves and acorns into the leather using a bamboo bbq skewer. The blade is made of a piece of saw blade gifted to me by a friend, and matches the original in size, save for thickness, being only .090" thick. https://i.imgur.com/5HRa6Zn.jpg https://i.imgur.com/OOFtrY4.jpg ^The scabbard build and handle-re-wrap I did for my Hanwei/Tinker Pierce Norman sword. The scabbard has a poplar core, lined with natural linen and wrapped in veg-tanned sheep or goat skin (I forgot which). I tried to keep it as period correct as I could, even referring to the archaeological find for the stitching on the back. I didn't include a chape, as those were pretty rare for the time of the Norman Conquest, and I was trying to create the look of a more "common" sword. A before and after of an old butcher's knife I converted into a mid-19th Century bowie knife. The darker wood (which I was unable to identify, but has a dark dark red color when you cut into it) is part of the original handle. The lighter wood is black walnut from a branch a storm knocked out of a tree in my parent's backyard. Kept as much of the weathering on the blade as I possibly could; I didn't want it to look new, even though it was made into something new. Mild steel guard, and red brass plaques with my initials inset into the handle. 8 and 5/8" blade, just shy of 13" overall. Balance point is about 1.5" below the guard. I wish it had more, as this blade is on the thinner side, about .135" on the spine. Still, she's razor sharp and very fast in the hand. Would be right at home in the old West, or even the US Civil War. I plan on making a sheath soon! More to come!
-
Swede, Mikey, Frosty, thank you for getting back to me so fast and for the welcome. I will try to answer all of the questions in order: The burner was in fact outside of the forge container, as it is still drying, and I am also still mulling over what angle to have the burner inserted (I left out making the hole, as it can be easily added, the forge vessel being made of 2600 rated IFB). It definitely makes sense that it would run differently inside the forge; I suppose what I was looking to do was try to see if I was getting a good looking flame. Also I was just really excited to fire it up, ha ha. If it helps, I was following the parts list from this video (save the other bits with patina; those are reused from my first burner, which was a gas hog and way too big for my new forge): https://youtu.be/dXFcwheId9I I will give it another shot, this time in the forge, before I try adjusting anything. I ought to expand on the reason I mentioned prior for the burner not being inserted into the forge yet. As I said, I am having trouble making up my mind on the angle. This is the forge I cobbled together. I did not feel comfortable handling ceramic wool, so I went with IFB instead. I am on a bit of a budget, so I tried to stretch 4 2600 degree rated bricks as far as I could. The sort of jigsaw looking fit is what was used in the final build. I had one 2300 degree brick left over from my first forge, so I used it to add more insulation in the corners; I figured being away from the actual hot interior, their lower rating and relative fragility wouldn't be too big an issue. You can see in the photo that I ended up with something a little different than the drawing. I decided that I wanted something to put in the front and back of the opening of the forge, so I saved half of that 2300 brick for that purpose, rather than sawing it into quarters like I had planned. I wanted to keep at least 2.5" of insulative material at all angles though, so I used the sawed-off rods of the 2600 degree IFB I was left with after cutting the joints into the brick. They weren't quite tall enough, which explains why it looks like an adobe building instead of a box. I ended up mixing way too much satanite. After everything was together, and not wanting to waste it, I just kind of... slathered it on the outside. Trying to offer as much structural integrity as I could, remembering how my previous forge of 2300 IFB crumbled to bits after a summer of use. I'm sure this will do little to stop this one from meeting the same fate, and the whole mess will probably serve no other purpose than being a big heat sink and flake right off... But it at least makes me *feel* better, ha ha. But enough of my justifications for what is probably a poor build. Like I was saying, I am unsure of what angle to go with inserting this thing. The pencil in the photo shows my current thinking. Trying to bounce the flame off the roof, onto the left wall, and hopefully spiraling to evenly heat the forge. In theory. The internal volume of this thing is so small, I don't know what will happen. But as long as it can make stock removal blades hot enough to quench, that is all I need it to do. I didn't mean to write an essay, but my fingers got away from me. In short, I plan to take all of your advice, and try running the burner again in the forge at a higher PSI as Frosty mentioned. To that end, am I on the right track with the angle I had planned? Is the tiny internal volume of this little monstrosity going to cause headaches? Thank you all in advance, I really appreciate it. I have a friend getting married in late August, and I promised the happy couple a chef's knife as a wedding present. EDIT/P . S . : I forgot to mention, Frosty, I am in the CNY/Upstate NY area.
-
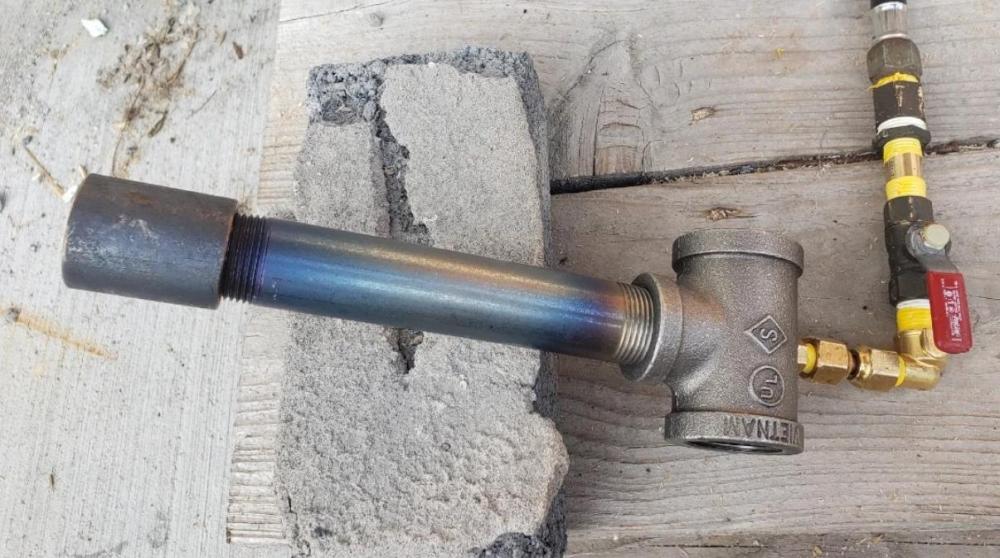
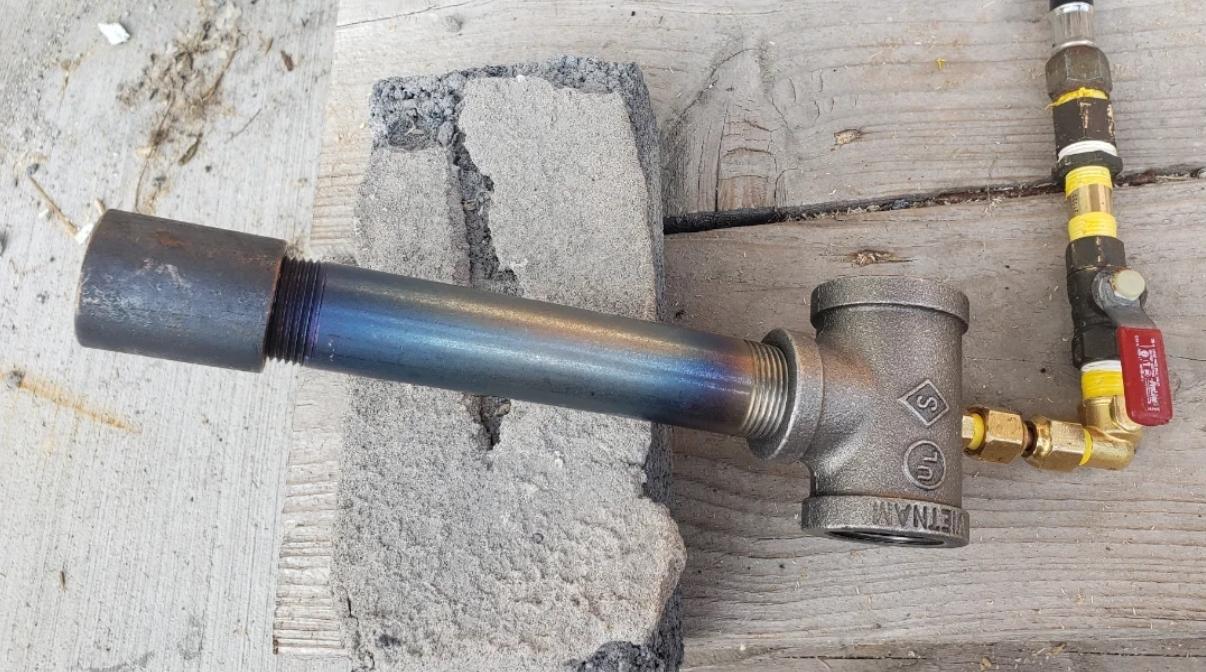
I fired up my 3/4" T-Burner for the first time yesterday, and there were some issues. First there was some sputtering/popping at random. I ran the burner between 2 and 10 PSI and it persisted. This I figure this is either my mig tip needing adjustment, or my regulator being old... it had sat out in the elements for a couple of years. I figured I would at least give it a shot before buying another one. What really concerned me, however, was that the brass fittings all the way up to the valve hot VERY hot, too hot to touch. This was after only 5-10 minutes of operation, in the exact position shown. This can't be normal, right? What could be causing this? I'm eager to get back to forging but I want to do so safely. Any advice would be greatly appreciated!