BoardMoreThanUsual
Members
-
Joined
-
Last visited
Everything posted by BoardMoreThanUsual
-
Thanks JHCC, All i have at my disposal is an old plumbers B tank with a standard soldering tip, i can use that it gets there just takes a while to heat up, ill keep your suggestion in mind.
-
i decieded to print out the "instrucions" as opposed to taking notes and missing something, hopefully i can get out there this weekend when the rain stops
-
Thanks i will TRY and keep that in mind going forward. I just checked my pile of steel and see i have at least 10' of 3/8" sq bar( hr) so ill take notes from your post with me into the garage next time i am out there and make a couple of those type hooks to start off, if i get into a grove maybe more than a couple. when i get that down maybe adjust to make curtain hold backs if the mrs likes them. i keep thinking to myself i need to expand what i am making but unless i can do something repeatedly its ALL expanding.
-
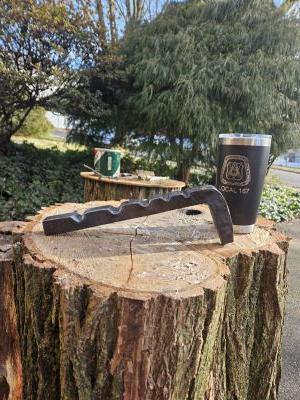
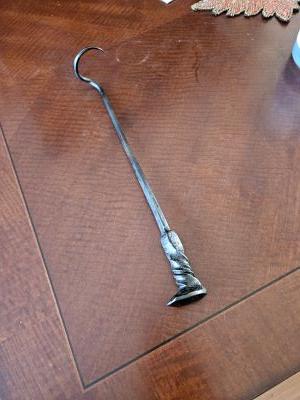
The hook doesnt have a purpose, probably just gonna be a display piece. I have a a few spots around the house i can hang things that i am pleased with. It will go there. I think i came up with a plan, im gonna go room to room in the house and try and replace every hook type thing made out of either plastic or stamped steel with a hand forged piece by me. Be it a towel hook or curtian hold back. The ones we like ill try and copy , the others ill try and make something i can be proud of. We are forcast for rain most of the week so ill use this time to try and plan out what i can do with the material i have on hand. I think that will keep me busy for a while atleast till i can forge more that one hook in a session. Wish me luck.
-
Yeah its a bit big, but atleast its complete and not burnt. My goal is to have atleast something to show for my day forging. And this was by no means my first leaf, it was my first successful leaf
-
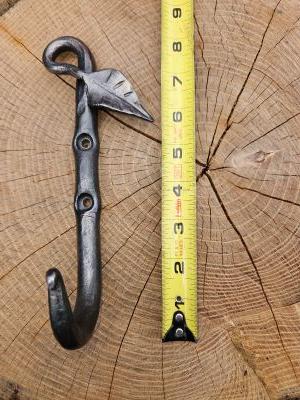
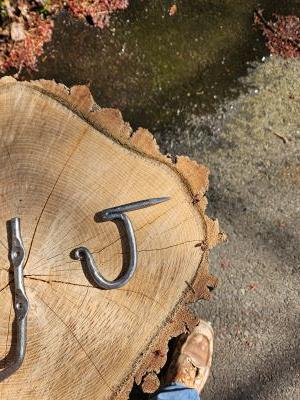
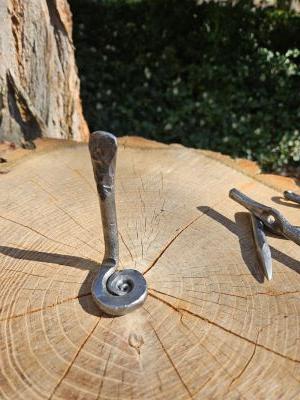
Hi Folks, did something today. made a hook, i know shocker. well i started out trying to make a hook out of 2x2x3/8 angle....that didnt work i think i started with to big of a piece (2"), so i will re visit at a later time. then went to my old stand by scrap, old 3/8 landscape nail, got half way thru it and burnt it up in the forge, still getting used to the coal/coke forge. so i went to something a bit heavier a piece of 5/8 round i got from the jobsite. i dont know how long it was when i started but almost screwed that up too but it was long enough that i could cut off the burnt end and start over. i ended up with a pretty large and heavy leaf hook, my first successful leaf. as it is finished i do see where and what i would change but i am happy with it.
-
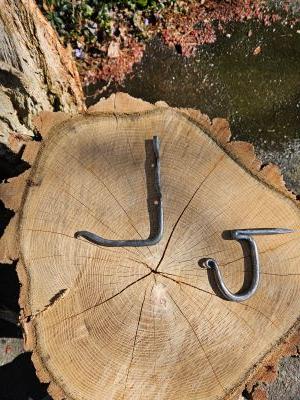
good morning all, 1st sorry i missed your post in my replies swedefiddle, i will keep the twist in mind for the next time i make drive hooks, thanks for the idea. been looking thru the 366 hooks pictures, who would have thought hooks could be so complex, simple, beautiful and different, in my minds eye i saw nothing but j hooks or s hooks when i thought about hooks. i guess this is one of the reasons i was getting frustrated with my making. this has me rethinking on what i want to make. i realize that many of those hooks are more than what they seem and i do not have any misconceptions that i will be able to duplicate them all anytime soon. but i am excited to get out there and start making hooks. i know you all have been saying there is more to hooks than just hooks but i guess i have not been able to comprehend what you have been saying. thanks for keeping with me and not getting to frustrated and giving up on me.
-
Thanks Iron, I bookmarked the page for future use. By the way, went out to forge today and just could not get into anything. I try not to force it. Maybe the 366 hooks will inspire me
-
I gotcha, was more poking fun at myself about sticking to hooks n such for the time being. But yeah i understand your point and appreciate your input
-
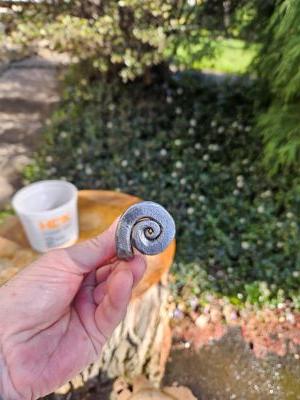
David, my brain hurt just looking at the sketch up. I dont think ill be doing that detail of drawing for hooks . But thanks for the example of what i should be aiming for. As far as the quality or lack there of on my projects, i went out there today to do something... anything. i have been coming up with excuses to not forge the past few days and didnt want to let another day slip by so i went out with out a plan or project in mind. I looked in my bucket and picked 3 old landscape nails and said lets see what i come up with. I feel like i rushed it i dont know why i feel so rushed when forging i just have to calm myself. After all the post/discusion today. I have come to the conclusion i need to stick to the basics for a while. I have enough small material to make 100s of hooks, leaves, BBQ tools. So be prepared to see all kinds of basics getting posted i appreciate all the feed back. Frosty, i always take your input to heart, the drive hook started out as a j hook mid way i tried to turn it into a drive hook so yes the perportions are off and will adjust in the future, the screw mount hook was an attempt for a hook for either grinding belts or angle grider disks again just didnt plan just hit. The stamp will have to wait till monday to find out if it works till she gets to her class , will let you know ill have her take a picture of the stamp in the clay if it works.
-
wow lots more replies since i went out to the garage. i took a couple hours to do a couple basic hook i have not tried before. Again 1st runs are always not the best. Also did a small spiral stamp my mrs wanted to try it for her pottery . idk if it will work but she will give it a shot. Frosty, Thanks managing my expectations is a weak point. I do get your point about comparing myself to what i watch. in "life" i preached to my kids as the were turning to adults was never compare yourself to what you see just compare yourself to yourself and hope to move forward. Larry,George. Drawing is not a strong suit and i did pick up a journal and some clay for the process. i have yet to use it but i will try and force myself to do so moving forward. them sitting on my work bench are not doing anyone any good. Billy, i too enjoy the guy on BMS you tube, his tong videos and his multi tool to name a couple were very informative. Again i think i just needed some reassurance that i wasnt spinning my wheels and wasting time and money. ALL you have helped along the way even if it was just commenting on any of the posts in this topic.
-
George, your response came up as i was typing mine, thanks. Yeah i guess i need to just keep making stuff so i get better at it, material isnt a problem luckily enough a got some from the job site before it got tossed and from a couple iron in the hat raffles from the local meets. I have to suck it up and keep making the simple stuff. I get to exceited when i see things done easily,as i said, online. Ill keep posting my progress and will keep trying
-
Thanks Army, Yes i am familiar with BBF i think i have watched almost all of his videos. I think thats part of my problem. His as well as most of the videos i watch make things look to easy. Say 5 hooks in an hour.... for me its more like 1 perfect hook in 2 hours. While i am not making things to sell, i am getting frustrated cause i cant figure out why its taking me so long. I like your idea of setting a goal for down the line more than a goal for today. Ill try and get myself into that mind set. Its hard for me. When everything lines up for me to get out into the forge i want to have something to show for my work and if i just end up with yet another hook i get discouraged. Again i know i should not , but it happens. I think thats where the you tube has me messed up. They cut and edit the process to make it watchable, even if it is only a couple heats of drawing out or what ever it is. I like to know how much time it actually should take. Making a set of dividers in 35 min for video is great but how much time should i expect to be spending on it. Hours days weeks ...? Yeah there is no right answer but this is where i am frustrated. Again thanks for the response
-
Thanks Frosty, sorry i kind of left things hanging here the past few post, i am at my frustration point in the process. I want to forge , i like forging , i have time to forge, i just dont know what to forge . Let me say i dont know what to forge that i am able to forge. i have seen lots of things on the internet that i want to try but most are above my talent level. the last few times i been out in the garage i have just feel like i am spinning my wheels. i melted my air grate in my "fire pot", failed at making a coal shovel i was proud of , my lack of knowledge and talent is catching up to me. i still cant find a blacksmithing class near by and the one i found i am on their mailing list for when they start up again so thats out of my control. went to my library to check out a book or two but they had none in stock. so asked another smith for recommendation on a book and purchased that one (A Blacksmith's Craft). Problem being i was never a book learner more of a hands on learner. read thru some posts on here for beginners and they have been somewhat helpful and encouraging knowing i am not alone but i still. i dont know what the point of this post is other than to vent my frustration, sometime listening to myself the answers come to me and maybe thats what i am hoping for. i keep telling myself NO ONE has gotten 30 yrs experience in 9 months. this is a process and it takes time. But yeah. thanks for reading all and thanks for the continued support form you all here. ill keep trudging along , time takes time.
-
So, for my next under taking i want to turn some old stone carving chisels into some metal working tools. I have no idea where to start, do i just grind them into the shape i want (while cooling as i go), for do i reforge the all together? There is a few hand fulls of them so i could save a few bucks getting some use out of them. Suggestions welcomed. Thanks in advance.
-
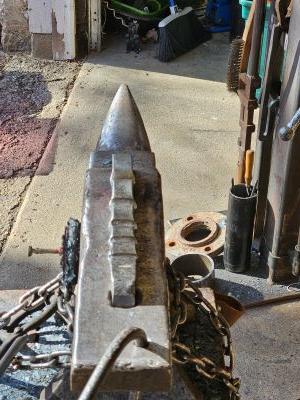
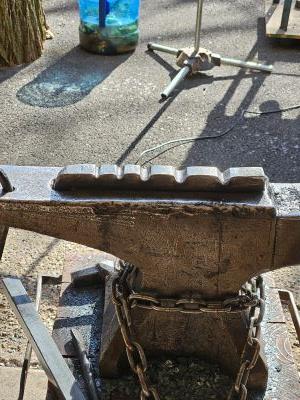
hey all another 1st for me, well a few 1sts. made a hardy swage block (inspired by BBF). Used 1" square bar of 1018 steel i kept it 3 foot long till i got the bend close then cut it to the size of my anvil face. i watch the video multiple times before starting but as usual the steps left my brain for a while till i got frustrated and paused then remembered to UPSET the corner to get it to sit flat on the anvil. after that long process i set out to do some 1/2 rounds and a 90* V. 1/4 3/8 1/2 5/8 half rounds and then used 5/8 sq for the v. i made this in hope it will help me making other things down the line. for instance want to make a few more hand fullers and hope this will make it easier getting different sizes of those. along with those 1sts this was the first time my anvil was warm to the touch all the way down to the base of it. i am guessing thats the first time in decades this anvil was warm thru out i dont know why but that made me happy and also made me think about everything else that came to life on this anvil, only wish the mrs father was still around so i could ask him more about his work on it and more of the history of it.
-
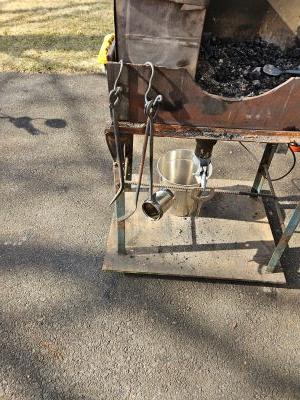
back at it now with the coal forge. made a few coal forge tools. kind of small but seem to go with the size of the forge and functional. also finished a railspike steak flipper this was done in my propane forge a while back but figured id put it in as i am pleased with it. Last but not least i tried my hand at some hand tools. 1/2" coils spring with the coal forge. a small ball punch and a small hand fuller. i hardened in some cooking oil and tempered to straw color. this was pretty cool for me i am pleased with these as well. i have no idea how they will hold up but wanted to try it.
-
Sure does, my novice mind figured i can make a few quick s hooks out of the 1/4 inch cause i could easily do it with the propane.... lesson learned. Ill post the finished tools tomorrow in my general topic once i wire wheel them and get the finish on them. Thanks again
-
Yes gettting the feel for time, ill learn. Was only the 1st full day of actually working in the fire. Did ok with 3/8 or better stock but not so much in 1/4 for some s hooks to hang the tools off the forge. Could turn my back for a minute with little propane not so much with this. Its more interactive.
-
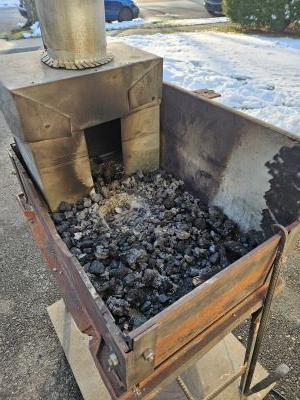
Ha, yeah fire control... thats the next mission. I prolly wont be modifing this forge again i will just learn on it. I have ideas for the next one but will save that for down the line, let me get used to this one so can can not melt thinner material in 30 seconds. Not so much worried about bigger more worried about firepot maintanece, and that i am afraid is something i just have to work at. If i can keep it clean and full of fuel the fire itself is plenty big enough for what i need at the moment
-
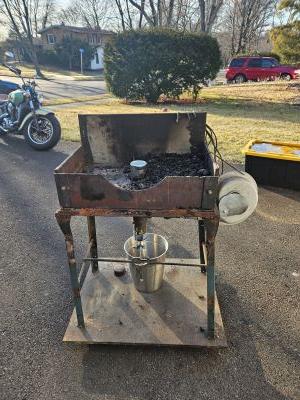
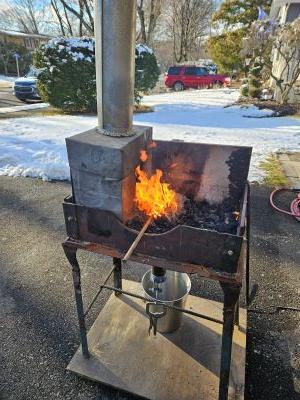
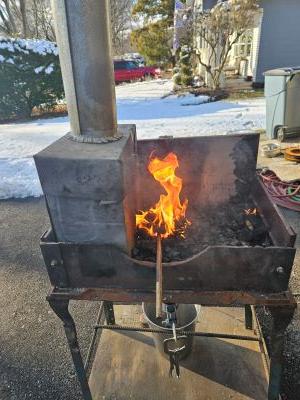
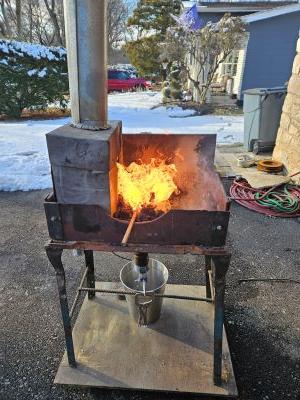
hi Again, I moved the blower and switch to the side and it makes it much easier to control and remember to turn it off. i can not believe how much hotter it is than my little mr volcano propane forge. i burnt the tip off many a taper today i am sure ill get the hang of it eventually. i am definitely enjoying the coal forging process and looking forward to getting a proper set up. made some small forge tools today have yet to "finish" them but all the forging done on them poker rake and water can holder ill post pics of them on my other thread ill leave this one to the forge as to stay on topic. the hood seems to work ,poorly but draws, not to worried about that as i will be upgrading that as well when i upsize to a more proper forge. For now my main concern is the small size of my "firepot" it seems to get blocked easily and requires constant attention thus why i made the forge tools 1st. but for what it is i am happy and gives me a good 1st taste of coal forging. thank you all again for everyones input / suggestions you all did not let me down.
-
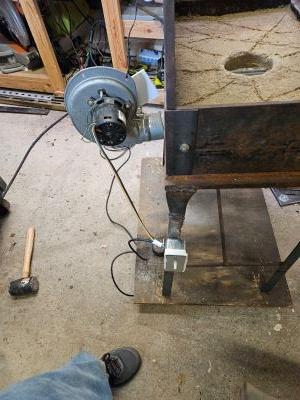
Yeah i must admit i didnt put much thought into the layout of controls and such basically put everything where the previous owner had them not to mention i was exceited to get her fired up. If i move the blower to the right side of forge then i can move the switch to that side as well putting it into my line of sight. The previous owner had an extention cord with a slide dimmer on it that he kept close by. I really appreciate everyones input
-
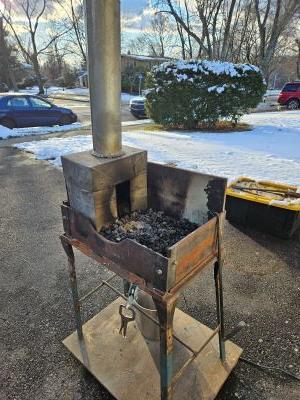
And wha-la i got her fired up did not have much time to play was almost time to start the grill for the steaks for dinner so will make the needed tools tomorrow the next day i dont know. i am pretty sure the hood is undersized but its what would fit in the forge probable better to do with out .. to be determined 1st impression a lot harder to get started than my propane forge but once up and going man its hot. i kept forgetting to turn off the blower when going to the anvil that i am sure will come with time. i ll watch some more coal forge videos on you tube but most just skip tru the fire and go right to the hammering.
-
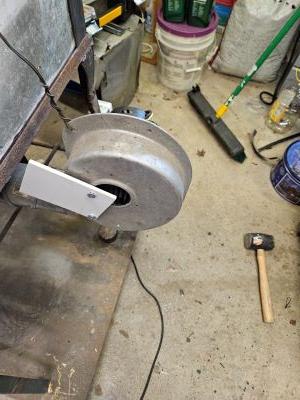
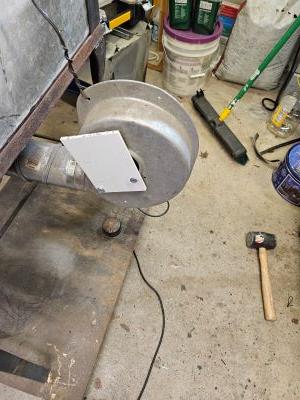
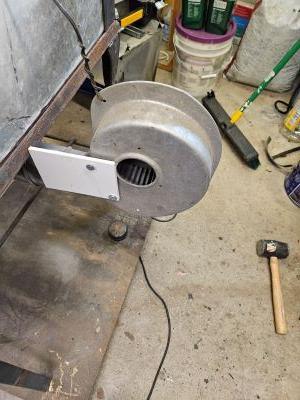
Added a intake "gate" to the blower along with a switch this morning. Again this is just to see if i cant forge with solid fuel this by no means is intended to be a permanent set up. the intake "gate" is functional all the way open blows paper out of the "pot" all the way closed it barely dances the paper. the hood is next i am going to try and make something out of the old hood parts and what ever else i have stashed in my garage. as i will be pulling this in and out og the garage for use i need to make it removable and then secure when in use this should be fun.
-
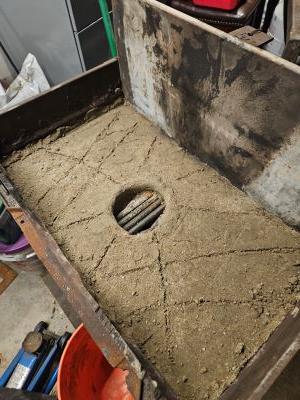
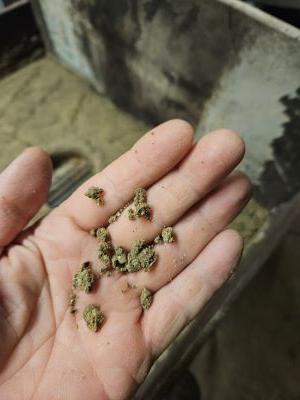
It really wasnt wet at all squeezed it, it clumped it didnt ooze between fingers. I actually was afraid it was to dry. There was no moisture visable . I tamped it with a rubber mallet. I did put score marks in it after the pictures were taken. If it does crack i have plenty of materials to try again. Ill be working on it again tomorrow ill post pictures again of the liner and let you all be the judge if i should re do it. Ill be working on the fan and such and some type of tong holder. Thanks again Ill go down to garage and take a pic now and add it here from the puter so i can shrinkbthe file first