MarcD
Members
-
Joined
-
Last visited
-
That's rough man. No time like the present. I have squandered many years of my life not knowing what it was that I wanted for myself or how to take care of myself properly. Now I know a little more, maybe I'm a bit wiser, and if I'm lucky I still have enough lead in my pencil to achieve a few of those dreams.
-
Neil! Thank you for clarifying that and for your patience with me. I do appreciate it Like I was saying a couple of posts back, "...my excitement got the best of me." Learnin' is occurin'! Back to the anvil with me.
-
Congratulations for what exactly? Thank you very much for explaining about propane tanks and for the tips on how to mitigate the freezing. I'm not looking to discuss the "One Forge To Rule Them All". I'm looking to discuss a forge specifically designed to make hammers, to make it as small as possible so that it is efficient. My question about size is exactly so I don't make my forge too big. I don't want to waste time and money figuring it out since I'm guessing someone here has already taken the time. If you think that that is trying to take a shortcut or being impatient I can see your angle but in this economy, if I can skip making a forge or two and maybe a year or two to get where I'm trying to go, I figure it's worth asking people who know more than me. Why "reinvent the wheel" you know? I will experiment with this if I must. But typing words only cost the time it takes to type them.
-
It has been quite some time! Life has a tendency to take over and keep one from their hobbies on occasion, am I right? I have had many days to ponder what I actually want the forge for and if what I have been designing is really what I need. In retrospect I should have asked these questions in the first place but my excitement got the best of me. I want to be able to make hammer heads, hardy tools, platens and other such things. I need a forge that can handle this kind of large, blocky shaped steel efficiently. I will make/use other forges or do brick forges for other purposes but really this is what I'm trying to accomplish. So at the risk of beating a dead horse that was beaten to death all I'm saying is that I'm worried that I'm going to use all of my budget on something that won't be especially good at what I'm trying to do. Any recommendations on dimensions of the forge and the size of the burner(s)? The little "Frosty N.A.R.B." is amazing for brick forges btw! I have been enjoying playing with it quite a bit. I'm currently waiting on a few more bricks so I can work on an octopus sculpture for my wife. So Frosty if you're reading this... thanks again. My mind has been whirling with wanting to test different sizes and configurations of naturally aspirated multi-port burners. I hope that I will be posting about those ideas within the year. As an aside I intend to compile everything that you guys have taught me here into one easy to read post with pictures of the forge that I make. I think that it's warranted since this thread was originally about making a Chilli Forge clone.
-
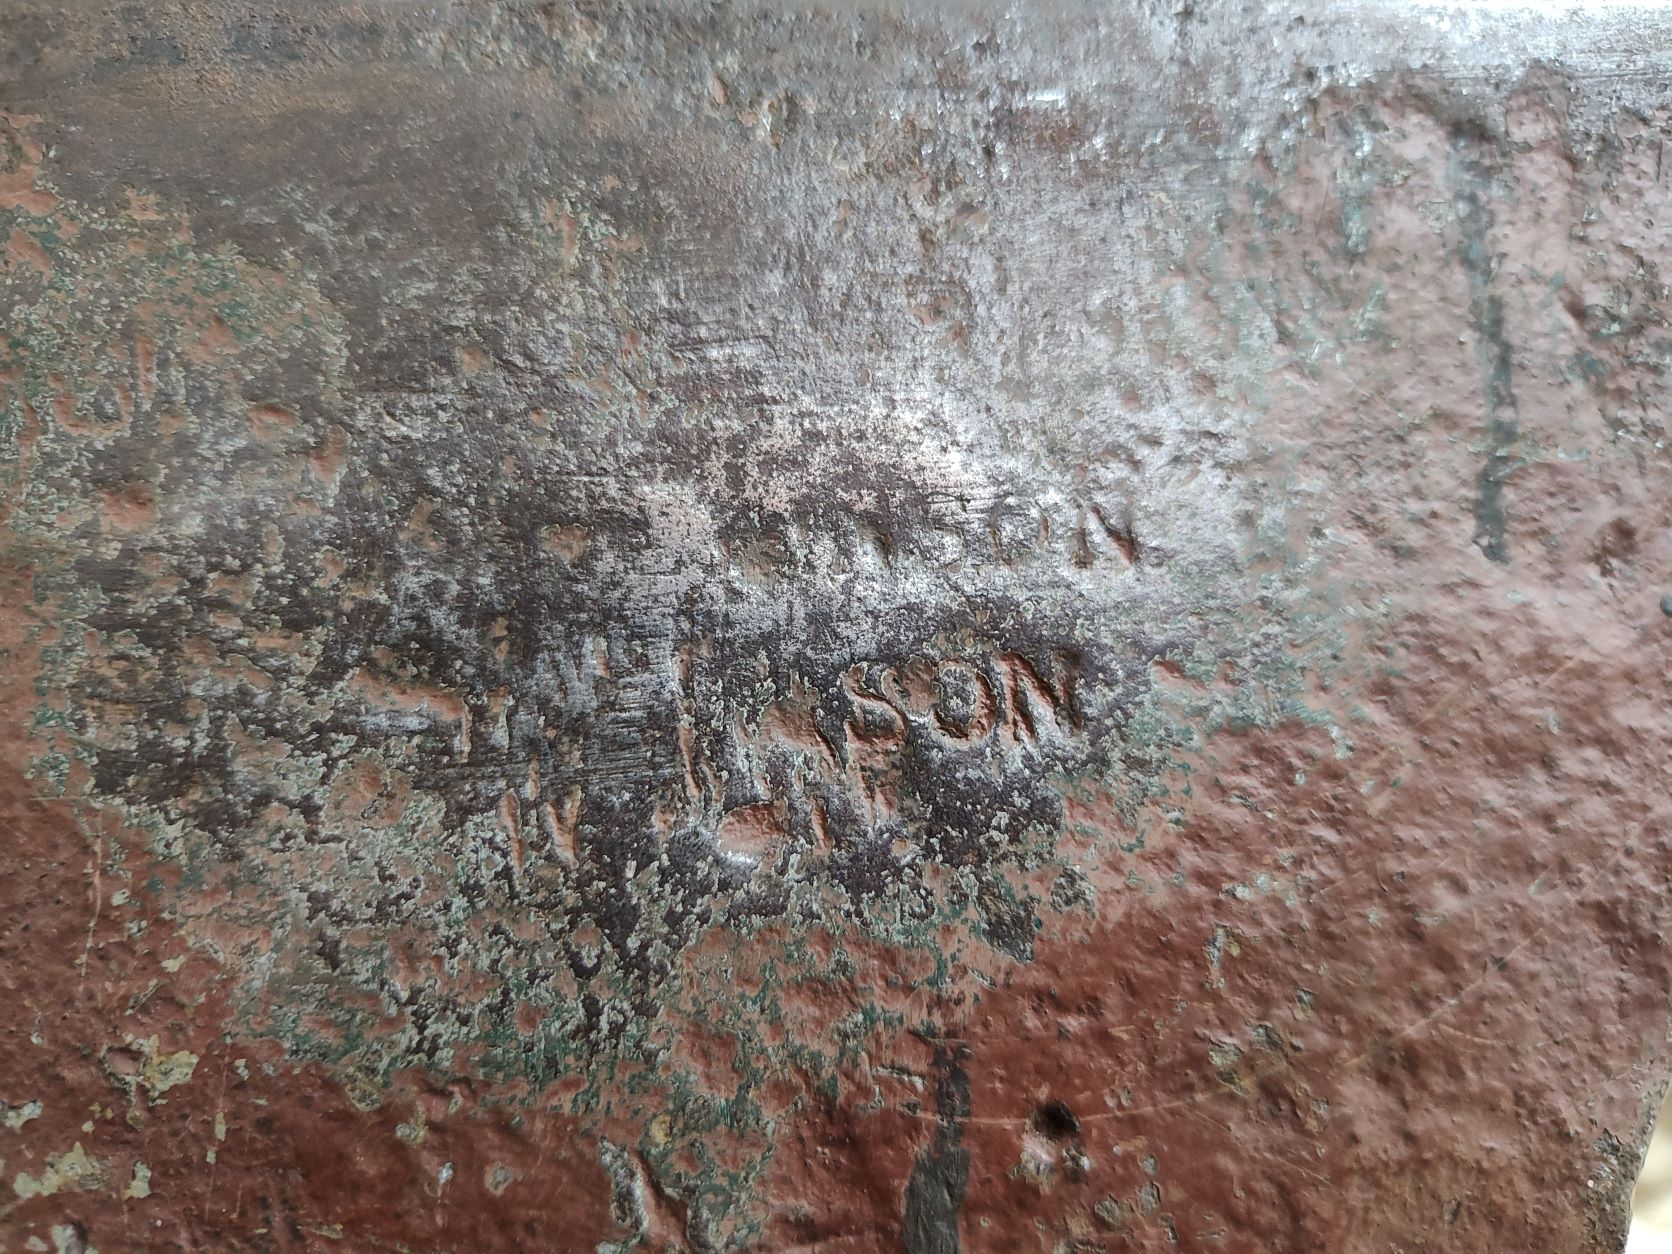
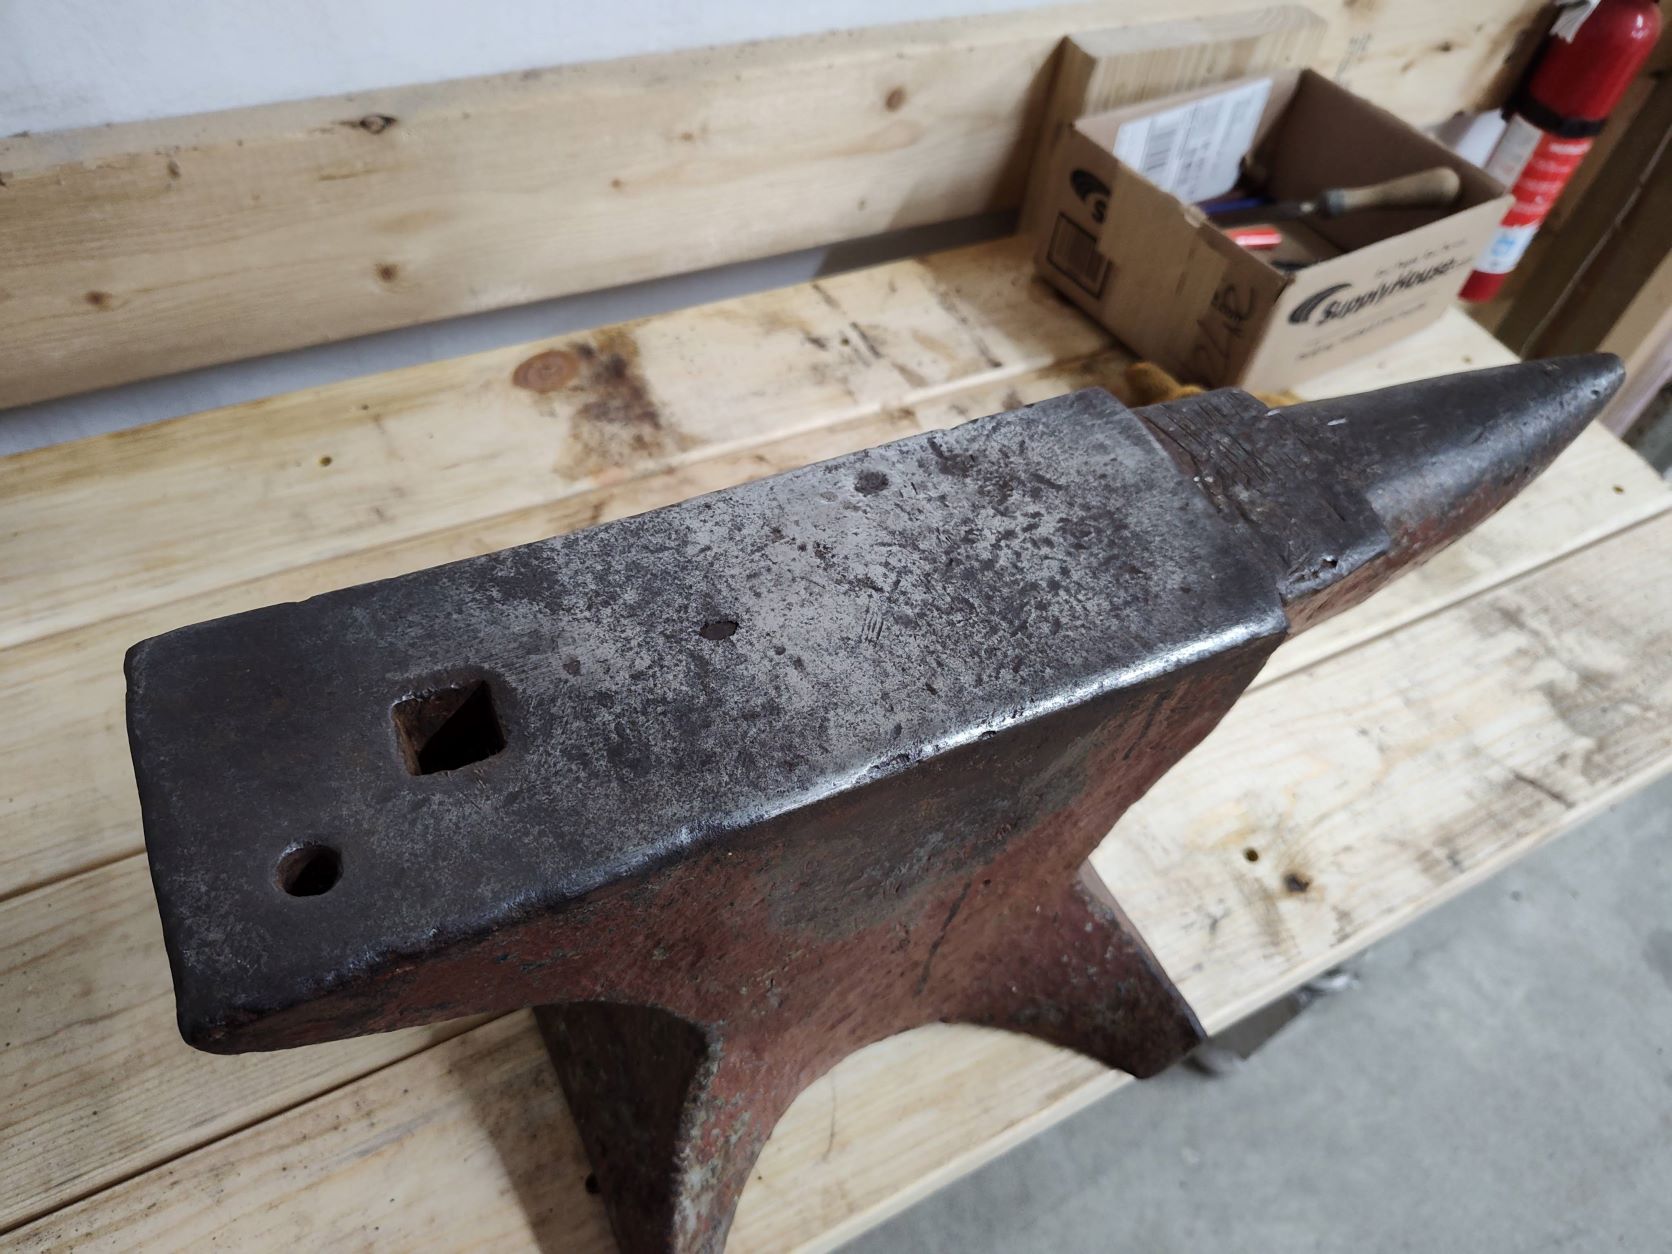
Hey Hi Hello! My father found an old anvil being used as a tarp weight in Nova Scotian harbor about 10 years ago. He knew that I like to hit hot steel so he asked how much they wanted for it and they gave it to him for free since they would rather it get used instead of rusting away in the ocean spray. I hadn't really put any effort into identifying it until yesterday evening but lo and behold it's a nice little 1-0-22 Wilkinson! Very good shape in fact. I figured that I would post a few pictures for posterity. In addition I would like to offer a couple of my own pennies when it comes to the question of the age of anvils. The age of the anvil is important no matter what age it is. It may have no PRACTICAL importance or maybe it does depending on the anvil. However it definitely has HISTORICAL importance. It is fun to try and date anvils. It is interesting. A lot of these anvils will be over 200 years old before too long. I see no reason not to be curious about these details. I'm sure that we can all agree that something that was made even 100 years ago is old even if it is still a practical thing. As I'm sure many elders would agree: old doesn't necessarily mean outdated. Be it an 1800's Wilkinson a modern Nimba or an unmarked medieval museum piece I think that it's important to keep track of an anvils age as best we can because, if nothing else, everyone likes a good story. Having said that I would like to ask if anyone has a copy of Anvils in America that they could reference for me about the approximate age of my anvil as I do not have a copy and can not afford the book at this time. Or any other reference material that anyone has to offer I would be overjoyed to hear about it!


-
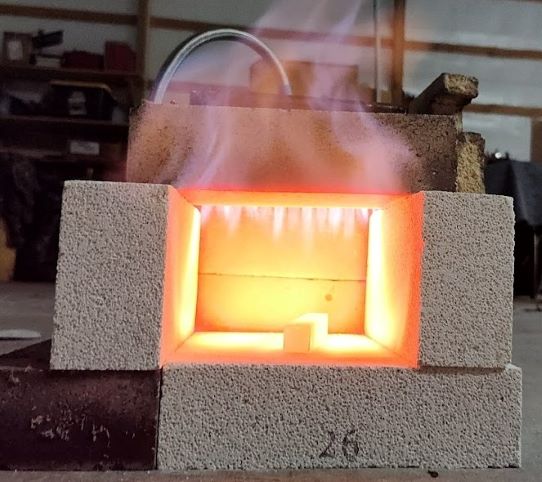
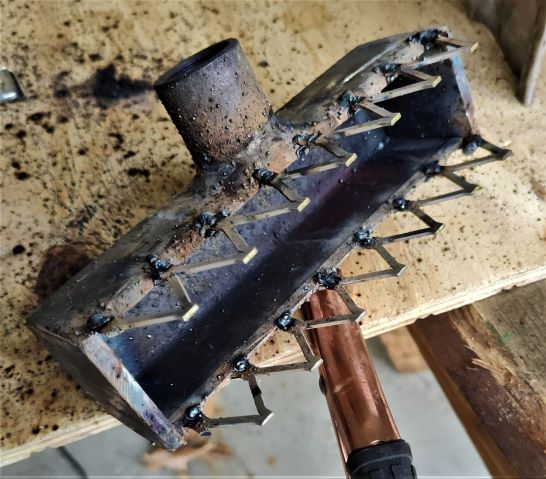
I left the burner in the mold for around 22 hrs at temps 80 degrees F or above. Cracked the mold and gave it another 20hrs. All the while keeping it covered by 2 layers of wet towels. I then baked out most of the wax by putting the whole thing in the oven pointing down into a pyrex dish. 1hr at 225 did the trick fine. I them immediately took the burner to the shop and drilled out the rest of the wax (there wasn't much left) and put it in my little brick pile forge (~155 sq. in.) to fire the burner up to temp while it was still warm from the oven. Dunno if that helped but I figured that it couldn't hurt to have the first heat be one event. It lit up fine first try. I started it at 1 PSIG and with the bricks spread out to keep the temp low to start. I increased the heat incrementally over a 4 hour period by closing up the forge bricks then slowly raising the fuel pressure. About 4 PSIG/hr. I got it up to about 17 PSIG before my tank froze but I didn't get a picture because I was waiting to get to 20... The picture is of the forge at 7 PSIG. The flame was definitely reducing though I am not experienced enough to tell how much. Just that my test piece of mild steel wasn't forming scale. Obviously the color is completely wrong. It was more of a medium orange. I found out after the burn that my nozzlettes had a little bit of Kastolite blocking them which I assume is why the flames are irregular. I cleared all of the ports out so I should get better performance there next time. On to the forge bit! I was waiting because I didn't know exactly how big or what shape the burner was going to be.
-
The IRS might want their name back though! I soaked the crayons in water for a couple of hours and the paper came off pretty easily. I found that without the paper Crayola brand crayons fit in a 21/64th sized hole pretty well. The mold is made from a piece of an old formica desktop. It is 1.75"H x 3"W x 8.5"L. I'm using Pam as a releasing agent. My strategy was just to make 1 pound batches of Kastolite and packing each one into the mold very tightly before adding the next batch. Used a paint stick to push the cement down in between the crayons. 2 passes per cement batch and 3 more after the mold was full. I also used the flat of the stick to push the cement in along the edges when the mold was full. There was a little bit of water at the top when I finished tamping. I ended up using about 2.25 pounds of refractory. I'll keep it covered with damp towels and above 80 degrees until tomorrow afternoon and we'll see what we got!
-
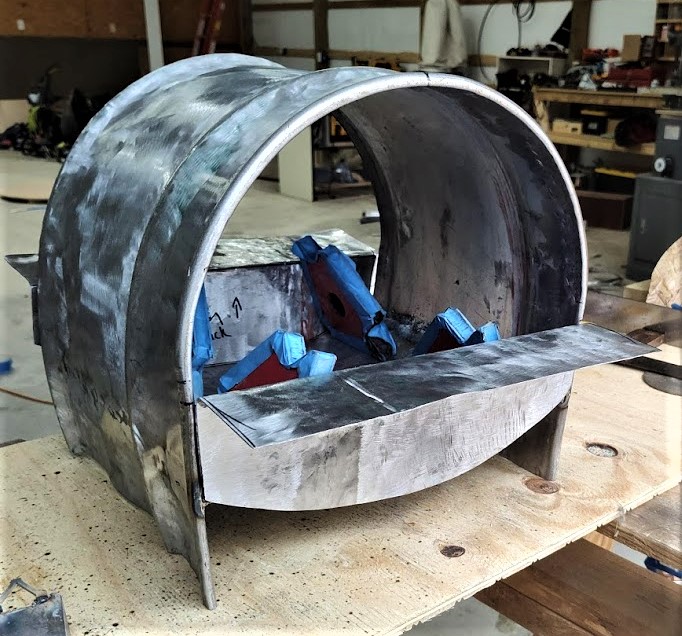
Alright a little progress has been made. I have my plenum welded up. I still need to clean it up a bit. Pay no attention the the exceptionally bad welds. I'm using a $100 harbor freight flux core and I'm not very good with it yet (if that's even possible...) I also spent some time doing some steel barrel cutting, shaping and welding. Ran out of wire so I had to put that on the back burner. All puns aside it's actually a good thing that I had to stop welding because the front and back panels are 2 inches too short. D'oh! Finally I put a t-burner together and tried it in my first tragic attempt at making a forge. It lit up first try and daaaang it roars. I LOVE that. Much better sounding (and hotter) than my cheap chinesium burner that I got on amazon. I didn't have the time to tune it or to let the forge come up to temp so the only picture that I have is probably not enough to really know what I need to do to tune it but there it is. I think that I have been able to combine most of the advice that I have received here into my design. The burner will be bottom mounted facing up at a slight inward angle to increase the distance before impingement on the wall. The forge floor will have around 2.5 inches of the width of the floor raised by about 1/2 inch along the side where the burner will be installed to reduce the risk of debris and flux going down into the burner. I have an extra 2 inches in the bottom of the forge for a layer of perlite. Going with a Frosty NARB powered by a Frosty T burner. The forge box will be 12.5" long and it will be a semi-cylinder with a radius of 4 inches. So the floor will be around 8 inches wide. Minus the raised edge for the burner this will be about 300 cu. in. This will be for blade making especially heat treating so I feel that the low ceiling won't be an issue but I'd like your take on that. So now for my questions! -Casting/curing Kastolite. I intend to be very careful to add water only if needed and only a tiny bit. I am aware of this but I have very little experience in gauging that point where it doesn't need more. Any tips? Also just any tips on using Kastolite? -With my burner being bottom mounted it will be partially imbedded in perlite. I have read that these burners can start backfiring when the plenum gets hot. I have seen a couple ideas that could help like increasing the refractory mass of the multi-hole burner head. O just moving it out further from the forge. Now because I'll be in an extra 2 inches on insulation my idea is to essentially to fabricate and weld a radiator on the back of the plenum to help the heat escape by increasing the surface area outside of the insulation. Does this sound like a bad or a rad idea? I can't see what could go wrong but then... best to ask. As always thank you for your time gentlefolk.

-
Perfect thank you! Hopefully my next post will have some pictures to share.
-
I do have two questions about the NA multi-port ribbon burner that you built Frosty. 1) Do you think that I need to add Zircopax to the Kastolite? I looked up what Zircopax is. I see that it has a very high resistance to heat and chemical corrosion from alkaline. But what exactly does it do for/with the Kastolite? Do you use it elsewhere in your forge construction? 2) In your original NARB post you have some good measurements to start from and the pictures do show a lot but there is one detail that I just can't suss out: How deep did the plenum go into the mold? Or another way of asking would be: How high on the plenum tube ends did you weld the temporary angle steel to hold the plenum in the mold at depth? I'm 10 pages into the 42 page conversation but have not found an answer. I saw someone guess at 1/2" but I don't like guessing when I don't have to. Better to stick with what works like you guys say I would love to read the other 32 pages and I may at some point but... there's no guarantee that the answer will present itself and I need to go to bed today at some point And my wife wants dinner.
-
Did you mean "sticky" here Frosty? I'm still not sure that I follow! I have an idea to compromise between having the burner facing up along one side and having to move it up and mounting it to the curve What if I mount it facing up from the bottom but at a... ooooh say 65-70 degree angle, or maybe even more drastic. This would still put it in a very good position to encourage atmospheric swirl but mitigate some of the damage and blockage that could occur. It also has the added bonus of reducing the burner's footprint on the working surface of the forge. My forge shape is beginning to form in my mind. The chamber would be something like a half cylinder with a radius of 4". Make it 14" long. With a 3 by 19 hole, 6" hole to hole distance burner like Frosty's NARB leaves about 4 inches on each end. The volume is close to 352 cu. in. The burner is mounted on the bottom edge pointing up at the arch at a slight angle.
-
"...2" of ceramic blanket and 1/2" total hard refractory and kiln wash. Yes?" Yes. "...plywood to cut for the bending dies." Funny, that's how I was making my chile style forge before I came here and learned about D forges! Thank you for the bottom hem idea. What a simple solution. I dig it. "Water setting binders absorb water on a molecular level, they DO NOT DRY!" I wish someone had told me this in high school. Kast-o-Lite is pretty cool stuff considering that it can bond to something like HDPE. I'm having trouble wrapping my mind around that one! I think remember reading somewhere that you can cover bricks with a kiln wash (re-emissive?) but I can't find it again. Is it as simple as putting a coat of Plistix on a k26 brick? I'm hoping to use something like this for my doors. Is a high alumina ceramic shelf the only option for a replaceable forge floor? I think that I will go with a ribbon burner that has a fan. I like the idea of having an easy way to adjust the flame.
-
I intend to make the shell out of steel 55 gallon drum material. I have the tools and expertise to do it well enough. I also have various pieces of angle and plate steel to brace or reinforce where needed. I have plenty of wool, rigidizer, and plistix. I don't have any bricks worth mentioning or Kast-o-Lite yet. I'm going to repeat this back to you in my own words for confirmation (instead of a picture of my terrible sketch) You recommend that the ribbon burner be installed facing up lengthwise down one side of the forge so that the flame brushes the length of the wall following the arch up and over to the other side be it a D or Oval shaped forge. If that's where I mount it I would have to plan extra width into the forge to avoid having a piece obstruct the burner. Would there be a risk of flux or other debris getting into the nozzlettes? I read Frosty's post about his NARB experiment. That seems like a doable project for me but I just don't know enough about ribbon burners to understand what is better for my application a NARB or something with an electric blower. I did try to track down the plans to the Wayne Coe burners but the plans are no longer on his website. Now I will probably make a D forge but this is by no means proof that I am normal, or sane. Also I have the oval forge itch now. Maybe I'll make a mini oval sometime down the road for traveling purposes.
-
Well I've been messing around with blacksmithing on solid fuel forges for around 17 years when I had space available to me... I don't think that I will soon abandon my hobby! Just taking the leap into gas forges is all. I am most definitely here to learn and if you're willing to message back and forth about my forge project I will gratefully accept all of the help that I can get. I see where you're going with your comments about the Chile forge being more difficult to build and a forge built with mass production in mind. I like the idea of being able to form the walls and ceiling with more curves and less seams instead of a block construction as well. So you're saying that the best balance between value, ease of assembly and performance is a D shaped forge with a side blast ribbon burner? Also the ribbon burner is a cast block of some sort that I would be making?
-
So here's the thing, I already purchased Greenpatch and Plistix 900F based on what I read from zoellerforge. I came here to ask questions after the fact. Kinda kicking myself now! I'm not opposed to buying some Kast-O-lite 30 and using my Greenpatch in a different project or as an experiment.