Savlaka
-
Posts
57 -
Joined
-
Last visited
Content Type
Profiles
Forums
Articles
Gallery
Downloads
Events
Everything posted by Savlaka
-
What did you do in the shop today?
Savlaka replied to Mark Ling's topic in Blacksmithing, General Discussion
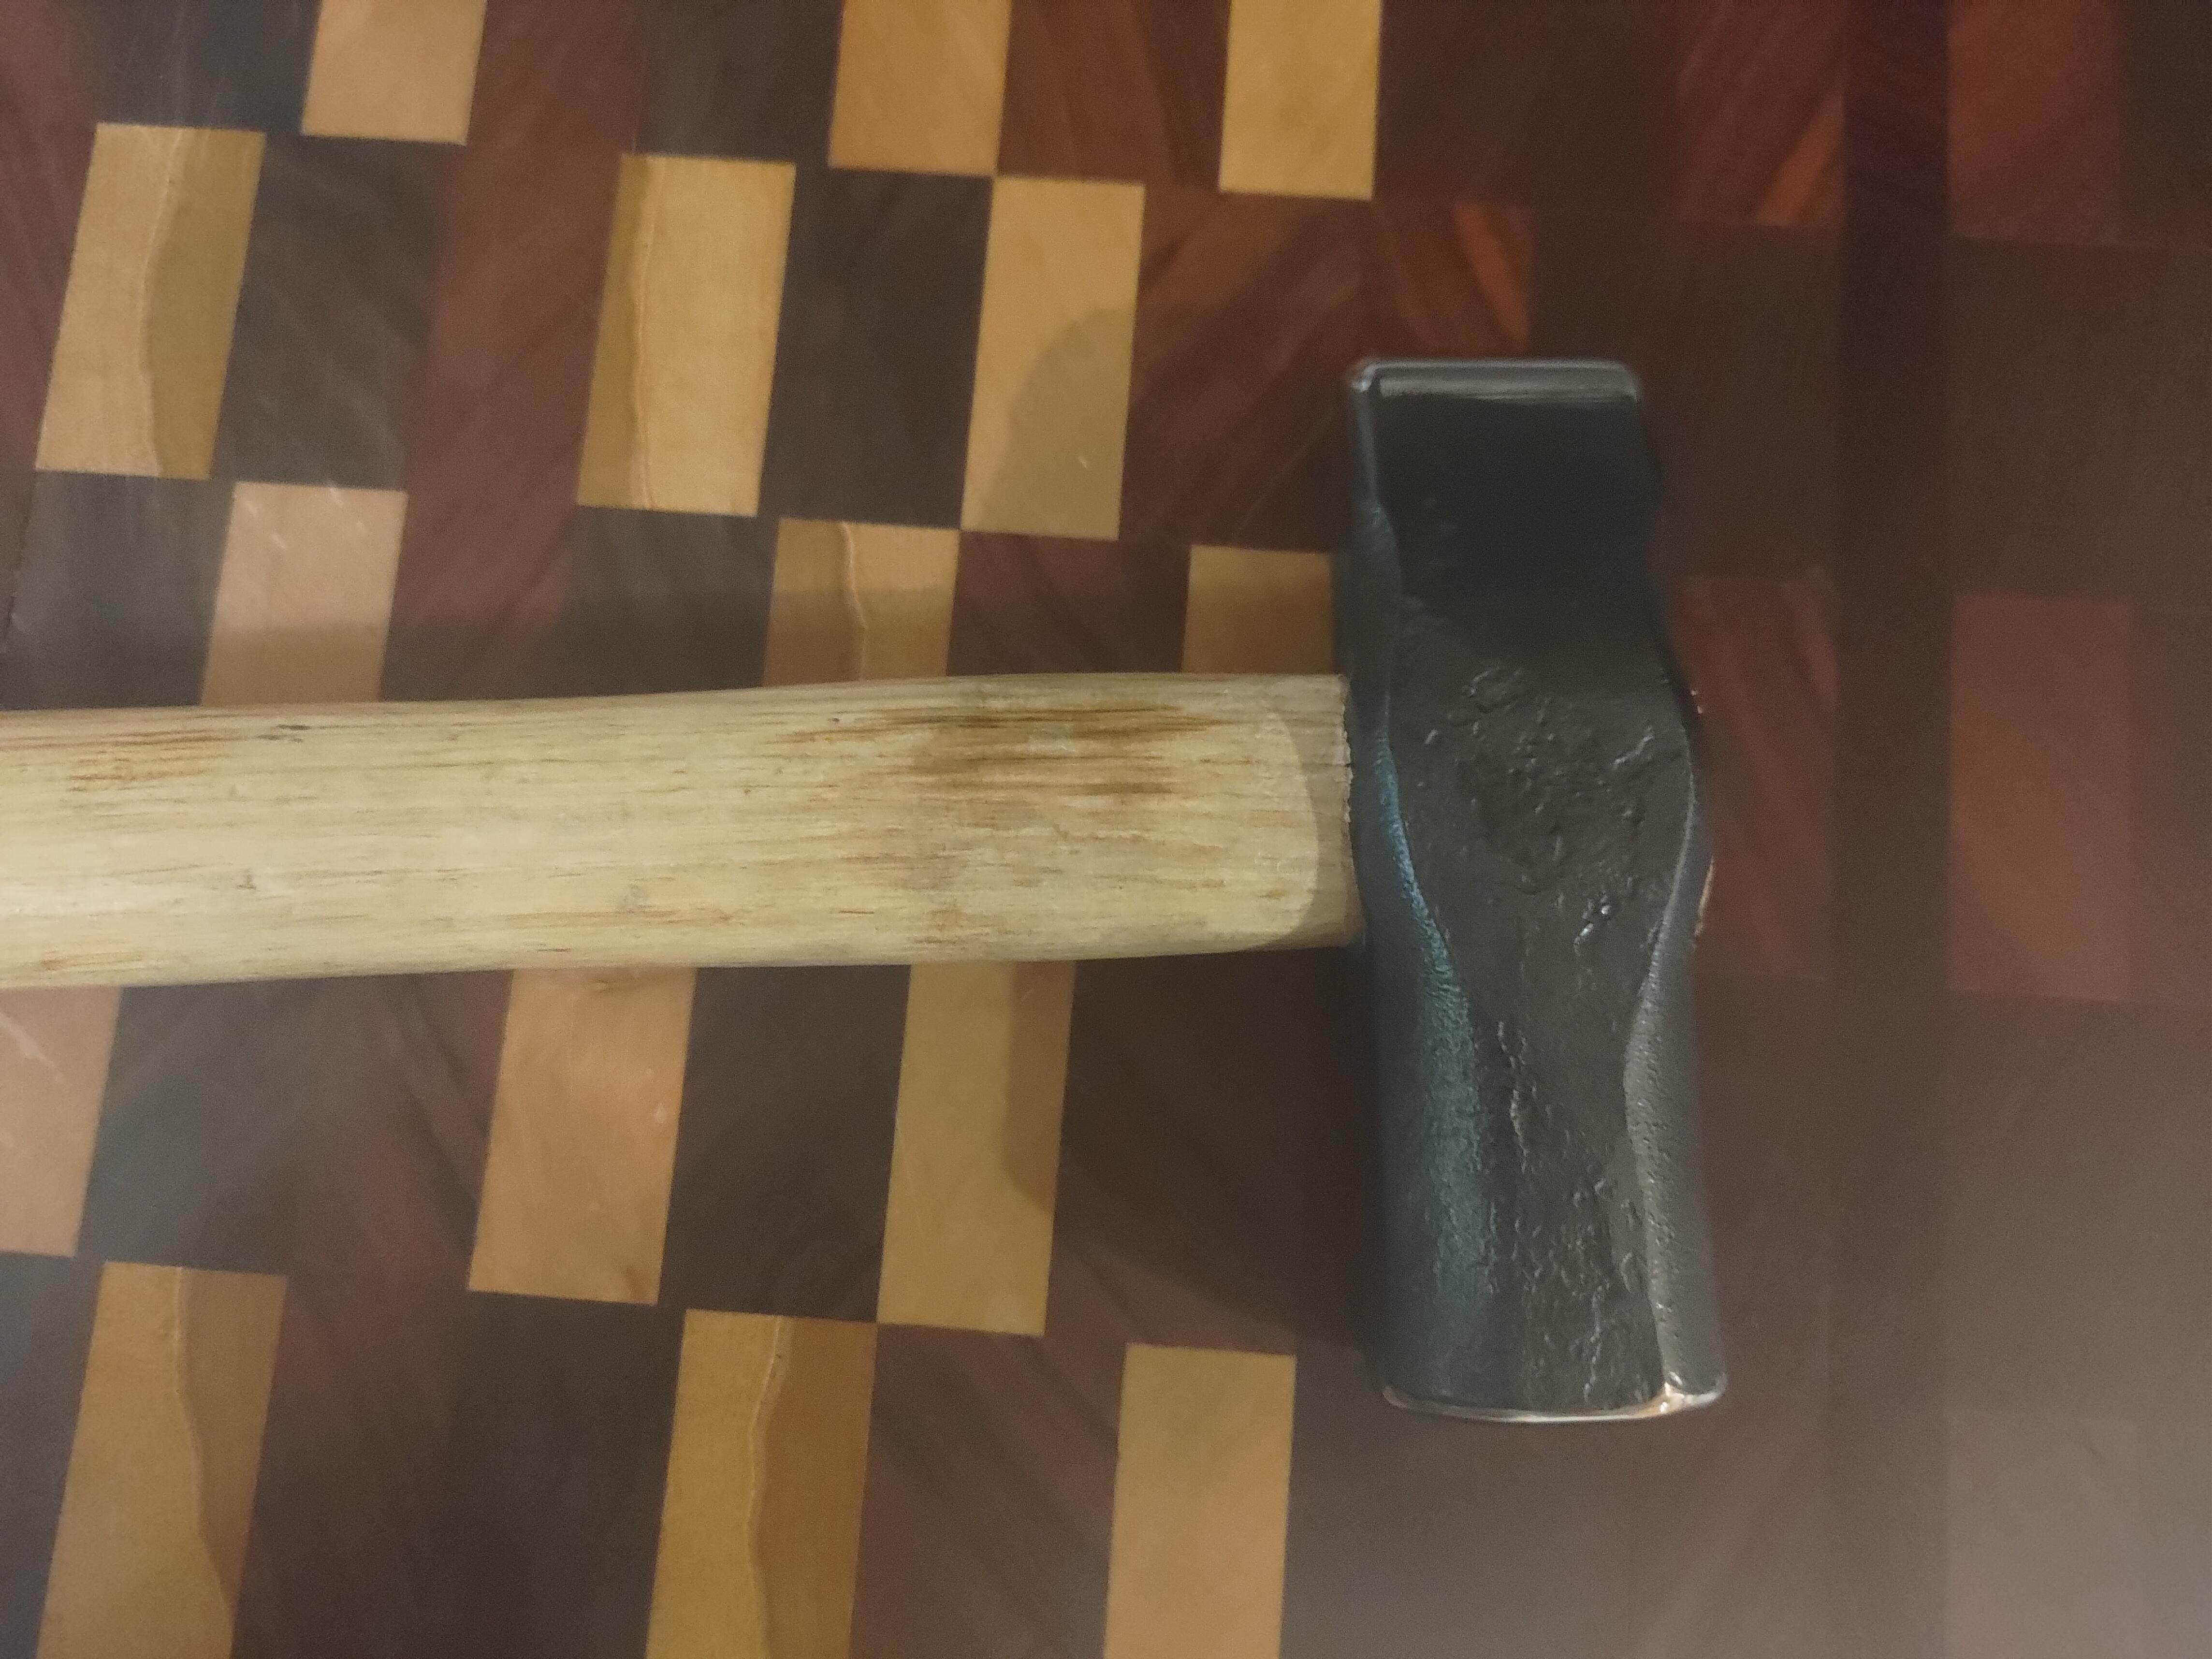
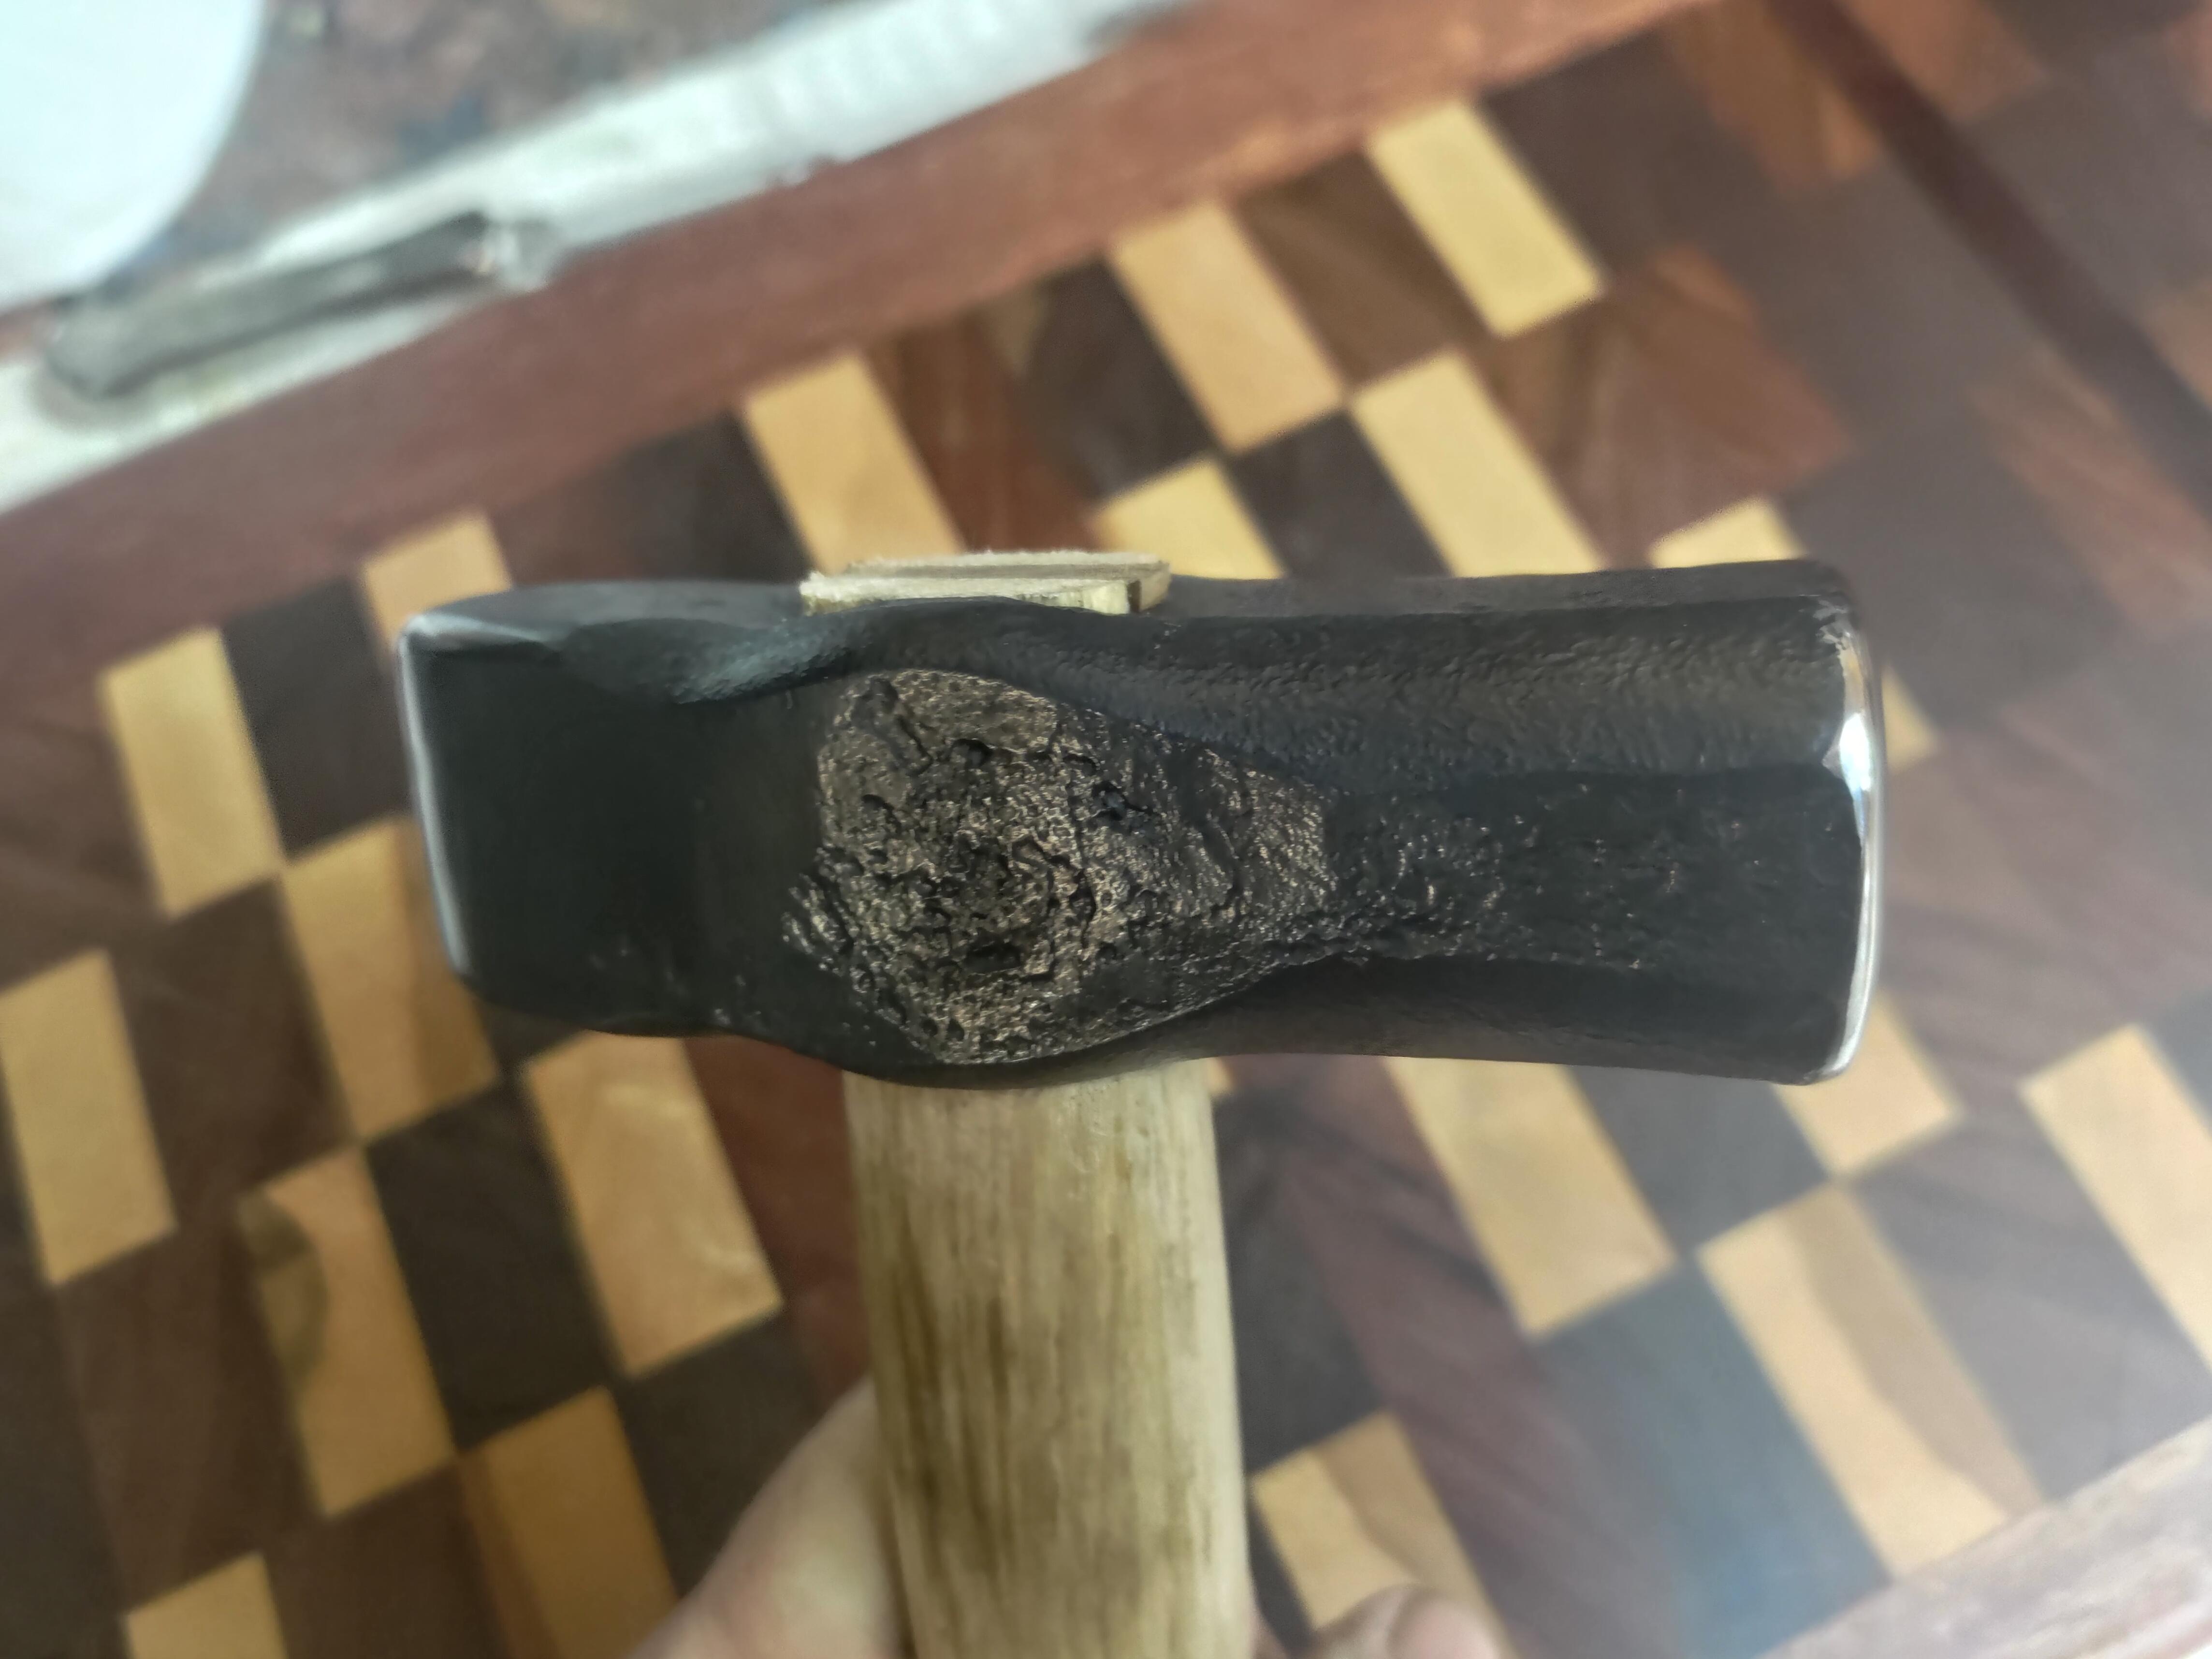
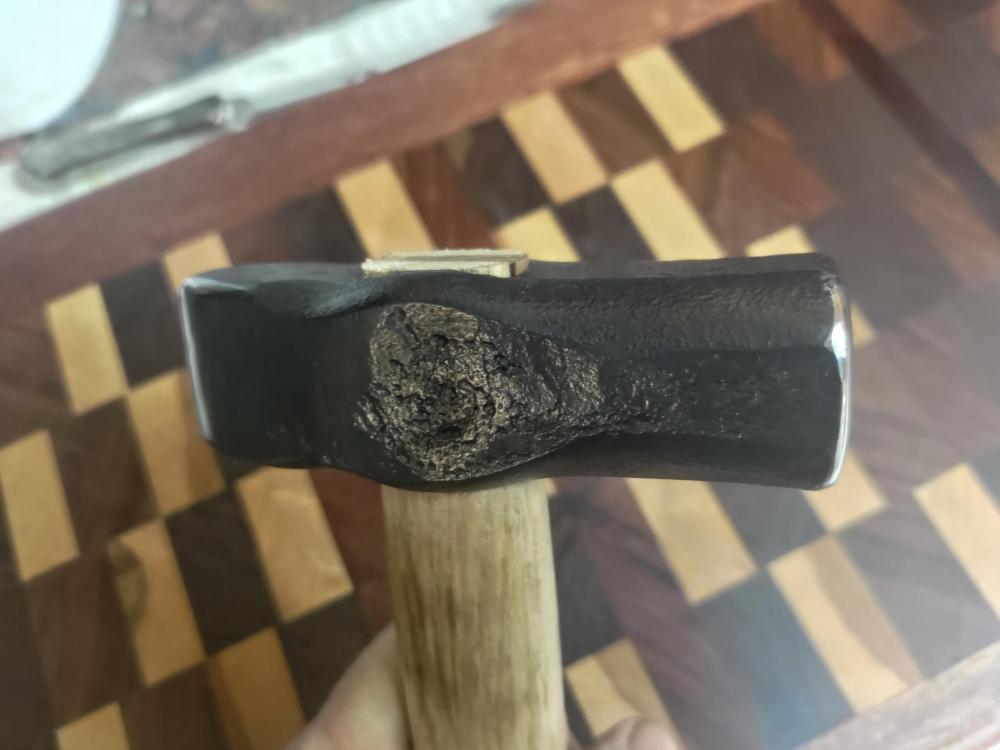
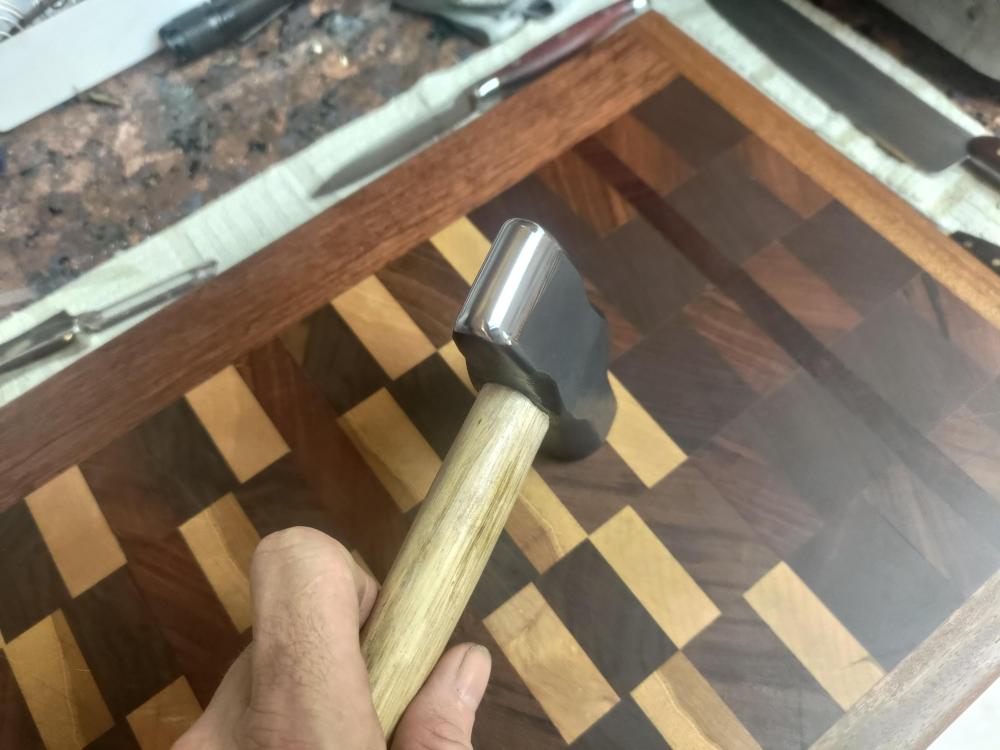
well today I made my first hammer... with all the odds and ends I've made with a forge over the years I hadn't actually tried to make a hammer. This one is made from 4130 (might be 41b30). it came in at about 1-3/4Lbs, and was made as a slightly offset center straight peen - more mass on the hammer side. I need to do a bit more work on the handle still. but overall I think it came out close to how I was aiming for.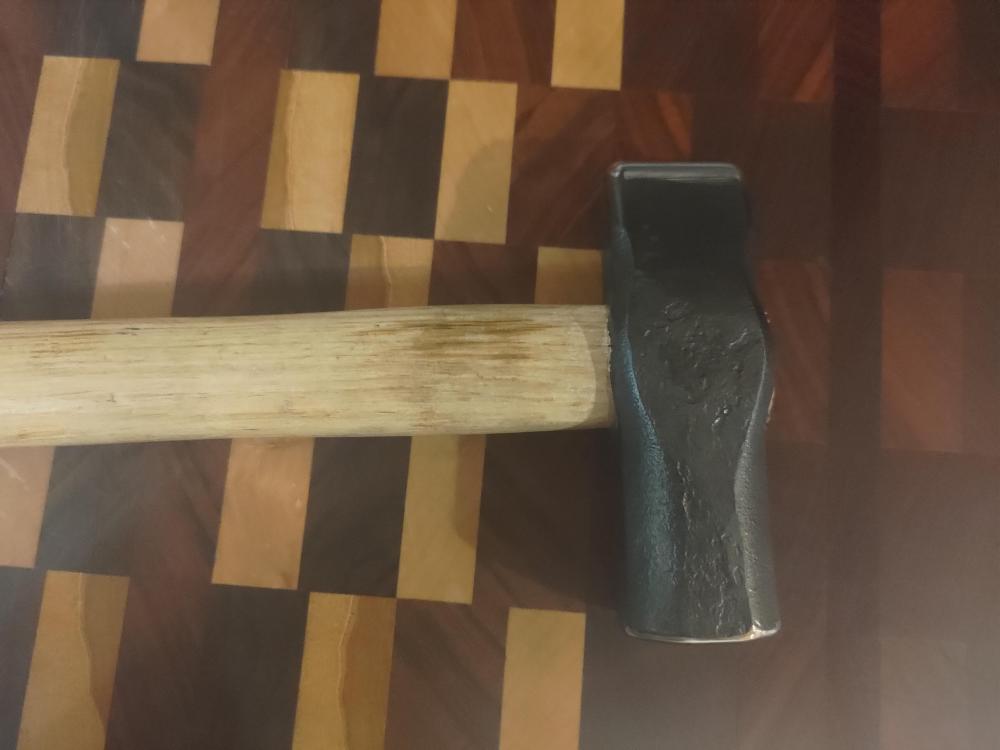
-
What did you do in the shop today?
Savlaka replied to Mark Ling's topic in Blacksmithing, General Discussion
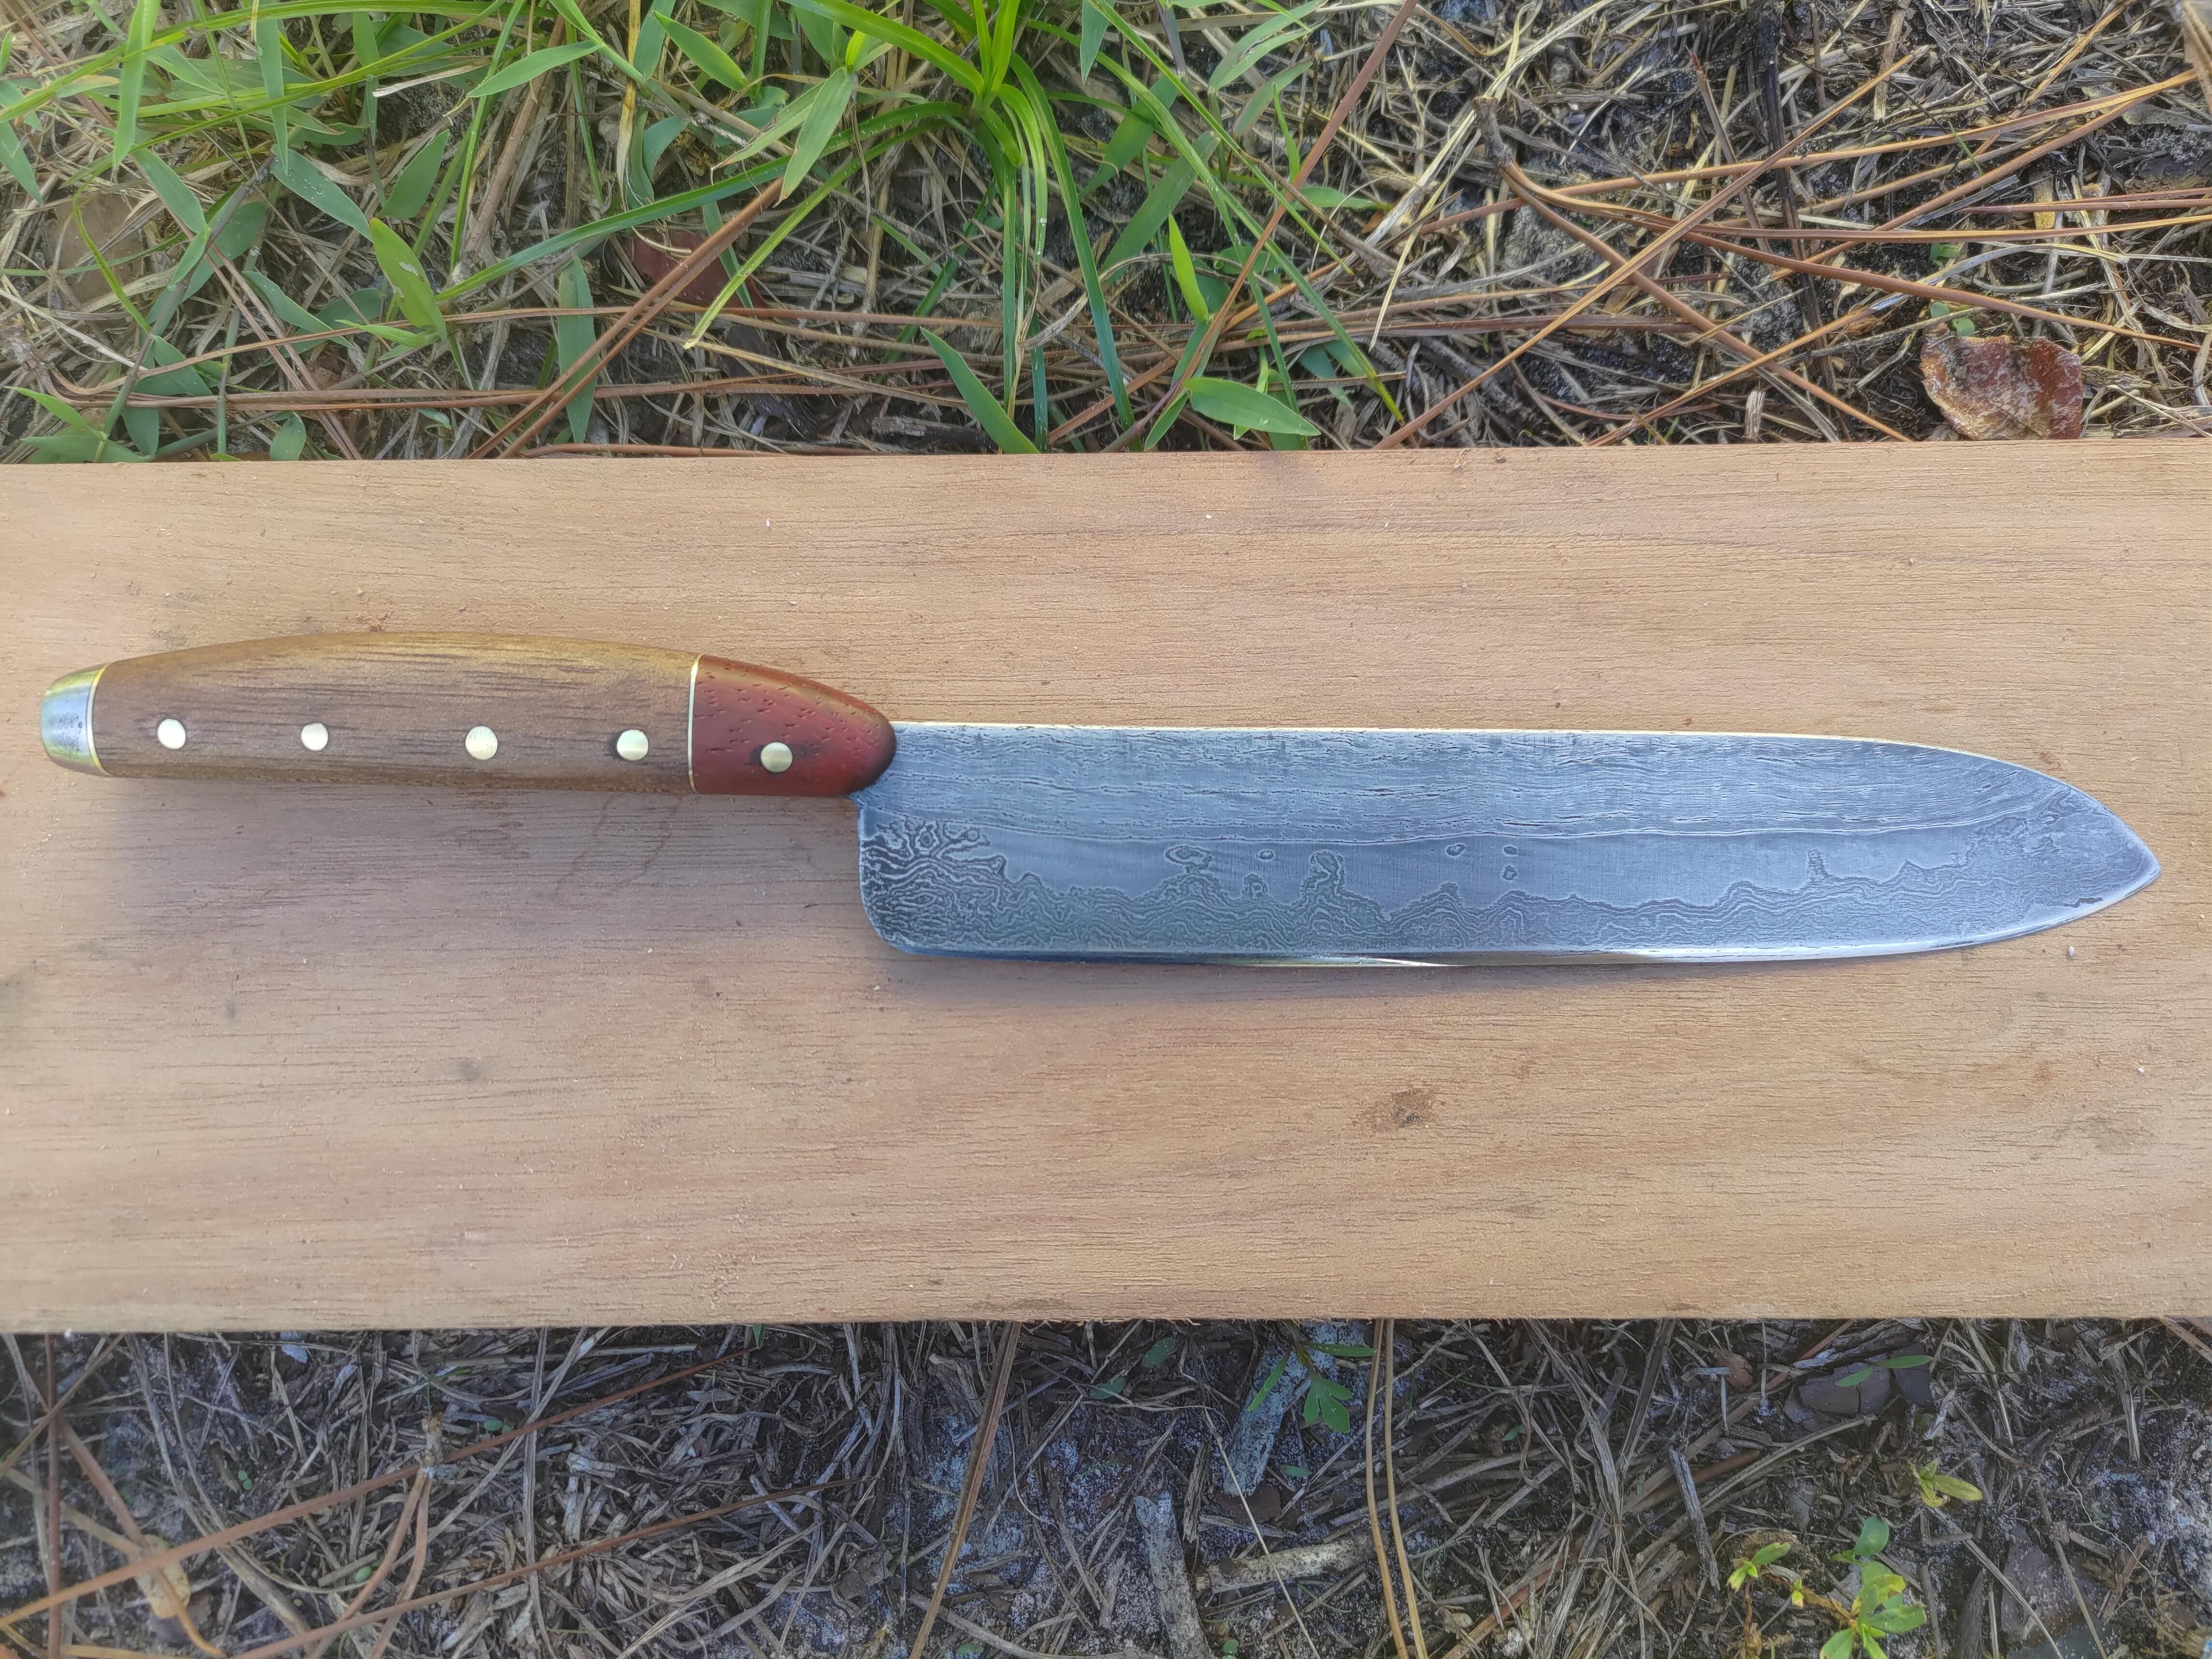
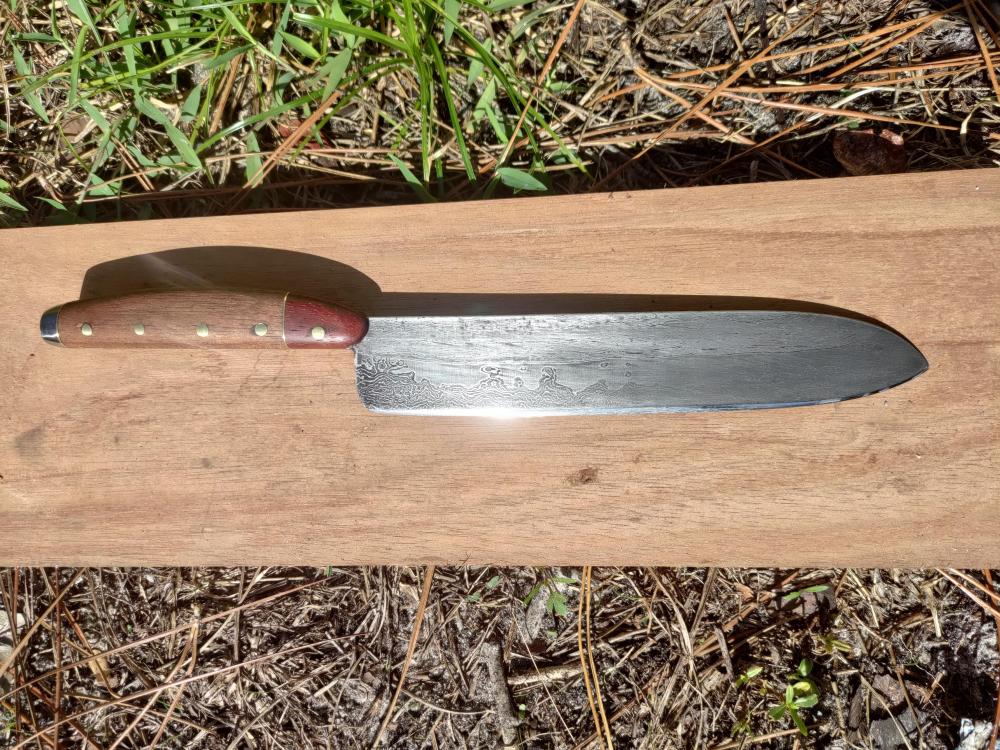
playing with knives... this one was made from an assortment of steels.... the spine and tang are cable, the main blade is 80crv2, 15n20, 1095 plain laid and restacked a few times to get about 160 Ish layers. the woods are Bolivian walnut and Paduk, with brass pins and accents... I worked the cables a bit too much so there is not much for a pattern there...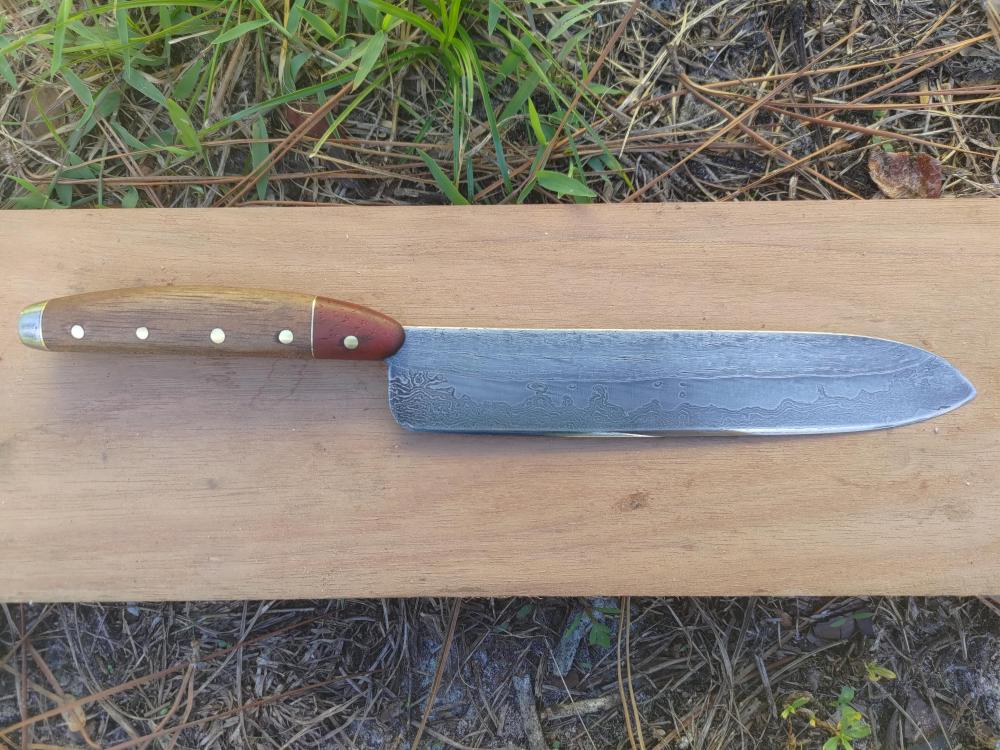
-
What did you do in the shop today?
Savlaka replied to Mark Ling's topic in Blacksmithing, General Discussion
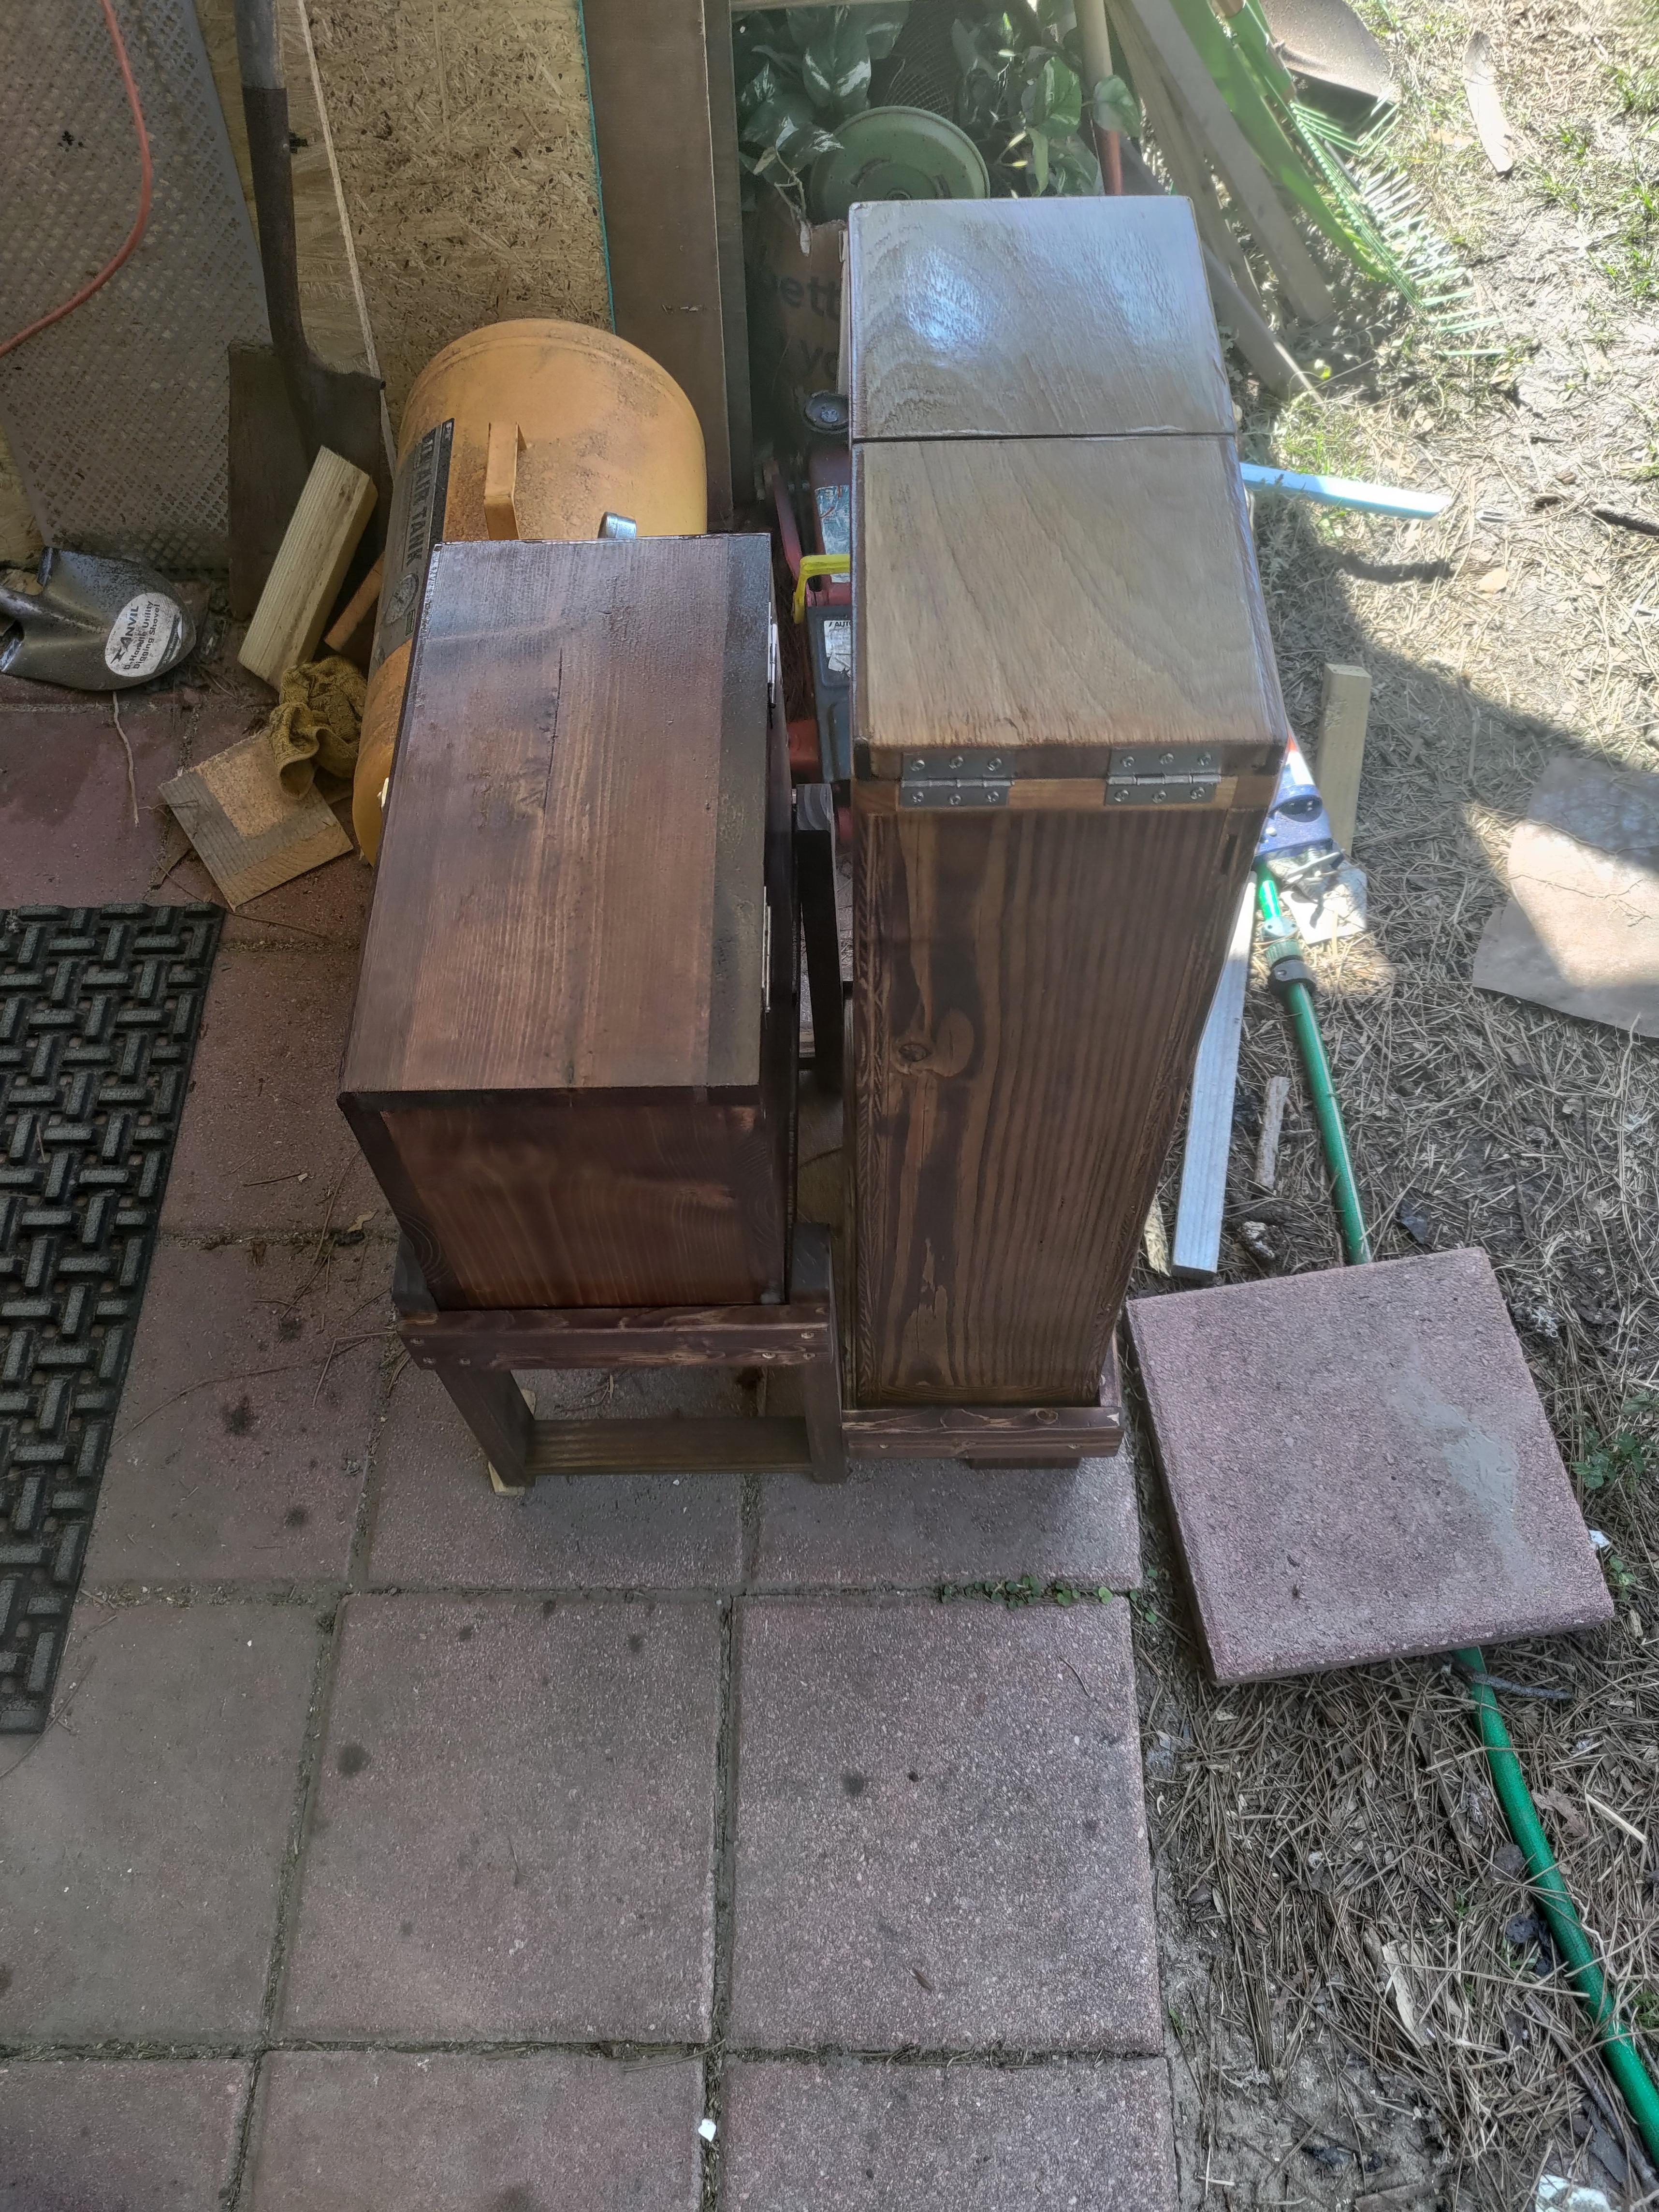
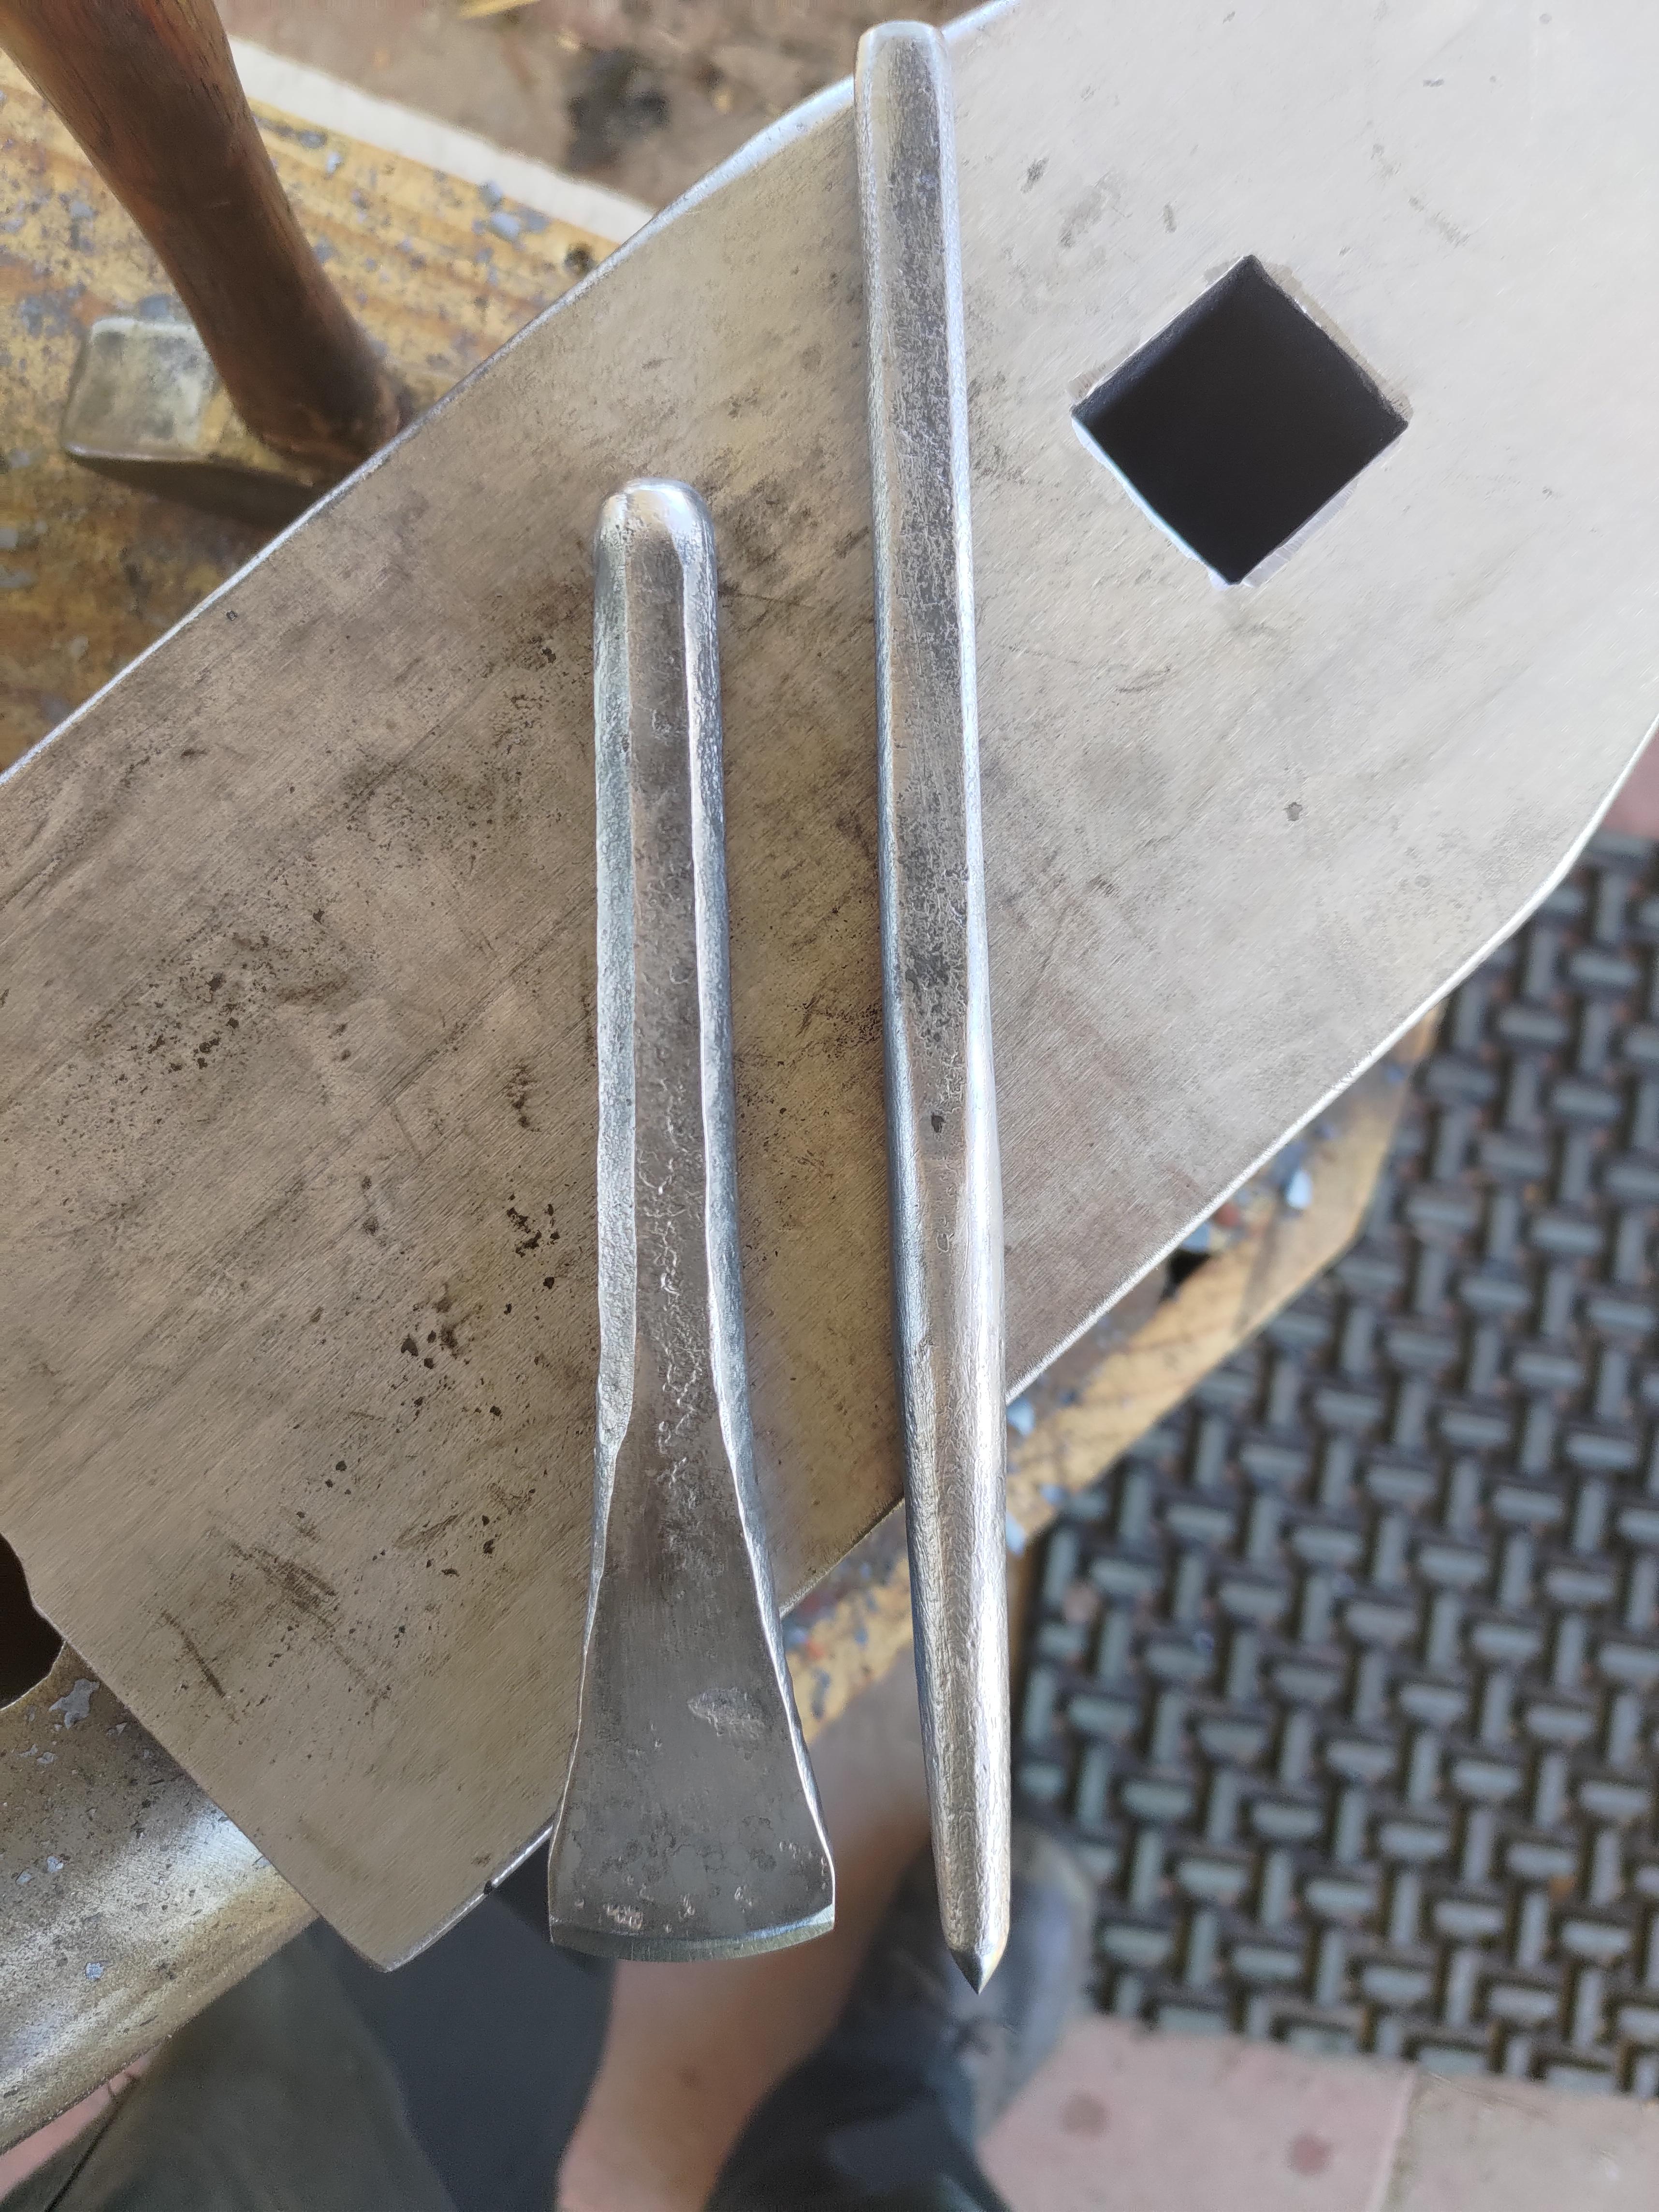
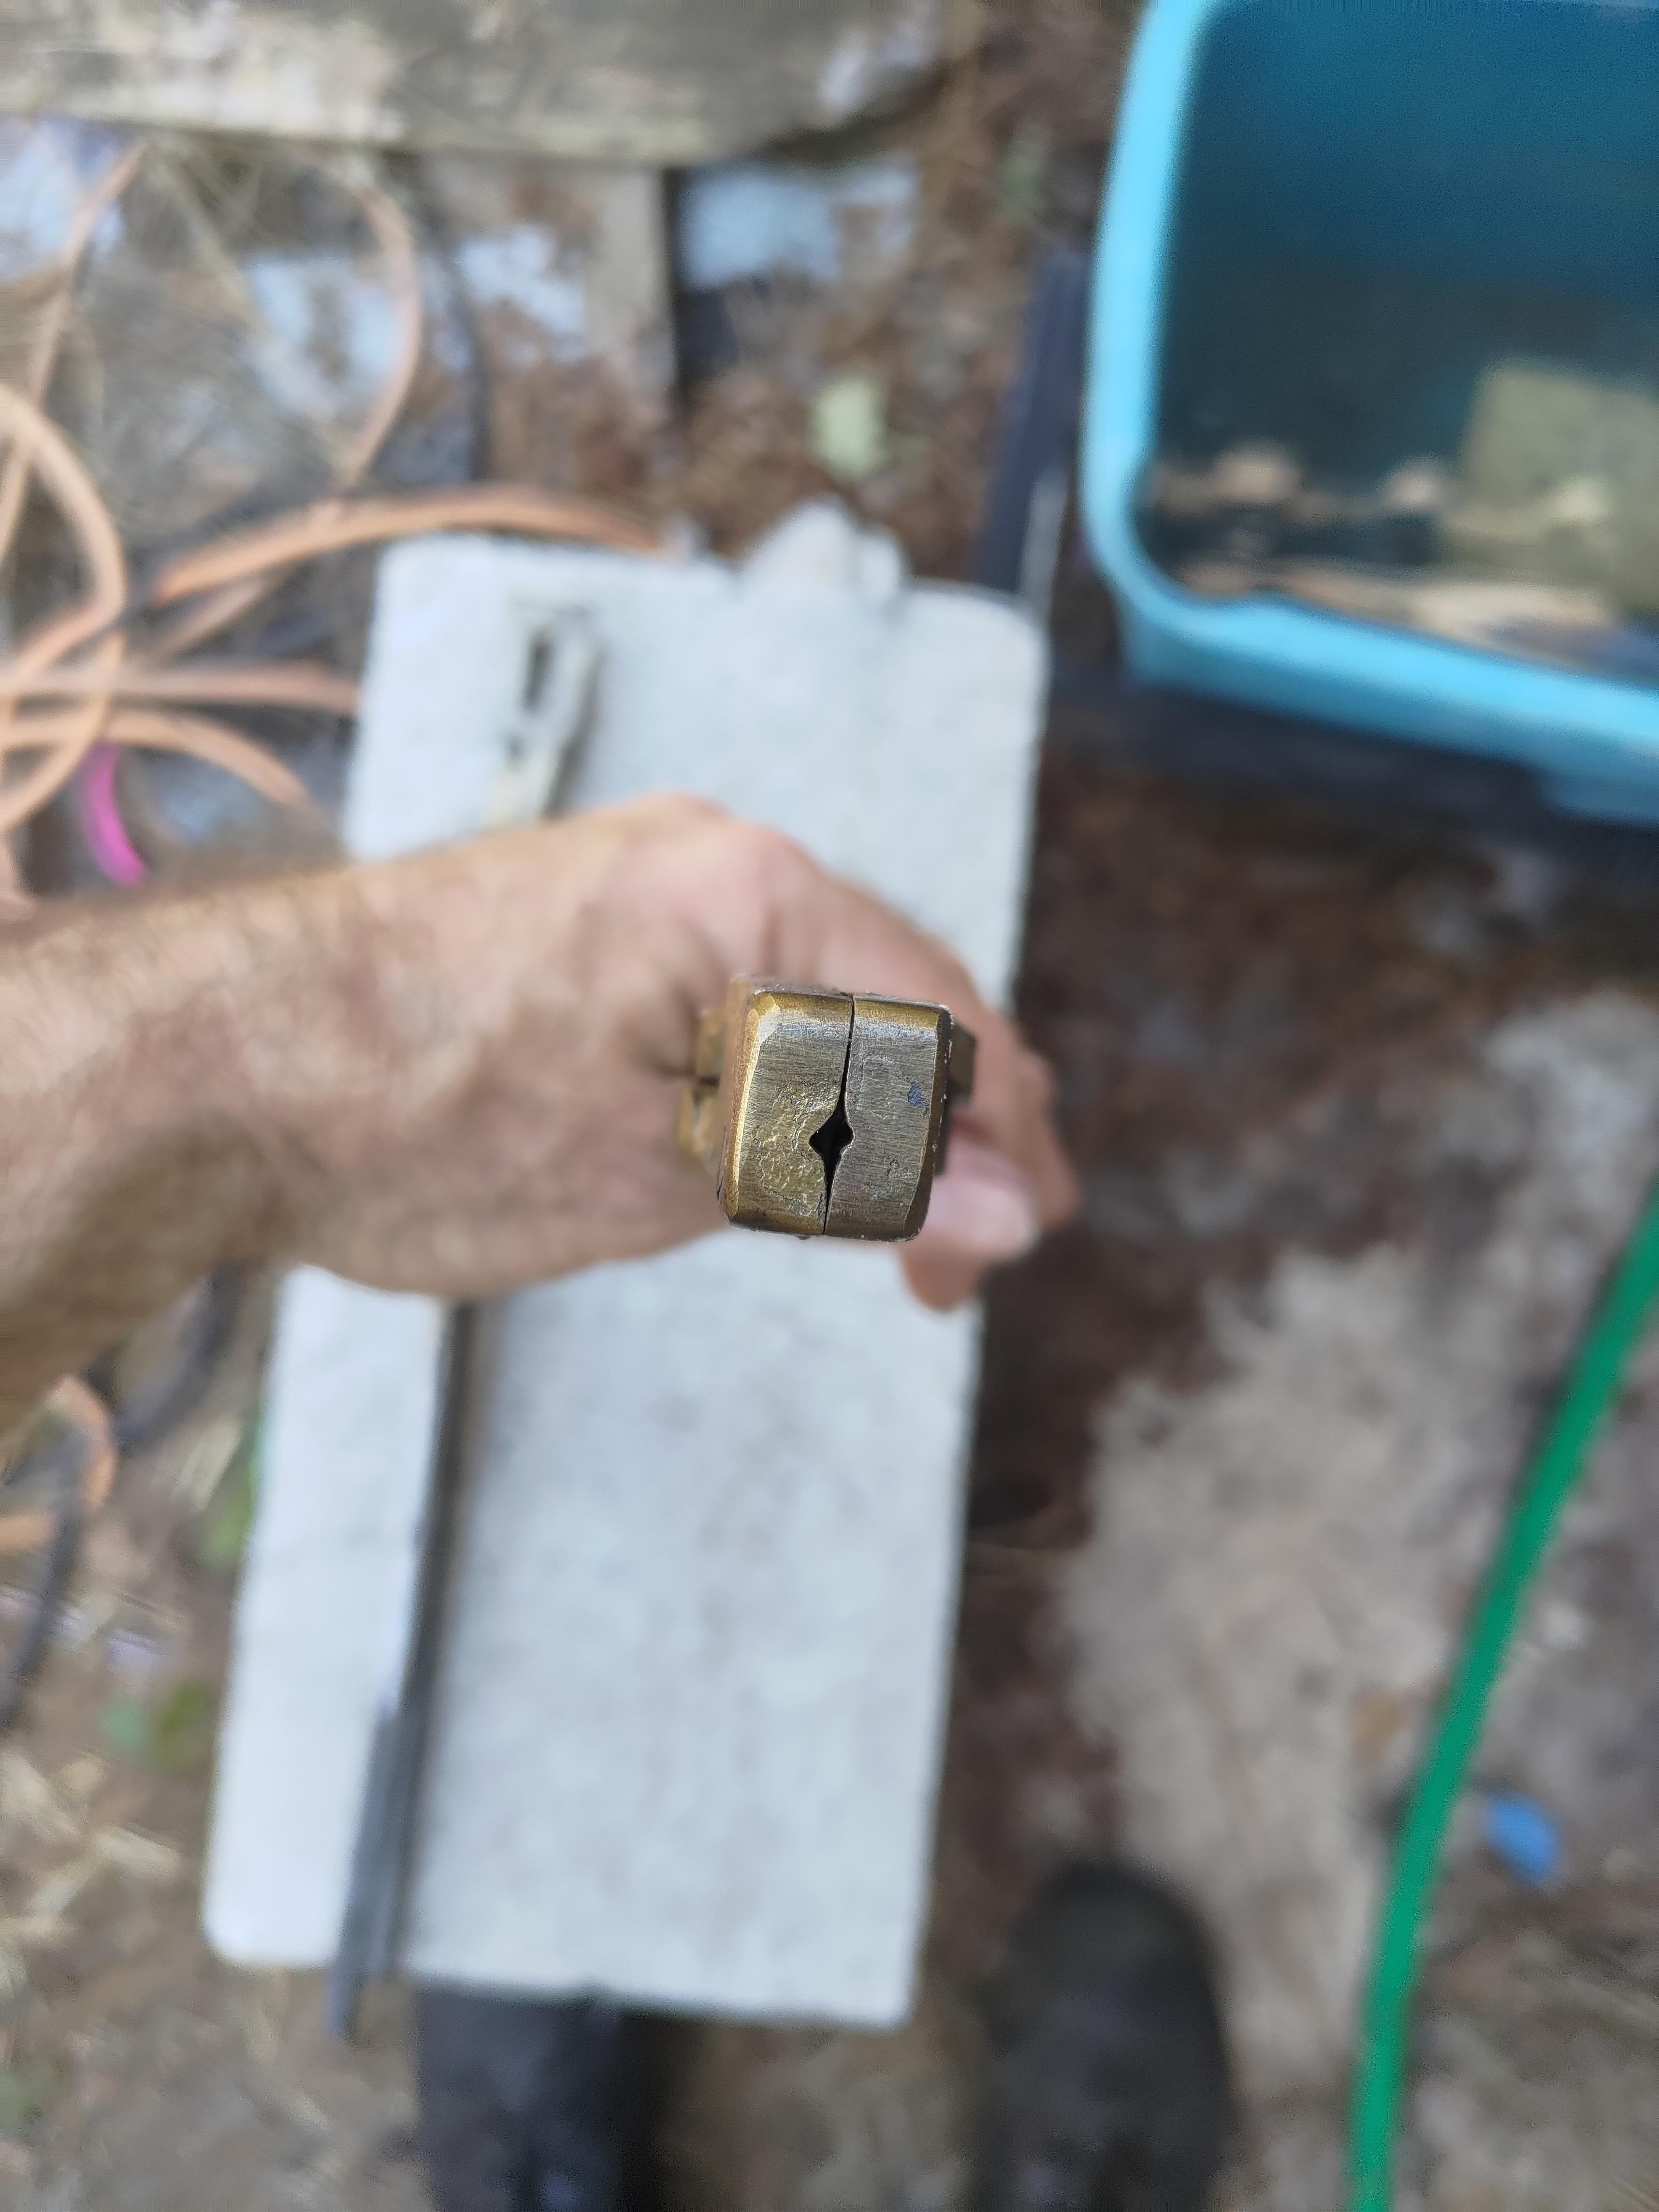
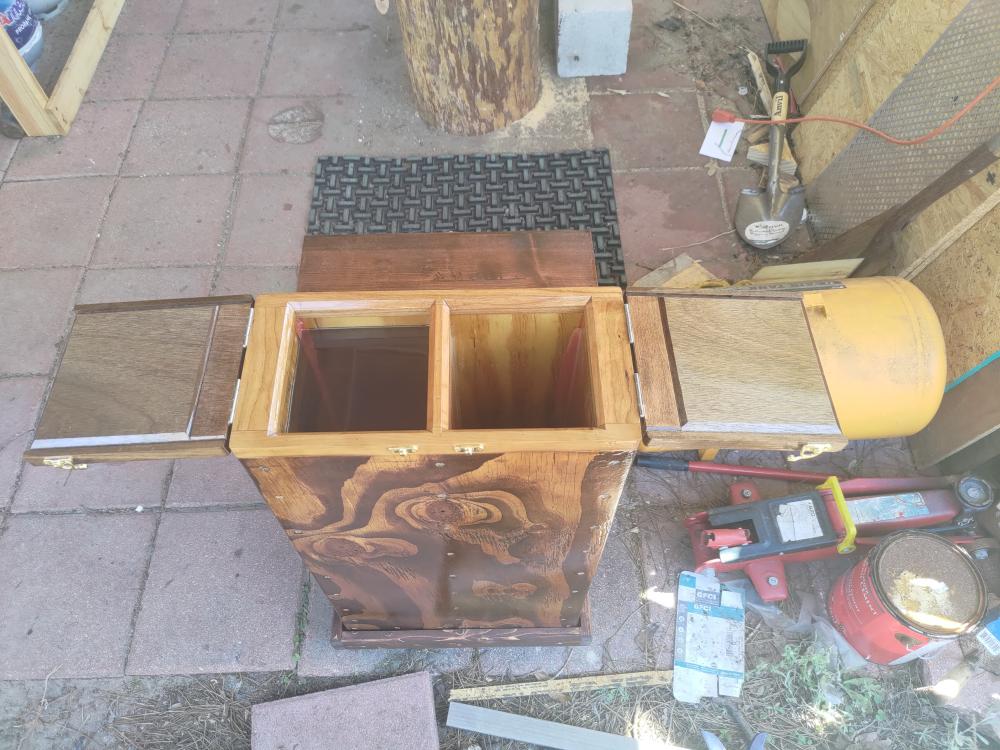
So yesterday I finished up my quench tanks. They're wooden tanks, Not metal I couldn't find any decently sized metal to make them out of. The vertical tanks are for my parks 50, and whatever medium fast oil I end up getting (like parks AAA or fusion 10).The other tank holds light mineral oil that I find works as a medium to slow oil depending on the temp I have it at. I still need to make a water tank for my slack tub, right now it's a plastic bucket. And today, I used the tanks while making a center punch and chisel out of some 1060 steel. The center punch was made from 9/16" round stock, and made square with the edges left slightly rounded. The chisel was made from 11/16" round stock made octagon. Both were quenched in the parks 50. And temper drawn by heating the struck end in the forge just after the burner was shut down till I could just see the light straw color getting to the cutting end.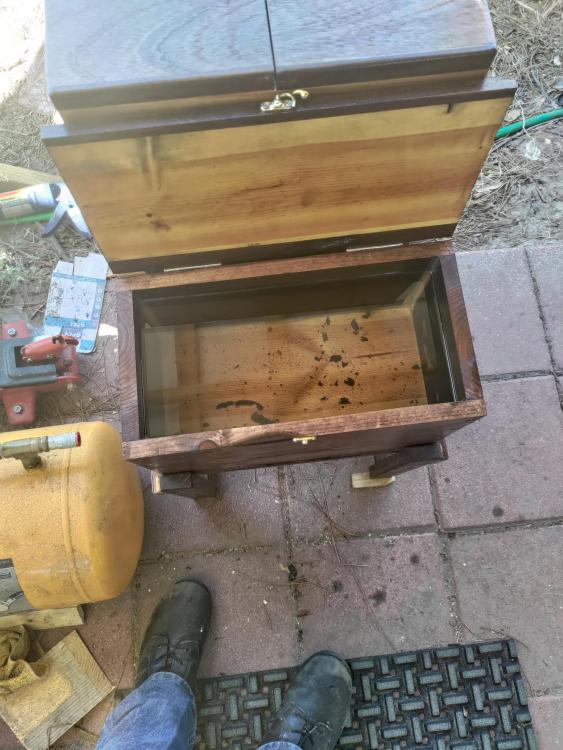


-
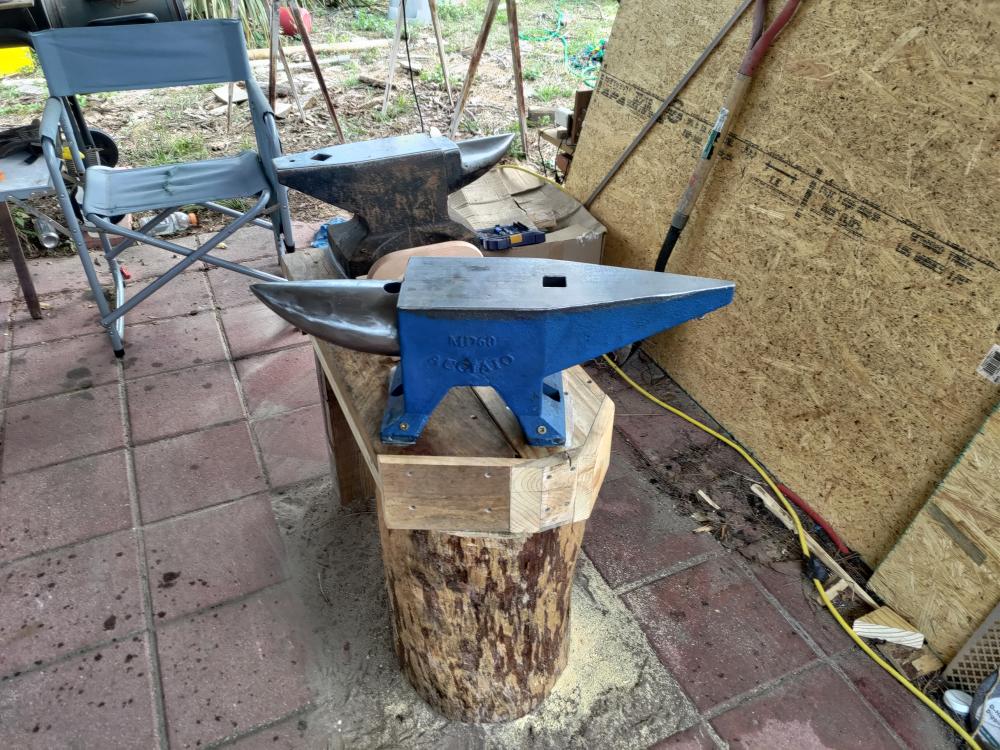
Show me your anvil stands
Savlaka replied to pkrankow's topic in Stands for Anvils, Swage Blocks, etc
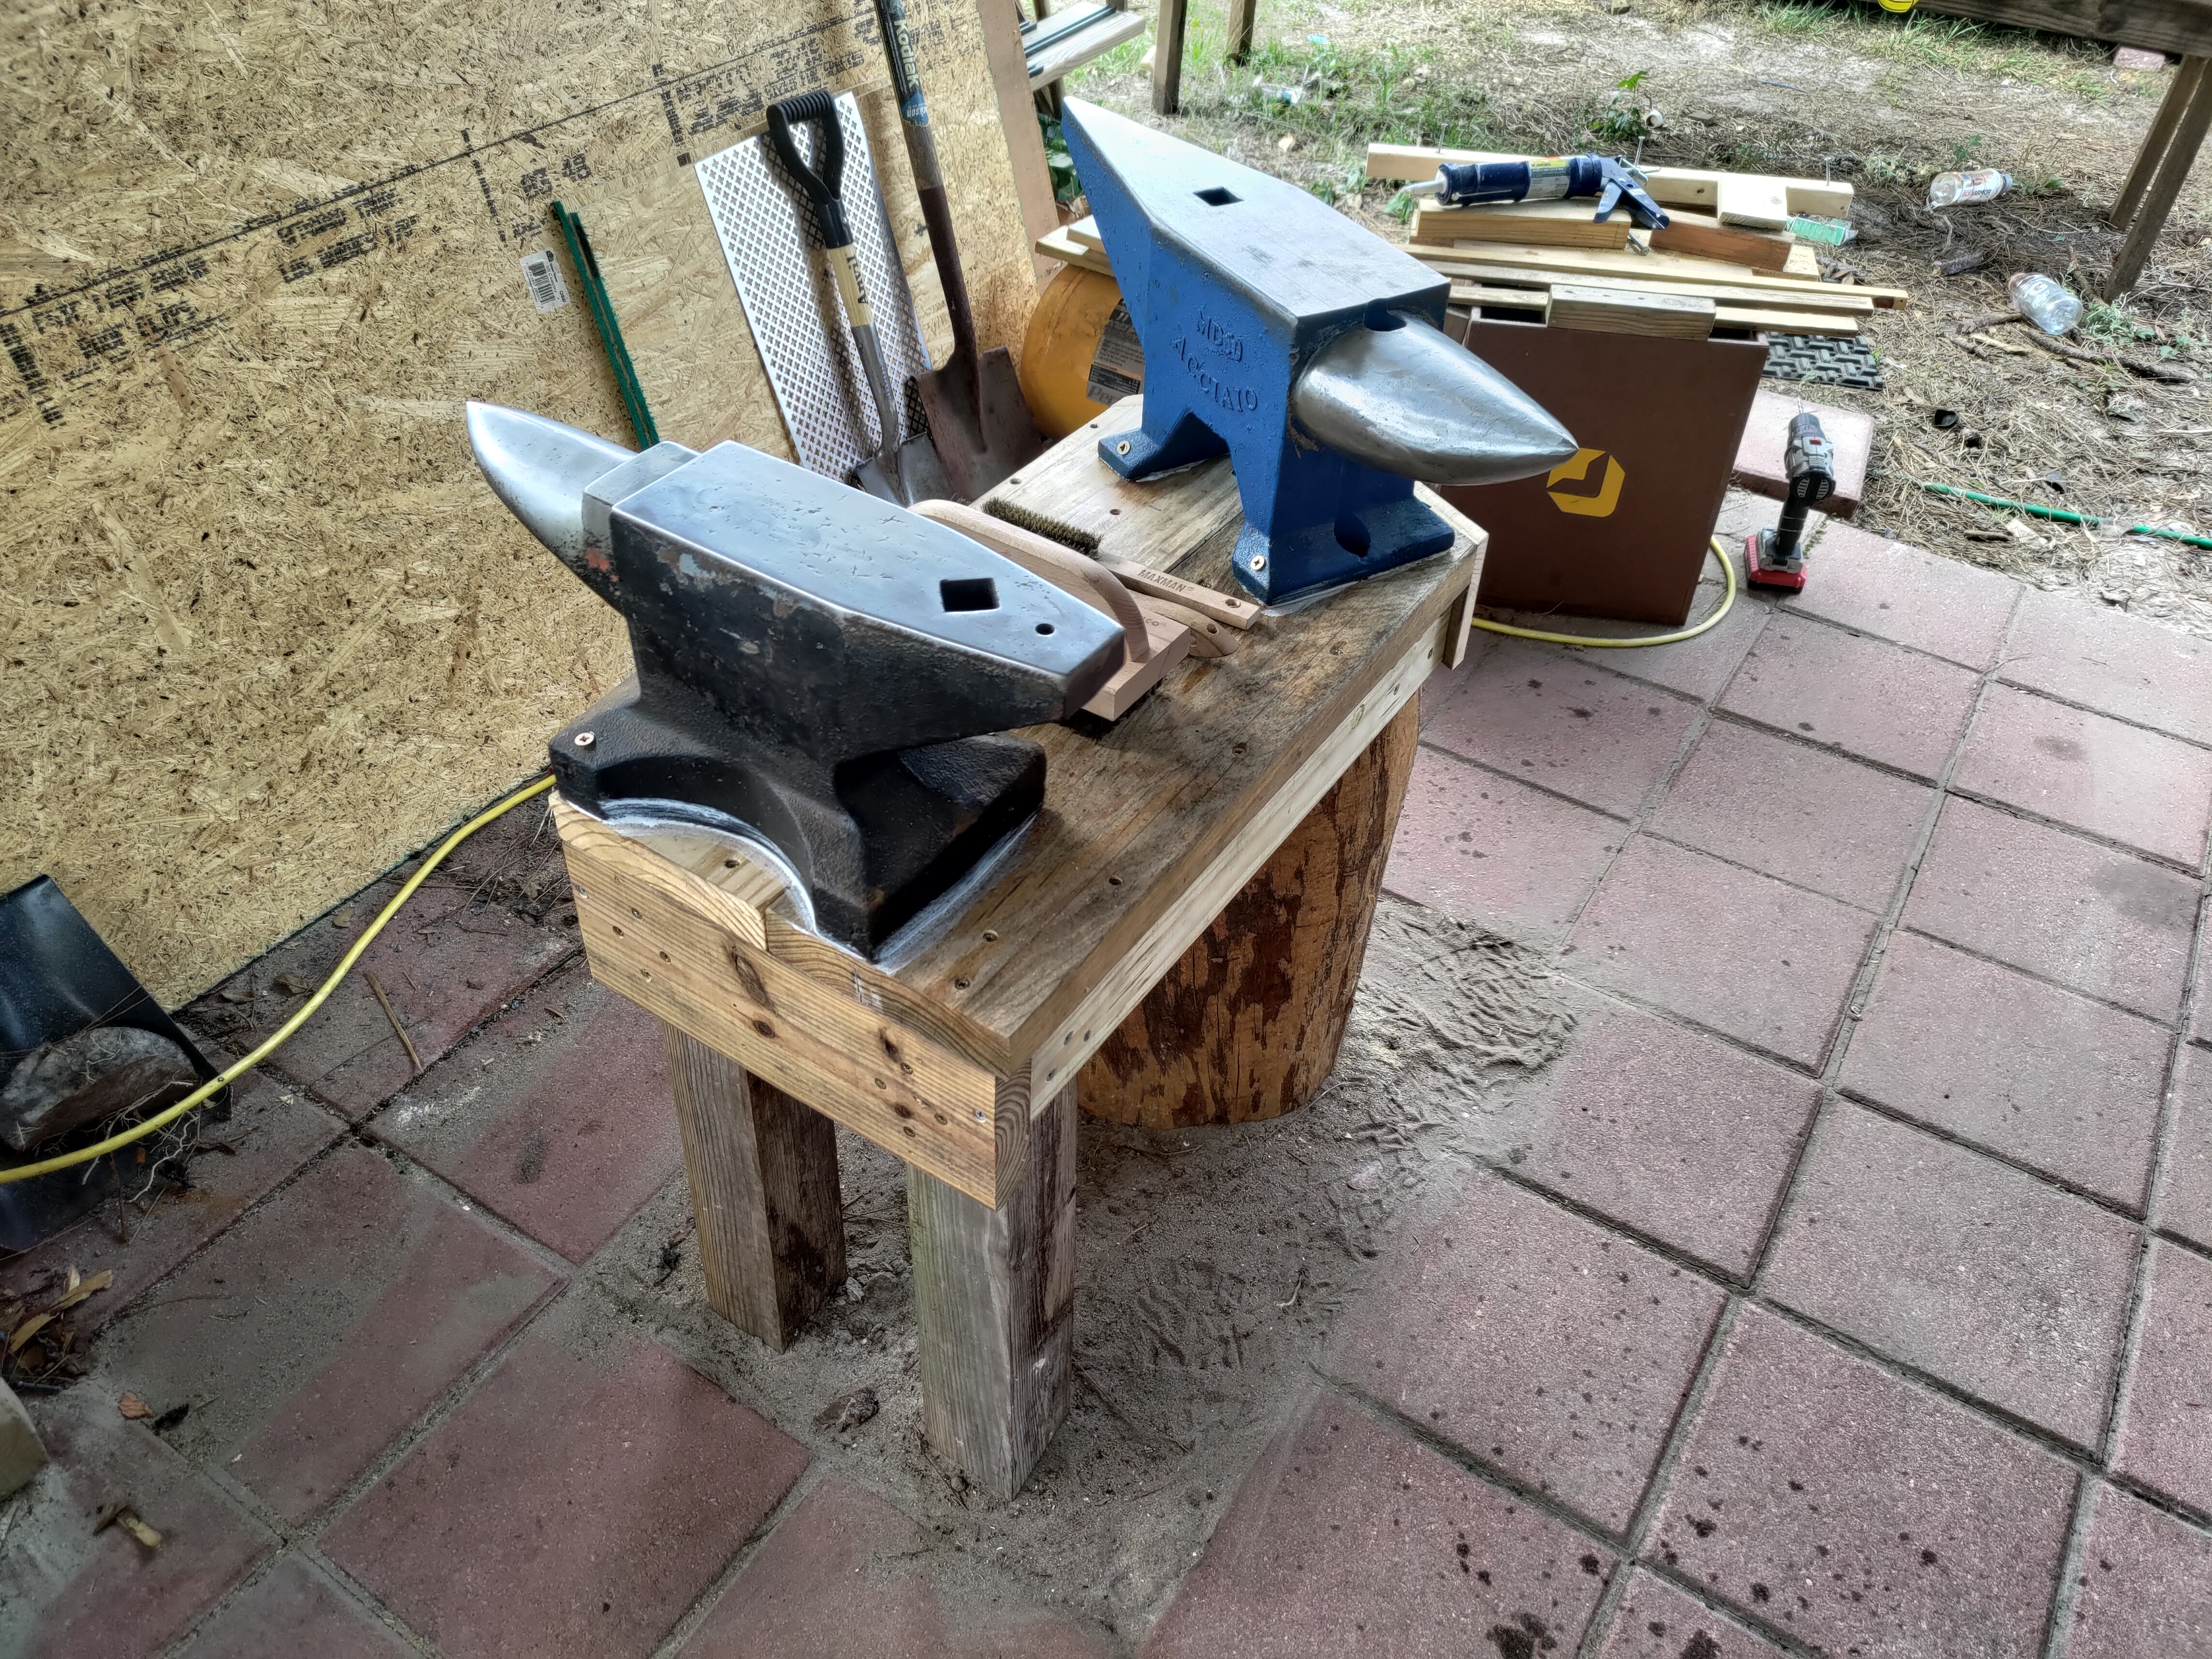
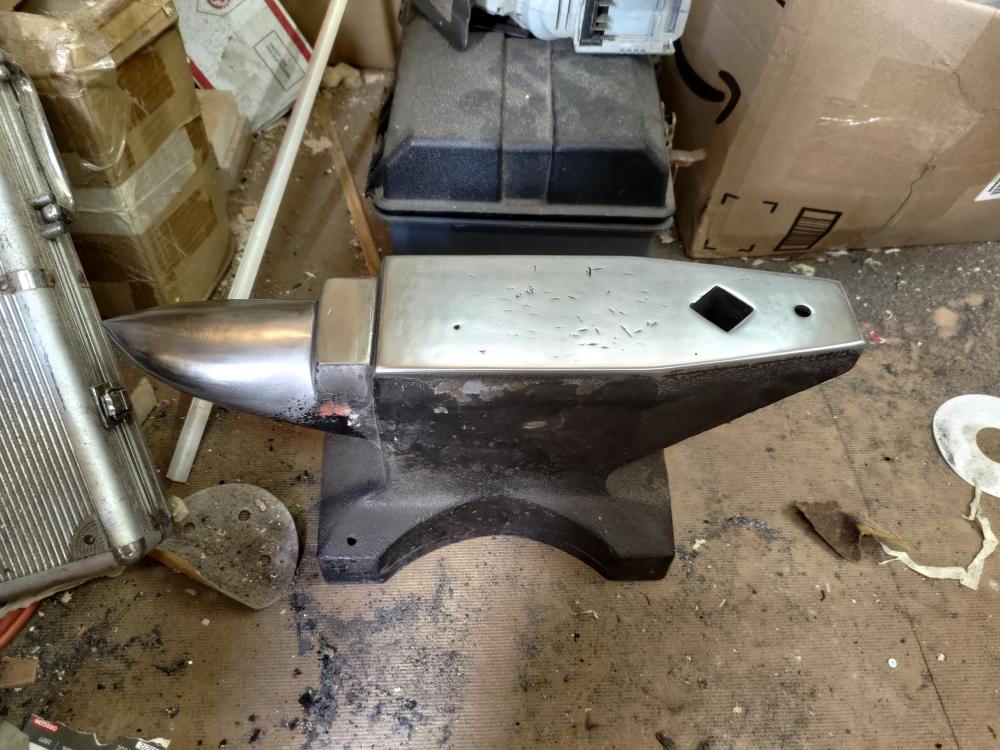
Just finished setting up my new stand. It's for two anvil's, the main anvil is above a hunk of pine tree that is about 16" in diameter. It was one of the three trees that destroyed my old pole barn... Figured it was fitting to use it in the new build. The base has a H shaped brace of 22 inch PT 2x6's on the bottom fitted into a square I cut into that side of the log about 12.5x12.5. then was buried about 18 inches to get the rough height I figured I wanted. The other side has a pair of 4x4's each about 5 foot long buried till about 2 feet are above the ground with a concrete brick at the bottom of the holes.. And a 22 inch long hardwood crossbeam about 6" underground. It's all tied together with a wood frame. And topped with a pair of 2x8's to reach the final height I wanted (about wrist height. Knuckle is definitely too low, so was thumb). The anvils have silicone caulk under them, and then were tied down using some hefty #12- 4+" long screws... Yes I committed the sin of drilling mounting holes in my anvil's... My old one already had it done years ago, and was one of those inexpensive steel anvils that were available back in the late 90's early 2000's - most actually came out of Russia or similar places. My new one is just one of the Vevor 132lb ones not something fancy. In the future I'll build in some tool storage and possibly a hot rack in the gap between the log and post's...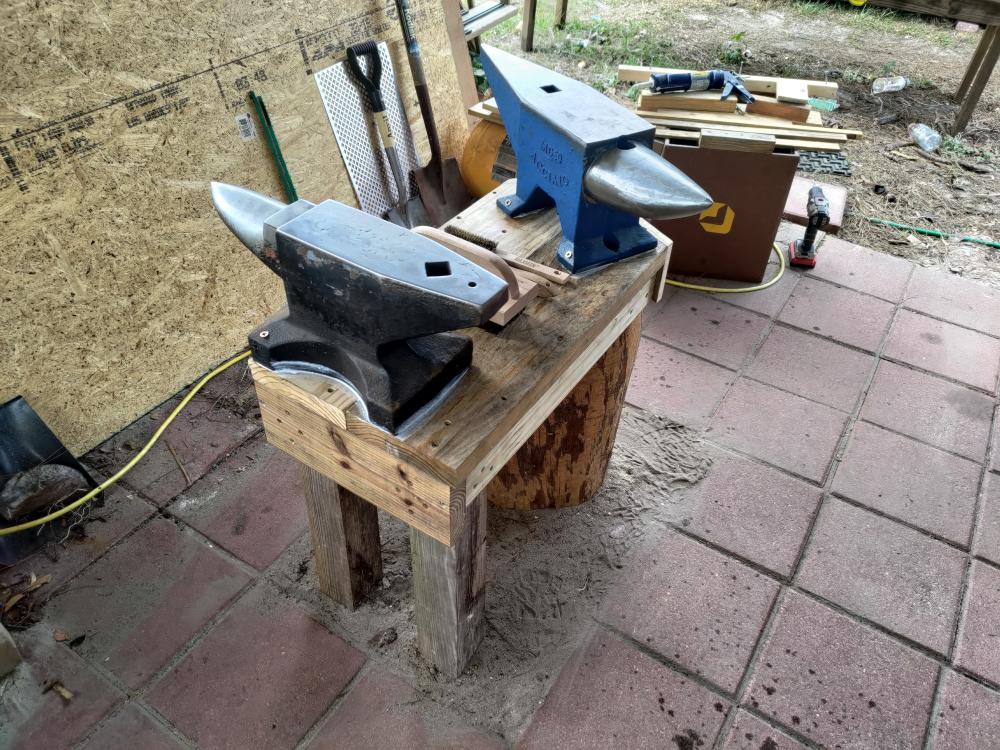
-
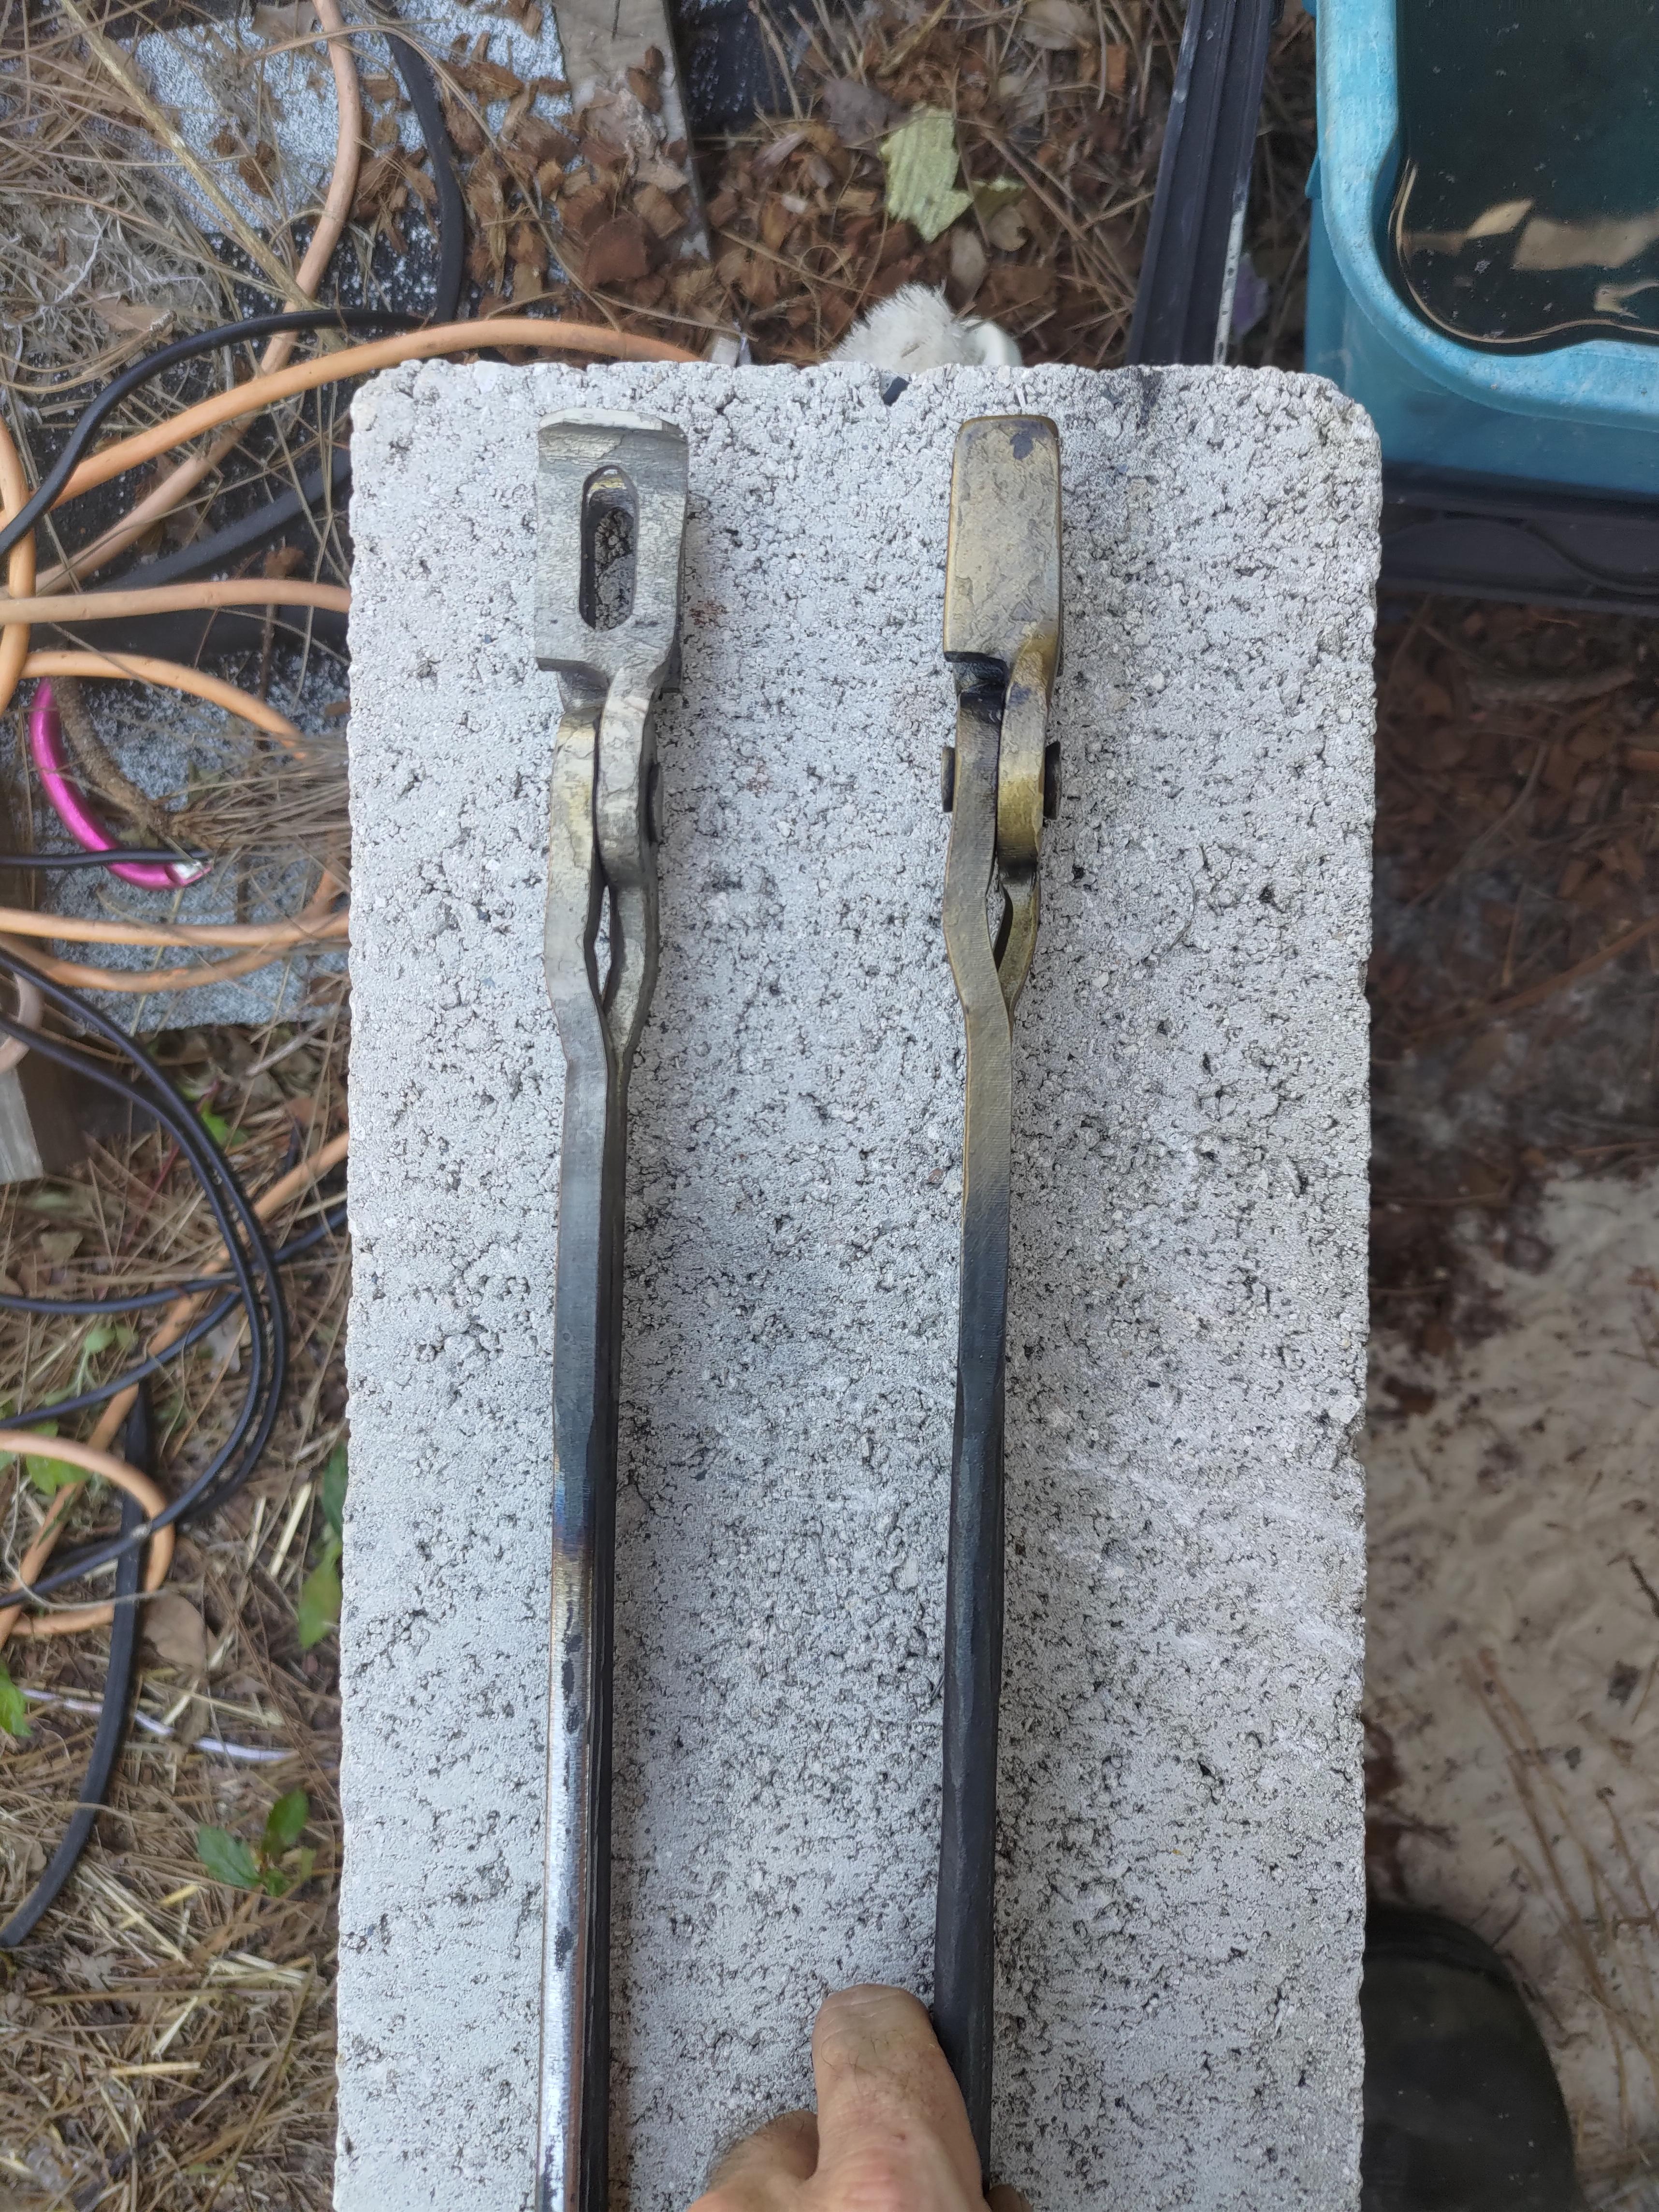
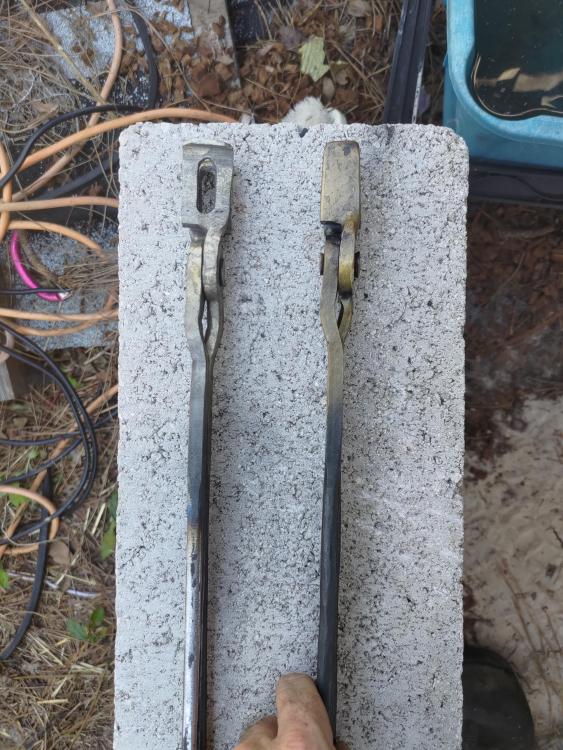
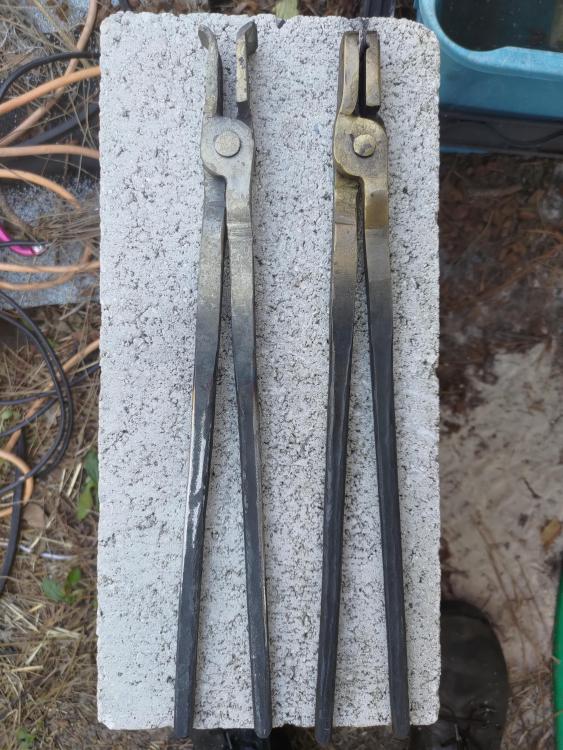
So I have *Finally* gotten around to setting up my lil home smithy. And since it's been nearly 20 years since I was forging previously I couldn't find most of my old tongs - not that they were anything special, but still... All I had left was a crappy one for about 1-1/8” (my old anvil's hardy hole size) and one for holding 1.5" round bar from the side..I bought a wolf jaw tongs online to let me get to work... To fill out my tooling a bit I ordered the tong kits from Kens custom Iron, this also lets get me back into doing stuff with a hammer and anvil. After mangling the small scroll tongs (trust me they were BAD), I was able to remember how some of this stuff works and made the flat jaw, and slot jaw tongs to a serviceable standard. These are both from the 5/16” lighter duty set, I haven't touched the heavier 3/8 kit. The flat jaw is sized for 1/8" stock and it'll hold up to 1/4” decently. I have a small pile of flat bar knife stock from 0.100" to 1/4". The slot jaw is sized for 3/8” flat stock or up to about 9/16” round stock well. I have some 3/8” flat stock in a few types and a bunch of types of steel in about 1/2” +- a bit round. I brushed them with a brass brush while still fairly hot to give them the gold tone. Just thought I looked nice, don't figure it'll last all that long. Figure I'll remember more of how to work metal as I build these, and then I'll go for a set from scratch.

-
Thanks frosty... Now I've just gotta get to actually building out the Smithy and metal working areas... Lol...
-
Scrap Yard Won't Sell Scrap Metal!!!!
Savlaka replied to CurlyGeorge's topic in Blacksmithing, General Discussion
Dax- those companies sound as bad as the defense contractors I have to deal with for the military. We have a team that tell all the officers that they're a Depot level maintenance team, and yet I personally have more experience repairing our missile launchers than their entire 8 man team combined. Yet I make about 1/3 of the money as any one of them. and I get looked down on by their people... Untill I walk over and fix the issue they're saying needs 10 more hours and $150k in parts, with a Leatherman and no parts... Multiple times in a day... (I know older post, just browsing through the site and saw this bit.) -
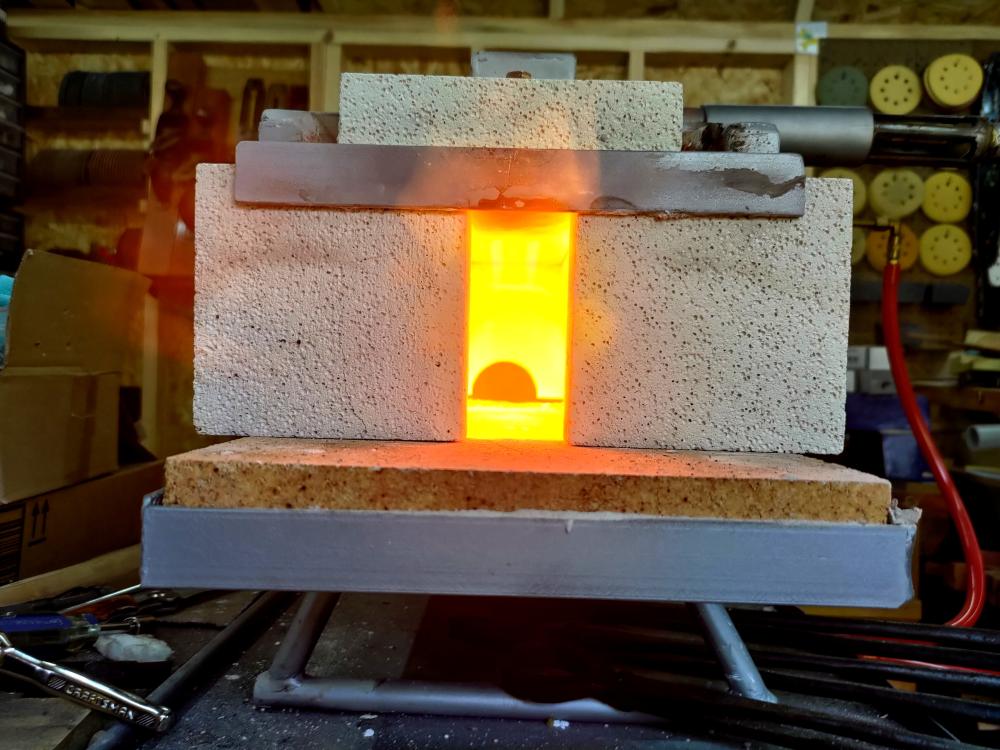
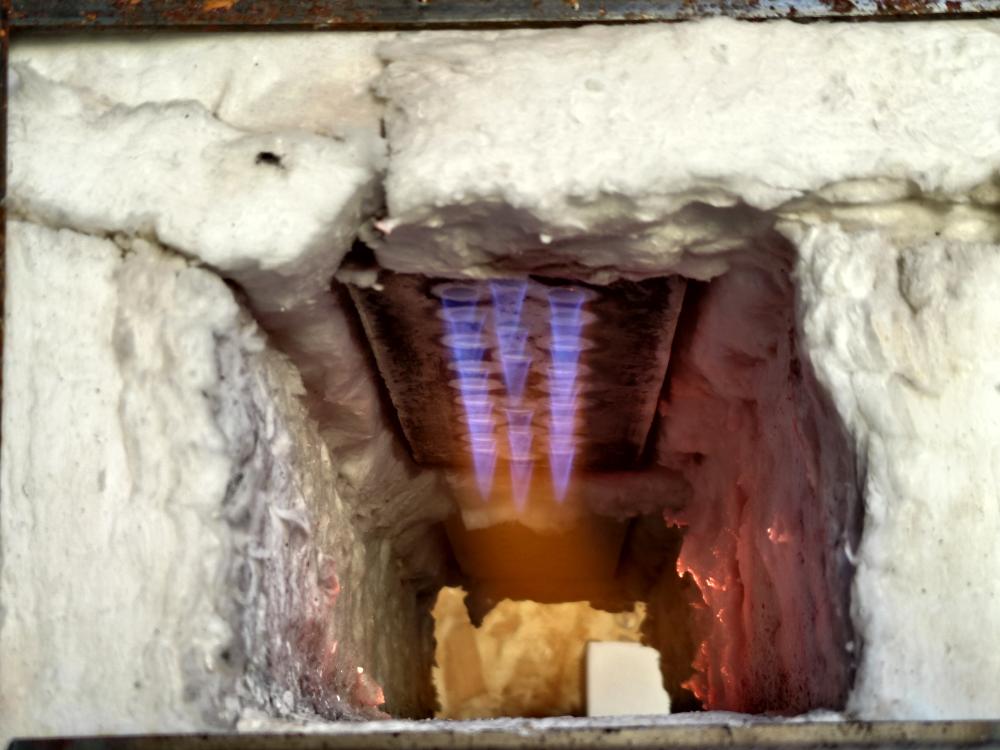
So final burner layout was 20 holes in the front block, and 18 in the back one. And they now perform about the same. Works at anything from 5 to 20+ psi. Heats metal just fine, I forge welded a piece of 1/8" mild steel left over from building the forge casing. Gets a good mid orange heat at 7.5psi. a good yellow heat, and will weld, at about 10-12 psi. Dragons breath is not bad either maybe 6" at welding heat.

-
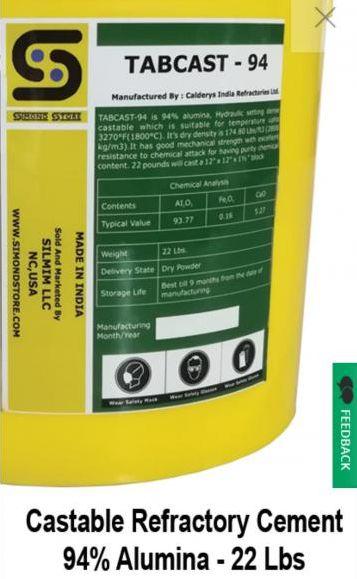
Buzz, I used the tabcast 94 for my burner blocks, it worked very well. I mixed it to a thick paste, packed and tamped the mould and tapped on the sides for a bit.I used a painted inside on my mould and smeared a few layers of hard wax on it after the paint dried... The first came out fairly clean, the second I forgot to rewax and I pulled paint on it - burns right off... I also used Teflon rods for my mini tubes, they pulled out very easy. And we're fairly cheap on Amazon.
-
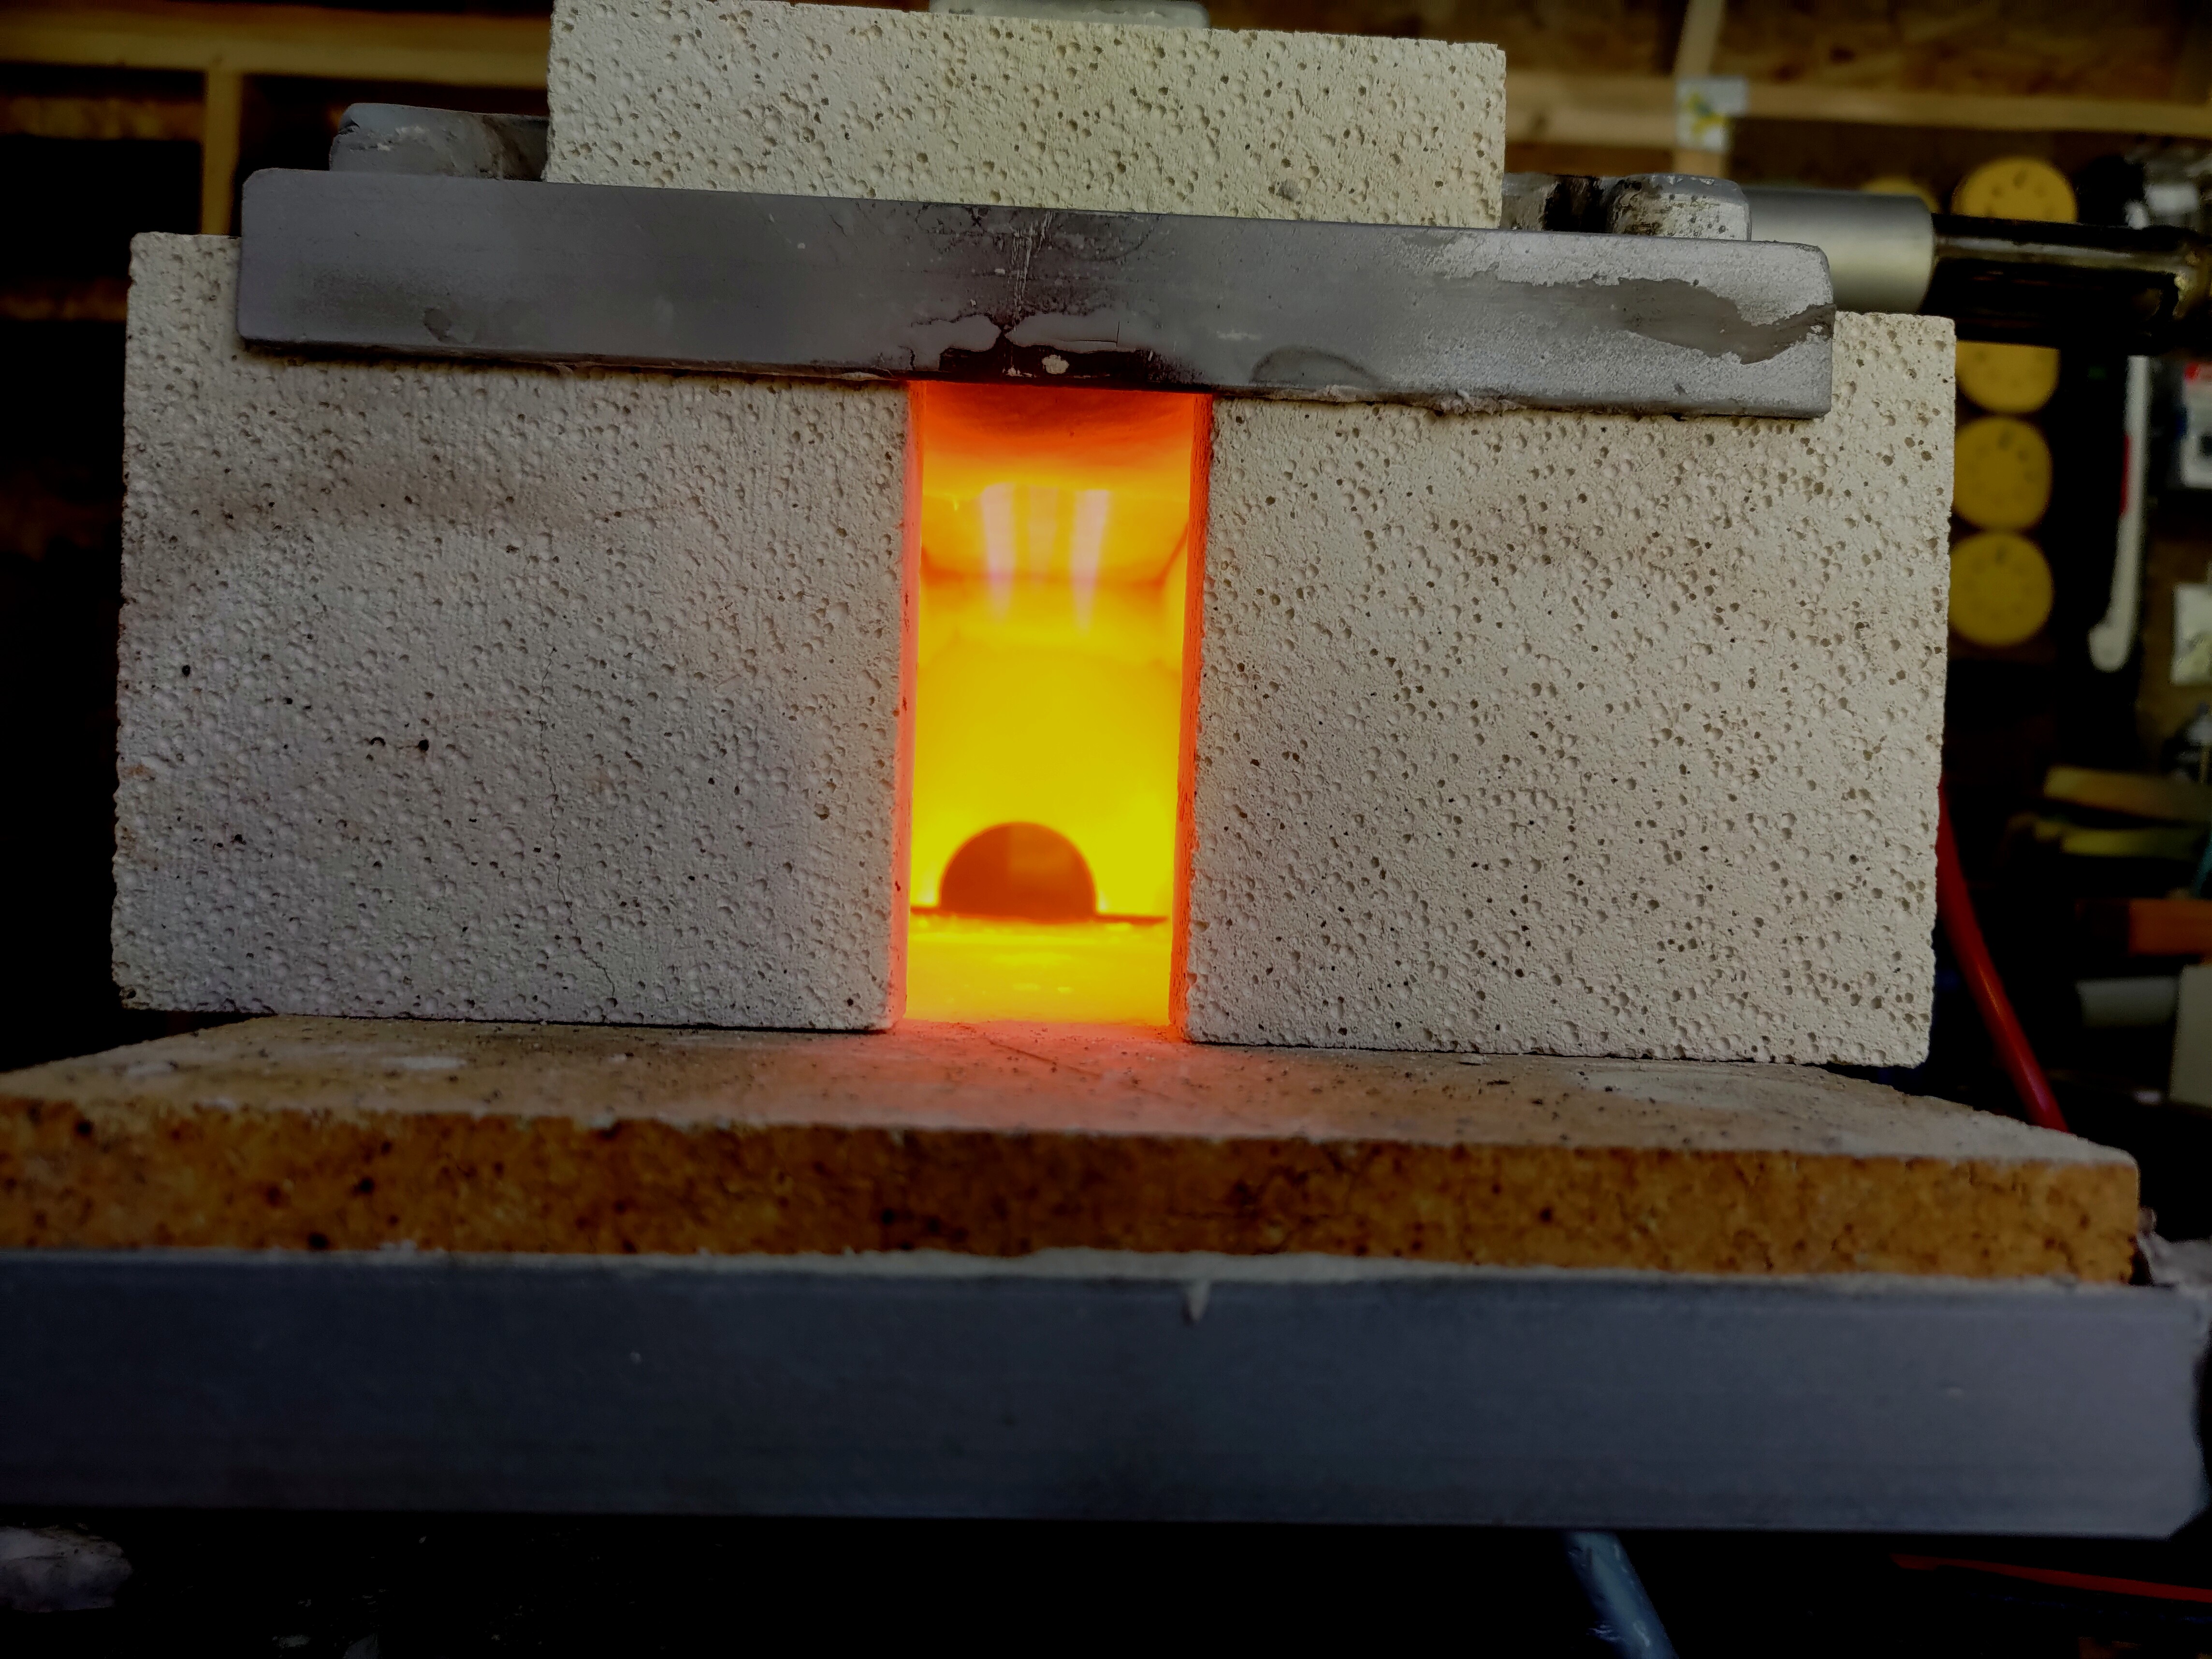
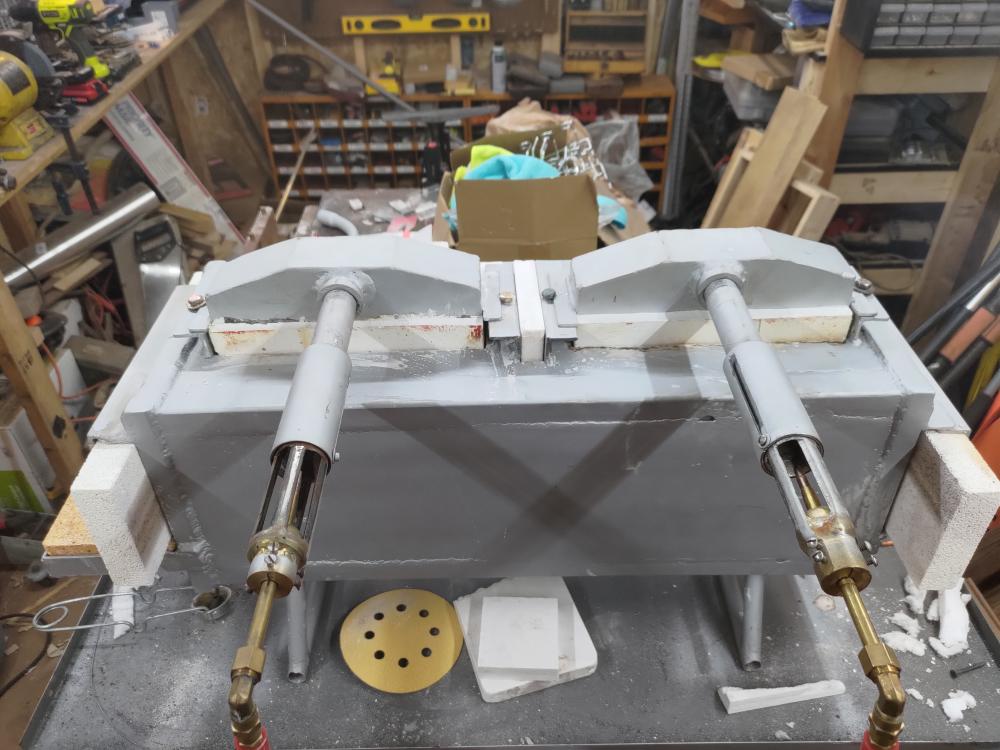
I honestly don't know how good of an insulator it is, the burner blocks cool down fairly fast. so it cannot be too bad, considering that it's harder than a hard fire brick. The more or less complete forge... The red silicone/PVC hoses will get swapped out when I move it out to the smithy area I'm setting up under the pole barn. I'm just using them while testing as they are quick and easy to get on and off. (They are rated for 150c, and 100psi anyway) I'm probably going to run soft copper lines to the burners and I have an actual "propane" hose to go from the manifold to the bank of tanks. I'm going to be using 3x 20lb tanks at a time to run this setup. I've been testing with 2 tanks untill I move it., I also finally replaced my 30+ year old regulator, the new one is much less finicky and actually reads below 5psi and over 22 ish...(old Guage was sticking). I also got my old anvil cleaned up... Yes those are hammer marks from 18+ years ago. Before I learned to properly dress my hammer face and was still missing... A Lot... I didn't want to grind all the way down to the bottom of them, so I just cleaned it up and re flattened it. I may see about getting a hunk of something like A2 or 1045 and weld on a new face ... Eventually....

-
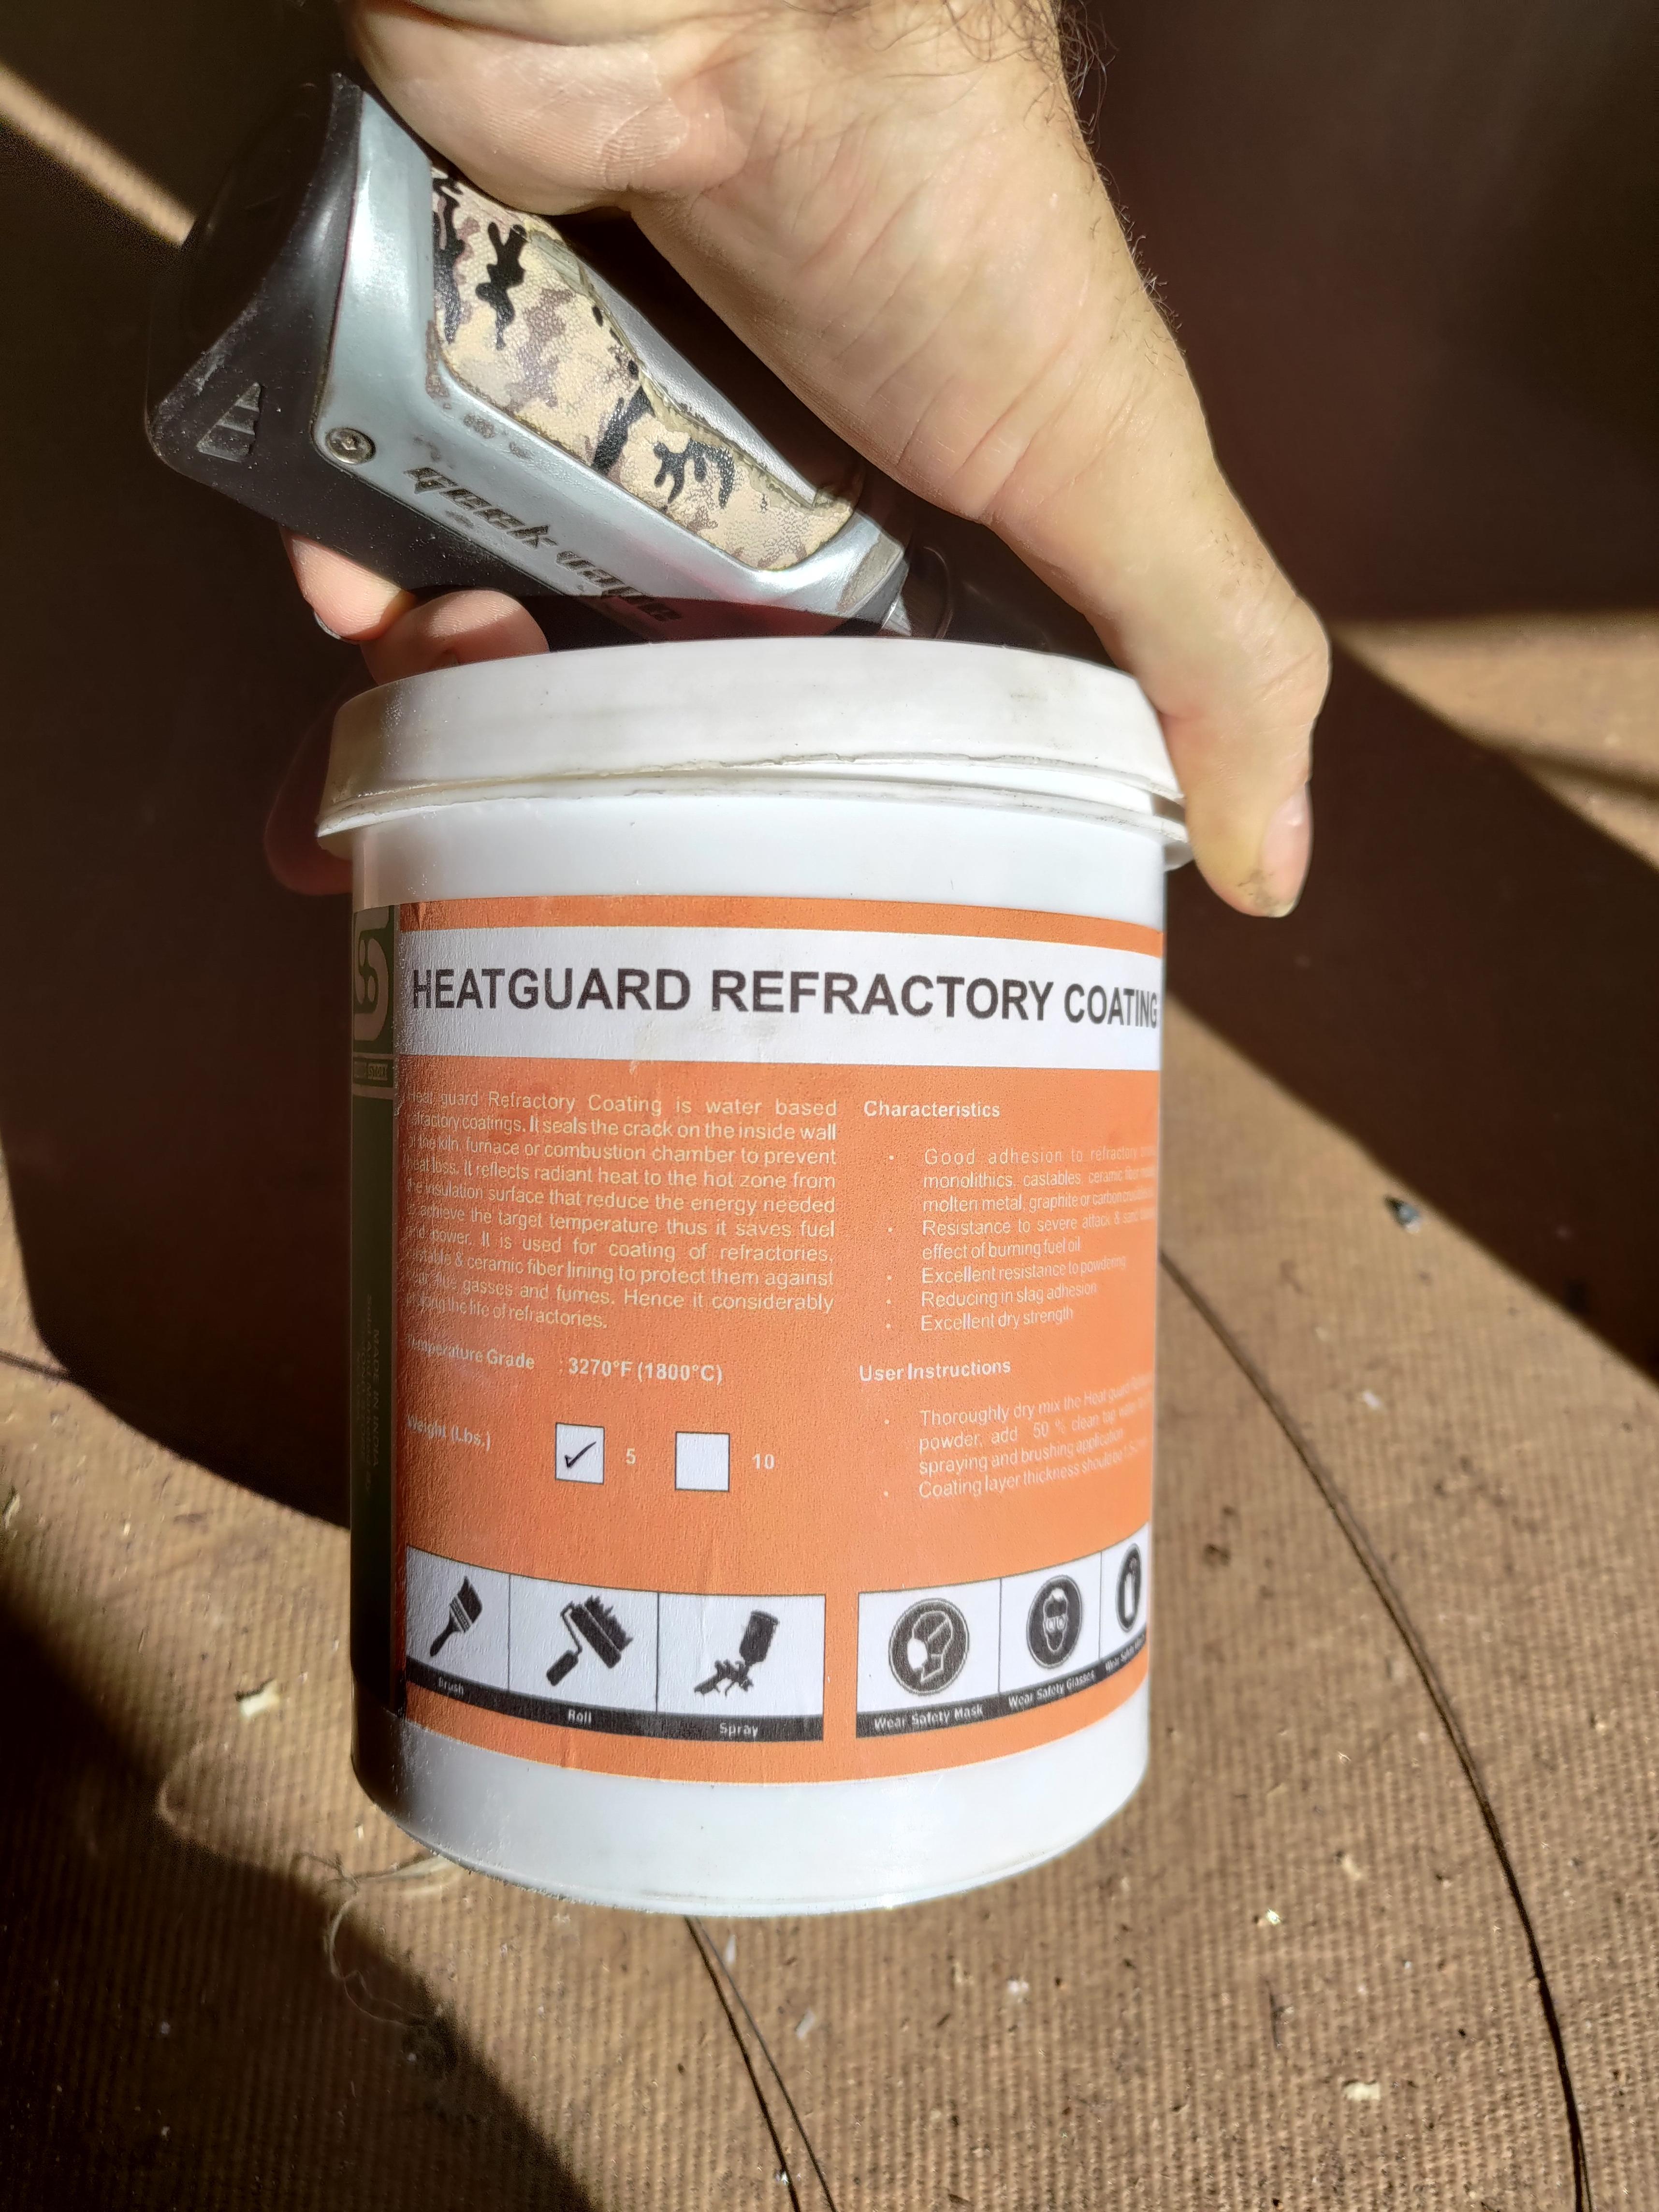
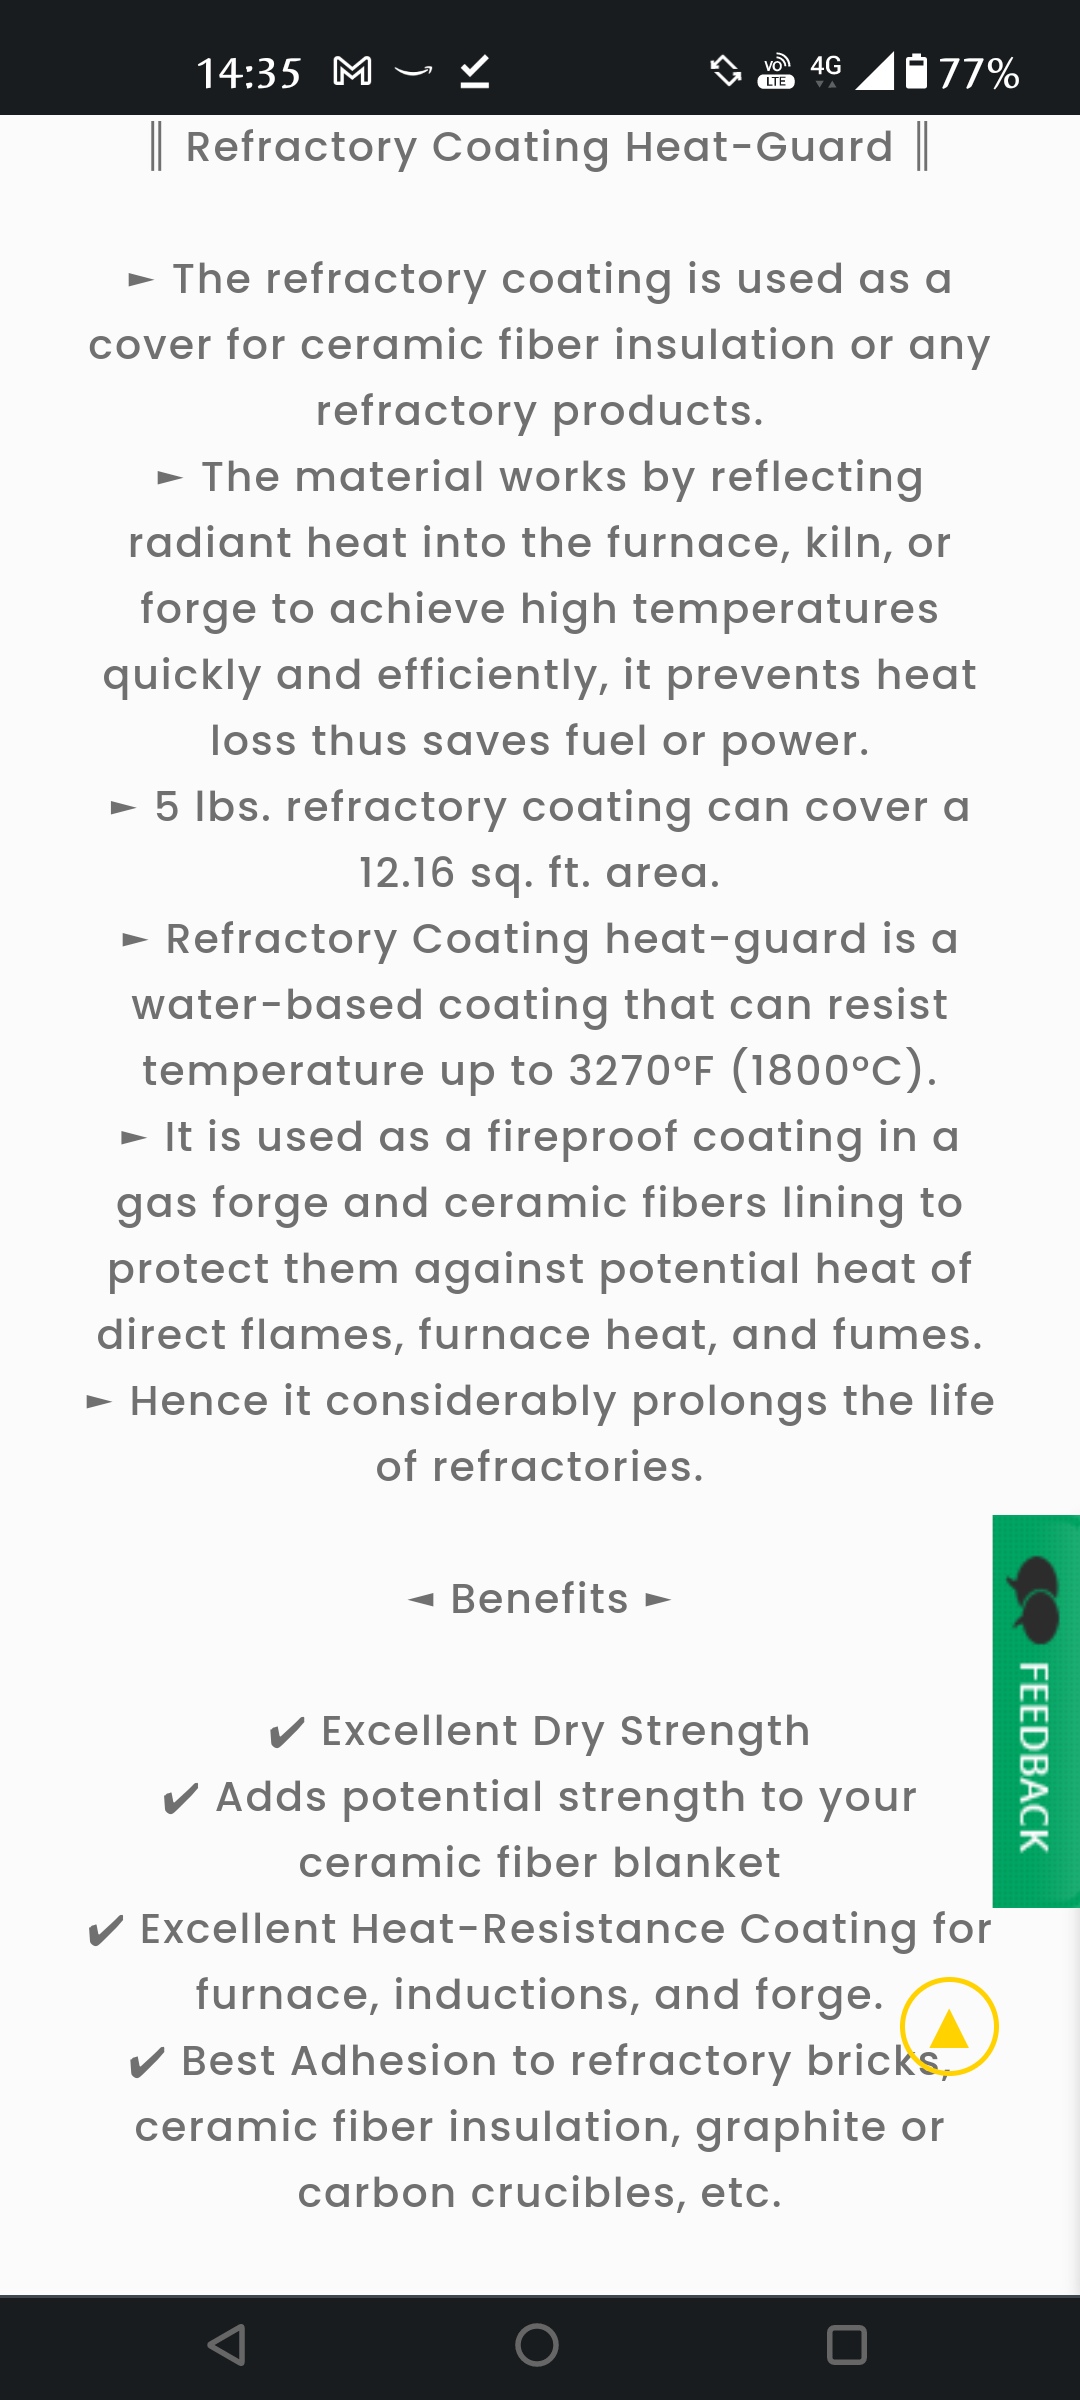
I'll look at putting some needle valves on it if this last test does not work out... On another note- I am basically done with the coatings and such. I used the tabcast for the floors and walls. A bit of satanite to protect the recessed section. And heatguard refractory coating as a wash on all surfaces... I really liked the tabcast 94... That stuff really sets HARD... The heatguard is from the same retailer and looks to be a heat reflective and somewhat tough coating...


-
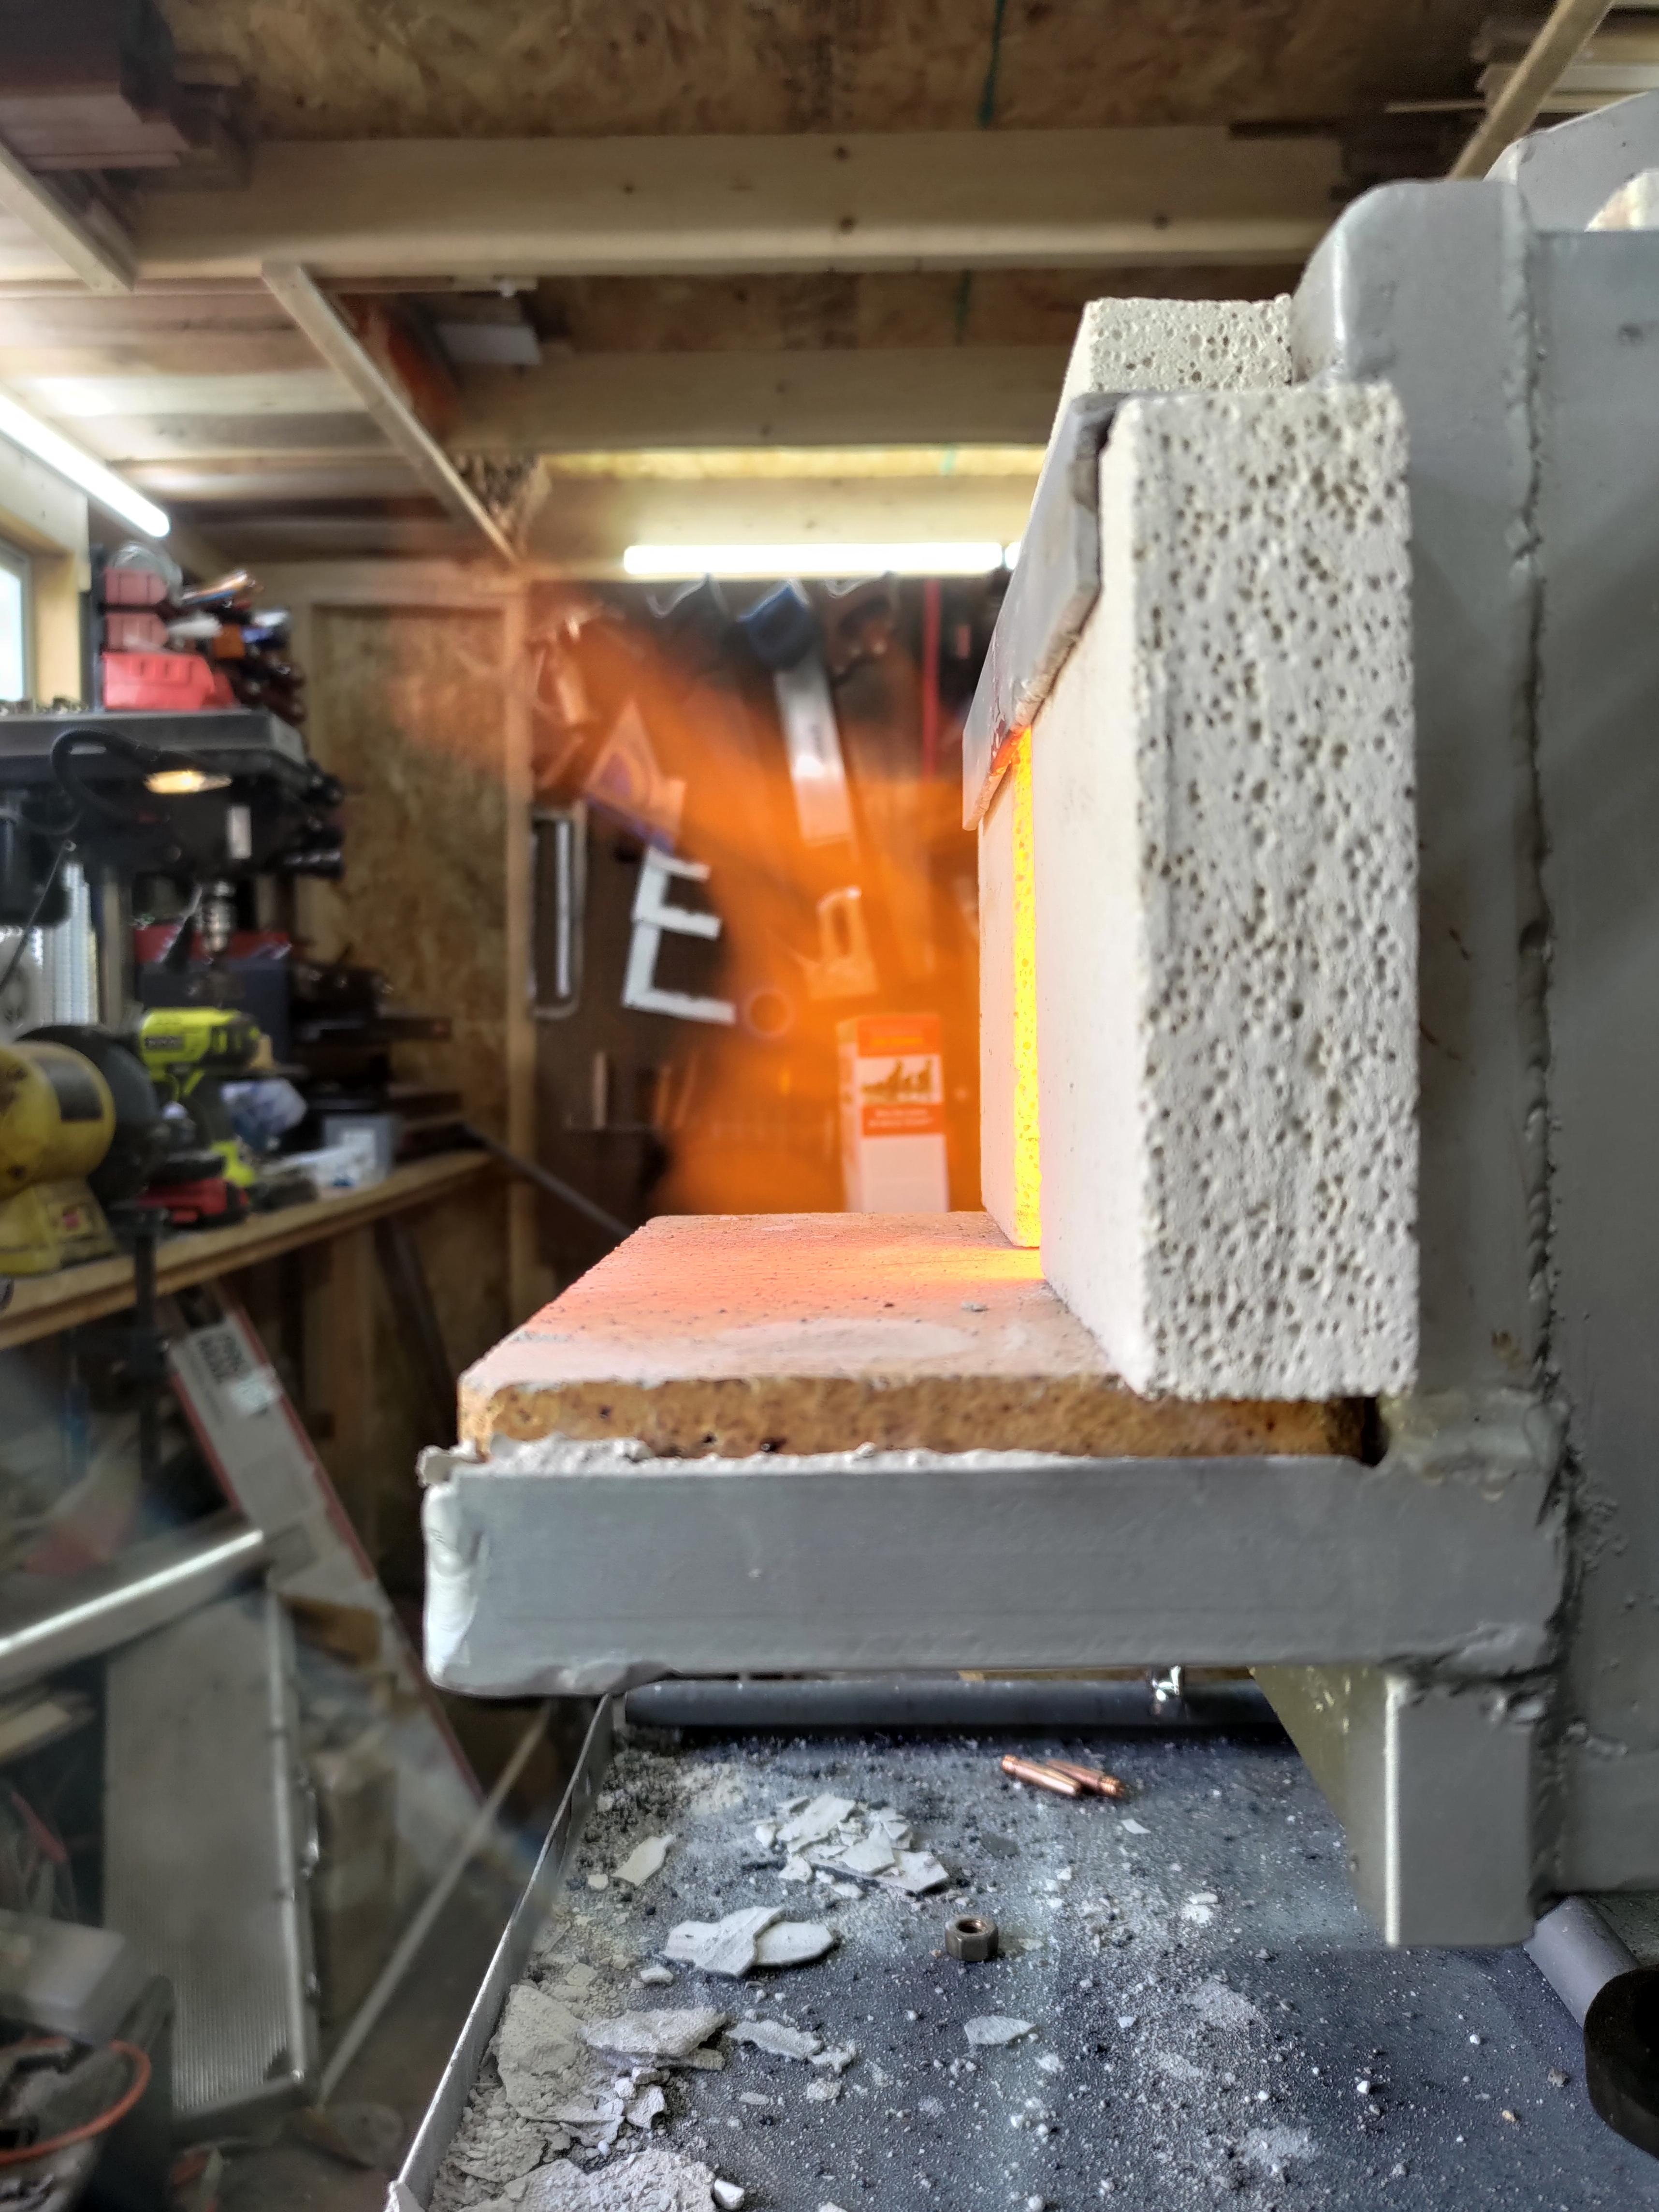
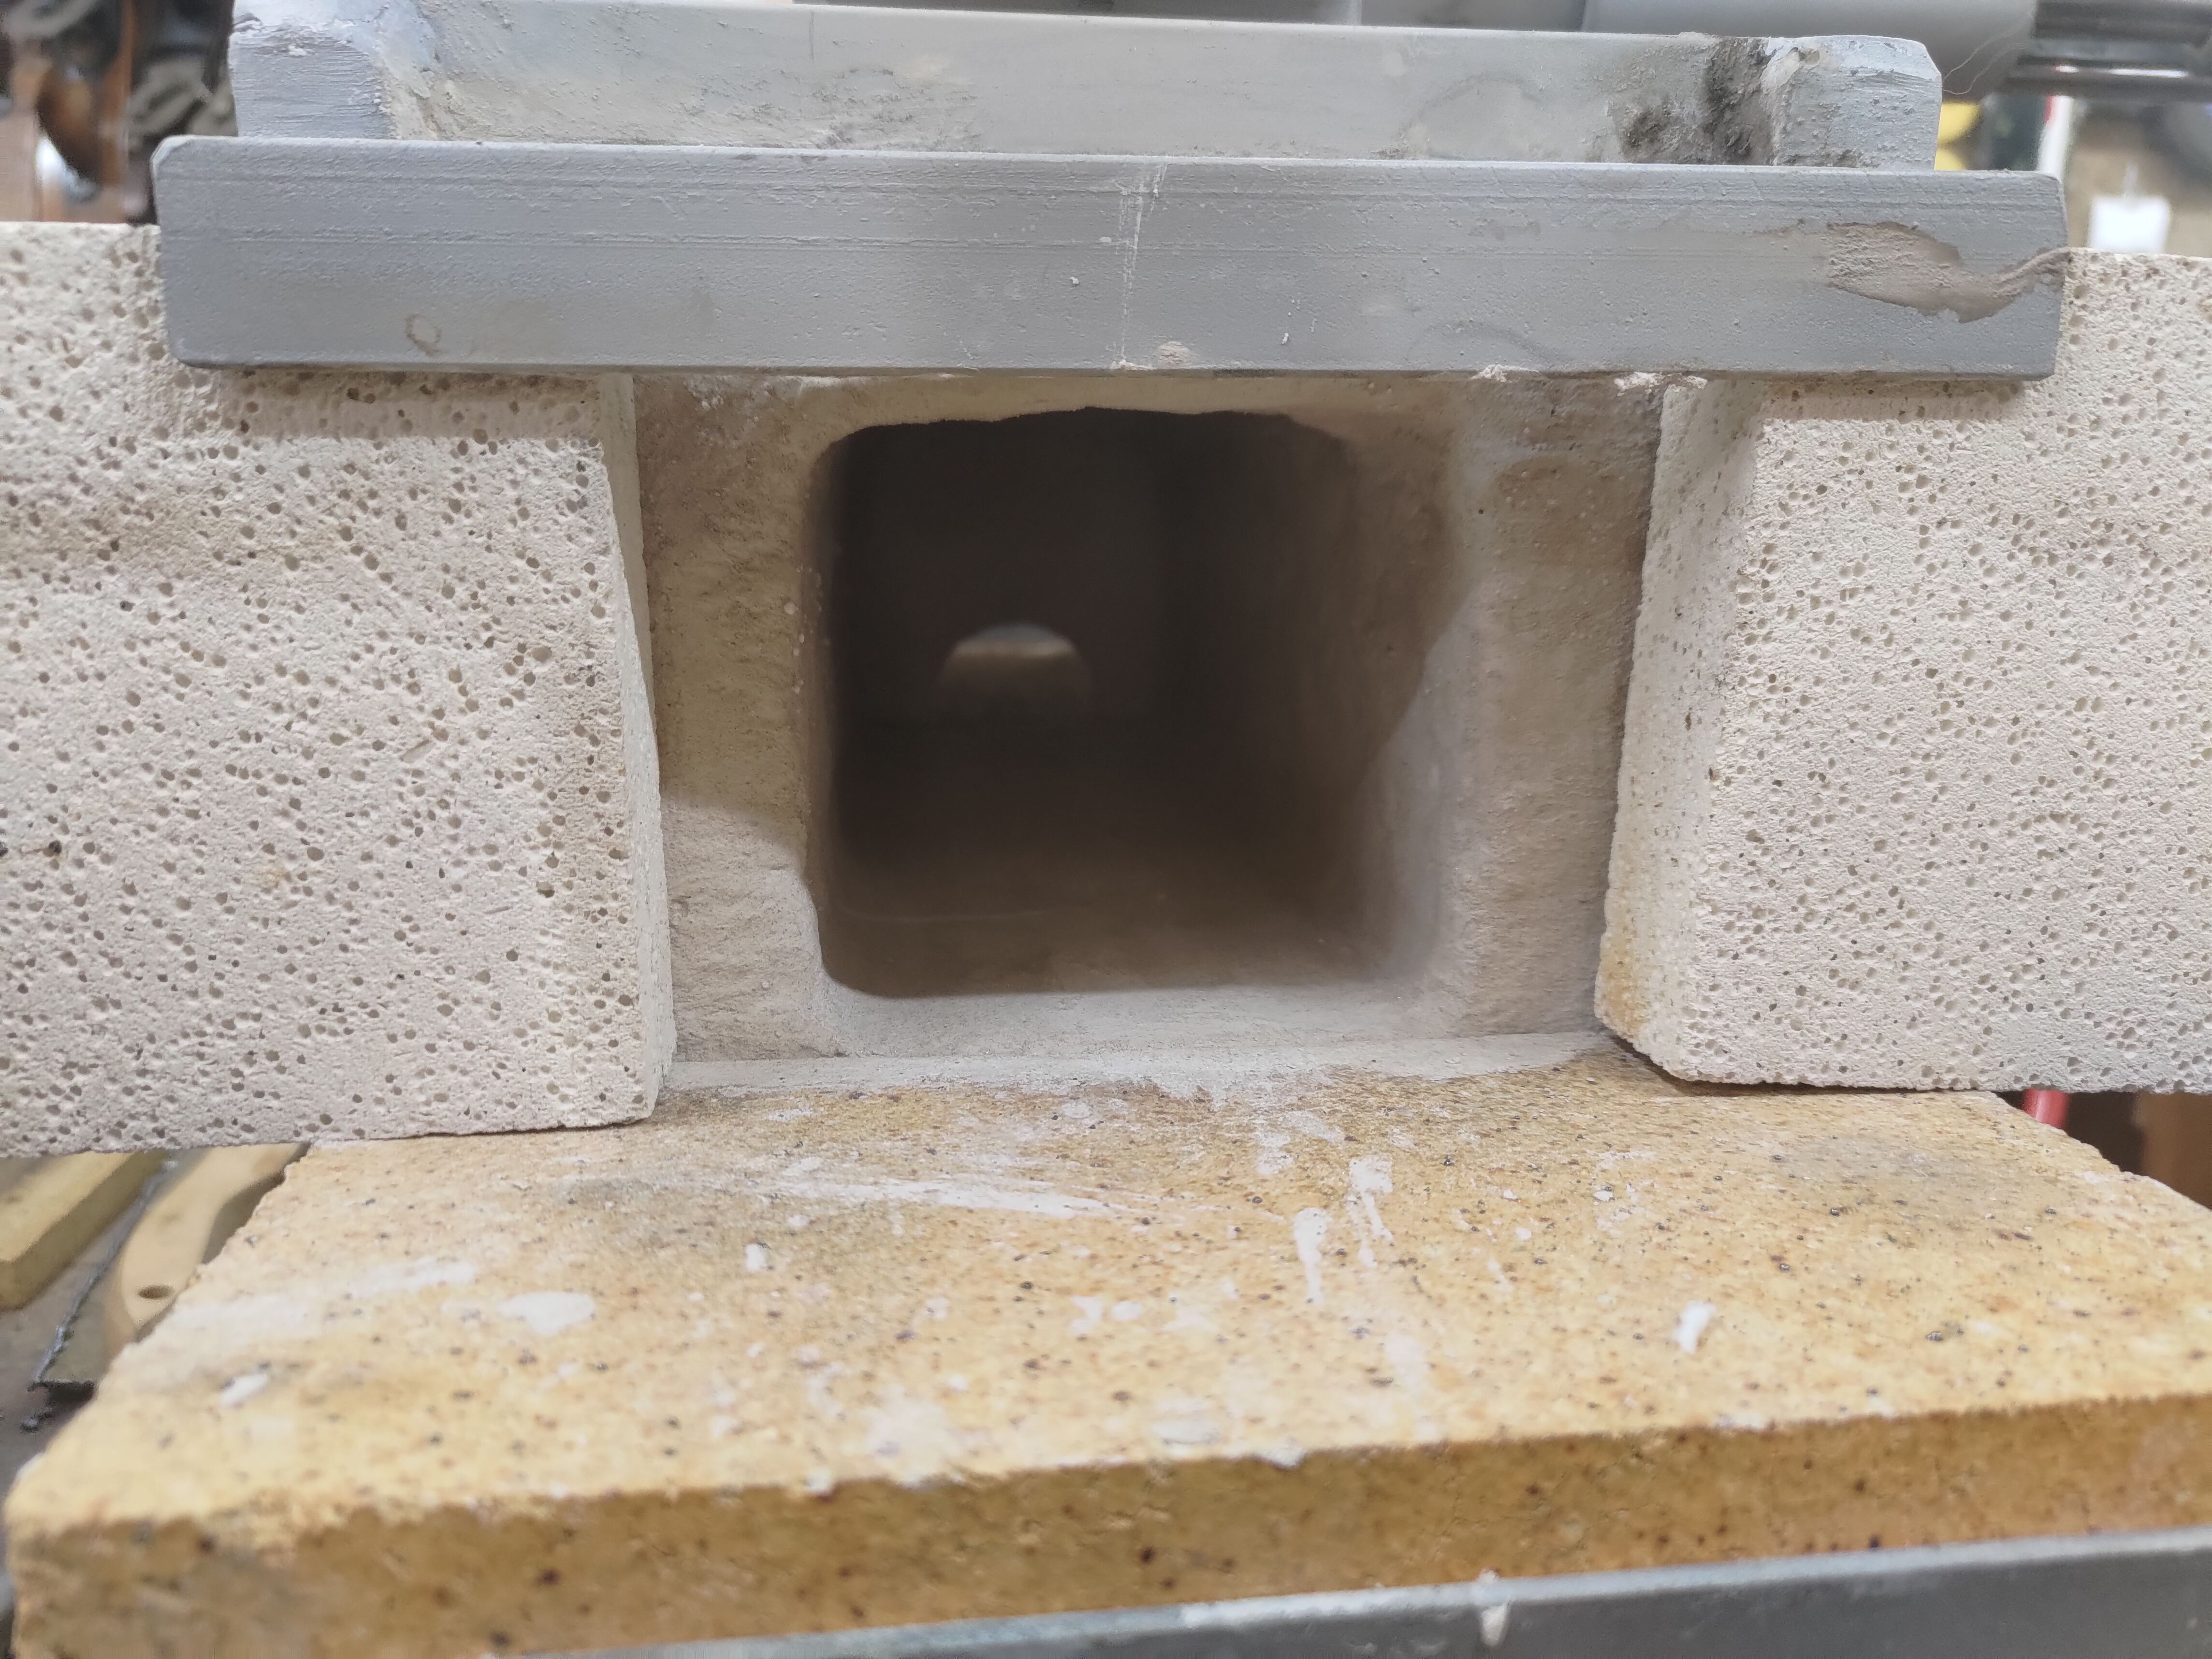
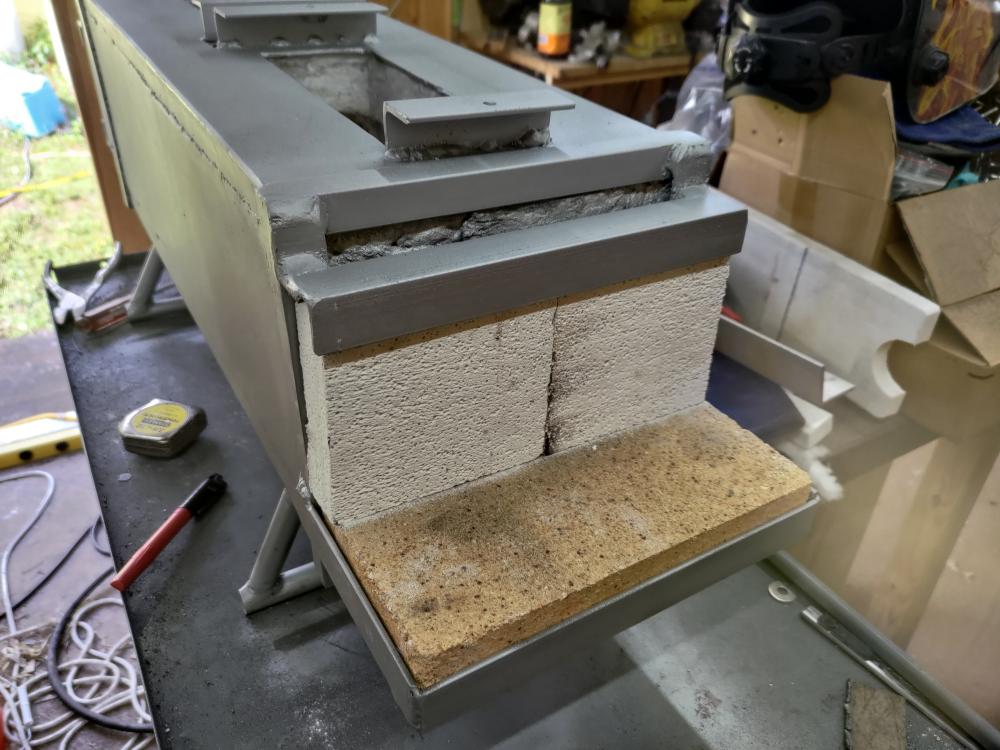
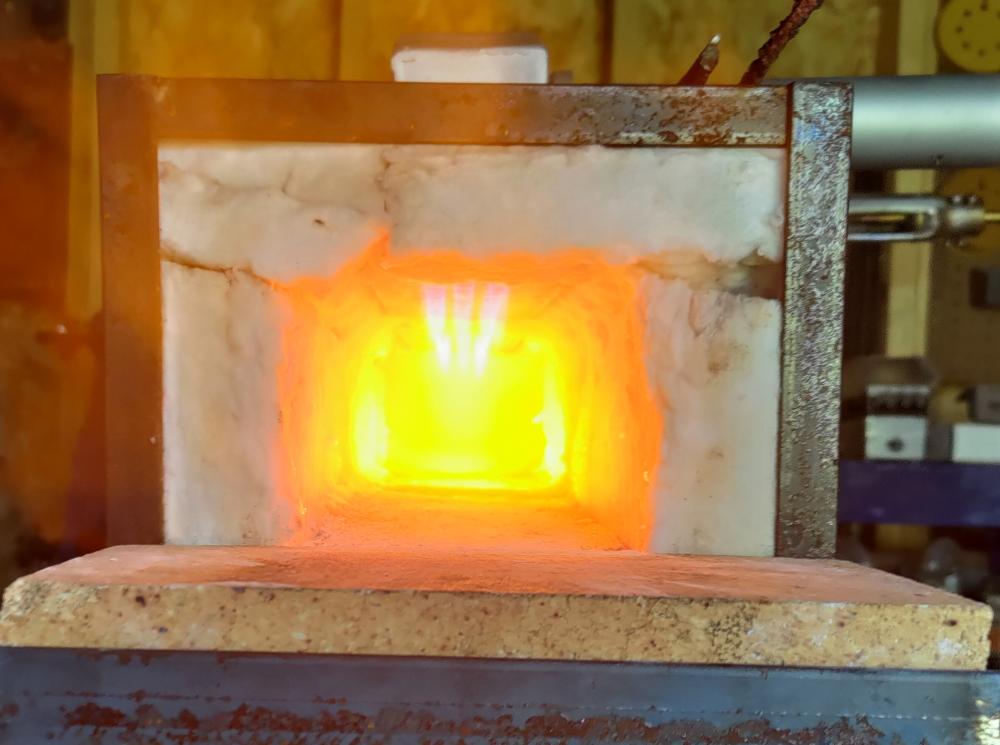
They are naturally aspirated... A hybrid style burner. I figured I wouldn't be identical, it's difference is just bigger than I figured.... 4 slots in a 1" pipe with a 1" brass rod used as the mounting point for the gas jet tube. And a 3/4” mixing tube. The jet tube is 8mm brass tubing. When doing the initial testing and Using a step nozzle I got them working best with a .030 mig tip. An .025 was a bit lean. The ribbon burner plenums are 9x2" with 1-3/4" space to the casting at it's highest... They taper (in height) down towards the ends to 7/8”. The cast blocks are 9x3x2" (LxWxD) with the aforementioned 5/16" holes cast in them. the forge itself has a 4.25x4x24" opening... There's a bit more volume that that inside as the burner blocks are up an inch into the roof. And a removable baffle wall at 12" to use only one side when I don't need both. I come up with about 462 in³ internal volume.
-
Thanks for that idea Frosty, blanket reminants worked perfectly to test... I've found that the two inducers work a bit differently from each other... The front one (#1) I got working down to 4psi by plugging one hole... I will test with 2 plugs next time I need to heat cycle the coatings. Just to see if I can extend that range more. But the back burner (#2) I'm up to 4 plugs to get it to perform ok down to 5psi I can actually see the holes that burn back still and will be trying out 5 and 6 plugs next. I think that configuration will be my final setup - 22x 5/16” holes for #1 and 18x 5/16” holes for #2 based on the testing so far... I got to checking everything about the two inducers, and it seems I brazed the brass block about 1/4" further down in #2 so the intake slots are only 2-1/4” instead of 2-1/2” this may be part of the reason they perform so differently in blocks cast from the same mould. I finished putting together the door guides and the center baffle...


-
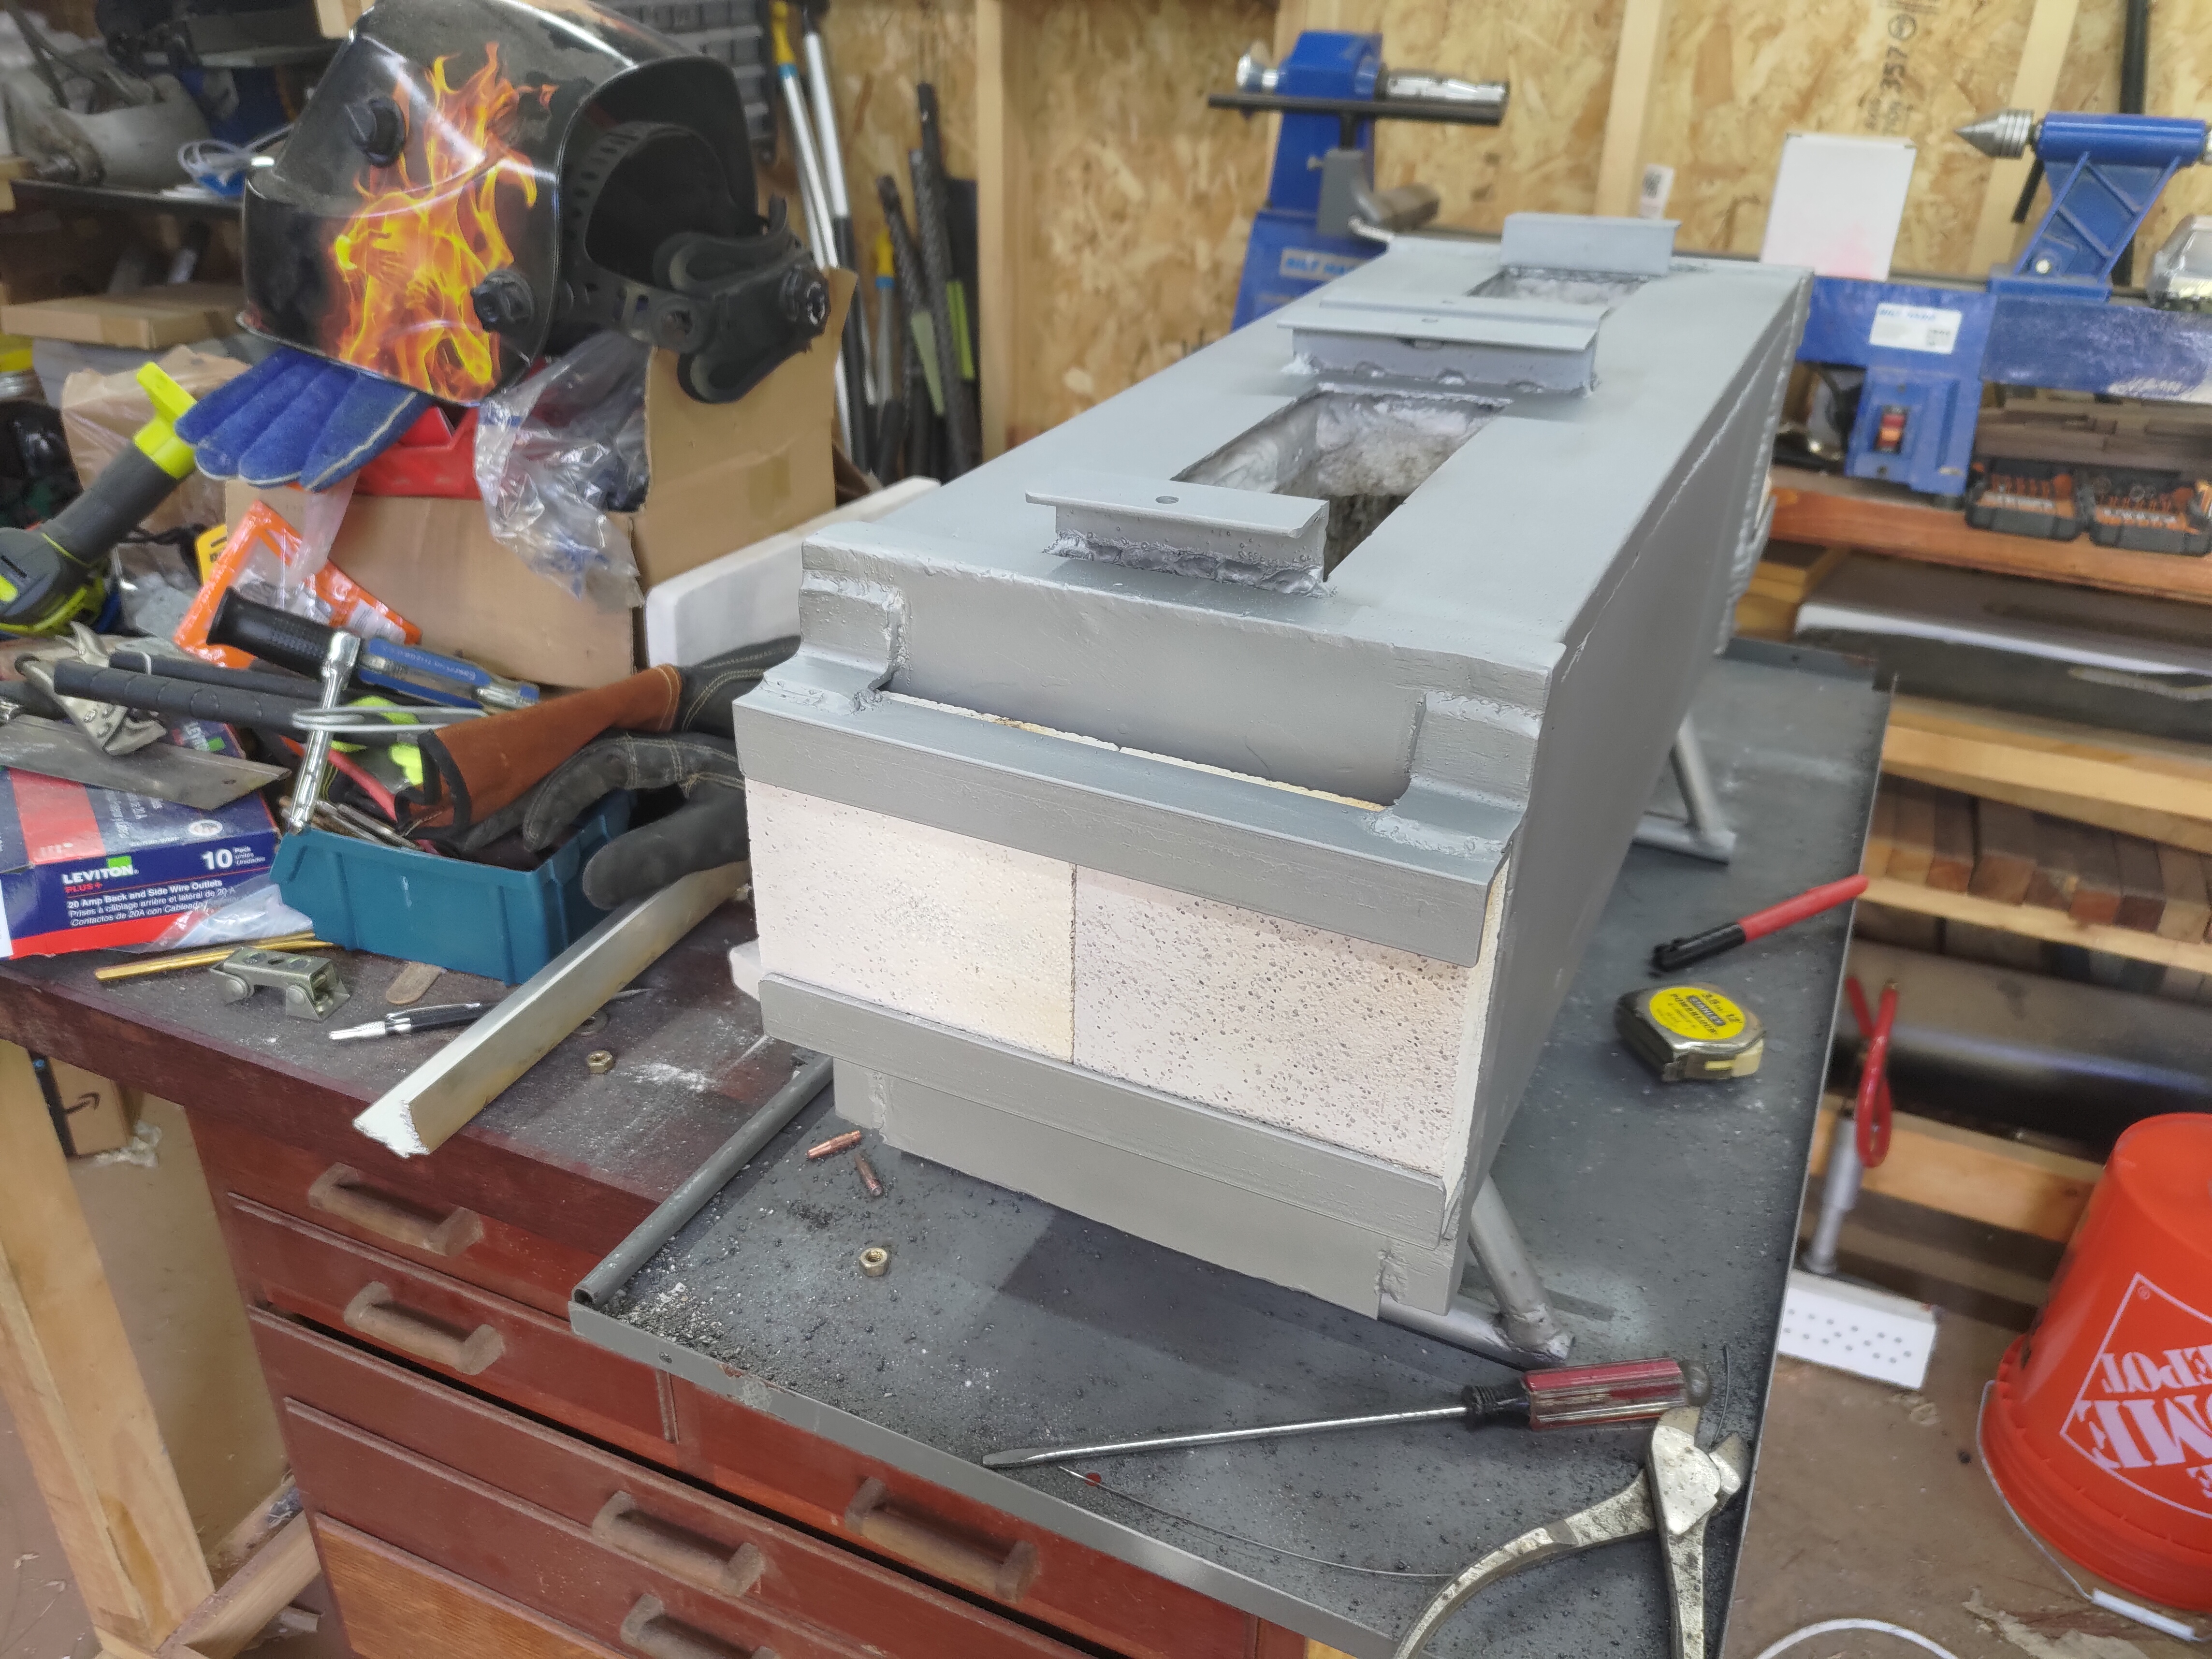
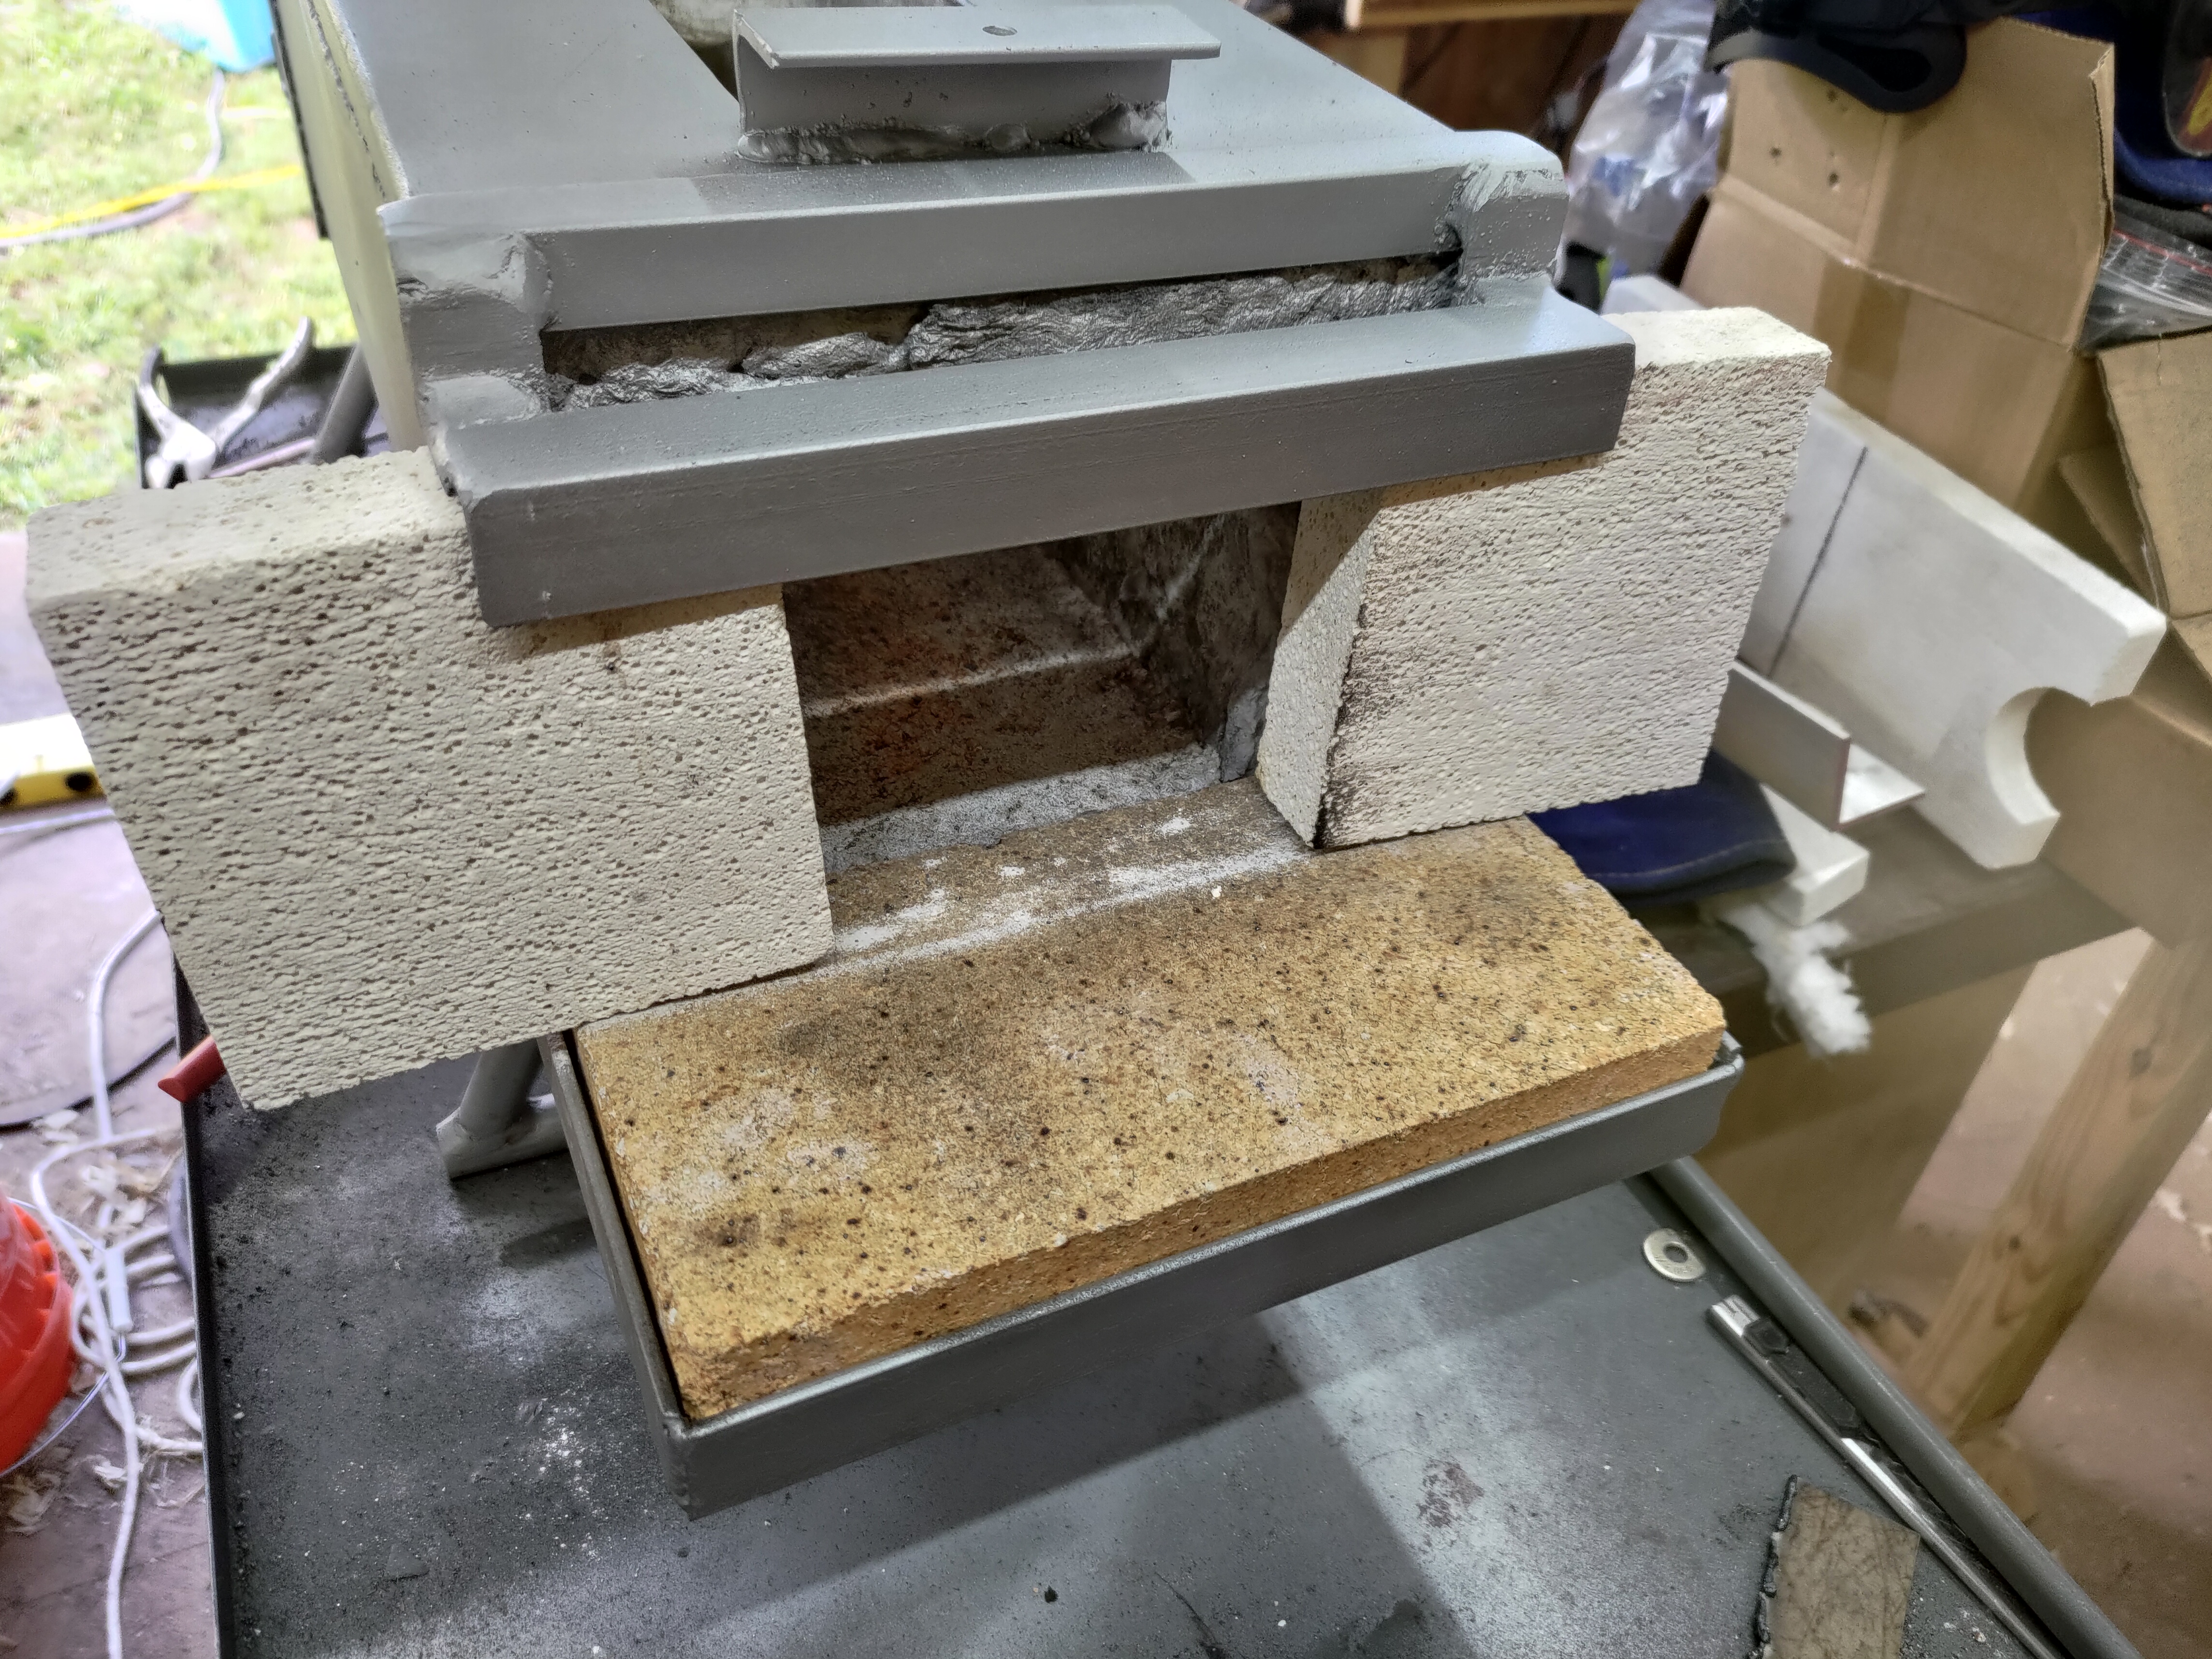
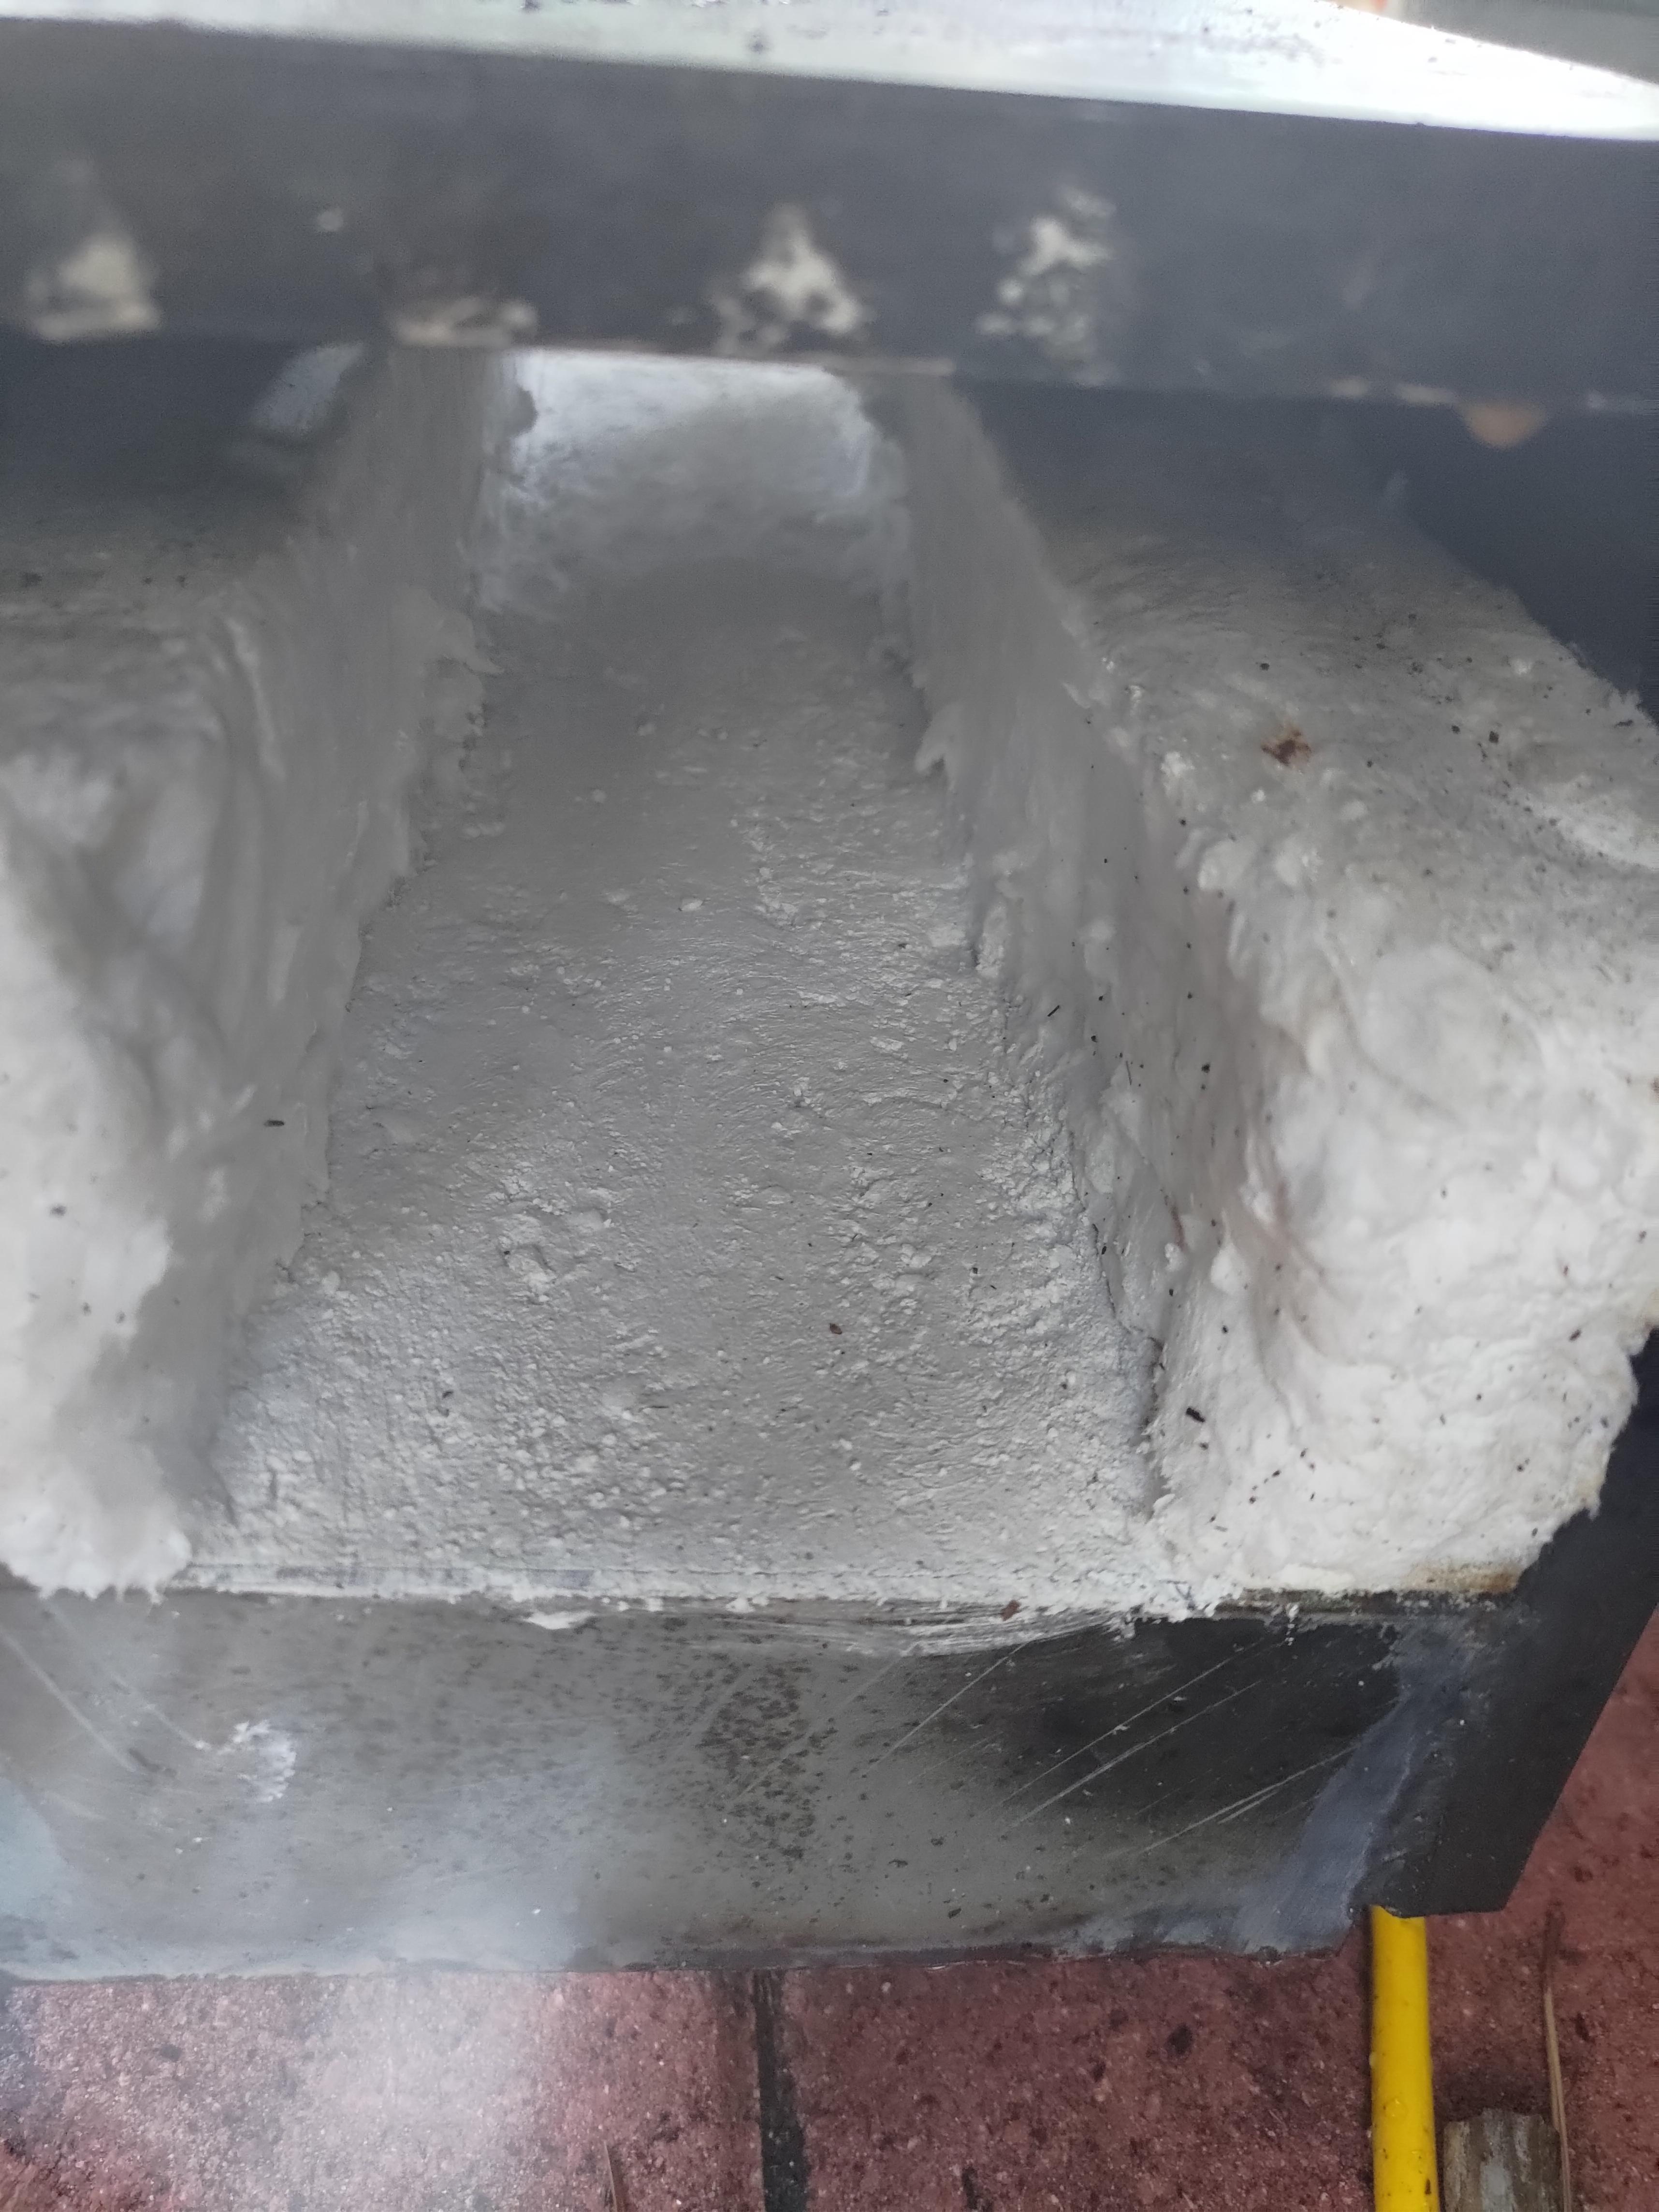
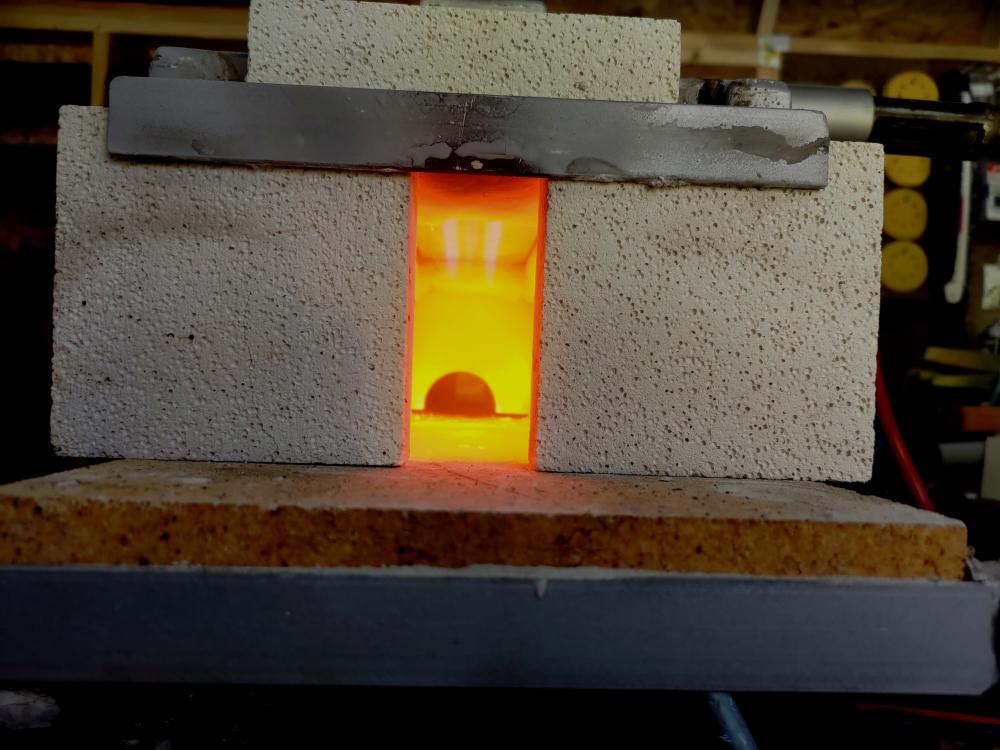
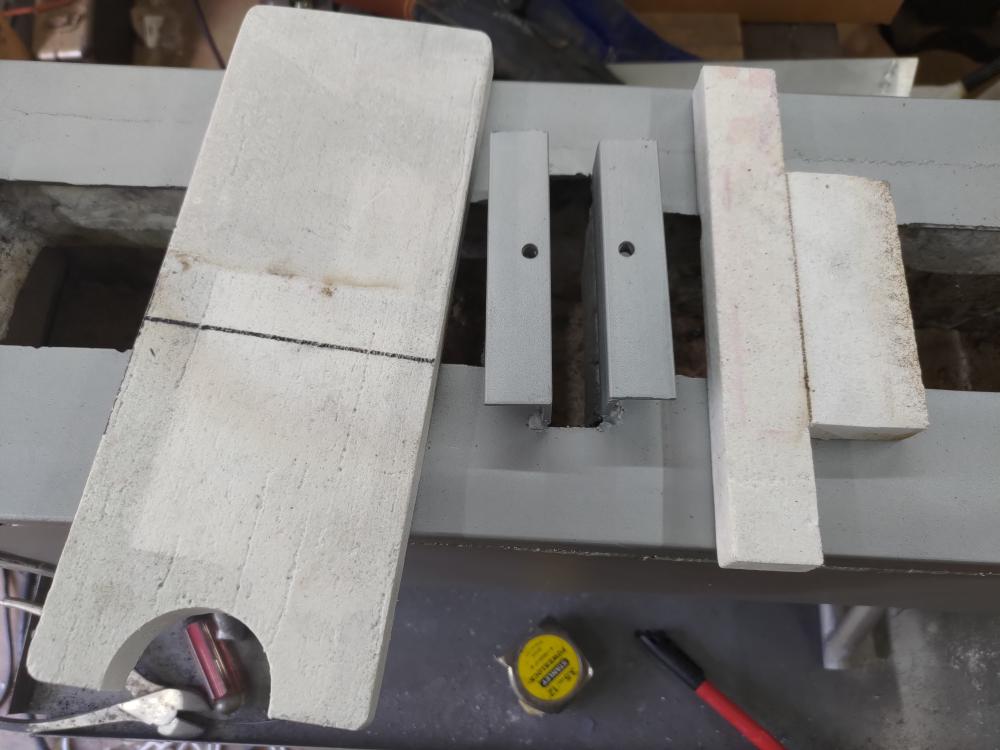
So I got the top cut, and did the initial heats of the burner blocks, and retreated it with the ridgidizer, as it didn't seem to set the first time I tried it. Initial lighting- I moved the burner face up an inch after this test. Burners in place where I want them, second coat of colloidal silica (and red dye), T baffle being used. I also got the center baffle slot cut. I'm using some 2700 deg insulation board for the baffle... Technically two one it a T shaped part for when the whole forge is in use the other is a reversable wall one side solid one with a 2.5" half circle cut out from the bottom. In the forge I was able to run at any pressure from 10psi upward, but under that I get burn back after a few min - the more under 10 the quicker it starts burning back... IIRC that should mean I need a hole or two less in my ribbon burner blocks... I built them with 24- 5/16” holes, 6 of those holes are in the centerline of the burner so can be plugged without making the heat too uneven. Should be a simple fix to mix up a little more castable and fill one or two holes at a time till it works well in the forge. These actually worked at a lower pressure setting outside the forge - stable at about 5psi. Well, after it cools down tomorrow I can see about the wall coatings and such...
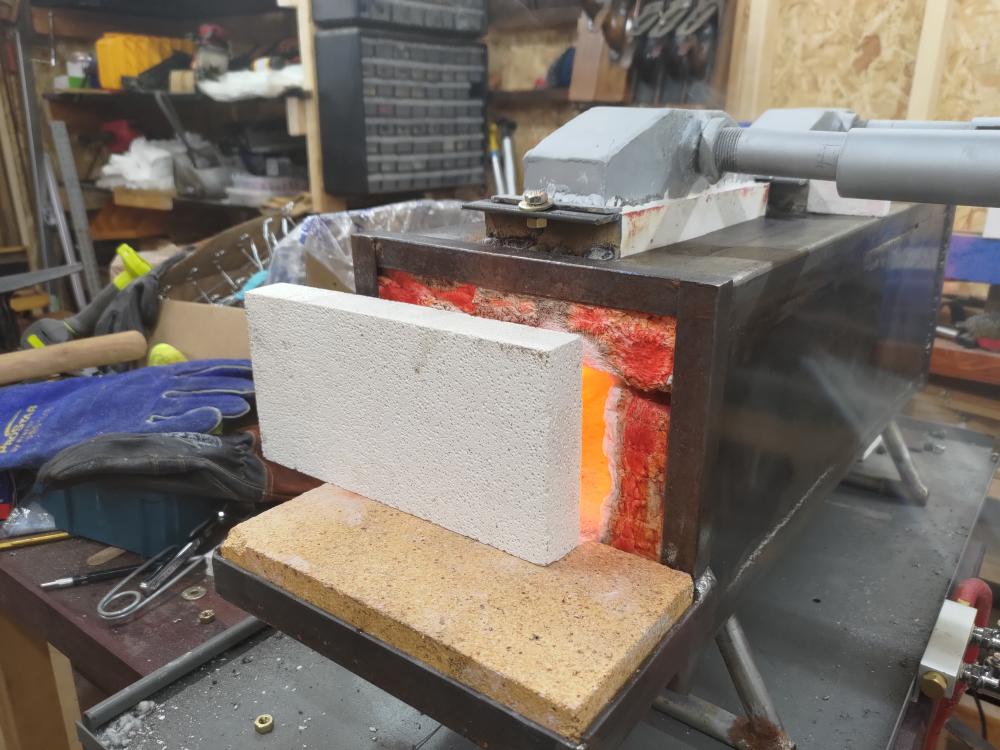
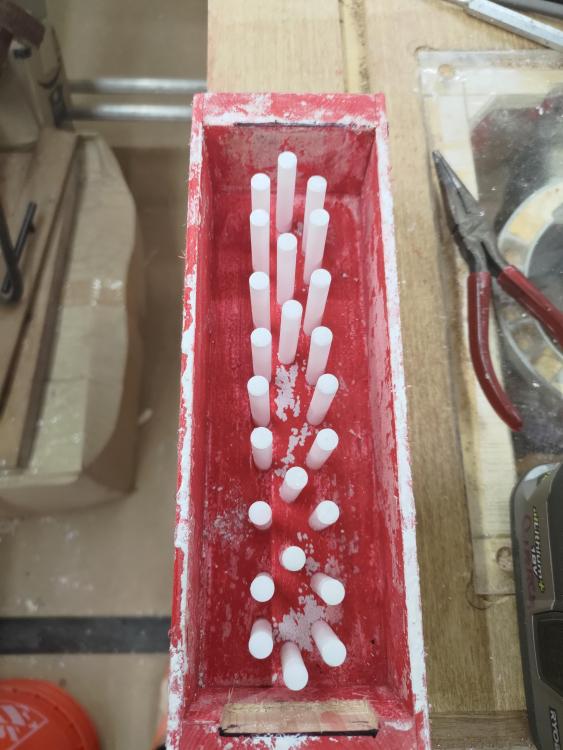
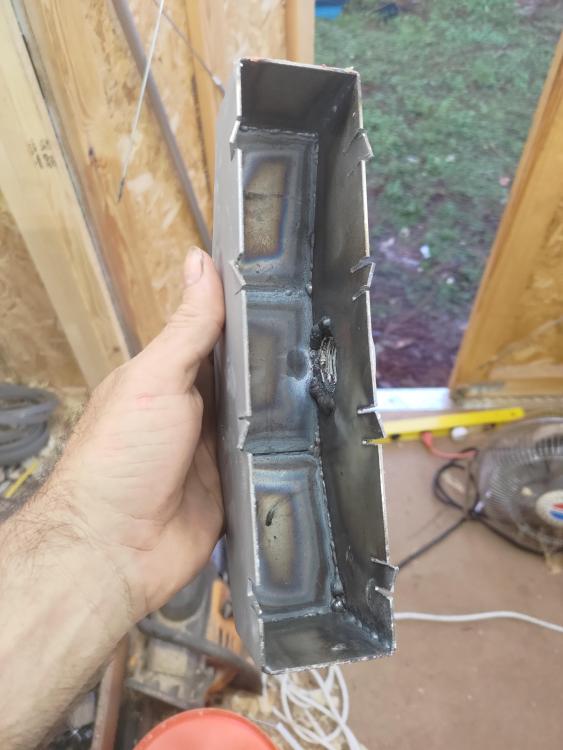
-
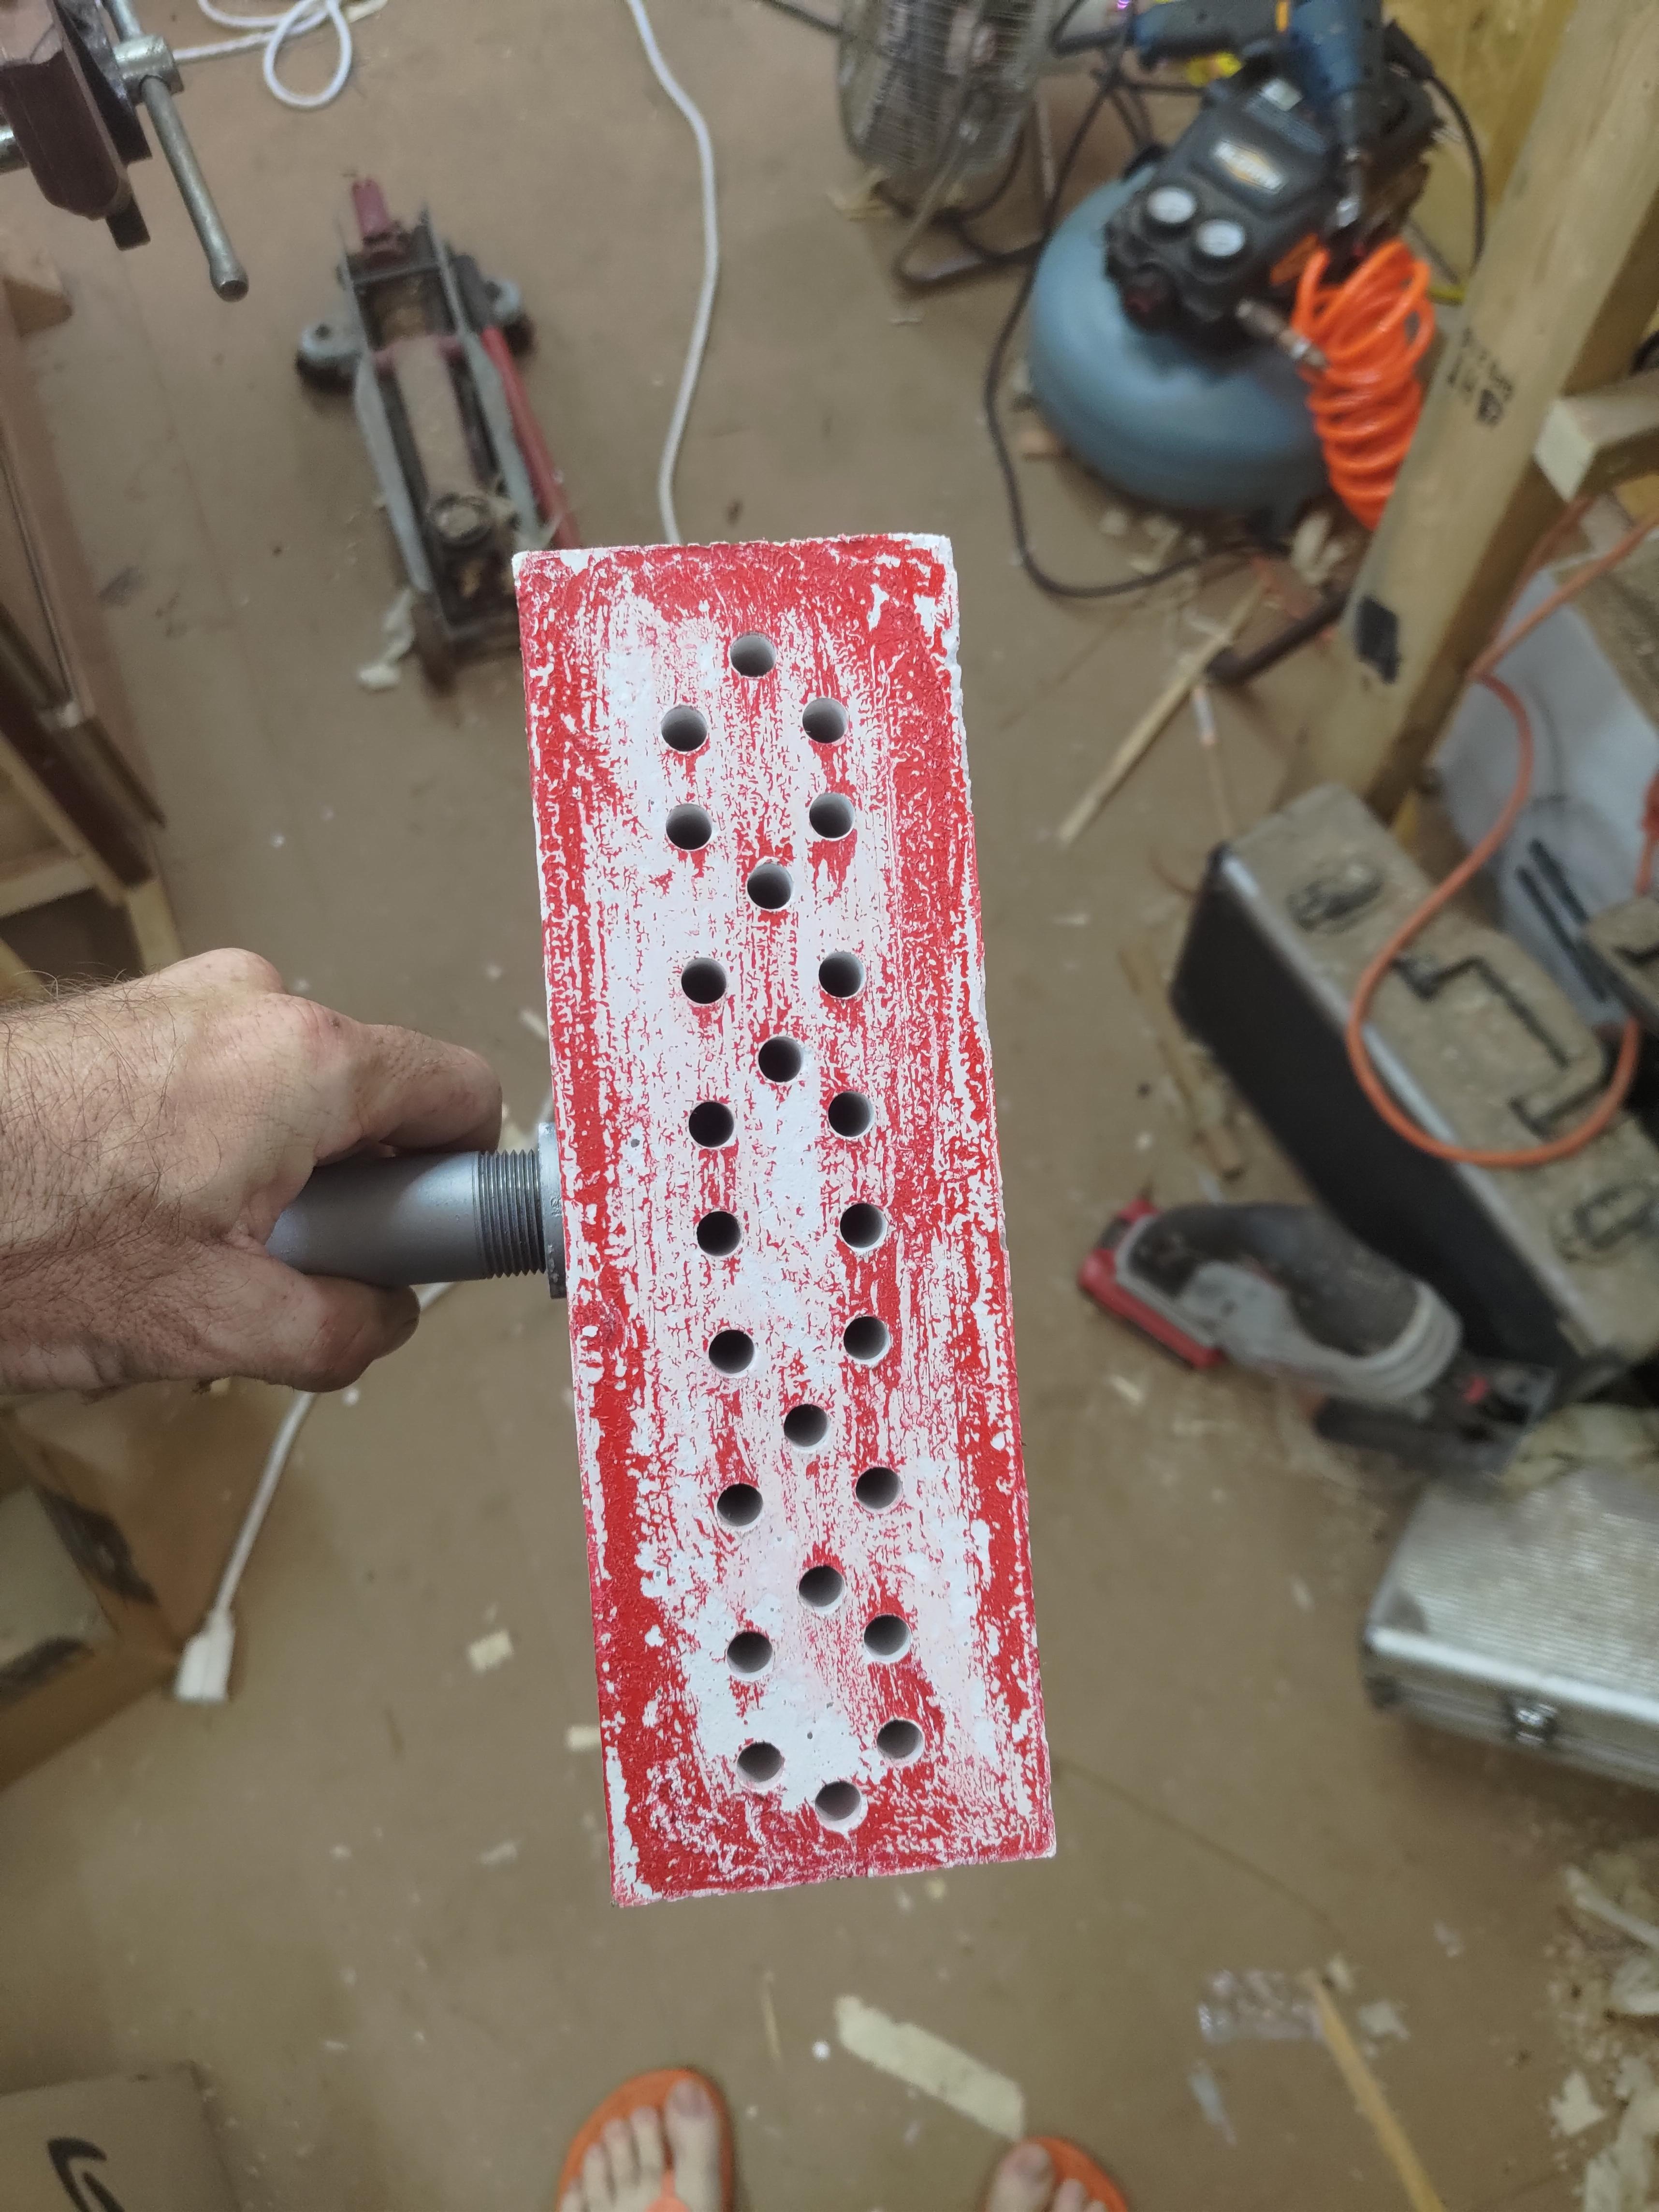
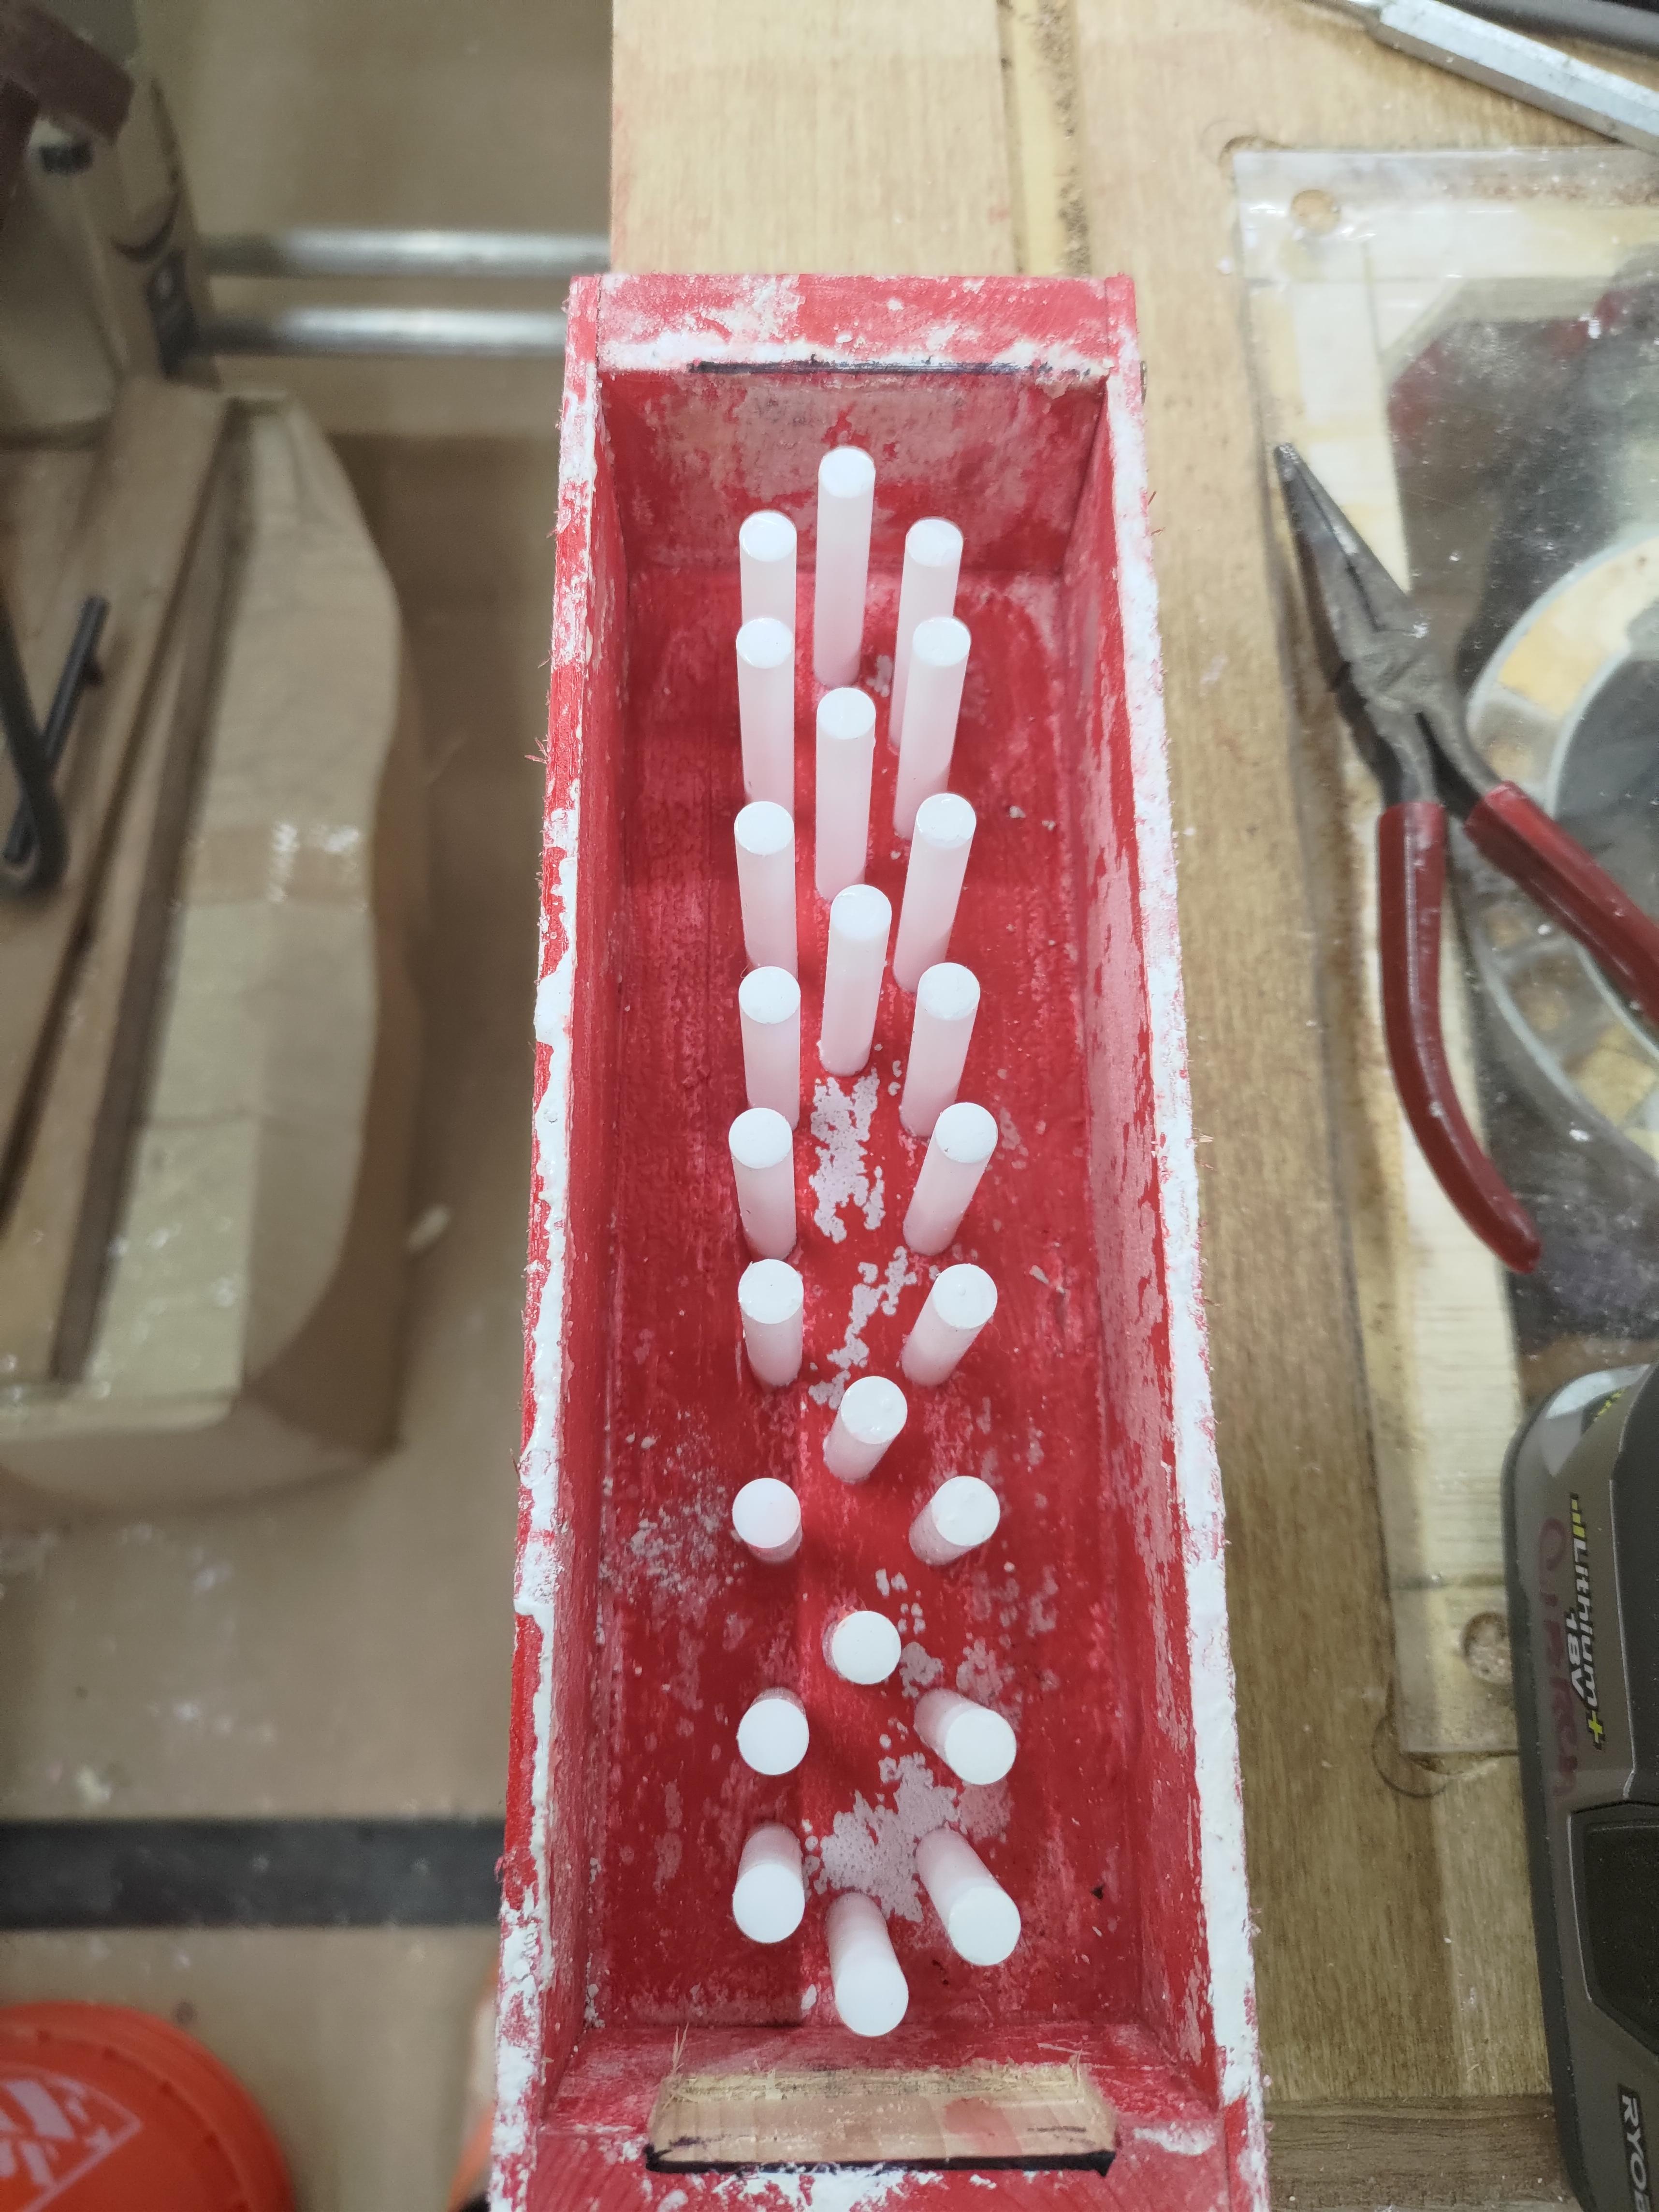
Well... A bit over a year and a hurricane later, I'm finally getting back to the projects I had started in late 2021... Not a month after my last post I found I was going to have to start packing everything up to move at the beginning of the year. By February we had just about gotten everything boxed up, and moved to the new place... Something like 15 loads in my 6x12 trailer and the SUV pulling it... I got a new shed placed so I would have room for everything but between my regular work and trying to get things settled I hadn't even looked at the boxes with the metalworking tools. And About the time I was finally getting close to caught up with the unpacking of my shop supplies and tools we get a direct hit from IAN... And now after I've rebuilt the pavilion that got crushed, and done most of the cleanup work. I've finished getting the tools in the shed into a usable state and can start trying to get back to my projects that were halted... I cast the floor in the forge, and two ribbon burner heads that should run on the burner jets I built last year. I did a few wood block tests to try and get a feel for how many and what length to make the ribbon burner heads... I settled on 24 holes 5/16” (8mm) in diameter. All about 2" long. The mould is 5mm ply on the sides and 3/4” pine for the ends and bottom. About 2.5" x 9.5" -ish (I used some scrap wood I had) and the inside was painted then waxed before the first was cast... For the burner holes I used 5/16" Teflon rods - these were SO easy to pull out. The plenums are some 1/16” 4130 steel I welded up with a female pipe thread welded to one side to attach the burner to. Then painted with header paint. I will cut the top of the forge to take these blocks later this week. After I find the angle iron I was going to use to make the mount for them... It's here somewhere, probably still in a blasted box. As I get to the rest I'll try and update this again...


-
BsnNFrnt, Thanks, that's good to hear. At least now I know I have materials that'll do a decent job.
-
Frankenburner, Opps, I guess I missed that when I was reading through the thread. That is quite similar to what I was suggesting... I know for me at least, reboring a hole is easier than getting a new hole centered perfect, and the 8mm tubing is usually fairly good at actually being 8mm so a good 8mm bit can make a good tight fit. Never thought of trying to make a split collet, I figure that'd be a bit more work for most lightly equipped shops. Not impossible, just more difficult.
-
Frosty, I've never built one of your burners but, something I used in my current burner build might make a good mod to your base design. Have you thought about drilling the Tee to accept 1/4” pipe thread and using a 1/4Npt to 5/16" compression fitting. ( Or an 1/8” if you can find it) Then use 8mm brass tubing to hold the mig tip. If you loosen the compression fitting (and don't crank it tight in between) you'd be able to slide the 8mm brass tube in and out to tune instead of cutting and filing it to it's final stickout... You'd likely need to drill out the base of the compression fitting a bit, but your not after a pressure seal at the Tee just an adjustable fitting... I used 8.0 x 1.5mm wall (5.0mm ID). the 11T sized mig tips (6.0x1.0mm thread) fit very well in one end and it fit a 5/16” compression fitting perfectly for the other. Just an idea for Y'all...
-
Thanks you two, Frosty, ain't it supposed to be the young ones chomping at the bit and rushing a project ... (Using experience levels here as I have no idea our respective ages) Mikey, I'll probably test a few different applications for this refractory beyond the forge floor, I'll try and update how it works in different roles... With one burner working the way I wanted, I'll work on building the second soon. And I'll actually start setting up the various bits for the forge itself. I wanted to get a burner that'd work the way I wanted before I went too far on the actual forge design. Still looking at the idea of using these hybrid burners to run a ribbon as that's definitely the best burner design for this forge build, seeing what I intend to use it for long term. But I'll likely still set it up with them as is first.
-
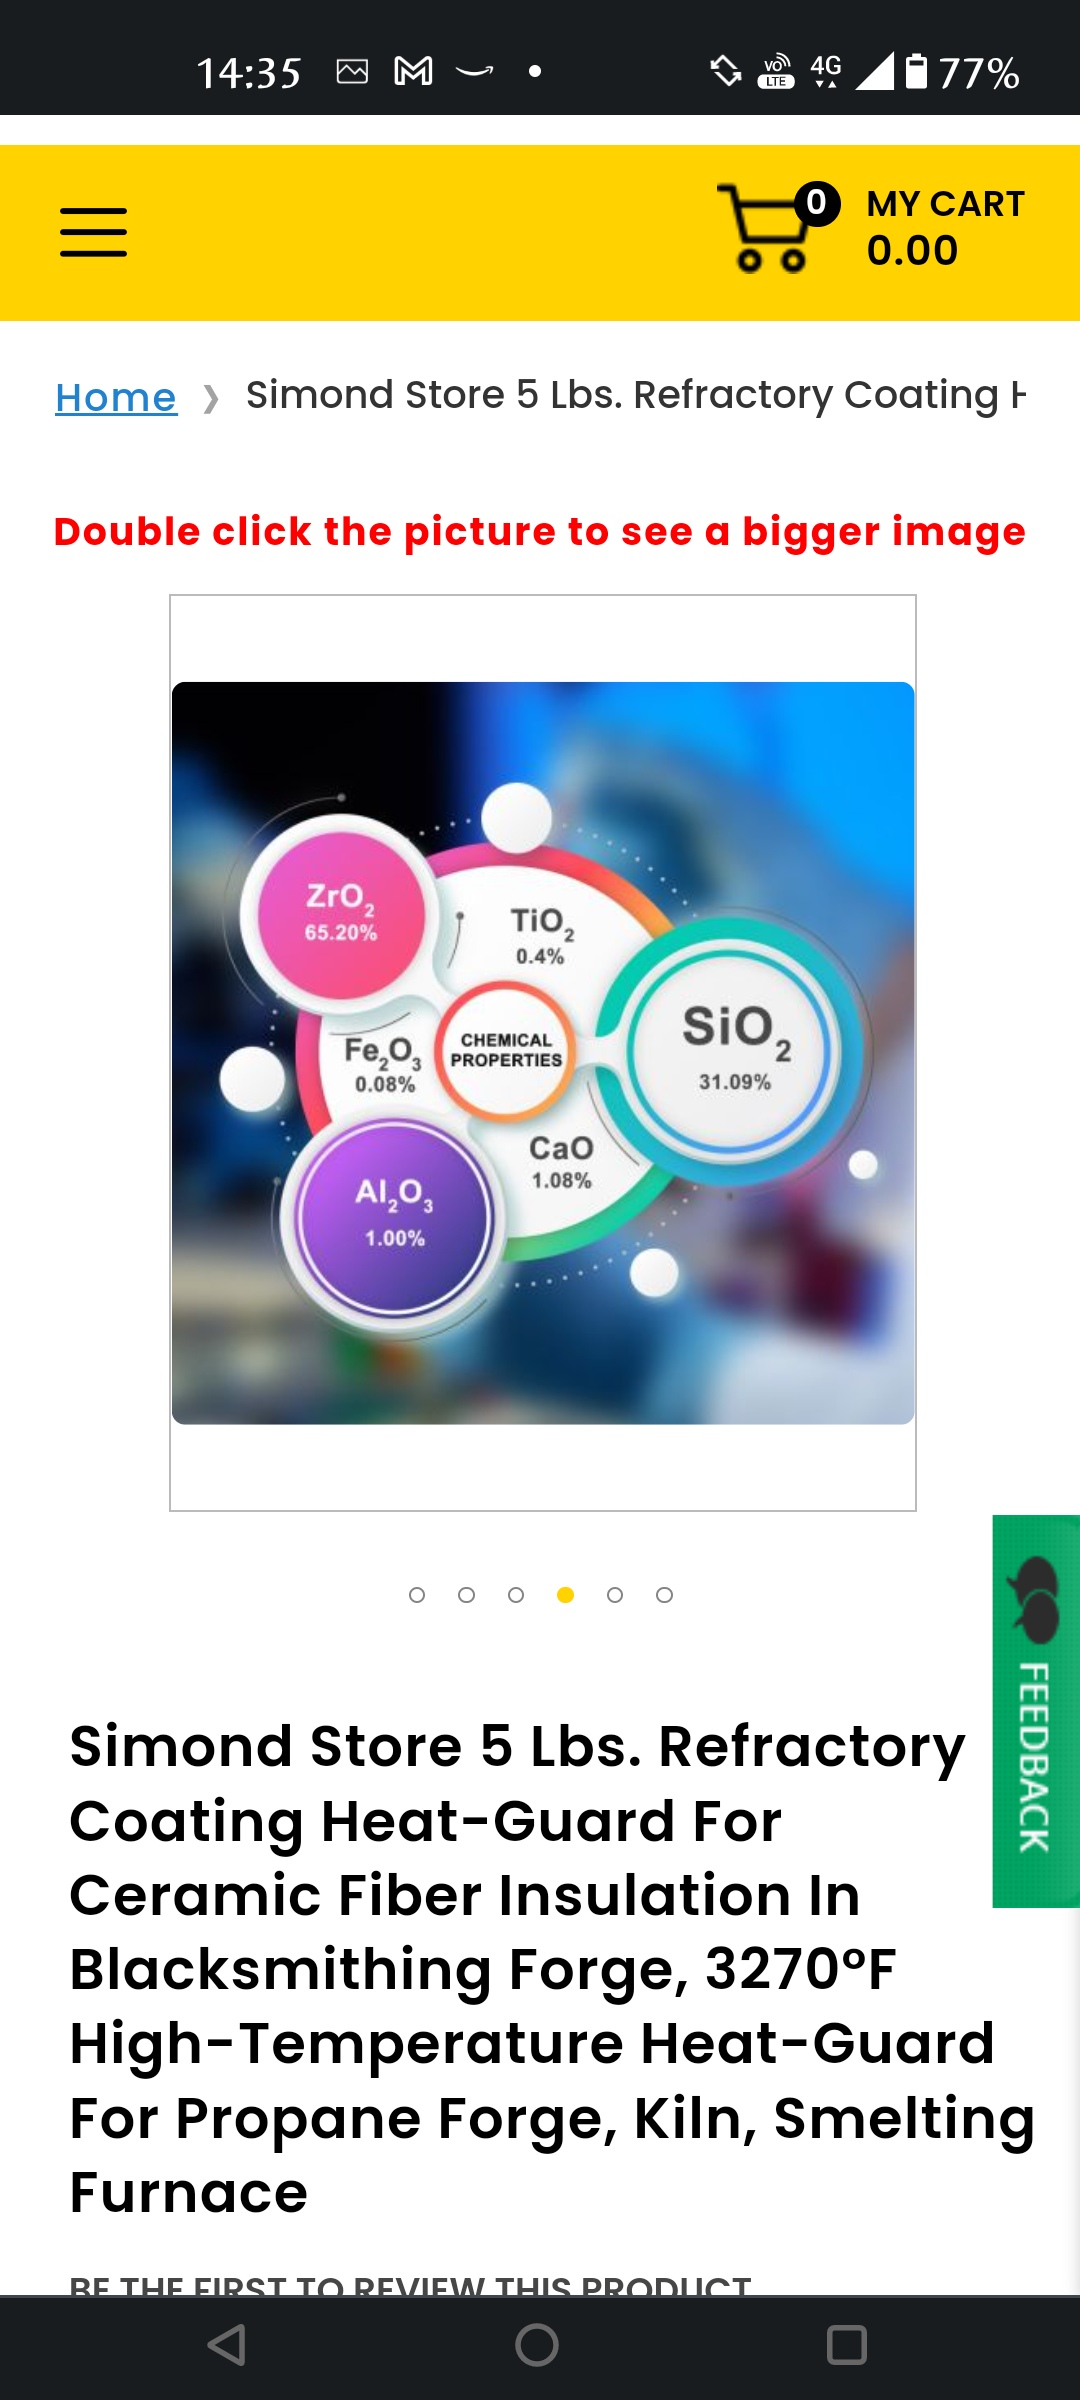
I don't know either, and I didn't find much when I searched for information on it. Figured it was better than the brick alone for the floor, no matter if it worked for any other applications. Here's it's label: This is what I found on it's website: Tabcast-94 is 94% alumina, hydraulic setting dense Castable, which is suitable for service temperature up to 3270°F (1800°C). It is premixed refractory compositions which can cast into any require shape and size. It has good mechanical strength with excellent resistance to chemical attack for having purity chemical content. 22 pounds will cast a 12’’ x 12’’ x 1½’’ block. it also use for reformer lining, transfer and riser lining, hydro cracking unit line, in petrochemical industry, coal gasification ducting, Cyclones, Burner pipe lining, iron ladles, in metal processing industry. Application High Velocity area High dust erosion area Iron Ladles High temperature boiler inlet Thermal combustors Hydrogen transfer line Ammonia reformer line High temperature burner blocks Coal gasification ducting Characteristics High Purity chemical content present Good Mechanical strength Excellent resistance for chemical attack It can resist temperature up to 3270°F (1800°C) Able to resist corrosion erosion Can resist high temperature for hydrogen service
-
I also found a 94% alumina dense castable refractory rated to 3200 deg. I'm thinking it will work for making the floor out of seeing as I haven't found a good source for the kiln shelf. I'm thinking a 1/2" or so layer on top of a 3/4” thick chunk of insulating brick should work, and make it fairly flux proof. I may also try it for making a ribbon burner at some point.
-
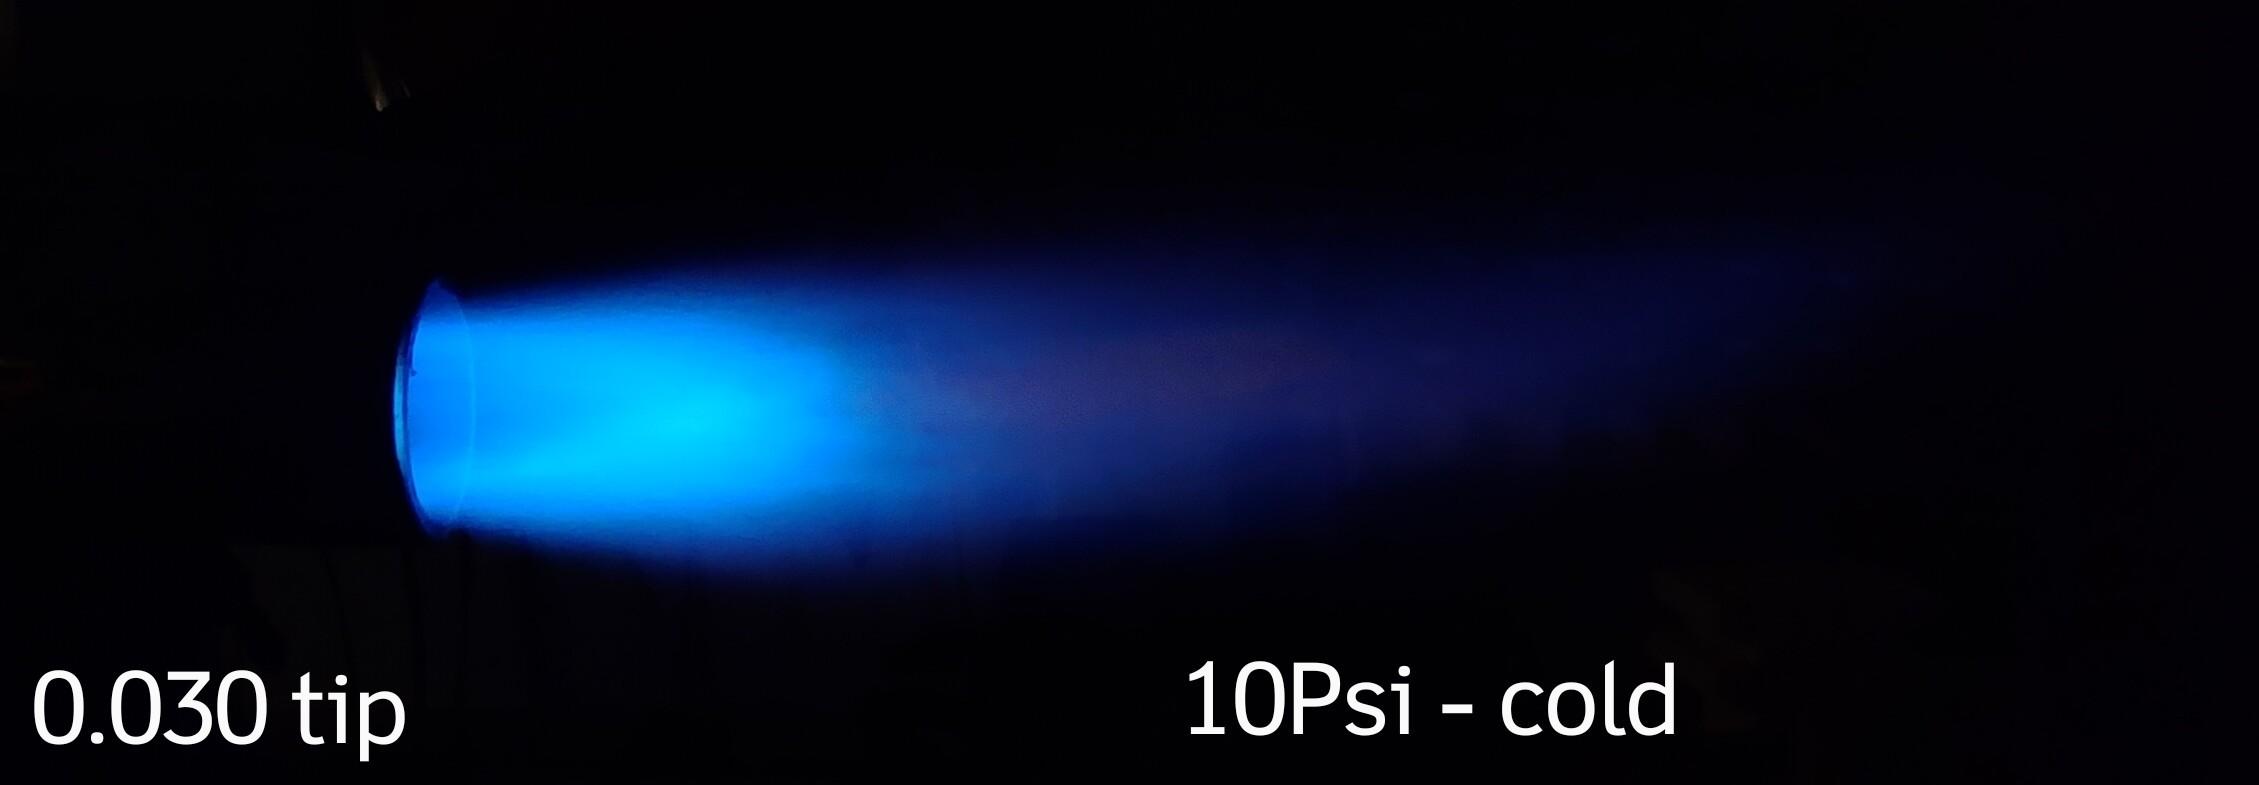
So I finally got time to finish up the 2nd version of this hybrid burner. I have a bit more testing and tuning to do, but it's looking good so far. I tried a .025 tip, but the flames were definitely oxidizing at any setting. Super dark blue even at higher pressures. So I moved back to the .030 tip With the .030 tip it looked much better. Especially once it heated up the nozzle a bit.


-
I hadn't delved into that thread, as I don't own or have access to a 3D printer... there's some interesting shapes working well in there. I think I'll save anything that complex for another project. though he does show that an airfoil shape works, I might try and do a reversing bevel - inside in one side outside on the other to add a small amount of inward spiral effect to the slots...
-
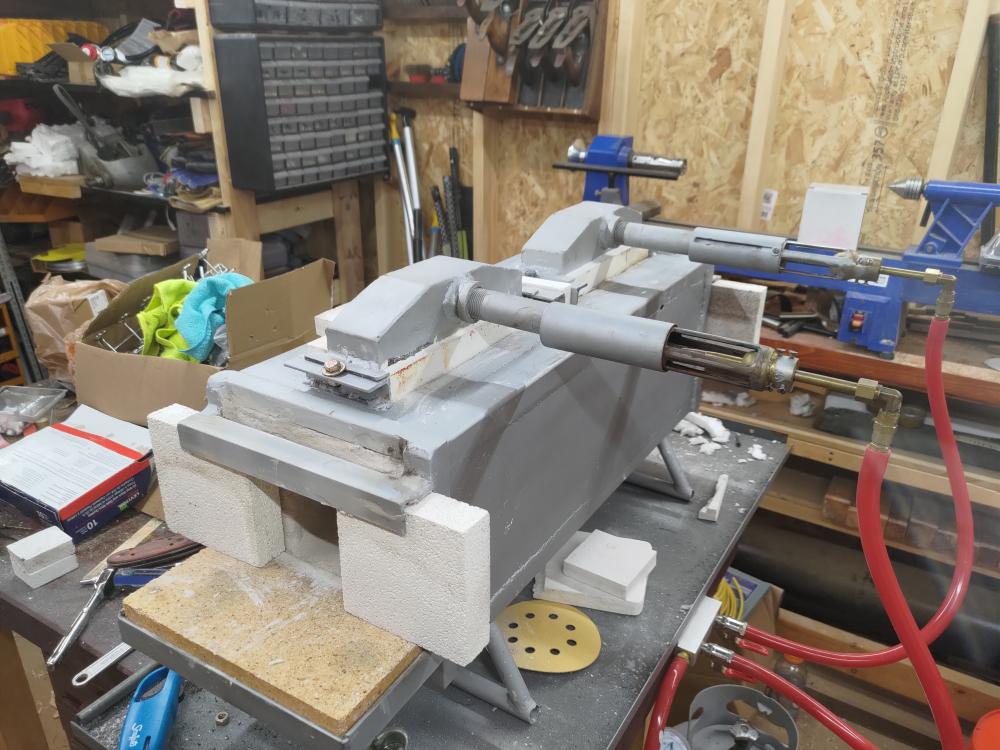
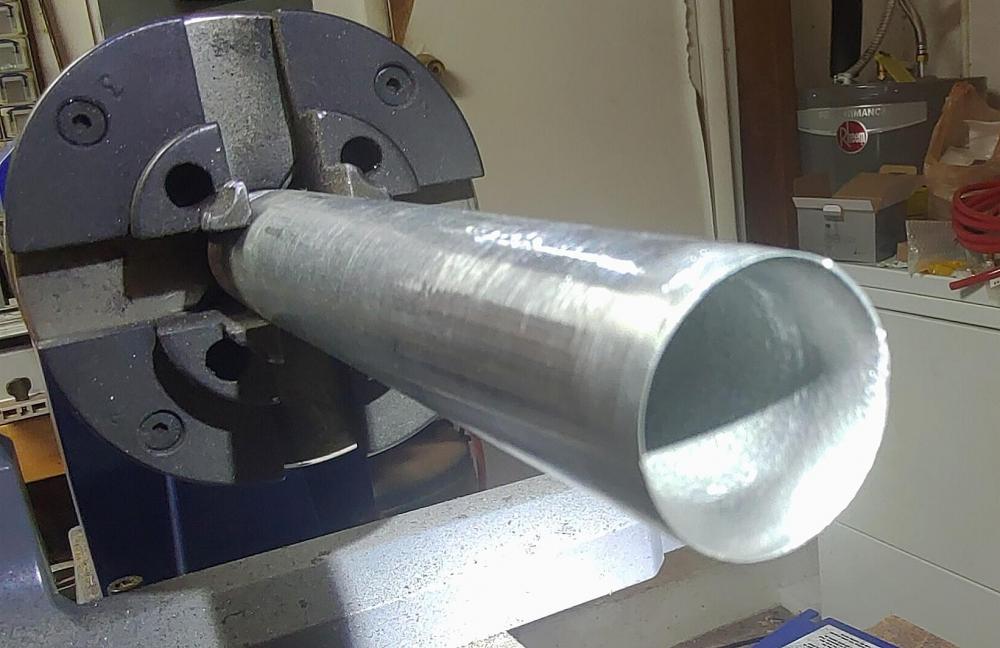
Well, since my roughly built prototype burner more or less ran ok, I started work on the more refined version I'll actually be using... Still a hybrid type - same basic design, just putting more work into the refinement of the parts and the fit and Finnish of the final product this time. This time the inner end of the 3/4” pipe mixing tube is getting a smooth transition ground in all the way to the edge, instead of the quick short bevel (maybe 30-45 degrees) I used in the prototype. And yeah that's my wood lathe it's chucked into... Using files, a Dremel, and similar tools while it's turning at the lowest speed the lathe works at (375Rpm IIRC) to keep it concentric. Each of the parts will end up here to get cleaned up a bit. I've ordered a better fitting tube for the choke to replace the sloppy fitting 1.25" pipe, and some 1" brass rod to make the gas jet holder from. Speaking of the gas jet, this time I'm using 8mm OD 1.5mm wall brass tube. This is a bit slimmer than the 1/8" pipe (0.315 vs .405) and already the right inner diameter to tap for the 6x1.0mm thread that the 11T type mig tips use. I could probably have gone all the way down to 7mm OD 1mm wall but I can still file this one down into a tapered end. The intake chamber will get better made air slots this time around... I understand a square slot is better than round holes or ovals, but I wonder what the best geometry is for the sides of the slots themselves? Straight square edge, inner side beveled, outside beveled, both, rounded? From what I understand about fluid flows I'm guessing outside bevels. But I'm better with airflows for aircraft wings than for something like this. It might be some combination of straight and inside bevel to help establish a better suction or vortex for all I know.
-
So I was reading through this thread, and had seen some of the discussion on tapered exit ports and tapered holes. As I was reading it I wondered if anyone had thought of using golf Tee's as the cores for the burner holes? IIRC they are about 1/8 or 3/16” in diameter along the shaft and flare out near the head to something around 3/8 or 7/16” at the top. Seems to me you could cut them off at whatever exit size you wanted and end up with cast in micro retention nozzles. They come in both wood and plastic types, and with the wood painted they should be easier to grease up to release from the castable used.