

Mothman_c3w
-
Posts
93 -
Joined
-
Last visited
Content Type
Profiles
Forums
Articles
Gallery
Downloads
Events
Everything posted by Mothman_c3w
-
Racine Model 816 info needed
Mothman_c3w replied to Mothman_c3w's topic in Saws, bandsaws, hack saws, etc
I've been chipping away at getting the saw up and running. I found a mistake in the math from one of my previous posts for the drive sheave/pulley and I ultimately decided on a 3" diameter pulley. Once its running, I'll time it and count the strokes to see how close I am to the factory speed. I got the base pretty much cleaned up, but I still have to scrape some more gunk from the inside. I painted the base exterior and the access doors, I know the black with white lettering is not factory original, but I like it and it's my machine. The motor frame did not align to the driven sheave on the original mount but fortunately I was able to fab up an adapter plate without the need to modify the original mount. Still have a bit more cleaning to do, and I'm waiting for another part to be delivered before I am ready for the final assembly. For the electrical circuit, I am planning on separating the coolant and the motor power. I'm going to bring power to a small gang box, and parallel wire a switch to the pump and a magnetic motor starter to the motor. A motor starter is not really necessary for a motor of this size, but I decided that it would be a good safety feature. Besides, who doesn't like a cool industrial start/stop button? Also, I'll have the option to dry cut if I so choose. Picture descriptions: 1. Shows the front of the saw, partially reassembled. 2. Front-Right isometric view, shows motor fitted with the adapter plate. 3. Rear view of sheaves and sprocket.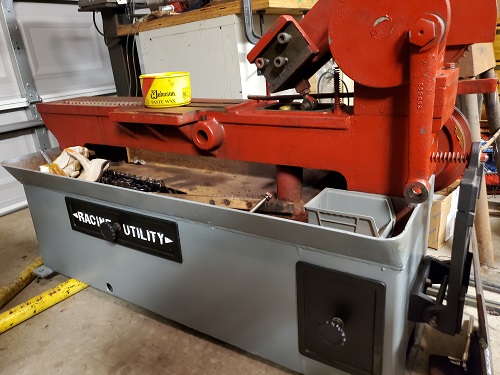


-
Racine Model 816 info needed
Mothman_c3w replied to Mothman_c3w's topic in Saws, bandsaws, hack saws, etc
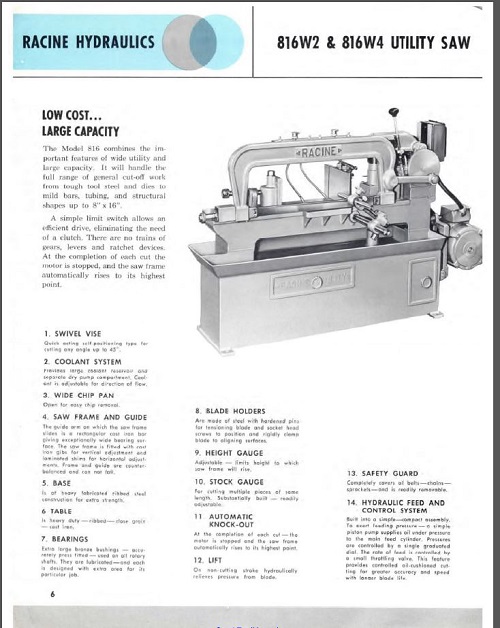
Rojo, thanks for sharing my enthusiasm for this old saw. I am also excited to get it running. I found a Racine sales brochure that give some specs on the saw, attached below. Looks like it weighs about 600 lbs. Judging by the included table of example material cuts, I'm going to take a wild stab in the dark and say I should be able to cut a section of 85 lb. train rail in 5 minutes or less. The downfeed pressure is adjustable however, so that will affect the cut speed. I'll have to do some experimenting once it is up and running.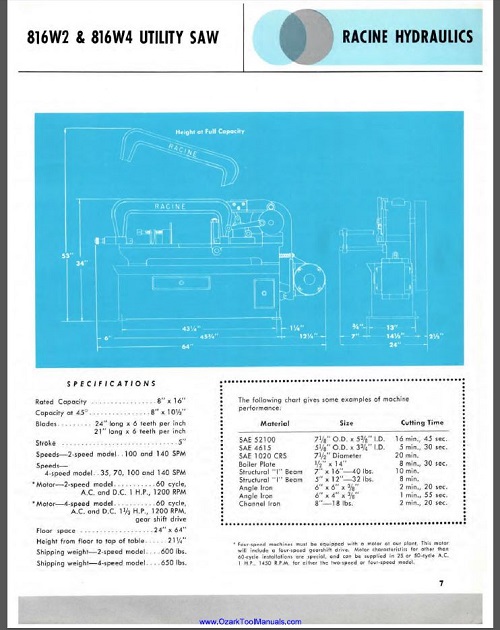
-
Racine Model 816 info needed
Mothman_c3w replied to Mothman_c3w's topic in Saws, bandsaws, hack saws, etc
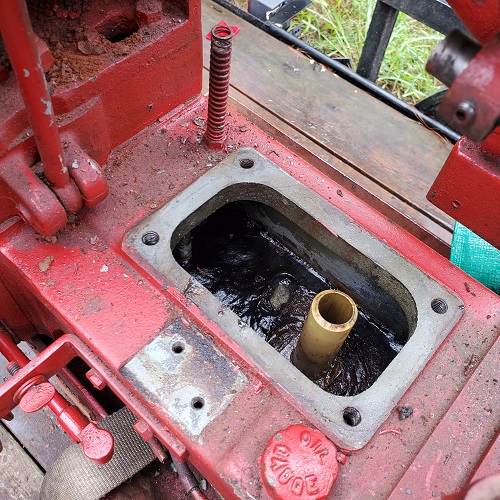
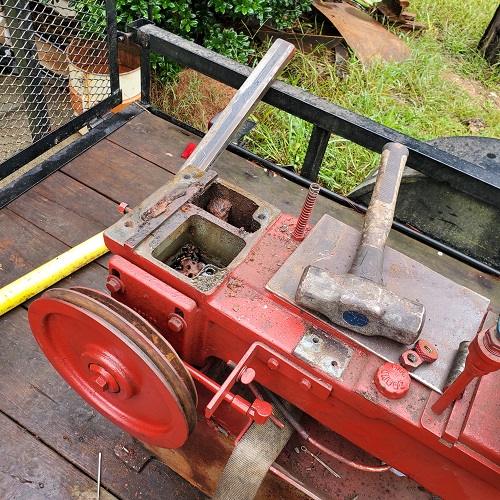
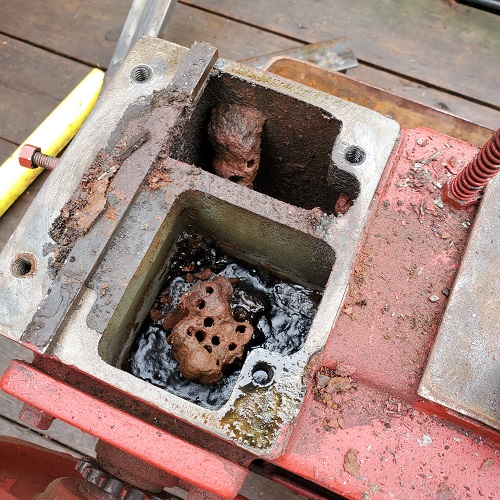
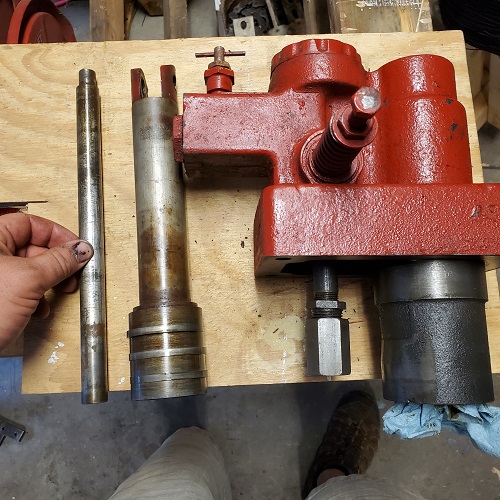
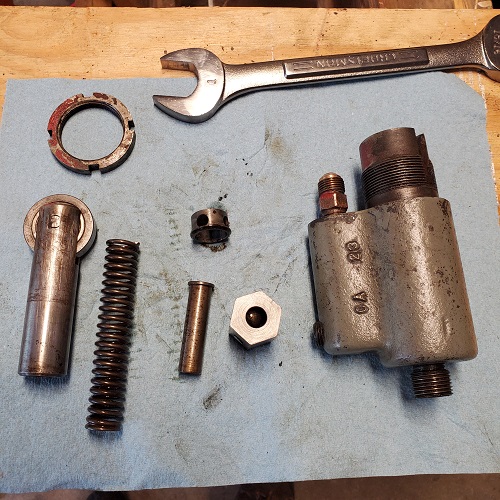
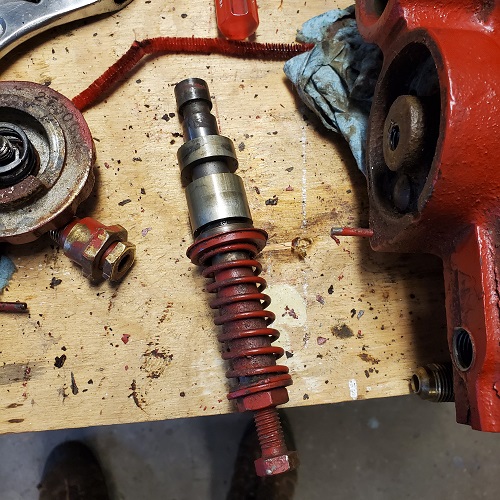
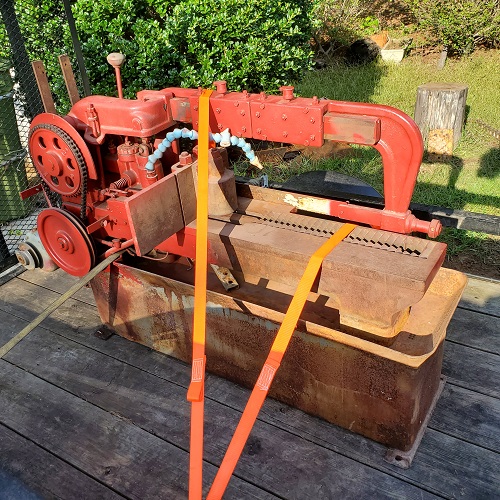
Still haven't found much info on this power hacksaw besides the Racine brochure, but I found a video on this exact saw on YouTube by a man named Jeff Heath. Not sure if Jeff is a member on this forum, but his work is much appreciated. I try to avoid "going in blind" whenever possible. I started tearing it down today while still on the trailer. It's too heavy for me to safely manipulate by myself, so this will help lighten the load. I know I started this topic as an information-seeking post, but I'm also going to use it to document as I tear it down and get it set back up. Picture descriptions: 1. Saw base and lower casting; saw arm and upper casting removed. 2. The Hydraulic Pump. The check valve was stuck and full of gunk. 3. Hydraulic Down-feed mechanism removed, showing hydraulic oil reservoir. 4. Upper casting removed, showing other side of the oil reservoir where the pump sits. 5. Hydraulic Pump chamber; I found some dirt dauber nests in the reservoir and about 1/2" of old sludge in the bottom. 6. The Hydraulic Down-feed mechanism. The piston and rings are in great shape. The ball bearing check valve was stuck and full of gunk. 7. I choose to call this the function selecting piston. It fits into the side of the Down-feed Mechanism and is part of the system that cuts the saw off and raises the arm when a cut is finished. The motor that came with it was all wrong; the original motor was a 1200 rpm, 1 HP motor. One of the previous owners installed a 1/3 HP, 288 rpm gearmotor, which I'm sure cut about as fast as a herd of turtles stampeding through peanut butter. I ordered a new motor of the right rating from Zoro. BTW, Zoro generally has good prices and frequently offers 20% coupons. I have saved a bunch of money ordering industrial supplies through them. I also need to determine the correct drive pulley size. This hacksaw is the 2-speed model, which is achieved by swapping the drive belt on the step pulleys, similar to a many drill presses. Unfortunately, the drive pulley is missing, so I have been doing some math to figure out the proper pulley size. The motor turns the drive pulley, which drives a pulley attached to a small sprocket (14 teeth), which drives a large sprocket (54 teeth). One revolution of the large sprocket equals one stroke, which is 5 inches. The Racine brochure says that this model has two speeds, 100 SPM and 140 SPM. I believe SPM is Strokes-Per-Minute, but I heard someone refer to it as Surface Feet-Per-Minute. Not sure I buy it though. The large side of the driven step pulley is 9.25" OD, and the small side is 8.25" OD. By my math, the drive pulley needs to be 2.25 or 2.5 inches, with a 4" step. I doubt I'm going to be able to find that, so I may just order a single pulley for the slower speed and run it like that. If anyone wants to check my math, or if someone actually has one of these saws and wants to let me know what is right, I would welcome the input. I'll keep updating this post as I get the chance to work on it.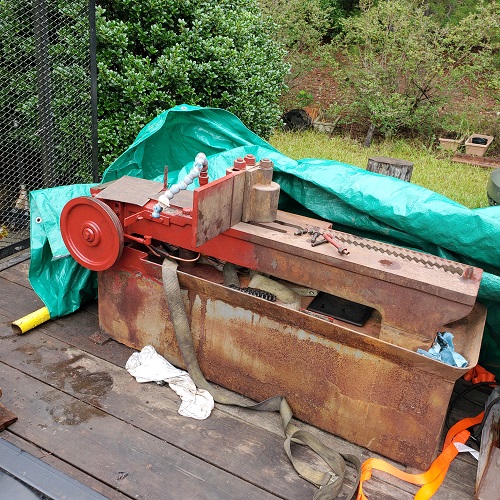
-
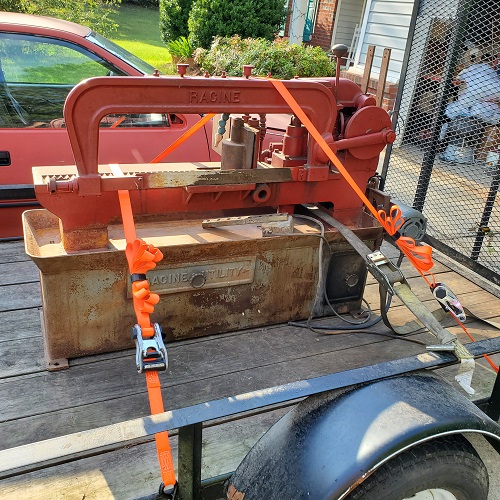
I just picked up this Racine Model 816 power hacksaw. I have found myself with a small pile of train rail that needs cutting, so I had been on the hunt for a decent bandsaw. I have scored and snapped rail before, but I want to make clean, square cuts all the way through. I lucked out and found this on FB marketplace, only had to drive 260 miles round trip to get it. Absolutely worth it. The saw is in great condition; the motor is not original and part of the stock gauge is missing, but otherwise it is in great shape. I have found the Racine sales pamphlet online regarding their power hacksaw lineup, but so far i have come up dry regarding a user's manual or parts explosion. Is there anybody out there that may be able to share some info or point me in the right direction?

-
Just drove 260 miles, round trip, for this Racine Model 816 power hacksaw. It needs a new motor pulley and a belt; the sprocket safety cover and part of the stock gauge are missing, but the action is smooth and everything else looks to be in fantastic condition. I even got a couple extra blades with it. Looking forward to getting it up and running; I have a pile of train rail begging to be cut up.

-
What did you do in the shop today?
Mothman_c3w replied to Mark Ling's topic in Blacksmithing, General Discussion
Gandalfgreen, I'm pretty certain links are frowned upon, but if you go to YouTube and search "Torbjörn åhman tortoise", it should be the first video to come up. The roller chain was used to drive the head shaft of a large steel beaded-pan apron-style conveyor. Each individual "link" in the conveyor is about 7" long and 56" wide, with "wings" at the edges to keep material from spilling. Each link in the conveyor is fastened to the next by means of piano-style hinges. The conveyor is used to feed scrap aluminum into a hammer breaker. Unfortunately I did not get the chance to rescue the sprocket when we swapped it out. -
What did you do in the shop today?
Mothman_c3w replied to Mark Ling's topic in Blacksmithing, General Discussion
Thanks Daswulf. I actually set out to make the openers out of flat bar, but I had an epiphany while digging through the scrap pile. The best part? No need to punch a hole, just drift what's already there. I have a bit over ten feet of the chain and there looks to be about ten links per foot, so I have plenty of material. Not yet sure what I want to do with the pins and rollers though. I turned one of the pin links into a hardy-tool bending fork a while back; it works ok but could be better. Regarding your last point; I may need to enlist some help with testing, I can't throw 'em back like I used to. -
What did you do in the shop today?
Mothman_c3w replied to Mark Ling's topic in Blacksmithing, General Discussion
I tried out a new (to me) bottle opener design using some links off a section of Size 200 roller chain I rescued from the scrap bin at work. Both 100% tested and ready for opening several lifetimes worth of frosty-cold, refreshing beverages. I also made a couple tiny cats and a tortoise based on Thunder Bear's videos.


-
buying cheap supplies (rivets)
Mothman_c3w replied to Duckkisser's topic in Blacksmithing, General Discussion
I don't see that anyone has mentioned them yet, but I like to buy rivets from McMaster-Carr. I have found the prices to be competitive and they have fast shipping. I have bought steel, brass, and copper rivets from them. -
What did you do in the shop today?
Mothman_c3w replied to Mark Ling's topic in Blacksmithing, General Discussion
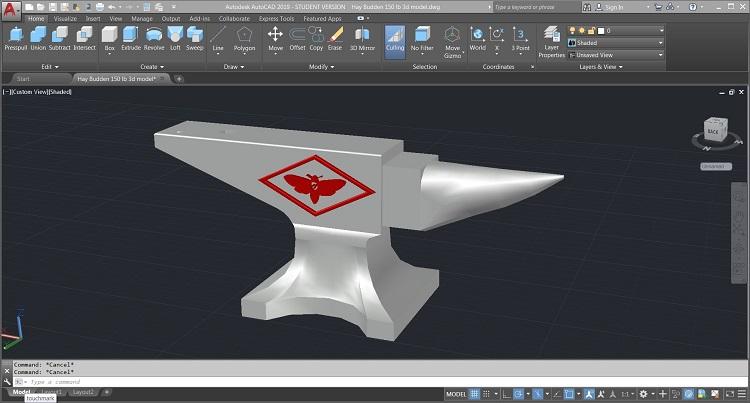
John, that plant hanger looks really clean. I think I like the "upside down" perspective better. Alexandr, those roses are stunning, I should plant some around my yard. I have a lot of issues with deer though, a few years ago I planted a few hundred dollars worth of azaleas, and the deer tore them up like they were candy. I thought they avoided plants in the Rhododendron family, but I guess not. This week I made this custom tool for my brother, it's a paddle for adjusting the pellets in his pellet smoker. He said he needed something about 24" long, with a ~4.5" long, 1.5" wide paddle. It couldn't be any wider because it has to fit in between a bunch of little slats apparently. I took the opportunity to add some twists and incorporate a bottle opener, since cleaning a smoker sounds like the type of job that would be well accompanied by a frosty beverage. Yesterday and today I worked on 3D modeling my 150 lb. Hay-Budden anvil in AutoCAD. I added my touchmark and my shop initials. I'm going to continue working on the model; I plan to design a casting mold complete with risers, runners, etc., get it 3D printed, and start casting paperweight-sized anvils from aluminum and bronze. The model is pretty close to the actual dimensions/shape. The heel slope and the horn are a little off, but I had to make some concessions based on the behavior of the CAD program. The "Loft" tool in AutoCAD can be fun, but also infuriating at times. I think it turned out pretty well though. One of these days I'd like to draw up a bunch of different styles and brands of anvils.

-
What did you do in the shop today?
Mothman_c3w replied to Mark Ling's topic in Blacksmithing, General Discussion
I absolutely love my Hossfeld #1. I don't often have an excuse to use it but, when I do, it saves me a lot of time and effort. I got it for free about 4 or 5 years ago; the engineering fab shop where I went to school was scrapping a bunch of old equipment. I got a couple manual shears, a large metal 12-drawer workbench filled with many dozens of metal files (mostly 6" triangle slims, but a lot of other types, too), and the Hossfeld #1. The Hossfeld came with the original steel mounting cabinet to store the dies, and a shop die package. The handle was missing and one of the die pieces was broken, but everything else was there. I made a new handle from a 1/2" x 2" bar, and I haven't needed the broken piece yet. I would have celebrated about it in "It Followed Me Home", but I wasn't a forum member then lol. As IronDragon said, they are still in business. In fact, I bought a die to bend angle iron the hard way from them about a year ago. -
Well I am sure I speak for many besides myself when I say that the advice, input, and experience from you and many others on this forum is much appreciated. That said, I think confusing watching a few videos with real research is not necessarily limited to the new generation; I've met some confused Gen X'ers, boomers, and old-timers too haha. It's too bad YouTube and other sites do not bother to vet how-to videos. I'm sure that would be expensive though.
-
I hear ya man, I understand and definitely appreciate it. I may know it, but someone else reading this thread may not have known. I like to research for a period of time before trying a new process. I figure if I spend a few hours reading and learning about techniques, common failure points, etc., I will save myself many hours of stumbling through on my own and greatly reduce the chance of failure (or at least I'll be safer if/when I fail).
-
George, Frosty, I'm aware that spring steel has a different recommended quench medium, but I appreciate y'all looking out for me.
-
Oh I've got a pile of springs out back of various styles and shapes. A few years ago I made a visit to my local off-road shop and they hooked me up. Now I work at an industrial aluminum recycling and casting facility, and there is occasionally opportunity to take home used springs off vibratory pans and the like. Gotta watch for cracks though. I've never tried super quench, but I've read about it. I'll give it a shot at some point.
-
Thomas, I didn't bother to heat treat, given the low carbon nature of most rail spikes. I could give it a shot though. I'm a pretty decent scrounger myself, but you would think building materials are made of gold lately. The industrial plant where I work may have some sheet metal to get rid of within the next year or so, I'm hoping I can get some.
-
Maybe I just need a power hammer to draw these spikes out faster lol. But first I need a shed to put it in so I don't shake the house down, and have you seen the price of materials these days? A few weeks ago I quoted a 24'x26' pole shed kit with two roll up doors, a 12" eave, wet-set pole brackets, and a man door. The quote was just under $17K, just for the materials! I'll keep forging in my garage for that price, thank you.
-
What did you do in the shop today?
Mothman_c3w replied to Mark Ling's topic in Blacksmithing, General Discussion
George, I used 1/8" (11 ga.) sheet for these. I have also used 12 gauge in the past. Seems to hold up well. I have considered getting some thin-wall 8" pipe and just cutting out 1/3 sections, but I can get flat plate for cheaper and I like to drill the rivet holes before I start forming it. -
What did you do in the shop today?
Mothman_c3w replied to Mark Ling's topic in Blacksmithing, General Discussion
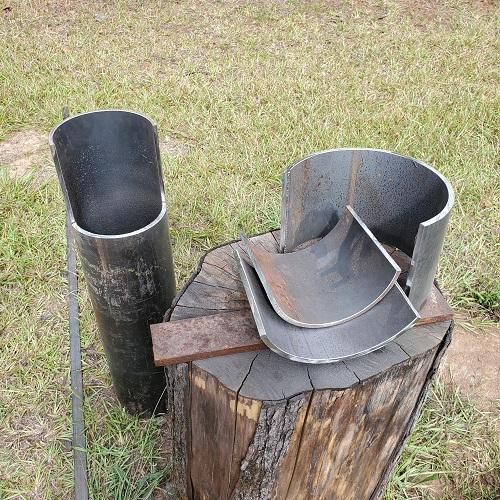
Rojo Pedro, I like that hook idea. Definitely going to borrow/adapt the concept. Today I finished up a batch of garden hose hooks. I managed to come up with a different scroll for the top of each. I did a hot oil finish on these, but I think I'd like to get some of these powder-coated in the future to hold up to heavy, outdoor use. I traded for a piece of heavy-wall 8" pipe to make a swage for the curved section. I cut a semicircle section of the 8" and a 6" pipe and used them in my HF hydraulic press to set the initial arch into the curved section. I then finish the shaping by hammering down into the pipe section. When I get around to it, I'll cut another section and weld a hardy hole stub onto it so I have one dedicated to the press, and one for the anvil.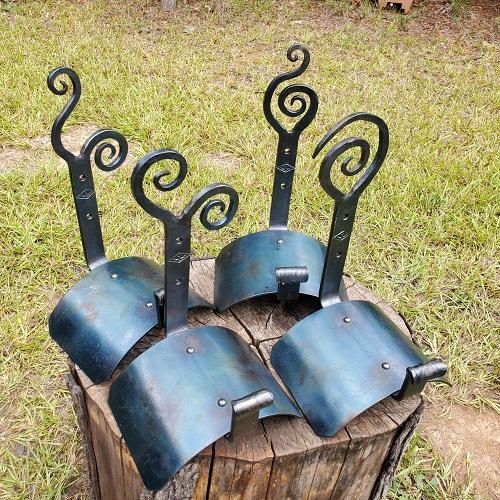
-
I know there's nothing new under the sun, but I have never seen a set of BBQ tongs made from a rail road spike. I thought I'd give it a shot and maybe come up with something I could include in a set with the forks and spatulas I make from spikes. I forged a spike out to about 12", then split it with a bandsaw. I tapered the arms out some more and spread the ends slightly. It ended up just about 14" long. Honestly, I'm not very pleased with it. The springy action is mediocre (not enough carbon in the steel, I imagine), and I just don't think there is enough material in a single spike to make it much longer without sacrificing strength, even if I used a chisel to split instead of a bandsaw. Also, it took me way too long to make it to be able to offer it it at a reasonable price. It's kinda cool to look at and it works (sort of) so it's not a waste. Maybe I could weld a spike head onto some spring steel and get a longer, springier set with the same aesthetic effect.

-
What did you do in the shop today?
Mothman_c3w replied to Mark Ling's topic in Blacksmithing, General Discussion
Today I finished up a prototype railroad spike spatula I started last weekend. Blade is made from 1/16" 304 stainless. It ended up just under 17" total length. I'm pretty pleased with it; I plan to eventually make these alongside railroad spike grill forks, bottle openers, and meat flippers to sell as sets. Ted, the key rack looks great. Does the rivet for the middle hook extend through the hanger as well?

-
What did you do in the shop today?
Mothman_c3w replied to Mark Ling's topic in Blacksmithing, General Discussion
Nice work on the hinges Jobtiel1, I've been meaning to try making some for a while now. Handles look great too. -
What did you do in the shop today?
Mothman_c3w replied to Mark Ling's topic in Blacksmithing, General Discussion
Today I cleaned, assembled, and finished two hose/cable/cord hooks, based on John Switzer's video. I had a week off work, so I put some work over the last several days and turned out a few key racks and a couple fireplace tool sets as well. I'm trying to build up some inventory for my first vendor event.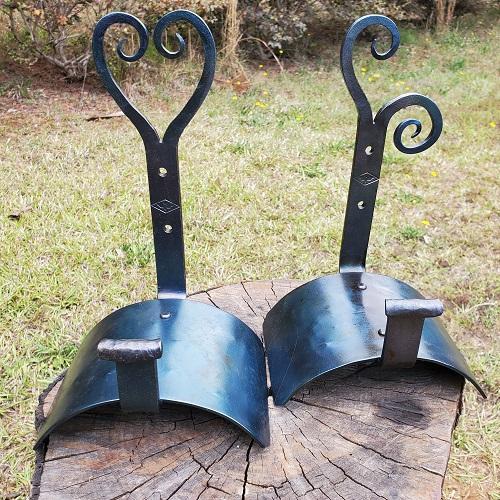


-
I went to an estate sale yesterday a few minutes down the road. Word is, the homeowners were downsizing. I didn't get to meet them, but from the amount of stuff around, the guy was truly a renaissance man. There was tools and supplies from all sorts of hobbies and professions. he had a large shop with a small office, three or four shipping containers, and a few small storage sheds to pick through. From the literature in his shop office, I'm guessing he was an engineer. I just kept adding stuff to my pile as I walked around. I didn't really need another post vise, but it was in good shape and only missing the mount bracket and wedge. The drill press looks like it was dropped at some point; the main casting had been broken, but repaired well. The blower is also in good shape, just needs some TLC. Of all the things I found, I think I am most tickled that I found a vintage knife steel with an antler handle. The man handling the estate sale was pretty familiar with the worth of the large pieces, but he gave me a very fair price after I told him I was a user, not a collector.

-
What did you do in the shop today?
Mothman_c3w replied to Mark Ling's topic in Blacksmithing, General Discussion
George, It's a two step process. The press has a 1-1/2" shaft and I use a thick plate with a 2-1/4" hole as a swage of sorts underneath. I use 1/4" plate for the candleholders, so there is some clearance between the press shaft and the swage. I press the plate hot; the center recesses in a steep, tapered curve. The area of the dish outside the swage hole gets pushed upward with a gentle sweep. With this process the bottom does not stay perfectly flat so, for my final forging step, I slide a scrap 1/2" plate underneath the dish and squish the bottom flat. I hope that makes sense the way I wrote it.