
Mad Uncle Cliff
-
Posts
57 -
Joined
-
Last visited
Content Type
Profiles
Forums
Articles
Gallery
Downloads
Events
Everything posted by Mad Uncle Cliff
-
I have gone off the tripod legged approach and changed my mind to a 'monopole' mount for the forge. Bending tube was going to get messy, and I kinda like the idea of one big pole in the centre, probably fixed to a plough disc as a base. I can screw a short stub of 2" plumbers pipe in to the brass T piece and use that as a sleeve mount into a 60mm ID pipe. Hunting for 2 foot of tube tomorrow, I already have the plough disc.
-
Thanks Beth - I managed to get some old tube stock today from a scrap yard near work for the legs (five bucks!) and hopefully I get the plate today too! As to whether it becomes a pleasure to use (or an interesting looking but totally useless forge) - I have no idea yet!
-
Been working on the portable forge in the hope of having it ready for use in August. So today I mounted three leg 'spigots' under the forge, with the idea that I now find some tube I can bend, and then crimp square to sleeve over the spigots. I can tap the tube and use bolt to hold each leg on. Also - I have finished the air manifold and ash dump - using some plumbing parts and mounting up the blower tube, and I have all the components EXCEPT the metal disc for the coke pit and work area. I picked up a second hand waste pipe grate that slips inside the metal tube for the coke pit nicely, it just needs the walls trimmed back so it allow more room for hot coke on top. Nice thing is I now know a local scrap yard with a pile of these grates in various sizes! I may even get this forge up and running by the end of the week if I am lucky.
-
 How many folks get to take their anvil to the office for a days work? Well I was lucky enough to do just that on Monday, along with Doug, Paul, Ash and several other smithies. We set up a demo for the Tree Project in the car park of the Country Fire Authority in Melbourne and showed the staff there what we do. I know that this really helped the CFA staff to open up a bit, relax a bit and talk about the fires with each other some more, and for some it was an emotional experiance. My heart felt thanks go out to the Tree Project supporters for supporting me and the rest of CFA on Monday - it was a great day and has had a very positive effect on CFA HQ. (And has introduced several more people to blacksmithing - expect the barn to get crowded). Funny thing was I walked back in to work the next day in suit and tie and to everyone who saw me and said 'gee you look different today compared to yesterday when you were a blacksmith' - I said 'I am still a blacksmith, this is my formal smithing attire'. Life is good.
 -
Working on that - waiting to hear from an engineer in Seymour and waiting to hear from my welder mate too. Next option is to hunt down a plough disc to cut down I suppose.
-
Wow! Look at all those French leaves! Fantastic!
-
Hey Locky, Matt Edwards (Valley welding service) did the repair job on the anvil. The anvil had to be heated to a dull straw colour, then the crack was gouged out with the oxy. After a nice deep gouge was done, it was then filled with hard weld. Finally - the anvil was slowly brough back to room temperature with an occasional application of heat. Quite a few hours work for Matt, but he would probably do another one - I will ask. My clean up process involved an hour with my angle grinder, using a grinding disc followed by a flap disc to finish the surface. I did it all by eye and got it pretty well level, if I want it dead flat I have a mate who makes injection moulding dies so I can always get it surface ground if I need to. As for the square post - that is a piece of 12" square Yellow Box I bought from a sawmill up in Millgrove called 'Bowerbird Timber'. They salvage a lot of timber and have a good range, check them out on the web.
-
I now have two anvils I can use! This is a Wilkinson Sword anvil, marked 1 0 26 so I am guessing it weighs around 140 pounds (?). It was a cheap buy because of the cracked top face, a crack ran about 1/2" down from the top face around the front half of the top plate (the picture with the yellow line shows where the crack was). So - I took it to my good friend and professional welder Matt, who knew just how to heat it up, hardface weld it up and then slowly 'heat' it down again. Matt told me how when he applied the heat, the water was running out of the anvil, and the front half of the top plate lifted off the block. After a few hour work gouging and welding, Matt had it all back together. An hours work by yours truly with the angle grinder and I now have a good horn and top plate back ready for use. It rings clean with a hammer strike (no buzzing) so it should be a good 'un. I will try it out in Marysville next week at the leaf making demo for the Tree Project. Shiny.
-
Well, I found a spare afternoon when I wasn't steampunk tinkering, gardening, looking for new homes or forging leaves for the Tree Project... ... so I got to mark up and cut up that steel cylinder for my portable forge. Here it stands, all marked up and ready for cutting. After a half hour with the angle grinder, the two halves seperated. Following a thorough hand file and a hit with the steel brush on the grinder, it now sits ready for some additions. I plan to heat the three 'tabs' I cut and bend them out so that I can then attach a curved piece of rod around the edge as a tool hanging rail or handle. Next step, modify the plumbing parts I have to make the blower inlet and ash dump. Then onto the coke pit.
-
Great leaves there Jeremy - and the gum nut looks amazing too, can't wait to see that on the tree.
-
Having just gone through this process twice recently for my first anvil - all I can say (after my first overcomplicated and over wobbly anvil trestle with built in wheels and vice) is 'KISS' it (keep it super simple) and go for a single block of wood. I did use the 'knuckle height' gauge and it worked a treat (see 'my first anvil' post). My small anvil is now on a 12" square 24" tall single offcut from a yellowbox eucalyptus post. It is sturdy and strong, but rather heavy for portable work. I also like this style because I can now add to the post as my skills develop (anvil stays, tool rests, vice holders, etc) so my stump will 'grow' with me.
-
My first anvil
Mad Uncle Cliff replied to Mad Uncle Cliff's topic in Anvils, Swage Blocks, and Mandrels
Guys - what you cannot see in the photos are the cracks. One half of the top plate is cracked away from the rest of the anvil. The crack runs across the top, along one side 1/4" down from the top, across the front and back up the other side. I reckon I could lever half the top plate off with a bamboo skewer if I could get it in the crack. Hit it with a hammer and is is very flat and dead. I am assured a groove out of the crack and weld up will bring it back to good use, and I am fortunate enough to have a 'top gun' welder for a friend in the local fire brigade. If I can photograph the cracks then I will post some photos. Cheers! -
My first anvil
Mad Uncle Cliff replied to Mad Uncle Cliff's topic in Anvils, Swage Blocks, and Mandrels
Funny you should mention that, the centre of the post was full of dirt and when I started to clean it out a whole lot of tiny white grubs came out. So I spent a good hour cleaning out the centre of the post from one end to the other to get all the bugs and mud out. I then poured boiling water down the hole to cook any stray bugs. The top of the post has an estapol finish on it for now, I still want to sand it dead smooth, then I will treat the whole post. One advantage of the hole through the post is that it makes it a wee bit lighter, the other advantage is that I can slide the long end of an angled workpiece down the hole if I need to work an angle on the anvil. -
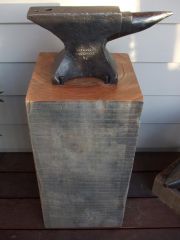 Small anvil on yellowbox post
 -
My first anvil
Mad Uncle Cliff replied to Mad Uncle Cliff's topic in Anvils, Swage Blocks, and Mandrels
Update time, I no longer have an anvil - I now have an anvil collection with the addition of slightly larger and slightly wounded big brother (needs a bit of a weld up before it starts work). Also the trestle stand for junior was a bit 'lightweight' so I sourced a very heavy and very solid block of 'yellow box' eucalyptus timber for a new anvil stand. Works a treat and weighs a ton! By the way - you know how you keep those strange little fasteners that you can't think of a use for right now but may do one day? Well - the long head hex insert M6 fasteners left over from an Ikea build finally found a home as the perfect anvil keepers for the stump, so easy to screw in and out as needed. -
You know I only just read this today, so I got the hammer out and rolled the edge off it ready for Yarra Junction on Sunday. Oh, and if all goes well I will have a 27" tall 12" square post offcut from the local mill as a new anvil stand for junior (the A frame trolley stand was a momentary act of madness). And off post - I mixed up some of Fanny's magic steel treatment goo today and finished my restored leg vice - lovely stuff!
-
Wish I could make it up the valley to Yarra Junction but that is one I will have to miss due to family needs. But - I am ready to go for Eltham on Saturday and I will be christening the new anvil and portable anvil stand fitted with wheels and built in vice (yes it looks kinda wierd - but its a prototype). Now - if I want to use off the shelf hammers on my new small 20lb anvil (until I make my own), what size ball pein and cross pein hammers do I buy to use (before I make my own - I promise). And well done to Danielle Green, secretary to the Victorian State Government Minister for Emergency Services, fellow CFA Diamond Creek Fire Brigade volunteer member and convert to the tree project, for giving us a good run in parliament.
-
Long story. Many moons ago I made some bookends for a shop to sell. The shop owner said' what do we call you on the price tag?', and I said 'Cliff'. (Being my name). 'Too boring' says he, 'we shall call you "mad uncle Cliff"'. So it stuck. If you Google 'Antipodean Steampunk Adventures' you will see just how mad an uncle I am.:D
-
My first anvil
Mad Uncle Cliff replied to Mad Uncle Cliff's topic in Anvils, Swage Blocks, and Mandrels
Well - I paid $350 Aussie dollars for it, mostly because it is an Attwoods anvil so I knew it was old and forged. Hurt the wallet a bit but probably money well spent in the long run. And thanks for the hammer advise folks. I may go and purchase one of those little kids plastic tool sets so as to get a hammer small enough and light enough not to hurt the anvil. -
Since I now have what is probably the smallest portable anvil on a stand - I can make an equally small portable forge. After hunting around for a suitable starting point - I found this air cylinder in a scrap yard. The cylinder is around 15" across and the neck is 4" across. I like it 'cos I can sleeve the neck from the inside with a short length of 1/8'' wall thickness tube, and weld a flat plate to the top of the sleeve tube to act as the bed for the coke. This will allow me to build up a little pit of coke in the tube. The air cylinder will end up being the 'outer shroud', with the blower and legs all mounting off the flange plate. Anyway - that's the plan. I will draw it up and scan the sketch in for this thread so I can get further comments from you all as I build. Cheers, Maduncle of the very small anvil.:p
-
Hey Paul, check out my first 'junior' anvil and the stand I made today. It's in the anvil thread called 'my first anvil'. Cheers - Cliff.
-
Finally! I have a portable anvil, courtesy of eBay and sourced from a friend of mine who runs a scrap metal yard. Photo 1 Looks okay in this picture - but just how 'big' is it? Photo2 As you can see - not very big really - at least it is very portable! Photo3 So now I need a stand for it, I made one out of scrap treated pine sleeper timber and used a couple of metal offcuts as guides for the anvil on the stand. Seems to hold itself in place and remain stable. Oh well - it will do until I find this little anvil a 'big brother'.:rolleyes:
-
Aha - a thread on anvil advice. As this is the 'next big thing' on the shopping list - what advice can good folk provide an Aussie when shopping for a new or old anvil. Advice on price, size and quality appreciated. So far - all the old eBay has to offer is one nice looking small one, one shiny ex-military decent sized one, and a few that look like they were made out of clay at primary school!
-
Cheers Frosty, Diamond Creek is in Victoria, about 2 miles north of Melbourne and 5 or so miles south of where the big fires were (and where I was fighting them). And only a couple of miles away from a few other forum members too. I am hoping to work my way up to making practical things with a decorative edge. From garden spikes for tying plants to, up to garden gates. Influences would include Art Nouveau and the work of Gaudi. For now though I am happy to learn some of the more basic things, like making myself some tools!
-
Mad Uncle Cliff here - signing on with the other Antipodean Smithies...