Bad_Rockk
-
Posts
56 -
Joined
-
Last visited
Content Type
Profiles
Forums
Articles
Gallery
Downloads
Events
Everything posted by Bad_Rockk
-
Hi Frosty, I watched several videos on the carbide saw blades to find out how others use those blades. In some videos they applied the downward pressure with weight plates attached to the saw. They did it to have constant and repeatable pressure to compare different blades. They used 20-30 lb to do that. I know a real craftsman won't do so but I like the approach to apply a constant pressure. I just need to find out how much weight to use to get the blade cutting without overloading it. I think this is a good option because I have to make quite long cuts and so I can let the saw make the work and I can focus on a straight cut and lubrication/cooling. What do you think about that?
-
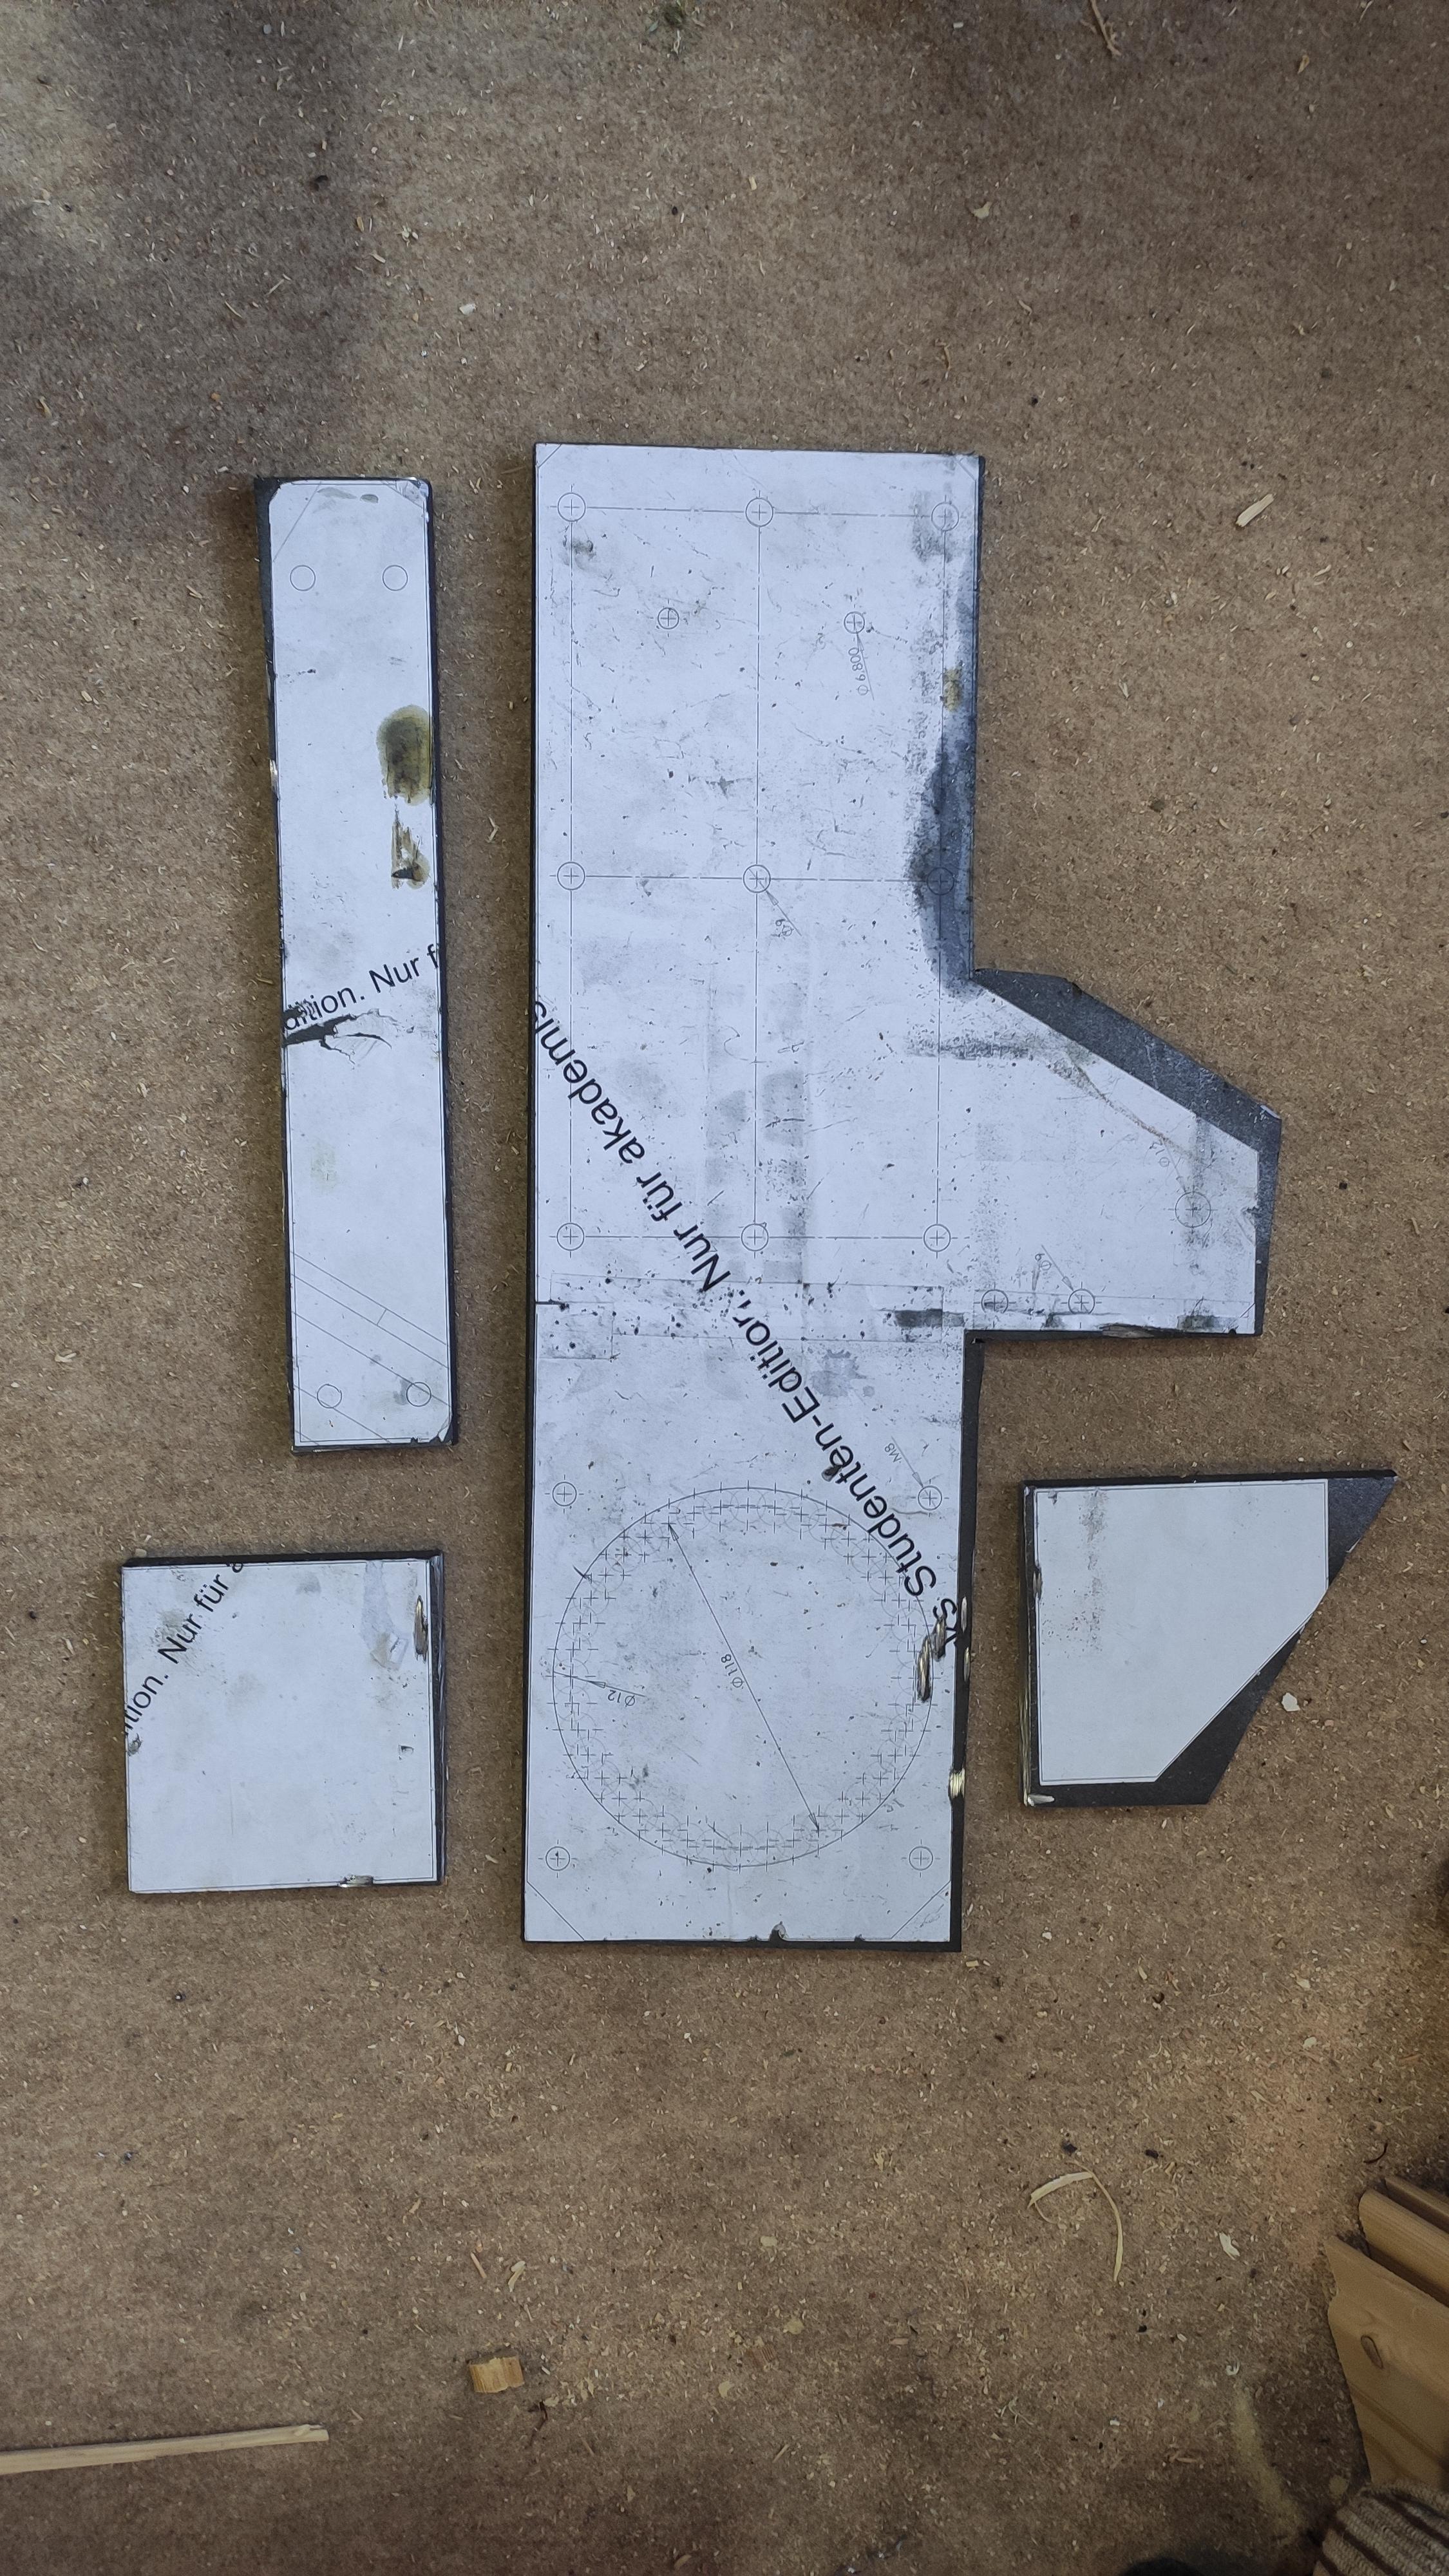
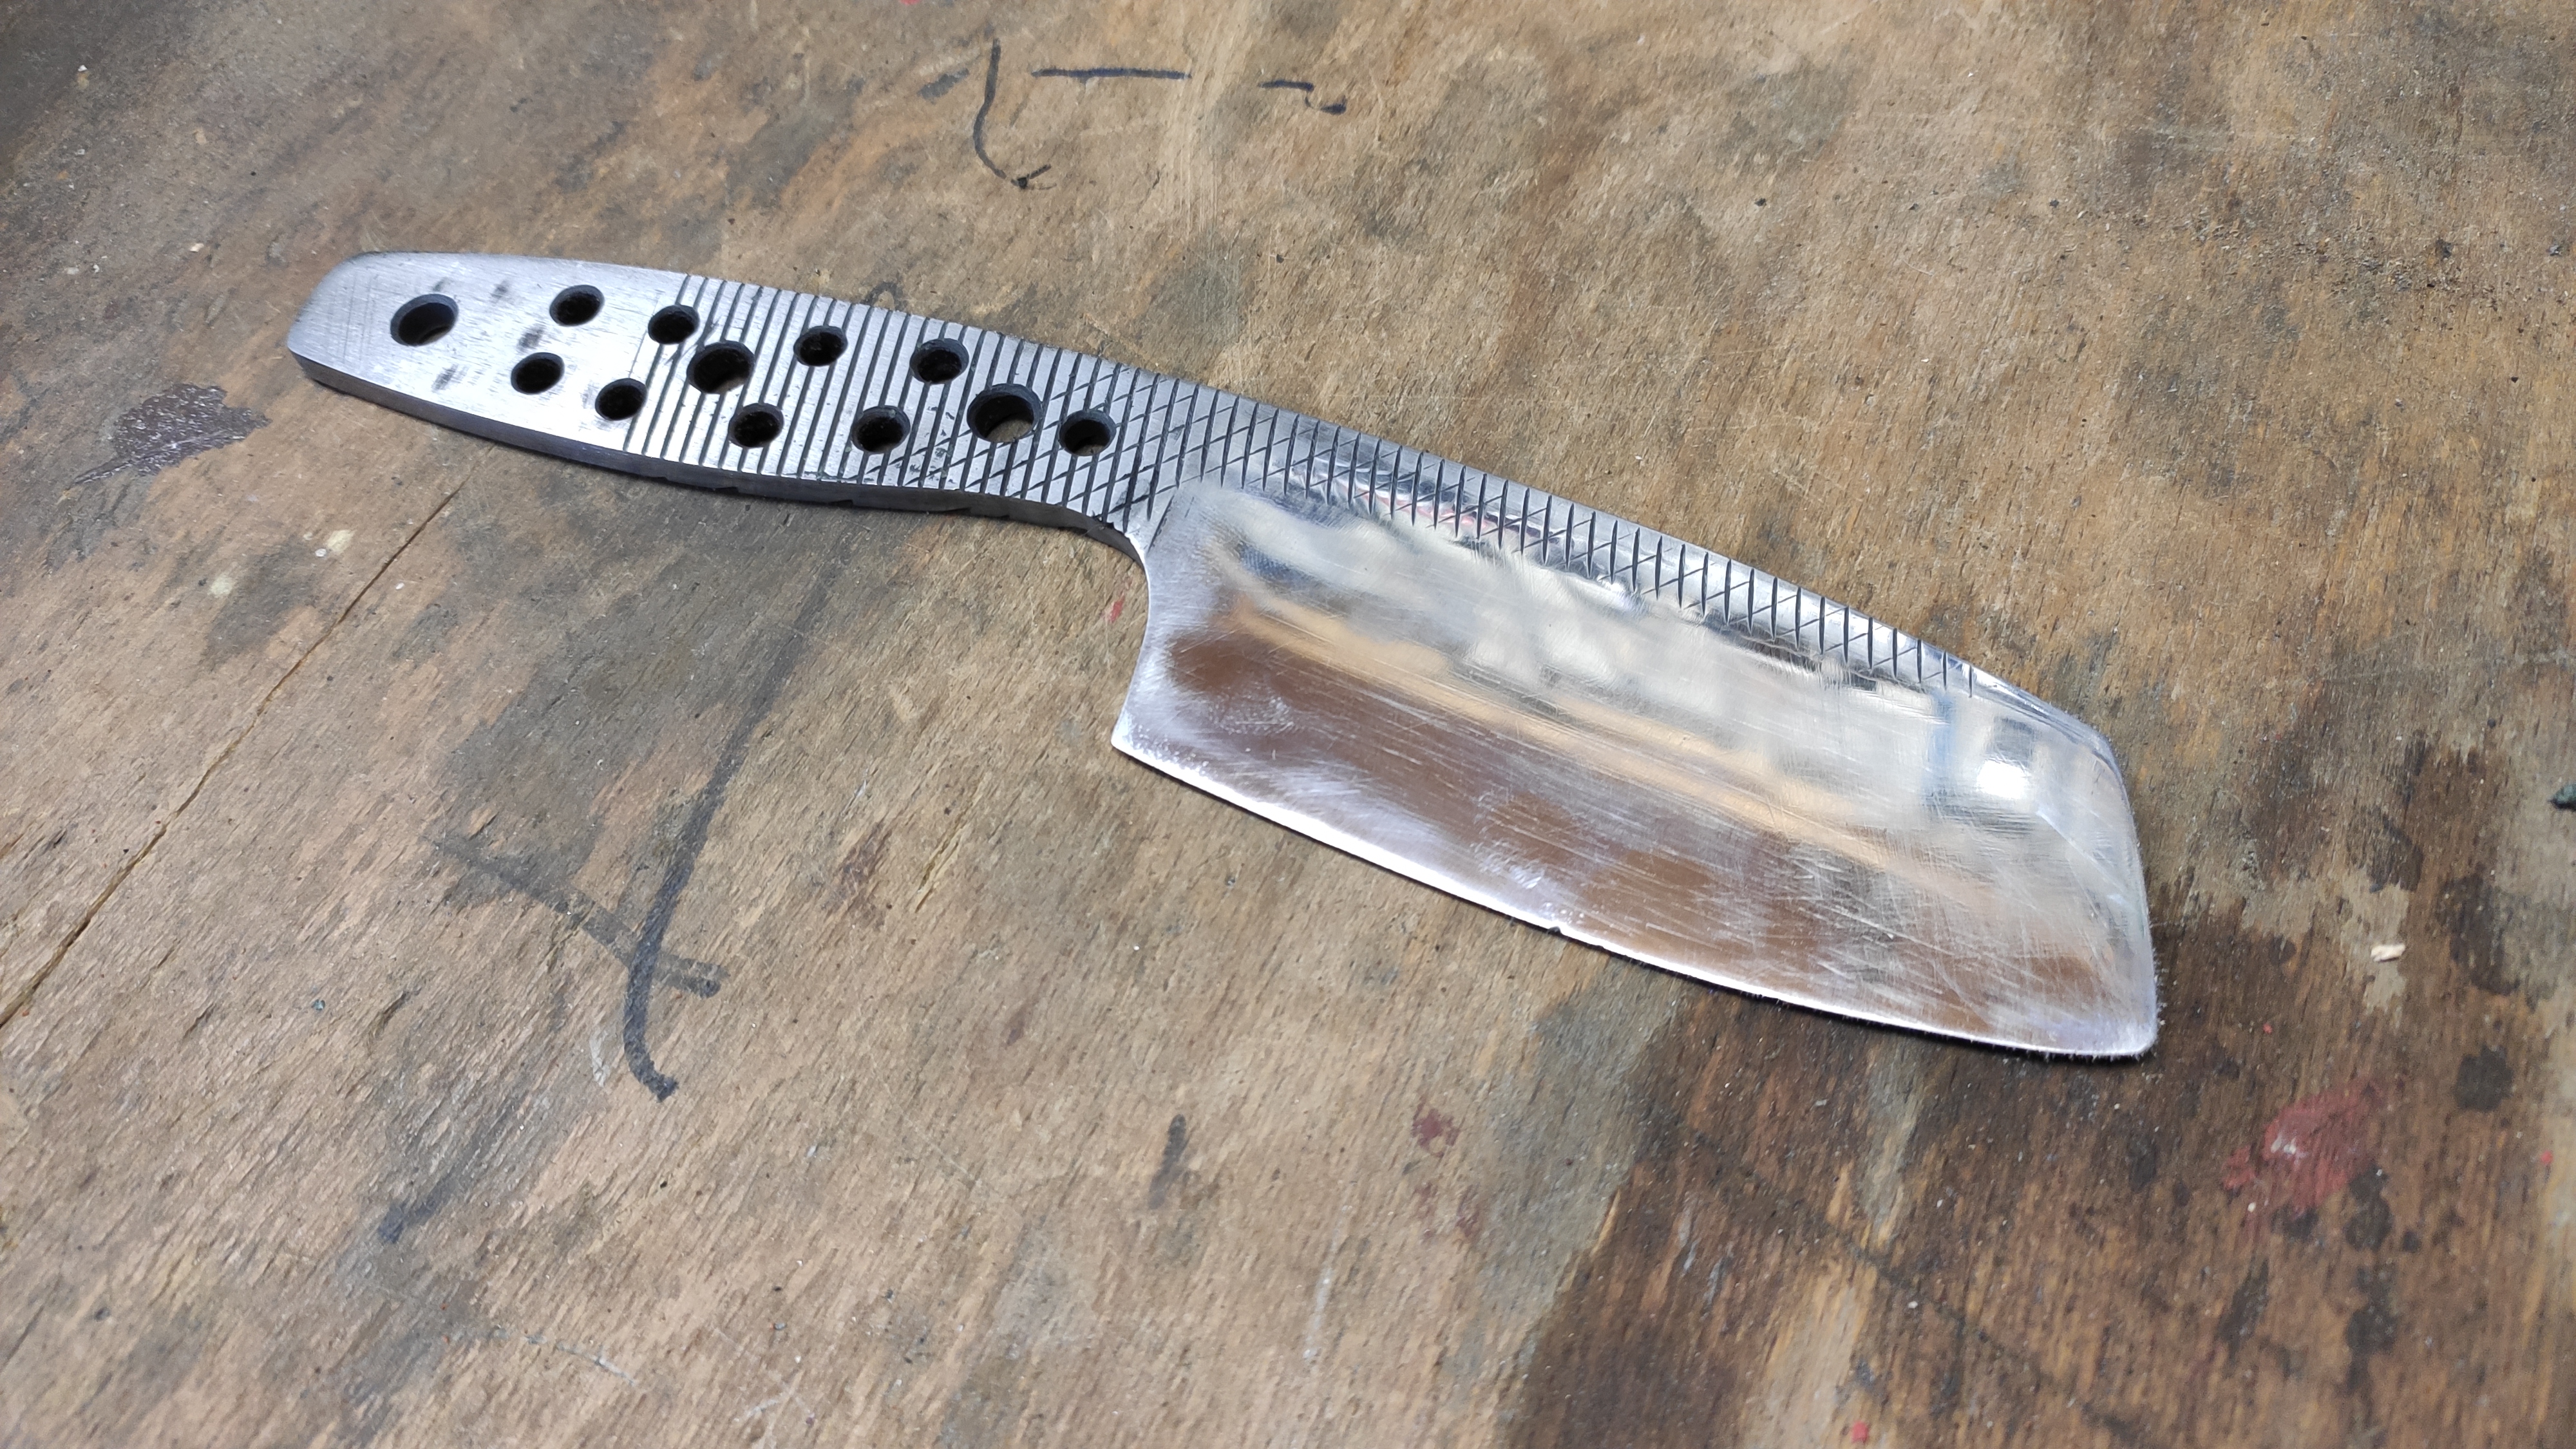
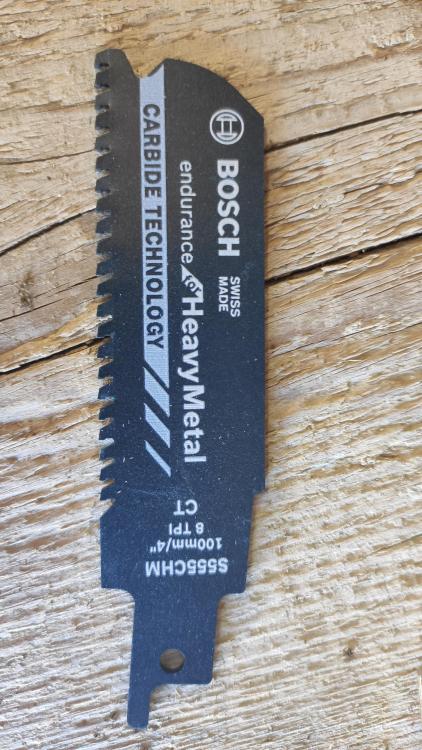
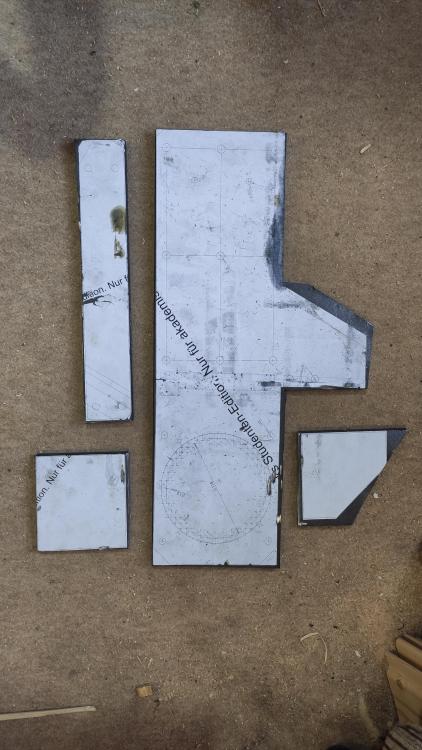
The new carbide blade arrived yesterday and today I gave it a try. It worked pretty good. Here's a picture of it: I think I had a false opinion on how fast those cuts are made. If you take your time you get a good result. I also switched between reciprocating saw and drill press to give the tools some time to cool down. In the workshop it was 95-100°F. There are still a lot of cuts to make and I will spend several hours with it. But I enjoy the time in the workshop and learn something new every session. Here are the parts that are already rough cut. It's the a side plate, the flat platten and two parts of the stand. Those still need to be cut/grinded/filed and drilled. The base plate is already finish. It's the bottom side of the plate. The corner holes are for rubber buffers, the inner holes are for mounting the stand.

-
Thank you Frosty! Sometimes you don't see the obvious Just ordered some grinding and flapp disks for the 4 1/2'' angle grinder.
-
Hi Frosty, me and my father are the same opinion. It's just our only option so far. So I ordered the carbide blade for the reciprocating saw after all. It's just 8€ so we'll try it and if it doesn't work it nothing to anger about. I'll keep you up to date with the building process. The pieces we cut today are just rough cuts and I will file them to the needed size. As soon as there is something to show I'll take some pictures.
-
Today we made the first cuts but without the stand. The stand is ok for cutting brick or other construction stuff but not for this task. We are doing it slow and as safe as possible. Now I have some file work to do
-
Hi Frosty, Thanks for your analysis. Maybe I put too much pressure on the angle grinder but not on purpose. The reciprocating saw try was surely wrong. It is not supposed to cut such thick steel plates and I tried it even tough. So clearly my fault. I will do the cuts with my father around. I don't want to risk my health but this is also not an extremely dangerous job to do if you do it right. After I watched several safety videos I checked on the dates on the cutting disks... Well now there is none left. Some of them were "made in West Germany" so 30+ years old. Fr some cuts I could use the hacksaw but not for all.
-
I changed my mind after the first try with the reciprocating saw. It also has just 500W and I think a better blade would not make a big impact. Due to that I pulled out our big 9'' angle grinder (probably as old as I am) and ordered some metal cutting disks. It has 1400W and I think is powerful enough to get the job done. This tool is a beast and I have respect to use it. But one big advantage is that we have a stand for it. I can bolt that stand to our workbench and also clamp down the steel plates.
-
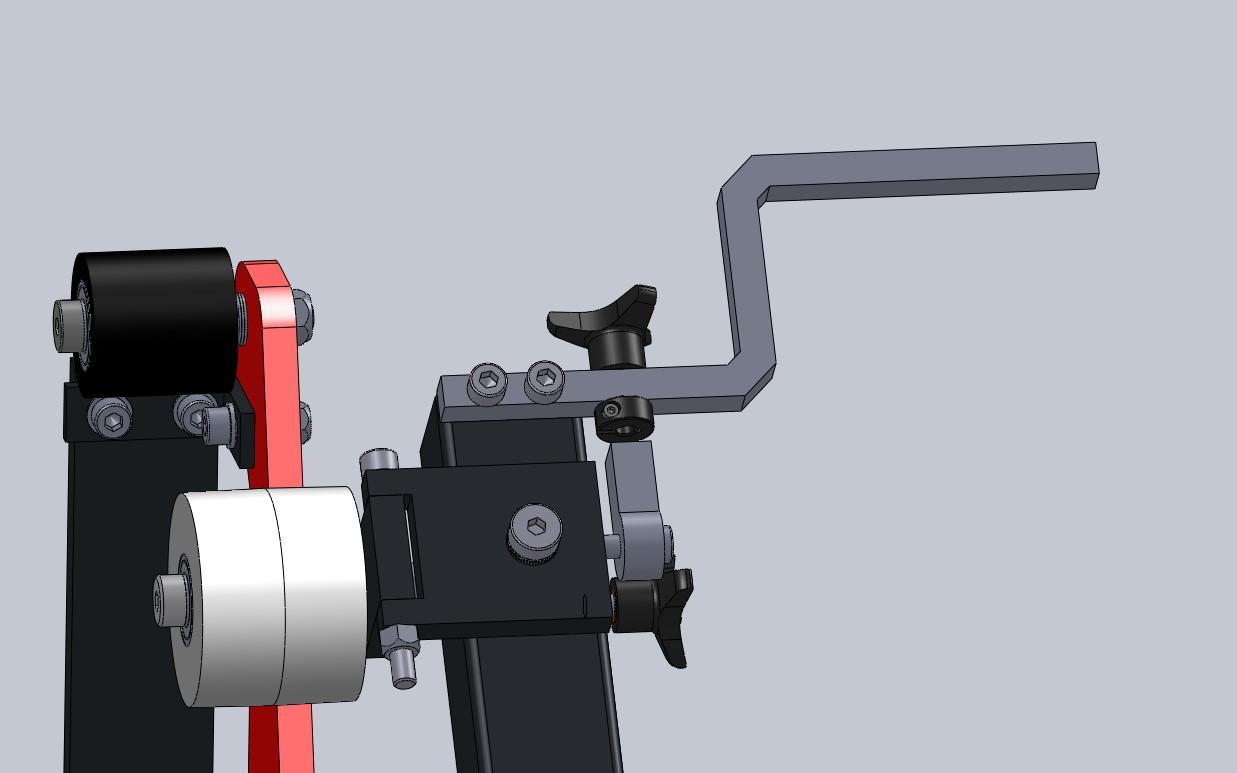
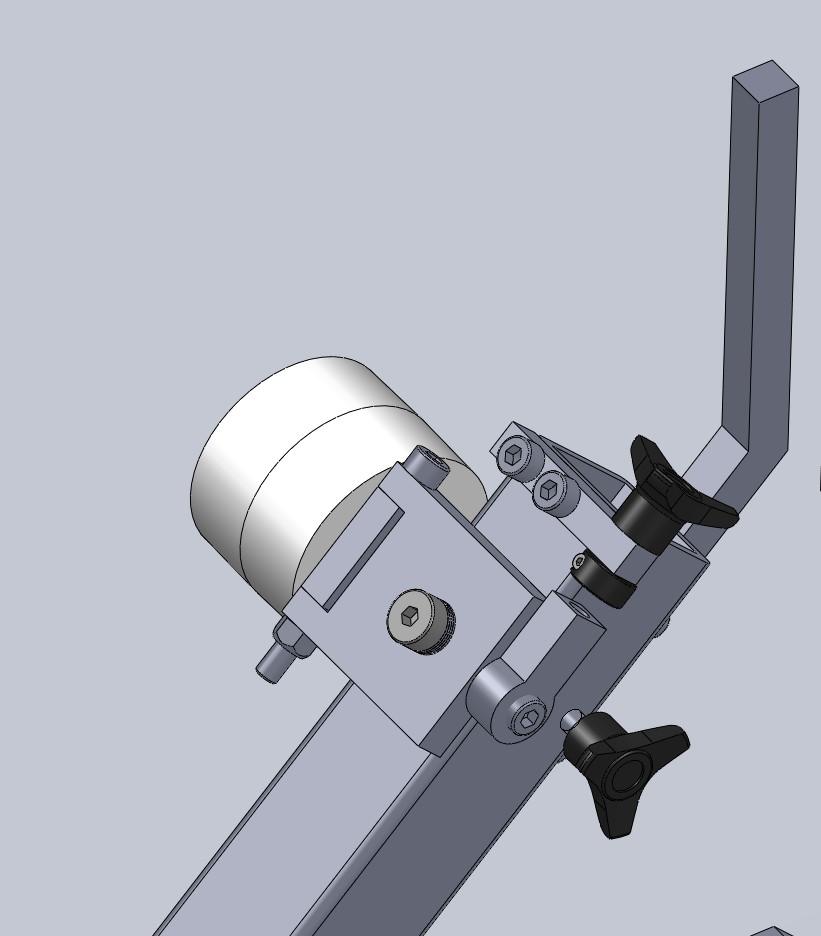
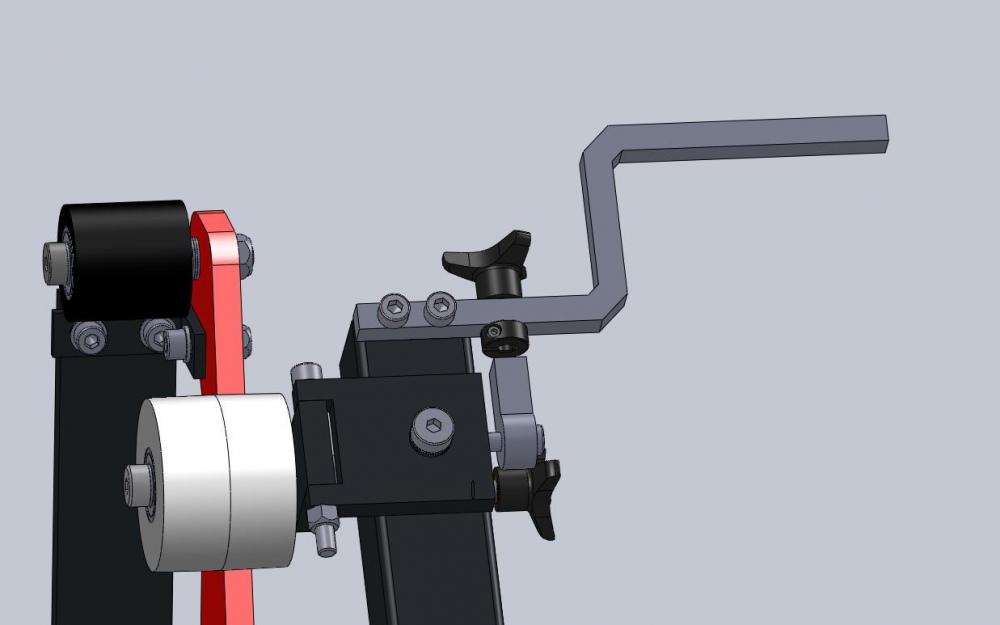
Hi Thomas, the tracking can be adjusted in both directions. I will glue in a threaded rod to the star handle, the black ring will be clamped on the thread rod to fix the position. The joint eye also has a internal threat so when the handle will be turned the joint eye moves forwards or backwards. The pivot point of the tracking will use a shoulder bolt. As far as I knew this axis does not need regular adjustments. So once it is aligned properly I will tighten it down that the position is fixed. Yesterday I started cutting my plate steel and recognized quickly that I have underpowered tools. The base plate was a cut with ~12'' length and nearly killed my little 5'' angle grinder. It took a lot of time and the angle grinder got seriously hot. The next cuts I made an the vertikal band saw (designed for cutting wood but equipped with a metal cutting saw band) but the same here. It takes for ever to cut these thick steel plates. Today I will try to use my reciprocating saw with the stock blades. If this works decent I will order some good blades.
-
Hi Thomas, I changed the handle to be pointing horizontal towards the left grinder side. So the hand position moves away from the belt.
-
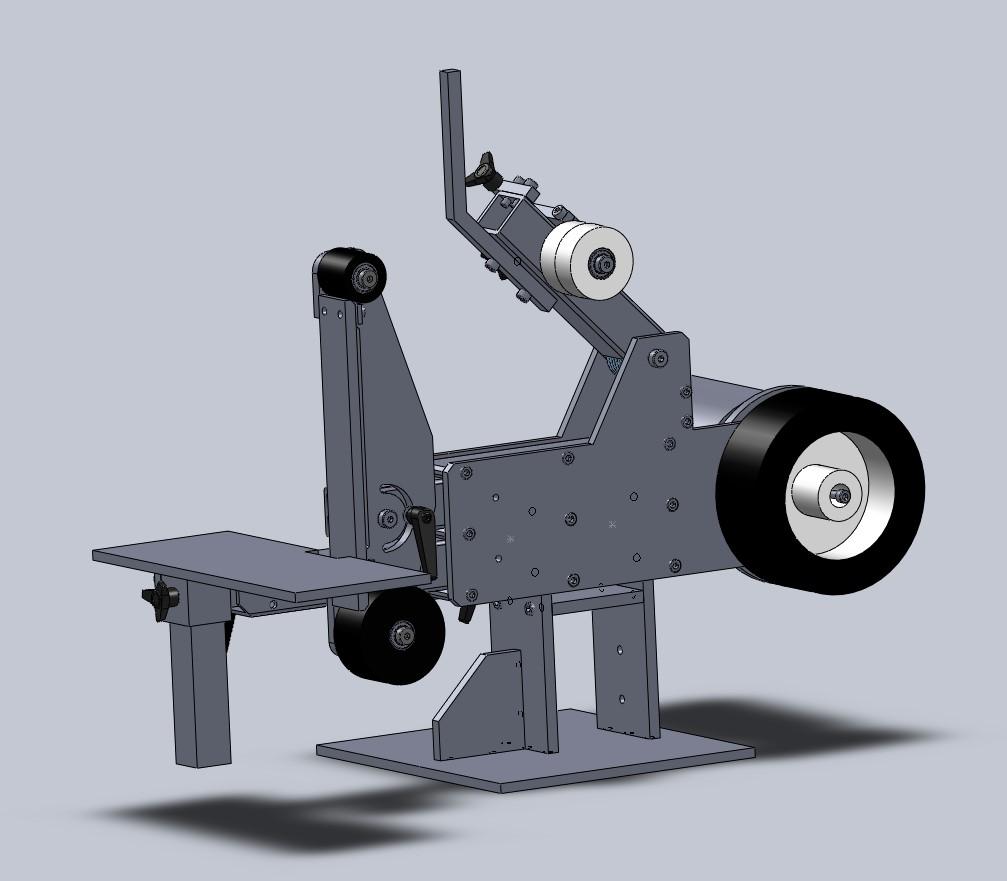
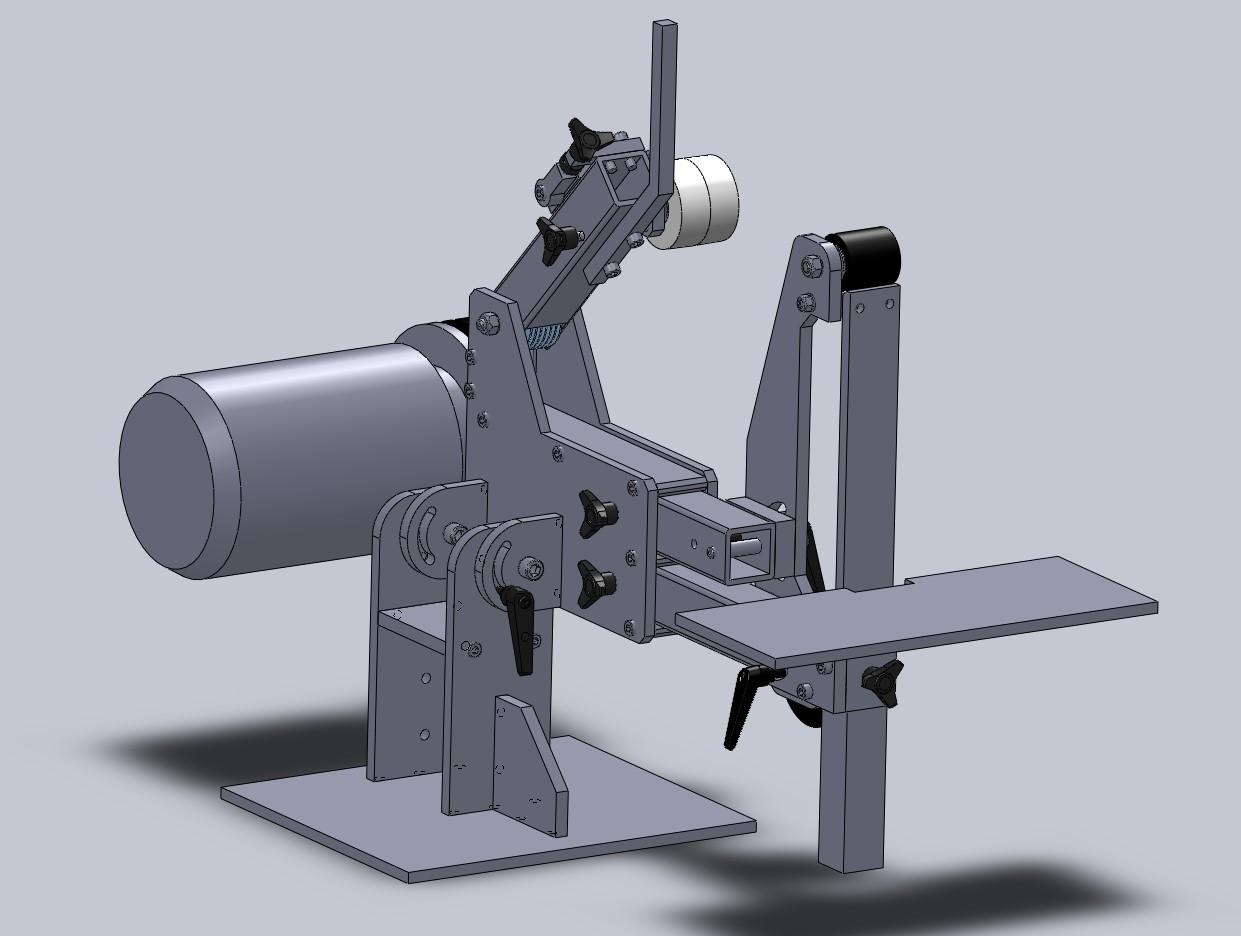
Hi folks, it's been a while since i posted the start of my first knife build half a year ago. Since then other projects crashed in and so I had to build a shed and a pool deck to please the family needs. The knife is still not done yet because I got really annoyed by my 3x20'' belt grinder. The belts I have in stock are for woodworking and wear out in seconds when i put some metal against them. And investing in proper belts for this machine wasn't an option. So I stopped working on the knife before I messed it up. I don't claim this to be my own design. I took as much as I could from other guys and tried to adopt it to my needs. I'm not a metal worker and I can't weld. Here are is the design as it should look like in the end. The grinder will be powered by a 3 HP, 2860 rpm, 3 phase motor that is just 1 year younger than me. I know it will have plenty of power and I have to be very careful with it but I got it cheap. The belt will be driven by a 3x8'' rubber coated drive wheel. Tracking wheel is a crowned 3''. The flat platten is based on the one of Brian from Houseworks but with a 4'' contact wheel on the bottom and a 2'' contact wheel on the top. The wilting work rest is also adopted from Brian. The tracking is a mixture of Brians design and the design of Beck's Armory. The belt tension is applied by a torsion spring like Jeremy Schmidt did it in his gen 1 grinder. The plate steel (12mm ~ 1/2'') arrived last week and the drawings are printed to be clued to the plate to start cutting. The tubes are 50x50x5 mm (~2x2x1/4''). I will do this build with the machines I've already own: a vertical band saw, angle grinder, drill press and files. I know it won't be a perfectly machined grinder, but it will be made by myself. So my question is: Does some of the experienced grinder users see any major problems that I have overlooked? Greetings from Germany, Tim


-
Hi Yanni, thanks for your answer. I also didn't find a better explanation for those designs. I'm just starting my own build and I'm also doing a two slots/bay version.
-
Hi Steve, your answer make sense but my question was something else. The Wilmont Quattro Grinder has 4 slots (where the tooling arms are pushed into) over each other. The Reeder ultimate grinder has 3 slots. So why 3 or 4 of them stacked? Just want to understand the design. They won't make this design without a good reason.
-
The tubes were the attachments are positioned. Reeder calls them bays and does one with 3 bays. Wilmont has their Quattro with 4 arm setup. Can someone give an example where more than two of them are needed? I'm new to 2x72 belt grinders and don't have experience working with them. I know that this are very versatile tools and this is a reason I will build one for myself. So thanks for your tips.
-
Hi there, what is the benefit of more than 2 receiver slots/bays on a 2x72? I saw designs with up to 4 slots/bays but never saw somebody using more than two slots at a time.
-
Finished the sanding of knife #1 today. It's not perfect but ok. Next will be the scales and I'm looking forward on this. Also worked on knife #2 and became impatient... Hand filing the bevels take hours so I tried the 3x20 belt grinder again. Its not made for knifes but it removes metal faster than hand filing. And I learned that I have to work with a guide for the plunge lines. It takes just one moment and a crisp line is gone... Got an old 3 HP motor and I want to build a very basic 2x72 belt grinder. Nothing fancy just enough to speed up the bevel grinding.
-
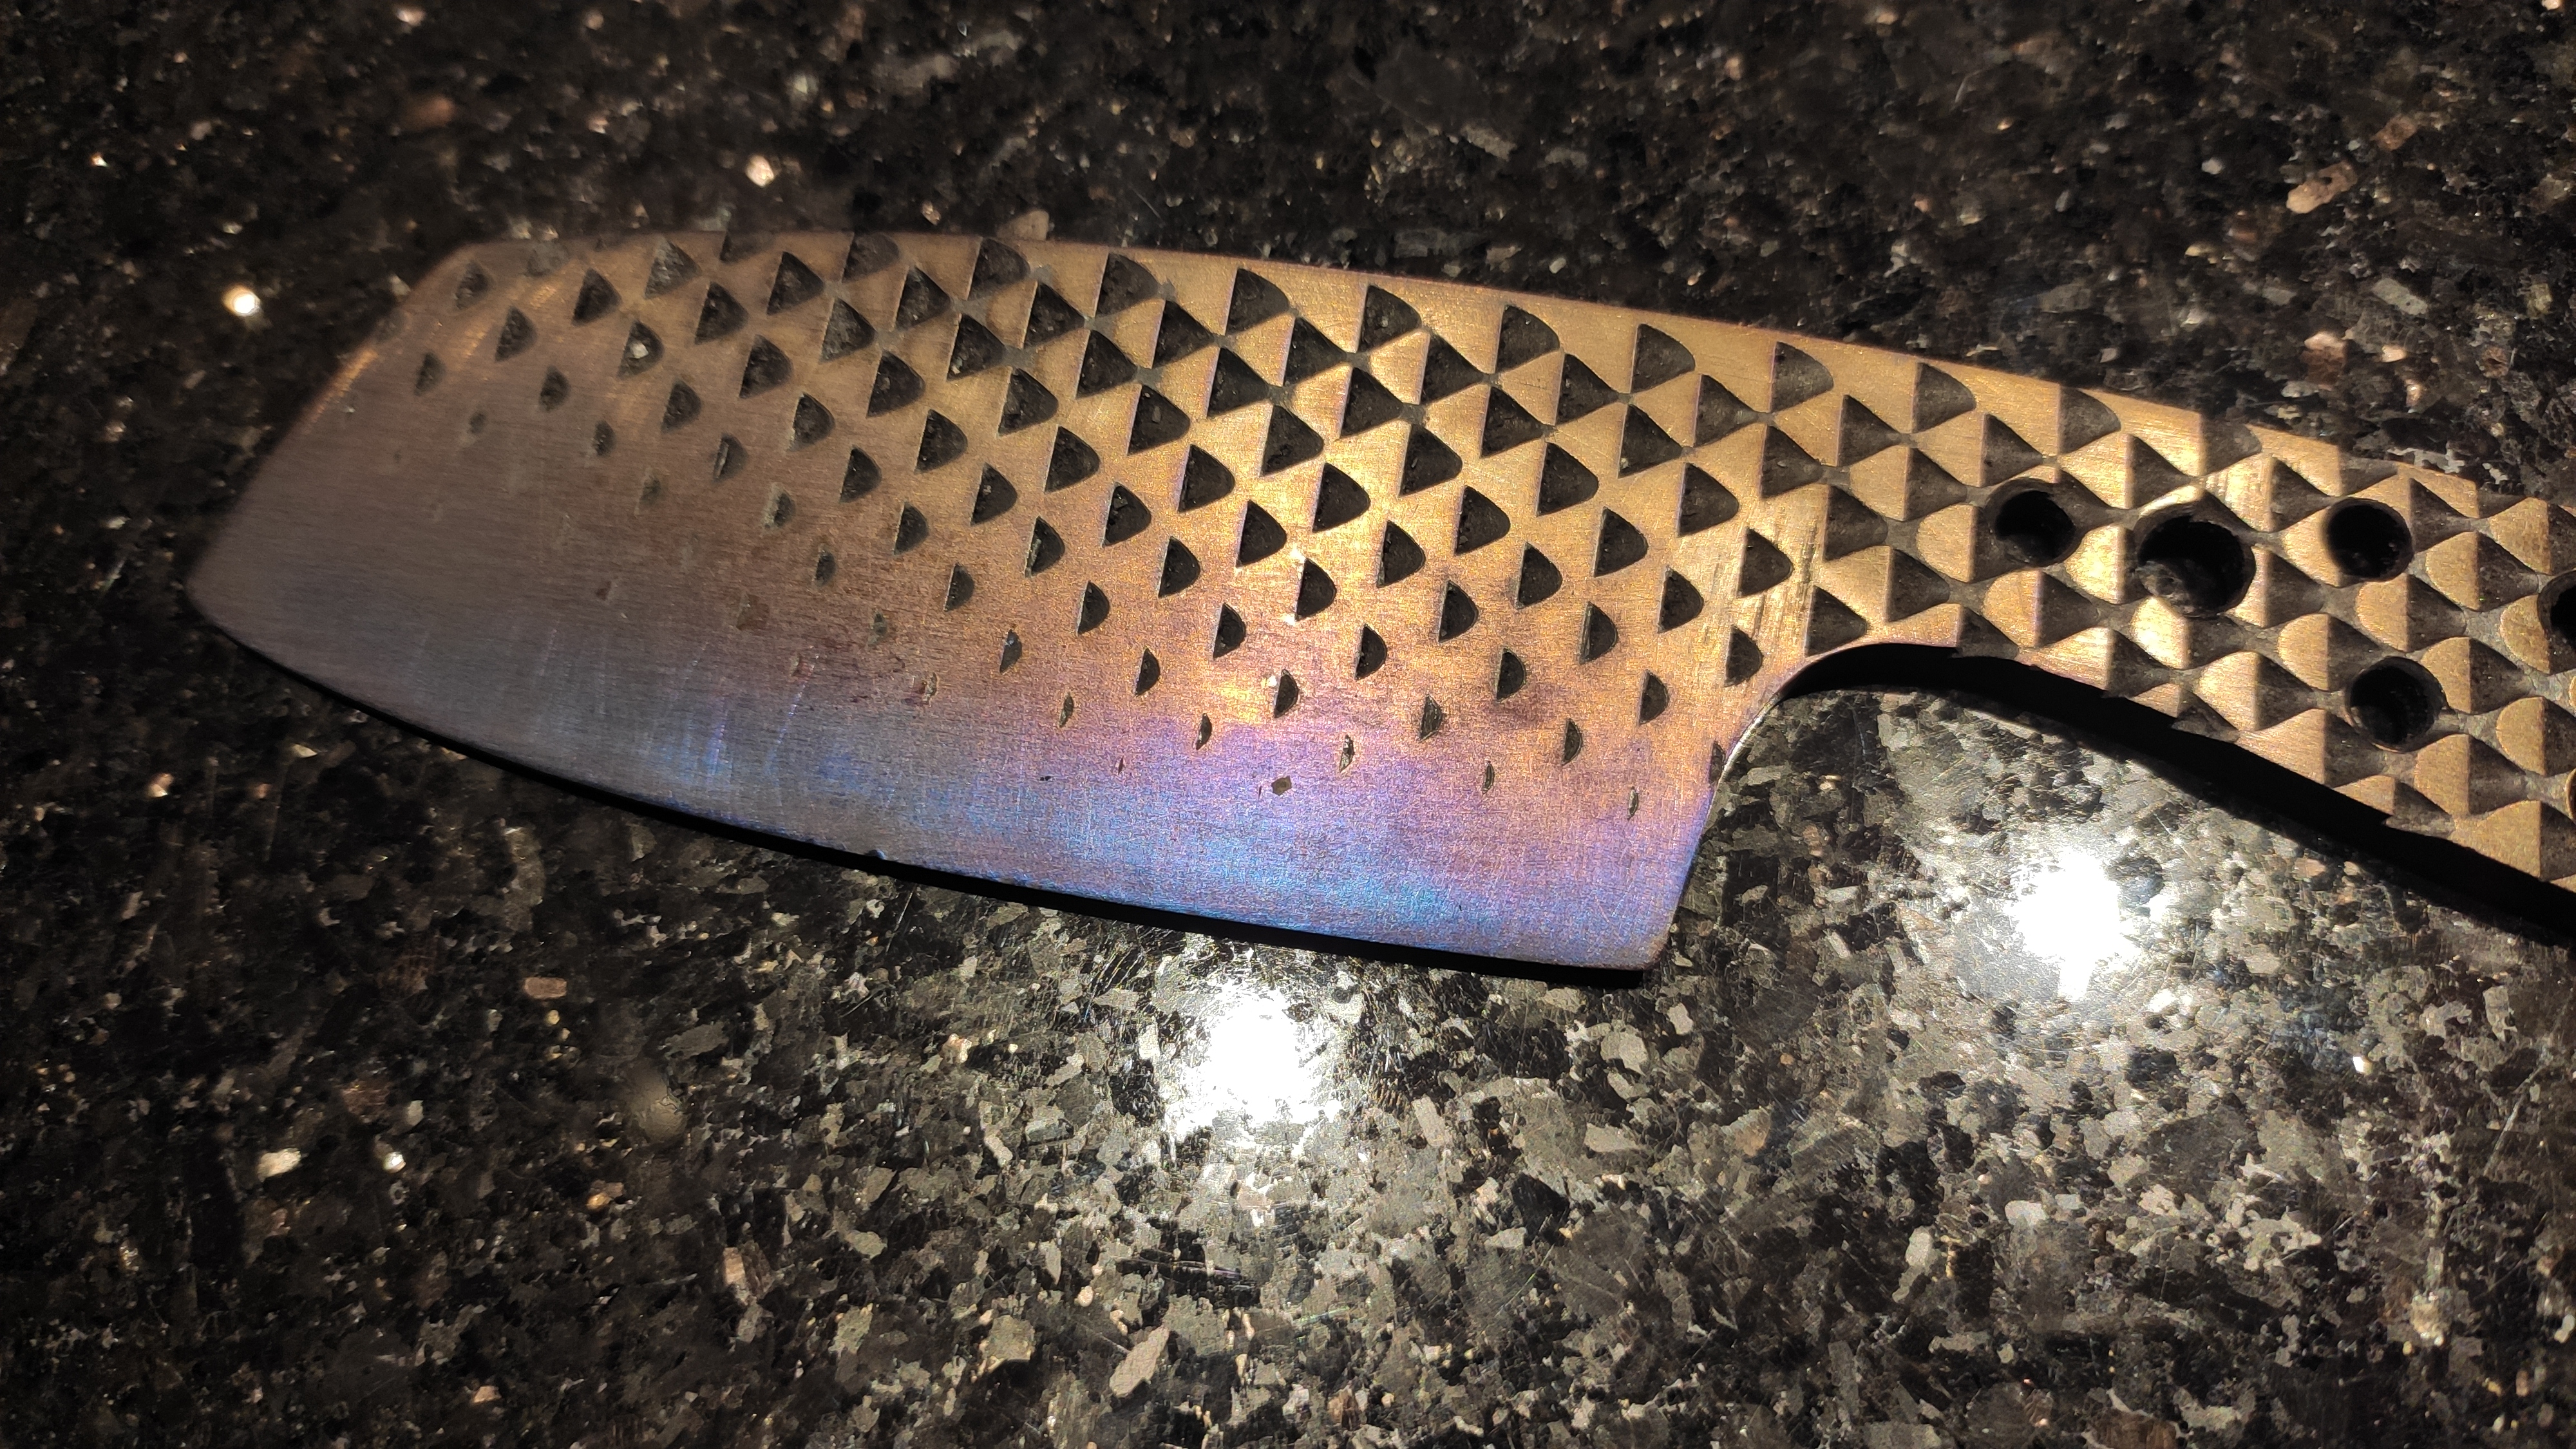
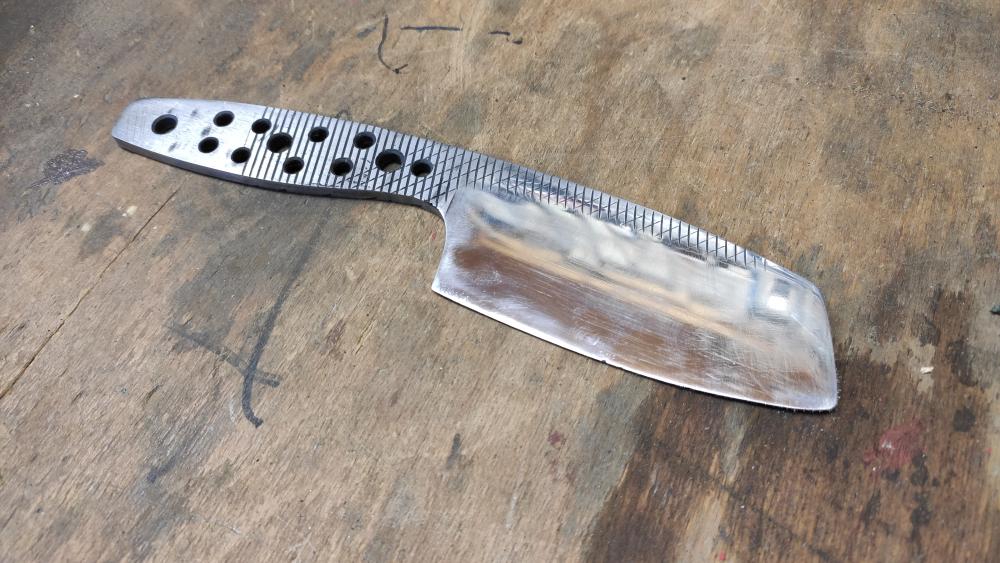
Hi, I have the first aid kit ready. The tempering is done and the blade reached straw colour. With the right oven mode the temperature was pretty accurate. Unfortunately the blade bend like a banana. I will try to correct it in the vice using bolts and if that doesn't work I ordered some metal clamps to try the re-bend using coins and angle iron in a tempering cycle. Also did some vegetable cutting to get a feeling of the knife profile. Due to the thick spine the knife won't be a perfect slicer. And without the scales it is a bit heavy towards the tip. Knife #2 I will file with a thinner spine and maybe try to achieve a distal taper. Have to figure out how to achieve such a low angle with my jig. Keeping the edge thickness around 1.5-2 mm.
-
Hi, the thermometer arrived and I put it in the oven to check the temperatures during Christmas cooking. All temperatures were about 5-10 K lower than the dialed temperature. I think I used a wrong operation mode when I tempered the blade. I don't know the Englisch expression for it but there is a fan running in the oven to move the air in the oven. Thought it would result in a more even heat distribution but it didn't. Next time I use another mode for the tempering. Also worked on knife #2 witch is made out of the left over part of the farriers rasp. But this brought me to hospital this morning. I had a respirator and eye protection glasses on while working the profile with the angle grinder but somehow a metal fragment got in my eye. Kept me awake to nights... Luckily the doc could remove it without any big problems.
-
Hi Frazer, hi Thomas, Tank you for your replies. Yes i heard of of such primers but more for painting wood/concrete. I'm new to metal working. My only practical experience is a two week basic metal working class bevor studies. So please excuse if some questions are very basic.
-
Still waiting for the thermometer but already thinking about the next steps. I want to try an etch with orange juice. I know the patina won't last forever but I want to make my own long term testing with normal kitchen use. The question is can I do the etch before I epoxy the scales? Or does the etching has a negative influence on the bonding of the epoxy?
-
Just ordered an oven thermometer. Next tempering has to wait until it arrives. Thought about putting the blade between to iron pans?! They should work as a temperature buffer. Came on this idea through the obove mentioned tempering tongs.
-
Do you have the knife still in use? Can you give a long time feedback on the coffee etching?
-
Hi Thomas, Thank you for your recommendation. Yes, I will do a new hardening and tempering cycle with 175°C/350F. I understood Pnuts post that I should do the 2x60 min tempering with 1 day in between. I will put a BBQ thermometer in the oven the next time. I knew that ovens aren't that precise but I didn't expect deviation of 60-80 K. This is almost 50% off.
-
Hi Pnut, If you recommend that I will try. I took my information on heat treating farriers rasps of this thread: https://www.iforgeiron.com/topic/35662-what-is-your-process-for-heat-treating-a-farriers-rasp/ Tim
-
Hi, yesterday I did the heat treatment of the blade. I did not increased the edge to 1 mm because I would lose about 5 mm of blade hight. During hardening I realised that the thin material is also problematic because it not only heats up faster but also cools faster. It's not ideal but for knife #1 I can live with that. I heated to non magnetic and quenched in canola oil (60°C / 140 F). But the file test wasn't as expected. The file did leafe some scratches on the blade. But I'm not sure if it was just the burned oil on the blade. For tempering I aimed for 2 X 60 min at 220°C / 425 F. The first hour went well and I got a light straw colour. I let it cool the room temperature and went for the second hour. I didn't watched after the blade and went for a shower. And the tempering failed: According to the colour on the edge the temperature was around 280-300 °C / 530-570 F. So my plan is to redo the hardening and tempering. And this time observe the tempering and working with lower temperature. Question: is the hardening correctly only if a file doesn't remove any material / make any scratches? Or do I have to remove the black "skin" (what is the correct wording for it?) befor the file test?

-
Hi Frazer, Thank you for sharing your experience. Yes if I would increase the edge to 2 mm a lot of the blade profile would be gone. So I will try it with 1 mm and try to heat up the blade slowly. For the next knife I will pay more attention to keeping the edge thick enough. Also I will buy larger material to make the blade around 50 mm / 2 inches high. For the scales I have some african padouk (barwood) with nice redish colour. Is handsanding to 220 grit fine enough before heat treat? I'm not going for a mirror finish.