
somber crow
Members
-
Joined
-
Last visited
Everything posted by somber crow
-
I rarely use stock over 1" thick, however I definitely need an opening at least 5-6" wide for certain projects I do. For that diamondback I find myself using the side openings 90% of the time, but having that big door is nice for when you need it. That is sort of what I'm leaning towards. I think the interior space overall can mostly remain consistent, but it would be nice to adjust the opening for the smaller pieces. My current one has brick on the bottom, but uses that fiber board stuff for the other walls, which I find kind of falls apart a bit fast if it gets bumped by whatever your forging from time to time. I'm sure there is info on here about the benefits between a full brick forge, kaowool, or fiber board in regards to temps, heat up times, etc. Although I know that all depends on the cubic feet of the interior as well.
-
Honestly I've only ever used double burners (and coal forges), I feel like if I went with a single one I'd be disappointed with the results. Would also appreciate having welding temps, but I don't do it often. The current one I'm running is 14" long, 12" wide, 9" high (exterior dimensions minus burners). I don't know what the cubic space is. I also have no experience with NARBs, but always thought they looked interesting. I had been thinking I'd most likely just reuse the burners from my current one, but maybe there is a benefit to keeping an old one functional for doing actual welds in if you're gonna tear up the bricks anyways. I appreciate the point about the door though. I imagine if I built a rectangular one that was open on both ends, I could just use bricks (or another system) to adjust the opening based on the work piece. It's tempting to over engineer a bit but it probably just isn't worth it.
-
Hello. I have a 2 burner diamondback forge that is.. on its way out. Looking to finally just build my own, and was wondering if there are any design aspects or features that people have messed around with that they really like. As well as forge shape/style, etc. My current one is a blacksmith model, so a box forge with a main opening and small ones on the sides. Has anyone ever transitioned from that style to any form of cylindrical forge? Did you miss the box model at all, or was it fine? I should note I mostly work on a smallish scale anyways. Anyone ever use a forge with a foot pedal to open the main door? Worth it or not? Any thoughts or tips are appreciated. I'm expecting to spend some money on the build to make sure I've got something really worth using for a long time.
-
Okay, some follow ups. -As for the epoxy brand, I'd been using combat abrasive's epoxy that they sell on any of my handles, but I ran out and was using JB until I do my next belt order, but I can try one of the other brands, I will look into that glue wars thread as well -Every handle I make I glue up and let set overnight. Although I've usually only had the "quick set" epoxys ever lying around. I will look into the longer set ones. Like I said I let it set overnight, so there is never really any rush. -I'd been cleaning with a de greasing soap I've seen other people use for stuff like this. I forget the brand off the top of my head. It's blue. Anyways, I will try acetone next time. I used to use it when I first started years back and had these same problems, but I was also an amateur overall, probably did something else wrong. As for Frosty's comment on temperatures, I do wonder, thin(ish) sheets of metal heat up really fast. When I've done my glue up things aren't 100% matched and do need to be ground down. I usually go until it just feels hot (maybe 15-20 seconds of grinding tops), then let it cool. But maybe I should go even slower. Or use thicker spacers. Anyways, thanks for the advice
-
Hello. I've been looking into redoing the style of how I do my handle work for some of my tools I make, as well as maybe do a bit more bladesmithing than I used to, but I am coming across an issue, and looking back, it is one I used to have back when I was first starting out. And that issue is the handle scales essentially just falling off after the epoxy has cured. In this particular case I'm doing some hidden tang wa/japanese style handles with a few layers, and am having this same issue, and am looking for advice. Here is my example: Handle is wood - 18g copper spacer - wood, with the grain all in the direction of the knife ( -->cu-->blade ). For prep I rough sand the ends of the wood that will be connecting. For any metal, I wash it with soap (while wearing gloves), and make sure it has a rough finish. Also experimenting with adding drilled holes in for the epoxy to fill through. Then clamp up, hard enough, but not too hard as to push out all the adhesive. I use 2 part epoxy (currently 5 min JB weld), making sure to mix well/evenly, and have over the years tried a few different brands with essentially the same results. Those results being maybe 2/5 handles failing, maybe even 3/5. I guess I should note handles that do fall apart typically happen within the first 30 seconds of grinding the stack flush. If there is metal in the handle (especially thin metal), I try to only do very short bursts, then let it cool Am I just missing something here ? I'd always been taught in regards to woodworking to not glue end grain, but clearly that is a thing that happens with these kinds of knife handles. Maybe I am making small mistakes, or one big one, or am just unlucky, but I'd love to hear some advice from some more experienced knife guys. Thanks!
-
Yeah I was thinking about that too, the few sets I've made have had just that. Honestly I might. Sometimes a client just wants what they want, so I'm kind of hoping that is.. not the case here. We shall see
-
Hah, yes thank you all for confirming my suspicions. I have a few other angle images but they are more useless than that. I don't think the client wants a 100% accurate match, but rather just something that's really close (fortunately). At least the woodworker doing the box seemed to think so. And yes to clarify I've made handles before, I've just never had to recreate one based on some crappy pictures. I think it will work out fine in that regard. However I will inquire about getting some better information, and I will pass on what I know up the ladder. If anything comes of it I'll post here again
-
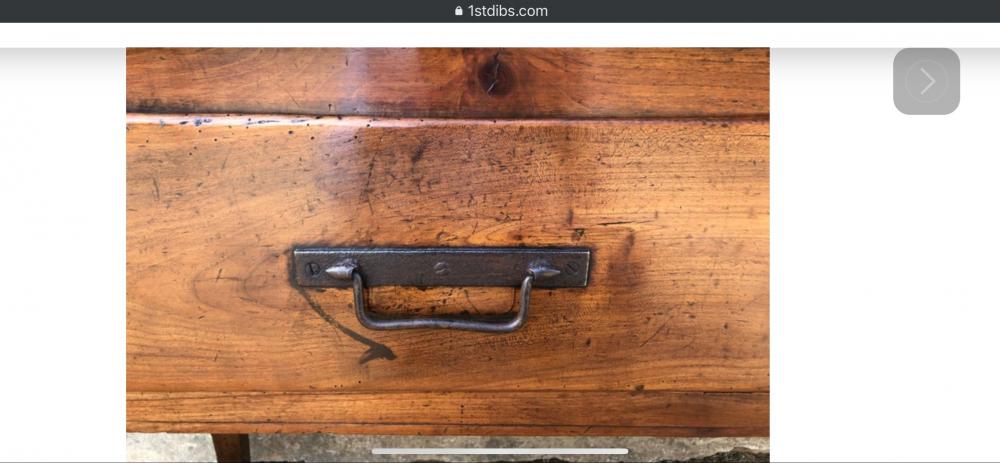
Hello. Apologies if this is the wrong board for this, but I'm looking for a second opinion on this. I've been subcontracted by a woodworker who is creating a replica of an old chest. She was told the steel hardware I'm making is a few hundred years old, but looking at it, I'm a little... confused? I'm looking at this, and the pieces that hold the actual handle aren't the usual staple-type ones I'm used to seeing for traditional forgings. They are weirdly cone-like, and almost look like they are welded on (could be braised, I don't really know). They're not even the same size which makes it more weird. Has anyone seen anything like this? Or could it just be something far younger than the initial buyer is aware of? All I have are some low quality pictures, but here is the most useful one: As for actually fabricating those pieces, all I can really think of is to drill a hole in a block of steel and grind/file it into that shape. Maybe even do it with a tenon sticking out of one size for a more traditional joint. So yeah. Anyone recognize this? Or have any thoughts on its origin? Seems like a weird one but maybe I'm way off here, not the kind of work I typically do. Thanks!
-
Yeah if I had a sandblaster that would definitely be what I would have done. I tried using a flap sander on something else like Frosty had suggested, and I think I might give that a go. I've ordered some rather fine grit ones to test and see how that goes. I'll report back when I've received them.
-
Ah okay. I do have one or two lying around somewhere, but I've never used them. Their grit may be a bit high for this use, but maybe ill test it on some scrap and see how it goes.
-
I know all that stuff works, but it would fully defeat the purpose if I over-clean the surface and remove the hammer marks. Hm we'll see then
-
okay yeah i hadn't thought about tumbling it like that. I did find one other thread on another website saying that passivation isn't really that effective for forged pieces, as in it's not really strong enough to get through the forged surface + any iron from the anvil/hammer that gets onto the surface, etc. So just maybe electropolishing may be the way to go..
-
Hmm. Well, I can certainly wirebrush to my best abilities and that sort of thing, but if I make a tall cup, or a necked in vase shaped piece, there is no way to reach in there with a wirebrush (if that even is good enough). Grinding it would defeat the whole purpose of making a hammered vessel. I met someone long ago who had made pieces like this, and they were clearly polished somehow, so I know there is some way to do it..
-
Hello. I've got a few stainless steel questions, and after investigating all the other threads I could find on the matter, I'm still unclear on some things, and am looking for advice. I've began messing around with hot-raising stainless steel (304) bowls and cups and things like that, and am have quickly learned that things like buffing wheels and the like don't really do the trick for polishing these (especially with these shapes). I'm looking into setting up a small DIY electropolishing area, but just want to make sure I'm approaching this right, and so here is what I am wondering. If the steel is hot worked, will this process still work overall? Stainless doesn't scale much at all, but there is a little naturally, and all surfaces are hammered. Would I still need to passivate it in citric acid first? After? Or do anything else to it? I am looking at some guides for setting up electropolishing stations, but if anyone has any specific advice, I'd happily accept it. If it comes down to it I could also forge in bulk and just send it off somewhere to be done. Thanks!
-
yeah, I guess I'll just keep trying unless anyone else shows up with some ideas. It just sort of perplexes me, if you watch the first ~45 seconds of that video, you see the two parts, and the finished product, and it doesn't look like its stretched much at all. Unless finished one was a different starting size for some reason. I do have a hunch it has less to do with that initial punch, and more related to the amount of drifting needed compared to the size of the second piece.
-
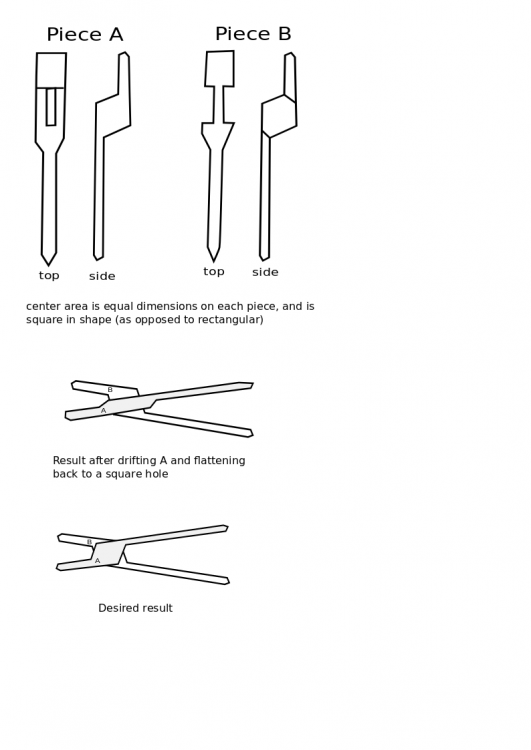
Hello, I'm trying to figure out how to make box joint pliers as the title implies. I should first note I'm trying to figure it out without much reference. There's one thread on here but it's not helpful. Anyways, I've based my forgings off an image (see below), and a video of Peter Ross doing the assembly (but not the actual forging). I *think* I have the actual forgings where they should be, but here's is my main problem. When I drift the punched piece, by the time I can squeeze its pair in, it's over stretched and the result is not clean looking and doesn't work great. I made a little sketch explaining what I mean, as I don't have images of pre-trashed attempts of mine, so see attached. I imagine a solution would be to make the punched piece half the length (in the punched) area, and generally bigger than its partner, but in the video they look the same size. I also imagine the hole needs to be punched at an angle. Which seems to stretch the metal even more. I'm only maybe 6 full attempts in, but I'd figure I'd ask about this. I should also note I've been grinding / filing a little bit before the fitting to make sure everything is flat enough, etc, so avoid any issues with that. And on a few I filed the hole to have a slight angle. I've also tried with 1/2", 5/8", and 3/4" square starting stock, but I imagine it wouldn't matter as long as you do it right. So any advice would be appreciated. There's surprisingly little online. Thanks! Reference image of forgings I found - Peter Ross video with assembly (and shots of forgings pre-assembly) -
-
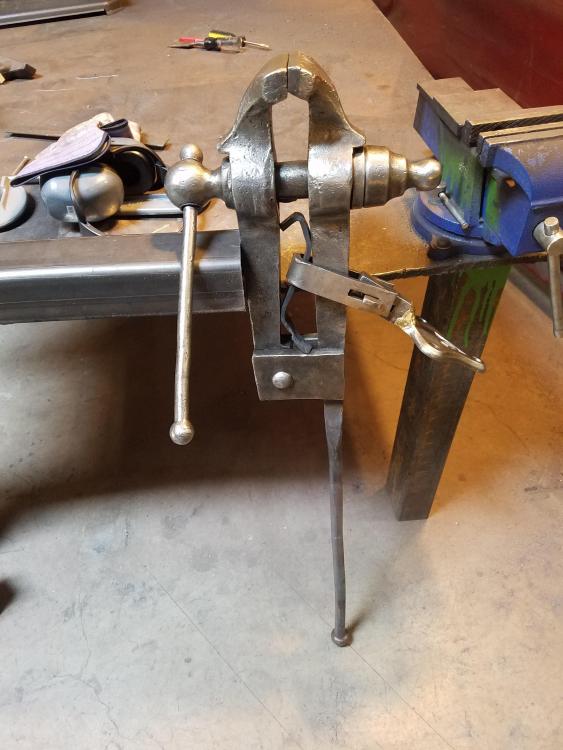
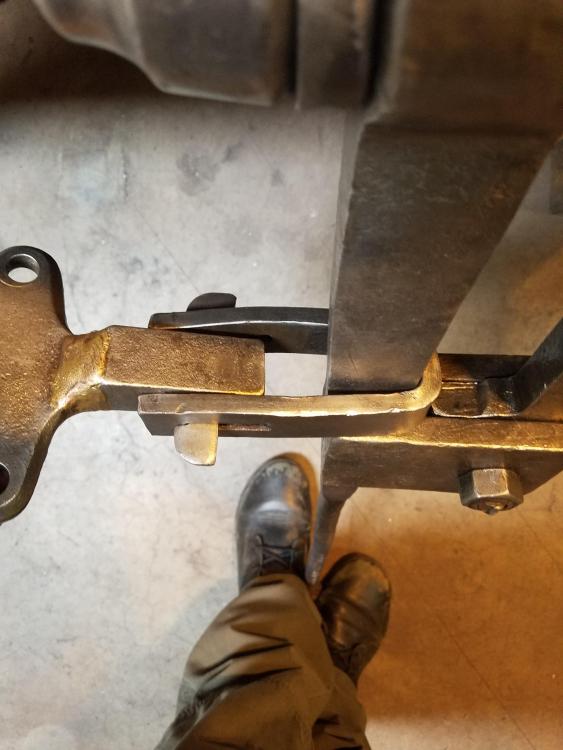
Hah, very well. Here it is. Forged a new spring with better steel. It didn't sit quite where I wanted but it works fine. You can see the tiny wedge I had to add to better lock the mounting bracket. It still has a little side to side wobble, which I will figure out tomorrow. More wedges I guess. Hopefully it'll all stay together. Thanks again to everyone for the tips.
-
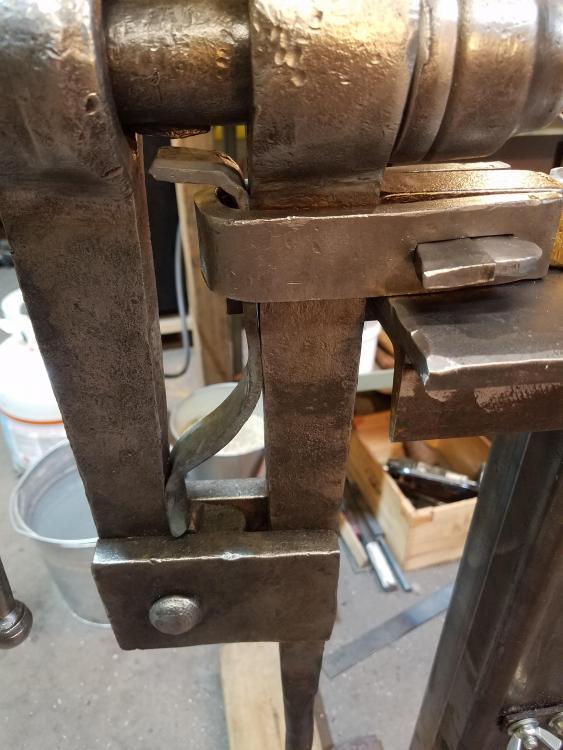
Okay, so I more or less got it working. That spring was indeed too short, so I made one out of mild as more of a temp due to my current lack of spring steel, and it sort of bent when I used the vise anyways. And I forged the missing wedge that was suggested. However, even with the wedge fit as tightly as I could, the shackle still wouldn't stay tight at all, there was still about 1/4" of a gap. I ended up driving in a second, tiny wedge next to the spring, and that seems to lock it. Just might be hard to get out, but I'll find a way. I don't think it'll effect the way the vise works, but we'll see.
-
Yeah I had been thinking of remaking that spring, every image I had looked at had springs with a different curve. Shouldn't be too hard. Thank you all for the tips (and especially caotropheus for the images/video). I definitely agree I am missing a piece now. I should be able to get to it in the next day or two. I'll report back.
-
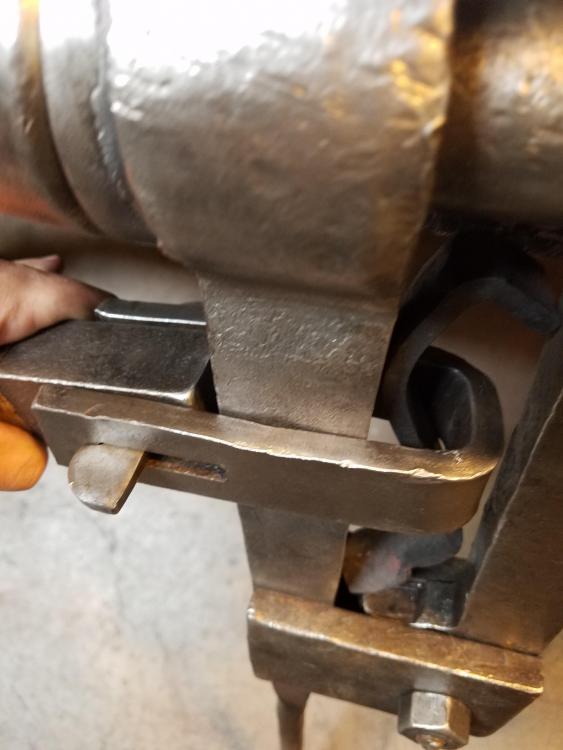
Hello, I picked up this leg vise last week, and there's something weird about it and I can't tell if it's missing a piece. The sliding bracket has a huge gap in it, making it impossible for the spring to stay in place, or for it to be mounted right. It looks like the piece is all original steel (so it's probably not some weird modification), spare the spring which is a recently forged replacement it seems like. Wondering if anyone has any ideas what I should do. Wedge a thick piece of steel in there? Weld it? Just want to make sure there isn't something I'm overlooking here... Thanks for your time!
-
I've made a jeweler's saw out of A36 that I work hardened after, seems to be holding out fine. I had been considering using spring steel anyways or something of that sort for hack saws though, just as some insurance essentially for keeping it strong. But it might not matter as much as I'd think based on what I'm hearing. It's awfully tempting to use mild though I must admit.
-
Alright, maybe I'm overthinking all of this. Thanks for the advice. I updated my profile as well.
-
Hello, I'm doing a series of tools and things and have been thinking about steel uses. For certain applications, it's pretty obvious when a tool steel would be appropriate, but for some applications I'm not sure if it's worth it, and was wondering what some other people's opinions on the matter are. Things like farm / garden tools. Hand trowels, rakes, hoes, etc. I imagine traditionally they weren't tool steel, but I don't know. How would a tool steel version compare to a work hardened mild steel variant? Same goes for tools like a compass or something similar. I imagine the tips should be [forge welded] tool steel, but how much would it matter for the body? I'm also going to do a saw frame, which I assume should be tool steel since it needs to hold tension, but once again I'm just not 100% sure. I have access to both mild and tool steel, I just do a lot of decorative filing work, and even if it's properly annealed, mild steel will always file nicer than tool steel. Thanks for your thoughts and time.


