Smifman
Members
-
Joined
-
Last visited
Everything posted by Smifman
-
Thank you for your response, Chris Williams. I read a post on IFI, where someone asked what kind of tooling can be made for the Treadle Hammer. I read another post, someone said they got rid of their T.H. I’m not sure why. My T.H. is right next to the forge. I depend on it. I have used it to forge 1” square table legs, and 1” long cross bow points. It is tremendously more versatile than my 25# L.G. I have been making tooling for this hammer for a couple of decades, and thought to dig out, and post pics of, some of the stuff that worked for me. Hoping, I might inspire someone about the possibilities of such an asset. “Worked for me”, has a caveat though. Maybe I should add a warning, that my methods can be somewhat hap-hazard. For instance, I made the ‘safety stop’ for the hammer, after I broke a bone. Perhaps it’s a good thing, if someone might gain from that.
-
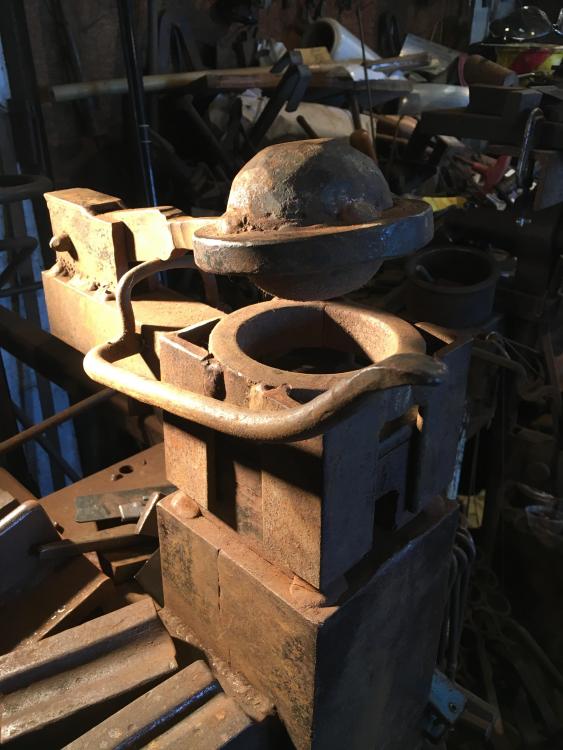
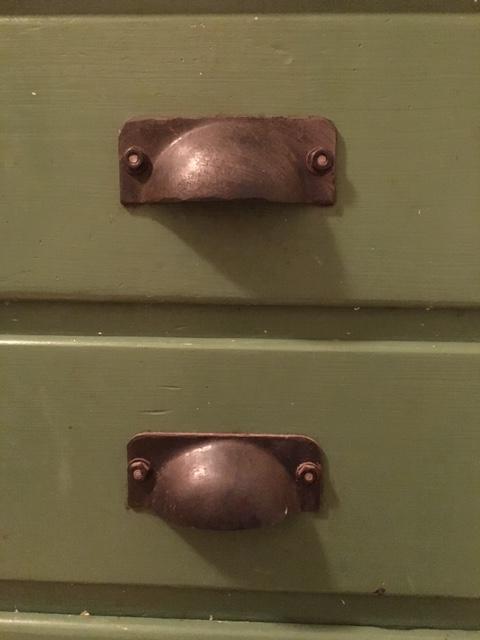
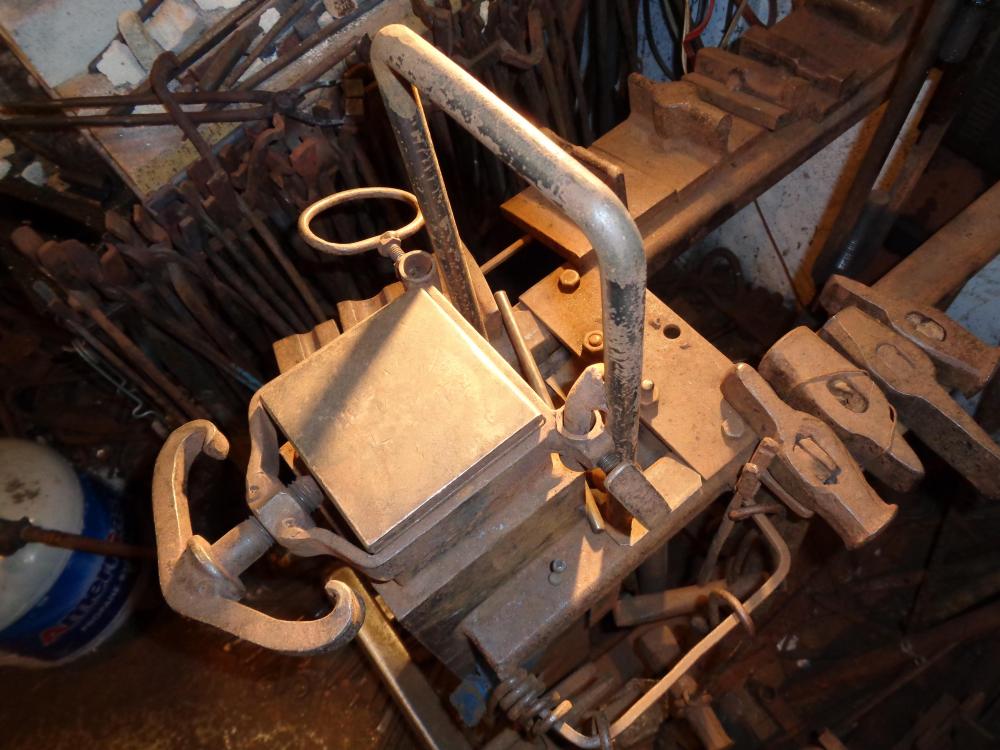
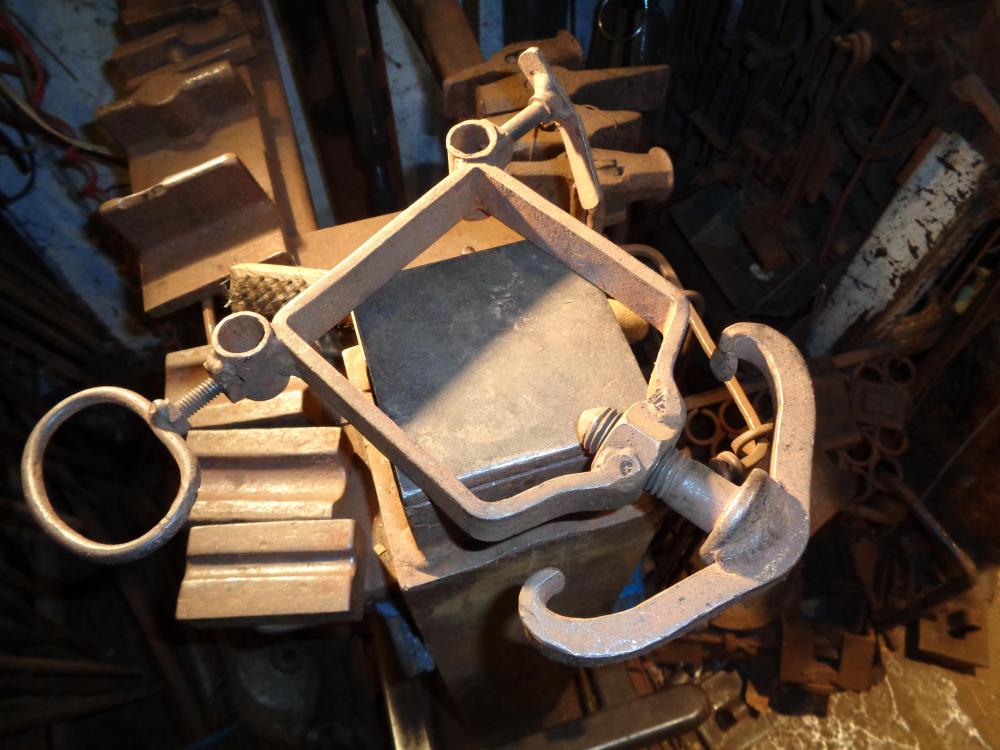
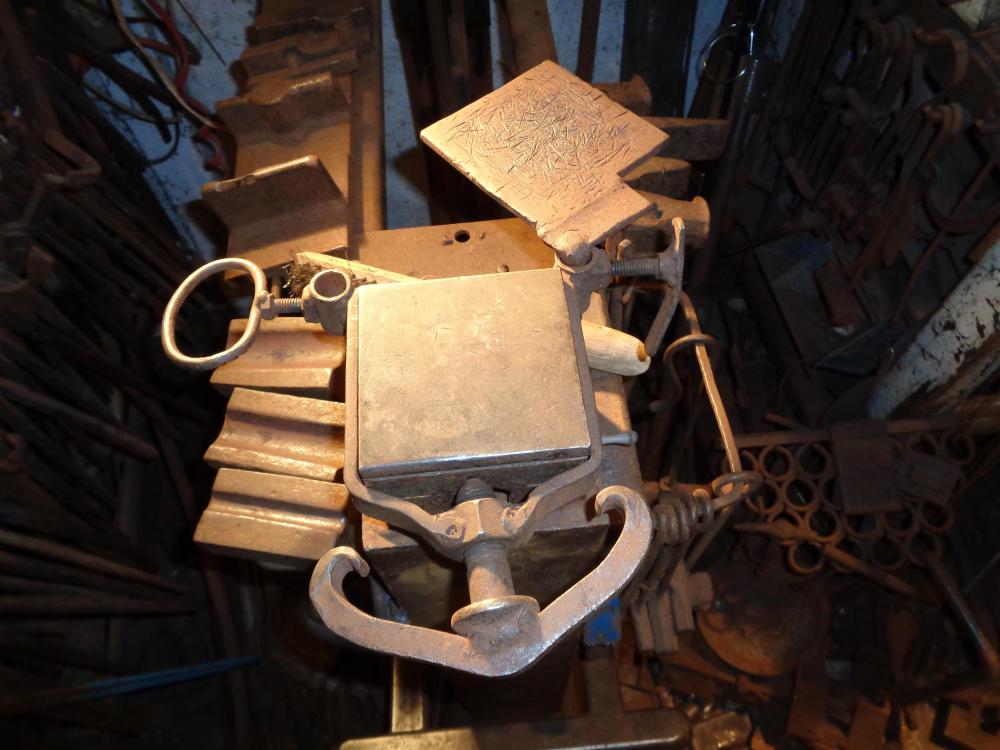
Powered with the treadle hammer, this tool Produces a raised round dome with a flat flange, from 1/8”X 5”X 5” plate. It was used to make bin pulls, which it does two at a time. The tool started with a three inch ball forged on a 3B, circled with 3/4” square stock, and welded. It is hinged to fit into another ring of 3/4” sq. Lifting the handle, lifts the ball, to load the hot plate. Most of the parts came out of my buddy’s scrap bin. The ball was a gift.
-
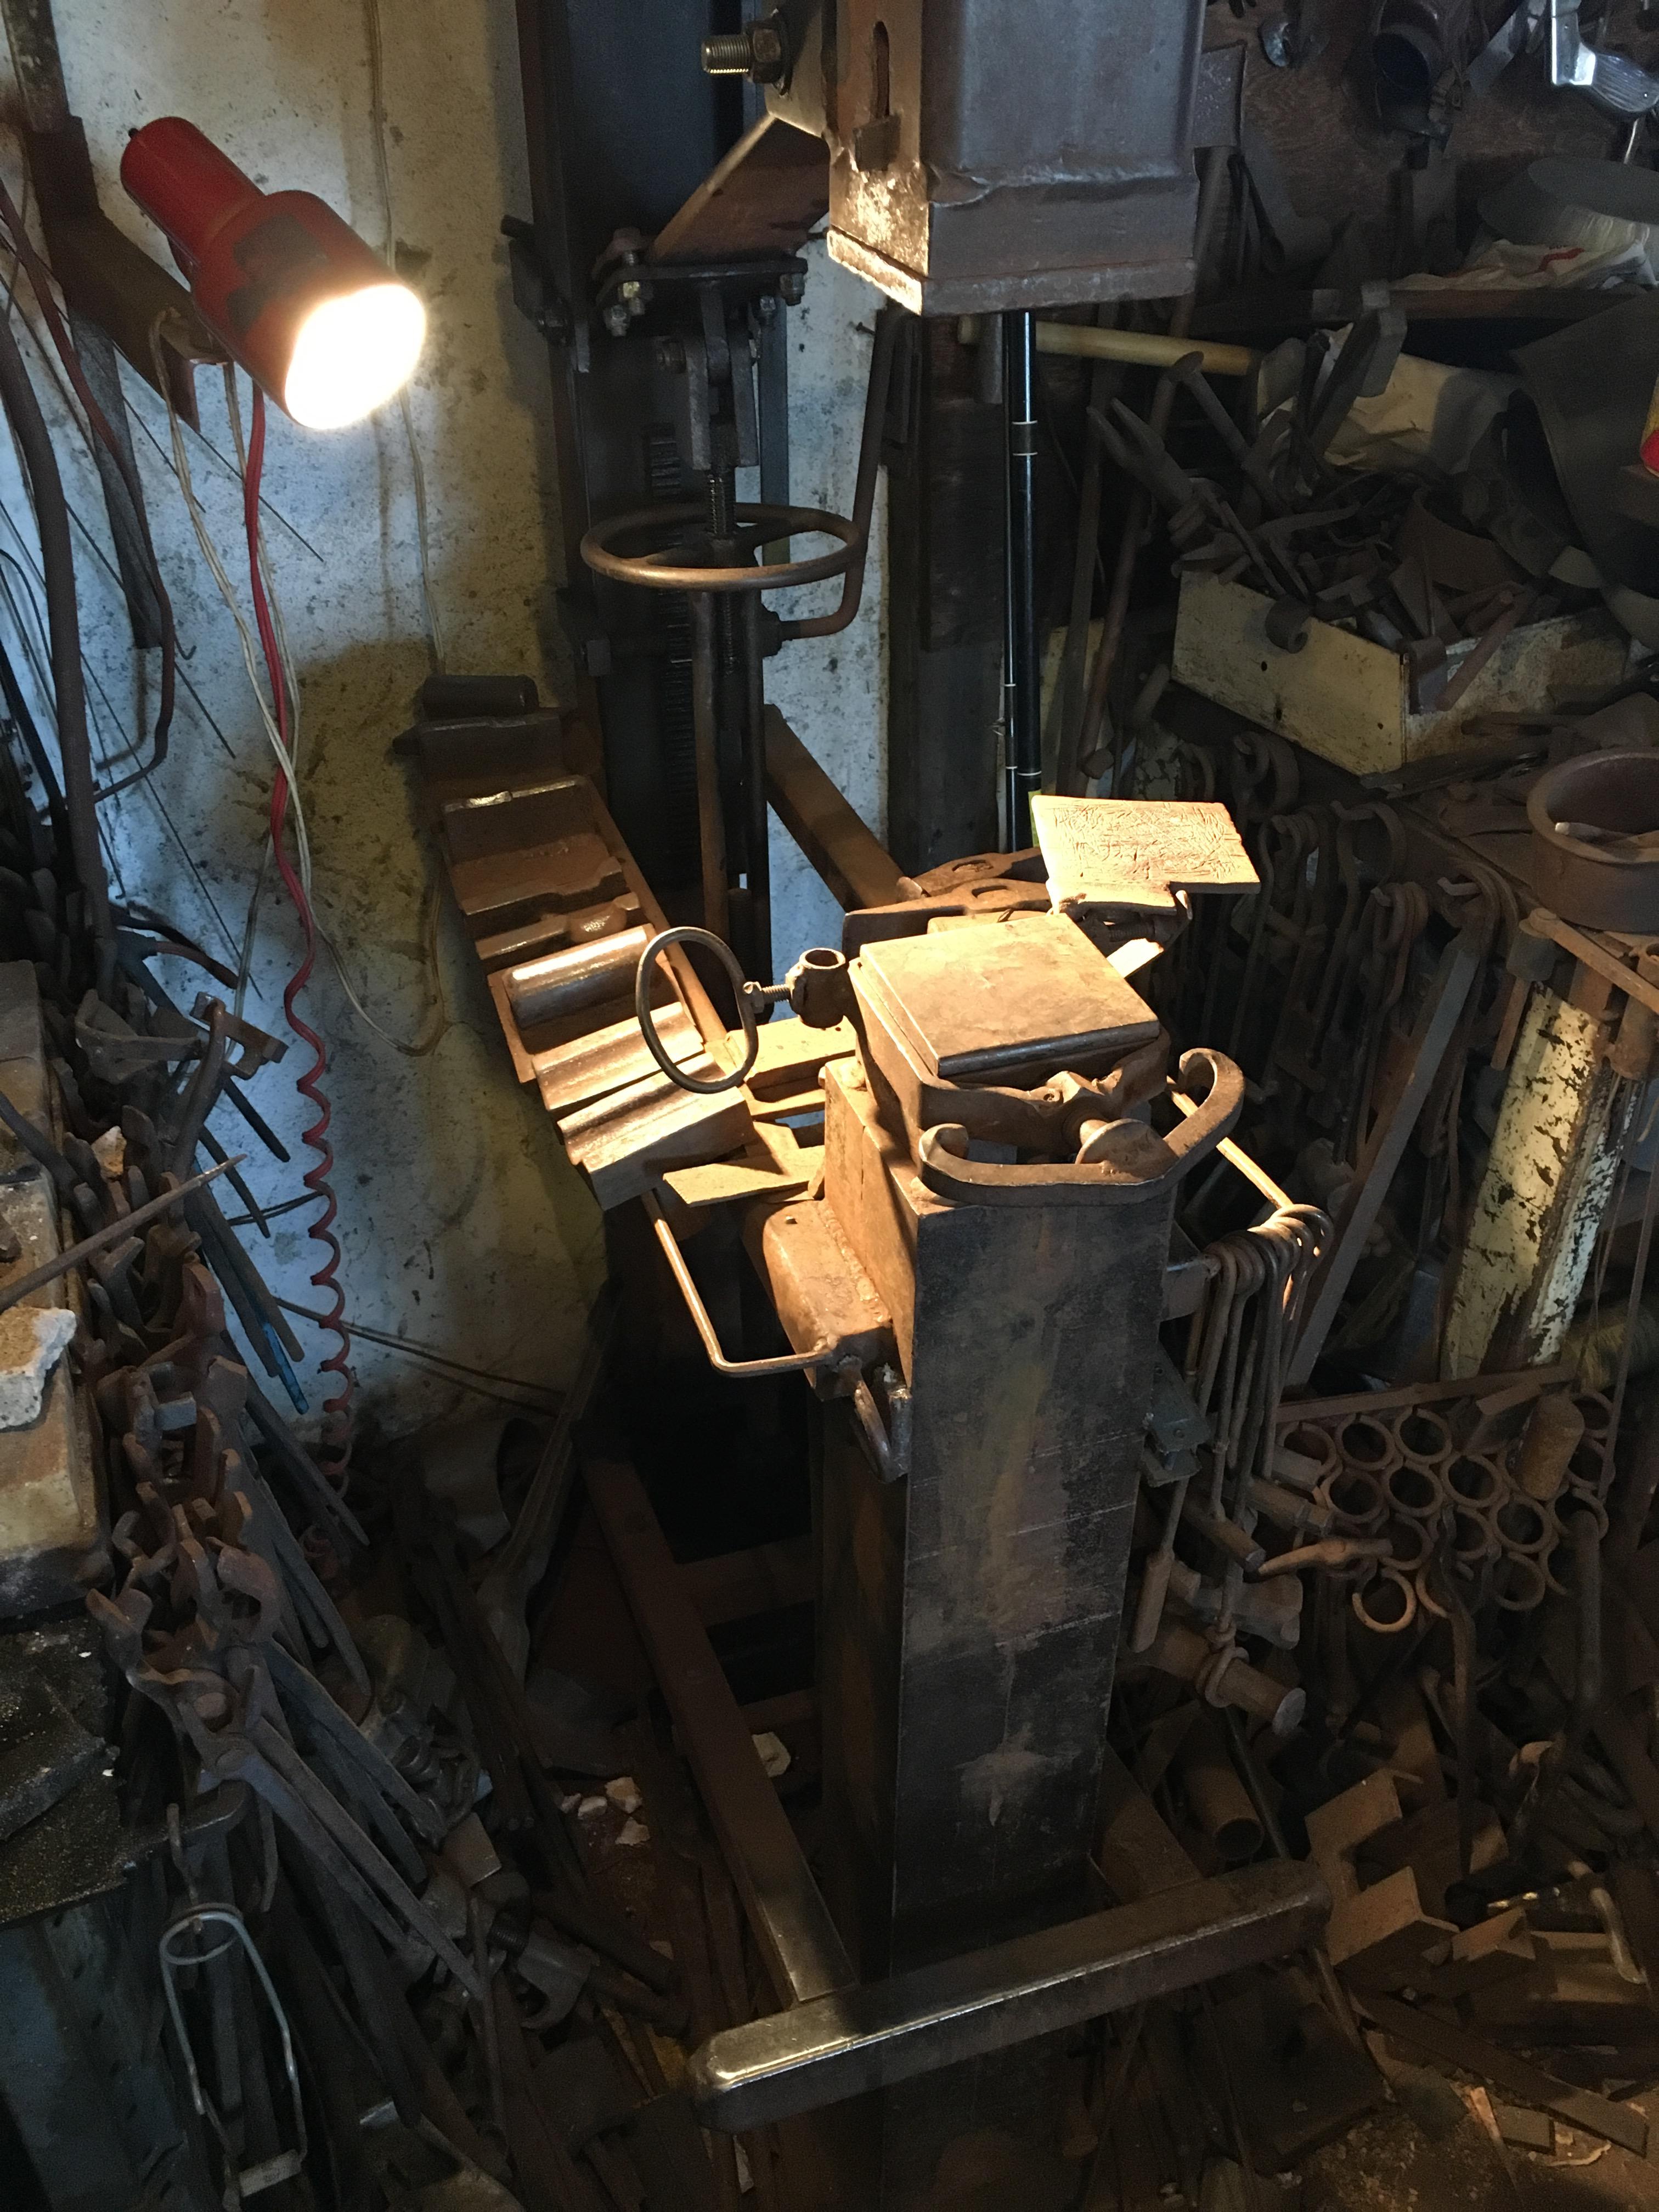
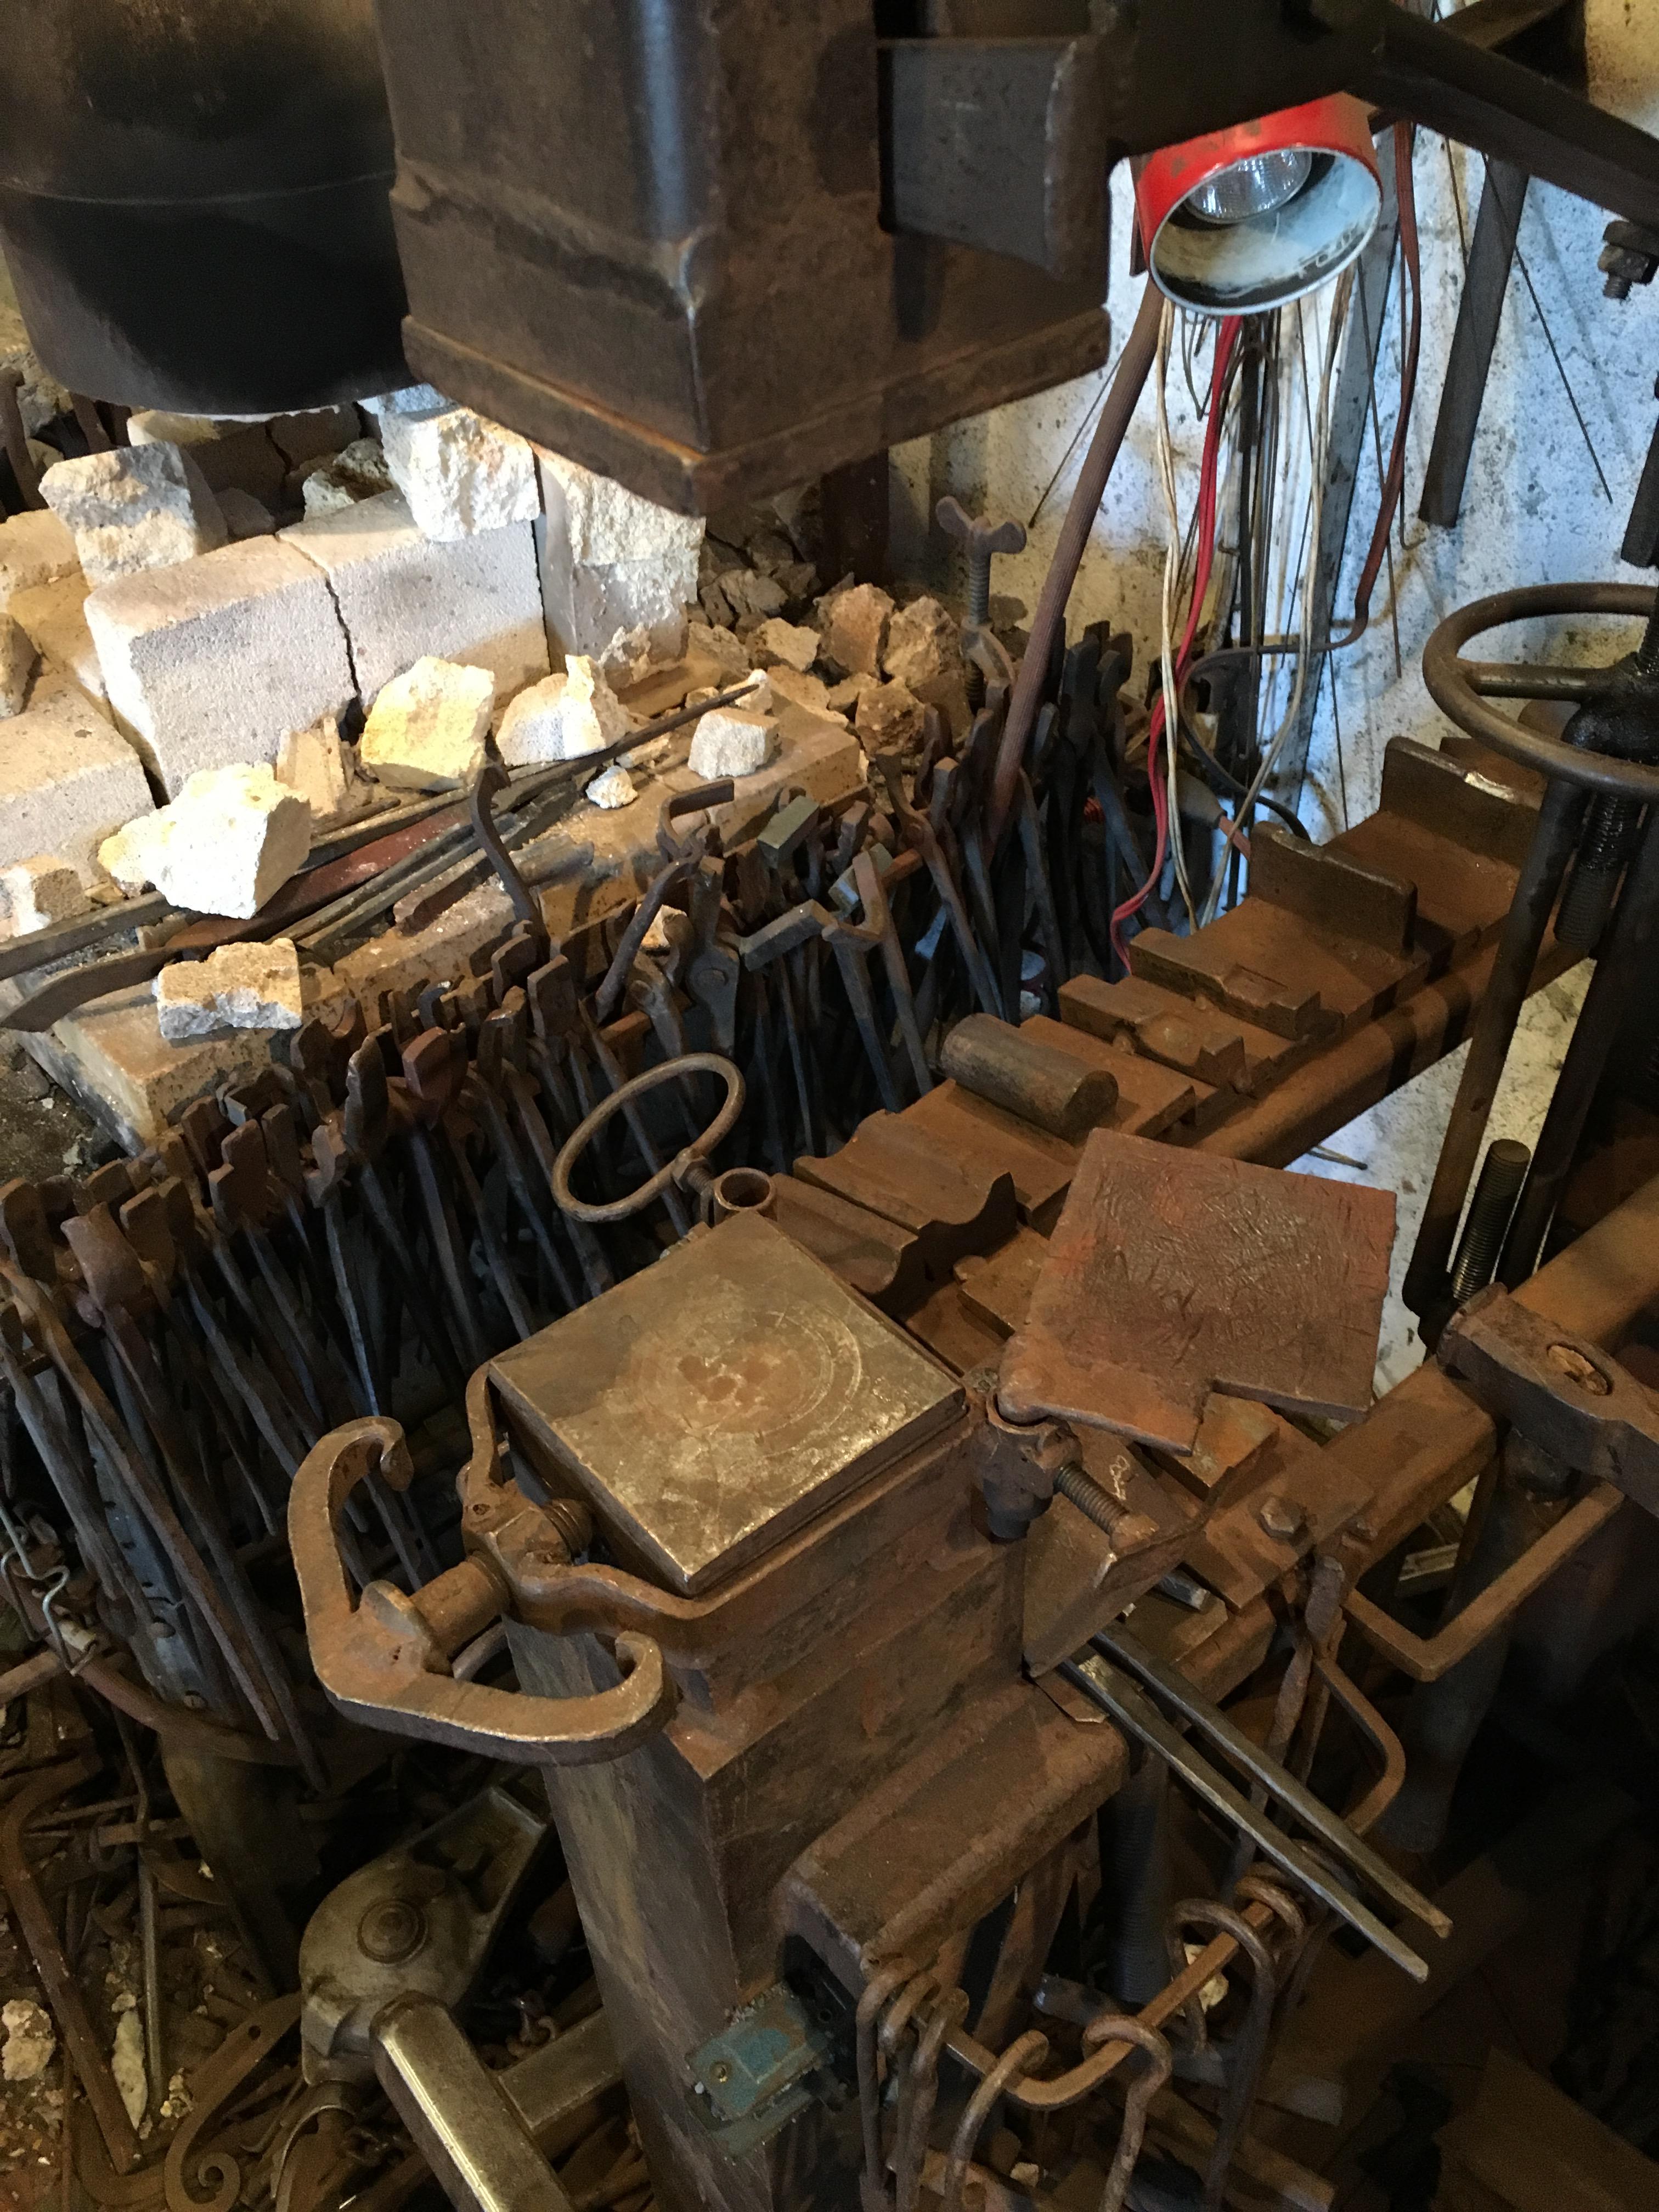
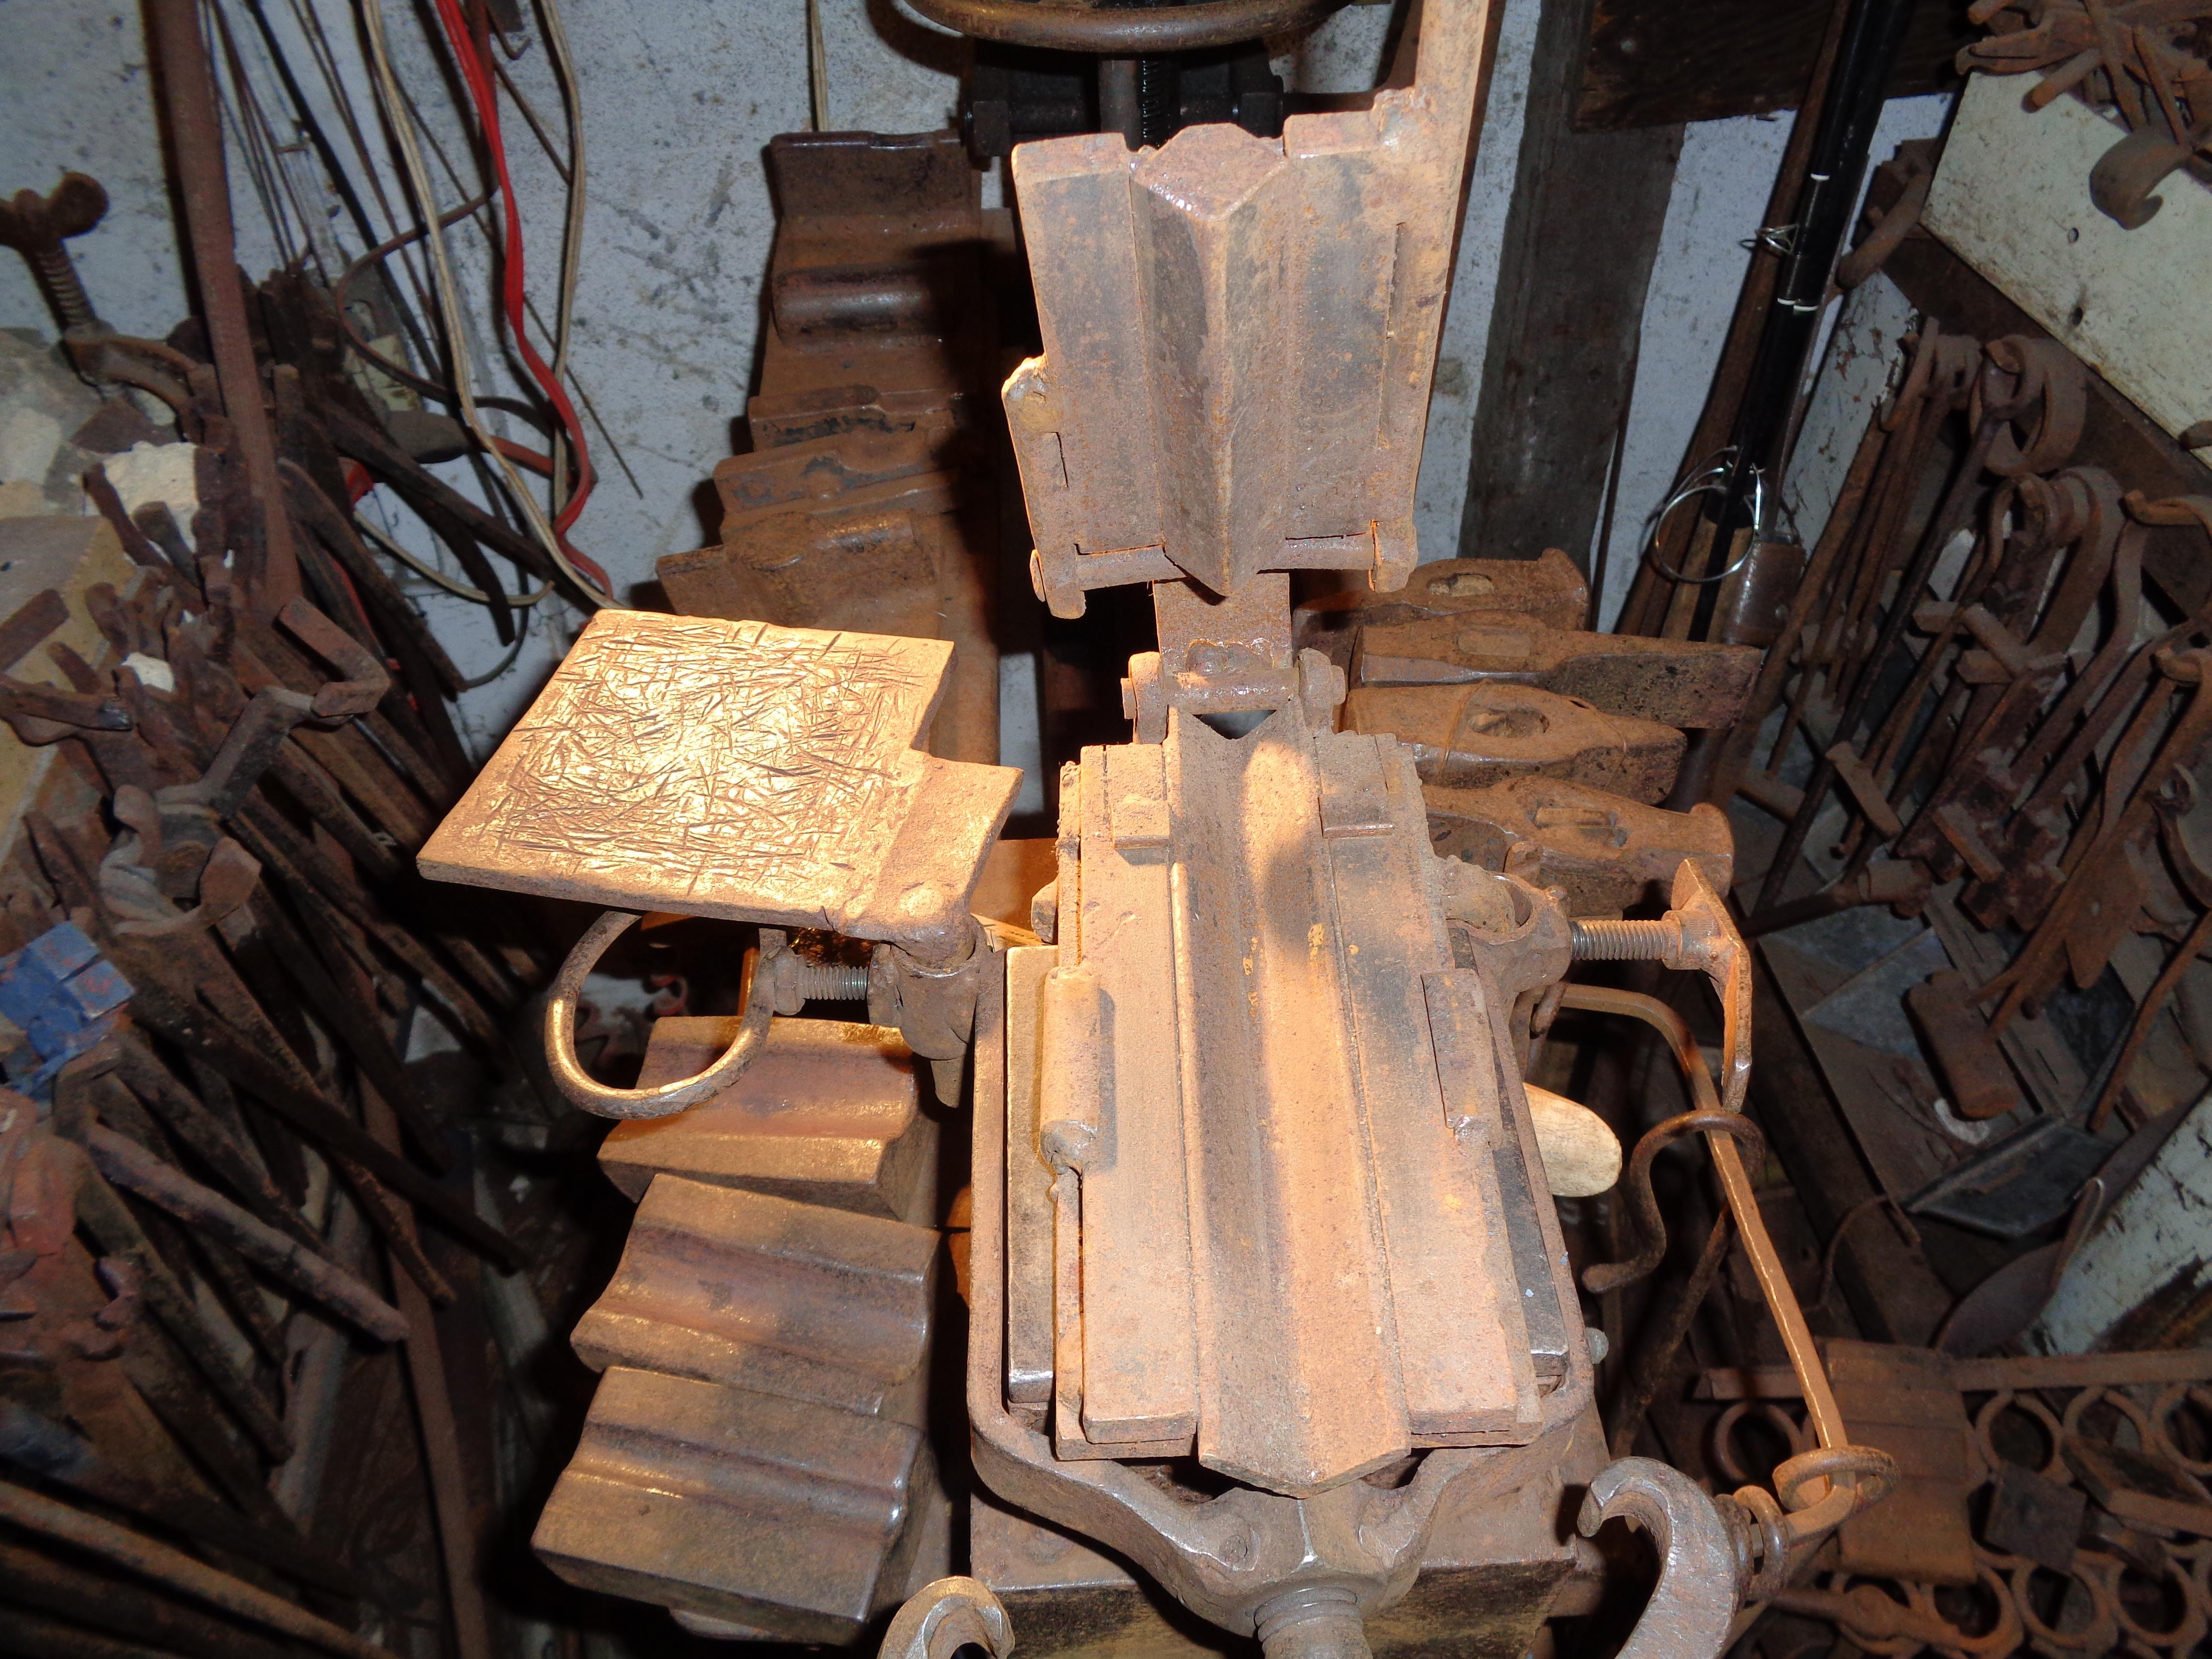
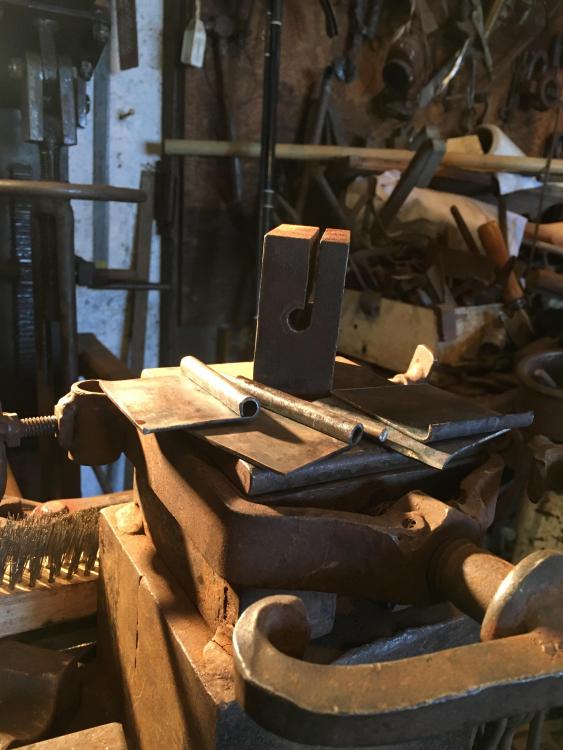
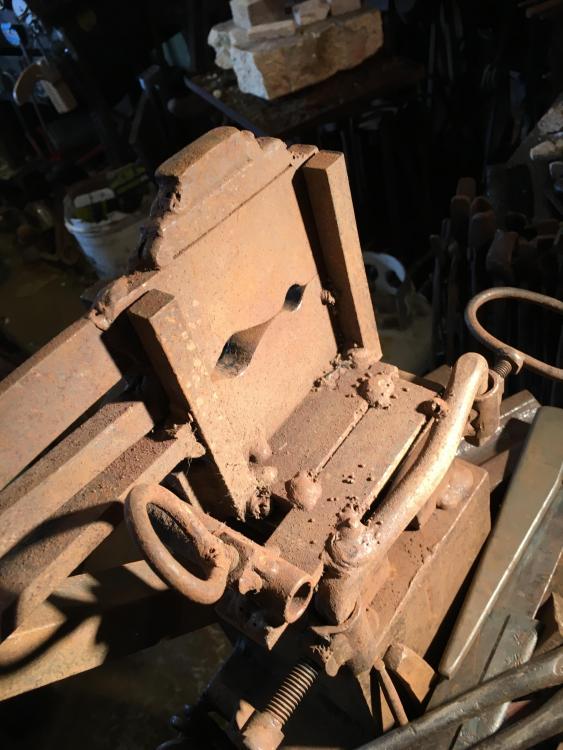
This tool rolls an ‘eye’ for a small hinge. It’s made from 2-1/2” square cold rolled, about an inch long. (A bit of cut-off, from the anvil on my T.H.) I drilled a 1/4” hole through it, followed by free-hand cuts on my cheap band saw. To make a hinge, put a small bevel on one edge of the i/16” stock, and start the curve over the edge of the anvil. Insert the stock into the tool along with a 3/16” mandrel in the hole, and drive it in gently with the T.H. Be certain to stop driving when the work piece completes the circle, or it will jam in the tool. If this happens you can usually drive it out with a 1/4” punch. You need two of these to make the hinge. The tricky part is cutting away parts, accurately enough, to make a working joint. Complete the hinge with a 3/16” pin. I once used this tool to make long copper hinges. The copper was not stiff enough to drive it into the tool, so I clamped the copper between two pieces of wood in the vise, and drove the tool onto the copper with a brass hammer. It worked well. This is a 3’8” tenon swage. The right side is the butcher, the left side rounds the tenon, followed by a monkey tool, it works well on 1/2” to 3/4” round or square. The farther the pivot is from the business end of this tool, the more vertical the travel of the swage. The backside image shows the relief of the butcher, and the mounting into the tool collar. The empty tube with the locking screw, at the bottom, is to fit a stop for repeated parts. As I recall it was problematic, because of the increasing length, produced during forging. To make the swage, tack weld two pieces of 1/2” plate together, then center punch, and drill the holes, at the seam. On the butcher side, drill a larger hole part way through. Break the two apart to dress all sharp edges off, and blend the butcher side smooth, with a round file, before assembling the tool. Put a bit of 3/8” round into the finish side when aligning the two halves together, when assembling the tool. The stack of 1/2” square on top is to focus the blow in the center of the working end.
-
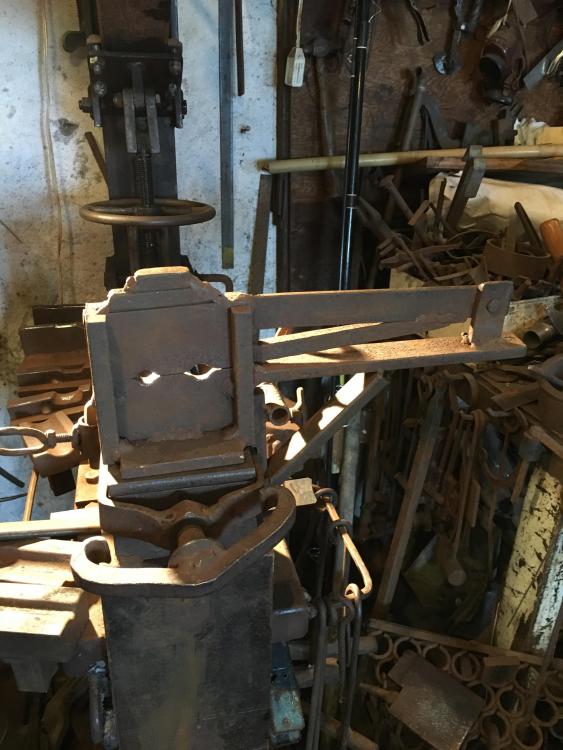
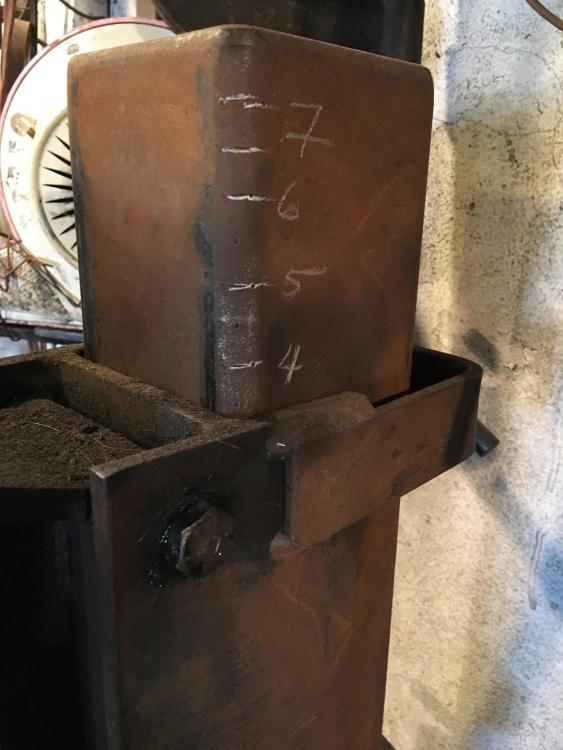
Because I am always seeking methods of simplifying my procedures, I feel no guilt stopping progress on a task, in order to build a fixture, or modify existing structures. Sometimes five minutes spent now, can save a minute every time you repeat a regular task. On the sixth time you repeat the task, you have saved a minute, and every time thereafter. Such was the motivation to chisel an inch scale, into the post supporting the swing arm. Swing arm type treadle hammers hit straight, only when the swing arm is parallel to the base plate on impact. Swing arm too low, it will strike with a forward sweep, too high, it will strike pulling to the rear. Hence the adjustable swing arm. I began by lowering the swing arm to it’s lowest point. That is, I put the tup flat on the anvil, and set the swing arm parallel. Then measured and marked the scale, from the top of the adjustable bracket, onto the post. Followed by chisel and number stamps. Now, when I set up tooling on the hammer, I need only to measure the height of the tooling and set the swing arm accordingly. After a couple of decades, the rust kinda obscured the chisel marks, and it was easier to draw the marks with a pencil, than to sand off the rust. It’s easier to see too, but the chiseled marks are still the guide.
-
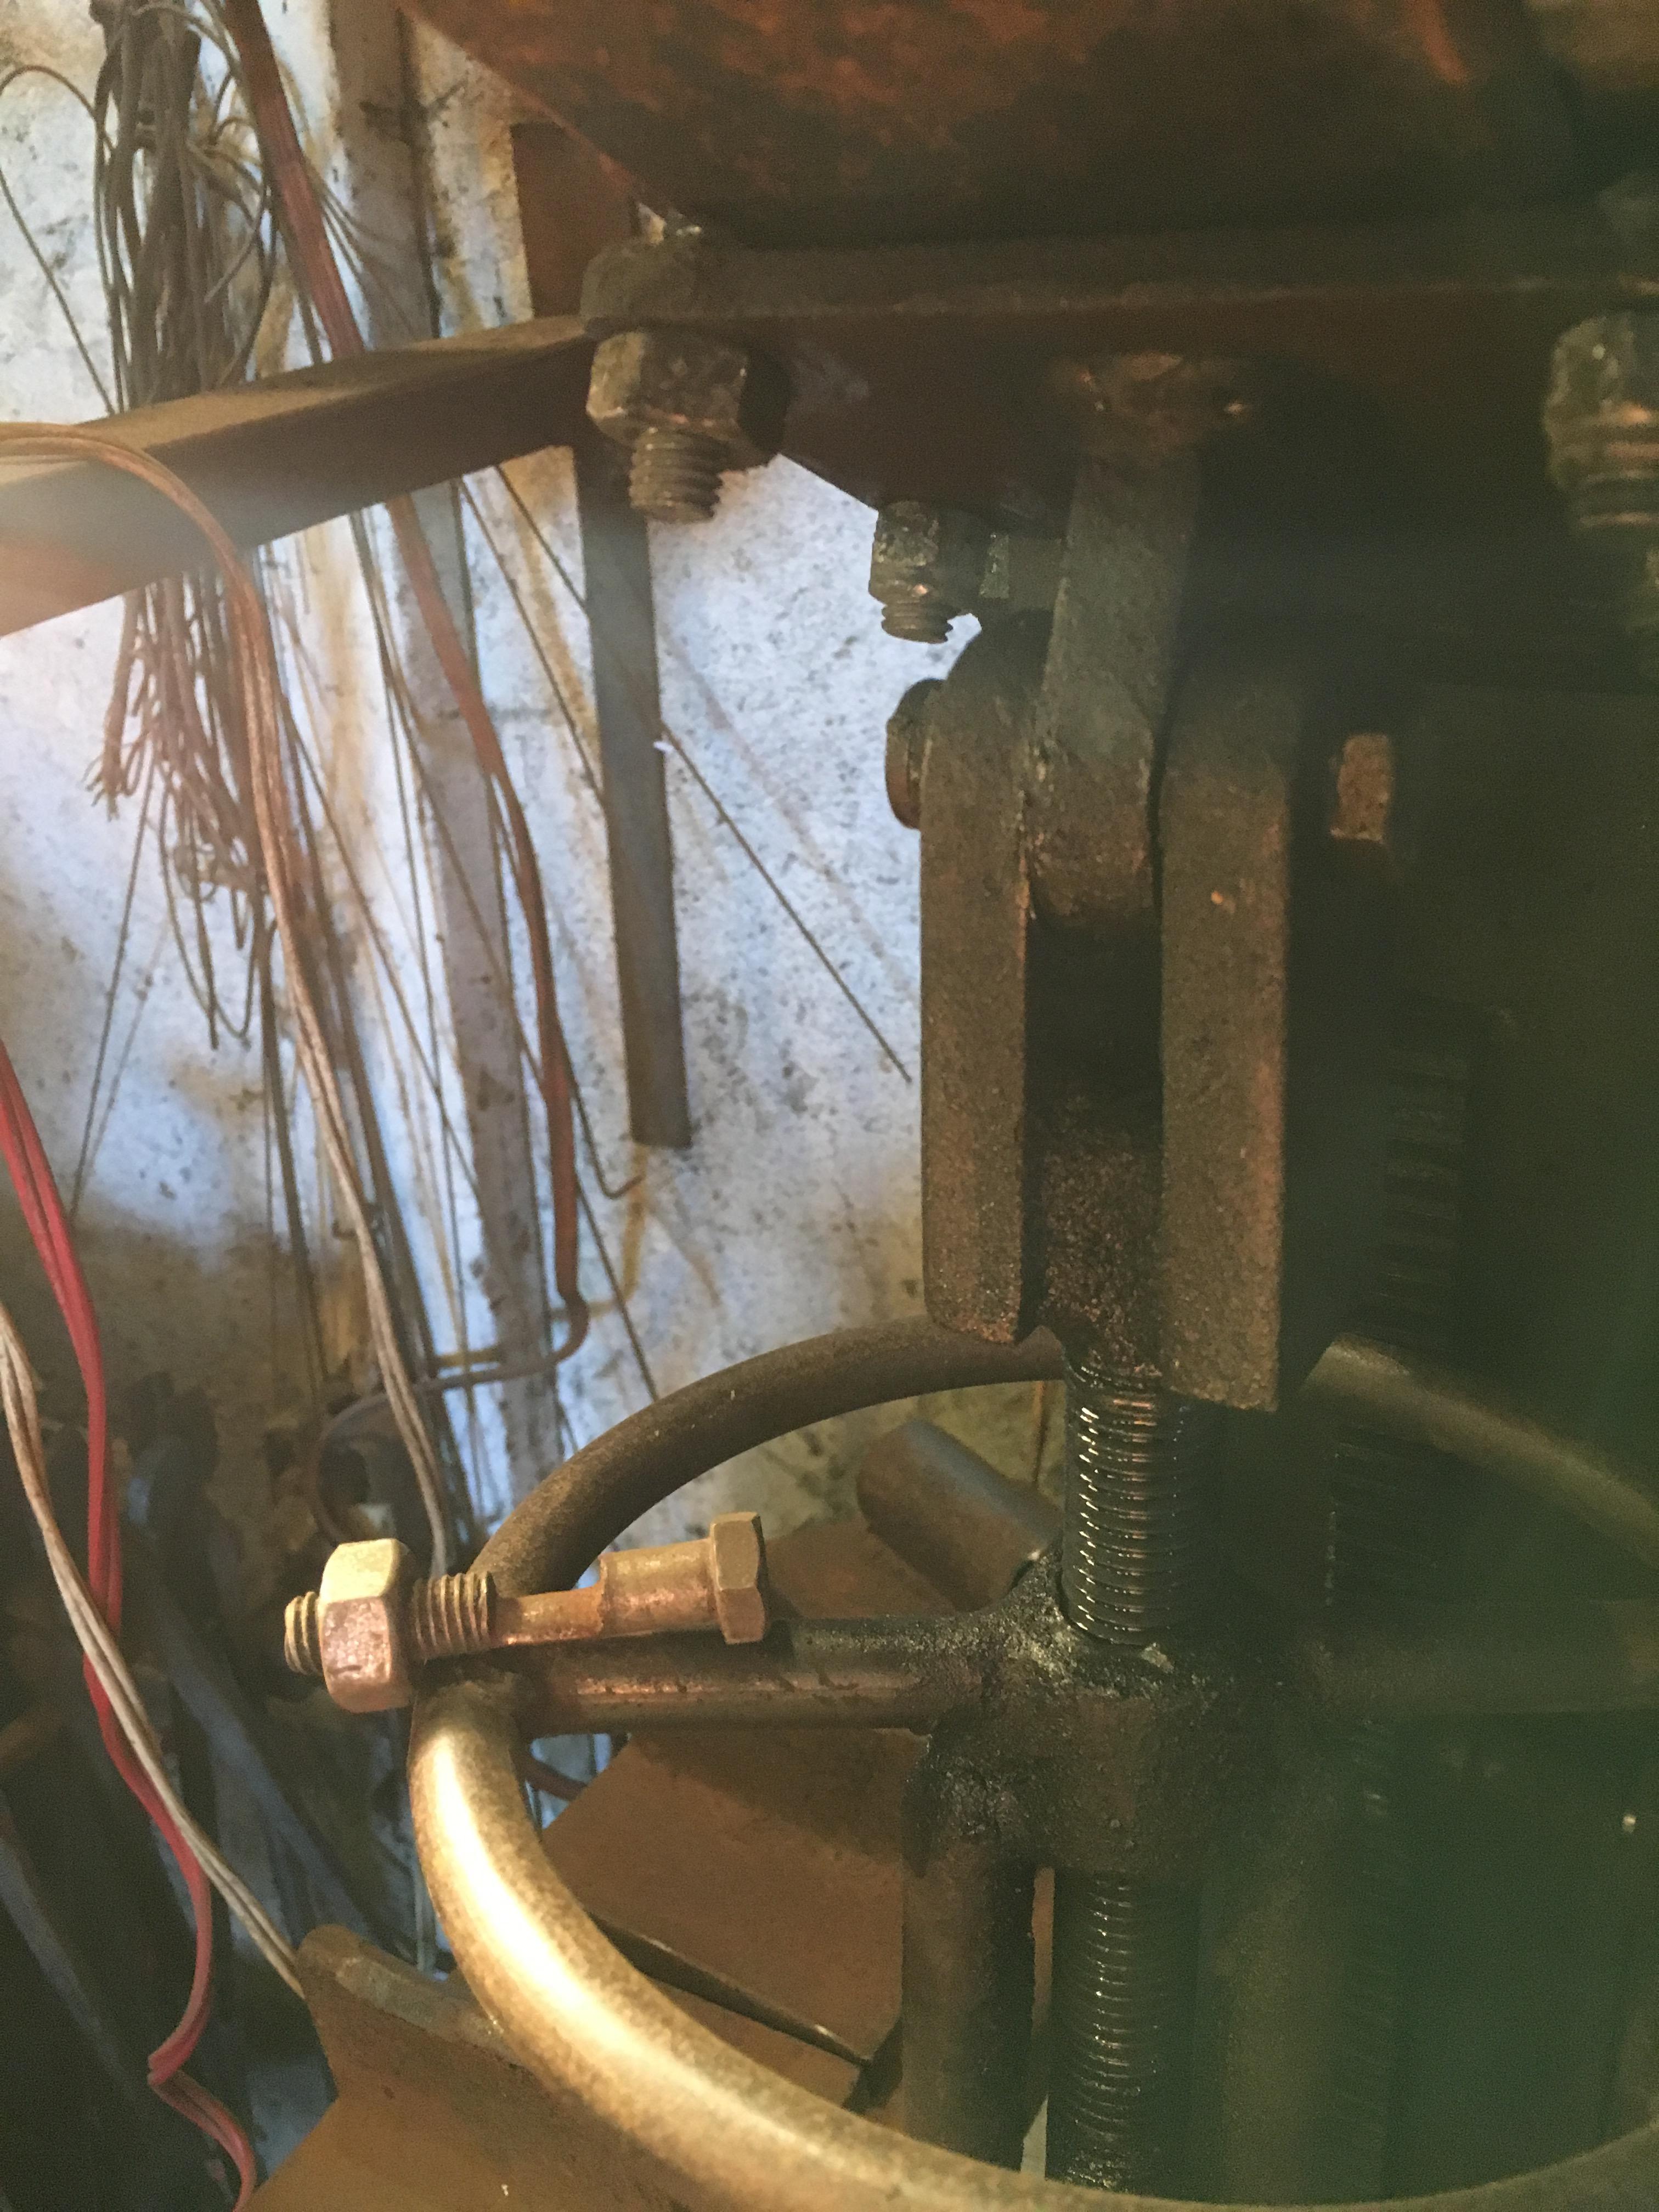
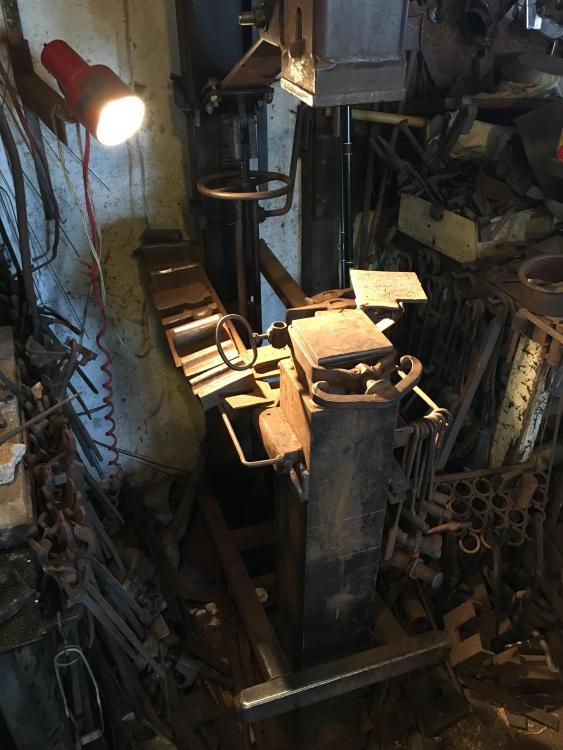
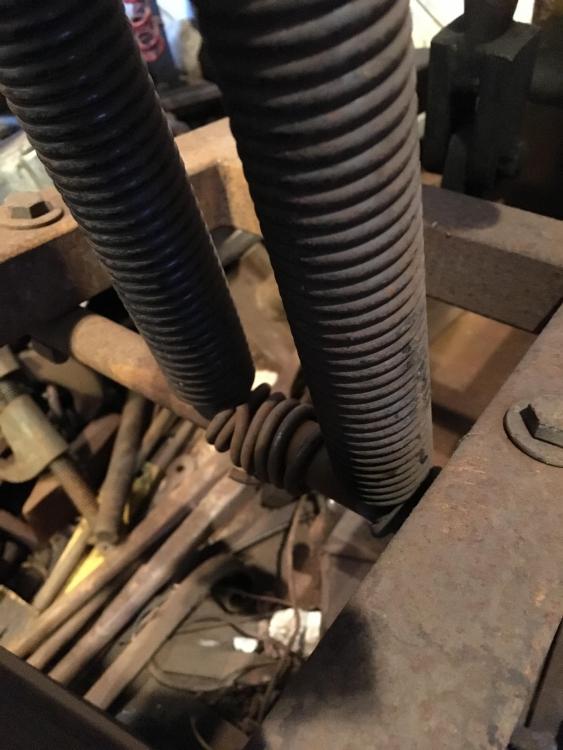
This is my treadle hammer. Built using the Hans Peot modified, Clay Spencer Treadle Hammer plans, from ABANA. Two changes made to those plans, were heavier wall thickness all around, (1/4”,) and some inches added to the back of the base plate, (six inches total). I added base plate length, because I wanted to push the hammer against a wall, and retain room to access the locking screws, when adjusting the swing arm height. One aspect of this hammer that helps it hit hard, is twelve feet of 2-1/2” square, cold rolled steel, married into a 5”X 5”X 36” anvil. The anvil calculates to 255#. The tup is 75#. I call it Mr. Monkey. This hammer was a boon to my forge. Previously, everything was by hand. It’s laborious, but with enthusiasm, possible, albeit impractical, to forge 1” round hot rolled steel by hand. I don’t recommend it. That being said, treadle hammers are not a substitute for a hammer with an electric motor. They can however, work effectively for some heavier forging, especially if you can get someone else to jump on it. As is known, by smiths with treadle hammers, they are ideal for chisel, and leaf work, punching and splitting operations, delicate accurate licks, and heavy single blows. They are very versatile. To the shop, they offer a very versatile striker, especially valuable in a limited space. I find it helpful, to think of it as a striker that can swing a seventy-five pound hammer, and who’s mistakes are my own. They are capable of serious injury. As for tooling, the versatility of the T.H. is limited by your own imagination. Faster than a hydraulic press, I have used mine to drive sealed bearings into bicycle hubs. They are capable of very delicate work. The biggest problem with my T.H., is the power source. It’s a bit unpredictable, sometimes unreliable, and subject to lapses of judgement. Somehow (so far) it keeps working in spite of the neglect, and over use of lubricants. There are certain dangers associated with treadle hammers. Simple maintenance can alleviate some of them. Keeping it oiled will slow the degradation caused by wear. Better bearings could help also. This bolt held the weight of the tup, at the top of the link to the treadle. A bit more wear and it would have sheared, and dropped the tup. Looking at this pic, it occurred to me that a chiseled line across the hinge, even with the axis of the bolt, would show the wear as it was displaced. The directions for the hammer said to bend the last coils of the springs cold, and insert the bar to fix them to the treadle. When bent cold they will eventually break off. The extra coils between the springs in this photo, are testimony to this fact. There are five of them. Once a spring broke, when I had only touched the treadle with my foot, ready for a strike. It is my belief that one spring alone, will let the tup down faster, and harder, than you can push it with your foot. For this reason, I do not put my hands on the anvil for very long, unless the ‘safety stop’ is in place. The ‘safety stop’ is made from 5/8” round, with a bit of 1/2” round welded to it, to mount it into the collar. It will stop the tup about four inches above the anvil. With it, I can hold tools by hand, with considerably less danger. Certain chisel work can be much more accurate, if you hold the tool with your fingers. With this kind of work it helps to lower the tup, just a few inches above the tool. This way, if a spring breaks, the tup cannot gain much speed, (Gravity accelerates at 32ft. a second, per second.) It also lessens the foot power required to drive the hammer, allowing greater delicacy.


-
I have tools that I've made and have no idea what their purpose is.
-
I don't belong to the club. Maybe I could join, if they'd have me. I do agree with their principals and practices. I made a prototype head badge that I thought to put on my Whizzer, but never mounted it. After years of sitting around the shop, (It would surface every now and then.) I gave it to a friend who was into lowrider bicycles. He ordered badges with the lettering for the club. He's figuring ten runs, of ten badges. The club is world wide. Several careers back I worked in bicycle shops, and now I'm a blacksmith, so yeah, I do my own mods. I've been making stuff and modifying things since I was wee. My exposure to forge work was a blessing. Custom parts needed were suddenly very available. It's easy for me cause I prefer the 'rat' look. I don't spend much time grinding and polishing. My passion is simple; I like pushing the metal around. The challenges drive me now. You know, make a tool, to make a tool. Or I'll make something just to see if I can. My fastest motorcycle was a Kawi H-2. I was about twenty-three years old. As I remember, it would lift the front wheel in third gear. Scared myself a couple of times.
-
Thanks again. I guess I didn't mention 'The Others' is a bicycle club. I'm just finishing the second run, of ten head badges, for bicycles. I still commute on my bicycles. It's about five miles to the forge. I've had a number of motorcycles. Still have a Kawi 250 dual sport. I haven't ridden it lately, I prefer bicycles. I also have a couple of Whizzer bikes, one factory, and one I built, but they're buried in the barn. They haven't been out for a long time. Summer is coming, though.
-
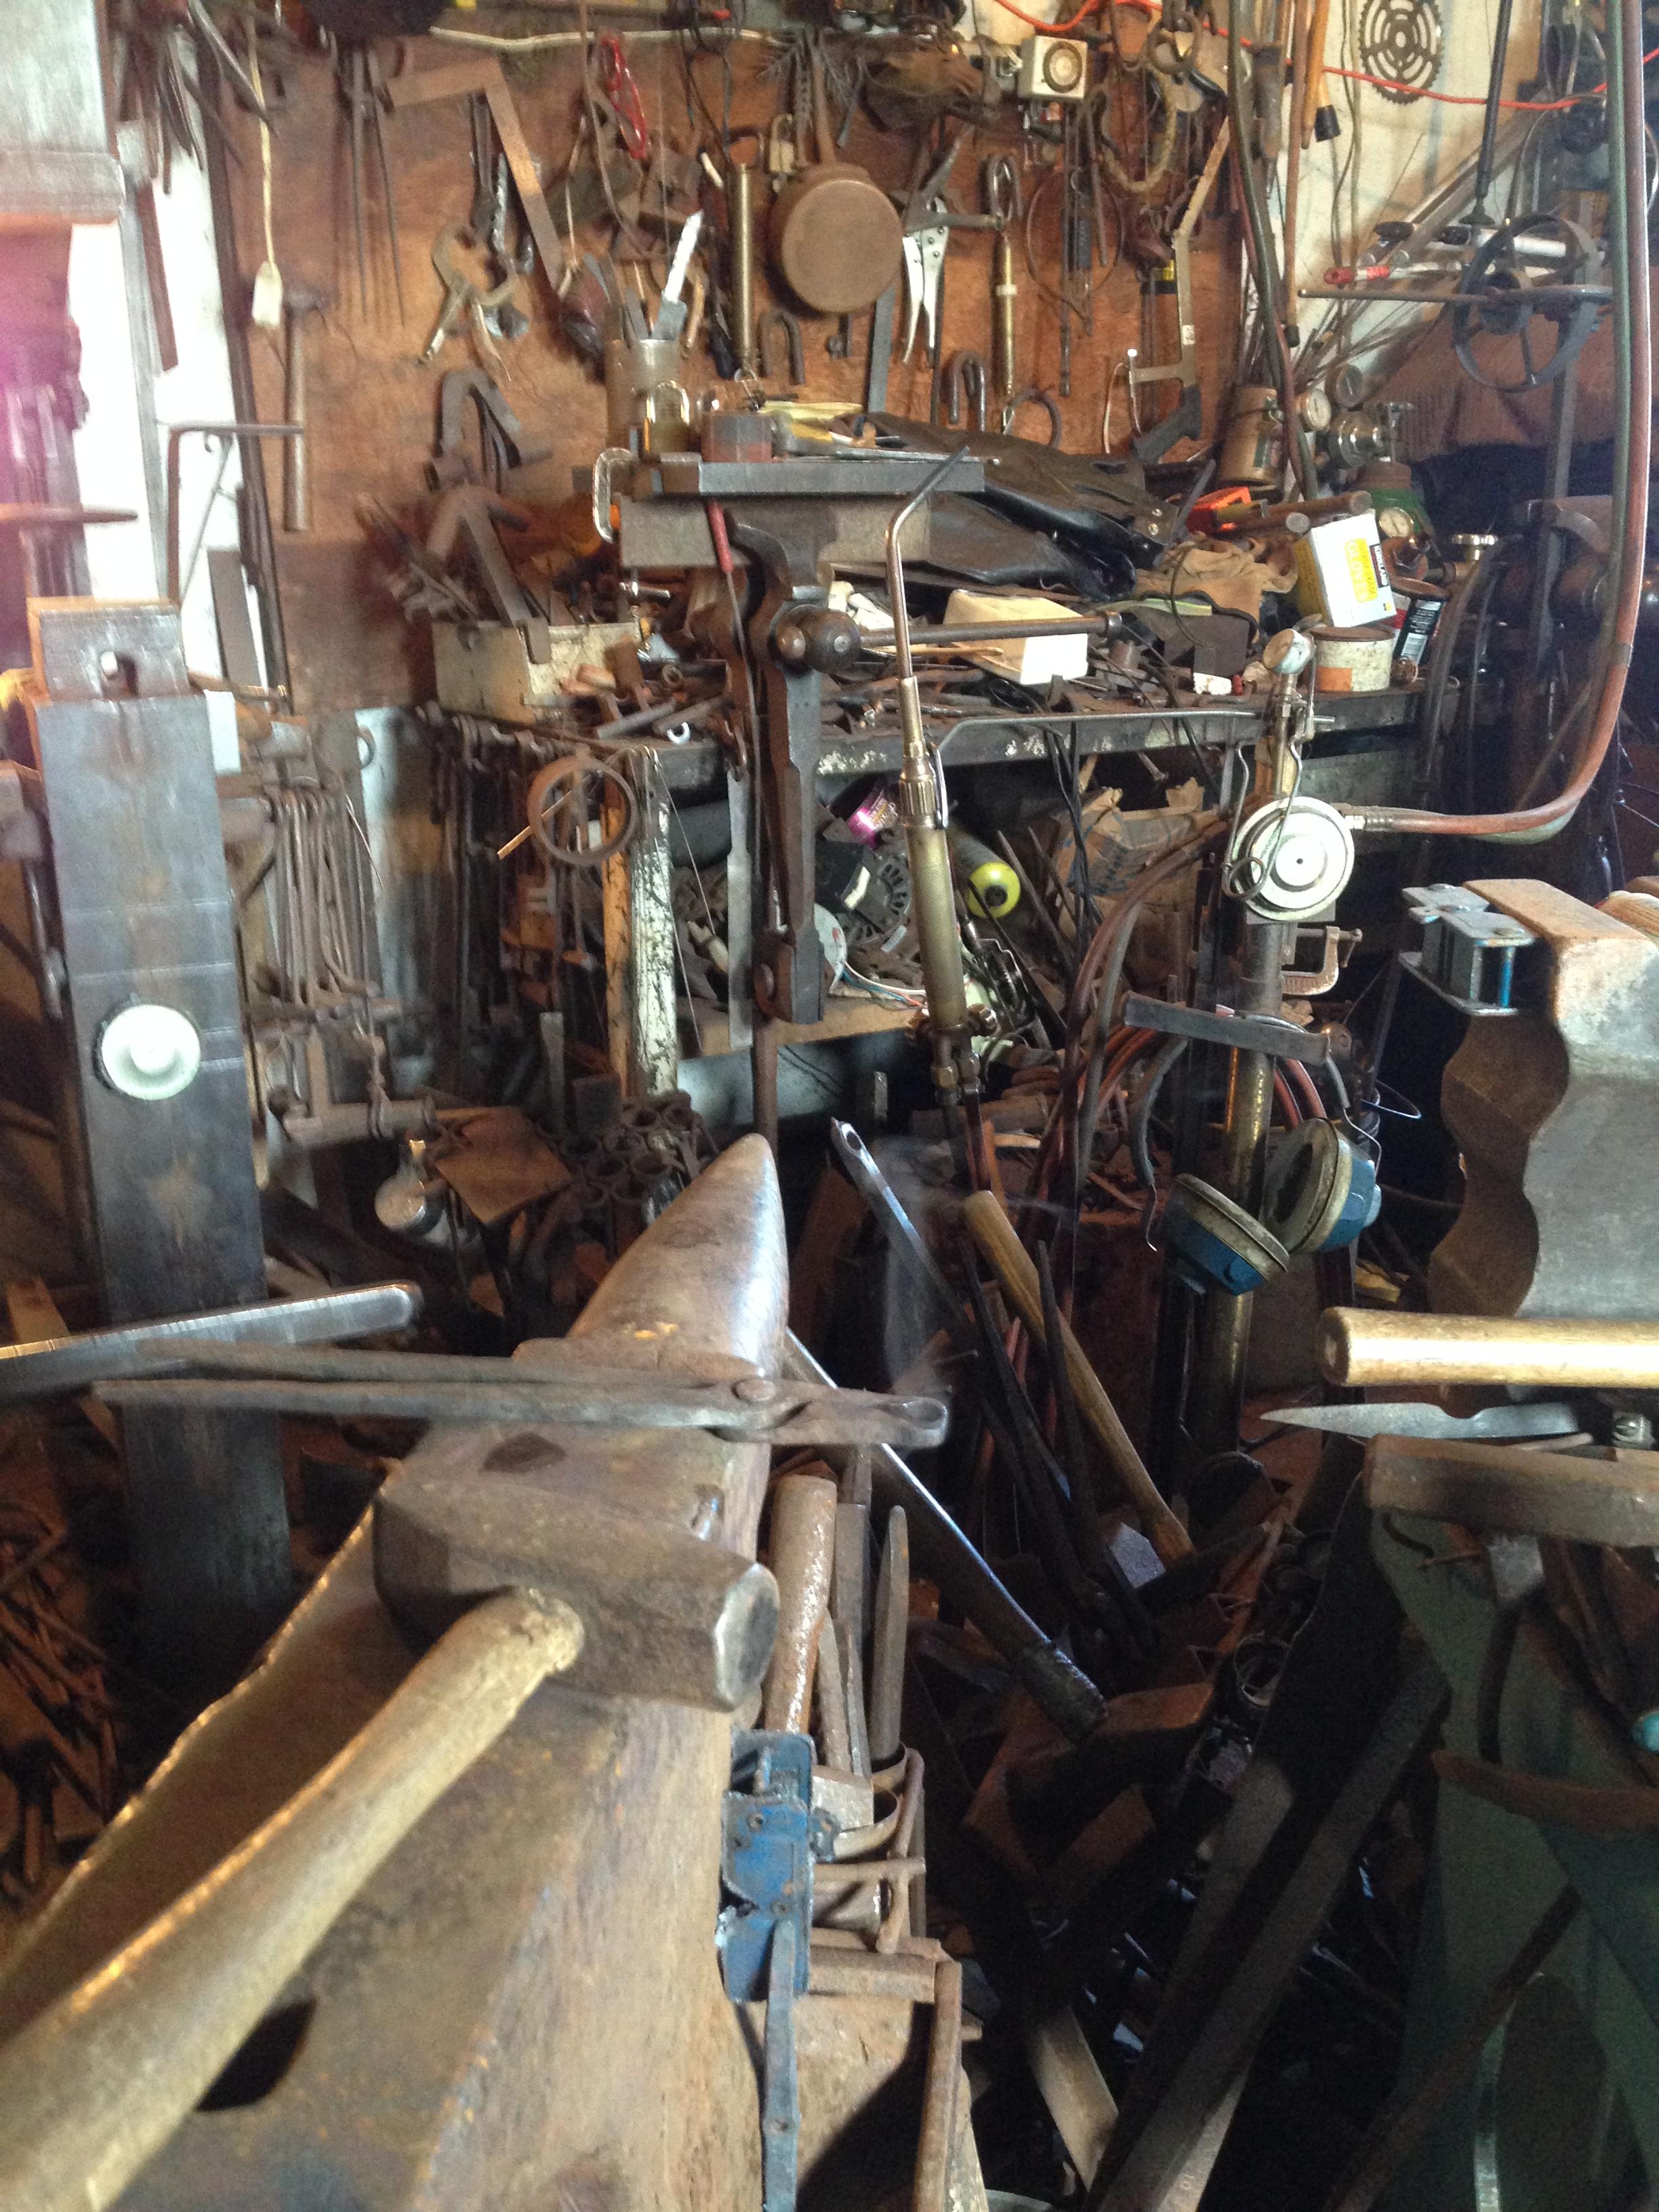
Thanks folks I appreciate the kind words- The clutter isn't necessarily an asset, but having all that stuff means fewer trips to the hardware store. I kinda know where things are. There are, however, places and things in my forge that I haven't seen for decades.
-
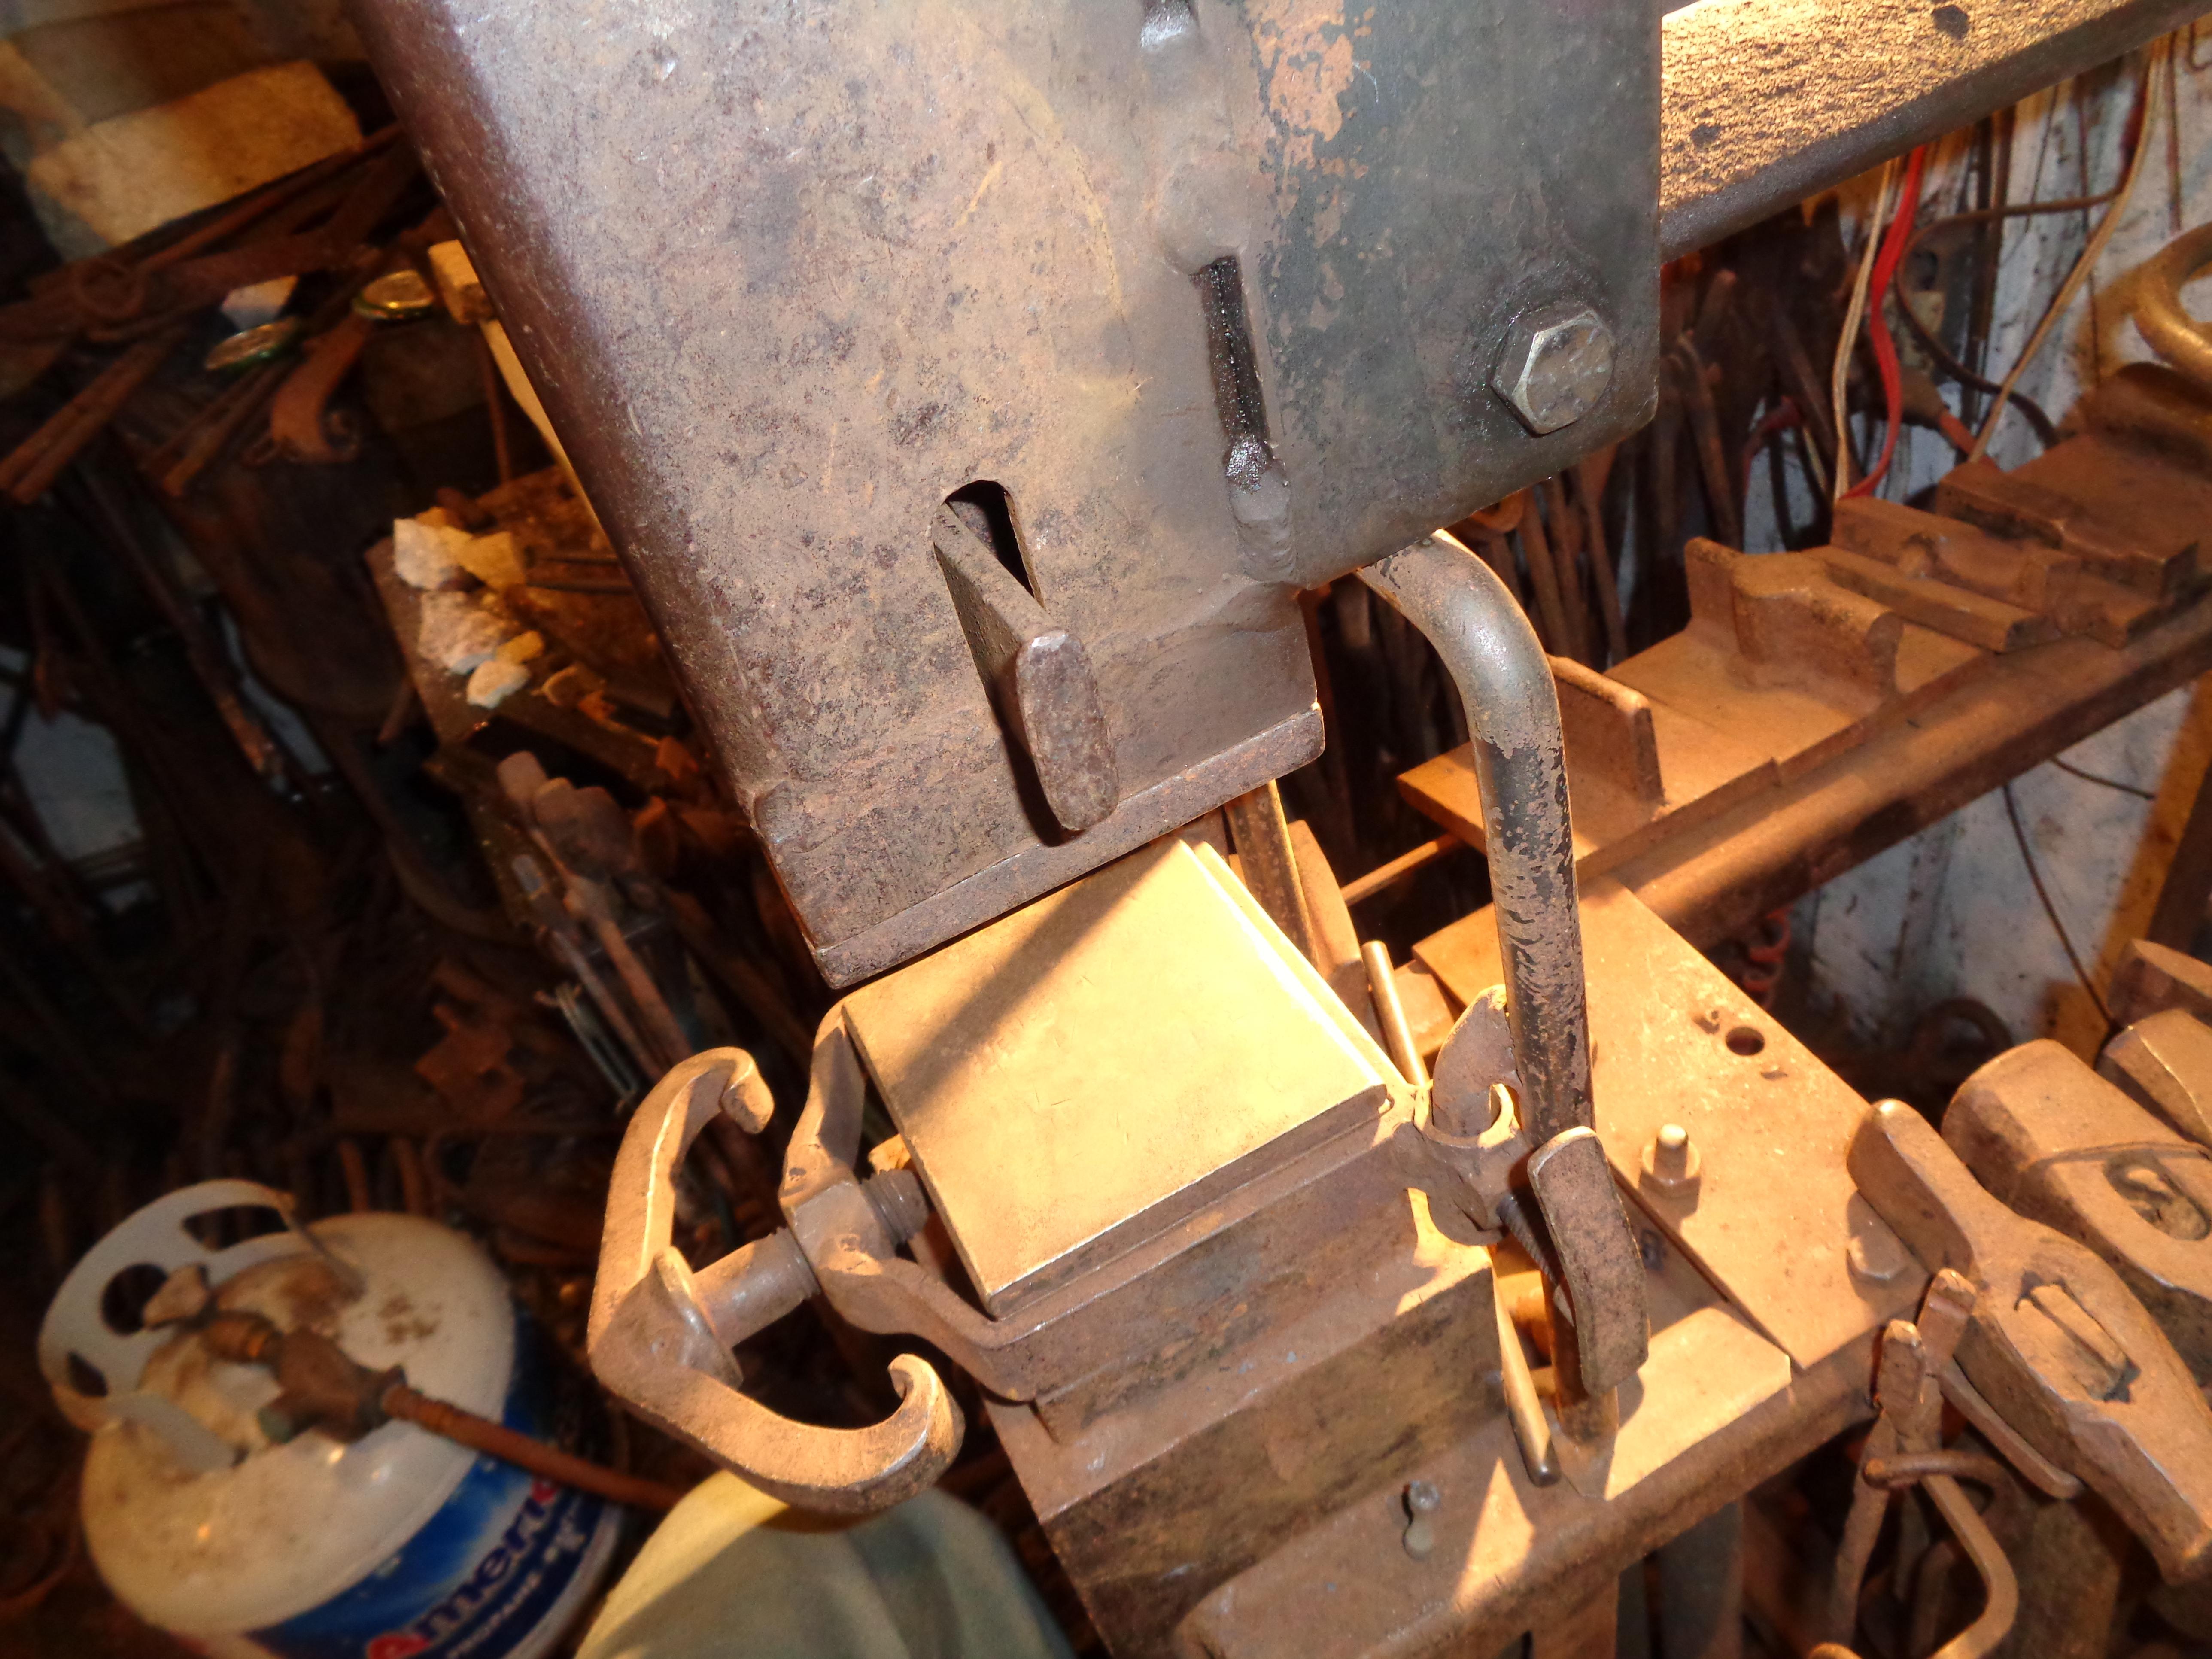
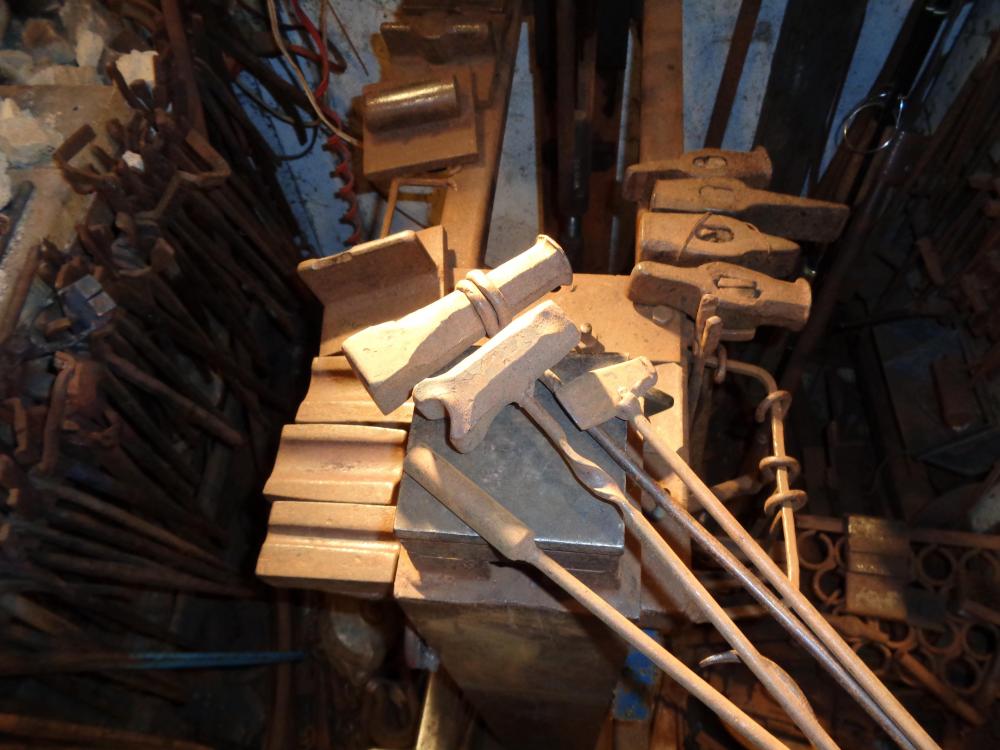
I saw this on a Nazel 3-B (called Nermy,) and made one for my treadle hammer. It's versatile, and works great. Some tools can be swung to the side, (like your cutting plate,) fixtures can be mounted securely, and easily swapped out. Two pics show my version of the 'safety stop' mounted in the collar. I don't recommend holding punches and chisels by hand, but for delicate, or accurate chisel, and punch work, hand held tools are way easier, and faster. However the risk of mashing yourself is too great. With this device in place the tup stops about four inches from the anvil. Enough room to hit a punch but not your hand. It has saved me once, which is enough to make it worth while. It's made from 5/8" round with a bit of 1/2" round welded to it to fit the holder. Another pic shows a fixture for bending 3/16" flat bar into something that looks like angle bar with flanges on the sides. I was using them for motor mounts on bicycles. The swages you see on the side were made with the treadle hammer. There are other tools, fullers and cutters visible with the swages. Also a couple of top tools used with the TH. The twisted flat section in the handled top tools are to provide flexibility in the handle. And lastly a swaging tool to make the Japanese style bail pull you see wired to the tool.


-
The badge is hot forged into a die. The rough texture is from the rusty flat bar I made the die from. I was motivated to join your forum after looking at treadle hammer tooling. Thought I might blunder around that section, and see if I can't embarrass myself.Thanks. Sorry if my intro is a bit much.
-
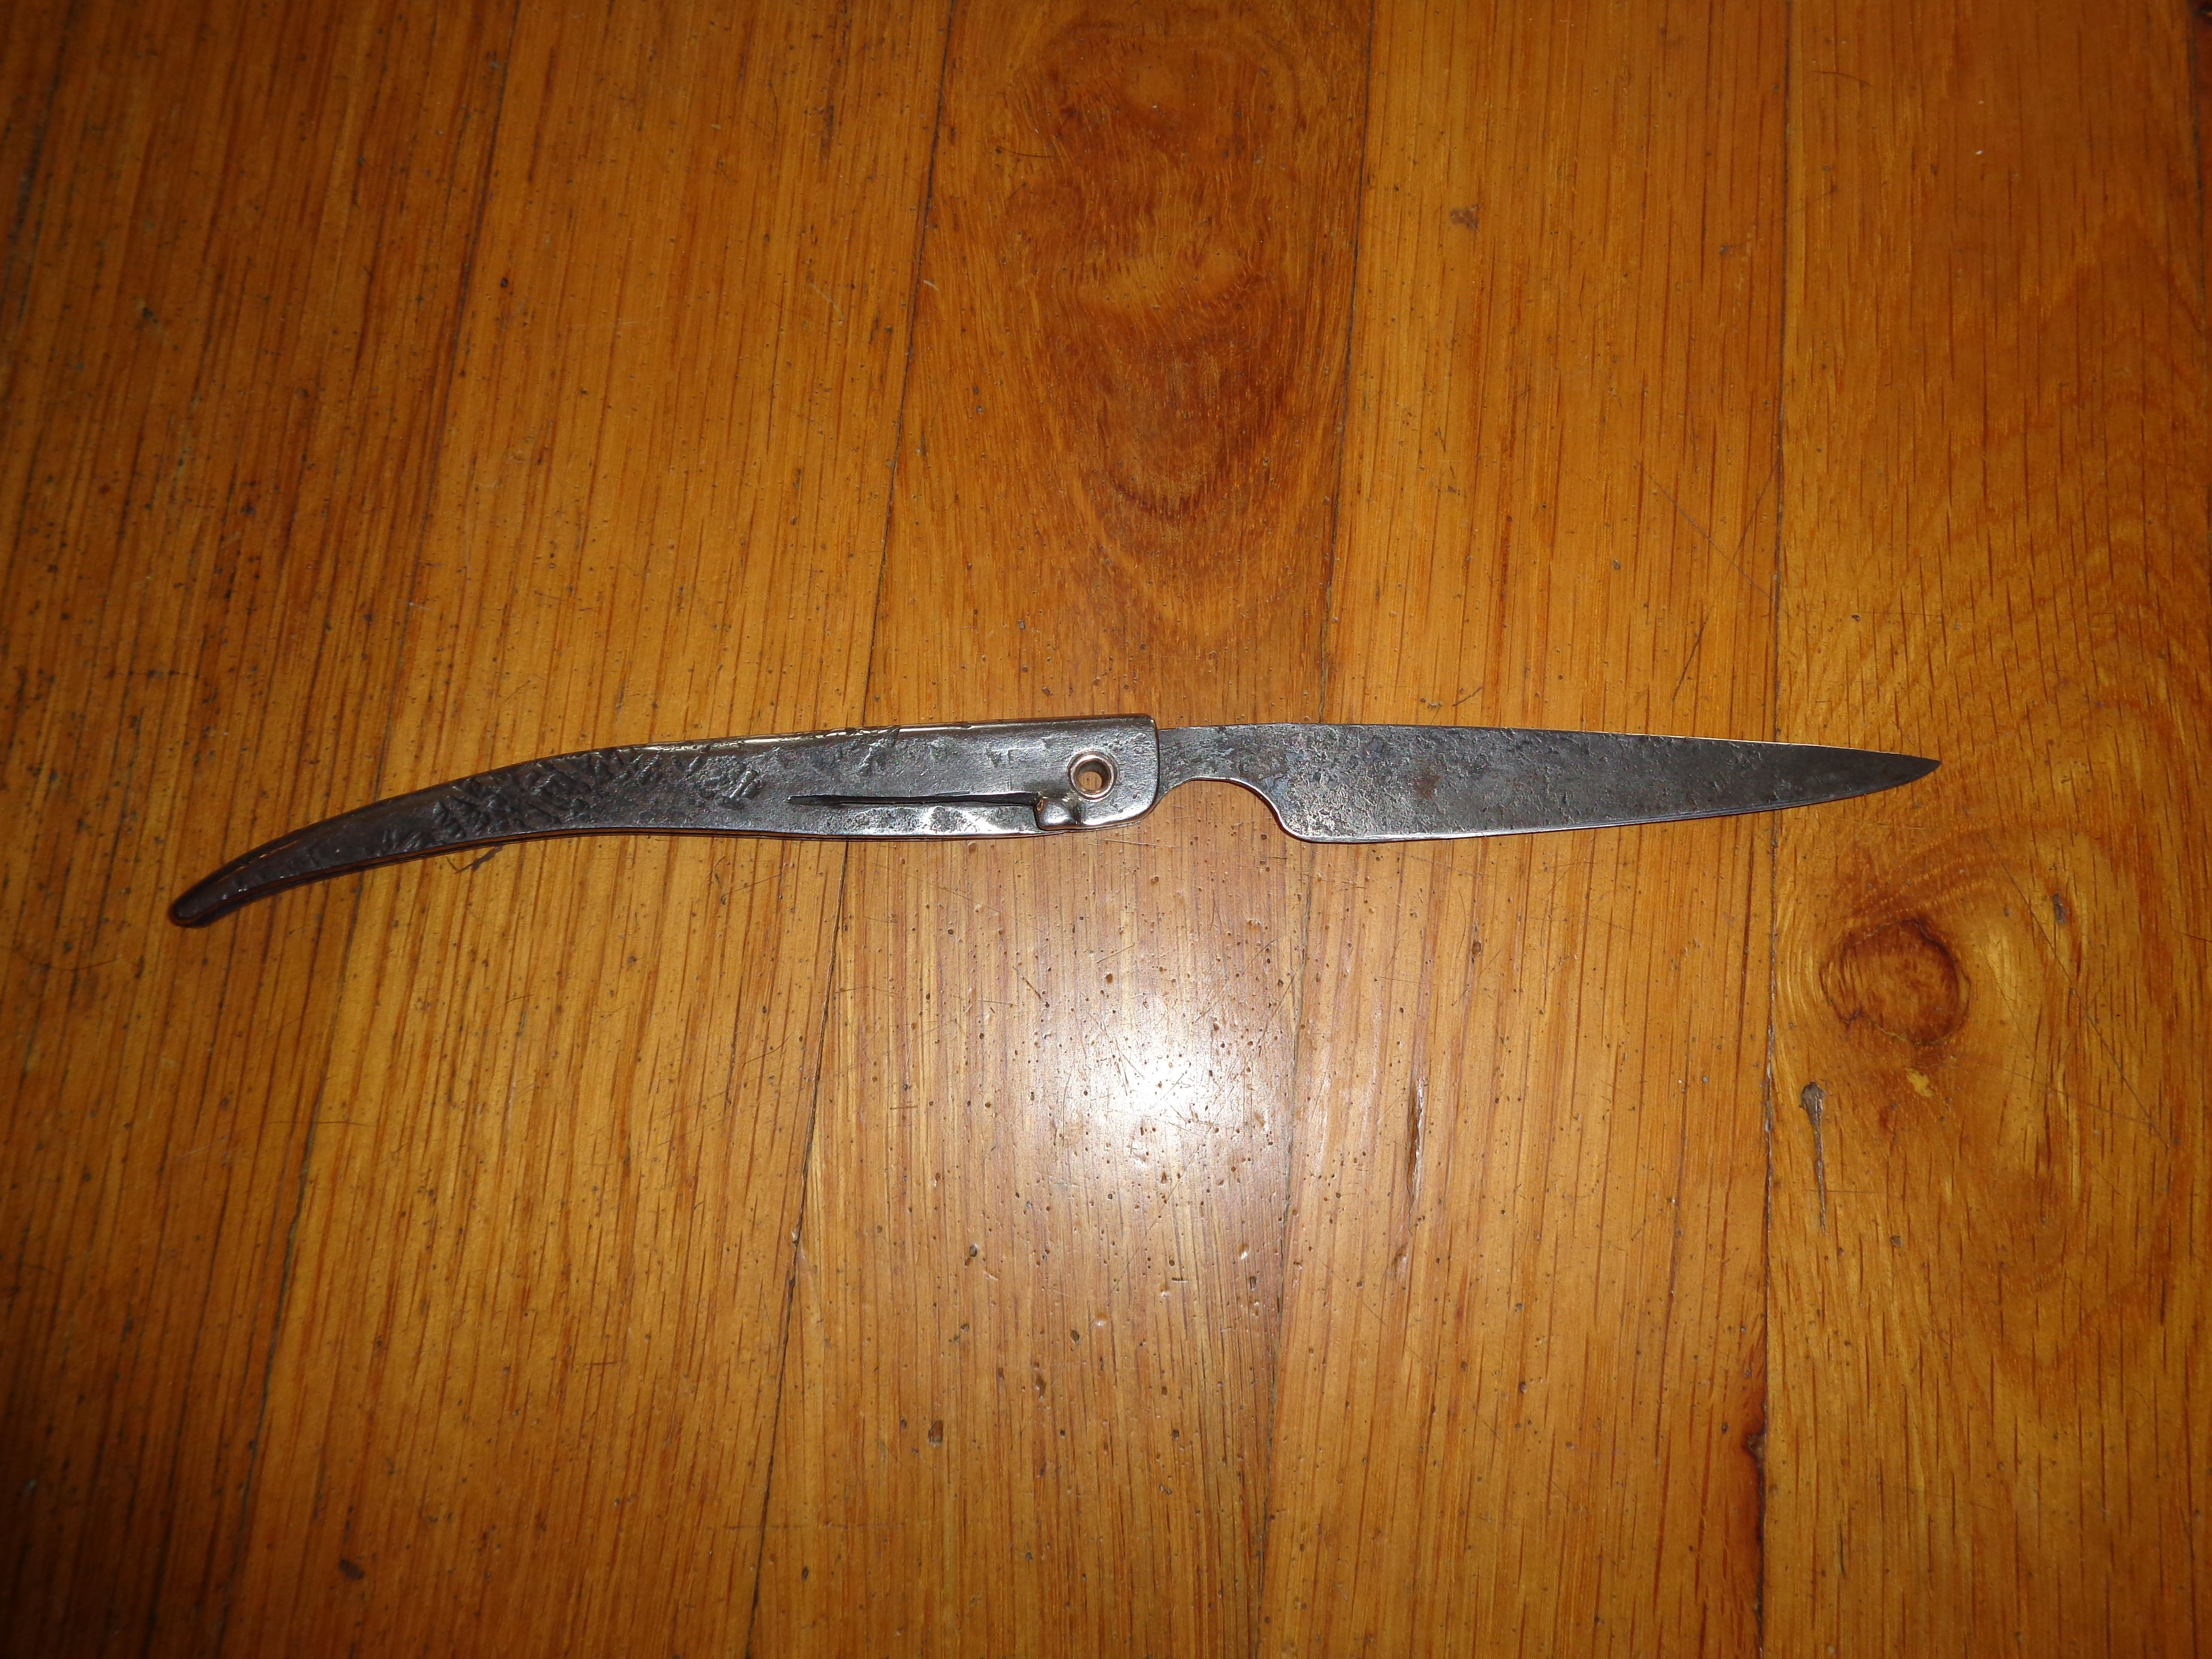
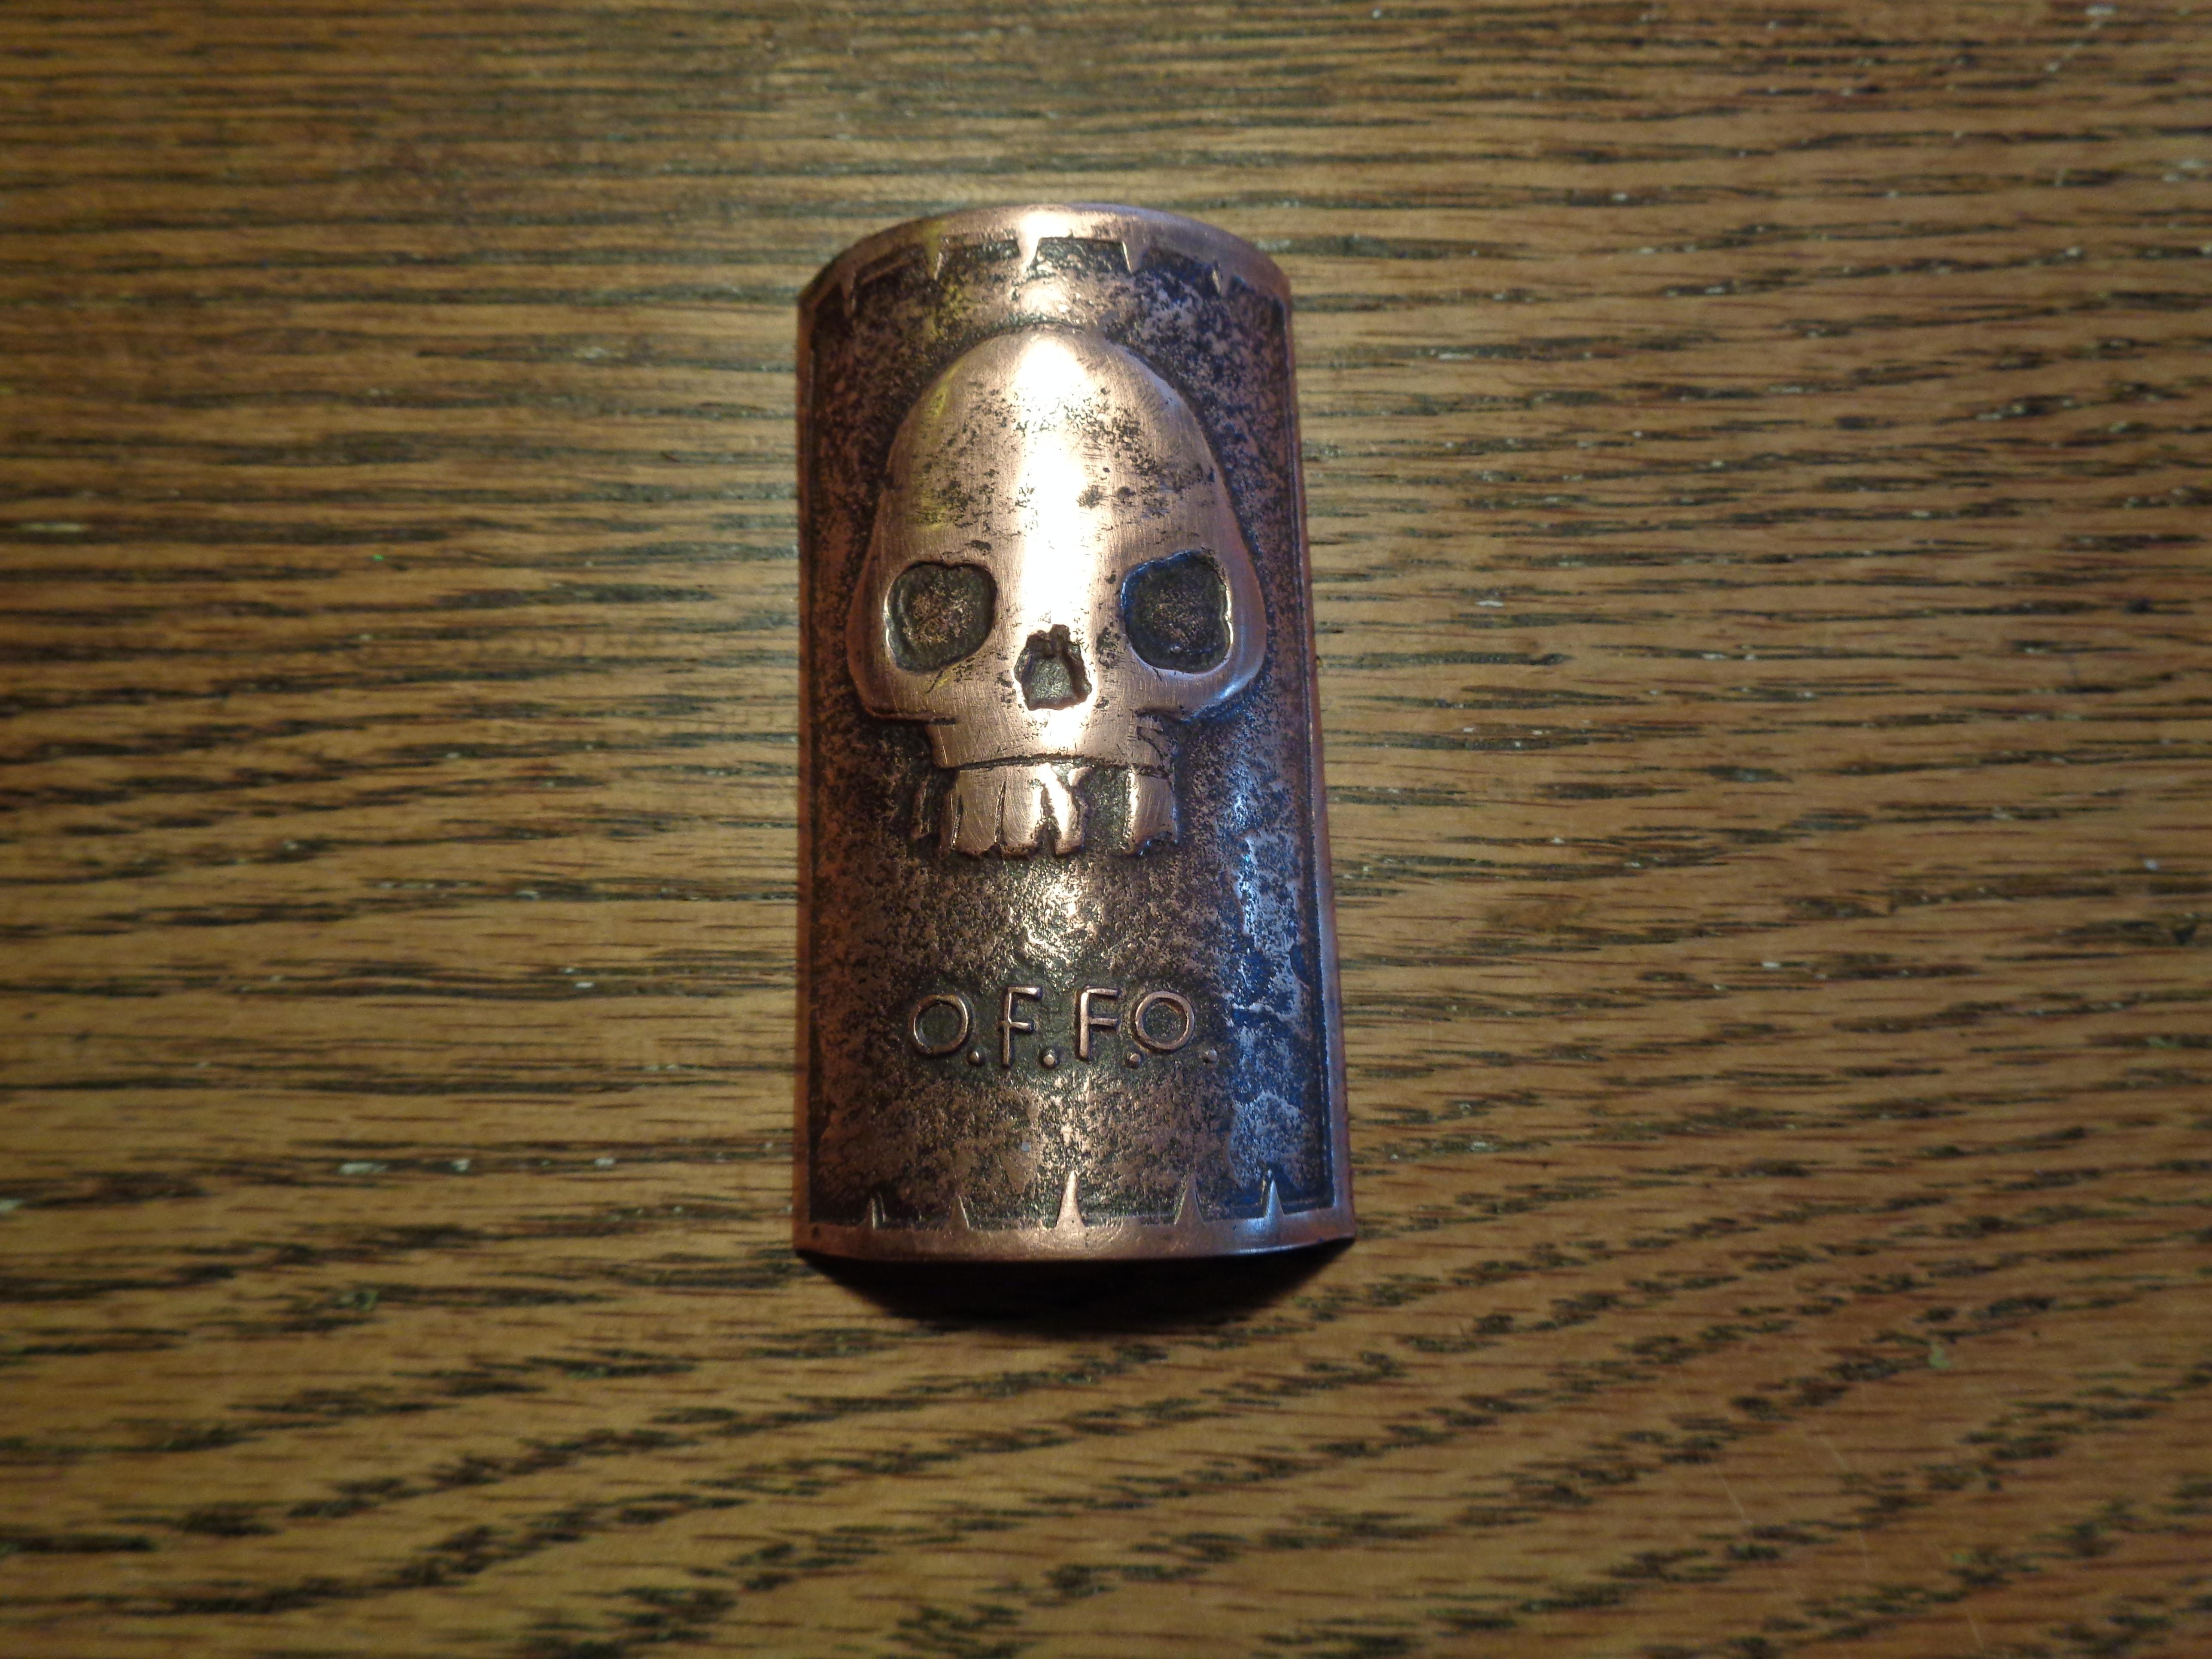
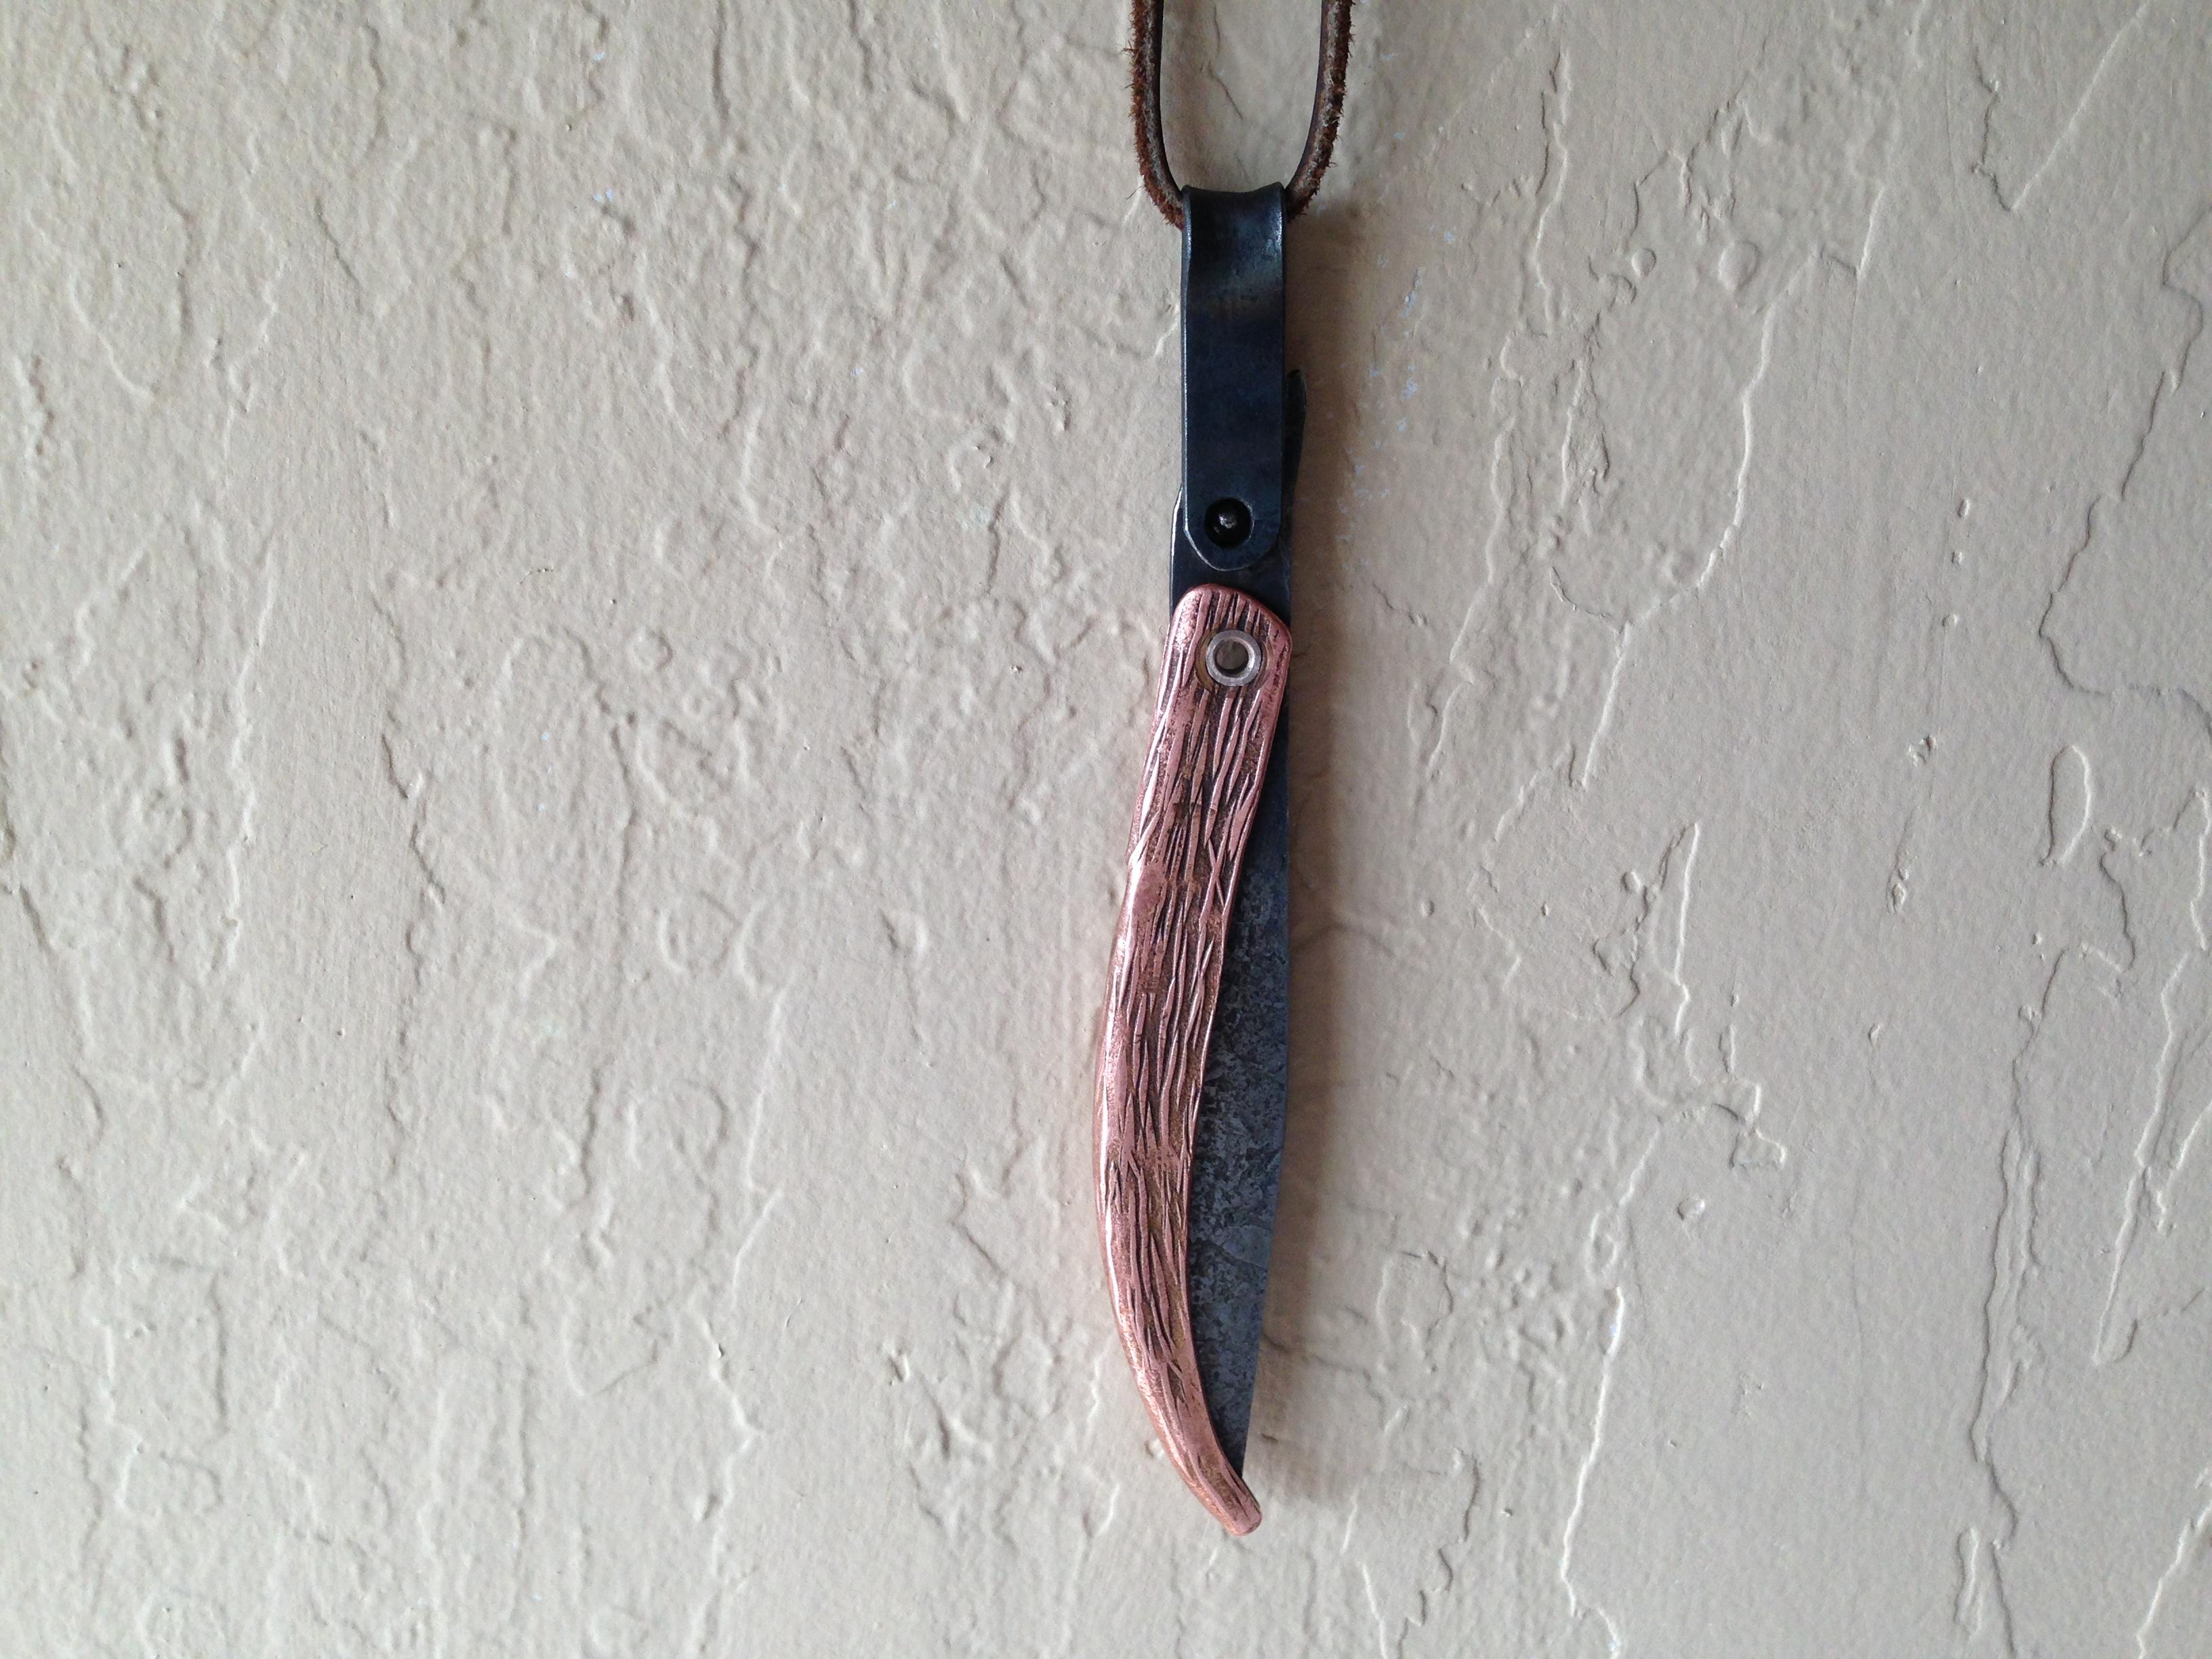
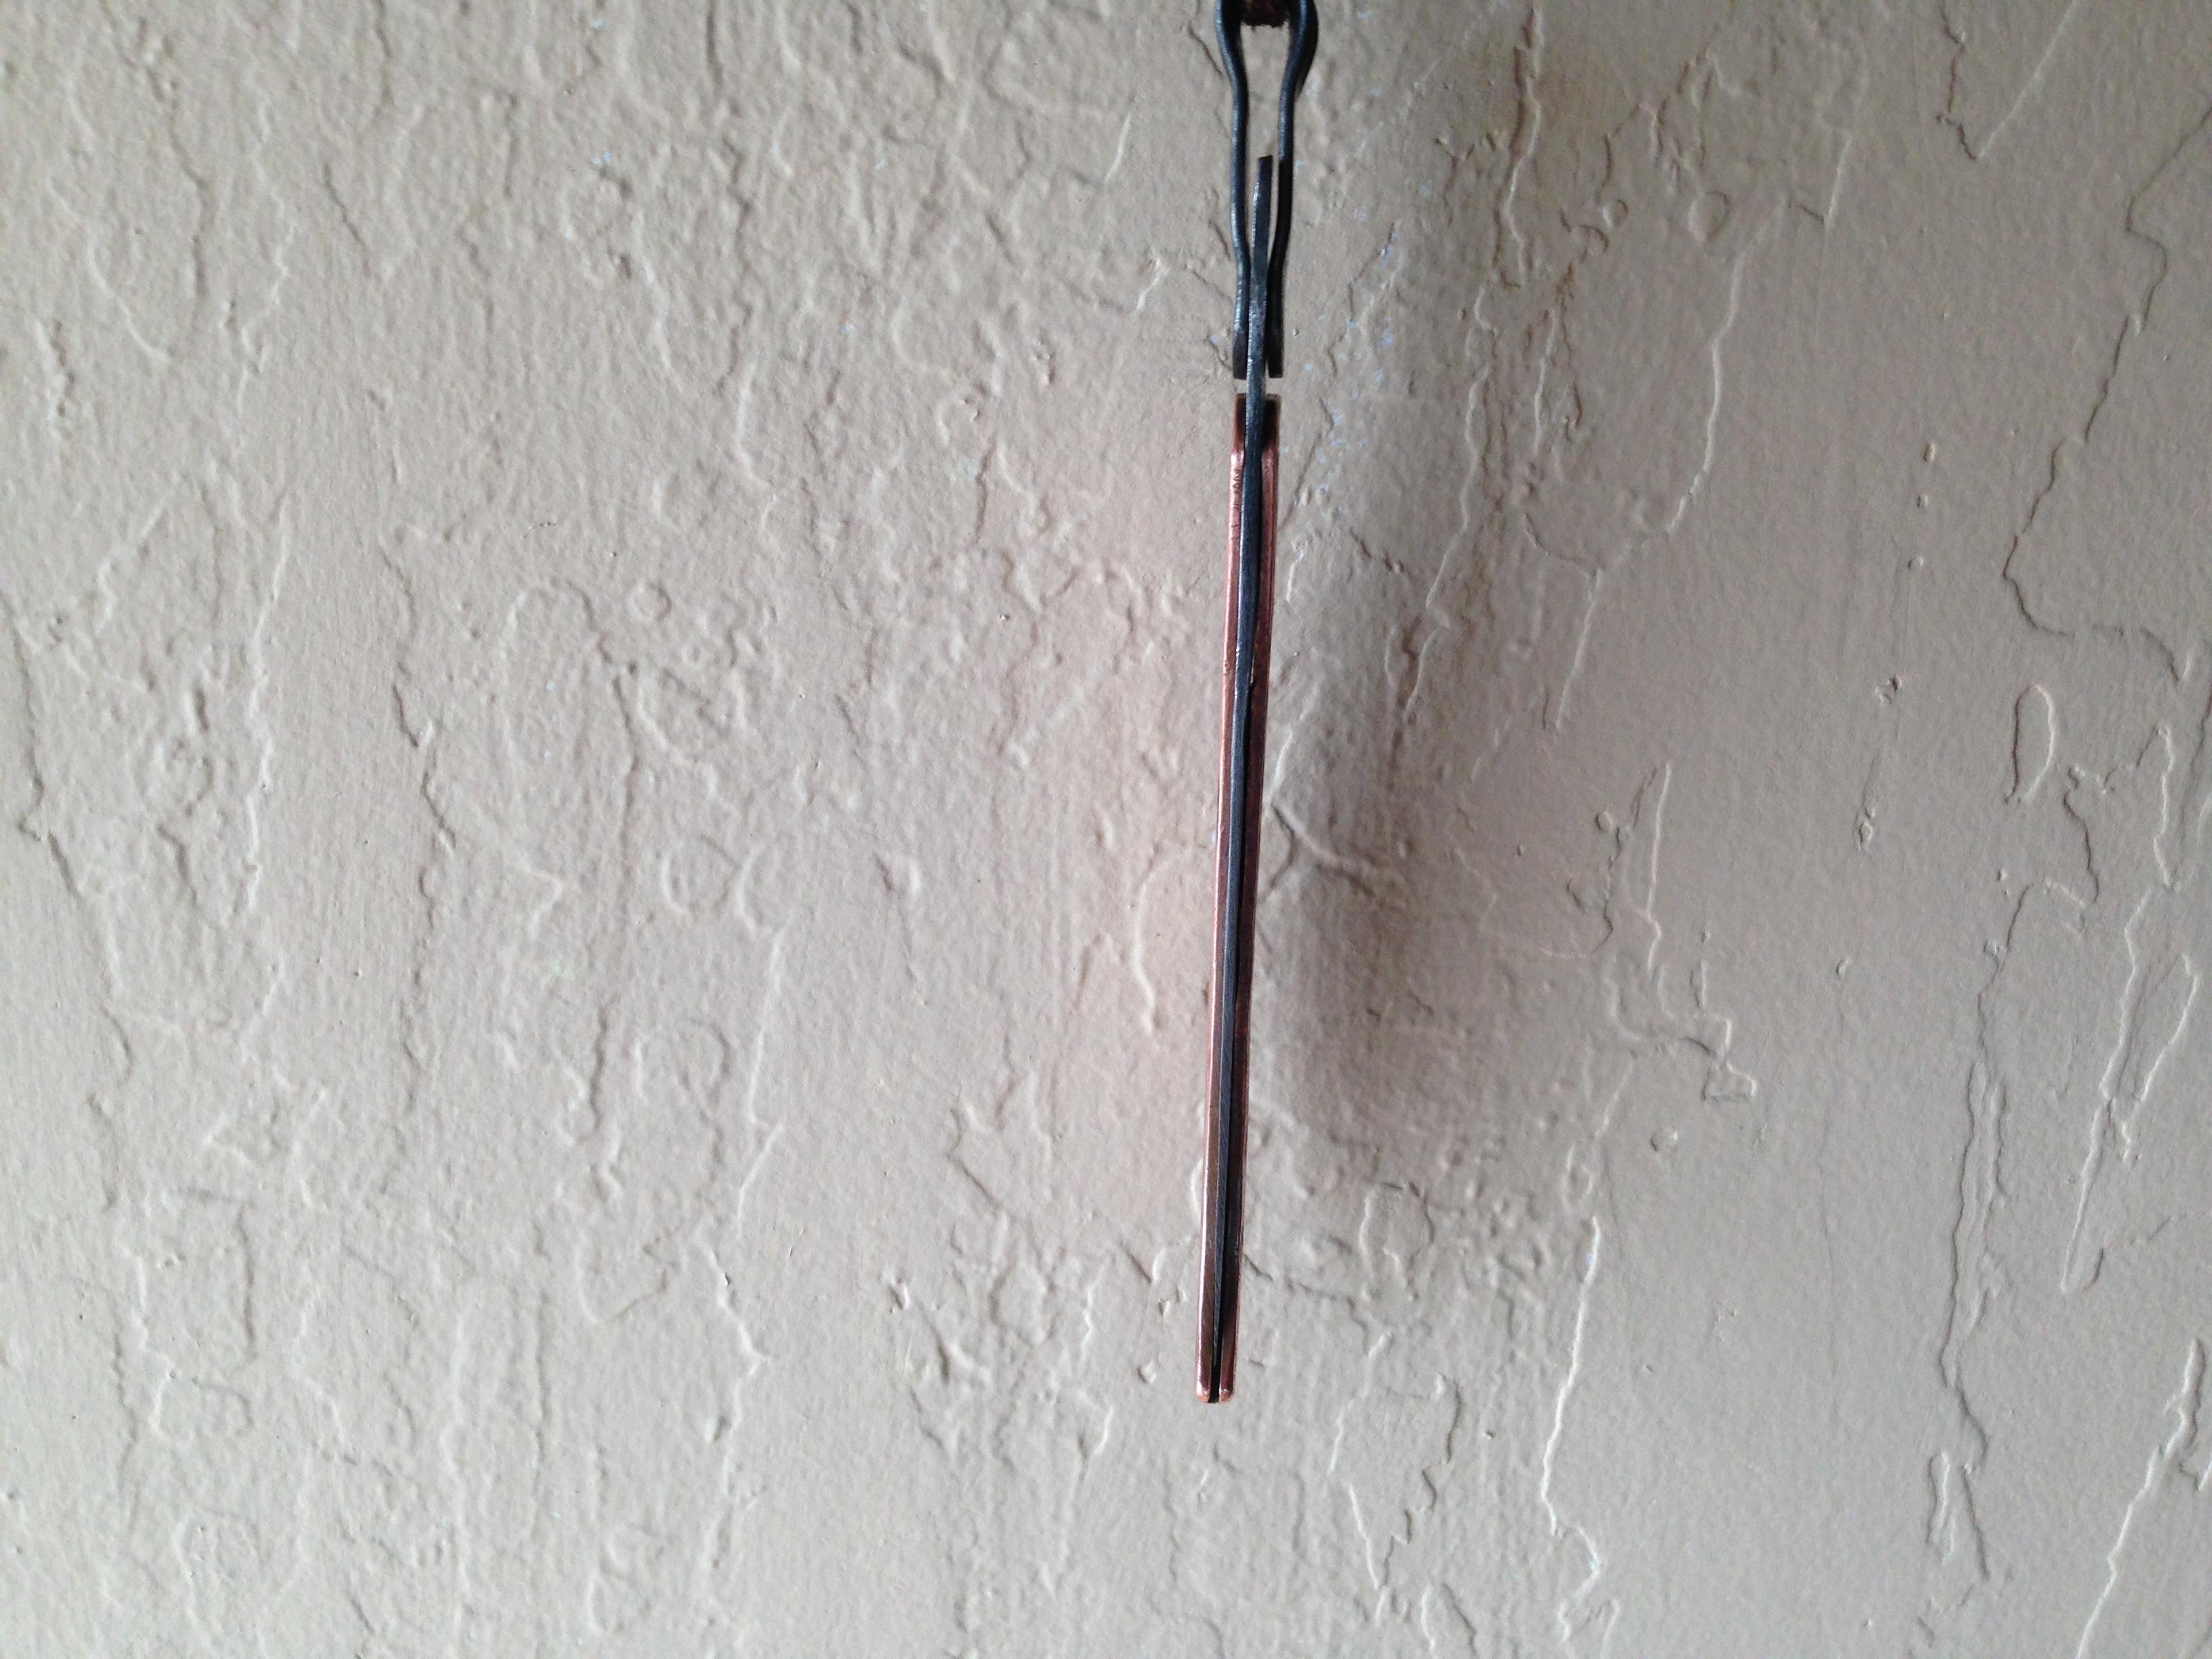
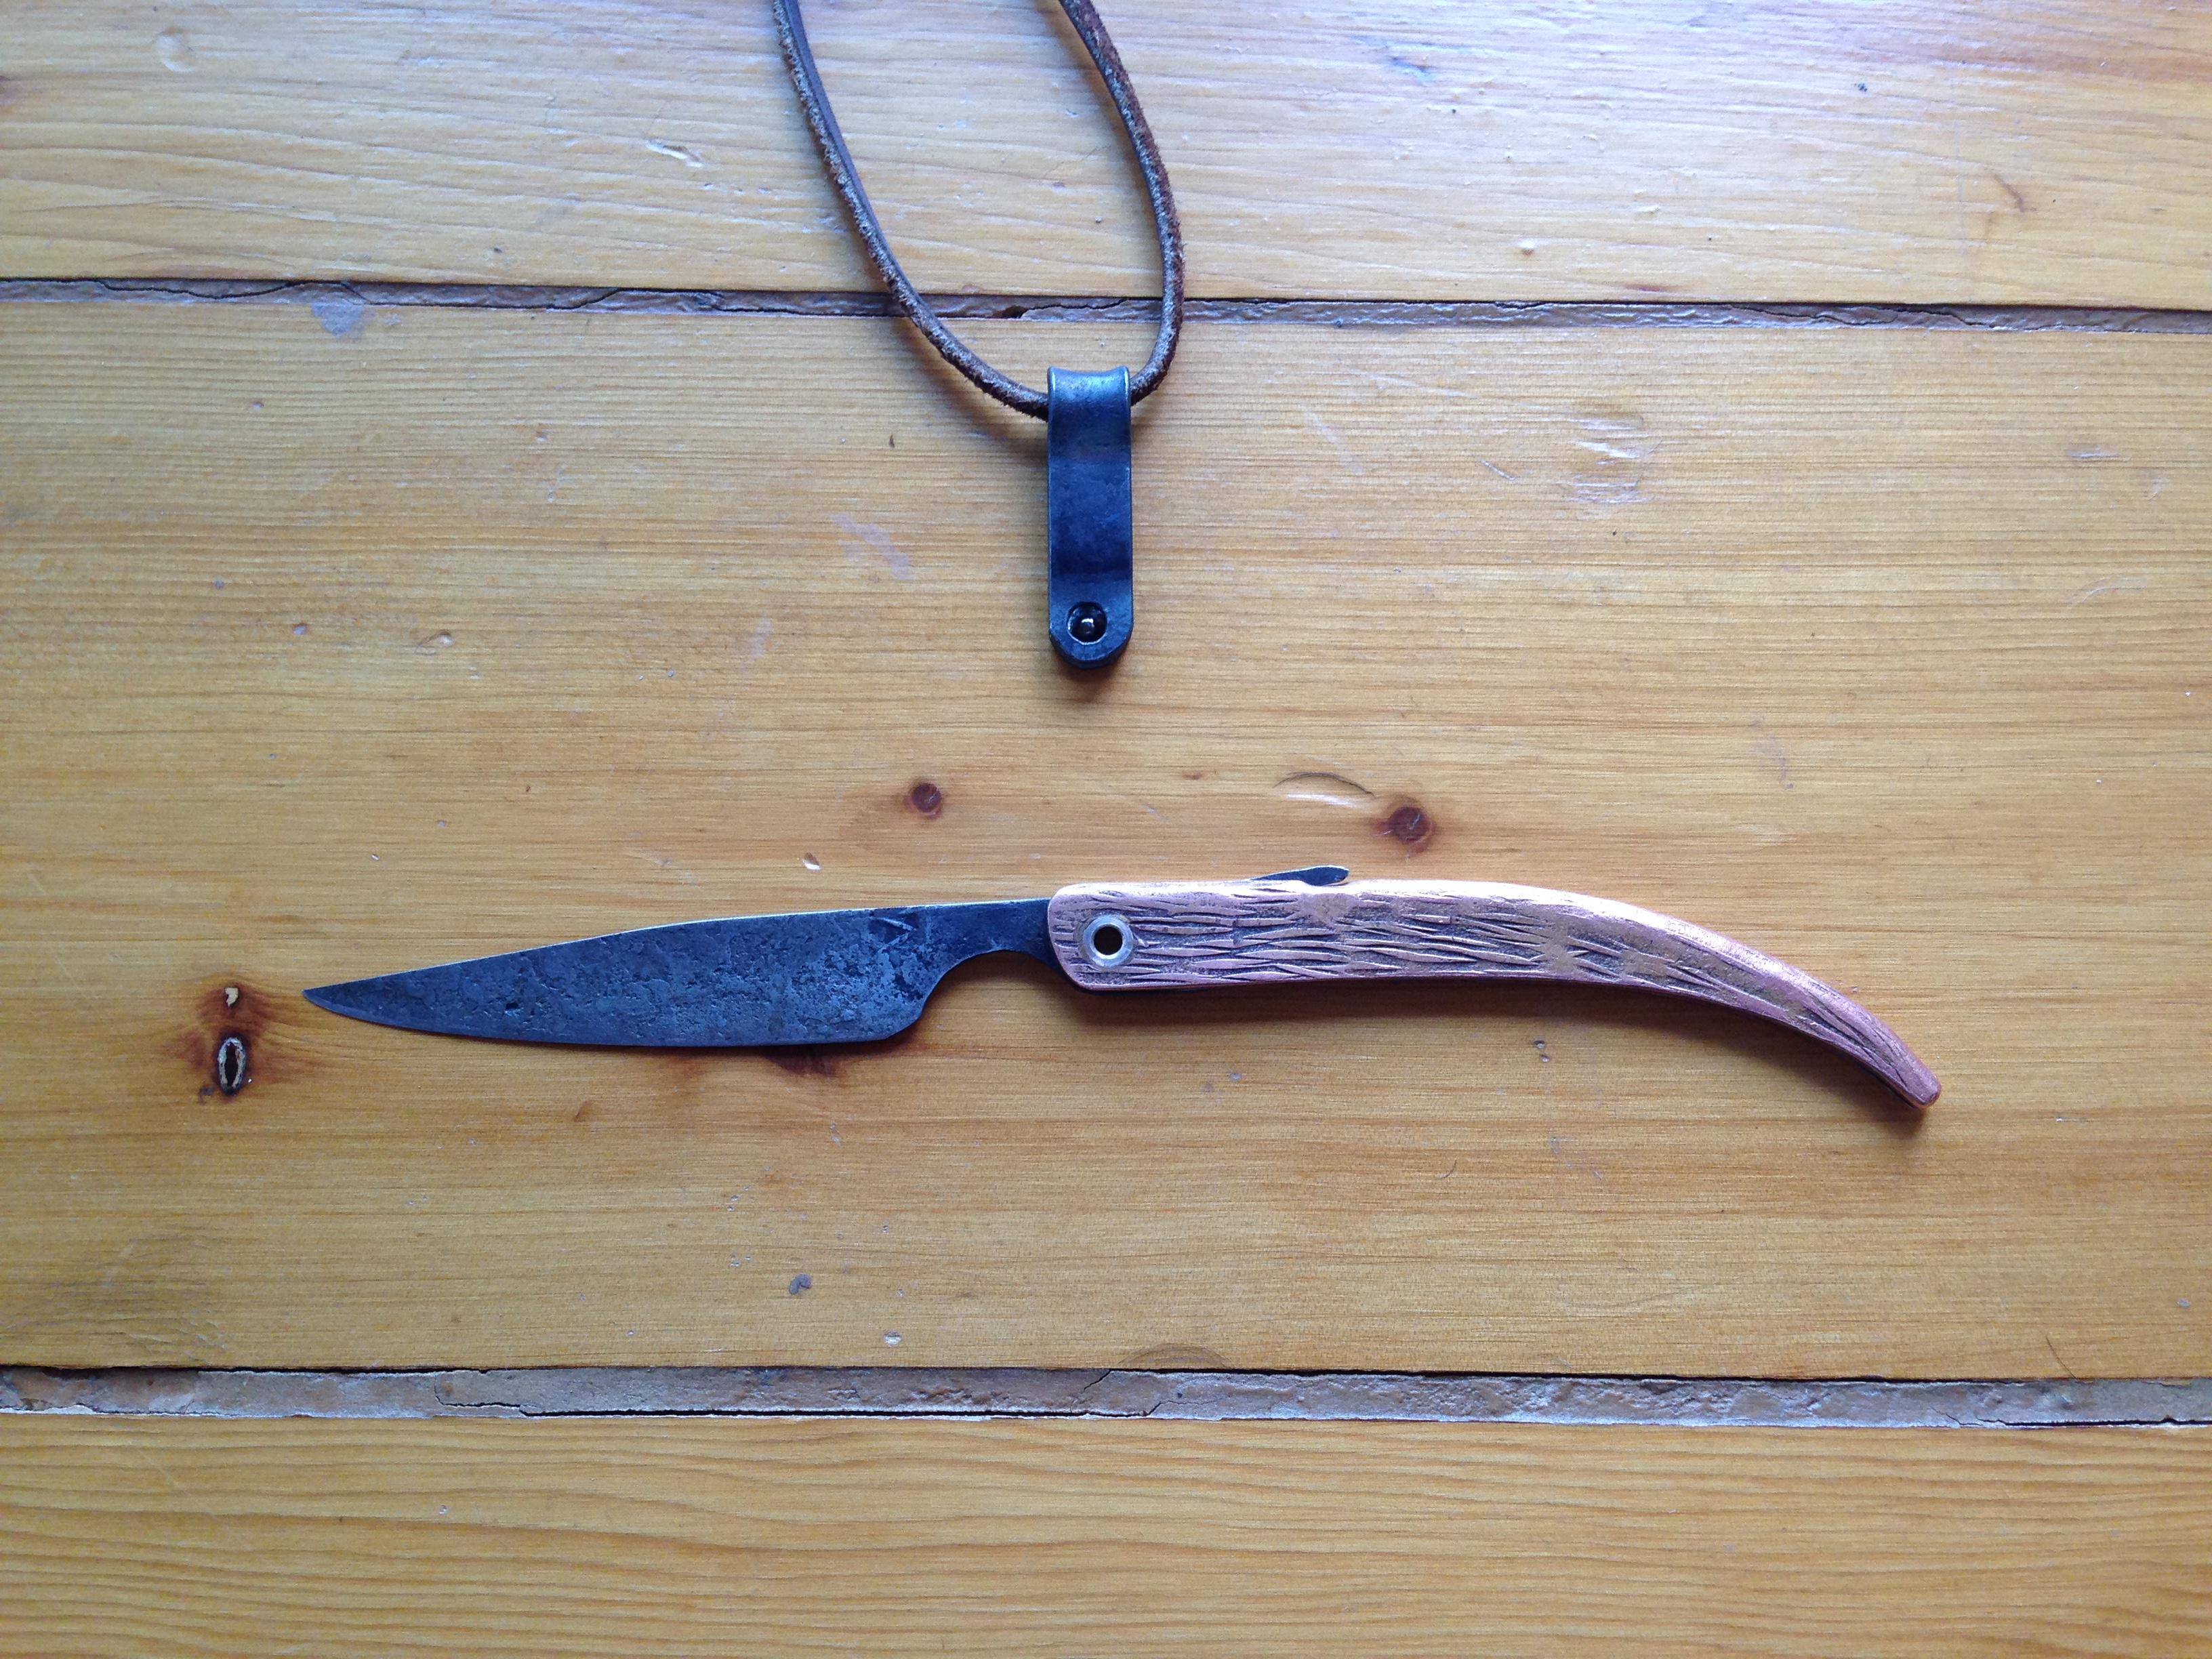
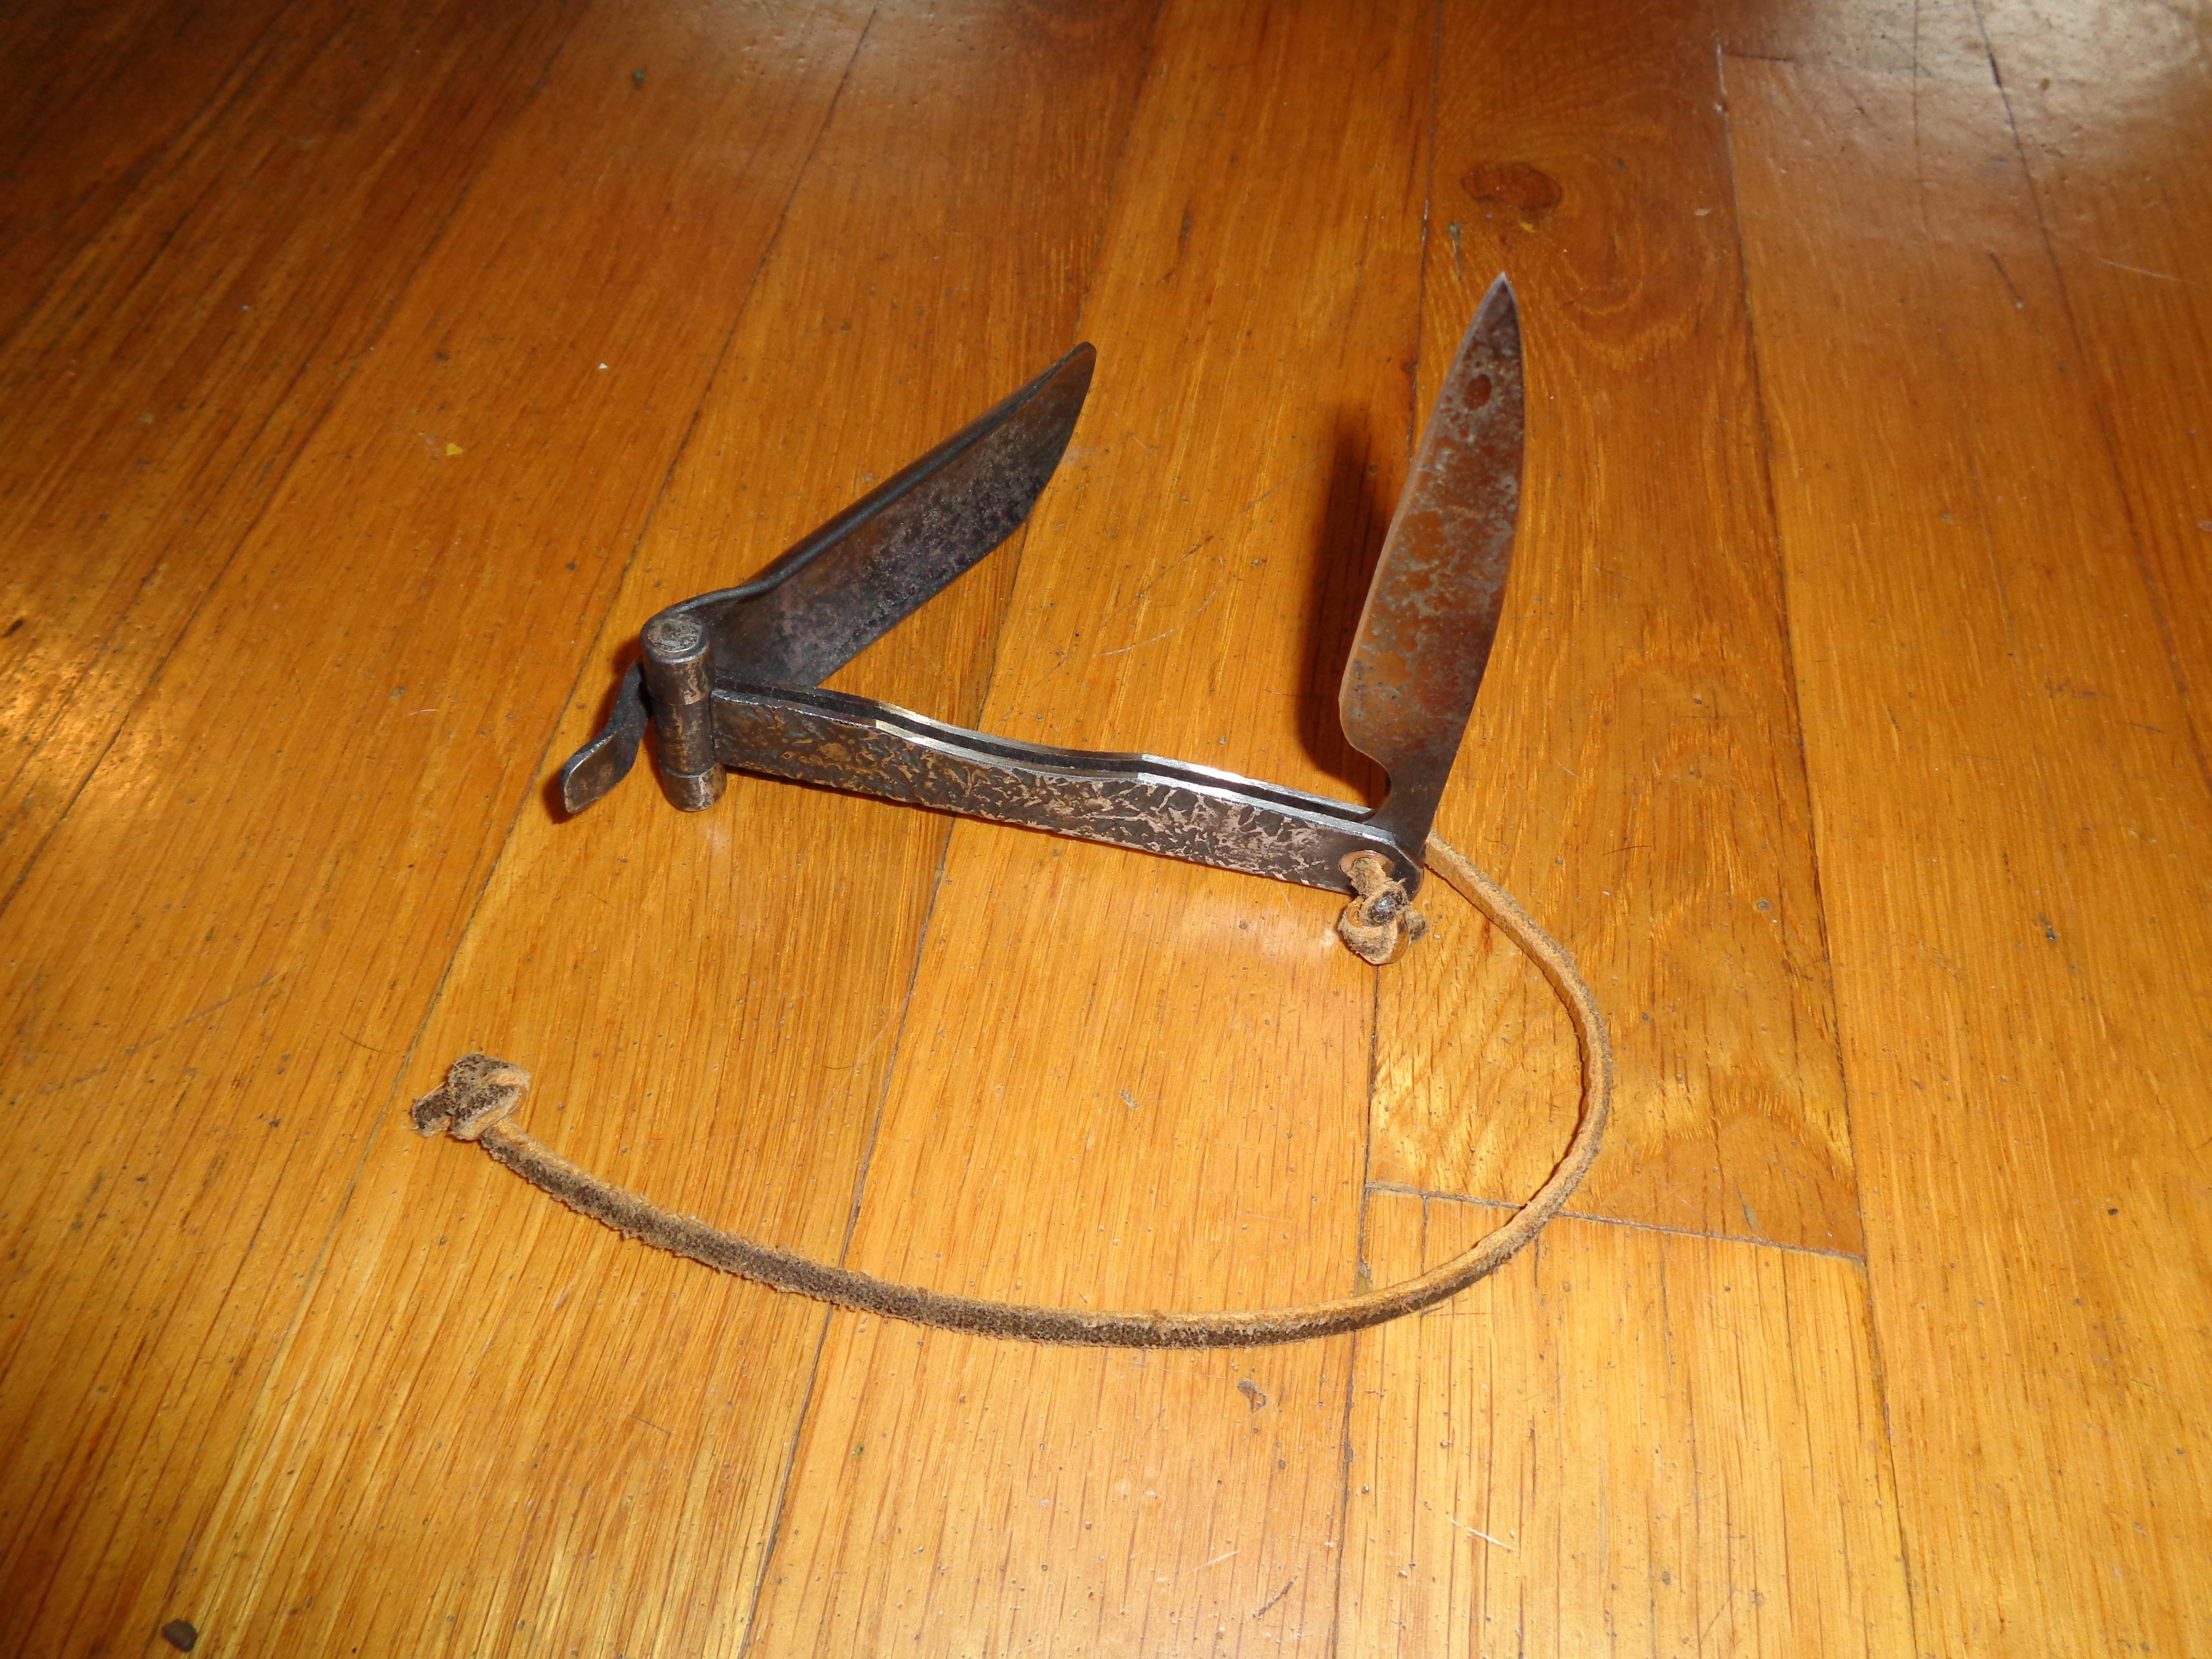
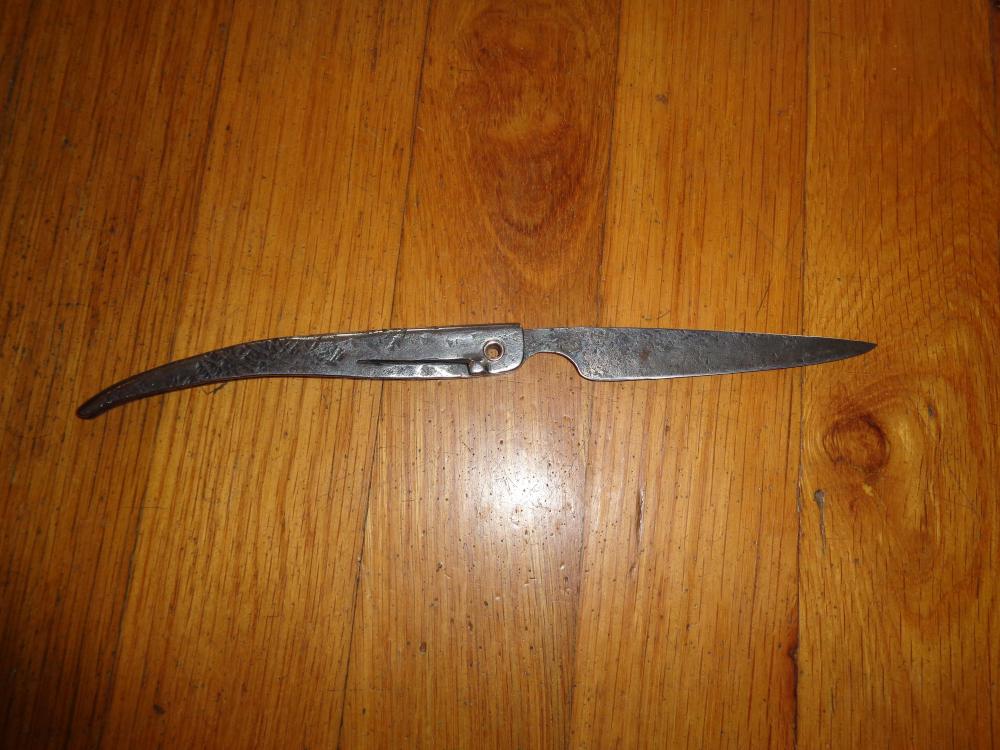
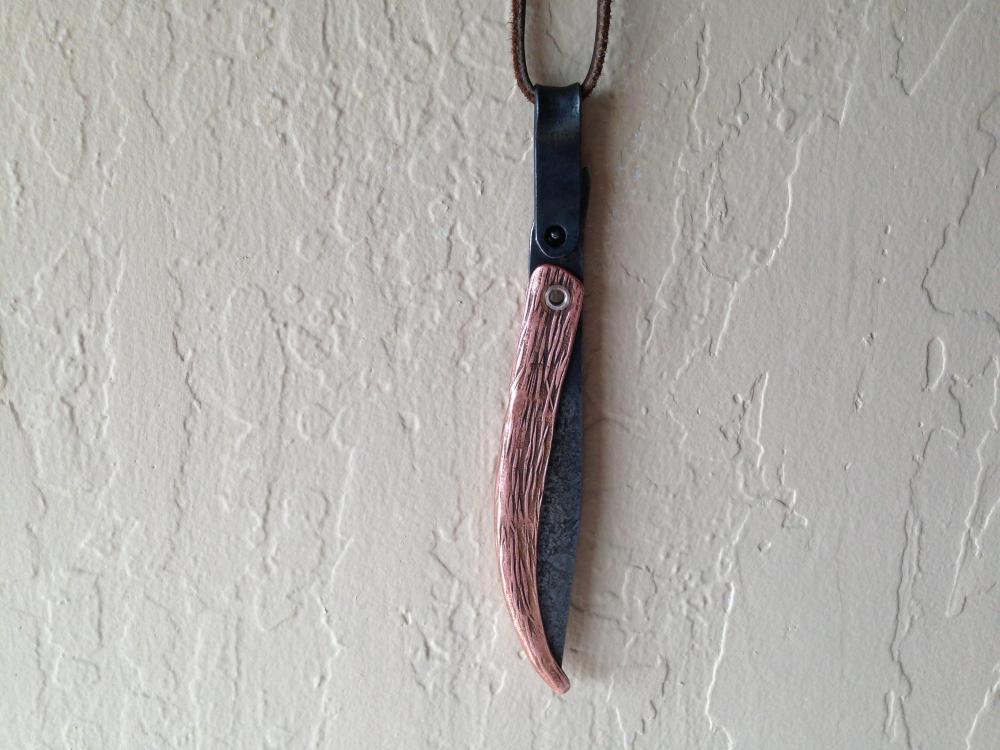
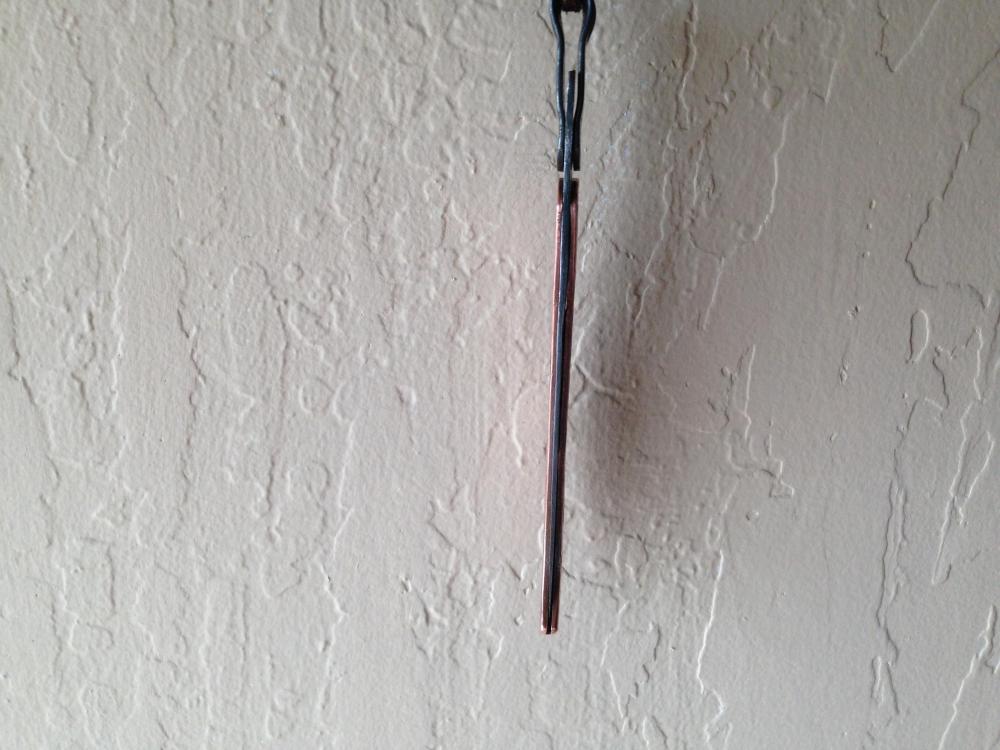
The mushroom knife is for foraging. Some mushrooms are best identified if you can get to the bottom of them. Hence the folding trowel. Some 'shrooms leak a milky substance when cut. Also used for identification. If you're going to eat them is best to know what you've collected. My blades are made, start to finish with a hammer, and just a bit of filing. No grinders. Here is a pic of the lock-back, and a copper head badge. O.F.F.O. stands for Others Forever, Forever Others. Oh, I have both Coal fired forge and propane. Mostly I use propane for the convenience and cleanliness, but a coal fire is hotter than my propane unit. I've been using 'Elkhorn Smithing coal' from Lazzari fuels in South San Francisco. It is the best smithing coal I have encountered. Super hot, really clean, and very little ash or clinker. It's wonderful stuff.

-
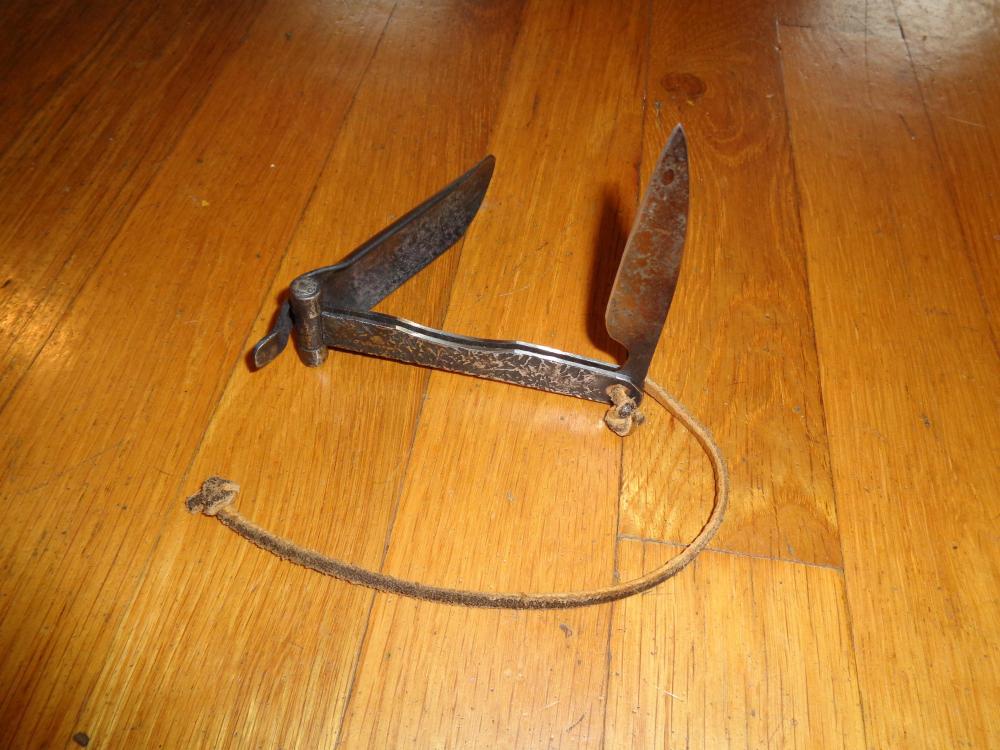
Thanks Mr. Frosty. Most of my career I've made household hardware and such, (curtain rods, brackets, fire screens and tools, window hardware, door locks etc.) but like most metal shops, I done a lot of other stuff, from welding mufflers to making small parts for repairs. I've had a passion for folding knives since I was very young, (I've collected around three hundred of them so far.) and so I make simple clasp knives, for fun and profit. Though profit has never really been a goal. (Do you know how to end up with a million dollars while smithing?...... Start with two.) I have four variations of the folding knife, and two versions of fixed blade. The two knives posted here are my 'Kneck Knife', and mushroom knife. The 'kneck knife' is "quick release", with just a tug. I also make a lock-back version that still has just three parts. Recently I made a batch of bicycle head badges for an outlaw bicycle club, 'The Others' My forge is a heap. The scrap pile is mostly everywhere. My Companion Animal (wifey) tends to stay away. She doesn't feel safe there. And rightly so. I am generally motivated to clean up after I trip over something.


-
Hi folks. I've been lurking around this site for a couple of years, and decided to take the plunge and join up. Thanks for the opportunity. I've just about finished my third decade of smithing, and, man, there is so much to learn. I hope to gain some pointers from you folks, and in turn, hope I can share some bits I've learned while doing things wrong, trying to get it right. Looking forward to participating. -Lester