TRR1143
Members
-
Joined
-
Last visited
Everything posted by TRR1143
-
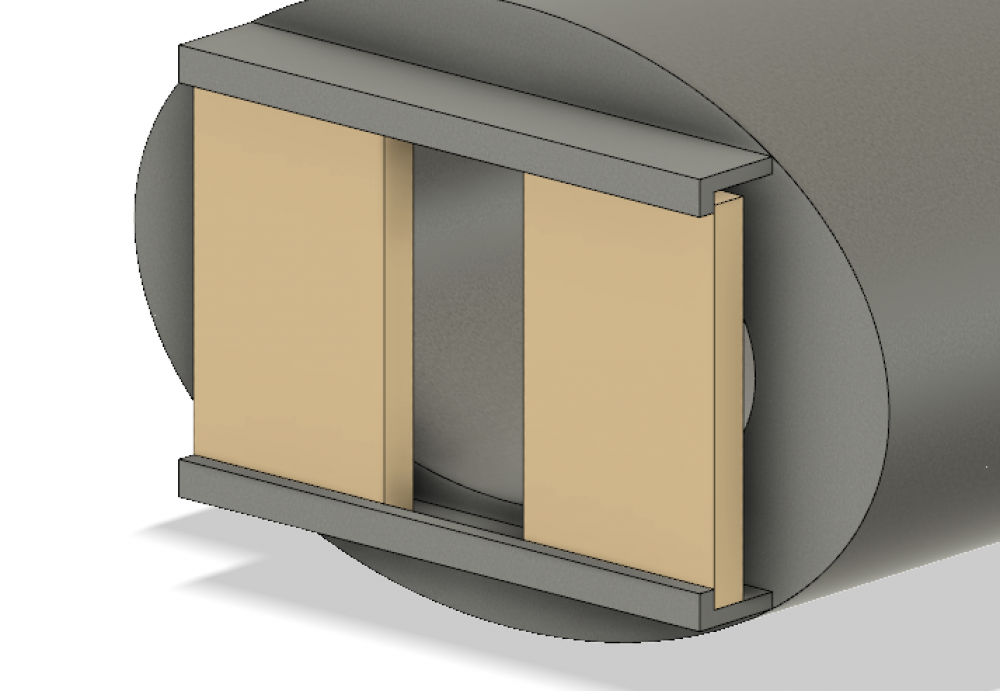
I'll definitely change that soon. What do you think of the idea of having two pieces of angle iron welded to the forge shell to allow the blocks to slide from side to side for the opening? Would you think that the top piece would interfere with the exhaust still? Similar to this model, not to scale.

-
Mikey, That was definitely a concern of mine, and I'll be grabbing some wider angle to use to hold my block walls with later this week. Probably a loaded question here, but how much of a difference would you expect that to make? Thank you
-
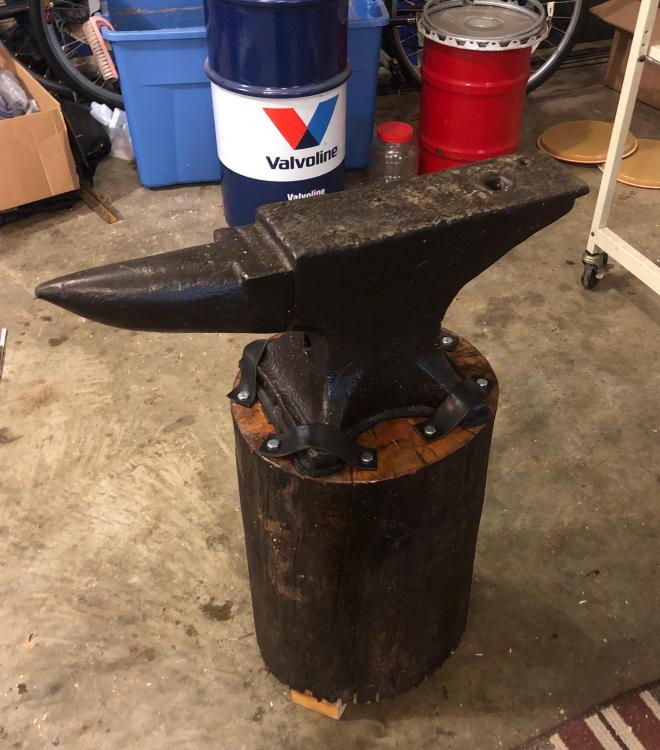
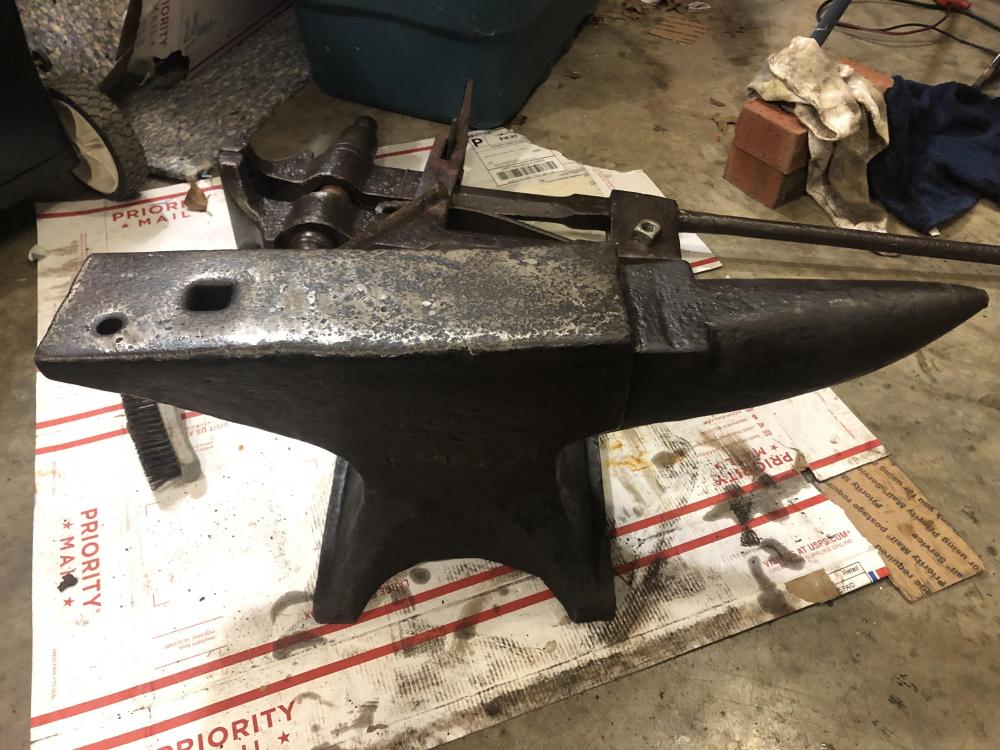
Finally got around to mounting my anvil down on a tree stump today. I flattened the top as best as I could and cutout a small pad from a rubber mat to help the surfaces mate. Bolted it all down with some leather straps, worked better than I thought it would. Still need to make some bands out of flat stock for the top and bottom, will be taken care of next weekend.
-
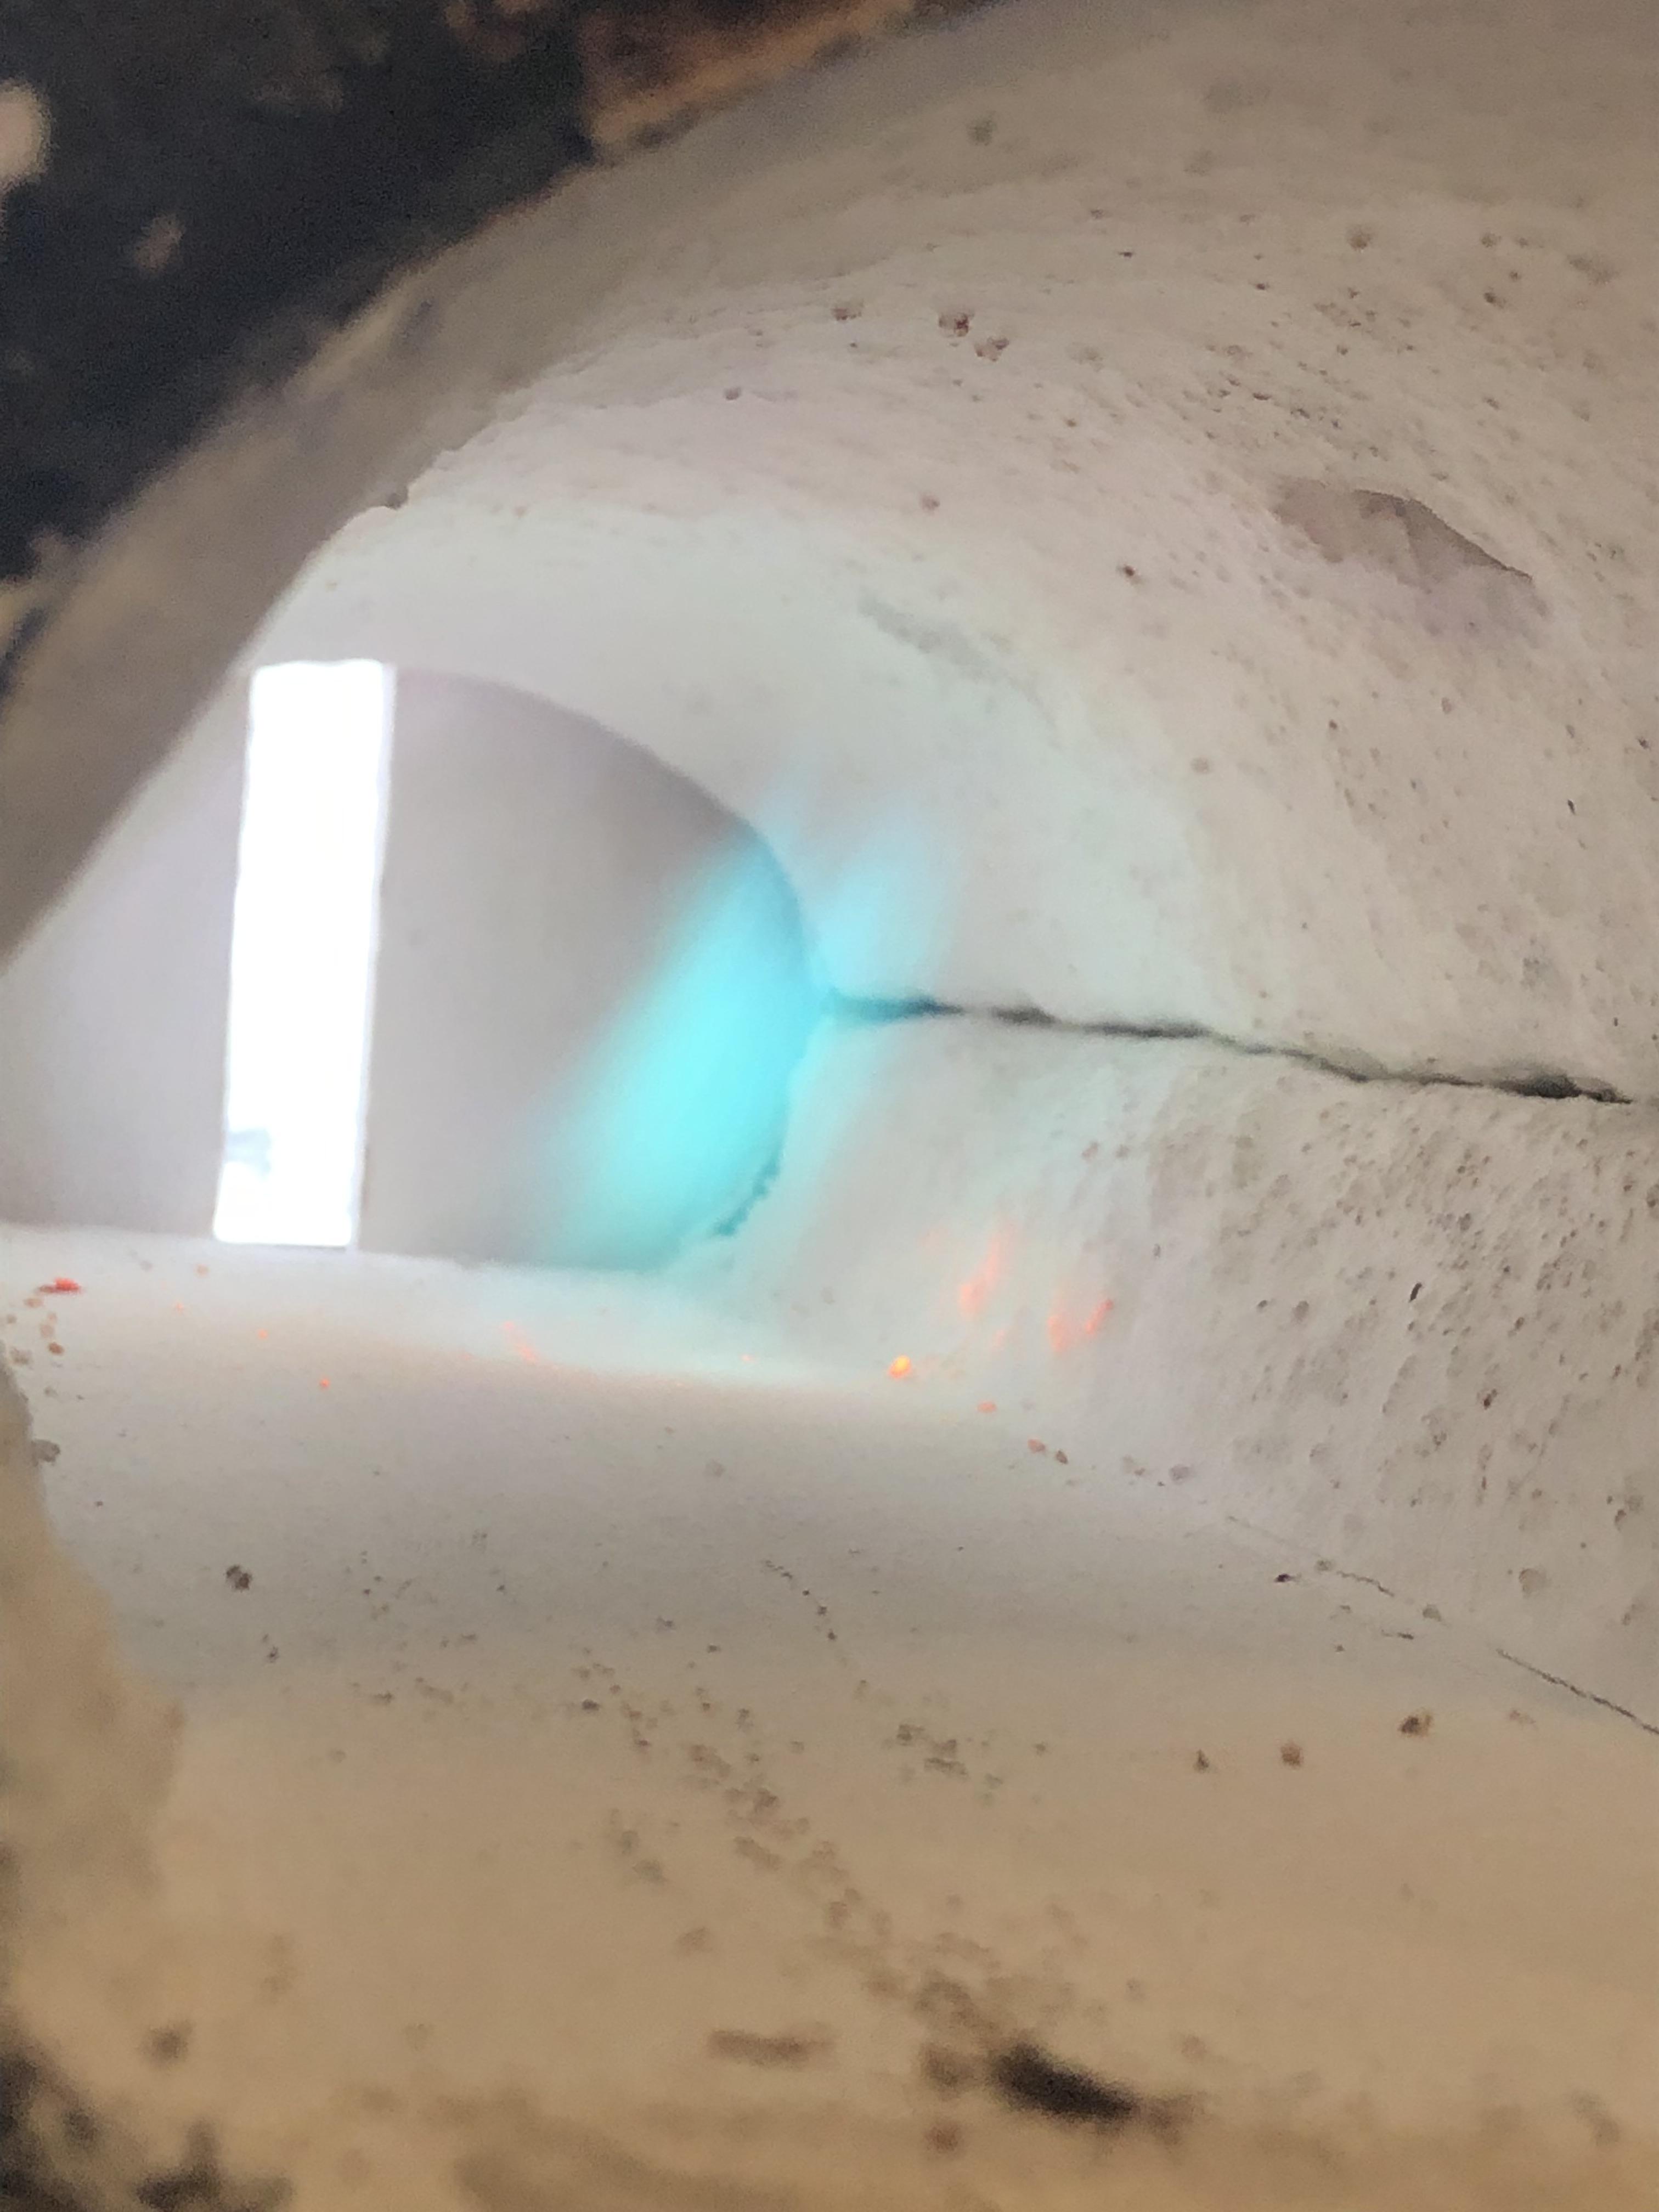
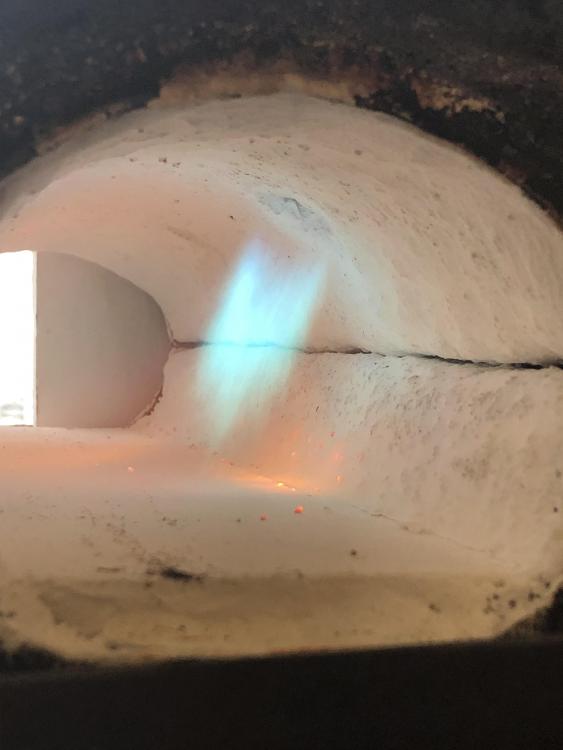
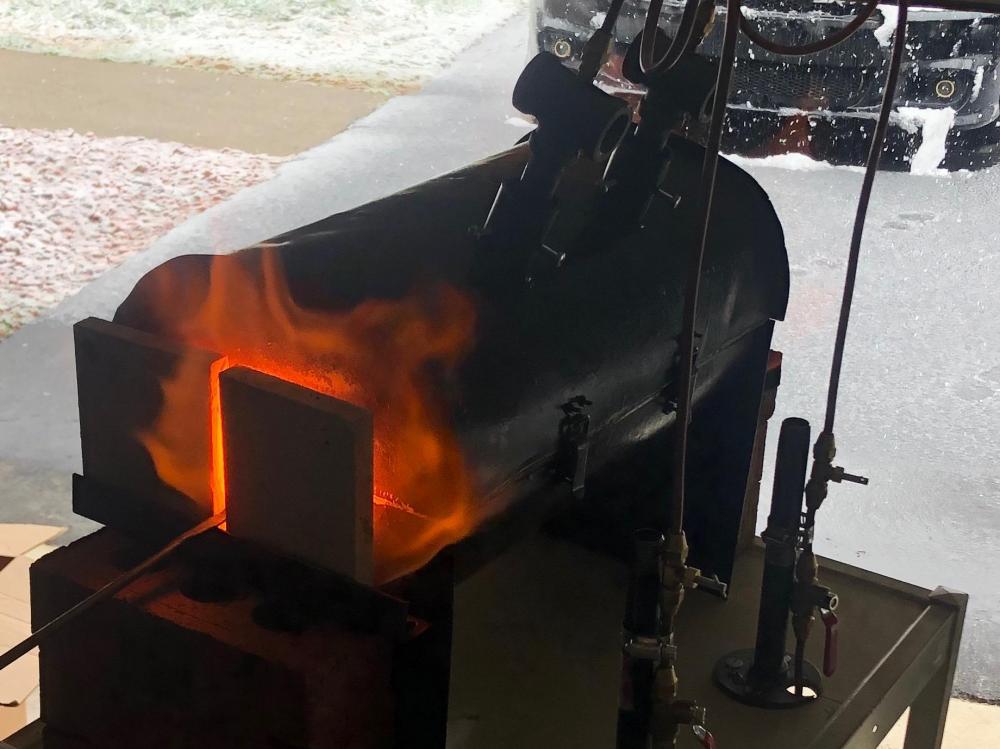
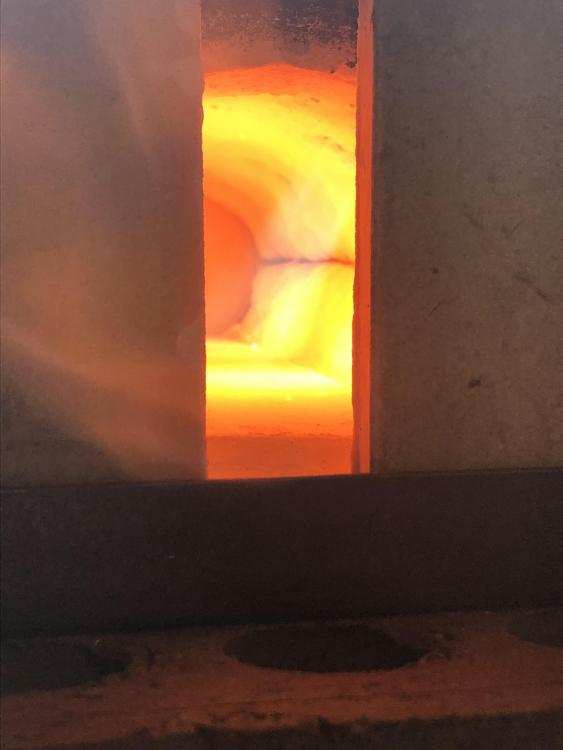
Today was the first time I actually got to forge after finally getting my anvil mounted. The forge will heat steel up to a bright orange color at around 12psi but it's still short of the welding heat goal and I don't know what steps I should take to get there. I would imagine that two half inch T burners should be able to bring the volume, ~240 cubic inches, I have to welding heat. I'm pretty sure that the burners still aren't running optimally. The pictures in the above post are still more or less true today but I'll attach some recent photos of the flames. The rear flame still seems to be under less pressure than the front one and is still green from the copper. Also, they seem to stutter a lot more than I would expect. Any dragon's breath is orange when the forge is up to temperature. I'm not sure if it's an air:fuel mixture issue or something else. I've cleaned the mig tips out and everything in the propane lines is as close to the same as I could manage. I would appreciate any advice with this, welding temperature really is the goal now from a functionality standpoint and for personal satisfaction. Thanks!

-
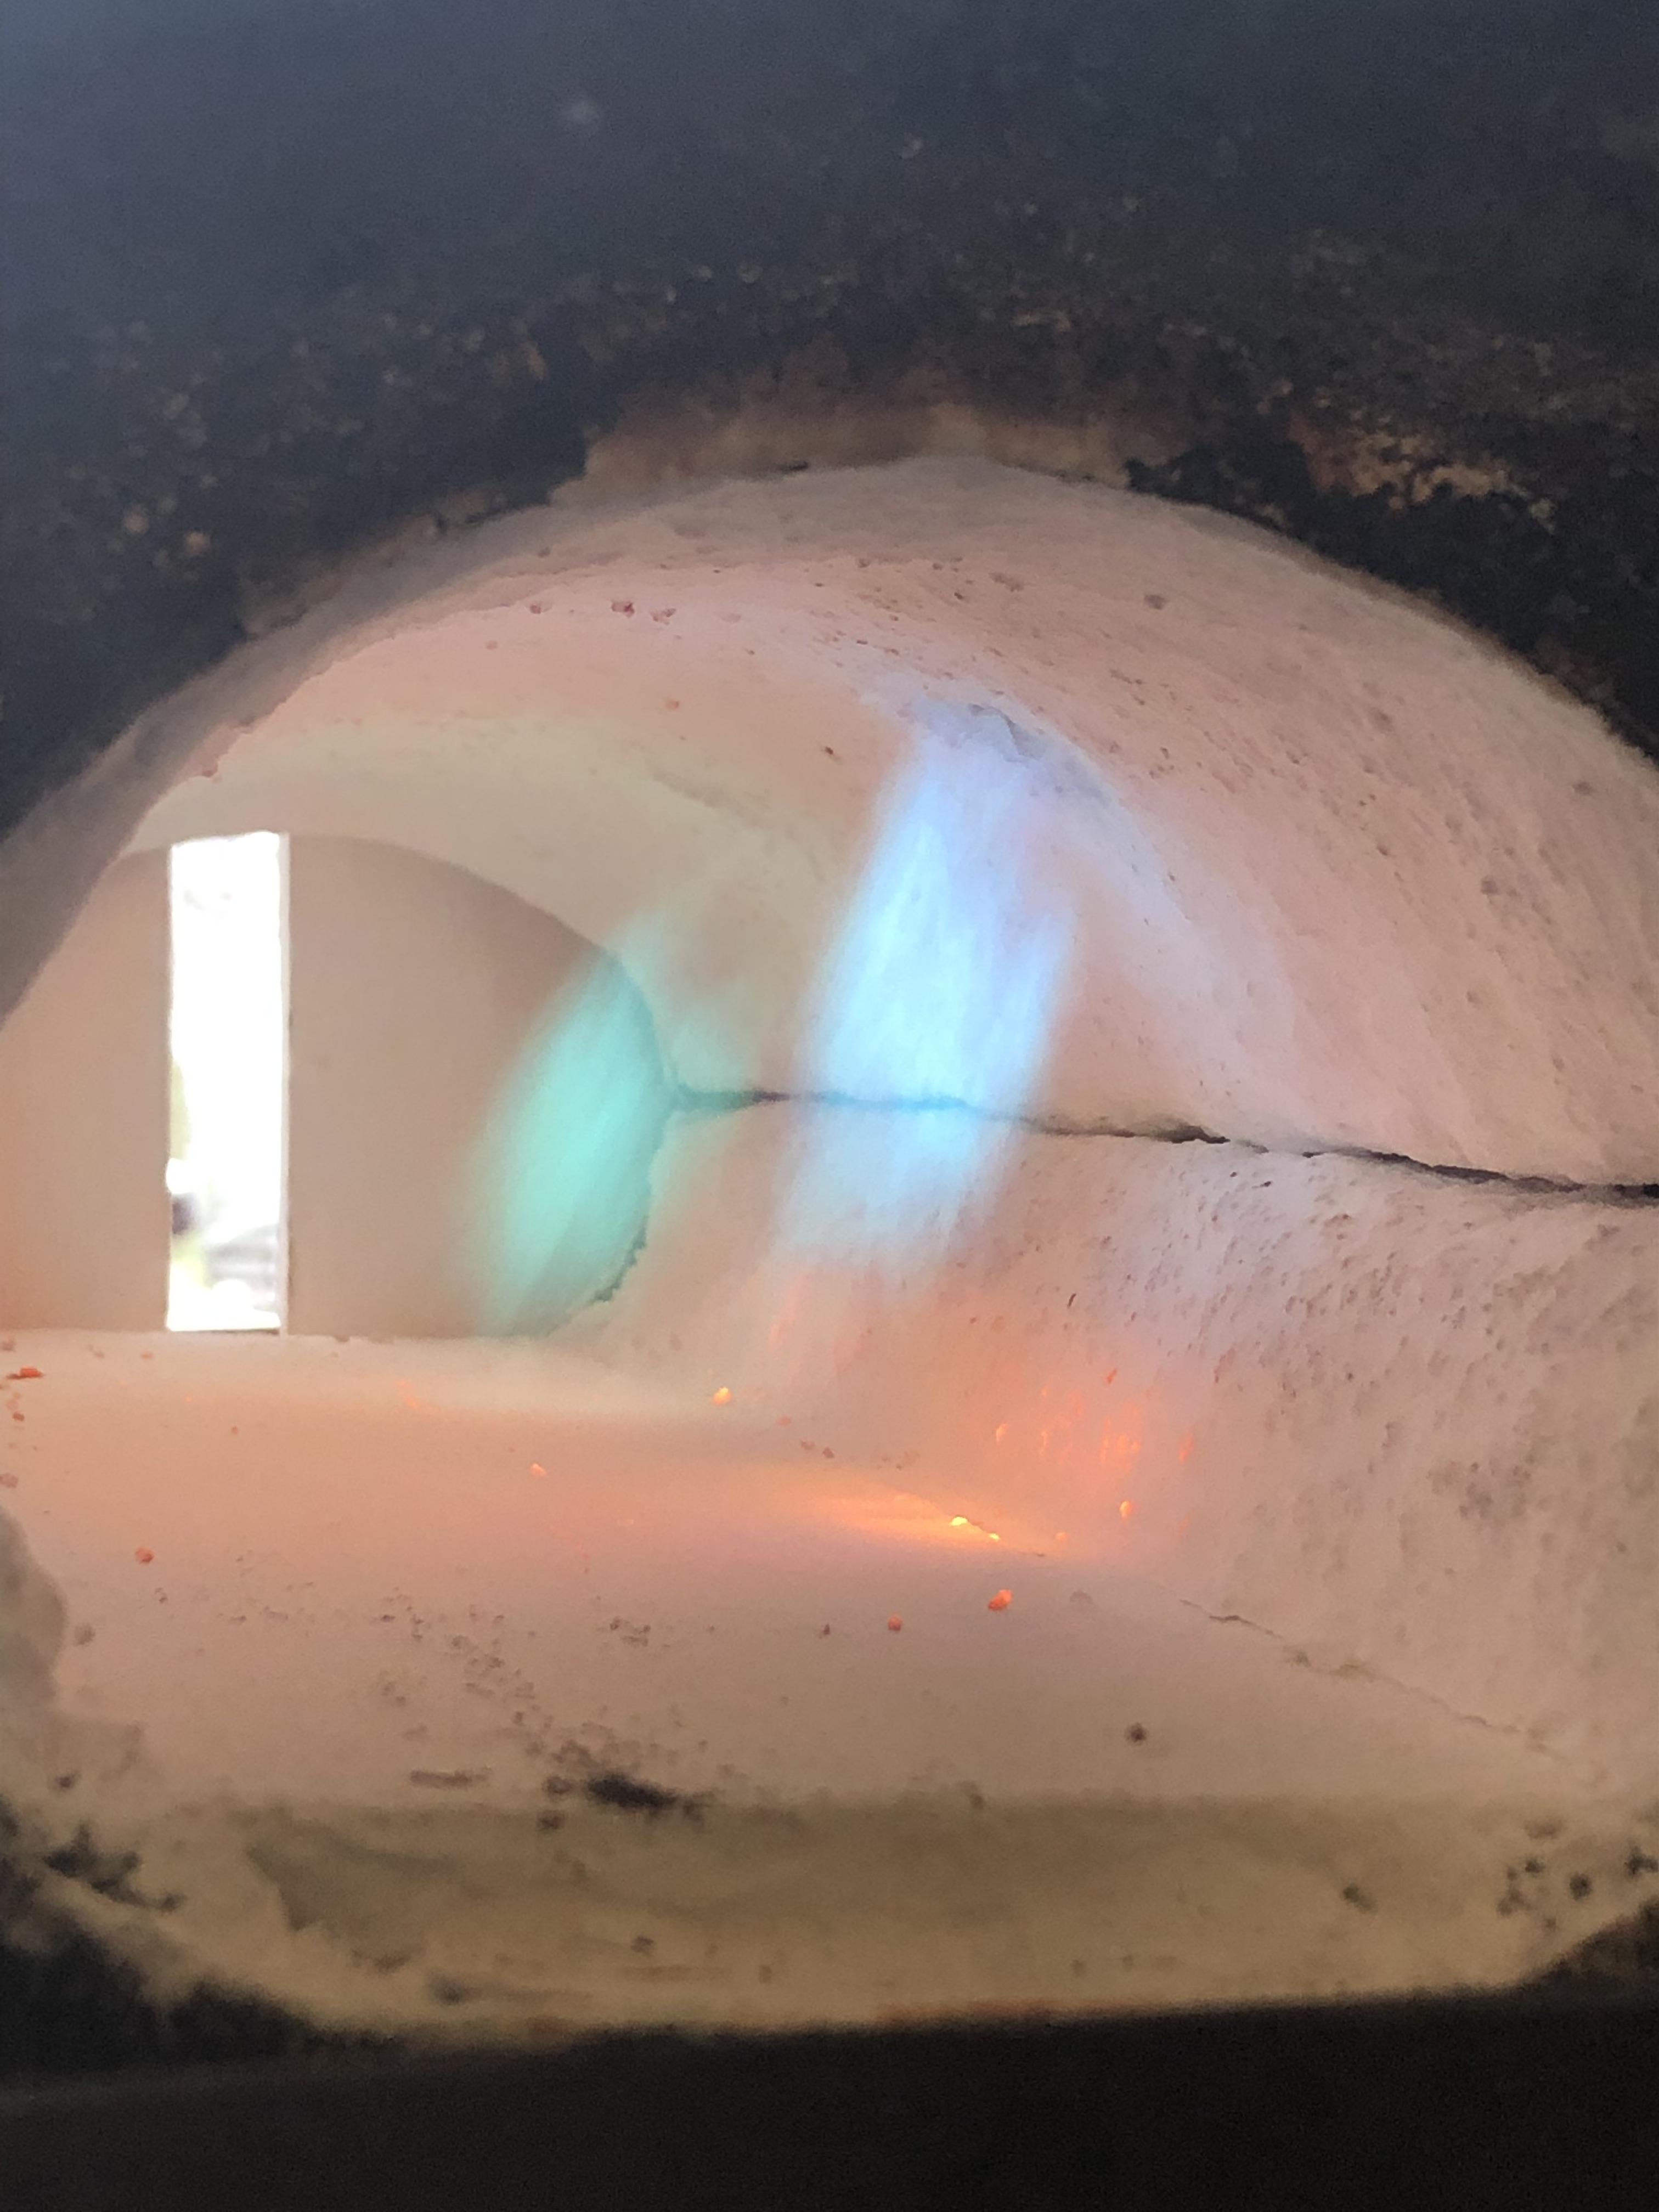
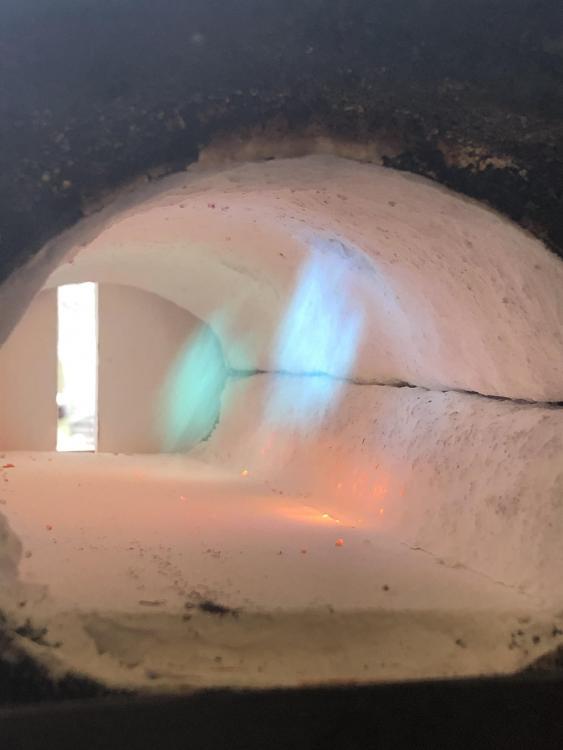
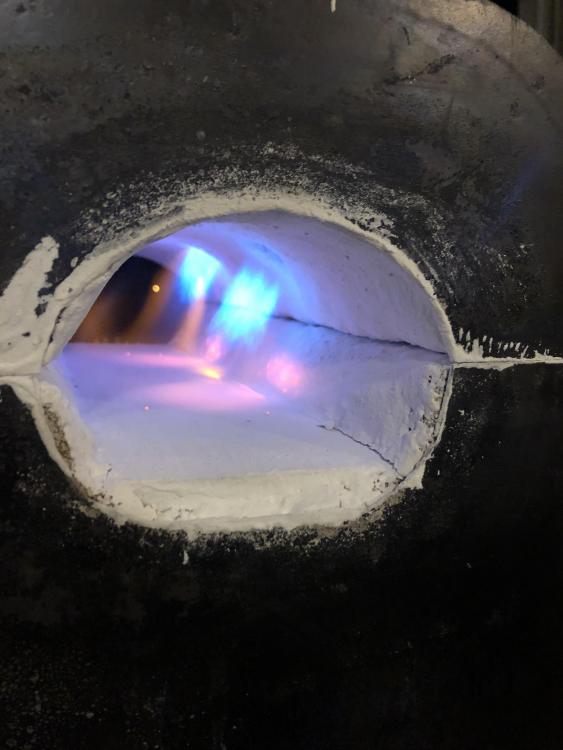
Back at it today. I cleaned out the mig tip on the rear burner and reinstalled it in the burner. Lit the forge and the back one is rather green still, probably the copper I think. Pictures below are right after lighting and then after coming up to temperature some. I ran it for around 10 minutes at around 10-12 psi or so and it seemed pretty hot, hard to get good pictures at that point. The link here is a youtube clip of it running. Let me know what you think. I see what you mean about the near flame burning off the nozzle, do I need to adjust the burner's position within the shell to address that or is it a pressure thing?

-
Frosty, I forgot to take another picture so that last one isn’t the most up to date, my mistake. Everything for each burner is as close to the same as I could get it to be going back to the brass tee flare fitting that splits my main propane line. I don’t have torch tip files, but they sound like a good idea to have and I’ll pick some up. I’m away from the forge during the week so I won’t be able to work on it again until Friday. I’ll probably give that tip on the back burner a clean and see how it goes from there. Thanks for all your help.
-
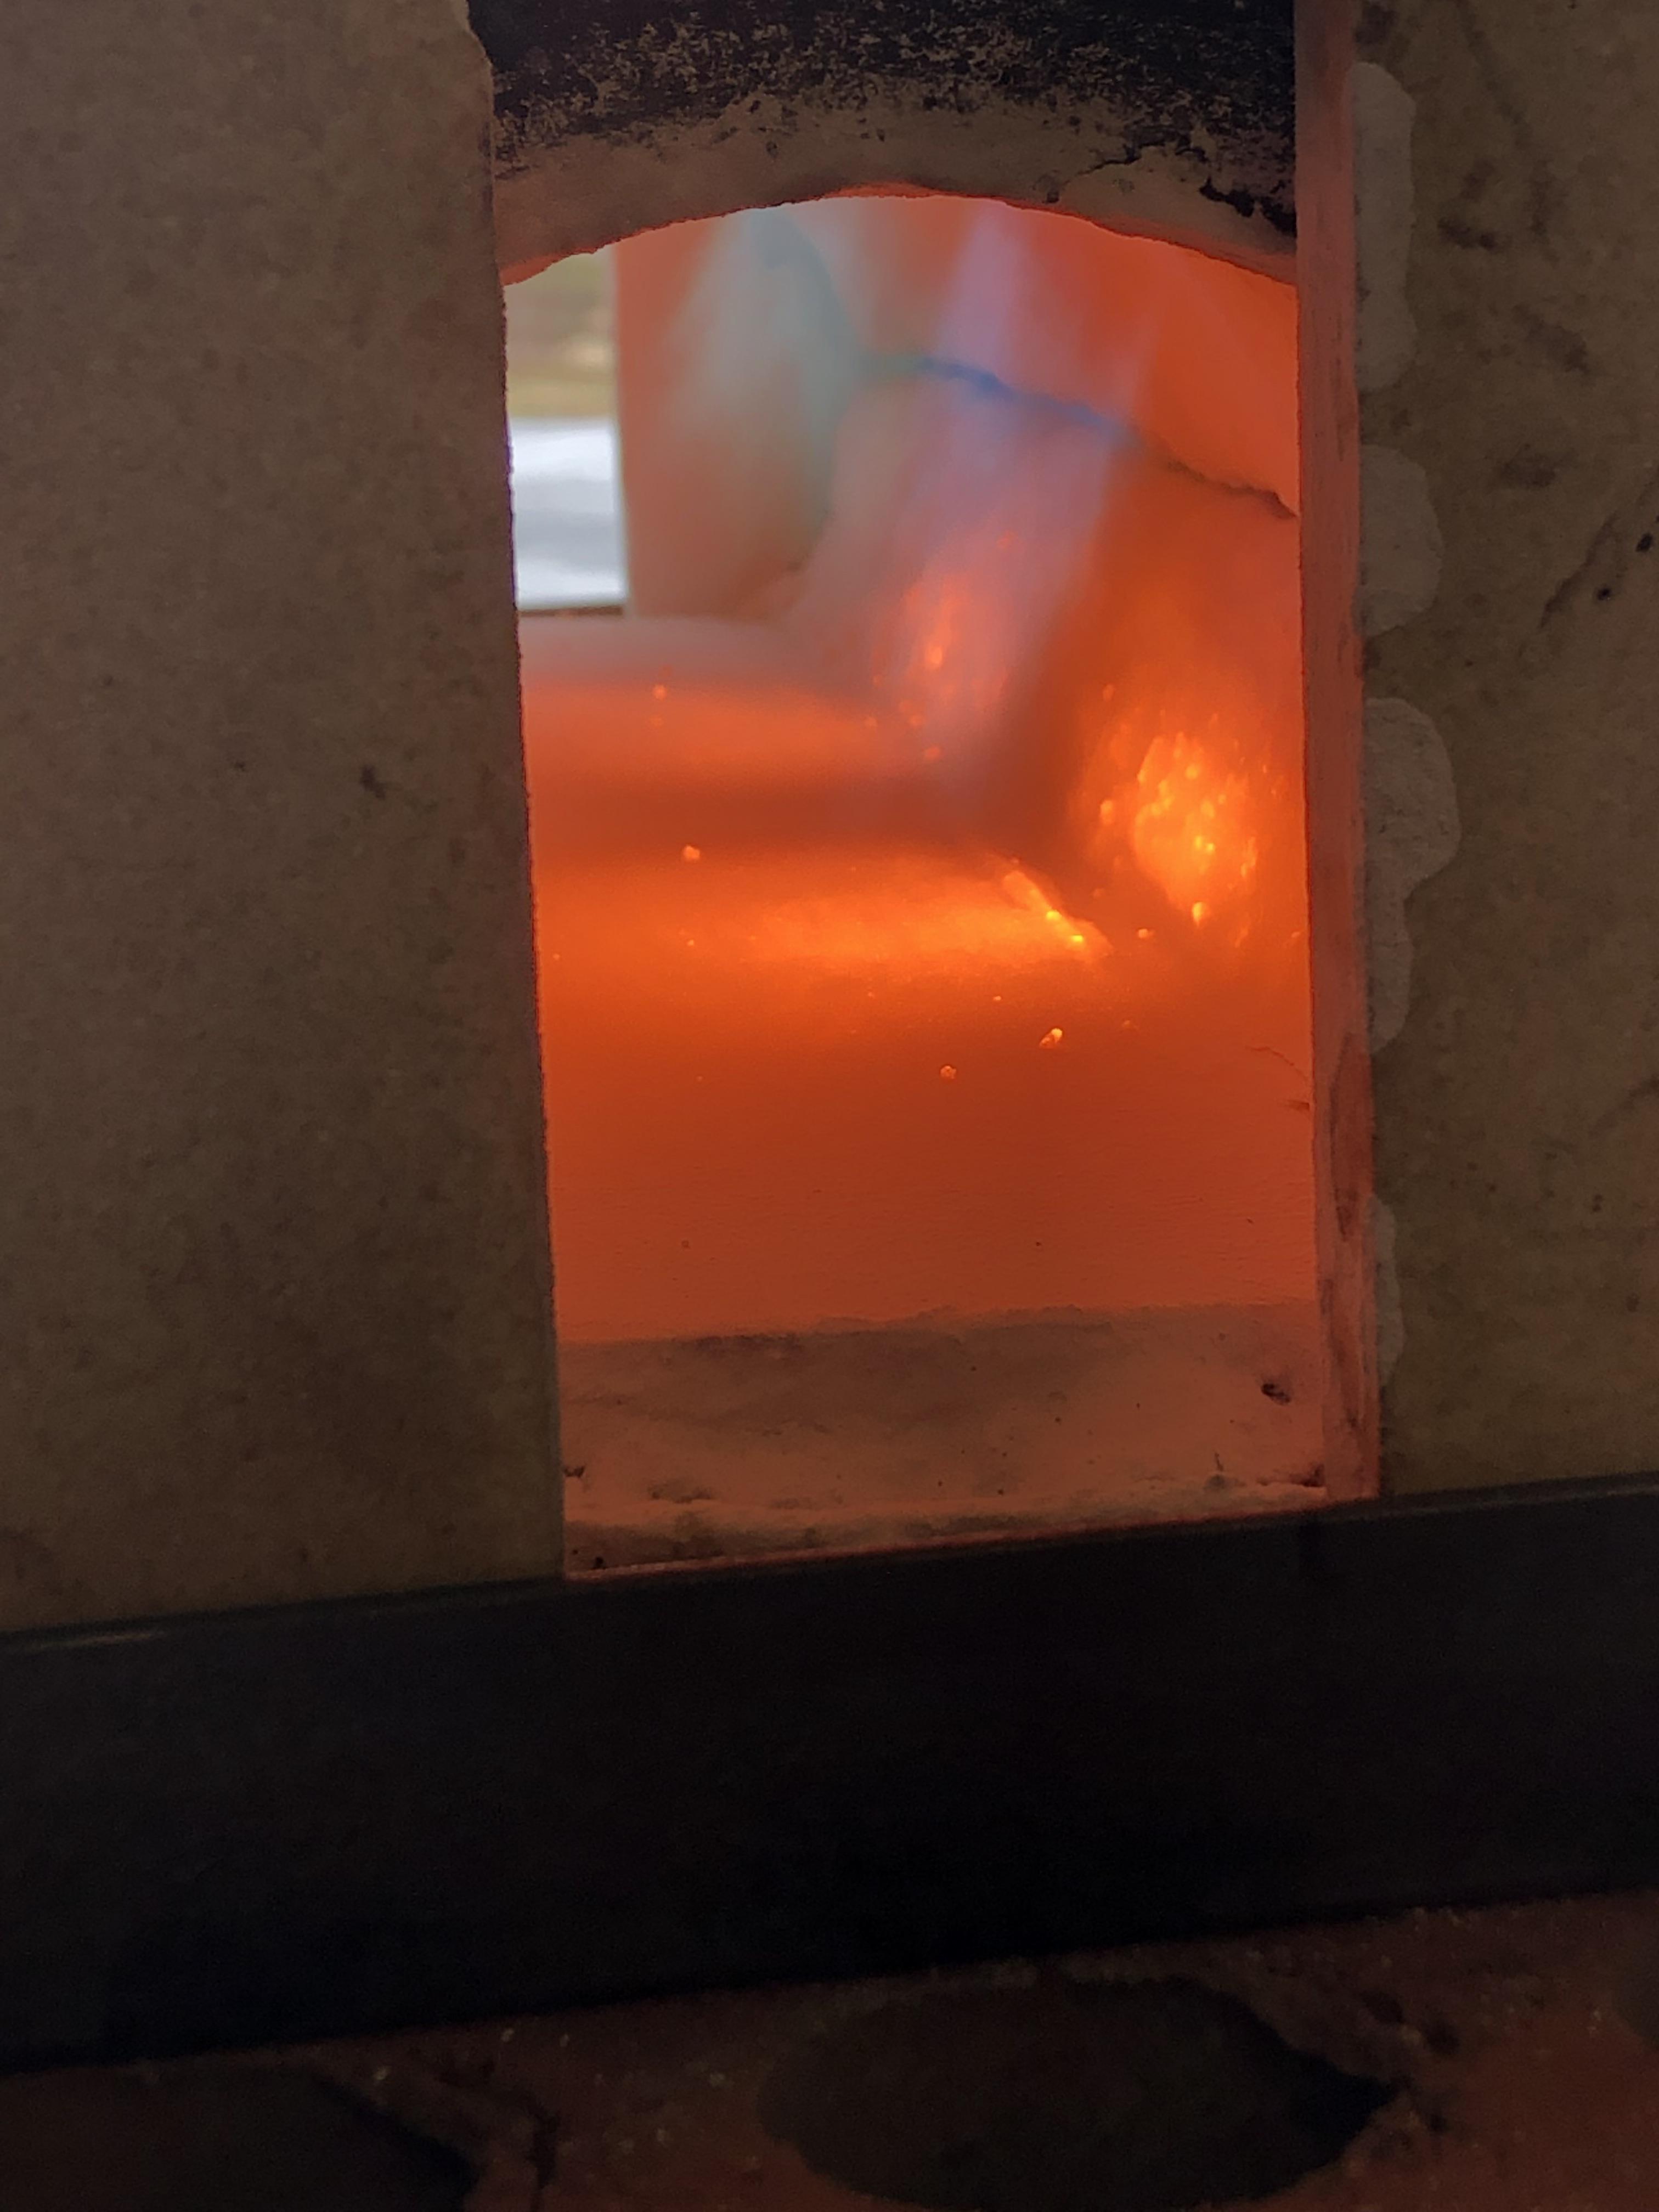
I replaced the tubing on the back burner and I'm not sure it's gotten any better. The flame in the back is now smaller and slightly green. The front flame also shows hints of green at times as well. I've checked the jets and they look lined up properly. If I remember correctly, green = fuel rich and that should be a sign to trim the mig tips? Slight edit: The back burner tube itself was slightly tilted out of alignment with the flare I cast in the refractory, I tweaked that a bit and now both flames look to be the same size, the rear flame is definitely more green, and the front is only a hint green at times.

-
I’ll go ahead and swap out that section of tubing and see how it goes. Would you recommend I trim the mig tips back a hair, say 1/8”? I'll also add that after the forge got around a nice orange color that back burner flame began to flicker every now and again as well.
-
The 1/2" is measured from the outer shell. The mig tips should be relatively clean I think, haven't touched those. I did manage to bends a few flatter portions in the coil loop on that back burner, might that be the issue?
-
Frosty, They're both about 1/2" into the lining. I've only had them running around 6-7 psi, but any dragon's breath that come's out is out the back for the most part, and blue. Not sure if that helps or means anything.
-
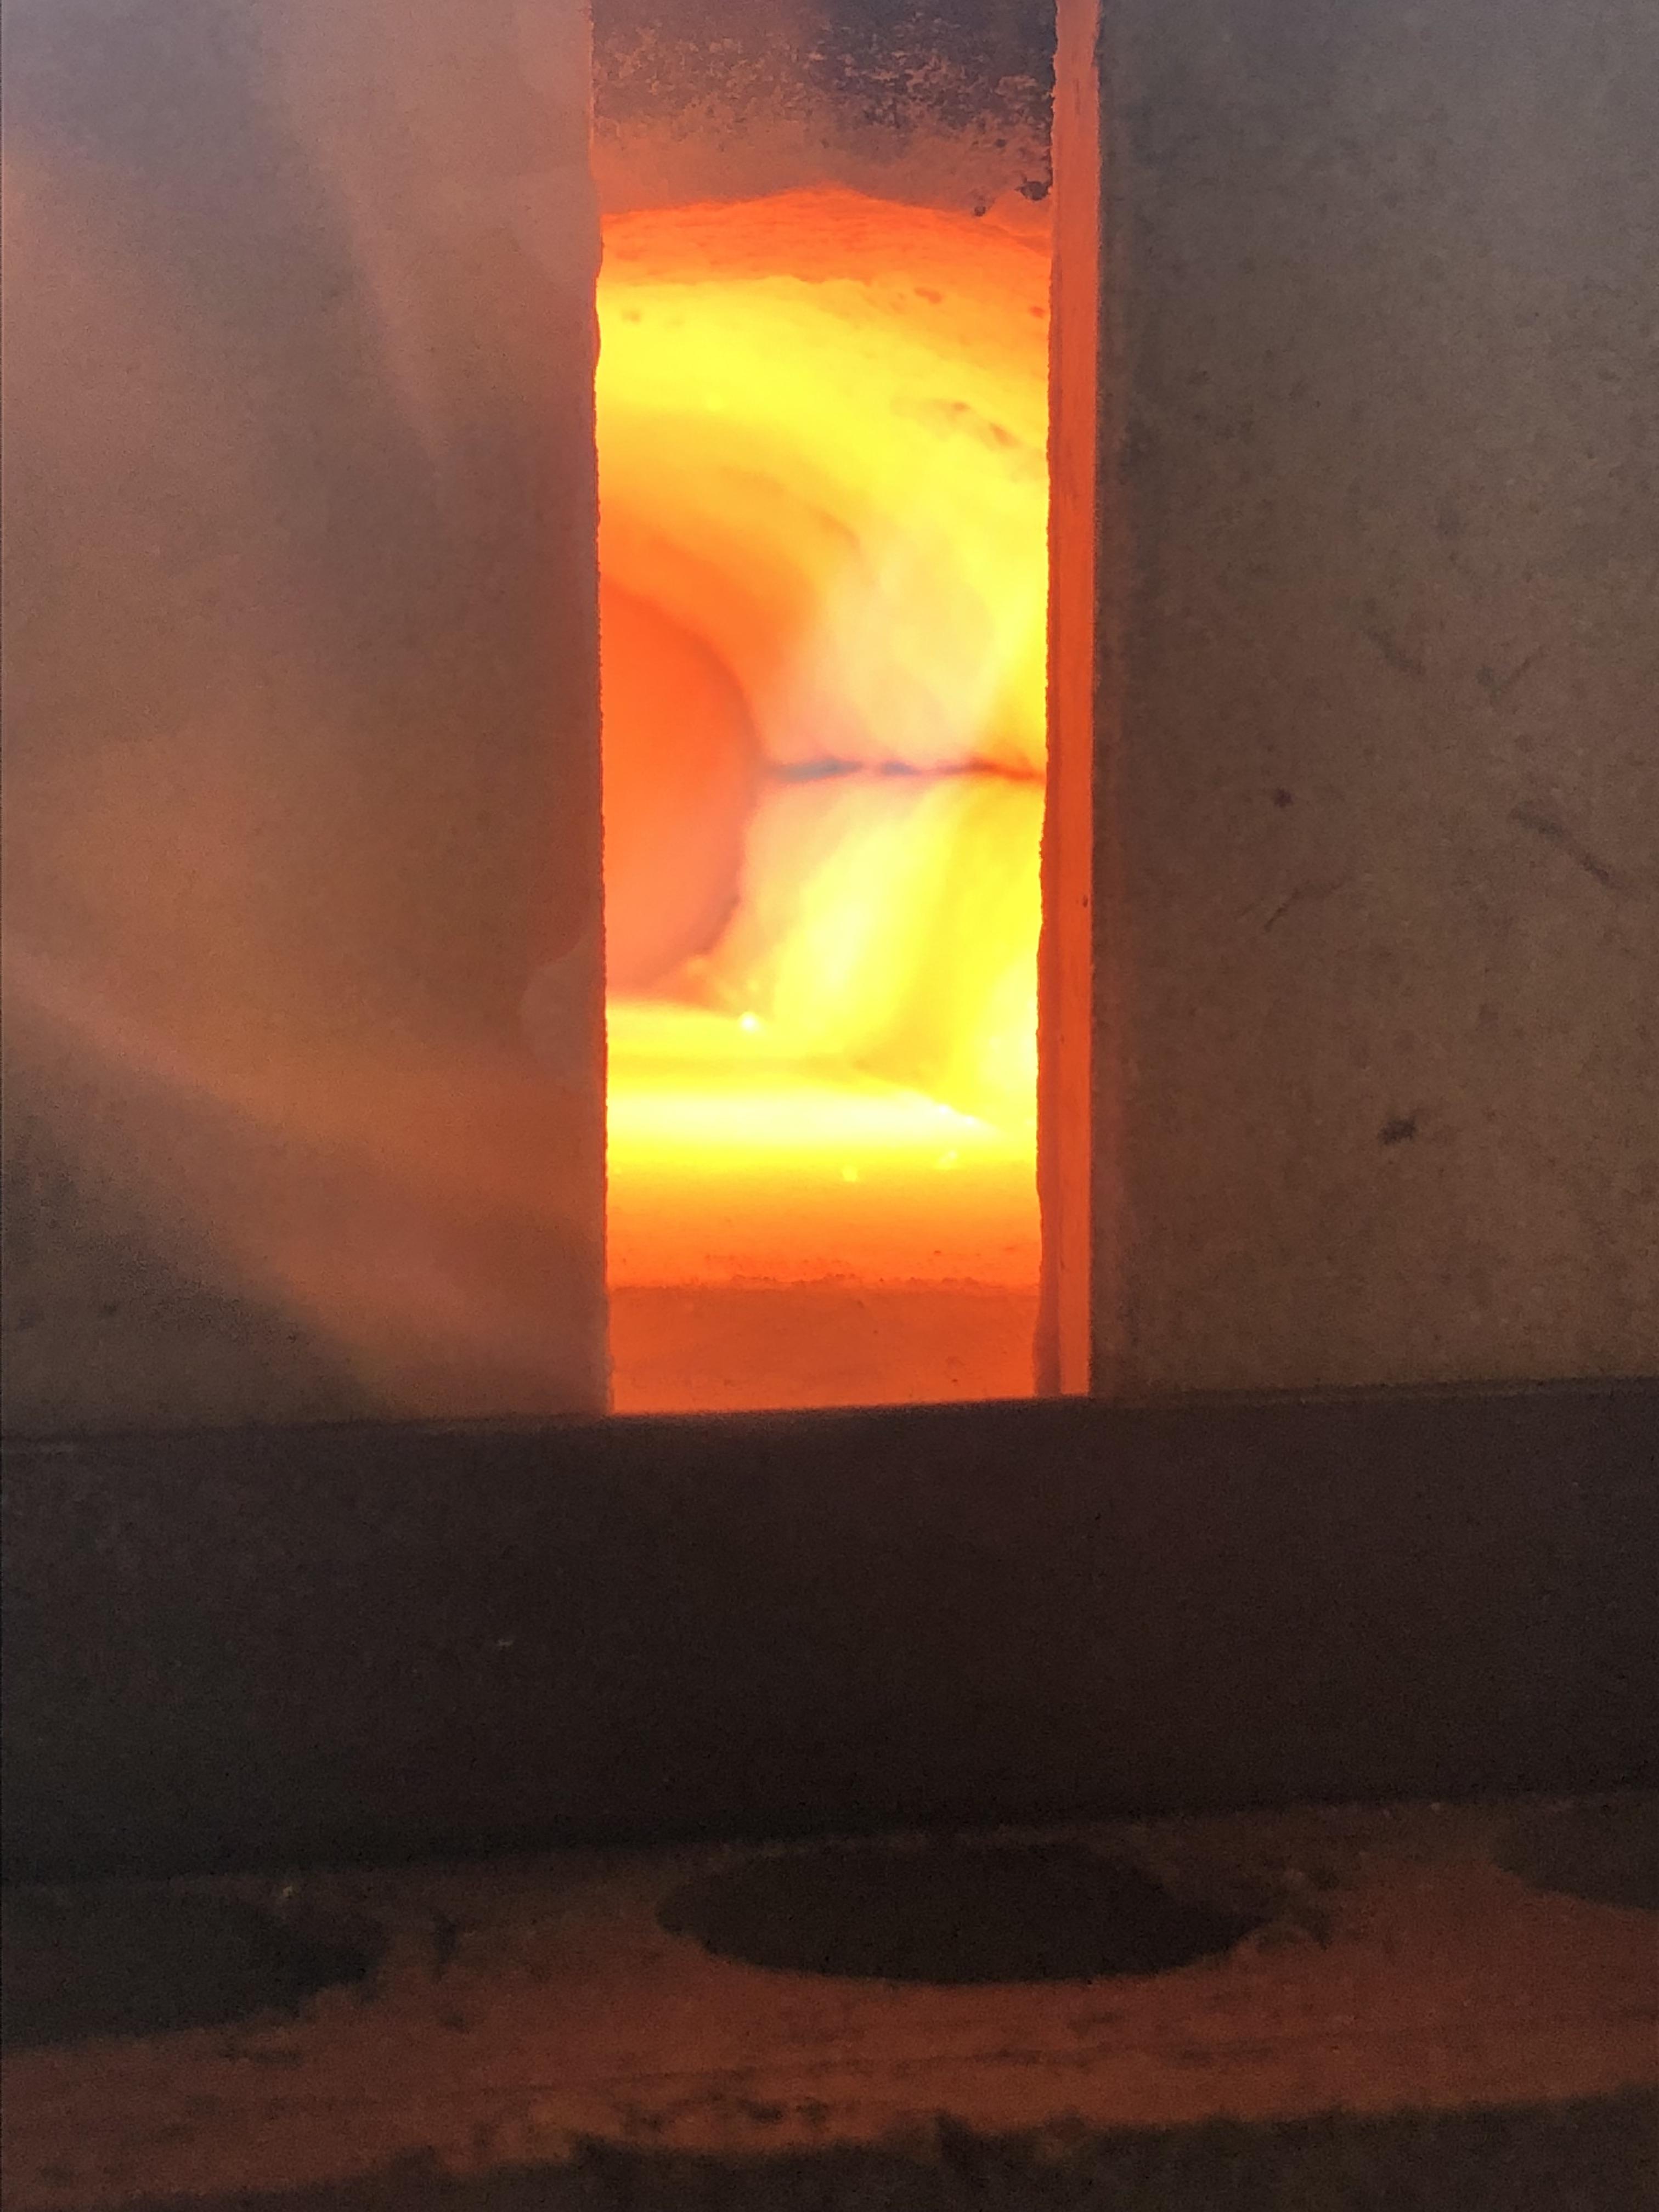
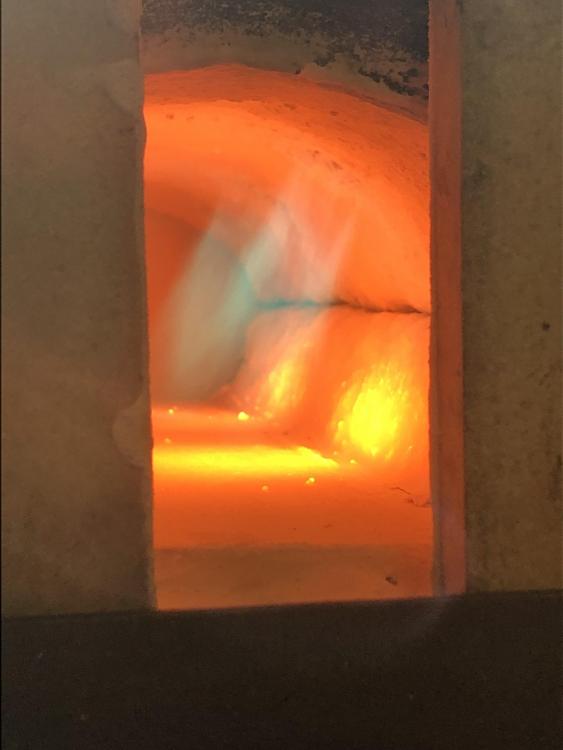
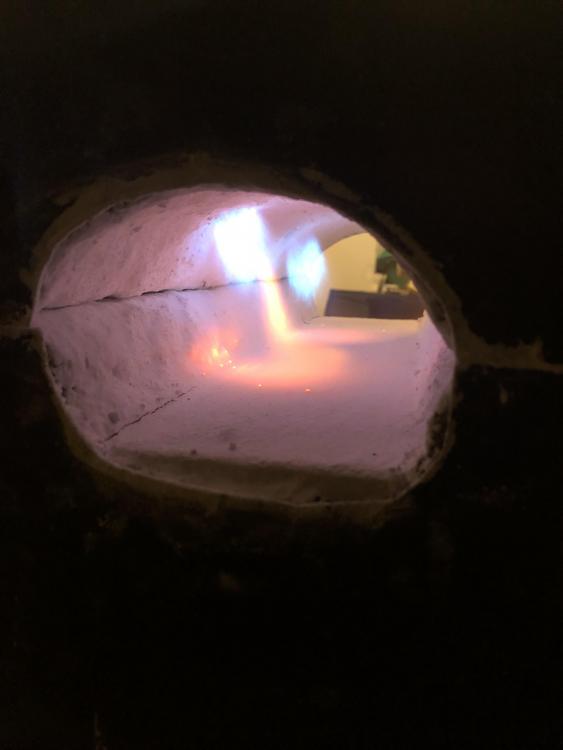
Finally lit the forge for the first time today. I just wanted some advice on tuning the burners. Fairly sure they're a bit fuel rich but I wanted some expert opinions on what exactly should be done. I have 2x 1/2" T-burners. First picture is the front flame, second is the back.
-
The thought crossed my mind but I’m too far along in this build now to change it. I’m certain I’ll be making another in the future and will likely implement that feature though.
-
Yeah, I definitely meant to type "needle" valve up there instead of "need." Thanks for the feedback Mikey.
-
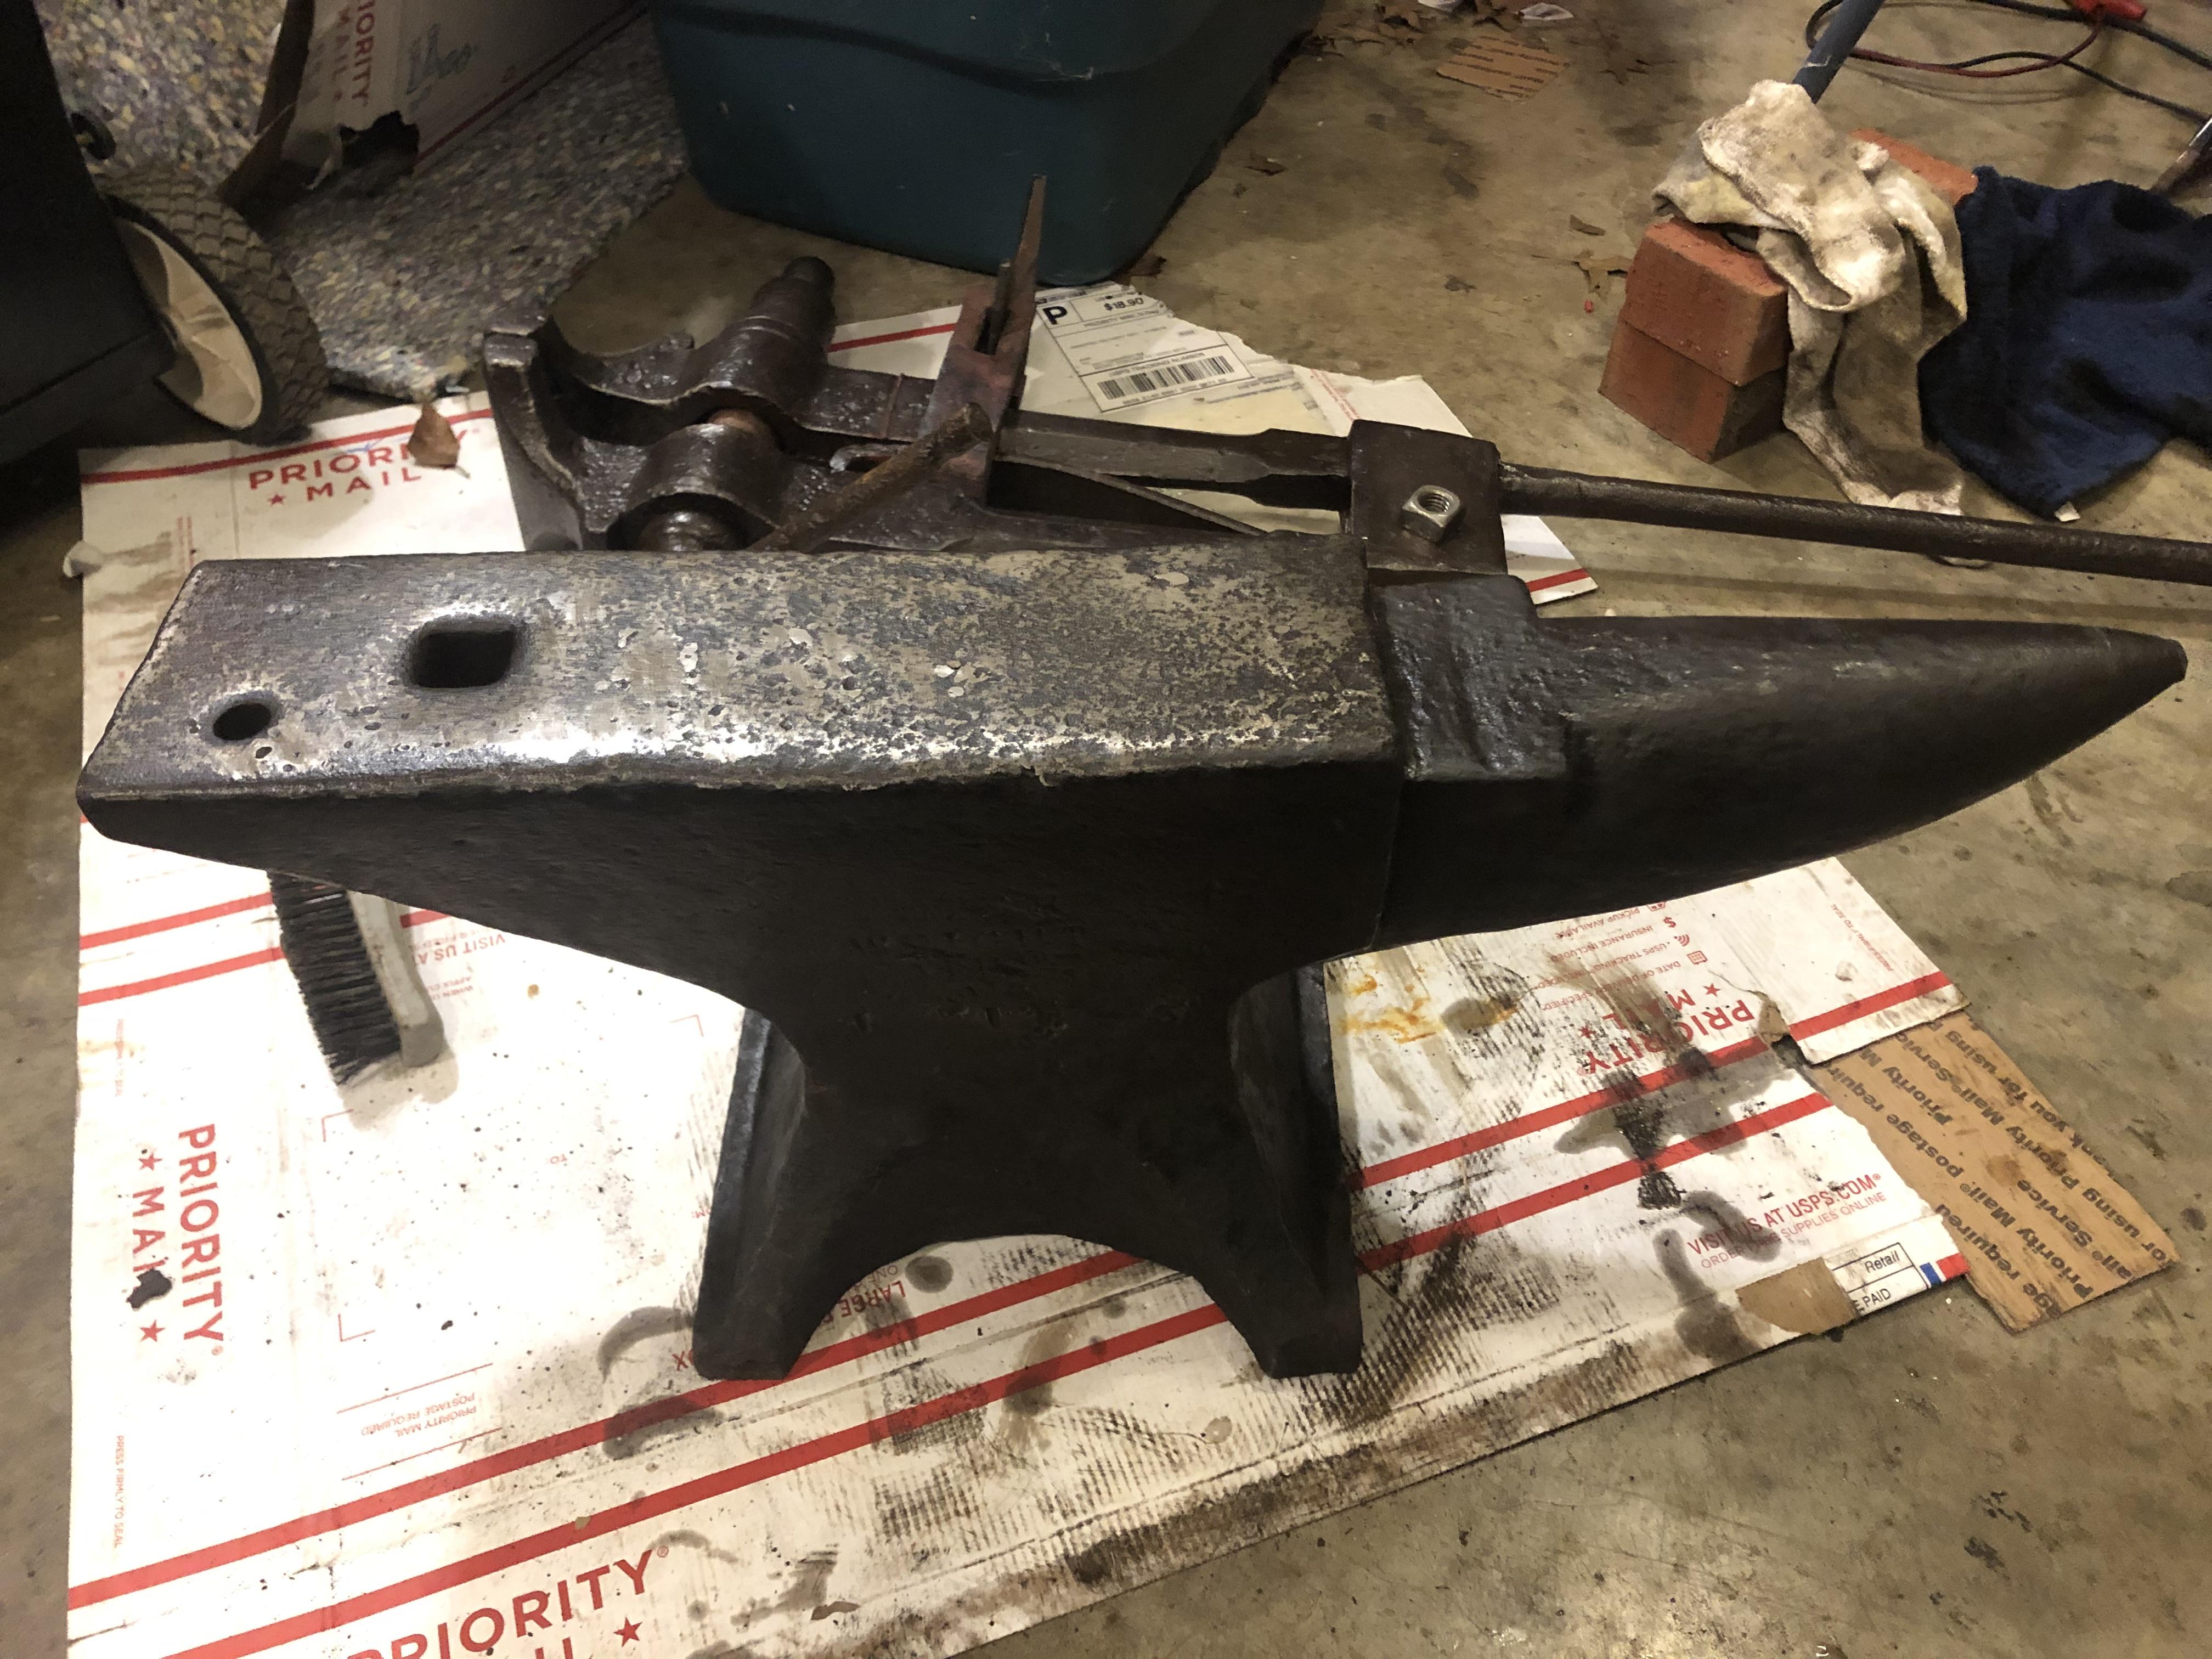
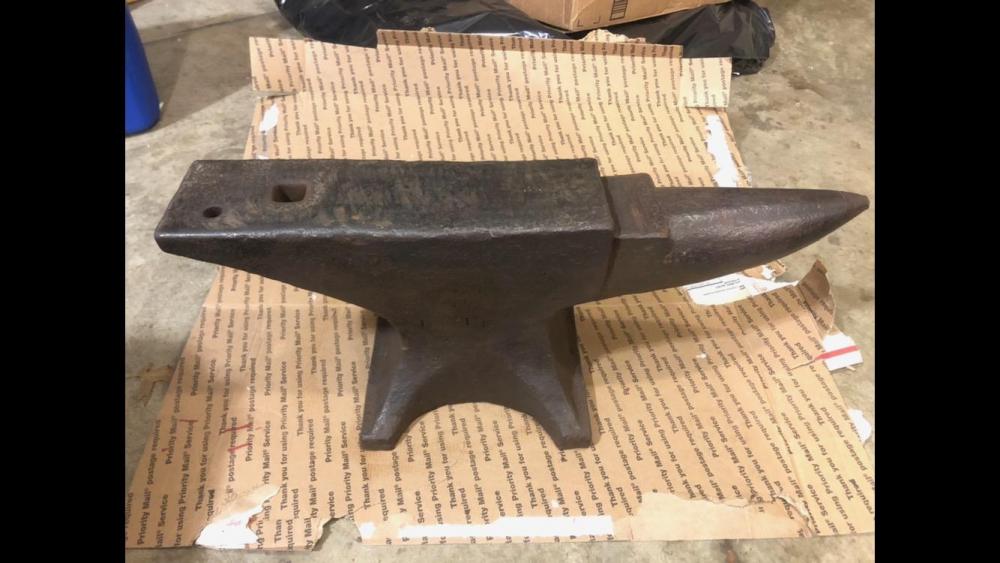
Picked up a 145 lb PW the other week. Here it is before and after some electrolysis treatment, looks like it might be worth it to clean up the face a touch (cameo by the new post vise).
-
Just a follow up here, I've been making progress on the weekends when I can, as school has started back up, but aside from that I've been thinking about propane plumbing. I've talked with some local people and family members that have led me to the follow plumbing route for my two burner setup: Propane Tank -> Regulator -> 1/4 turn ball valve (E-stop) -> hose to T Joint -> 1/4 turn ball valve (burner on/off) -> need valve (fine psi control) -> copper tubing -> T burner flare fitting Does this seem reasonable? Reading some on here I can't see if needle valves are a good idea or not but people I've talked to recommend them. I would appreciate any thoughts, thanks!
-
Great, thanks again for the info. Good to know I'm on the right track.
-
Thanks for the information Mikey. In terms of flame orientation, the target for impingement would be the burner side of the kiln plate. I've read about placing the burners between 1 and 2 o'clock on the shell, angled to the near side of the floor plate. Due to the oval shape, I'd think an orientation closer to vertical would work best, maybe just north of 45 degrees from horizontal. I've attached a crude sketch of my idea, not to scale obviously. Let me know what you think.

-
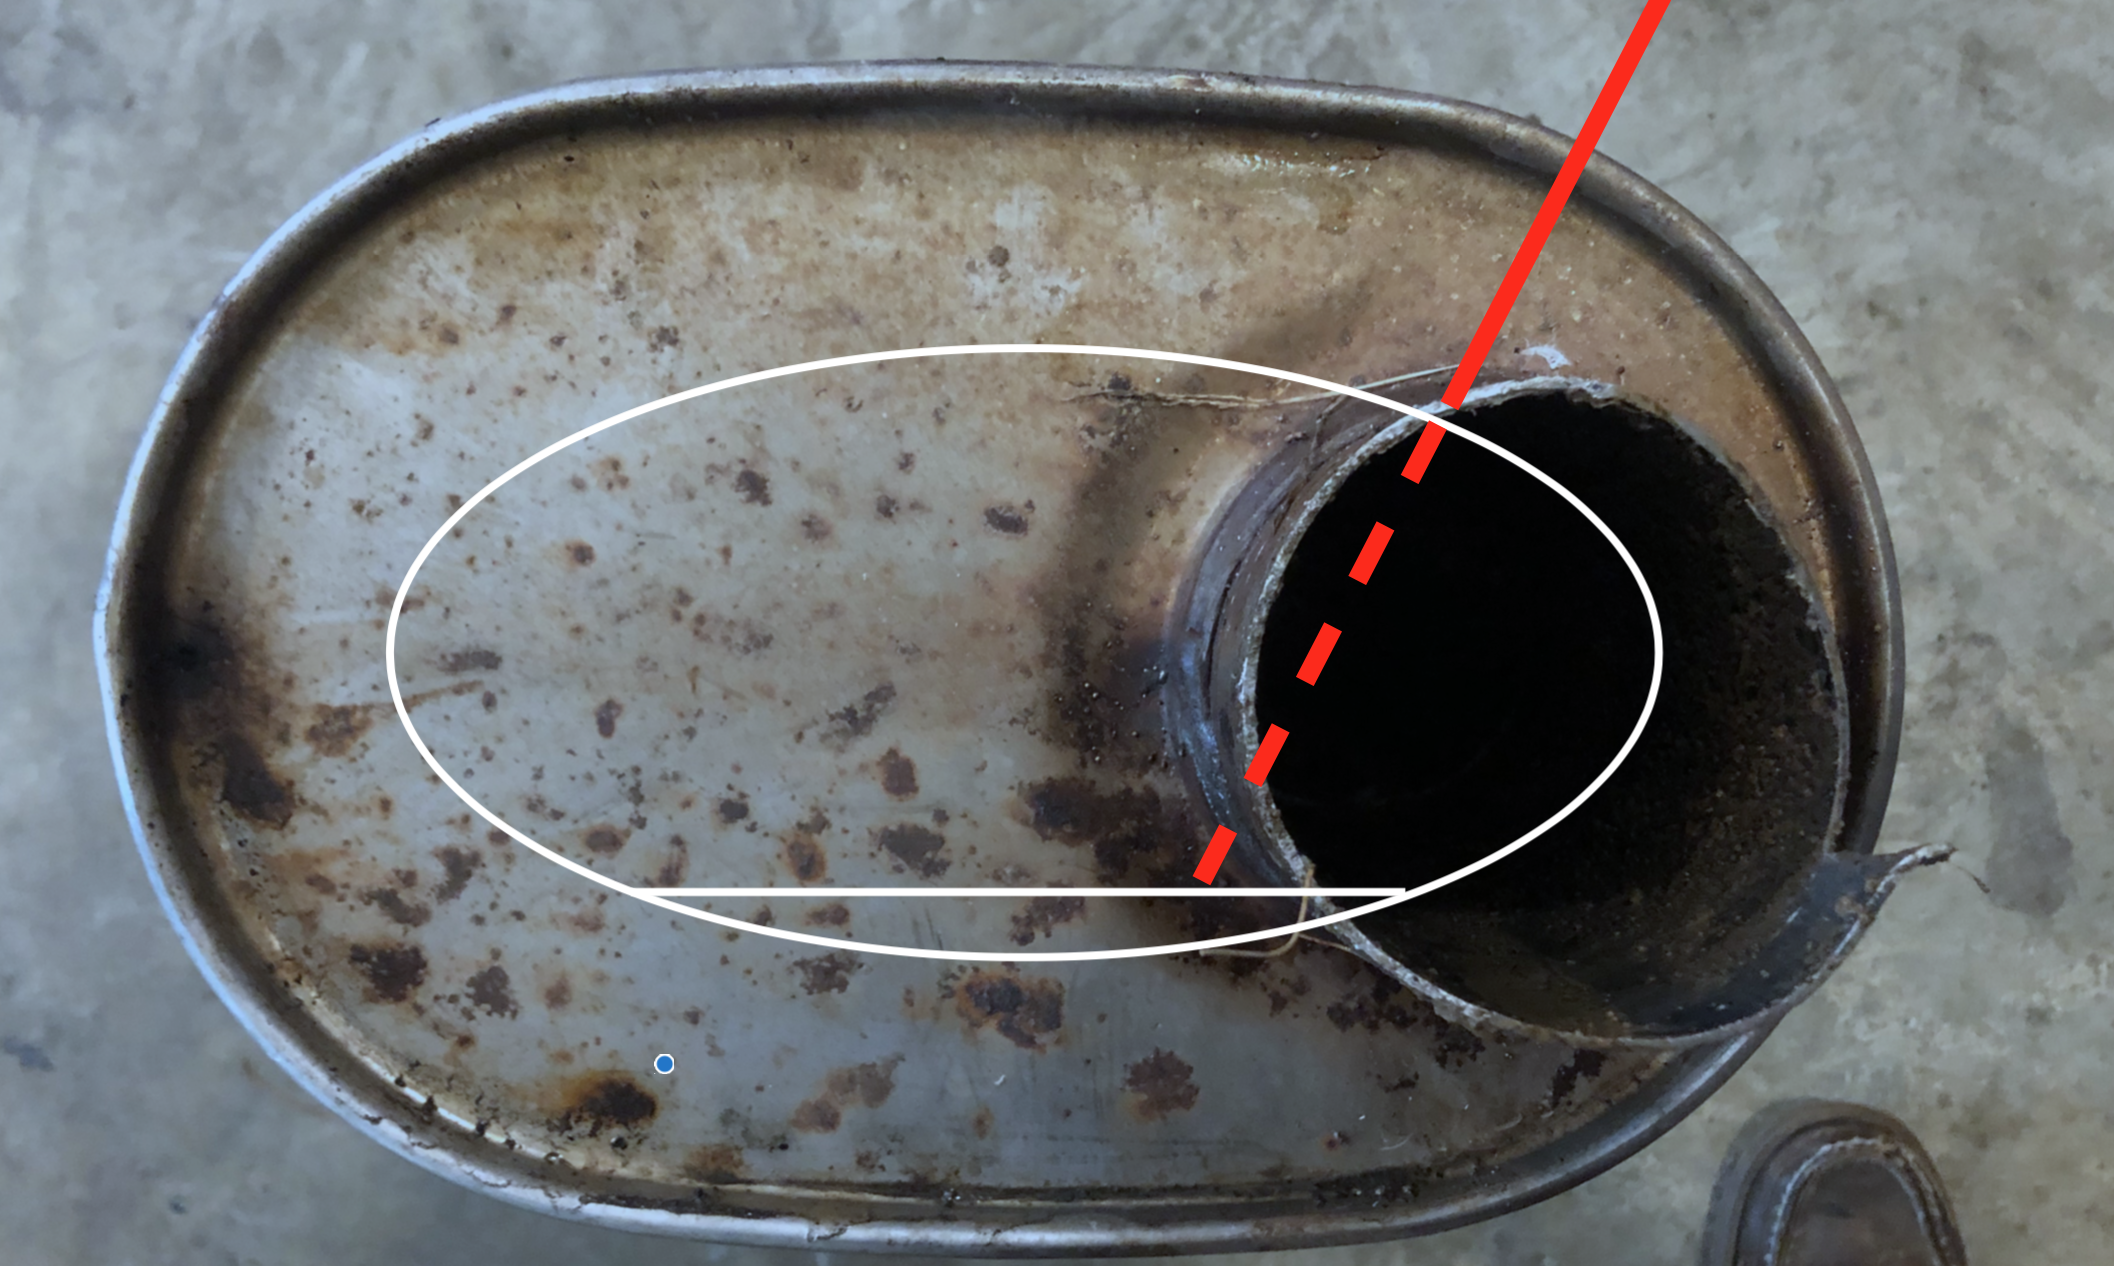
Hey everyone, I've been reading a lot on the 101 threads on this forum over the past few days and have come up with a design and a few questions that I wanted to run by some people before I went out and made too many mistakes. This will be my first forge and I'll likely start out making the usual beginner blacksmithing projects, leaves, bottles openers, hooks and such. Eventually I'd like to get into tool making, blades, and damascus work in the future. Nothing huge and ornamental like railings or anything like that. My design was based in part on the oval Chile Forge and on the muffler build thread I found on this site/YouTube, as we had a decent sized muffler laying around that looked perfect for the job. Now on to the design. Forge Body As I mentioned above, I'll be using a large muffler for the shell. The dimensions are roughly 11.5" x 7.5" for the oval cross section and the muffler is 20" long. I am currently targeting a length around 16" for the design, but I feel that 16" may be too long? More on that with the burners though. For the front and rear openings, I like the idea of attaching some brackets for sliding fire brick but would be open to other ideas. Forge Lining and Floor After reading a lot on the site I feel the Kaowool, rigidizer, refractory, IR reflective setup would work well. I would also have a high alumina kiln shelf as my floor. I'm currently planning on having 2x 1" layers of the rigidized kaowool, 1/4" - 1/2" of the Kast-O-Lite, and then a layer of the Metrikote to polish it all off. I believe I read about also coating the kiln shelf as well, would the Metrikote work for that application? My target cross section after the lining would be something around 3.5" high and 6"-7" wide for the forge chamber, more of a D shape. I can do the math with the insulation layers to know what to expect but I suspect that the wool will compress slightly during installation/rigidizing and I would plan to use the refractory to create my desired cross section in the end, but wouldn't apply more than 1/2". Burners This is perhaps my greatest area of uncertainty. Running the volume numbers for the dimensions listed above, at around a 16" length chokes out a range from 336 to 392 cubic inches, based on a 6" or 7" wide chamber. I am considering building my own Frosty T burners and am familiar with the 350 cubic inches rule of thumb. My case here appears to borderline the need for two 3/4" burners. I feel that with the 16" length, a single burner simply wouldn't be able to heat the space evenly. So my main questions would be should I go for a two burner set up, evenly spaced at 1/3rd and 2/3rd the length of the forge and would two 3/4" Ts work out or should I go for two 1/2" burners? I don't really want to shorten the forge length too much, as I feel projects will grow into the extra room but if that sounds too big I am open to design changes here. Additionally, if I go the two burner route, I'm tossing around the idea of using an insertable wall to basically split the forge when I'd only need to use one burner if that makes sense. If anyone has any suggestions or thoughts on this topic I would appreciate it. I would plan to aim the burners at an angle to hit the near 1/3rd of my floor plate. This is my design concept in a nut shell and I just wanted to run it by some people who actually know what they're doing to make sure I haven't overlooked something or thought up a glaring error. Please share your thoughts or suggestions about anything in the design. Thanks!