

John in Oly, WA
-
Posts
932 -
Joined
-
Last visited
Content Type
Profiles
Forums
Articles
Gallery
Downloads
Events
Posts posted by John in Oly, WA
-
-
I like the eyes of the new dragon and the nostrils of the first "old design" dragon. All are very nice though!
The practical side of my brain is wondering if the dragon's mouth on the cable knife works as a bottle opener?
-
If that were sitting in my shop with intention of turning it into a forge, I'd figure out what interior volume of forge I wanted, I'd take the thing apart and stack the bricks in a configuration to fit the interior volume size determined plus 2 inches bigger on each dimension interior size. I'd build a frame out of angle to hold all the bricks in that configuration. Add hole(s) where I want the burner(s) coming through. Then I'd cast an inch of kast-o-lite 30 all around on the inside surface to get the finished interior dimension, and ponder wrapping the exterior with ceramic blanket and use the sheet metal, rebent and resized to contain the ceramic blanket and make the whole thing look nice. That's just what I'd do.
-
Nice design! I like it.
-
I agree, Trenton. 125 lb. Ser. # looks like A 161989 to me.
-
He "Rect" that triangle alright.
-
Nice! That's about the specs of mine. It's a fun build, be sure to post pics on the progress! We love pics!
-
Makes an awfully tiny window though.
-
I agree, nice blade work!
What's the blade metal?
-
First off, I'd start a new thread focused on this forge, rather than tack on to this old thread. Second, I'd close down those two big holes in the ends of the forge, you're losing all your heat.
-
LBS - Nice output of work! Your rattlesnake made me think of a paper towel holder. Make the tail go straight up a bit taller so the rattle would just stick out the top of the paper towel roll, and maybe bring the head up a little to act as the (whatever the tear off edge stop thing would be called).
EJ - those stick welders are "fun" LOL As long as the welds will hold, I figure that's what angle grinders were made for.
Me - I just continued work on converting my kiln to digital control.
-
I hear ya. I've done some multi pass welding to get bigger stuff together with my 135. Then I bought a stick welder for the bigger stuff - now that's a learning experience I'll be working on for some time. And with the little MIG, I thought I was getting pretty good at welding - LOL! That stick welding's just embarrassing.

-
Thanks! Nice to know. I'll have to do some experimenting.
-
Hey Das, cool new addition to the shop! Gotta love those new additions to the tool collection!
I have a welder like your Lincoln sitting in the background of your photo - a 135Plus. It's nice for the thinner stuff.
-
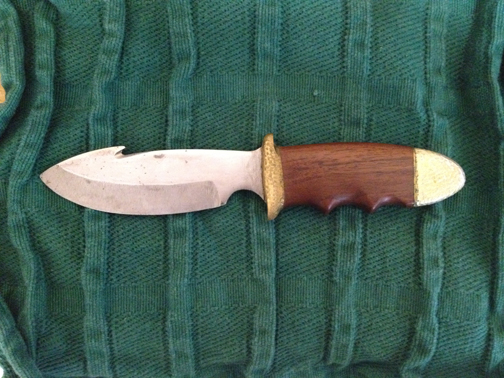
A knife I made from an old flat file in high school shop class 40 years ago. Probably wouldn't even be allowed to make one in school these days. Even back then, the shop teacher kept it locked in his office when I wasn't in class.
-
Thanks Theo. That makes sense. I've just started playing with a home printer and I'm finding that out - the resolution isn't great. It'll work for some things, but for high quality/high resolution, the commercial printers can't be beat.
-
On 3/13/2017 at 2:02 PM, lanternnate said:
If you flip the positive and negative after you etch for depth you can blacken. This was my first test run including blackening.
Lanternnate - How durable is the blackening? I tried something similar using copper sulphate pentahydrate (Root Kill at the orange box store) in water and a copper wire for an anode. It coated the piece with a nice copper shine, but rubbed off very easily.
-
16 hours ago, ThomasPowers said:
And what is greener than putting their scrap through another use cycle before melting it down?
That is something most people seem to have ignored - that "recycle" is the last resort on the triangular logo. Reduce, reUSE, recycle.
-
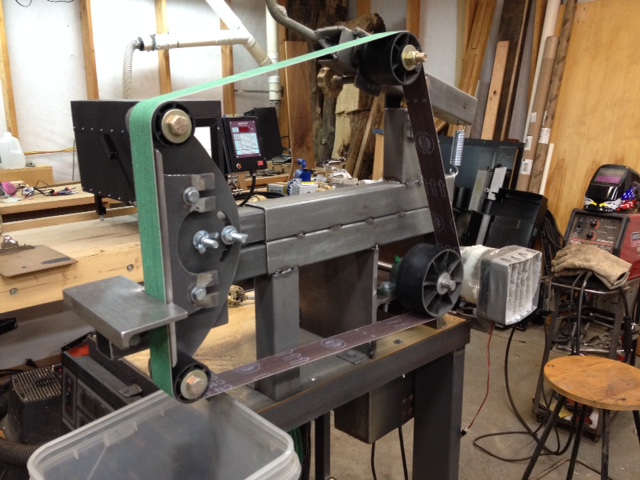
The wheels I picked up on eBay from oregonblademaker. The tracking adjustment is just a door hinge I welded to the top angled square tube. If you look closely at the bottom two pictures - the top most wheel, you'll see a brass knob. That's the tracking adjustment. I drilled a hole in the door hinge for a 5/8" bolt, slid the bolt through and welded the bolt to the door hinge. The tracking wheel slides onto that bolt. Lined up the hinge on the upper square tube and welded the other leaf of the hinge to that. Welded a nut to the bottom side of that square tube and ran a bolt through it to contact the bottom edge of the hanging hinge leaf (actually welded a bit of an extension to that bottom edge of the hinge. Ran a spring onto the bolt before screwing it into the welded on nut just to keep some tension on it to hold it in place. Cast some brass knobs onto all the adjuster bolts just for fun.
-
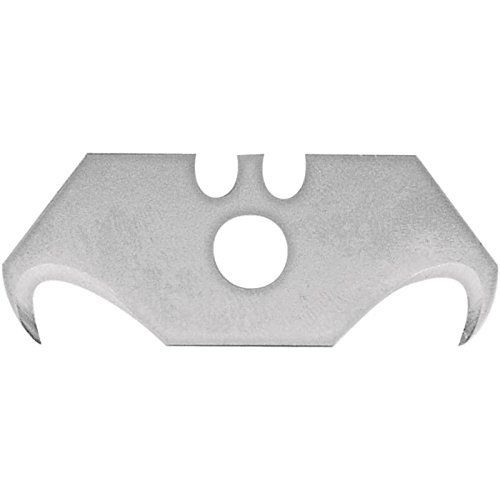
Then there's these Milwaukee hook utility knife blades - pack of 100 for about $10-$11 on eBay.
-
Nice Theo! I'll be tuning in.
I'd like to hear more about your 3D printing and casting experiences. Mainly because I just bought a 3D printer kit with the idea of printing and casting parts and pieces and am wondering if PLA works for this or if I need to go to something like that Moldlay wax-like filament. Or are you printing straight to metal?
-
Michael - what spring are you referring to? The belt tensioning spring? Yeah, it's a box store purchase. Fan and filter idea - steal away. I picked up the idea from other conversations on IFI.
Frosty - Yes, the motor is pretty strong at the high end. The label on it states 2 HP and max 7099 RPM. I have mostly run it full speed, which according to the calc's above for the pulley configuration is about 5227 SFPM. I thought it was kind of weak at first, but then I realized the belt was slipping. Installed a belt tensioner and solved that problem.
-
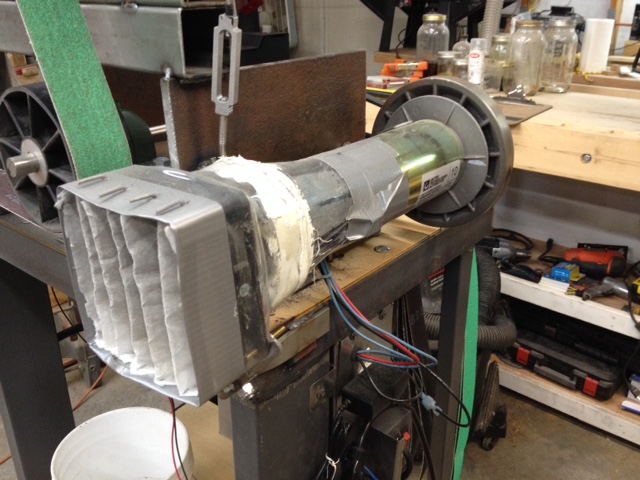
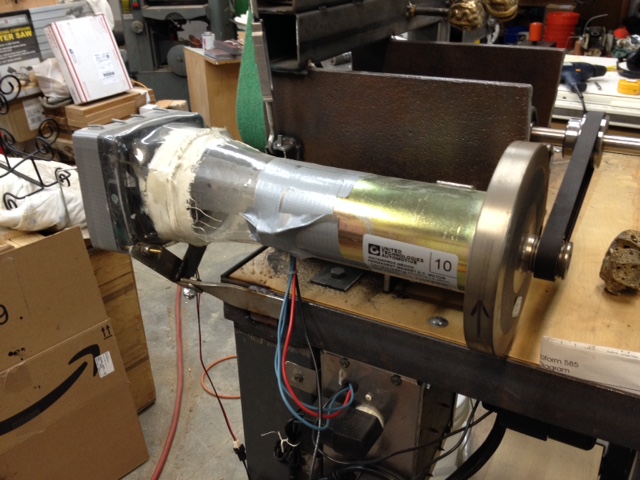
Well, I finished my belt grinder built from a treadmill a while ago. Now I wonder how I ever got along without one.
I thought I'd just post my cobbled together attempt to increase the life of the treadmill motor by keeping all the grinder swarf out of it. I wired in a 110v outlet to the motor circuit. Bought a computer fan and wall wart of appropriate output to power it. Built a pattern out of wood and heat shrunk a couple of plastic bottles over the pattern to form a duct. One large bottle couldn't accommodate the square size at the fan end and shrink enough to form the diameter of the motor at the other. So I had to use two of different sizes and trim them and goop them together. Bought a furnace filter to cut into squares to fit. It's pretty ugly, but it is trapping a lot of particulate.
I don't know if I really need the computer fan, but I put it in there to counter any decrease in the built-in motor fan's airflow caused by the added filter, and figured it wouldn't hurt anything.

-
It may be an optical illusion, but on your burner, the angle of the brass elbow to the burner tube disturbs me. It should be inline - in other words, the hose fitting 90 degrees to the burner pipe.
-
Peter B - Read up on burners (Burners 101 sticky) and forges (Forges 101 sticky). Start a new thread with pictures of your forge and burner and the problems you're having and ask the questions you need answers to.
Tong Rack
in Tools, general discussion
Posted
Very nice idea. I assume it spins on the shaft to bring the desired tool within easy reach without having to do all that laborious walking around.
Another project to add to the list! I'm having fun!