ecforge
Members
-
Joined
-
Last visited
Everything posted by ecforge
-
-
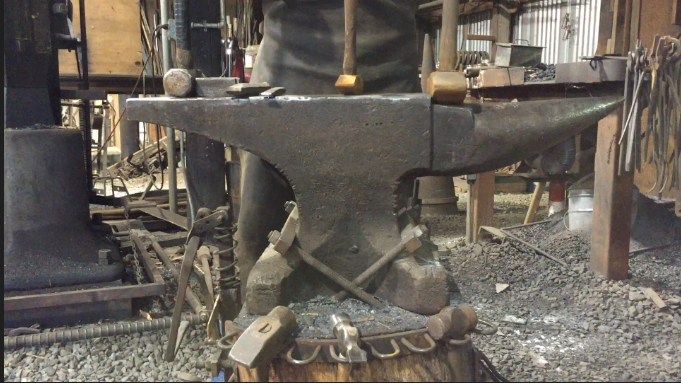
My 448lb Hay Budden. It is a beautiful anvil. Face is spotless clean, but markings around waist show that it has had done lots of work. Very nice tool....
-
Annulus!! Another great term! This pizza oven is getting more respectable all the time! Sonotubes are terrific, and that sounds like a slick application. In applications like this (using them as interior block outs) caution is advised when hydraulic form pressures get large. I have a great friend, Dustin Ferch ...(phenomenal concrete man, who helped me place and finish my forge) who learned this the hard way. Casting a chimney for a "Russian?" stove...24 inch OD, 12 inch ID, good rebar section etc... pumping the mud into the form, when the lift got to about 8 feet high the inner tube collapsed. Shipwreck! The moral of the story is that hydraulic form pressures mount at approximately 150 pounds per square foot for every vertical foot of formed height and sonotube does NOT resist crushing as well as it resists tension. Probably at least partially because the outside of the tube is not water resistant. The other moral of the story is that Blacksmithing is way more fun that concrete.
-
I like that term 'vaulted' to describe a forge like this....Lots of people who see mine call it a 'pizza oven' The wall thickness of the forge tapers from 2 inches at the peak of the barrel to 3 inches thick where the forge rests on the base. Building the forms was simple, casting the refractory was not. Visualize the frame of the forge upside down on sawhorses.The plywood clamped to the ends of the forge frame located the top of the door opening and the location of the wall thickness from the door down to the base. The interior plywood forms established the thickness of the headwall and located the arc of the interior ceiling of the barrel. I used styrofoam block outs wrapped in duct tape to create the opening for the ribbon burners. The refractory when mixed according to instructions is very strange stuff. Containing only 5% lime, it is not cohesive at all. It does not want to stick to itself and when mixed with the right amount of water will only barely create a ball when squeezed in the palm of your hand. So ... placing the mix was entirely dry packing and then screeding/scraping to final shape. The result though is a well consolidated casting. As if I was casting a curb face, or a set of stairs, after the refractory took an initial set, I stripped the interior and exterior head wall forms... faced them up... covered the whole thing with visqueen...put in a light bulb to keep the temperature at optimum and let it cure.
-
Thank you. The Thanks all. I used styrofoam wrapped in duct tape to make blockouts for the ribbon burners. The mold included plywood on the ends of the forge, on inside and out. Once the refractory set up I stripped forms. The rest was hand packed and screed.... very interesting material to work with.
-
Welp here goes - This is a video my son helped me create describing my forge. I designed and built this about 4-5 years ago and it has been everything I imagined and more. If I could do it over, the only thing I would change would be smaller blower fans.... these ones are a bit overkill. Hope this helps someone trying to design and build a forge of their own! I'm proud of this forge,
-
Jib crane went up yesterday. Still have few things to do on it before it's functional, but the hard part is done. I had friend film a bit so I'll try and put another video together showing crane and modifications I made. It's going to make my shop very useful. I have been dealing with back issues recently, so I'm hoping the crane helps take stress off myback and allows me to keep working on heavy-ish pieces.
-
Thank you, yes there are quite a few interesting pieces in this shop. My family all refers to it as the 'cave of wonders' aka the cave. The forge is something I designed and I'm hoping to do a similar video on it soon. I'll add it here as well. Thinking about OSHA in my shop gives me chills...
-