Krush
Members
-
Joined
-
Last visited
Everything posted by Krush
-
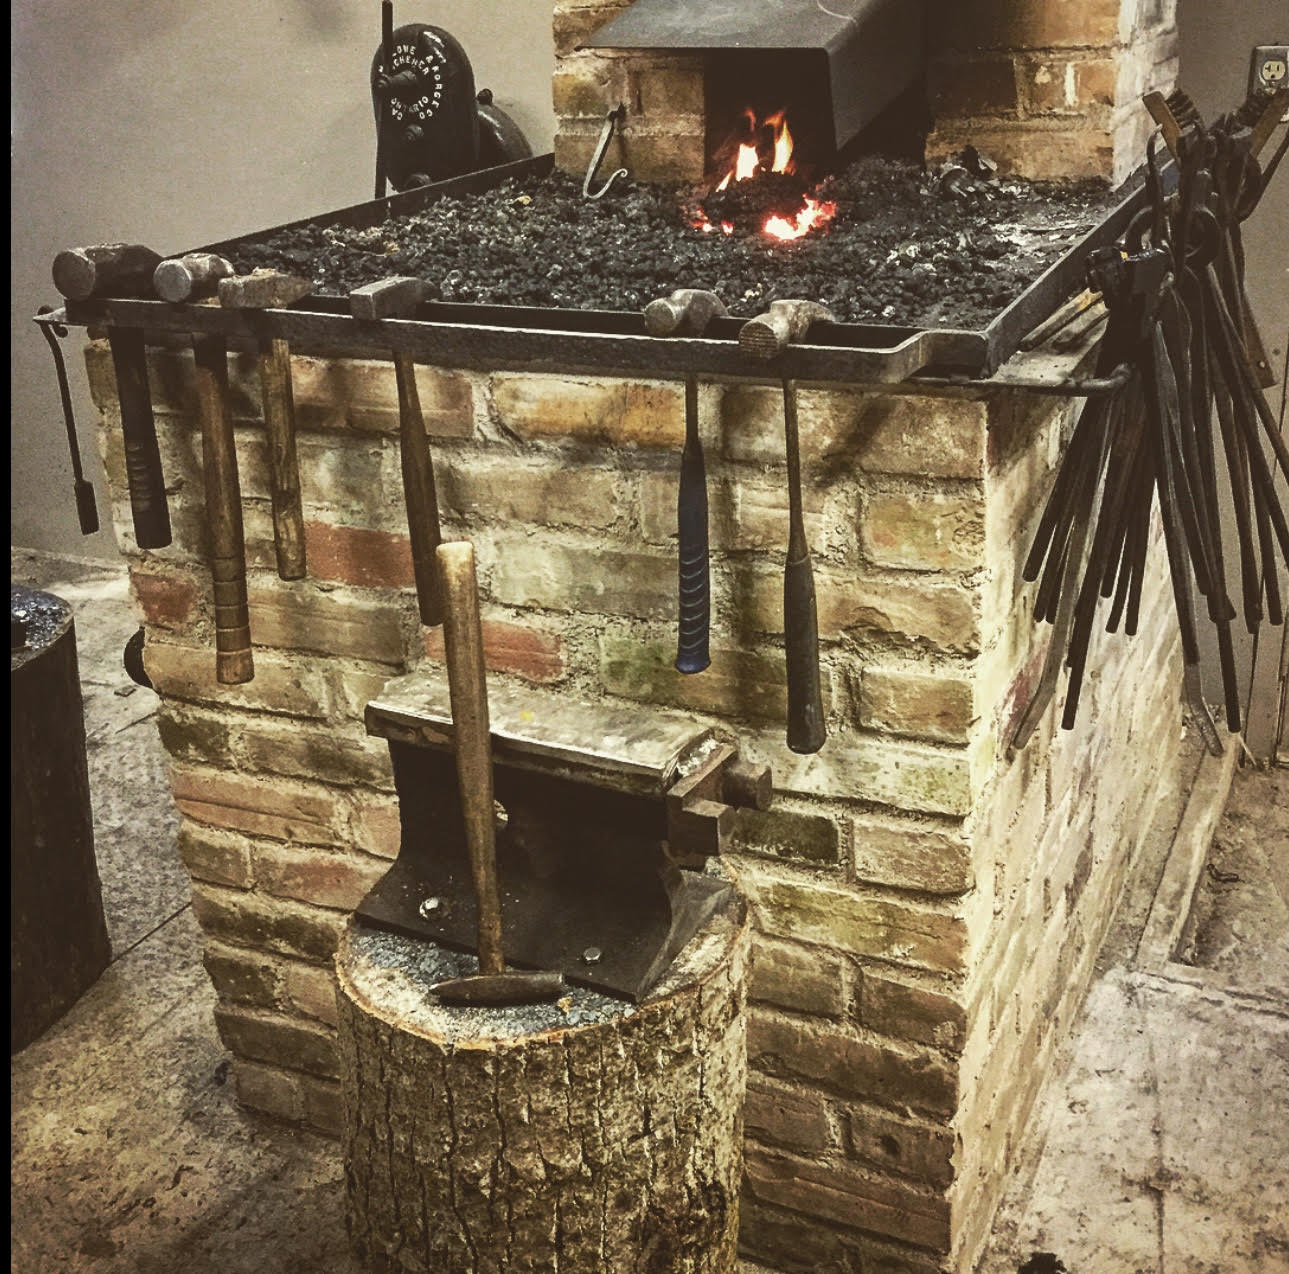
I agree with you, I just figured I’d pass along the info to anyone like me looking for an inexpensive supplier of coal. I’m not taking anything away from other suppliers mentioned and I’ve used all their stuff and was happy but the one I tried to share is local to my area and great price.
-
In my area prices for bitumous coal is 60 percent higher than what i mentioned in the above post. From my searching and and digging to find the most economical fuel source I was excited to find a source that much cheaper and even better that close to me. I cant speak to the quality of the coal and that can be a whole different story all together but i believe it comes out of pennsylvania and kentucky. At that price I will definitely be giving it a try next time i need more. For now I have 2500 pounds of coke to burn up first. Im not paying for advertising but xxxxxxxxxxxxxxxxxxxxxxxxxxxxxxxxxxxxxxxxxxxxxxxxxxxxxxxxxxxxxxxxxxxxxxxxxxxxxxxxxxxxxxxxxxxxxxxxx Trying to do a end run around the site rules is not allowed. You ARE using the site to promote their product. That is advertising and you are acting as their agent.
-
Ironic, ive not wanted to pay out my nose for coal or coke and wanted to buy in bulk but was not available from the 2 main vendors i knew of. the day after i brought home 3000 pounds of coke i was driving through ontario about 20 min from my place and due to the flooding the last couple of weeks the bridge is out. I had to take a detour and in doing so saw a large hill of anthracite so asked about it. The owner has been selling bituminous coal for blacksmithing nut sized and anthracite but never advertised it. Prices are very good at $17 a 50 pound bag and cheaper if you buy in bulk. He told me to let others know his contact info. Name at xxx-xxx-xxxx He is good about getting back to people but takes a little time. im going to get another 2000 pounds or so. Price is by far the best for me even if i had to drive farther. PLEASE contact the admins about where to send the bill for your advertising
-
-
Pic of the completed hammer, the belt was glued and stitched very well. Really good leather working custom company made the belt for me. will post some vid of running on the weekend. Now I gotta make its little brother, maybe a 25 or 50 pounder built same design but with a tire hammer clutch and the return spring on the back of the helve so no need for counterweight on the wheel and spring return should provide the 1 stroke hits I would like to make it capable of. Surprising that this beastie was gentle enough and had enough control that i was able to chisel lines into some 1/2" square bar for rubicks twists last night.

-
If you have no wading experience fabricating either one may end up in your demise. You would be safer and cheaper buying a small powerhammer or log splitter and get a weld shop to modify the splitter into a hydraulic press for you. Xxxx spell check!!!!! Not wading, welding! I have no wading experience myself and would never attempt a project that would require wading skills.... welding i have no reservations about.
-
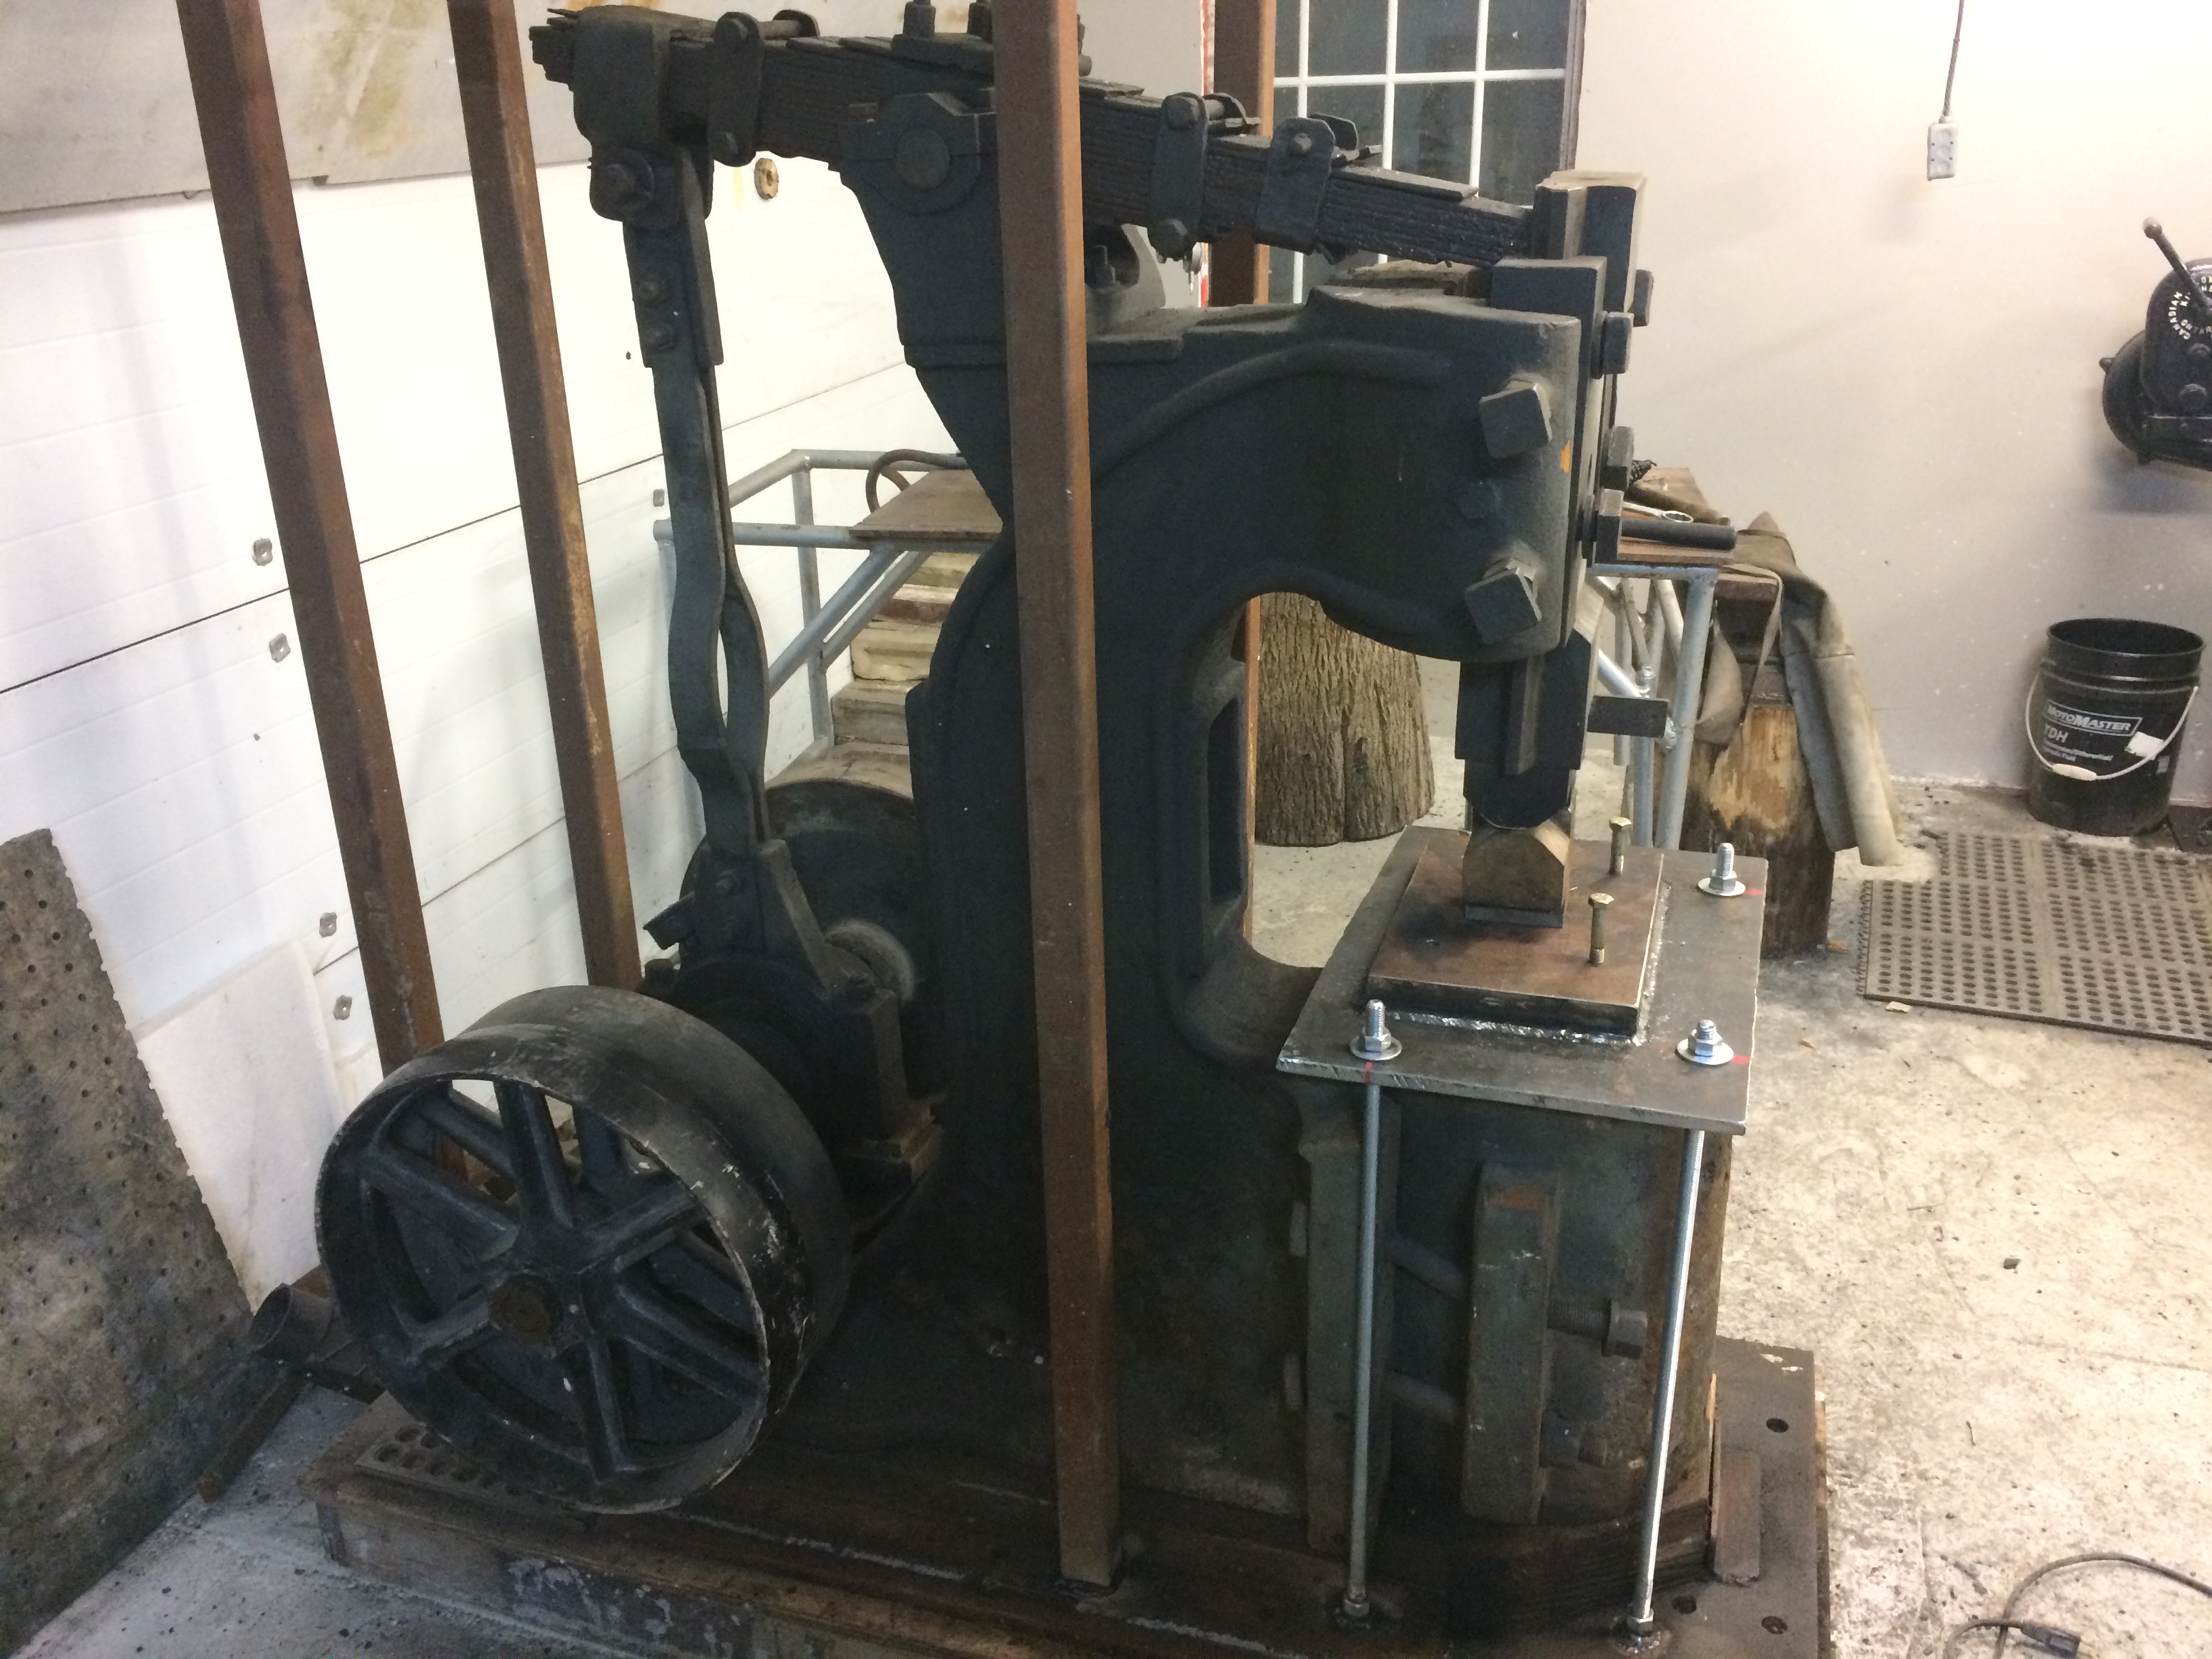
Well i managed to get the time to get the destroyer of worlds up and running. I cant beleive what it did. Ive had some 100 pound Kinyon style hammers, and a few mechanicals before but nothing ever gobbled up the material like this beast does. it took 1 inch thick 5160 down to 1/8 thick in roughly 3 seconds with a 1 inch long piece on the flat dies. i never guessed it would have so much power. it also has amazing light touch. i switched it to a slack belt drive instead of the traditional double pulley with the belt that drifts. just gotta make a brake for it and paint it up and then i will post a video. I would never get caught up in the holy wars of what style hammers are the best mechanical or air and dupont linkage or spring or strap hammer, I see how they all have their advantages but i will say i never expected this 1890's hammer could be so gentle and caring with the steel and then be able to hit with that much power from one blow to the next!
-
thinner and more springs will work best, thicker like a solid bar will be more prone to breaking. The industrial hammer that i have has 36 springs in the pack none being more than 36". The snap will be dependant on the harmonics so the spring thickness and speed of the hammer. more springs will give you more flex at the right speed with less likelihood of breaking and hurting you if a piece flies off.
-
its not the ram weight, did it run steadily if you push the foot treadle just enough to get it to run a little slower?
-
I cant tell how heavy the ram is but doesnt look heavy enough to need more than the 1 hp I had a 60 pounder that ran fine with a 3/4 hp motor. if its the spring harmonics speed or spring stiffness needs to be looked at. Definitely increasing hp would stop the thermal trips but wont address the underlying issue if harmonics are an issue.
-
-
so i have a 5 hp motor now with a 2.25 inch 3 5/8 belt drive on it to the jackshaft driven pulley diameter of 10.5 and the jackshaft driving pulley of 7 inches to the 19 inch flywheel. makes for a 7.36 gear reduction and 235 RPM on the hammer. if my math is correct then should be only 5 rpm under target speed. It will have to do. thanks for the information Artfist!
-
-
just my .002 of a cent. i have an idea for a telescoping throat so throw height adjustments could be done on the fly when running just like how a high hoe has an extendable boom. similar to the Dave preston hammers but no bolts to tighten, just flick the switch up or down to adjust die clearances with a hydraulic cylinder or heavy linear actuator. it would make using hand tooling alot easier than stopping to adjust the pitman arm. im going to build that into the one that i am going to build one day
-
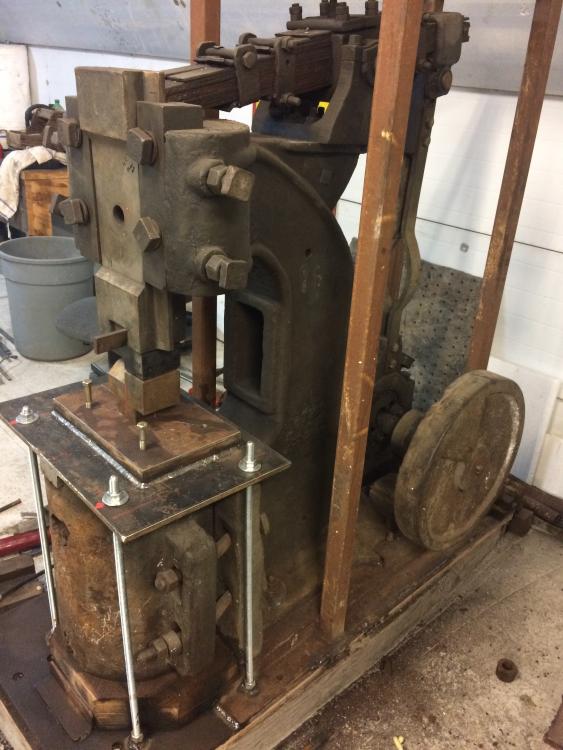
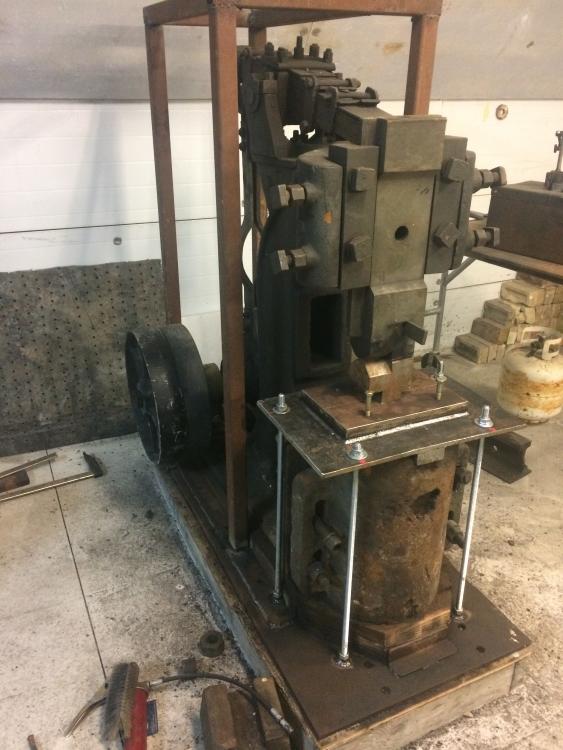
ok i will answer what i can here, try to size your hammer head by the largest weight anvil you can get. a laminated anvil will work but one solid mass will work better and try to get 10 to 1 minimum ratio or higher. if you dont you will have all kinds of energy flying around with the ram and the energy would be lost if you have an anvil that doesnt size up. check this link, a counterweighted flywheel wether a tire clutch or not is one option but this link will show an old patent which would give single hits and negate the requirement of a counterweight on the flywheel for the ram by using a heavy spring to always pull the ram back up and serving the same function as a counterweight, you could use a heavy spring and tire clutch setup. http://www.google.com.pg/patents/US2665600 also notice in the picture that the Pitman arm on my industrial helve hammer has 2 pieces of 3/4 by 1.5 inch flat bar that has a bow in it, the bow is not to pass material through the pitman arm but acts like a spring and takes alot of the shock instead of transmitting that resonant energy into the frame or eccentric setup. Also the hammer has 36 individual springs sideby side 1 inch wide and a little less than a quarter inch in thickness. The Rusty appalachian hammers ive used in the past only had 3 or 4 wide flat springs. I had the springs fail and launch the broken parts out and nearly hit someone in the head. The many springs together are like a bundle of wood and will flex and take more stress than a few thick ones. This is a significant difference. It makes for a little more cost but service and safety of the hammer would be improved. check out the following link and you will see a pretty good video of how an industrial unit works. I might build a nice 50 pounder in a year or so but need to get this one up and humming before starting the next project. also here is a nice little read on the hammers laying out specs. the rusty is the same thing just doesnt use the drifting slack belt from wheel to the other as a clutch. one other thing, make the frame solid as you can, or you will get yawning in the frame when the hammer hits, if you use too light a wall tubing and dont reinforce it well enough there will be too much flex and you will lose energy that should go into your workpiece or brake with time the machine will tear itself apart. sorry for long winded reply but those are the things i see alot of and its a shame when a lot of effort, time and money goes into building a machine with the best of intentions but if the few things mentioned are over looked the machine performance will not be as good as it could be. ajax hammer.pdf

-
if you message my account i can forward some pics and extra info to make your hammer perform. ive had homemade helves and worked on industrial ones. im rebuilding an old federhammer now which the appalachian hamers are based on. there are a few basic design features that will make your hammer perform significantly better. how heavy a ram will you make it?
-
-
-
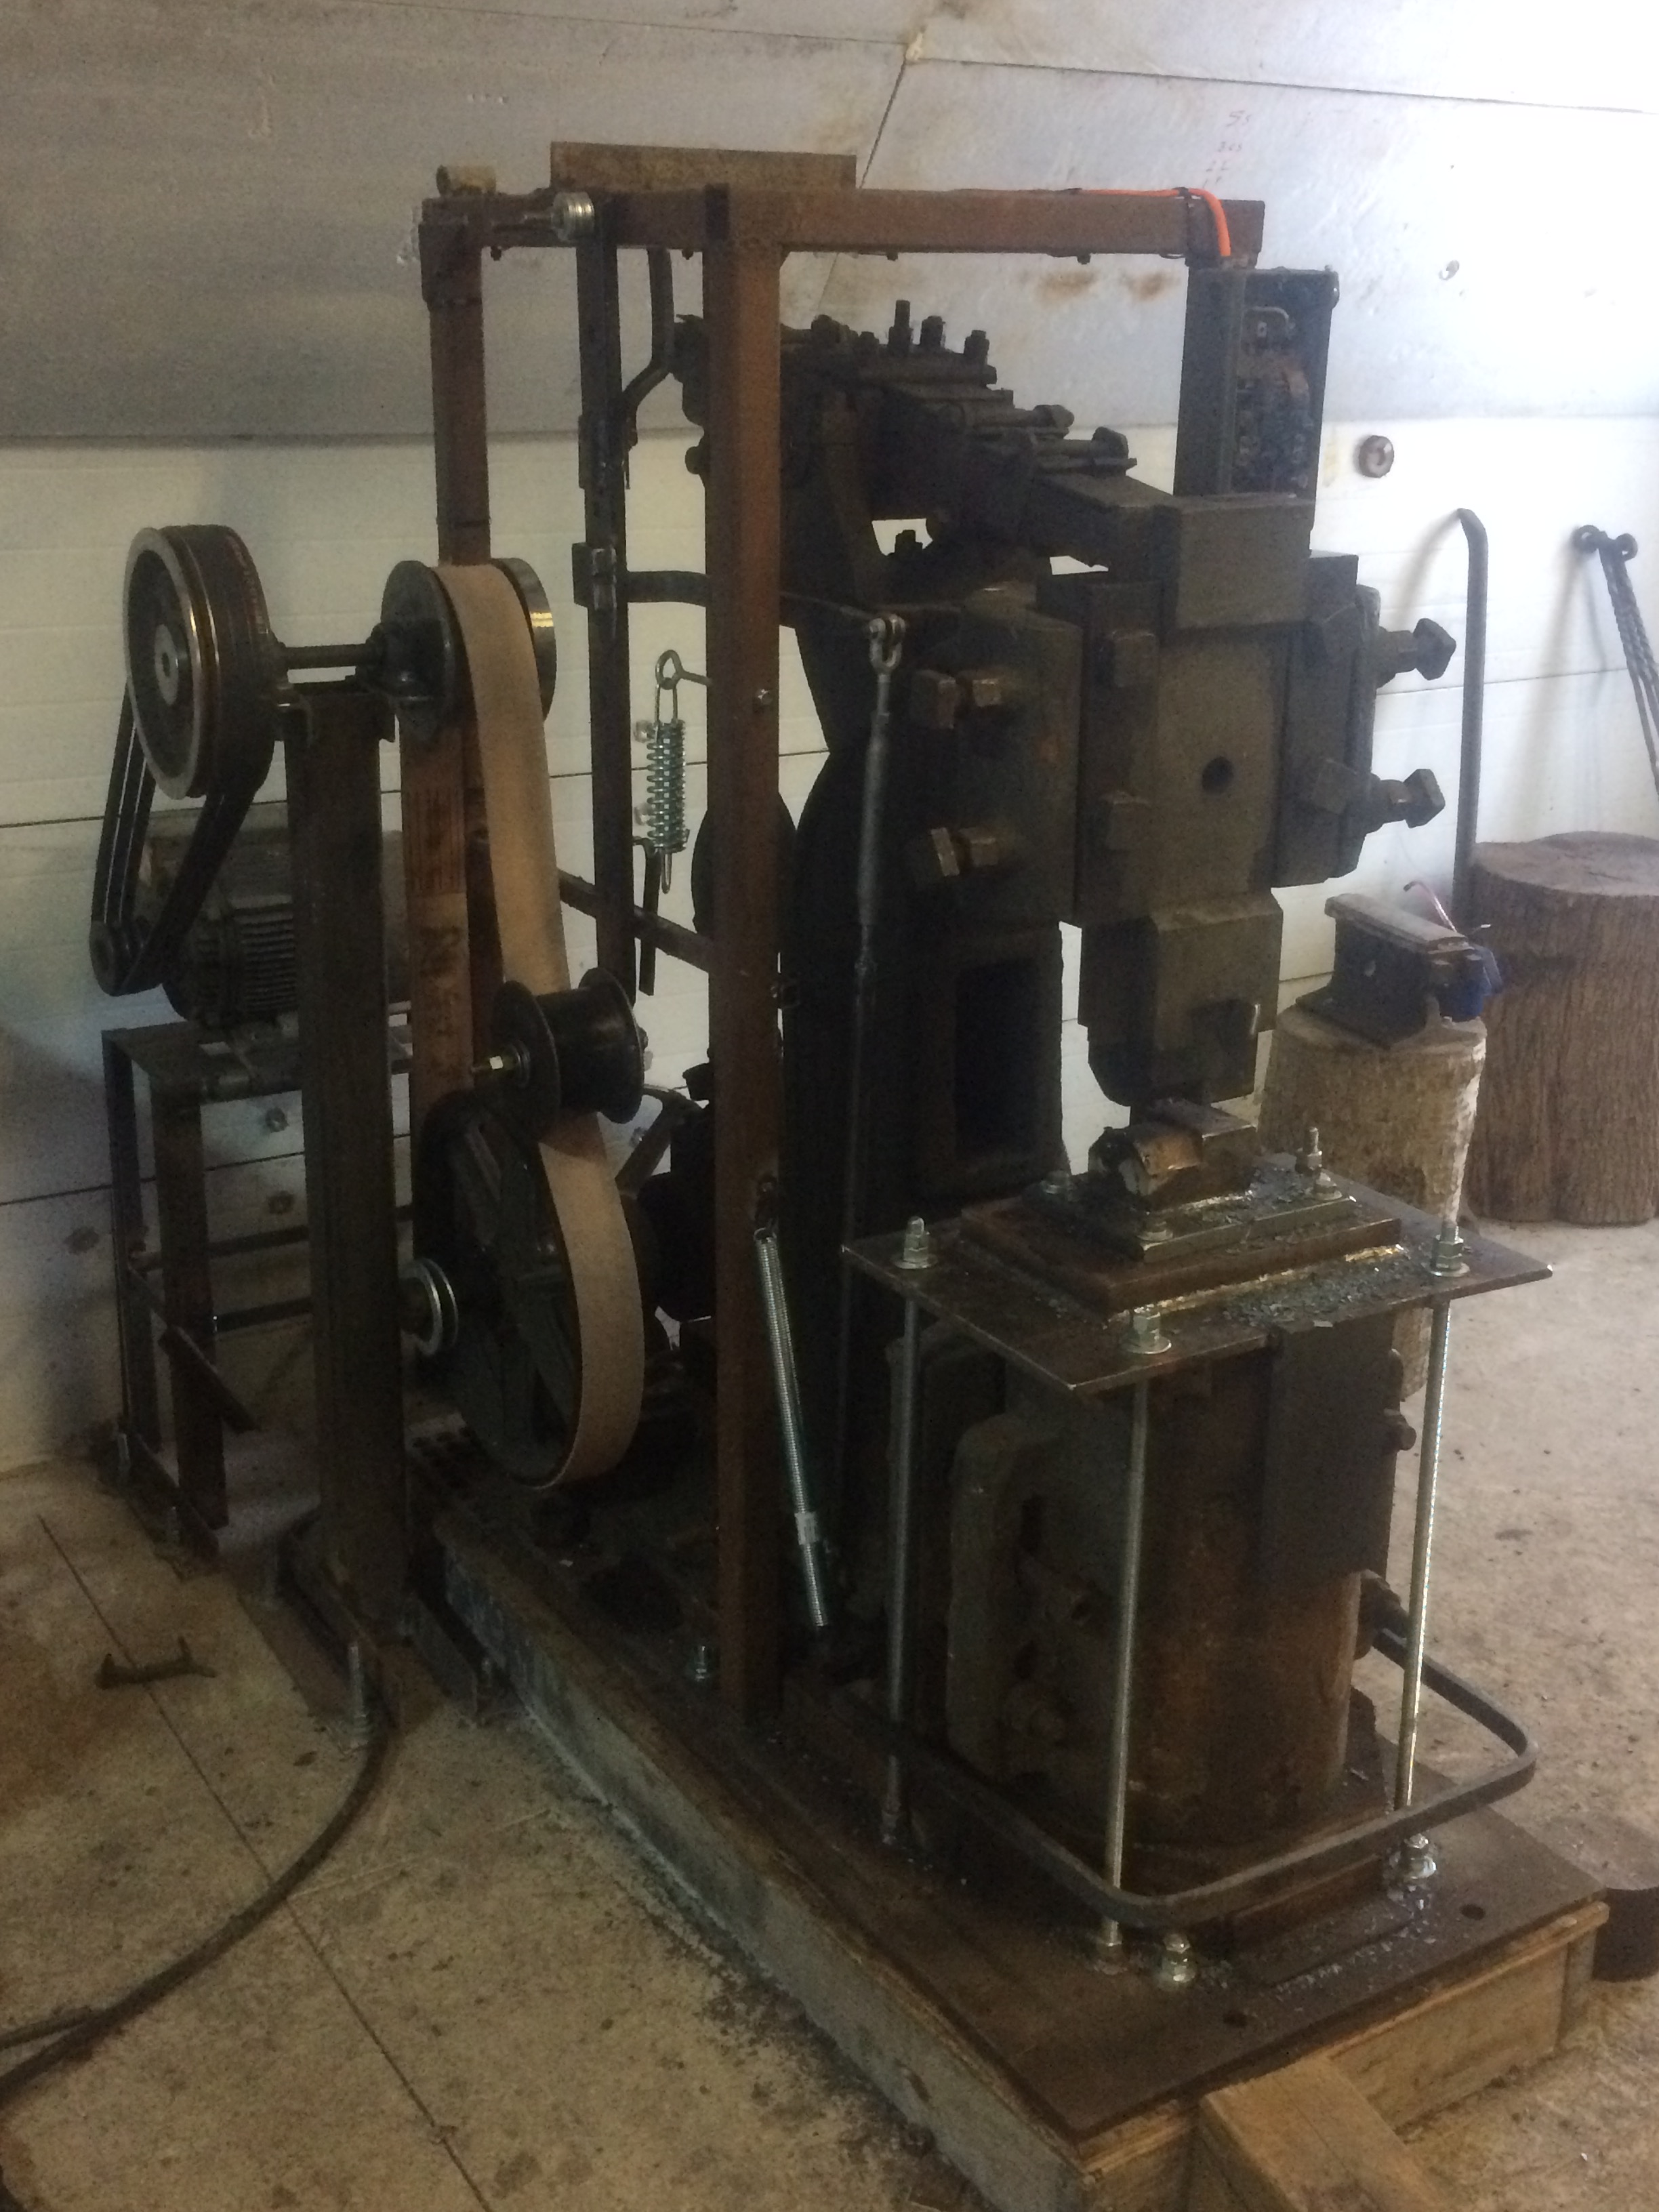
Hello all, finally got my hands on a rebuilt GE 5 hp 1730 rpm motor for the hammer. I have to build the treadle system from scratch. from all the federhammers ive seen they run the belt on the outside flywheel which is always spinning and then with the treadle it drifts over to the right flywheel and slowly starts the hammer. For my setup I think im going to do it differently, im going to run a jackshaft and slack belt setup so I have the kinetic energy to start the hammer quick and build a brake for the main flywheel to stop the hammer similar to the bradley compact strap hammers that ive seen. I already made a 6 inch idler pulley which will also serve as a counterweight for the treadle, the flywheel is 19" and weighs roughly 60 pounds. i know the machine is supposed to run at 240 BPM. ive rebuilt the LGs in the past and figured out the sizing of pulleys and all that. However I kind of hit a road bump figuring out how to size the jackshaft setup. the motor has a 4" pulley on it and i would like the jackshaft pulley that drives the hammer to be large enough to have the kinetic energy to start it quickly as well as being big enough to provide good contact when pushing the treadle down. Let me know if you have an equation for figuring out the jackshaft pulley setup. The only things that will not change are the motor speed of 1730 RPM and the hammers flywheel pulley of 19" running at 240 RPM. everything else can be changed also anybody ever used P20 material for hammer dies? Industrial forging environment i came from never used the stuff, always H13 and W360. the fellow i got the hammer from had the dies professionally made but he was from a stamping background. Im a little concerned the material will not handle the temperatures and cant find any information on its ability to handle high temp exposure. Ive picked shrapnel out of my stomach before when large press dies were setup incorrectly and dont want to use the P20 unless i have more information on it. Thank you Gents
-
She will definitely get a liberal rub down with Grease before each use. Really fascinating to see how they were built. The design approach could be used in the home built hammers and make them safer and run better. The spring pack is made up of 36 flat springs 1.5” wide side by side and many stacked instead of 3 or 4 large wide thicker ones which will not flex as much and fatigue faster increasing odds of breaking. I thought the bow in the jackshaft was simply to pass material through but found some old documentation that was actually to reduce shock on the bearings and eccentric which makes sense. thanks again all for your help
-
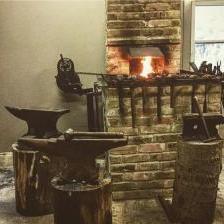
Thank you Gergely, much appreciated. Here are some pics of mine. The Sow block being Wrought was severely impacted and beat to heck so i spun the block 180 degrees to take advantage of the less chipped out area where the die would sit. i dont have a big enough mill or want to pay someone to do the work so i made a bolster cap similar to what I used to have in the hot forging shop working with presses and Hammers that we had. i milled a block to slide in the dovetail that fit just right, ground everything flat as i could with hand grinder using blue and a straight edge which took forever. Then made the table out of 1/2 inch plate thats 22 wide and 16 deep. the table is bolted with rod to the base (all the rods do is keep the plate and die plate assembly down on the sow block. they do not take and compression. on top of the table i have a 1" mild steel plate that is big enough to distribute the pounding across a larger surface of the sow block compared to the old one and the holes are drilled and ready for a 1/2 inch plate the dies will be welded to. With this setup i can service anything that may wear or break moving forward in future. The same system worked well in the Japanese factories i worked in for years so im not concerned it wont hold up. Surprisingly good amount of rebound even though its just mild steel for the sow block table. Have to make a foot treadle and and idler and mount a motor then should be ready to go

-
-
-
-