

Failed Attempt
-
Posts
51 -
Joined
-
Last visited
Content Type
Profiles
Forums
Articles
Gallery
Downloads
Events
Everything posted by Failed Attempt
-
-
-
-
-
-
-
-
-

-
-
-
-
 Charcoal retort prototype. First test run.
 -
 I finally got the necessary parts gathered to hook the forge to my air compressor, but it's so small and breathless that I didn't get enough airflow for long enough time to get anything past bright red. I have to look into another solution for air. A small radial fan with speed control would be ideal, but that may be out of my price range for now. Box bellows maybe. I might need to add more bars to the grate as smaller pieces of charcoal tend to fall straight through. FlyingXS, I can't imagine why you would have problems with the images. I directly linked them from my web page space. Thanks for the tip Bob. I haven't made the removable coal grate yet, but I will most probably over engineer it like I tend to do with most things. I did however get some free 50mm rock wool out of a skip at a construction site. I insulated the charcoal retort today, and made a sleeve from 0.5mm sheet over the insulation and riveted it together. I also cut the bottom off from a 200l drum for an insulated lid. If I can finish that construction tomorrow I will post images and explain the idea behind the design. Might aswell do it in this topic since the charcoal retort is in the title. I'm really itching to get hammering steel, but progress has been slow. Hard to find the free time and necessary parts to get things working. If we can not see the photos, the thread could become useless. In the past we have had to removed soem threads, when we could not resolve the issue. When they have been posted off site, against our recomendations, then it is beyond our control to remedy.
 -
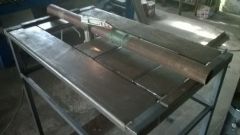
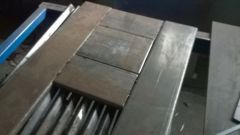
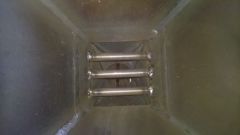
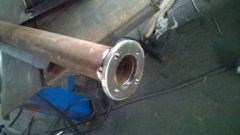
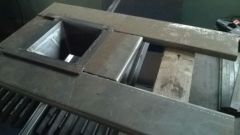
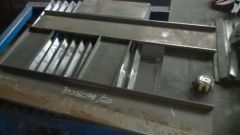
I got a day off from work today and spent the whole day in the workshop. Now the firepot has a grate. 12mm round bar. I also made a fitting for the flange. It's a smooth transition from the square hole to a round one. There's nothing that could start collecting ash or anything now. I bought some 40x40x4 angle for the legs. 30x30x3 angle holding the legs together and providing support for a shelf. As the legs are now the table stands about 90cm (3ft) off the ground. Which is about waist level for me. I can adjust that easily later if need be. Pretensioned the table top prior to welding to keep it from warping. Ash dump plate. Now hinged. I can easily add more counterweight if the weight of the plate isn't enough. Fitting the air pipe to the vertical pipe. Added removable side walls to the table. These can be removed by just lifting them off. All I need now is a blower or bellows and she's ready to go. I'm sure there's something I overlooked. I will use it outdoors at first. Eventually it'll be mounted indoors, so I will need to make a hood and a stack. Side draft most probably, but that's another topic entirely. :)
-
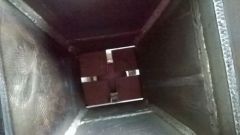
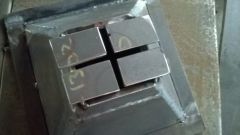
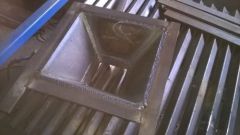
Thank you for your kind words Randy. I'm a welder/fabricator by profession and it's what keeps me fed at the moment. Thank you Glenn. I'd rather leave the charcoal retort bit out of this. That's perhaps best left to it's own topic. I'll just concentrate on the forge build in this, but then the topic title and tags need changing. I messed that up when I started this trainwreck. Yes, using wood crossed my mind but I'd rather cook the steel and not myself. Besides my retort seems to be working ok. At 2,5-3 hour mark there was so much gas coming from the twin pipes that the flames were pushing out of the firebox. After trying several drawing programs on my computer and the frustration caused by their limited capabilities I just grabbed traditional pen & paper. I'm used to working with real CAD programs, and MS Paint is a poor substitute. This was my original plan for burning coal. Thank you Andrew for pointing out the clinker and ash problem with a similar setup. So If I make the coal grate a shallow 4 sided pyramid and leave some gaps at the sides, that should circumvent the issue. If I make it from 20mm plate I probably won't have to worry about the grate melting. The lower grate will be just 12mm round bar for charcoal use.
-
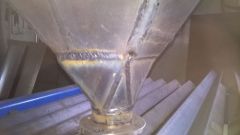
Sorry about the incoherent babbling in the first post. I'm not very good at expressing my thoughts in english. Anyway. I got some work done on the forge today. Welded a flange on the fire pot. I only have a tiny 150A mig at home so I have to push it quite hard to weld material this thick. The flanges are 6mm scrap plate. I'll drill mounting holes on them once the whole thing is welded together. Salvaged some plate from the scrap bin at work and got started on the table top. The plate is 6mm thick and the bent flanges make it rigid so I don't have to reinfoce it in any manner. Lucky find. This is my current idea for the "tuyere". I just tacked it together just in case someone thinks this is a bad idea and I need to take it apart. If it's ok I'll weld the pipe on this and weld the gaps shut. This is going to be the air pipe. 60mm outer daimeter from an old boiler. The flange is my own product. Crude but It'll do. Since my opening post was so convoluted I didn't get an answer for the question about the adjustable depth firepot. I assume most people thought "who is this guy and what is he on about?" or the question was so stupid it didn't deserve an answer, or my english is so bad no one understood a thing (very likely). :) I do wish I could edit it, but sadly it is something I can't do on this forum.
-
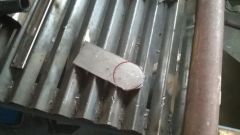
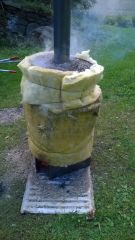
Hello everyone. Boy is it hard to start a new thread and do it in some sort of intelligent fashion. At the moment I have an anvil, some hammers but no forge or anything to burn. I'm inclined to fabricate the forge myself since it's, well, cheaper that way :). Building a forge: Haven't been in a hurry at this since I don't have anything to burn yet. I've started on the firepot with charcoal in mind. From what I've gathered reading the various discussions on this forum charcoal needs a deeper firepot than coal or coke. So my design is about 140mm deep. I was wondering if it's possible to have a grate to lift the bottom upwards to make it shallower if need be. Just in case I have to burn coal. Or is the grate going to melt? This is what I have so far. Dimensions at the top (outer): 290x280mm Bottom hole: 100x90mm Height: 140mm Thickness: 12-16mm It's made of scrap steel so it's not uniform thickness and ugly as xxxx, but I don't think the coal will mind. :) On the subject of having something to burn in my forge, I had to make a charcoal retort of some sort. This thing didn't have an easy birth. And it's at prototype stage at the moment. The first burn I tried was half full and didn't have any insulation on the outside. That test run ended with two logs having charred ends and the rest very dry and blackened. I guess it didn't quite reach the temperature to start gassing the wood and I didn't keep strong enough fire going so most of the heat went to drying the wood. The next test run in the photo is a full drum, insulation on the outside and as I'm writing this, it's outside burning on it's own on the wood gas alone. I'm hoping it's going to be done by the end of the day and I'll have charcoal by tomorrow. I'll probably cut a 200l drum and fit it on top as a sleeve and stuff some insulation between the drums. The current solution is hardly ideal. I'll keep a build diary of the forge in this thread and bug you with more stupid questions. -FA
-
Old soviet made anvil
Failed Attempt replied to Failed Attempt's topic in Anvils, Swage Blocks, and Mandrels
Well there it is. Looks like any other russian anvil. I expect the quality to be russian aswell, as in "not very good". But that remains to be seen after I get to clean it up. The EP on it is the mark of the previous owner. I'll probably post more and better photos in the anvil thread. Also 3 200l drums scored from work. :) -
Old soviet made anvil
Failed Attempt replied to Failed Attempt's topic in Anvils, Swage Blocks, and Mandrels
Will do. If everything goes to plan I'll be picking it up tomorrow. Got some bearing balls for testing aswell. -
Old soviet made anvil
Failed Attempt replied to Failed Attempt's topic in Anvils, Swage Blocks, and Mandrels
Thanks for the advice. The anvil is currently stored in my co-workers friends unoccupied summer place and I don't want to go tresspassing in there just to test it. Considering the anvil has hardly been used I'll just buy it. -
Old soviet made anvil
Failed Attempt replied to Failed Attempt's topic in Anvils, Swage Blocks, and Mandrels
I didn't think to take pictures when I went to take a look at the anvil. Didn't get to try rebound either since there wasn't a hammer around in the old barn. But he told me that the anvil rings like a bell when hit, so that should tell something. I got an offer for another similar anvil for half the price. But the face on that has been grinded with angle grinder very recently. That may just be for removing surface rust. But it appears to have been done with a coarse disc. I'd post a picture but I'm not at my home computer at the moment and my phone can't handle images of that size. Should I pass the cheaper anvil on the account of the grindmarks on it? It is a 500km drive both ways to get aswell. -
Hi there. First some background so you know where I'm coming from. I'm new to this forum an to smithing. I've been doing a lot of reading on the forums and other sites lately to learn more. Now I have finally begun gathering equipment to get started. Used anvils in good condition are hard to come by in finland these days and the market for new ones is small and they are expensive. My co-worker has an old russian, probably soviet era anvil he is willing to part with. It's nearly 100kg and almost pristine but there are small dents from hammer (maybe 7) on the face. Should I be worried about the dents. I mean how easily anvils normally get dented? Is the face too soft or is this normal? He is asking 500€ for it with a good wooden stand. (to put that into perspective, a new 40kg anvil is around 650€). To tell the truth I'm a bit jealous of you americans since used anvils seem to be a lot more common and cheaper around there. Thanks in advance.