Failed Attempt
-
Posts
51 -
Joined
-
Last visited
Content Type
Profiles
Forums
Articles
Gallery
Downloads
Events
Everything posted by Failed Attempt
-
Thank you Neil. I didn't know dassault had a free cad version available. Very helpful.
-
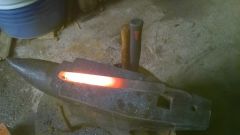
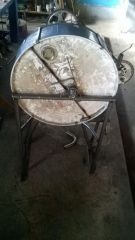
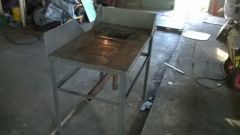
 So I started at 8:00 this morning and made the pipe fittings for the blower and finished connecting it to the forge. Once I got the forge fired up about midday, I started heating metal and practicing some simple things like tapering. I learned and noticed a lot of things today I need to address. -The hot spot in my forge seems to be deeper in the firepot than the hearth level. I may need to lift the grate from the original 140mm depth to about 120 or 115 and adjust the depth and shape with bricks as needed. -A trench shaped firepot with even steeper sides might be more fuel efficient. -The blower struggles if I pack too much small bits of charcoal into the firepot. -I need to learn to manage the fire better. Sometimes it looks like it's hot enough, but when I take the steel out after heating, it's only dull red. I probably can't "read" the fire properly due to my inexperience. -I need to add an adjustable railing in the front of the forge to support longer pieces. -Smoke hood and stack required ASAP. -I need to remember to take care of my own needs while going at it. I started at 8:00 with the blower build and proceeded to forge afterwards. Got a head ache at 3pm and suddenly remembered I had not drinked or eaten anything during the day. -My hammers are awful. Mainly because they are not blacksmiths hammers. Apart from a light ball pein I bought recently, but It's so light it's like hitting an elephant with a pillow. I've got a 1kg one with a fiberglass handle that's too long. Another with too thick wooden handle that's good length, but the head is too heavy. Most of the little control I have over the hammer is lost due to the awkward handles and excess weight. The heads are sharp edged and leave dents on everything I work on, including my "quality" russian anvil. I need to fix the hammers before I try anything else. -I need tooling for the anvil. I had to cut against the edge of the anvil since I haven't got a hot cut tool. Need to look for an old axe blade. I also need a jig for bending. http://www.iforgeiron.com/gallery/image/38517-blower-hooked-up-to-the-forge/ Blower connected to the forge. Finally. http://www.iforgeiron.com/gallery/image/38518-old-file/ An old file I stuck upright into the forge against the bottom grate in order to see the depth of the fireball. http://www.iforgeiron.com/gallery/image/38519-my-slack-tub/ My slack tub is an old milk churn. http://www.iforgeiron.com/gallery/image/38520-done-for-today/ Covered the firepot with a brick and left it to cool. And the flock of barnacle geese flying by just as I stopped working. Here's a video of heating steel. First bit is a 12mm round bar. The other one is the file. No youtube link, sorry.
 -
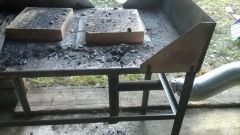 Putting the forge to rest. Firebrick is a perfect fit to cover the fire pot.
 -
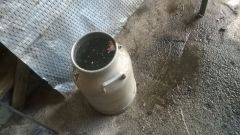 Slack tub. An old aluminium milk churn.
 -
 An old file. I stood it up into the forge against the bottom grate to see at what depth the sweet spot of the fire was.
 -
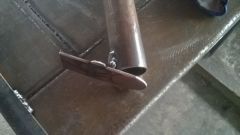
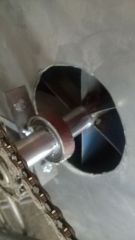
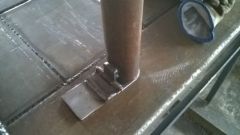
 Made a fitting for 125mm flexible al tube to the business end of the blower. Now it's hooked up to the forge.
 -
 It does put enough air for charcoal. Could be better, but considering it cost me next to nothing it'll do. I will inevitably start tweaking it here & there to improve the performance.
 -
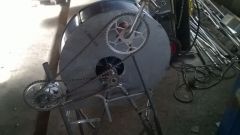
If I calculated correctly the ratio is about 6,75. I wish I could get it higher, but those were the only gears I had, and I'm hoping the large diameter of the blower will offset the lack of rpm.
-
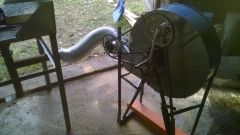
After looking into different options for my forge blower (hairdryer, electric duct fans, vacuum cleaners, car heater blowers) I decided to try building my own. After a lot of research on this site and others I concluded that I want a handcranked blower. I didn't have a build plan other than that the only case suitable for a blower was 200l barrel. Other than that I had to use whatever scrap I had lying around. The case is a 230mm cut from the top end of the barrel. The lid sealing the case is a piece of 1,5mm sheet I already had. The axle for the fan is a length of 30mm hydraulic tube and the fan blades are cuts from the barrel sides. The back plate supporting the fan blades is a piece of 4mm plate I also had lying around. The stand and the frame is mostly pieces of steel frame from scrapped sofa and various other bits of scrap. I couldn't find gears large or small enough to get the gearing I needed with just 1 set of gears so I butchered and old excercise cycle for the secondary gear set and the primary is from an broken bicycle. I didn't have any suitable bearings for the fan axle so those I had to buy. Sorry about the lack of pictures from the fabrication. At the time I didn't think this would ever amount to anything but a failure so I found no need to document it. It took me about 12 hours spanned over two weekends to make this. I didn't aim for anything more than a proof of concept so I can see if it's even a functional design. Tools used. 125mm angle grinder, power drill and 150A mig. Now I just need to hook this contraption into my forge and HOPE it pumps enough air. http://www.iforgeiron.com/gallery/image/38495-barrelblower-mk-i/ This is by far the ugliest thing I've ever built. http://www.iforgeiron.com/gallery/image/38496-barrelblower-mk-i/ Front side http://www.iforgeiron.com/gallery/image/38497-barrelblower-mk-i/ Back side http://www.iforgeiron.com/gallery/image/38498-barrelblower-mk-i/ Barrelpiece fan.
-
 The fan blades are cut from the barrel sides.
 -
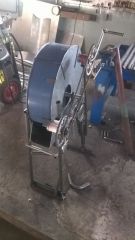
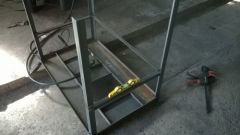
 Back side. The frame is made from random bits of scrap in a hurry and it shows.
 -
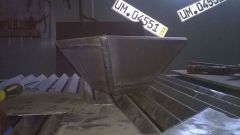
 Front side. By far the ugliest thing I've ever built.
 -
Handcranked forge blower made from parts of 200l barrel, frame of an old sofa, excercise cycle, bicycle, pieces of 1,5mm and 4mm steel plate, 30mm hydraulic tube and two 3,5€ chinese bearings mounted in cuts from 60mm pipe.
-
The sidewalls sit on small hooks bent from 13x3mm flat bar. Didn't want anything complicated like nut&bolt fittings. Now you can just lift them off.
-
-
Sorry, I didn't know linking images off site was frowned upon. Never before has anyones forum alias been more appropriate. I uploaded the images, probably in the wrong section of the gallery. Knowing my luck this will not work, but I linked the images from the gallery. I'll only know after I've posted and then it'll be too late since I can't edit it afterwards. Here goes the first post. [edit] Well it worked. I could re post the images like this, but I don't think it's a good idea on my part to make more mess than I've already managed to do on the forum. [/edit]
-
-
-
-
-
-
-

-
-