Leeknivek
Members
-
Joined
-
Last visited
Everything posted by Leeknivek
-
you must have missed the "rarely use this site" part. First & last warning . Everyone return to the subject or mass warnings points , member moderation &/or BANNINGS will be involved Mod 86
-
http://www.alloyavenue.com/vb/showthread.php?2469-Foundry-Tutorial-Book
-
i know how to use google, thank you. you see, this is why i rarely use this site, and often end up worse off than i was before i posted. since this has gone so far off topic and into a critique of my character, i don't feel bad in writing what i am about to write - you are all far to quick to write me off as lazy or impatient rather than spending the same amount of time constructing a response that is actually helpful to myself and whomever goes on to read the thread in the future. forgive me for not spending my entire life reading arbitrary forum posts, because i thought the whole point of a forum was to ask questions and receive answers, not the actual lazy way out by answering with "well just go sift through a 30 page thread, if you can't do that, you're not worth my time". Mikey, i'm not suggesting you hand feed me anything, but at least a book has a table of contents in it so i can skip beyond the topics i am already familiar with, and find those that i am not. your thread is literally an amalgamation of short paragraphs with a couple key points, interjecting users asking questions, you replying to those questions - i'm sorry, but it is absolutely a mess. this isn't a critique of your knowledge, mind you, this is a critique of your writing skills. Frosty, upon our first interaction, i genuinely appreciated your very first couple of posts in response to me on my power hammer build - you were kind, helpful, patient - and i don't say this lightly, but it meant a lot to me that you took the time to write out what you did. however, it very quickly evolved into something else when it became easier to lay insults on my character, my ability, my resources - yeah, fine, i do things the hard way, i'll give you that, but you aren't helping anyone a whole lot with your sanctimonious blacksmithing advice that is blown across this forum. i may not have read every thread under the sun, but i have read enough to see that you certainly are the curmudgeon - at least you're somewhat honest. and i get it - it can be frustrating to have nothing but the same stupid questions thrown at you ad infinitum - though if it's too much trouble for you to answer questions, or have a discussion, then don't. it would probably be much better for the community further if you didn't project that laziness onto the people asking the questions. any single thing that is not within the current preffered method of doing something is instantly written off along with the person in question as lazy and impatient millenial or a forged in fire inspiree or some other excuse as to why you have better things to do than answer questions. yet here you all are, nearly every day of your current lives, shooting down anyone who doesn't know it all right off the bat. give me a break. you can have your empire of dirt, i'll find the information elsewhere - thanks for pointing me in the right direction.
-
Wayne, thank you, that is an excellent resource and i may be in contact with you soon. (M) - this is the type of stuff that I am trying to avoid. i haven't seen that thread before, so thanks for bringing it to my attention, but i wasn't able to find much of anything that wasn't obvious within the first few pages, though i did find this^ post from OP. and yes, i know, there might be valuable information on page 16 post #4 or on page 24 towards the bottom, but that's the kind of tedium i am looking to avoid, sorry. i have visited ron reil's site multiple times in the past, reading through most of his site. there was good, clear cut and fairly concise information listed there - the Forges 101 thread i think could use some better organization, because there is useful information, but finding it is nothing beyond "read through 29 pages of arbitrarily-ordered forum discussion and foot notes" Exo313, i am not interested in building a box of dirt, thanks. i have been doing this a handful of years and i do understand the constant bombardment of obvious questions from instant blacksmiths but i would just like to state that i am not in that category. now, as to the fire brick you mentioned - that is exactly what i had in mind, though i am wondering it's durability if it is "properly" cemented in place as a hot face, not an open and exposed doorway. i have heard mention of high alumina kiln shelfing, too - perhaps that is an alternative - but what i have in mind is cementing them together as an interior lining; as one solid contiguous piece, not simply sat on the wool. ie, wool, a coating of cement all around exposed surfaces, and the bricks mortared to that cement. i am not married to this idea, but it is inexpensive, available, and i have some idea of what i am actually getting, it isn't some cost-prohibitive exotic ceramic product. as i mentioned before, i understand there is a stigma behind using either of these products - and perhaps it is well justified, i couldn't say - - but i do know from building up a variety of melting furnaces that i have run setups burning motor oil with a white hot flame (somewhere around 1/2gal-minute) into nothing more than a shallow hole in the ground, a cast iron pipe hot face 12"ø 1/4" wall, and a circular stack of hodge podge 100 year old red house bricks to contain the flame, and a bit of a pile of dirt to surround it. i put more than 50 hours of burn time at or around 2000 degrees, i have had the dirt in the ground glowing red, i have had the interior of the red house bricks glowing orange, and i have had the entire cast iron hot face glowing red. 75,000btu/minute. after a while, the bricks, which were only held in by gravity, began to shatter on the inside (no explosions, but they were heavily cracked) the cast iron warped, and the cast iron melting pot i used had significant blistering - but it worked, and it worked well for 50 hours. if red bricks, the bane of all forge builders, are capable of that, i am thinking that low end actual refractory materials are plenty capable of what i want to do, if i work around their weak points. if they are absolutely not acceptable, well, then that's one thing - but i would like to have an open discussion on what the limit actually is, instead of [/hyperbole]"well it won't work at all so don't even bother". [hyperbole]
-
having some trouble finding specific information on building a gas forge. i know the basic gist of it - ceramic wool, sodium silicate, refractory coating, propane, done. but i am looking for some answers on what's actually necessary and why. secondly, i want to use a forced air burner - from what i understand, you can run at a lower psi which means less volume, less gas, less money to operate. currently, for the most part, research is limited to all the random people on youtube, or random forum posts that hit from my search terms - slow process. i have a few items that i have scrounged from work or the dump, i have enough ceramic wool for a forge, i have a few candidates for a shell, and i have plenty of pipe and fittings. what i am thinking is a chamber between 4-6" in diameter and 8-12" long. i use a 20lb tank currently for my foundry furnace (20gal garbage can lined with kaowool and 18ga stainless hot face) beyond that i really am not sure what i should buy. i know there are items such as kastolite or satanite, but i am not too particular on buying 55lb bags from the other side of the country on ebay or some other not-really-practical venture. i know there's a stigma to "furnace cement" - but within what limits? has anyone tested to say it will fail at X temperature, or after X hours, etc. i see propane forges listed on ebay for a couple hundred dollars (made in europe, i believe) and they are sold with only a blanket and a single firebrick ... if i remember rightly i have seen those in action on youtube through the past few years performing ok as built. i have also heard that furnace cement will "make do" or "get you started" - the credibility to that, i am not sure, but i do not intend to start production work, rather, i only want a simple and easy to use forge that doesn't require fiddling with a coal fire for half an hour for a 5 minute job. so i am wondering if kaowool coated with fire cement and with fire brick cemented on three or four or six sides is an adequate forge for occasional use. i doubt i will do any welding in it, though maybe rarely. once a year, say. keeping the temp somewhere around 1800-2000F for 1.5" and under stock, mostly light work, repair work, maintenance work, basic heat treating. i understand this is not ideal, it's perhaps a terrible idea, but if it works "good enough" and i can KISS it, i can afford to buy new fire bricks every few years, and they're within a couple miles of my house, not in portland oregon. i think this is a fair point, for myself and a lot of others, that if there's a way to make it work, maybe we can explore that. if it doesn't work, it doesn't work. anyways - as for blown burners, i have seen simple designs with 1.5" npt pipe, an inexpensive hair dryer, and some sort of nozzle and mixing chamber assembly. blower > nipple > gate valve > nipple > elbow-with-nozzle-inside > nipple > forge. am i missing anything? are there any rules of thumb to follow? sorry for the length, i am trying to be fairly specific so that you guys don't have to ask as many questions.
-
4.5" round inside of the 5" bore will work just fine. you may not even need to shim it -you could 1. cut the sleeve down the length 3 or 4 times, equally spaced and weld it at either side, or, 2. weld at the bottom, fill with sand or lead, weld the top. This may be seen as unorthodox by others, but that will be a lot simpler than finding 1/4" or 1/2" wall 4.5" id pipe in the length you need. Not to mention, that's going to be a hell of a fight to sink 4.5" round into 4.5" id pipe, and then sink that into 5" or 5.5" sleeve. Be very thankful that you have a loose fit right now, instead of a tight one. The head weight is calculated as everything that moves down and securely attached. The weight, the dies, the clevis, the bolts that go into the clevis, if you're particularly anal. It really isn't a critical measurement, nor all that relevant or useful to know - weight it all and round up to the nearest 5. The only reason ram weight is relevant is because there is an "ideal" ratio of ram-to-anvil weight, generally, 10:1 minimum, 16:1 "good", 20:1 "better". This has to do with some physics, but, the differences are hard to measure and have nothing to really compare to besides theoretical maths. Figure on a ballpark estimate and, basically, the more mass overall the better off you will be.
-
Save the stainless for when you want to make a waste oil torch. From what I understand, it can be contaminated to some degree if forged hot on regular steel. Plus you have to tend with alloying elements vaporizing and weakening and all the hocus pocus heat treat. To begin with, find a steel supplier and buy a couple 20 foot lengths of 1/2" round and 1/2" square and maybe some 3/8x1 bar stock. That'll cost you less than $50 if you pick it up, they usually will cut into 10' lengths for free, and there are very many projects than can be made from that. No special variables to worry about for a beginner, easy to work, and it's a uniform enough selection that it is easy to begin visualizing how this stuff works, in terms of volume-of-steel vs linear measurements alone. In addition, a small collection of high carbon scrap is good, too, for making simple tools. Old springs, chisels, hammers, axles ..... random bits and drops and plates ..... shear blades, cutting edges, old files .... there is a use for many thrown away tooling that people very often neglect to consider. There is a lot of good mystery steel out there that is "good enough" for lighter duty, homeowner grade, hobbyist grade, farm grade, or used-ten-times-in-its-lifetime tools. And, in my opinion, stainless isn't a particularly great alloy anyway. I mean, it has its utility in certain things - rust resistant, kind of heat resistant, moderately hard, moderately durable - but in blacksmithing terms .... I rarely ever use it and I doubt very many others use it often or ever, either. Doing commercial sheet metal fab + install, it's also used sparingly and is pretty awful to work with compared to mild. Mild steel is way more available, way less expensive and way more useful. You'll see!
-
I need some ideas on storing those "someday i'll use this" pieces. You know, irregular odds and ends that don't really mesh nicely on a shelf but on occasion you'll remember you have that specific piece of material that is PERFECT for the job at hand - you spend up to an hour looking for it and decide either it's lost, already used, or it's been thrown out. I use, right now, a 12x36ish steel 4 shelf storage rack. Those cheap stamped steel ones. It's got four indiscriminate piles of trash heaped up onto it, stuff that I do use and have plans for, eventually, but not right now. I am moving my operation into an 8x8 shed (the fire outside, machines and benches inside) with ... limited storage space. I'm trying to get creative. Any pictures, ideas, suggestions? You all know as well as I how valuable these "pieces" are ........
-
Here is a "scale drawing" of the spring and helve I think I am going to use this hammer for the ram, rather than the 4.5" round. With the dies I plan on using (cut from an old cutting edge from a loader bucket) I can weld a pin on them to go through the eye of the hammer, Or threaded rod. Gives an easy change of the top die. It will weigh about 12lbs doing this, which should be plenty. That isn't counting the pipe. I think a good weld around the head of the hammer into the pipe will suffice, and should be pretty strong. Please correct me if I am wrong. I plan on using some u bolts and plates to hold the spring. I can make it a little adjustable doing this. I want to have the pitman come up and meet the pipe in the middle, though I may also have it come meet the spring in the back, too. Either way, I think I'll cut the spring down. I have some channel that I may weld on to either side of the pipe, too, to make it more rigid. I plan on putting a shaft, likely 1", through the X on the left end of the pipe. Welded in place, to meet two flange bearings on either side of the I beam.
-
When I first started looking into building a power hammer, I had read that one fellow said it took him two years to complete his. I scoffed. Two years? I bet I could build one in a month! Well, it's now been two years since I started this build - and I am still not finished. Perhaps if I had a kit I could do it in a month, but from scratch - engineering and material wise - two years is .... just the beginning. --------------------------- So I have been doing some more research lately. I think I am going to change direction a little. So far, I do have a good solid anvil on a decent base - but that's about it. I think I am going to go the route of an unguided helve hammer - a la Depew, Hawkeye. They are lighter, they are not as strong, top tooling is not always compatible, but they're dead simple and I bet for 1" and under, they're as good as any. And, of course, that beats my hand by a long shot! Here's a mockup of what I have: Here's a sketch with approximately how I want to do this: The big gray upright is a 4"x6" highway I beam. I have the web almost touching the anvil, with the two flanges on either side of the anvil. I think I want to weld the bottom of it along the side to the anvil, and notch the flange on both sides to the web so that I can make the radii shown in the sketch. My cousin has a backhoe, so I think I can set it between two rocks and gently nudge it into shape - the notches should force it where I want it to be. The wheelbarrow wheel, 13", is on its own axle. It's 5/8" chromed rod. I want to mount that on pillow blocks and forge it into a simple crankshaft. I think this will be strong enough. a 1.5" pulley will give me 200bpm with this setup. Which brings me to the ram - I have a couple options. I have seen sledge hammer heads used pretty effectively, but I also have a 25lb chunk of 4.5" round, about 6" long. I could mount that perpendicular to the anvil, like this: That gives me options for interchangeable dies. I would prefer to do that, but, 25lbs may be too much. I am having trouble figuring out what I should make the helve itself out of - wood or steel - and how I should securely attach the head. I'm a pretty good welder, but I don't know if welds are enough for that. I'm almost considering tapping threads AND welding it, but that provides its own logistical challenges. I am not so concerned about the ram weight - I think 10lbs is plenty for my needs, and I have an anvil that will provide a 40:1 ratio with a 10lb head. I could go up to 16lbs and have a 25:1, too, so I think that the 25lbs may be more trouble than it's worth. From what I understand, it'll move more metal with a lighter head and the same size anvil (in some cases) So, there you go, full resurrection.
-
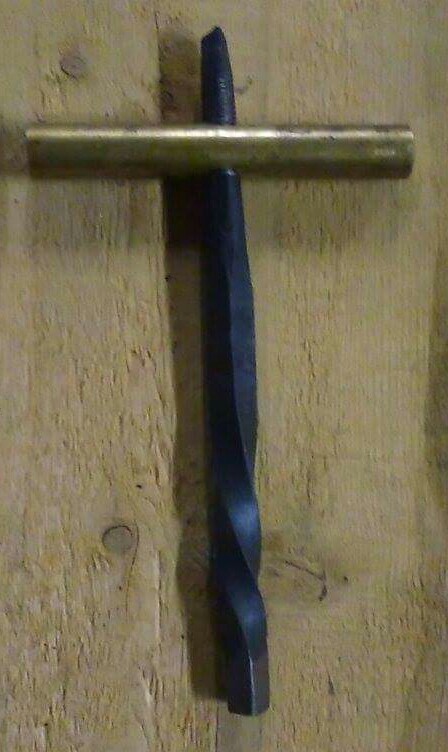
well, i did keep it pretty simple. it's only a light duty wrench for the lathe chuck - i highly doubt it'll see more than 40lbs of force. I like your grub screw through the threads idea - that may work. i needed to be able to detach it for now so that when i get my new backing plate for this chuck, i can turn the brass handle down into something a little bit nicer. once i do that, i suppose i may just braze it. thanks for the ideas
-
Hi. I needed a wrench for my lathe chuck - 1/2" square drive. I took some 1/2" square, took one end down to 1/2" round, cut some 1/2" -13 threads on it and added a brass handle. I used threads because I wanted the brass handle, and the brass I had didn't really like being forged - sort of crumbly. So, my problem now is locking the threads. I considered using picture, I suppose I may jut do that, but I am wondering if a mechanical lock might be better? A keyway or something, perhaps? Wanted to know what some of you thought, curious for ideas. I don't want to go too crazy,just something that will lock but still be able to be removed if it needs it. I attached a picture: I still need to remove the top portion, for obvious ergonomics, though I was considering a cap nut with a saddle, so I left it.
-
Hi. I was offered an apprenticeship doing sheet metal work, I started about a month ago. First week or two I was fine, but the proceeding, well... my hands and wrists have been extremely sore from swinging a hammer 40 hours a week. I've been doing various metal work for a couple of years now, I've practiced enough prior to this job that I can make steady, accurate blows for a few hours, but I've never previously done that full time. I'm having a hard time keeping up, and my hands can be so cramped up some mornings that I'm afraid I may be hurting myself long term. Is this something I should be worried about, or should I keep plugging along?
-
It is unfortunate. I had spoken to one of these fellows on youtube not too long ago - they mentioned plans for full sail ahead due for next year (2016). Whether that's true or not, I can't say for sure. Introducing an affordable induction forge to the blacksmithing community is going to send us all soaring. From what I have seen induction capable of, this is like introducing the Little Giant. We might have a chance to catch up on all of our projects .............. just kidding
-
Haven't been ... yet. I got the tank through craigslist when buying my MIG welder. It's been empty so I just run fluxcore. The only one I have around here was Abco - but I think that's Airgas now? I'll have to check them out next time I'm in that area. I also found that my tig welder is not actually a standalone piece but a HF arc stabilizer - something I'll have to plug into my stick welder. Know anything on these?
-
I've got a bottle for my mig welder - 75/25 argon/co2. For the little bit I use the mig welder, I usually just use fluxcore. I want to teach myself tig, and my tig regulator fits onto this tank - but I have read that tig likes 100% argon. I have also read argon/helium mixes are good for both mig and tig. When one gets a tank refilled, can the tank be refilled differently than what it was previously? Can I use this 75/25 tank for straight argon? What's a price I can expect to pay?
-
if you are using MIG (with shielding gas) make sure you have electrode positive. If you are using fluxcore (wire - but no gas) make sure you have electrode negative. This should make a big difference in the quality of welds you can achieve. If you are using stick, SMAW - practice! Run a pad of beads. Burn a few pounds of electrodes at once. Get your technique down. Always play around with amperage settings. You will learn to recognize when you have too much or too little. Welding isn't hard - but, like anything, it takes a bit of practice and experimentation to get it right. Invest the time and it'll pay off. Good luck with your hammer - I think this design has a lot of great benefits. I don't mean to belittle your project through your welds, only trying to offer some advice! I'm thoroughly impressed otherwise.
-
tdriack - I would implore you to research other power hammer linkages. I have found that, while effective, this style linkage is more complicated to build than the leaf-spring types. Especially if it is a strap hammer. Much less welding, minimal bushings, easier to design as a home fabricator. Phil - do you know which welding process you're using? MIG, fluxcore, stick ... tig? I was leading up to offering advice on how you might achieve better welds.
-
I like your idea for adjustability, looks like another clever design. I would run a couple passes more over some of the welds - those holes in the bead (porosity) are weak spots and something with this much momentum might cause them to break. What kind of welder are you using?
-
YES. I came to the same design, later saw Sam's hammer, and am working on building mine (though much larger, 45lb ram). I was worried that the concept wouldn't work efficiently. More proof that it does. Thank you for sharing. It looks like it hits plenty hard - and I like your idea for bracing in the back, I think I'm going to do that with mine.
-
That welder is pretty good - I just wish it could do DC instead of only AC. You can only go so high before it goes from "welder" to "plasma cutter" .... I welded this at 125 amps, I think. 225 would have just eaten up the rod and my parts, unfortunately. It's coming along, though. Slowly but surely, I'll have it up and running eventually.
-
Geez, Matthew - you always use that sledge with one hand??
-
oooooooook. Well, I got a bit done on the hammer today after work. I cleaned up the base plate and the anvil - got those two welded together. Gave my new 4 1/2" Makita a run for its money, went an hour grinding and it didn't even get warm. It's also kind of scary trying to wrangle 360 (and later 460!) pounds of steel by yourself with nothing but an engine hoist and a loop of steel cable. That's almost four times my weight! Here's the pictures:
-
Ah, sorry it's been so long. been busy, preparing to move and getting married in a few months... I haven't made any progress on the hammer - I have everything but a motor, though. Just needs preparation and assembly. I did do some work on the anvil I started fabricating last year, that's not done yet either, but I have a base, a hardie hole, and a square horn on it now. Still need to do a bit of cleaning up and eventually add a round horn. Maybe a pritchel hole. Here's a couple pictures of that: first picture is the block I started with last year, I think it was 85lbs. Second picture shows the seam I welded up, 1" square tube butted in between the main block and the horn block, I think I did 100+ passes on EACH side filling that gap. Still a little bit of touching up to do, but I'll get to that when I get a new liner for my mig welder. The stick welder is too clumsy for stuff that delicate, the arc blows out too much when I have the amps cranked to use my 30 year old rod............ third picture is the face as it stands now. Like I said, little bit of touching up to do, but it works just fine until I find something suitable for a horn. The horn added something like 20-30lbs, the base added another 10lbs. I'm hoping to have it around 130-140lbs when finished. I haven't weighed it yet, but it's getting hefty. I also needed a new forge. I made on a couple years ago using a 55-gallon drum, but its been outside in the very unforgiving New England weather and the hood looks more like rusty corn flakes... So I quickly made up a new one out of a lawnmower deck and some angle iron. I haven't even had a fire going yet this year! here's the old vs. the new: I haven't painted the new one yet. After seeing what happened to the first one, I don't know if I will. The new one looks like a piece of crap but it's just something to hold a fire, so... That's what I've been up to in the past month. Sorry I haven't had more time to get on here. I'll have the hammer done soon enough, I hope!
-
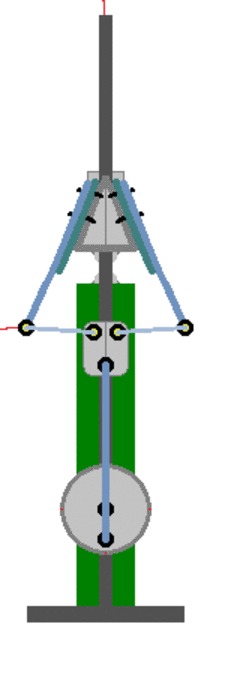
Okay. Had a busy week - got two 9' hickory logs bucked and almost ready to be hewn into beams. Straight as an arrow, and about 400lbs each. My younger brother (15) and I loaded them into my F150 ......... by hand! Just about maxed out my suspension, between that and the cordwood. Anyways - I've done a little more design work on my hammer. I've got it just about worked out in my head, a few pieces still need to come together. I have the spring for the linkage - I decided to go with the X1-style, though it is a little modified. I bought a 1,000lb capacity leaf spring. It's small, but I can't hardly budge it by jumping on it, so, I think it'll work. I'm worried it might even be too stiff! To alleviate that, just in case, I'm going to use a nylon strap in the Champion bow spring style. This is easier to fabricate and, from what I have read, offers the benefit of hitting harder. Less hardware, less bushings. I'm a cheapskate so I'm trying to make the most economical, least expensive and best performing hammer I can. I've researched literally every day back to at least a week before I started this thread. It's all starting to come together now. Since I bought this leaf spring new - a simple trailer spring - it has plastic bushings. Now, I was wary of them - and I still am, to some extent - but I did find this article showing the (surprise!) benefits to plastic bushings over bronze bushings. It might not hold up to the shock, but if it doesn't I can always replace them. Here's a link to the article: http://machinedesign.com/news/comparing-thin-walled-plastic-bushings-and-thick-walled-bronze-bushings News to me. I hope I don't get ripped a new one for saying plastic might be comparable to bronze........... So, here's my latest Microsoft Paint animation. It's a little wonky, but it shows my updated design well. Not so much the actual physics, being that it is, after all, Microsoft Paint, so bear with me. Leaf springs on either side, attached to a central block. The ram is guided similar to Sam Salvati's hammer, though I have a little trick in which I will be making vee-ways with (semi-)proper bearing material. That bearing material might be hardwood. I'm not sure if the bottom of the linkage will be guided or free to rotate yet. The ram will have the added weight of the springs, the guide parts, and the plate in which the springs attach.With the die, I might be close to 50 pounds. The tire was 'replaced' with a generic flywheel for ease of illustration (I hand-drew this on Paint). The anvil is the green, the gray central column is the guide pole and the dies are on the opposite side of the linkage. The beauty of this, however, is that it is to some degree "upgradeable". In brainstorming, if the frame is strong enough (I'm not afraid of gussets or maxing out my stick welder) it should be that I can have varying linkages and motors to change from 25lb to 50lb to 75lb. For what that's worth, anyway. It might be able to handle 100lb, but I won't be able to tell until I have it all up and running. The ram could simply be pulled off through the top, a new one bolted to the pitman arm, and a different motor bolted in place. I don't know how practical those weight changes may be, but for a mechanical hammer, it may be a useful concept.