
Leeknivek
Members
-
Joined
-
Last visited
Everything posted by Leeknivek
-
I think he's banned from this site right now. I've seen him on many other blacksmithing and knife making forums, though. I sent him a friend request on Facebook for the same reason but he hasn't accepted it yet. I guess ill be able to answer in a week or two when I get this pig up and running ... Hopefully
-
Ah, we'll have to see. You're probably right. I sold my stupid Hammond organ, so I have a little more money to invest into this now. I'll probably buy a proper motor and springs and hardware. That's about all that's left, then I just need to weld it all up. Going to have to crack open that 25lb can of 7018... Jeddly, I'm hoping this design I have will turn out ok. Seemed to have worked for Sam Salvati with the video I posted, that's basically what I'm doing. It looks like his coil spring needs to be under a bit more compression though - but mine, like his, is about 10"x30", 5' tall. Very compact for a +/-30lb hammer. any other opinions on the X1 linkage?
-
That's true, this will be more a temporary fix until I can find a decent motor on CL. That VFD concept looks promising, however since I don't have 3-phase (yet?) it looks like more than it's worth for right now. I do have about 50 old tires. This just happens to be my only compact spare. I have a solid axle, too, with intact wheel bearings. That would work, if I can find something that matches the lug pattern ... then I'll draw out the solid axle! I was thinking of using this because the wheels are offset on dog bone shaped plates, which are about 6" long. I could conceivably drill a number of holes and have a little bit of adjustment, since I have room for a larger than normal stroke. I could probably mill out the middle of the dog bone, too, but that seems a lot less stronger for very little gain. I would have to stick the wheel bearing to the axle, though, and mount the whole thing on a pillow block. No welding on the rim, and lag bolts are easily accessible from the back. I made a (very crude) working model of the linkage to confirm for myself and to better understand how this works. The whip works as a result of gravity, in that when the linkage moves up, the weight of the ram will cause the ram to "lag". "Mechanically", it will be easier for the linkage to compress the springs before it lifts the heavy ram. The same is true on the downstroke, the ram is still on the up stroke, but the rest of the assembly is starting to fall - the spring compresses again to compensate for the weight and the ram in turn has a larger stroke and is slammed down. The faster you go, the more powerful the lag - and therefore the whip - will be. I think it will work just fine, however, there's some complex physics and engineering going on here, arm vs link length, ram weight vs. spring strength, how tight everything is, and then speed... For this particular one, I know that I need a deeper throat to allow for the potentially increased whip. I probably need springs that are stronger, but in either setup a DP linkage is using gravity vs. the spring. I haven't purchased any hardware yet because of this - I'm kind of stuck on figuring out these dimensions. I think I have something like 30-40" between BDC and the ram's bottom, so the linkage needs to be about that tall. I'm also leaning more towards the champion-style linkage as opposed to the LG. Seems a lot easier to construct, though I wouldn't know how to bend the leaf spring. There is the X1 sort of linkage, too, that Jock Dempsey came up with. Anyone have any experience with that?
-
I'll definitely be posting a video when I have it all up and running. Whether it runs good or not, that is. The motor I have is probably at the least 25 years old, more likely 35-40. Just for reference.
-
Ah, so Anvilfire is down. I was wondering why I couldn't get on there. I have seen that chart, however, I have also read that older electric motors (the big, bulky kind, like this one) have more torque than the newer ones. I don't know for sure if it will work, but I think it's worth a try considering that a 1-2HP motor will cost $100.
-
hey, that's a good idea! Are you using your anvil as a welding table?
-
Jeremy, that's true, but to be fair that hammer has no bottom plate and the frame isn't bolted down. arftist, you're right. In my setup, with the ram in the front and the linkage in the back on the bottom, I'll have room for up to 24" of stroke. The linkage will cut that down significantly, depending on how big it is, but I think 12" is good like you suggested. I did some sketches of a full mock up, but I left my notebook at the shop. I did take some pictures, though: Almost time to put it all together. Another couple weeks and I think we'll be up and running, need a base plate, the linkage, and some hardware. Oh, and some paint! What color should I paint it? I don't want to do green or gray, because 75% of all hammers I've seen are British Racing Green or LG gray. The other 15% are red, 6% blue, 4% something else.
-
Here is an example I found of the principle I'm trying to express... The anvil is small and the ram is "10-20lbs", looks very light duty, but I think I can work within this design and amp it up some. Some evidence that it does "work"!!!
-
12" of stroke? On such a small hammer? I was thinking more like 6-8" as I won't be trying to work anything bigger than like 3", and only then for drawing. If I start working on stuff that big I'll make a bigger hammer. Speaking of which, how does one calculate stroke/eccentric shaft position? Is there a good rule of thumb? I was figuring 1/3 of 'maximum' stroke, assuming that if there were a static stroke you'd want half. In a variable stroke, I want the linkage to provide the extra length of stroke. The tup weight is going to be about 30-35lbs, once all the engagements are made. I've read that 10:1 is minimum and 20:1 is maximum practical. I don't expect that it will make a huge deal of difference. I'm looking for the biggest piece of plate out there, didn't see it today. I don't know where it is but I'll find it... All I need is the base plate, some thinner 1/8" plate (for giving profile and suave to my machine when finished), a coil spring and some hardware. I've got it mostly figured out in my head, too. The devil is in the details.
-
Too late. Rather than orienting it like an "I", however, I will be orienting it like an "H". My ram is a 4 5/8"D x 6" cylinder, with a 5/8" square groove machined into one side. Not sure why. I have a piece of 5/8" x 2 1/2" bar stock that I will be welding into this groove, and on either side of the bar stock I will be using some angle iron to create two parallel vee ways to act as the guide. The I-beam i have isn't particularly strong, but I will be trussing and gusseting it up. This design will have the ram and anvil relatively close to the I-beam, and I will later enclose it all in plate and pack with sand or iron dust or something for added weight and rigidity - as well as aesthetic reasons. Here's a picture of the anvil:
-
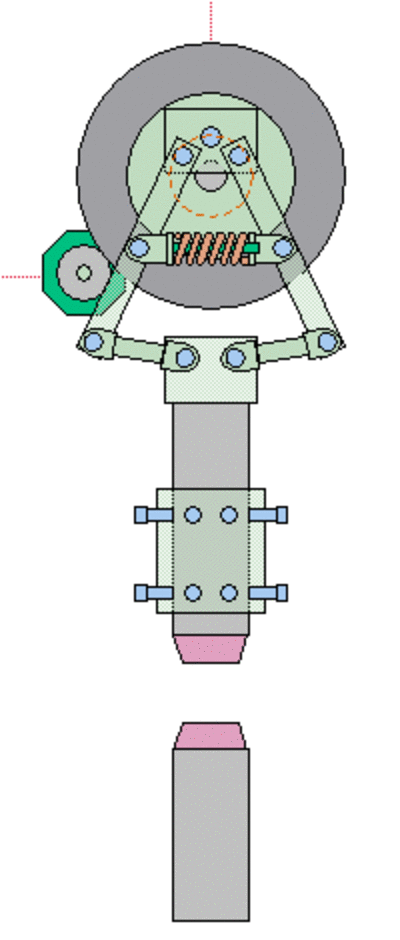
...obviously. I wasn't trying to prove anything with the animation, only illustrate what I mean. That diagram doesn't hold true to a DuPont style linkage, either, because it leaves out the very working principle of the DuPont linkage - the toggle arms and coil spring. With the toggle links and arms being specific lengths and attached as they are, the coil spring holds them in place. The coil spring absorbs the outward force on the toggle arms. On a lighter note, I did find a suitable anvil. They didn't have anything REALLY big, the biggest was 362lbs, 6 1/2" round by 38 1/2" long. Because it isn't 500+lbs, I opted for a smaller ram - 25lbs. I guessed the weight by holding it, I would have liked 35 but this should do just as well. This gives me something like a 1:14.5 hammer-anvil ratio. I also bought a small i-beam, it's about 70" tall. Same as me. I didn't have enough for a hefty piece of plate today. They didn't really have much. I paid $160 even for everything, 471lbs. $0.34/pound. That yard is still stuck at last years prices... Interestingly, they are actually a thrift store that, in addition to selling typical thrift store stuff, they have a steel yard and are a used lawnmower/motorcycle dealer.
-
I meant for heavy canvas over the tire, so that the tire remains intact and the canvas can be replaced. It wouldn't add much to diameter and could be made to be fairly easy to replace. It is available at most craft stores - and Walmart.
-
I have, and that's always an option however the Rusty style hammers need a larger footprint. The entire weight of most vehicles is held up by four coil springs. I don't think holding 50lbs with one coil spring is that far out of the question, the problem I see is that a sufficient brake would be needed to keep the crank/tire from rotating. This will likely require rigging up the drum brake on the spindle to work. Maybe the e-brake, because hydraulic brakes are pushing it for me. If you look closely at these linkages, the toggle links are level both in the top dead center idle position and the bottom dead center idle position. Presumably, the snap works in both ways as the spring compresses and allows the "elbows" (where arm meets link) to come closer together. The ram should travel further in both directions. With a sufficient brake, too, I can present the next idea I have - I've seen a lot of complaints about spare tires wearing out. I think a simple solution might be to fit a heavy canvas liner around the tire. It might need some sort of friction material added to it, but since the tire is a difficult to find consumable at best, this would, potentially, save a lot of time and effort.
-
26" of concrete? geez. That'll have to be a later addition. I don't actually know how thick the slab is (I have three hydraulic in-floor vehicle lifts with a maximum height of about 6', so who knows really). That's a very good reference though, for the future. I wouldn't have guessed that much but makes a lot of sense. I had an epiphany, also. Many people complain about tire hammers being wobbly at the top - and I guess this would hold true of any power hammer with a giant crank 6 feet up in the air - so what if the drive and linkage was reversed and instead was on the floor? I think the working principle of the spring-toggle linkage would still work, though it may need some modification. I made an new animation to help me understand it, it will probably help illustrate what it is I mean: assuming the linkage principals still work the same, the end result would be a hammer where all the momentum happens low to the ground and is less affected by violent, heavy, off-center-of-gravity swinging. Less material. Less top-heavy.This also opens up not only having the drive opposite the user, but while retaining the few parts needed in the original, front-facing design. This is hard to illustrate with a 2D animation, so i'll try to explain... Imagine that instead of a ram directly connected to the linkage, instead is a piece of thick plate that measures, say, for sake of argument, 7"w x 15"H x 1"d (30lbs, for reference). The ram, 5"w x 10"H x 4"d (57lbs), is attached to the plate, so that the top is flush with the top of the plate. The bottom 5" of the plate are empty, all for a 5" stroke. (note: these figures are arbitrary)The ram is in line with the anvil, while the plate can be used as a guide - maybe set into the flange of an I-beam. I don't have this part exactly figured out yet, but ideas are welcome. I think this is a much more practical design, again assuming the linkages will still work in the same manner. I'm still wrapping my head around it, but I'm very excited... EDIT: thinking more on this, I think the working principal would have to be the same, because the toggle arms and links are a mirror image and the spring keeps them apart. The spring should be compressing on every up and down stroke either way. This may require a stiffer spring to overcome gravity, however.
-
that sounds good enough. I have a slab already, it's about 3' wide off the edge of my shop. I could dig a hole beyond the slab, however. I'm hoping the first piece isn't cast, I think ill only be able to tell with a spark test. More work for the long skinny one, if the first is steel. I'll just have to wait and see I guess.
-
finally got to see what the scrapyard has. Found an i-beam mast, a huge structural i-beam for the base, and I have two options for the anvil. option 1 - about 8"Dx30-36"H. Looks to be a large ram of some sort, has a cast in loop with steel wire running through it on one side. Only problem - it might be cast iron. This is the better of the two choices, aside from the cast iron possibility. Is it worth trying to weld? (my stick welder goes up to 400amps, 220v). It may just be hardened, hard to tell with the few minutes i had. There was a thin section where the cast-in loop is, chipped right off with no effort. Hit it with a junk hammer I found. This piece would be my preference. I guess I could bolt it in, also. Option 2 - an industrial roller for a printing press or something to that effect. About 4-5" in diameter but 7' long. Steel. both have machined surfaces. Both are probably about the same weight. One is fat and short, one is skinny and long. I could even cut a hole in the base to plant the long one in the ground however long I need it to be, setting this up outside. opinions?? Price is $0.25/pound
-
Here's a quick and dirty .gif I made, also, from an image I found on Google. Just for fun.
-
Grade 5 vs. Grade 8 bolts: Grade 5 (sized 1/4"-1") Yield Strength: 92,000 psi Tensile Strength: 120,000 psi Grade 8 (sized 1/4"-1 1/2") Yield Strength: 130,000 psi Tensile Strength: 150,000 psi There are more sources out there, I'm certain, but the numbers say grade 8 is far superior to grade 5 in terms of tensile strength and shear rating. They have to be in order to be classified as such. That being said, considering that mild steel "has a minimum yield strength of 36,000 psi and ultimate tensile strength of 58,000–80,000 psi", and most weld filler materials have a tensile strength of around 70,000+ psi, I think grade 5 will do fine for a power hammer. Grade 8's, as Charles mentioned, should inevitably last longer. __________________________ Based on what you've said, Charles, it does seem like using the studs is more trouble than it's worth. I'll just have to remove the tire and run a few beads. If I make my own crank plate, I can give extra space on the opposite side for a counterweight if I need it. I think I'm going to use 5/8"ID x 3/4"OD x 1" OAL bronze bushings, inserted into 3/4"ID x 1 1/16"OD black steel pipe. This allows me to use 5/8" or 3/4" threaded rod for the spring. I still don't have a ram or coil spring and am having trouble calculating how long the toggle arms and toggle links should be. I guess it's probably not very important, but I think it will determine how hard my ram will hit and how long my stroke will be. This is important for planning the guide.
-
I don't have the means to purchase plans unless they're available in .PDF format. From what I've imagined in ram geometry, the ram will be in some way leveled by the linkage in two axis, X and Y, if Z is vertical stroke. This would, however, put more lateral stresses on the linkage members and not allow a completely square ram. In using a DuPont style linkage, the ram is attached at two points and the rotation of the ram would be dependent on how loose the linkage is. More loose of a linkage means an easier movement in stroke, more powerful stroke while creating potentially more wear on moving parts - and vice versa, more stiff linkage means more effort required to move the ram and less powerful stroke, but likely even more wear on parts however the ram should be more centered and less prone to lateral movement. This is the basis for a guide - to not only center the ram but to also remove points of stress from the linkage due to lateral movement. I don't claim this to be entirely true, of course, this is just how I understand it. Feel free to correct me, I'm only assuming based on reasoning. I am, right now, undecided on how my ram will be guided because that will be left to what I am able to find. The only thing I will be buying new in this project is hardware - new steel is incredulously more expensive than scrap. I have found a few options - Using a square ram, which will be inherently shorter than cylindrical rams of the same weight: 1. Wide Roller Bearings set in heavy (3"x1/4") angle iron. I have read that this design is relatively simple to construct, so long as care is taken to make all the holes square, and has the benefit of little drag and little maintenance, as opposed to other fully enclosed designs. 2. The "traditional" square tubing. Easier to assemble, so long as care is taken in squareness, but with the trade-off of more maintenance compared to option 1. 3. An alternative V-ways that I've come up with myself, in which the flange of railroad track or i-beam is used as the negative, with an enclosed, bolted on guide of plate. This would require some squaring up of the flange, but I think a grinder, a level, and a good eye is sufficient. A light oil or heavy grease should work fair enough. Using a cylindrical ram: 1. Wide Roller Bearings, as above, but ideally with a radius to fit the cylinder. 2. Thick-walled pipe. Same merits as option 2. above. ----------This is all using a DuPont style linkage. A Beaudry-style linkage can only work with V-ways, and I am still considering that route. In videos I have seen, Beaudry linkages seem to have more snap. More velocity = more force, the main difference between a drop hammer and a power hammer. What I end up doing is entirely dependent on what I can find. I think all options will work well, but option 1 - using roller bearings - has the most merit, I think, in that it is simple yet reliable. The stroke and all that follows is also going to be dependent on what is used for a ram. The drive system is comprised of the following: >Electric motor with 2.5" diameter drive wheel >Spare tire donut, 19.5" diameter crank >Crank plate, on the center of crank >Eccentric shaft, final drive point of the drive system. There is a great resource for computing pulley ratios and RPM's, among other things, on a website called Blocklayer.com. Using this resource, I have found the following: With the sizes listed above, an input RPM from the 2.5"d drive wheel of 1750 (common on most motors) will net an RPM of 225 on the 19.5"d spare tire crank. 225 RPM on a 50lb tup should be fair, so long as I'm not overworking, under-maintaining or otherwise abusing the machine. I have considered also using 3/4" drive sockets. I recently came across an old set while cleaning. A 3/4" drive socket wrench will typically be a 3/4" drive machined into a larger cylinder, mounted onto a steel shaft. Using this, it offers the option of changing drive wheel diameters. 3/4" sockets surely aren't cheap, but since I have an entire set with no use, it may be worth experimenting with. Most of your points, KRS, are dependent on me having at least a ram first. I hope the above illustrates that I am taking this seriously and planning out what I can. For the dies I will be using the top bit on pieces of rail track, welded to plate, bolted into the ram and anvil. I'll tap the holes with the biggest size tap that I own - probably 1/2" or 5/8". If that turns out to be too small, I can always go larger. As far as safety, surely I have no incentive to kill or maim my person. I don't think blacksmithing is the epitome of safety to begin with, never mind mechanical power hammers (homemade or commercial). I have a large grille of steel, meant to cover the rear window on a pickup, that I will probably form around the linkage to form a protective shroud. I will also be using some sort of lockout device - maybe even a vehicle ignition - so that the hammer requires a key to be powered on. Just so that it doesn't accidentally get turned on. I appreciate all the feedback, really. This is helping me along a great amount. Thank you.
-
I don't know much in the way of air hammers. Are there any additional plates besides the center one on the 88?
-
Yes, I've got it just about figured out enough to sketch it up in scale. I just need to figure out the ratios in which the linkage arms would have to be. Is there a resource for this anywhere? The hardwood bearings I meant for the ram guide - still debating it but ideally, like you mentioned, it needs to be something that can be replaced. I think that really only implies that it's bolted on to the frame rather than welded, which isn't that big a deal. I'm off to the scrapyard tomorrow. I spotted a piece of I-beam there yesterday. I think, based on pictures I've seen, if the anvil is 36" tall, the mast will need to be 72" tall - twice the height - to allow a decent stroke. I did read, also, in my copy of "The Complete Modern Blacksmith", if it's of any news to anyone, that tightening or loosening the coil spring on LG, Fairbanks or Clay Spencer type linkages will adjust the stroke and force.
-
Sure. I'd like to document most of this for those that are looking for information. Sorry, when I think of lag bolt I usually think exclusively of lag bolts for wood. I understand what you mean now - this is what I was planning on doing. I hope it is clear where my confusion was after saying this....... Please don't be trite and captious. This is the sort of politic that I was referring to. I do not mean to impose or to offend, but I have seen a lot of condescending talk from many users on this forum. I don't think it's very encouraging, to say the least, and certainly I can't imagine that it's very well appreciated by those on the receiving end. Now. Back to business. I have looked into buying Clay Spencer's plans, however, there is only a printed copy available and no .PDF version that I could find. I do not have checks. If I could pay through PayPal and receive a .PDF document, that would be a little more practical for me. I suppose I should email him. (PS - I work for $9.59 an hour - so that's more than three hours of my time right there. Even without the gouging taxes one has to pay.) I mentioned that this would be a friction drive in a previous post, so the motor will be towards the top able to come into contact with the drive wheel (spare). Yes, I am committed to using fully-capable owned material on a non-structural and non-critical part. I do understand what you mean, though, but I will be working with salvaged materials. I acknowledge that this comes with restrictions. On the other hand, these are literally called "Junkyard Hammers". ***DISCLAIMER - for the sake of my integrity, no sarcasm was meant in any word or phrase in this post and my words were placed carefully. I am remaining neutral and keeping my patience.
-
I'm not trying to reinvent the wheel, by any means. What I'm looking to build, I should have clarified, is in the same working principles of the Clay Spencer tire hammer. Friction drive, same linkage, same general idea. I just think the $30 is a little steep. I'm getting a better and better visual in my head of how to assemble it all as I go. "The pins can be 9/16+/- lag bolts" - Do you have a picture of this? I don't understand what you mean, lag bolts with the threads cut off? I was thinking just some grade 8's, like you also mentioned. I'll keep an eye out for bushings and see if they aren't for sale in surplus on eBay. You're right about the crank arm dimensions, and that's exactly what I was hoping to hear. The pillow block I'm referring to is mounted upside down on some plate, the uppermost part of the linkage. It mounts to the eccentric shaft. I was thinking a piece of heavy rod (1"-1 1/2") welded to the crank plate and a hole drilled for a cotter pin on the opposite side. I have some heavy round stock - broken jackhammer bits, giant bolts, etc. - but I'm sure just about any steel would work for the eccentric shaft. I have the whole car to use, too. So I have two spindles from the rear wheels. Very small (6" or so) brake drums attached. Same lug pattern as my spare. But the trailer spindle is a good idea for the other tires I have, if I end up using those. I could do 36x48 - it'll fit on a standard pallet at that point. I'm trying to fit it with the concrete slab I have poured outside behind my shop where my coal forge is. I'll have to take some measurements to make sure I have room. The motor I think will go in about the same spot as the Clay Spencer hammer would have. I picked up a set of old bed rails to make all of the foot pedal and clutch linkage with. Couple of nice big heavy duty hinges, too. For the guides, the simplest I can think is either a cylindrical ram in a matching steel pipe, a bolted-up frame of plate for a square ram, or maybe even a hardwood bearing surface within a steel frame. I like to build stuff too! I don't have a copy of that book, I'll keep an eye out at Goodwill for it.
-
I do scale drawings here and there, I find that it isn't so much difficult but rather more tedious, which I have no aversion to. I sketched a scale layout on the shop floor earlier, so that's a start! I'll work on some drafting tomorrow morning. I may have to make some changes due to using found and scrap parts. I have three tires that survived, four including the spare. The rims on the others are aluminum alloy, though. I do have an exceptionally large pile of tires and rims (50+) inherited from my grandfather. I can mix and match from there. Thick and solid is what I'm hoping for. Going to take a trip to one yard before work, see what I can see... I have dabbled a fair amount in MIG and stick welding, though I know more in the abstract than I have experience. A welding shop was impressed with my work when I applied there, if that says anything. I'm certainly no expert, though. I'm hoping for a 30"x40" footprint, the thickest I can reasonably find. 3/4" minimum, I think. The bearings and bushings I was referring to are the ones located in the linkage, the moving points aside from the pillow block. On the DuPont-style linkage, there are six - two on the eccentric shaft mount/pillow block, two on the tup, and two in the middle. Well, one per each side on all of those. I guess for a 50lb hammer it shouldn't be too big of a deal, but if a couple of dollars and a little extra planning can add reliability, then I may want to pursue that. The ram guide seems to be the most complicated part of this build. It might be that I can't fabricate something, since I don't own any machine tools. Don't be shy about talking too much, either, friend - I can sponge it up all day long!
-
That's a good idea, Steve. I could have enough for the whole state if I go through the bucket I have.

