
Sam Falzone
-
Posts
653 -
Joined
-
Last visited
Content Type
Profiles
Forums
Articles
Gallery
Downloads
Events
Posts posted by Sam Falzone
-
-
You don't need to do an anneal before starting---they forge will have it up past annealing temps anyway!
Generally I take a cutting disk on the angle grinder and zip down the side of the coil on one or two sides to make a bunch of arcs of coil the same length---easier to store and to un-coil in the forge.
Have tongs that fit the material well. I like to heat a coil section and bend it open reheat one end and straighten on the anvil then flip it around and do the other. Sometimes putting an end in the hardy hole and grabbing the other end to bend it open helps.
Forge at a good temp, lower orange works for me---don't work cold! Quench slightly above loss of magnetic properties in warm oil, temper as appropriate! Remember too high a tempering temp is safer than too low!
Why would one *want* a torch for heat treating?
Scrounge a number of different coils of different cross section diameters---makes it a lot easier to make punches if you start near the wanted size!
Thomas what does "temper as appropriate" mean?
All of my experience so far has been just "forming". I've no experience making tools, especially tools that need to be hardened or have a cutting edge, so all this is new to me.
Can you elaborate for me? And remember, I'm a total blank slate here
-
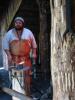
I just got back from an amazing trip. A living history group I belong to (Regia Angelorum) was invited to go out to a place called Norstead on the north penninsula of Newfoundland (directly across the street from the UNESCO L'Anse aux Meadow / Vinland site) for their Viking Festival. Ostensibly we were there to help train their interpreters - I was invited to work in the blacksmith shop. It was an amazing week - we trained, made repairs and had a lot of fun. I even got to spend an afternoon working with the blacksmith at the L'Anse aux Meadow / Vinland interpretive site, inside one of the re-constructed buildings - and my wife and I got to walk among the actual mounds of the historic site in our full kit. That was an experience I will never forget.
Anyway, while I was at Norstead I got to try my hand at some blacksmithing projects I've never done before - all solo, off the cuff.
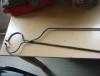
One was a pair of pottery tongs my friend (who is a potter by trade) wanted to leave behind for the site's new pottery program. I didn't have any punches to finish off the tongs so the site handyman ended up drilling the hinge point .
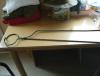
The other was a Norse grilling iron for cooking which I made for my wife. The grill head was a bit small but I really like how the curve turned out. It's supposed to be made out of flat stock but I didn't have any with me so I first hammered out a section of 1/2" round flat for the grill and the other end flat for the handle. Needless to say it has a good heft to it. Hope you all like the photos. This is one trip I'll never forget ... can't wait to go back.
Sam
... also called Valdr
-
I finally got a hold of some old car spring steel (coil spring) that I want to start playing around with - but I realize I have no idea where to start.
I want to use this steel to make some punches - I don't have much steel, perhaps enough to make 3 punches, but I figure its a good start.
1. How do I even begin?
2. Do I have to anneal the steel before attempting to cut it or shape it?
3. How do I re-harden the punch when I'm done?
4. How do I heat-treat using only a forge? (I don't have any torches yet)
5. Anything else I should know?
Sam -
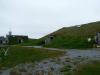
Greeti ngs from Norris Point in beautiful Newfoundland, Canada.
We're on vacation for 2.5 weeks - here we're at week 1.
I have been just dumbfounded by the absolute stunning beauty of Newfoudland - if you've ever thought about going to Newfoundland ... YOU HAVE TO VISIT THIS PLACE !!!
We're here actually for a working holiday ... one of the viking groups I belong to got invited to come to Norstead in Newfoundland - next to L'ans aux Meadow to work in the interpretation. So for 5 days I'll be the blacksmith at Norstead.
Cheers.

-
Thanks for the video Junker - I actually went to find the part 2 as well.
Am I the only one who thinks that the heat conduction and radiation from actually using that rig to do any forging would melt that plastic fan into a puddle of goo?
Am I wrong? -
Nothing to get all worked up about, it's an anvil after all. Paint the non working surfaces, and don't worry about rust, it will polish right up as soon as you start using it. It will also develop a patina after awhile. All of my anvils sit outside uncovered.
Cover your work anvil surface with an oiled rag when you are not using it.
And like Big Gun said - don't worry about it, it's an anvil.
Rust spots aren't going to hurt it. -
I agree be patient and use what you have i looked for 2 years as well. Then when i went to sales i started asking other people at the sales and i had 4 with in a year i sold 2 and kept 2 and broke even with 2 anvils.
Bob
Everyone is right - be patient (... I know that's not what you wanted to hear ).
).
I made my first anvil from a 5"x5"x5" block of steel, real primitive but it worked.
I used that block anvil for 2 years before I got my first 100lb anvil - I still use it for my demo anvil.
The steel I used was mild steel and the anvil worked out to be 20lbs.
If you want tool steel, Old World Anvils sell 4" block anvils made of 4140 tool steel for $85.00. http://www.oldworldanvils.com/anvils/4x4.html
There are alternatives - a 4"x4" area is plenty of work space and you could grind each edge to a different radius.
Economical, portable, versatile ... think about it ...
Keep looking - it will come. -
Sam , I have seen them on Ebay from time to time.
Yeah, so have I.
I'm hoping to avoid ebay all together - you may win a great bid price but it's the shipping that will kill you.
Then there's the fact you're buying something just based on a picture - that's a tough one for me.
But thanks for the suggestion Harley.
Maybe i'll find one at quad state.
Sam -
/>
Sam I have seen them but not often. I think they would be properly called box vises... but you might see them called most anything. Here is a link to a pic of one that was sold as a "chuck wagon tongue vise". Take a look at the photo... it seems to me that the easy way to get one would be to alter a regular post vise by making a more robust mounting (because without the post the mount has to resist ALL the twisting and pounding forces) and cutting off the post leg. It looks fairly simple to do and you'd likely make a better one than you could buy.chuck wagon tongue vise
THAT'S IT !!!
Thanks Bigfoot. I was hoping they were more common.
I think your idea of modifying a 3" or 4" vice might be the best way to go - they're definitely common enough.
Thanks again.
Sam -
Looking for some help here.
I was given a post/leg vice by my father-in-law when they moved out of their old house - needs a bit of work but it was a great gift.
I have in mind to one day make a forge wagon to take to demos and I want ti include a vise in the set-up. The vise I have is too big and heavy.
I've seen pictures of small blacksmith vises that look just like a post vise, but without the post - the vise ends at the box hinge.
This is what I'm looking for. (wish I could find some pictures)
Does this style of post-less vise go by another name?
Where can I find them?
Sam -
I am definitely in need of stumps.
I figure I'm going to need 6 of the 2' x 16-18" stumps if possible.
Let me know when you have them and i can come pick them up near the end of July _ I have friends inf Brantford and I'm there all the time.
I fact I plan on being in Brantford next sunday if you can get the stumps by then ...
Let me know either way.
Thanks.
Sam -
love the wash tub forge design - it is one of my favourites and I can't count how many times I've recommended this forge idea to new smiths I've met.
Short of a hole in the ground - I can't think of a better design that shows how simple a forge can be - and also how cheap setting up your first forge could be. -
Damascus is the general term used to describe pattern-welded steel.
It is where 2 or more types of different grade steels or iron (hard and soft) are forge welded together in alternating layers.
The original forged billet is then drawn out, cut, one half stacked on top of the other and forge welded again.
By drawing the billet out, cutting and reforging together several times, the number of layers increase exponentially giving the steel a very attractive rippling effect - like running water - when etched, .
By introducing twists in the process, the pattern in the steel can become even more striking. Etching the steel in a weak acid makes the pattern stand out even more as the softer steel layers get etched away slightly. A skilled pattern welded steel makes excellent blades - not just because of its beauty but because the blade benefits from the advantages of both types of steel - the hard cutting edge and toughness in the hard steel and the shock absorbing springiness of the softer steel.
This is just a basic description - if you want to know more others on this list can give you more specifics.
Cheers.
Sam -
Here's my addition to the list.
120lb Peter Wright
-long horn, minor wear on some edges
$200.00 -antique shop in St. Jacobs, ON.
2008
175lb Peter Wright
-minor wear on some edges, small cuts on horn tip
$250 -Mr. Used. Hamilton, ON
2010
100lb Mousehole
-minor wear
$180 -found on Kijiji
2010
20lb block anvil - homemade
-mild steel, water quench hardened,
$45 -some steel retailer in Orangeville, ON
2005


-
Since alot of people have been asking about smiths around there areas lately, I thought I would too.
I'm in Brantford, Ontario. Wondering if there are many smiths around southern ontario that might be up for getting together for a forging day.
Lets see what we could come up with.
Aaron
Hi Aaron,
I'm in Hamilton.
You'll also find John Newman in Hmailton as well - long experienced smith, seller of fine smithing tools and all around good guy.
There's an OABA forum on IFI that I asked Glenn to create for us last year. I haven't had much time to keep on it lately, I usually post the OABA meetings that are coming up and we've had some brief discussions about local topics, but i would love to see our forum become more active - I say that as I am about to become completely unavailable until the fall.
There's a number of us here in Southern Ontario and many who are not on IFI.
I'd love to hook up with you and others at an OABA meeting sometime and talk more about group work days and stuff.
Things to mark off on your calendar:
Quad State - Sept 24-26, 2010 - in Ohio.
Can-Iron 8 - July 28-Aug 1, 2011 - Fergus Ontario.
Cheers -
I'm looking for either a oxy-propane or oxy-acetelyne torch. I'm wondering which one you guys think would be the better option. I'm thinking to go with the propane torch since I have extra propane tanks. I would just be doing simple heating for tennons, rivets, wrapping, etc. and simple cutting of material. I am also wondering what I would need for a propane torch since I am having a hard time finding specifics.
Any help or advice would be greatly appreciated.
Thanks
Aaron
Aaron go to Mohawk Welding supplies - it's on Elgin, right across from Mohawk College.
They're open until 5:00pm and the guys there will answer all your questions and tell you what you want to know.
Cheers.
Sam -
Nice for someone to finally make a comment about these anvils. I've been looking at them for a while, especially the 100 & 200kg ones.
Well ... what's the scoop on these???
Who makes them and where can you get them? - other than ebay -
I think I've seen this anvil before on a web search.
I think they're coming out of China.
NOPE!
My mistake ... apparently I was thinking about a different anvil coming out of China.
But I have seen this anvil style before - I just can't remember where. -
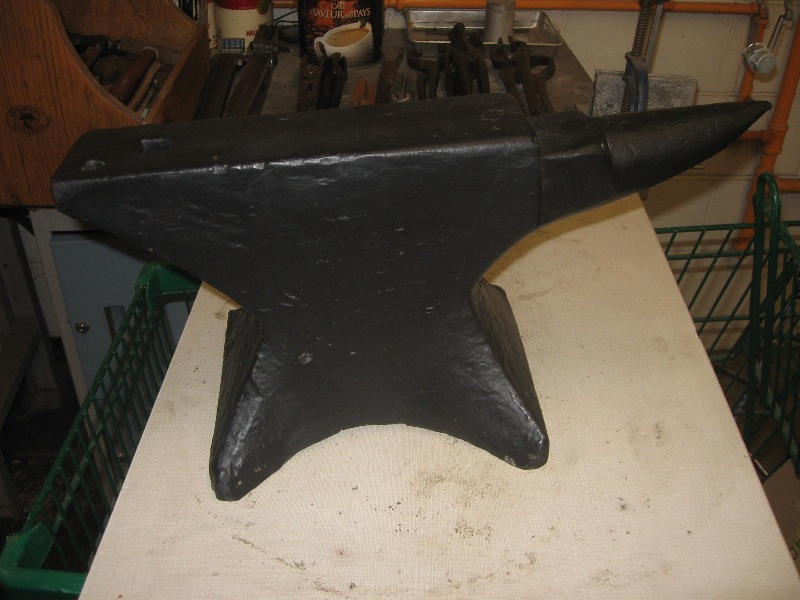
http://www.anvilfire...Anvils%20Radius
Nice anvil. Any idea what make is it? It looks somewhat squat, which is not a bad thing.
Phil
I think I've seen this anvil before on a web search.
I think they're coming out of China. -
Hi everyone.
I'm looking to pick the collective IFI brains on something I've been thinking about lately.
I have a portable charcoal forge rig that I haul out to demos, and it always gets lots of attention. I've been approached many times over the years if I would be interested in teaching a beginner's blacksmithing class at various demos. Lately I've found myself seriously considering it so I've began gathering up gear that I would want ,to teach a class of up to 4 beginners some very basic smithing skills (basic hammering, stance, drawing out, bending, etc), enough that they could make their own S-hook by the end of the class - lots of you probably do similar things. The main things I wanted were two 75-100lb anvils to make 2 student work stations.
Recently in another thread I posted that I had found a sweet 100lb mousehole that I had picked up for my teaching rig. But then I got to thinking, "Do I want an absolute green beginner whaling away on my sweet little mousehole - or any decent anvil for that matter?"
So what I would like your opinion on is ...
Should I risk using good anvils for these student stations or should I use a cheaper ASO? (Like the picture I attached)

-
With 2 layers of firebrick, you don't even need the clay.
This is my charcoal forge. The box is 1.25" ash planks, the firebox is 2 layers of soft firebrick sitting on a plate steel shelf.
It's also a side-blast design, the 2 standing firebricks act as a firewall.
I've run this forge ALL DAY at demos and the planks don't even get warm (well, barely).
So, a charcoal forge can be pretty simple.
A friend of mine uses a table full of sand for his charcoal forge - saves him from digging a hole in the dirt and stooping all day.
Good luck.
Hope this helps.
Sam

-
WARNING: Blacksmithing by the braille method is NOT a good idea!
You could try it ... but you'll probably only do it ONCE.
-
I believe Practical Blacksmithing has no copyright anymore do to its age. The following link is one of my favorites for technical E-Books. Just click on the blacksmithing and scroll down. There are 4 books on all. Each are a collection of smithing articles from old time magazines and periodicals. Lots of good info on tools, forges, etc.
Practical Blacksmithing
Hope this helps!
Great site Blue ... thanks.
The funny thing is that I downloaded copies of Practical Blacksmithing and most of those other articles last year from another site.
So now I have rediscovered a stash of resources I forgot I had ... this has turned out to be a profitable day after all.
Thanks everyone.
Sam -
Sam - Steve Sells designed his brick forge after the one I built - Glenn may be able to send you the Blueprint (that Steve used) I did on it that gives the dimensions and pictures - OR If Steve Still has the info - he may be able to pass it on to you. - since that info was put on IFI, My computer crashed and I lost lots of info I had sent out.
Steve or Glenn - help please??? - Jeremy
THANKS Jeremy.
So that's 2 votes for Steve (and one for you because you came up with the original blueprint )
)
So hopefully Steve or Glenn will still have the blueprint.
Cheers
Sam


A 36 for anvil
in Anvils, Swage Blocks, and Mandrels
Posted
I love it when people say "buy a real anvil" - it just makes me shake my head and laugh.
A farrier style, or a London-pattern, or an Austrian-pattern or a German-pattern, etc, etc, are not the only REAL anvils out there.
My first anvil was a 5"x5"x5" block of mild steel ... and it IS a REAL ANVIL ... still use it to this day.
Are they going to try and tell Brian that his plate design anvil isn't a real anvil?
Are they going to tell Dodge that his CNC anvil isn't a real anvil ... just because it's made of mild steel?
I DON'T THINK SO !!!
I've seen people blacksmith on a chunk of granite, and for that time and that purpose it was a REAL anvil.
A piece of advice to all the new smiths just starting out ... Use what ever you got that will get the job done - tool steel, mild steel, railroad track, forklift tine, drops or rocks ... if you hit hot metal with a hammer on it, then it's an anvil. Sure if you're looking to make a LIVING out of this trade, then a certain pattern or style of anvil may be an investment for your business. But if smithing is just going to be a hobby for you (like me) then don't let other people's hang-ups discourage you ... they don't need to become your hang-ups too. Have fun and pound some hot steel.