

ThorsHammer82
-
Posts
586 -
Joined
-
Last visited
Content Type
Profiles
Forums
Articles
Gallery
Downloads
Events
Posts posted by ThorsHammer82
-
-
This sounds like a great project, what happened to pictures?
-
a pipe flange works well for attaching to the bottom of a drum/rotor. or just weld on a plate and cut a hole in that.
More to the point. Slow down. I've found that all my injuries have happened when I was moving to fast, or trying to do something before it or I were ready to actually do it. Be it based on skill level, or shop prep, or what not. You'll find it's a lot quicker to do something slowly and do it right, vs quickly and have to do it again, or get hurt in the process and have to delay due to injury.
research research research then work.
-
sounds like a plan to me. but again. post pictures.
-
Why not just add a hard brick in to reduce the volume of the cylinder to a more optimal range for the 3/4" burner?
-
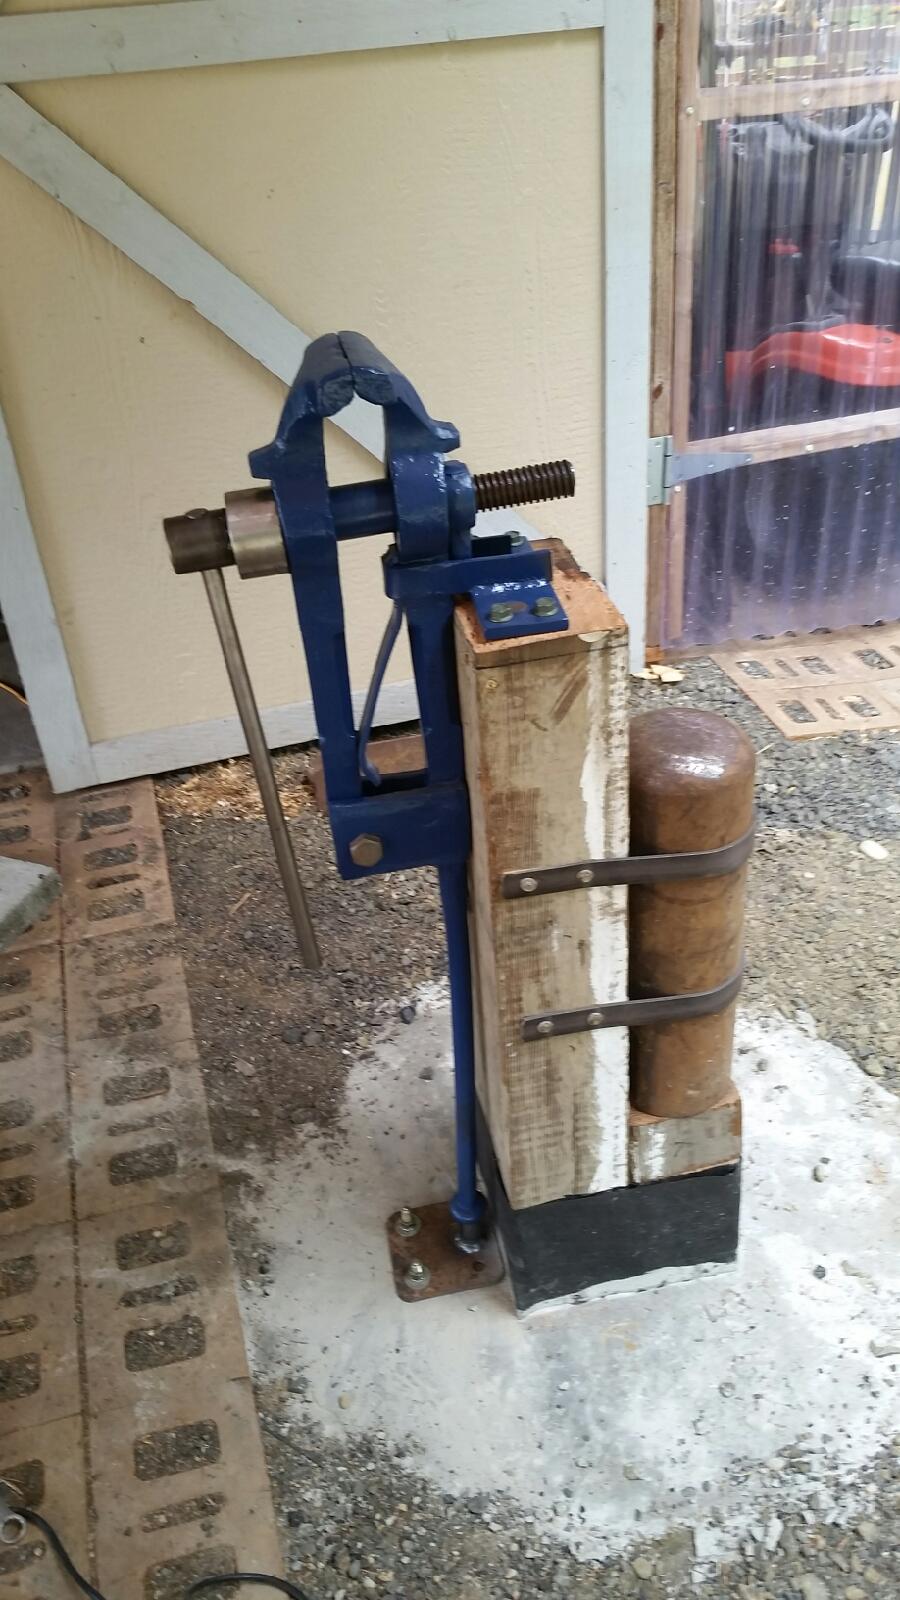
I have the benefit of being height gifted. At 6'5" my "Normal working height" is above the average man's. So to get the vise up to a comfortable working height, there was about 1.5" between the bottom of the shoulder, and the concrete base of my stand. 1/4" plate + pipe to make up the difference.
-
Good Morning,
Cake aHR Square, Pie aHR Round. NOT the same as volume of a pipe, Pie aHR Squared x the length. Inches to inches or MM to MM, it works the same.
Eye don't thingk Thor should use a Rectangular phormula, on a Peace Pipe. Same as mixing up Hinches and McMetrics.
If you don't have doors, will that alter your McCalculations?????????

I can't tell if the river is running Fast or Slow, Enjoy the RIDE!!!
Neil
I used rectangle for simplicity, and to show the "maximum volume" for the nominal measurements. As the cylinder is not a true cylinder I couldn't use the formula for a cylinder or r2xPixL. And frankly don't want to do the math for the segment because simply using the rectangle formula was enough to show that the calculations were off. I then provided the needed information to find the correct volume.
-
For mine, I welded a section of pipe onto a plate mounted to the concrete. The tube fits around the foot, but catches the flare to direct the force through the flare down to the ground.

-
what did you use? LxWxH is a rectangle. so 5.44x8x9= 391.68
if you want to do the actual math follow this link. https://en.wikipedia.org/wiki/Circular_segment
-
From your measurements if you make it a rectangle not an arch you're at 391.68 CI. but it's less than that with the arch. Probably pretty close to that 350 CI target actually.
-
um.... My math says a 9"x13" sheet will make a 9"x4.14" tube...
to make an 11" tube with 1/2" over lap you'd need a 36" sheet.
-
How are you going to line a spherical forge? It's going to be a BIG beast but fun just to see running.
Frosty The Lucky.
cut it in half and call them "Hemi forges"
-
A brake rotor is going to be to small, unless you can use 3 in a triangle shape to spread the load and make a wider base to which you attach your post too.
-
post in the ground firmly mounted. I used concrete some just pack it in really well (really dependent upon the type of soil available.)
Large foot (plate, sewer cover, Semi wheel, etc) with a post welded/mounted to it is a more mobile option.
-
I'm not sure who said it, but one of my favorite engineering quotes is "the sign of a good engineer is the simplicity of his design."
I find this correlates directly with the KISS principal. (For those not familiar "Keep It Simple Stupid")
With both of those being said, I think you're just playing with your abundance of toys by boring out the pipe weld. Black smithing, inherently, is an imprecise precise science. What that means is you use imprecise equipment to make exactly what you/the customer wants. It isn't a precision machine shop where variances are within .003" all the time every time. that's what gives forged items character. Can perfection be achieved? absolutely. But is it always needed? not really.
Also, I see no need for the rubber washer/o-ring on the outside of the T fitting. your fuel air mixture is pulling air into the holes so any air leak at that fitting would just be sucking air into the burner. not leaking out of it.
I too am in the process of building my first T burner, and I think you definitely fit your alter ego with some of the steps you plan on for making yours. Carry on and forge beautiful things.
-
One issue I ran into building my wine rack was the interior size of the gas forge. I could just barely get the 4 3/4" rings into forge on an angle if I couldn't get the bends done in one heat. When I went to try and do 5" rings, I had to use both the gas forge ( to evenly heat a long length of stock to do as much of the bend as possible), but then had to stick the partially bent ring into the coal forge because the ring wouldn't fit any longer in the gas forge.
I'm not sure what size scrolls you are looking to make. Just keep final size in mind just in case you have to reheat something and need to stick the whole piece inside the forge again.
I also know when I tried to make my brick forge out of standard fire brick vs insulating bricks, that the brick mass soaked up a ton of heat and it took forever to get hot. Not sure what type of bricks you have to work with. My single burner really wasn't enough to deal with the large brick mass I had. I really needed two burners if not 3.
So, would you recommend some sort of refractory applied to the inside of the bricks?
As for the interior space, I thought of that. The scrolls will be fairly tight, at less than 2" in diameter so I think my interior space of 4"x4" should be able to account for that.
Also, for gas forges, is a top blast better than a side blast? or would it be best to have it enter at more or less a corner to try to make the heat flow more around the interior of the forge vs hitting a surface and deflecting out in all directions?
-
Due to the extremely high fire danger in my state right now. I don't want to fire up the coal forge. But I've got a project that I was hoping to have done by Labor day so I'm thinking about make a quick and dirty Venturi Brick forge so that I can do some fish tail scrolls on 2"x3/8" flat stock for a fire place grill I'm making for my families cabin.
I saw a quick, yet not necessarily efficient 3/4" venturi burner using mostly Gas BBQ parts. I don't need forge welding heat, just need to get hot enough to shape the metal relatively easily.
I want to use my 20# Propane bottle, and some fire bricks I've already got. My idea is to weld up an Angle Iron frame for the bricks to fit into with a remove-able brick in the back so I can pass stock through if needed. I want the interior space of the forge to be 8"x4"x4". Is that big enough, to big, or possibly just right? I want to make the forge a top blast for simplicity.
Can someone tell me what I might be missing to do this build? I understand that the regulator needs to be able to handle 10 PSI+ and that I should have a valve after the regulator to control the gas flow. Apart from an inefficient venturi burner, am I missing something?
-
That should do.
-
what Thomas said. You can't tell till you know what you're working with.
Note, my vise does not have anything covering the outer end of the screw at this point. the cover is just there to keep the crud out of the screw assembly. I think you're fine if the end isn't there.
-
length of the rod would affect where the cam cycle hits. but I like your method better yet still. shims of the same size would make incremental size changes easy. 1/8", 1/4", 1/2" & 1" and combine them to meet the need.
-
price seems fair enough.
if you can weld, you can add a cap. but if it's going to be out side, you can just put a garbage bag over it while not in use. then you're not killing grass and just covering the vise.
But I will add, you don't really want a lot of grass in your work area. there are lots of sparks and hot things falling in your work area, so killing off the grass and converting the area to dirt, or crushed gravel would be best.
-
Lets see if it lets me on this computer. It won't at home.
Anyway, Nothing is permanent. And since I've got access to a vast majority of the round anvil I don't see it being an issue. We'll see though.
-
a long enough/big enough lag won't come out. I used 4 8"x5/8" lags for mine. I'm not worried about them coming out at all. Especially since you're hitting towards the wood, not away from it.
-
Very nice.
I like the tension screw/set screw on the mount, and the shoulder on the pivot point to keep crud from getting in the joint.
-
you guys are over thinking things. several different length connecting rods is all you need to adjust for different sized pieces. the hooks are open plenty for it to be a quick disconnect/connect set up. Done. Don't need to fuss with threads, or nuts that can loosen or strip. Don't need to have to grease or clean anything. Just swap out the rod with another and you're good to go.
Bad omen?
in Blacksmithing, General Discussion
Posted
feel free. I guess I count my "PLAN" time in the research portion...