

ThorsHammer82
-
Posts
586 -
Joined
-
Last visited
Content Type
Profiles
Forums
Articles
Gallery
Downloads
Events
Everything posted by ThorsHammer82
-
Smithing loves company?
ThorsHammer82 replied to ThorsHammer82's topic in Blacksmithing, General Discussion
Now Craven, that's no way to live. Fear of reprisal does not promote community and fellowship. Besides, I wont be inviting over anyone I don't know, at least not until I've got an anvil that rings loud enought to make the neighbors wonder what's going on. and the fact that the majority of them are on the far side of the trees, I doubt that I could work on a bell and bring them in. I do get the extra PPE. Thats just a given. -
right now it's an old small shop vac. and let me tell you it moves some air. eventually I'll add a dimmer to it, but for now I'm going to try the open ash dump method. The switch is on the front and right now the piece of bent rebar I'm using as a fire poker works real well for flipping the switch.
-
Smithing loves company?
ThorsHammer82 replied to ThorsHammer82's topic in Blacksmithing, General Discussion
based on where I'm at in my smithing any learning is a ton. -
Smithing loves company?
ThorsHammer82 replied to ThorsHammer82's topic in Blacksmithing, General Discussion
Frosty, If I ever make it up to Alaska I'll hammer on some metal with you. I'm sure I'd learn a ton. -
Smithing loves company?
ThorsHammer82 replied to ThorsHammer82's topic in Blacksmithing, General Discussion
lol In that case it's a good thing I live on a coldesac... No pedestrian is safe. -
I'm just starting out in my smithing. Forge is built, Anvil is next on the list and shortly after that tongs are a must. but besides all that. I find myself incouraging my friends to take up the hammer too. I might not know much, but I'm excited about the prospects and I love working with metal and working with my hands. I can't be the only one who's done this. and I know that smiths aren't hermots hiding in their dark workshops all the time. If so there wouldn't be large groups like the NWBA or forums like this. How many of you have offered to get people into smithing even if they haven't voiced an interest in learning it? Them - "Hey that's pretty cool, you built your own forge." Me - "it wouldn't be hard to build you one too."
-
Coal Conspiracy???
ThorsHammer82 replied to Countryboy39067's topic in Blacksmithing, General Discussion
you're in coal rich country. on the west coast we aren't as lucky. There was a coal mine a while ago but I believe it has been shut down, and I don't think it was good smithing coal... The supplier I'm going to get it from has it already bagged, or I can get it in bulk and bring what ever sized container I want and they do it by lbs. The plan is to take a 35gal garbage bin down and fill it up. that should last me a long while. I'm assuming that will be a couple hundred lbs of coal once it's all said and done. -
Thanks! thats cheaper than buying a dimmer switch. lol. but I may still do that so I can have some more control.
-
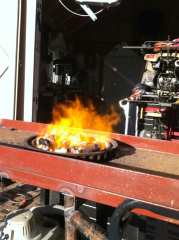
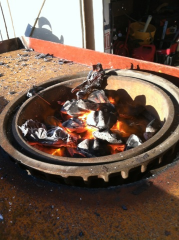
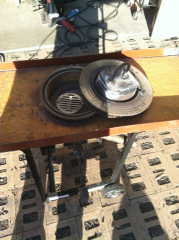
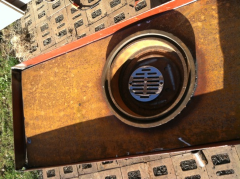
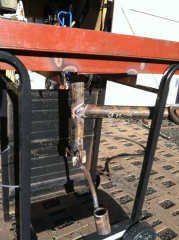
OK, here are the requested pictures. First the full picture. built off an old BBQ grill frame. Approxmate size is 48"x18" for the table top http://www.iforgeiron.com/gallery/image/37467-forge/ The under side http://www.iforgeiron.com/gallery/image/37468-forge1/ The weighted ash dump http://www.iforgeiron.com/gallery/image/37469-forge2/ The ash dump was cobbled together from scrap form this and other welding projects The ash lid is just a section of 3"x1.5" channel iron. http://www.iforgeiron.com/gallery/image/37470-forge3/ I made a lid/damper for the fire pot out of a brake rotor i had around. puts the fire out quick. http://www.iforgeiron.com/gallery/image/37472-forge5/ http://www.iforgeiron.com/gallery/image/37473-forge10/ THe inside of the fire pot with the drop in grate removed. http://www.iforgeiron.com/gallery/image/37474-forge6/ The first fire was started with briquets, but I eventually added coal. Started with large chucks around the outside and let them coke up and than moved into the fire more. I plan on buying coal from a local supplier soon as it's cheaper than buying lump charcoal. http://www.iforgeiron.com/gallery/image/37475-forge7/ Turned on the blower (shop-vac) and flame one... on a side note, I need to add a dimmer switch to the shop vac so I can control the air speed. right now it's blasting some of the finer fuel bits right out of the firepot. http://www.iforgeiron.com/gallery/image/37476-forge8/ and finally, the first heat. This was done with just the briquets. I was able to draw this 1/2" round bar down to about a 3/16" "square" (not a perfect square) on a section of track placed on my soon to be anvil stand. I'm in dire need of decent tongs. Channel lock plyers just aren't cutting it. http://www.iforgeiron.com/gallery/image/37477-forge9/ next I'll start on the finalized anvil. But that may be a few weeks out. I've got quads to fix for a camping trip in a couple weeks.
-
Here is a quick and dirty of mine. Full details in my link posted below. http://www.iforgeiron.com/gallery/image/37467-forge/ http://www.iforgeiron.com/gallery/image/37473-forge10/ http://www.iforgeiron.com/gallery/image/37475-forge7/ http://www.iforgeiron.com/gallery/image/37476-forge8/ http://www.iforgeiron.com/gallery/image/37477-forge9/ '?do=embed' frameborder='0' data-embedContent>>
-
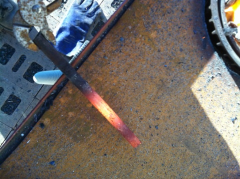 this is just with briquets.
 -
 first note from my first burn. the shopvac motor is to strong and I need to add a dimmer switch to reduce the airflow. It's blowing smaller bits of fuel material right out of the firepot.
 -
 started the first fire with charcoal than added coal
 -

-
-
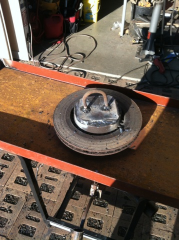 Made a lid for the fire pot out of a brake rotor. This acts just like a candle snuffer. killing the fire quickly.and it works great!
 -
-
-
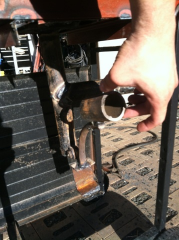 The weighted ash dump.
 -
-
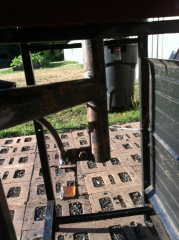
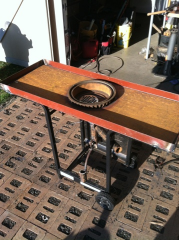 total dimensions are approximately 4'x1.5' for the table. The The fire pot sits up above the table surface so if I do larger pieces I shouldn't have any interference with the sides.
 -
Coal Conspiracy???
ThorsHammer82 replied to Countryboy39067's topic in Blacksmithing, General Discussion
Digging up an old thread here. but from what I'm seeing the price I can get Utah Bituminous coal for is $0.12 a lb, or $240 a ton picked up. that doesn't seem to bad to me, not that I'm going to be buying a ton at a time any time soon. -
new beast of an anvil :) (pic heavy)
ThorsHammer82 replied to hiltsbilt's topic in Anvils, Swage Blocks, and Mandrels
Have you named your beast yet? what a beauty. -
I'll buy the lump charcoal if thats what I need. Same size requirements as the coal? I was thinking maybe 1" chunks and smaller, but if I've gotta go to 1/2" or 1/4" I will on the coal. I'll take some pictures when I get a chance to work on it again. it's definitely not pretty, but it will get the job done.
-
Its my understanding that fire bricks are more dense than regular bricks. The wet area might not be as deep as you think. You might try cutting 1 to see how wet the inside is. If they haven't fallen appart yet from the freeze thaw cycle you're probably safe from that. but you do want to dry them out before you build anything out of them. stack them up a safe distance from a fire. Close enough to get warm, but not to close that they get hot. The warmth will get the moisture out without causing the bricks to explode from rapid expansion of gasses.