
madwing
-
Posts
93 -
Joined
-
Last visited
Content Type
Profiles
Forums
Articles
Gallery
Downloads
Events
Everything posted by madwing
-
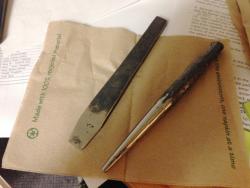
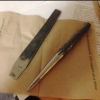
today picked up a worn Russell green river sharpening steel, some interesting perpendicular snips, and a rockwell 31-352 sander/grinder (1x42", I think). $17 at a garage sale :) anyone recognize the snips? they are unmarked.
-
wagon wheel rims - pretty sure they're wrought iron
madwing replied to madwing's topic in Blacksmithing, General Discussion
thanks all. good advice on the cutting. I will keep the second wheel whole, and use up the first. I never thought to cut it into shorts. what I meant was to rip it, along its length, into pieces whose thickness:width ratio was 1:1 or 1:2; that would leave me with (say) 8' of 7/16x7/16 stock, and the same of 7/16x7/8 stock. *that* I could cut down as needed. sorry I was unclear. -
wagon wheel rims - pretty sure they're wrought iron
madwing replied to madwing's topic in Blacksmithing, General Discussion
Dave, these were already off the rotted-away wheels. do don't you worry... -
wagon wheel rims - pretty sure they're wrought iron
madwing replied to madwing's topic in Blacksmithing, General Discussion
hmm. that's actually a good point, andrew. i'd not really considered that. i *would* like to make some of the outdoors stuff (gate handles and locks) from this, because it weathers so well. but simple things like hooks, etc., you're right. what would *you* make out of it? btw, i just went to your website. NICE! that might answer my question, but i am wondering what "valuable" can be made of wrought iron. knives i know (hardware and backing for tool/cutting steel), scuplture (someone posted leaves out of wrought iron on here that were really nice)...and? best, bill -
i'm a newly-emerging and learning larval blacksmith, taking kirk mcneil's cba level 1 class at freedom forge in santa cruz. as such, i've been thinking about all things blacksmith, including how to find materials. craigslist i am very familiar with, and i've used it to find my anvil, forge, coal...and now some wrought iron (i think!). i happened to be going to santa clara for a meeting yesterday, and was perusing craigslist earlier in the week just to pass the time. i found a pair of wagon wheels advertised, and decided to buy them against the idea they were wrought iron. fortunately kirk suggested to look for the forge weld of the wheel, since i wouldn't be in a position to cut them up; it's his idea that later steel wheels weren't forge welded the same way, if at all (i have no clue). so i bought them yesterday, because i found welds on both tires. and i brought them to a friend's shop at lunch today, and used his power saw to cut a piece out, then through halfway, then bent it to see if there was any grain. based on the attached pics, i think i'm rolling in wrought (pun intended). it's 7/16" thick, and 3" wide, and if straightened out i have about 18' of stock to work with. i was thinking of sawing a bunch lenghwise into 1:1 cross-sections, a bunch into 1:2 cross sections, and trying various things with them. i was thinking i'd make some gate handles and latching mechanisms, tongs, hooks, simple things befitting a beginning blacksmith...but lacking any real knowledge (having never worked wrought iron at all), i am open to suggestions :)
-
AMAZING forging documentary
madwing replied to surthrival's topic in Blacksmithing, General Discussion
brilliant, love the "family car". that era studebakers are just the boss. -
Cba Backsmith where you from ?
madwing replied to ironwolfforgeca's topic in California Blacksmith Assoc
relatively new to smithing here, brand new to cba as of a month ago. i'm currently 4 weeks in to kirk mcneil's level 1 course at freedom forge in santa cruz. what a lot of fun. i couldn't go to oktoberfest this year (sunday was my 18th wedding anniversary), but hope to get there next year. definitely going to hollister in the spring. i've had the pleasure of working with michael (at his incorrectly named "know nothing forge") in richmond, and look forward to making and learning and sharing this work. best, bill felton, ca -
back in may of 2013 my friend michael helped me start some strap hinges (to be mounted on lag pintels in 6x6 redwood gateposts), from 2" wide, 4' long, 1/4" thick mild steel: >big hinges i have attached a picture of michael heating up one in his forge, so we can spread out the "branchlets" from the main body of the hinge. as i wasn't done with the 80 feet of fence, let alone the gate that would hang by those hinges, finishing them quickly wasn't an issue. fast forward to last october, and one was basically done, and the second had the hinge bent and pre-cut with a plasma cutter. my friend joe, the machinist, did the plasma cutting. we'd done a couple of the cuts on the first one with my grandfather's hot cut, but it was going to take too long for us to do that (even with no time pressure!)...so the plasma cutter came out and saved us a bunch of work. see the second picture below, they're leaning up against michael's anvil. then, this past may i knew i wanted them up by the end of july (my 50th birthday party), so we accellerated production. we spent a long day and finished the second one, except for the final hammered finish. that's the third picture. over the course of the last couple years i've been acquiring what i need to forge with coal at home. i picked up a nice, home made forge (angle iron and welded diamondplate, with a tuyere and ash dump: the fourth picture), my soderfors anvil (fifth picture, mounted on an oak stump), and a post vise that i am still finishing the parts of. in early july i knew i needed to put the peined finish on the hinges, because the fence was done and i needed to build and hang the gate. so i found a nice shady spot under a walnut tree, between the house and the garage, behind a (lockable) fence, nearly perfect for a small smithy, the sixth picture. i had to clear it completely out of ivy, junked bicycles, old brewing equipment, and other items, and make a wooden top for a low metal table for tools, etc. i also used michael's loaner mapp gas forge (see it on the coal forge in the sixth picture) to make a water dipper (seventh picture) before i could start on the hinges with the coke that came with the coal forge. i finally got started, and it took me the better part of two days to get the hinges hammered and the bolt holes punched/drilled/squared. i left one hinge in too long at one point, and the spark rats gnawed a bit, but it wasn't horrible. i don't have any pictures with the holes in them; but the eighth picture shows the hinges after they're done, before (i) punching one hole with an unhardened square punch, and (ii) drilling the rest and using the unhardened punch to square the holes to receive the carriage bolts holding the frame of the gate to the hinges. once they were done i built the frame and marked everything for mounting, then built the gate and marked and drilled for the hinges. my son and i hung the gate on the lagged pintels, and it hung true. the ninth and tenth pictures are the hung gate, in the finished fence. i also built the bridge leading to it. one cool feature i wasn't expecting is, after i was done getting the bolt holes into the hinges, i wirebrushed the hell out of them, both sides, to get rid of as much rust/slag/etc. as possible. i then gave them a double wipe with acetone, and after that'd evaporated sprayed them with clear satin spray lacquer. they turned black! i had wanted a black finish, but was prepared to go with "natural" as i couldn't figure how to get enough oil together to try and make a black oil finish. the lacquer was perfect, and hopefully the lacquer will keep them from rusting as quickly as they otherwise would. thanks for reading!
-
a follow-up: we used this flatter to help finish the forging of a brazeal-style hot cut, and it worked fine, even with the markings. it did break the thin-necked ash handle i carved for it on the fly (michael has a shave horse, and a supply of ash), probably from being tipped up while being hammered flat (thus breaking the handle right at the flatter). i see that, if nothing else, as a reason why that tool would have a rod stock handle, which i am going to make at some point. can anyone suggest pictures of such a handle?
-
I wondered about that, Thomas. I think it will work either way...barely for the wood (but hickory is tough stuff ;) )
-
thomas, i am but a padewan in all this. and it's a cool tool to have and fix up... ;) i hit it with the deburring wheel and there's definitely some texture on the face of it. i will work with it for now, and see how much marking it leaves on a surface so i know what needs to come off. still no maker's mark, and it's a tiny hole for a handle, my guess is thus home-made. michael, i'll bring it, but it's unhandled as well. unless i can carve one tonight.
-
I use evaporust for removal when needed, but it's not in this case...I'll hit it on the debuting wheel at the machine shop at work, then know how to proceed. Flat, no need for mirror, got it! Thanks, all!
-
cheers, using it was going to be my step 1. I am forging with a friend Thursday and we will see what it looks like. but after...make it shine like a brazeal rounding hammer face?
-
a friend just gave me a nice 2" square flatter hammerhead. no maker's mark I can see. it's rusty, the face has some roughness, I'd like not to have it marking my work. just use it on stuff I am not to worried about until it is smooth? burnishing wheel until smooth? sand/grind it smooth? then polish it?
-
yes, it is a cute little bugger. I've not known a whole lot of folk who have ever even seen one...
-
more than i wanted to...north of $100...
-
tools available to me...what basics to start with?
madwing replied to madwing's topic in Tools, general discussion
that was disappointing. one man's understanding of "many tools" is clearly different than another's. he didn't really even have a starter set to take out, and wants $600 for a dozen tongs and a dozen hammers... oh well, what they say about if it sounds too good to be true is true :) -
tools available to me...what basics to start with?
madwing replied to madwing's topic in Tools, general discussion
Thanks, Thomas. Especially the stock, he is a machinist by trade so I am sure his stock is marked or he knows and I can mark it. -
tools available to me...what basics to start with?
madwing replied to madwing's topic in Tools, general discussion
DSW, short on cash is it. I have very few tools, and need to make a start. Glenn, what items are hard to find? I am just starting out and have not a clue! -
tools available to me...what basics to start with?
madwing replied to madwing's topic in Tools, general discussion
good thought. I am hoping to make woodworking chisels, hooks/etc. for around the house, more tongs, and other very beginner stuff. -
I picked up the sweetest little vise the other day. It has 2.5" wide jaws that stand about 1.75" above the screw. It is about 7" from the handle to the anvil, and not only does it clamp to the bench but it swivels! it is similar to one I saw on the net from late 1800s France; mine is unmarked. it is clearly set up to have a capture rail that supports the anvil end when it swivels, but that has been cut off. It's a great addition to my post vise and my grandfather's Wilton.
-
I finally got my forge, am going to make a mount and spring for my post vise Saturday. I have my anvil, and a fuller that goes in the hardy hole, a few hammers and a hot cut chisel. And today I heard from a smith friend that he is selling all his smithing kit, anvil, forge, and all tools, top and bottom tools as well as hammers, etc. I am going by his place Sunday for a little pre-sale picking; apparently I am first in line. What are the tools I should be looking to buy? I am thinking a hardy, flat, round, and square bar tongs, some drifts (flat and round), a curved hot cut, and maybe a 6-8 lb. sledge. Am I missing anything obvious? I appreciate any help and advice.
-
quint, as i said about the concrete it did a good job of muffling the ring; it sounded like i was hitting broken concrete, not steel. i plan to put it on a stump, and sandwich a layer of asphaltic emulsion between the two, and hold it down with a chain that's resting on the same emulsion sheet around the base of the anvil...just thin strips, it shouldn't take much. then a few rare earth magnets that have the same emulsion stuck to them placed as needed. i have a vanagon, and the emulsion sheets quieted it down hugely. vaughn, that's kind of where i've gone with it. not so much the result, but using it until i find those edges needing to be different. my usual mo is to get it all done up front, but the smithing i've done has already showed me that it's better to just use it, not think about it terribly much. more than woodworking smithing seems to be a "use it" process to learn, even though reading is fun and informative for ideas and process awareness.
-
a four pound sledge, banged on the side top rim of the barrel. it was only in a couple inches, and i never hit the anvil directly. the concrete was pretty old, and not set like rock (it was pretty sandy), so it broke off in big chunks that freed up the anvil and the two rods (which i kept for stock to make stump staples). i hit the whole anvil with a wire wheel, then washed it off to get rid of the rust and remaining concrete. there is a line of raised rusty blobs that follows the contour of the concrete covering; my guess is water would get there and go no deeper. the final three pictures above show pretty much what is there. concrete isn't that bad an idea for a "stump", actually. he'd put a piece of 2x6 centered directly under the anvil, and between that and the concrete there was no ring *at all*. in fact, if i hadn't realized how it was made, i might have passed on it because it was so dull. out of the concrete it rings with a shrill, piercing quality that's going to necessitate damping as well as double ear protection (muffs and shooting plugs).
-
Belknap (Columbus Forge & Iron Co.) Anvil
madwing replied to SilverDeck's topic in Anvils, Swage Blocks, and Mandrels
copilot, you're welcome for the link above. i am happy it gave you information enough to surmise the actual maker of your anvil. very, very cool.
