

FieryFurnace
-
Posts
2,106 -
Joined
-
Last visited
Content Type
Profiles
Forums
Articles
Gallery
Downloads
Events
Posts posted by FieryFurnace
-
-
I have an International Harvester (I'm a God fearin hard workin...
 ) number 37 twine baler that has bent knotters. I ordered new knotters but when I drove 1 hour, one way to get them, the parts guy said he ordered the wrong one! He ordered the wire knotter instead of the twine knotter. The wire knotter was a steep $113 a piece, but the twine knotters were a vertical $220 a piece! Is this something I can heat up and bend back to it's propper position/shape? Does anyone have one of these balers, and if so a picture of the knotters?
I have the original owners manual, but there is only a sketch of the knotters!
Any help appreciated!
Thoughts???
Dave -
I think I could manage all of the sheet steel pieces that didn't need bending.
If they are thin enough then I could bend them cold right? (Isn't #24 the thickness and isn't that pretty thin?)
I don't know about the airback though. It seems to be shaped a bit wierd!?
I am pretty sure I could do the bellows hook as well. The only thing I am trying to figure out is how to get the T-shape. Do you punch/forge the top part, forge the hook it's bar, and then weld the two together? If so I could do it. I don't know of any other way of doing it though. However, maybe I am missing something.
The iron piece on the end of the bellows pole I could manage as well. (bellows pole strap) The only thing I am wondering about here is the pivit whole. How is that forged and attached?
The bellows pole stud is the same way. I can manage the upright piece and the little foot thing at the bottom, but I don't know about that little piece up toward the top!?
The three straps made from the 1/2inch by 2 1/2 inch bar I could do. (They are going to take a LONG time to heat! WEW!)
There are probably some more parts that I could do, but for now I am pretty sure I can get the above ones done.
Thanks,
Dave -
I am overwhelmed by the generosity of such an offer. I would be a fool to refuse such an offer. So, procede! Of all the money I make at events I allow myself a small percentage of spending, so that within a year or two we could have a completely historic forge built. What do I need to do to get this started?
Thanks,
Dave
P.S. AWWww common...the making whatever was a little bit of an exageration. JOURNEYMAN??? I can't make a ball on the end of a piece of steel in any number of heats, much less one! LOL :confused: -
I wish my gear could reflect my knowledge...however my funds do not allow that. Maybe my sign off should be FARB KING! LOL Anyway, I built this trailer for little over $500. I know about the artillery forge you posted a picture of. I have use a 100% authentic repro of one! Took $5000 to build it. At 16, $5000 is an awfull precious sum. I am at the age where my hobbies, interests, etc, do not need to be draining my funds. I am at the age where I need to be saving to be able to provide a house, land, car(s), etc. if and when the Lord provides me with a wife and family. To me, blacksmithing, reenacting, authenticity, (there people jump on me with a choke hold!) boatbuilding, fencing, NOTHING, can take a place of importance over that! NOTHING!!! Maybe one day, but today is not that day!
Sorry I was unable to get any pics of the forge "in action," as momma was busy under the tent all day! We have another fest coming up, and as we will all be present, I should be able to get some good ones there.
Thanks for the thoughts,
Dave -
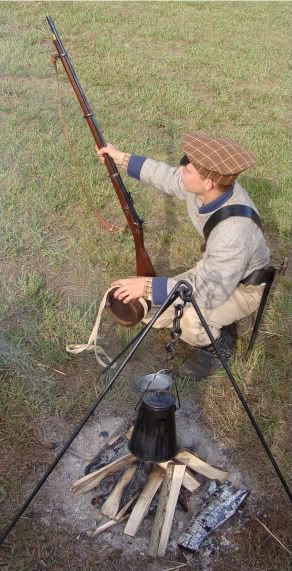
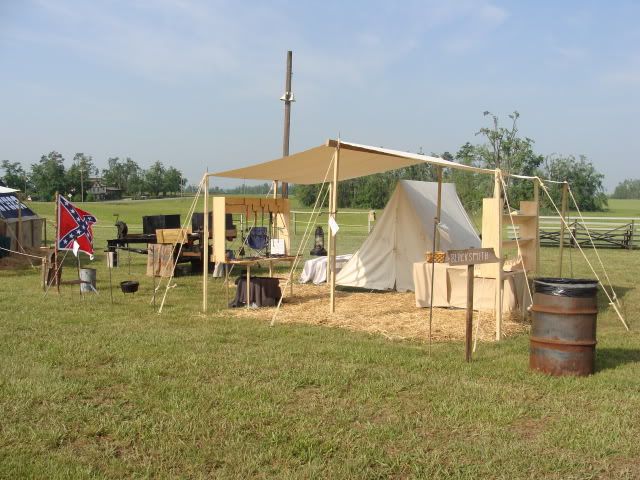
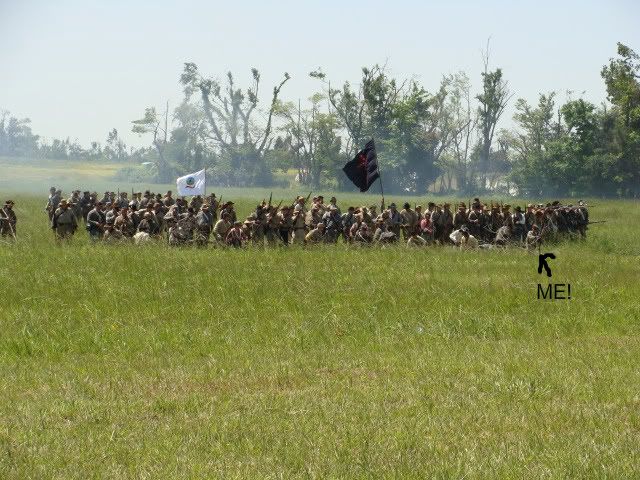
Here are some pics of my demo trailer set up, and of our booth space all together. I don't really have any close ups of the vice yet. Also are a couple of reenactment pics.

I'll have more photos on a blog on our website some time soon.
The event was prosperous. I cleared about $150 and also got some very potential contacts. (IE Brigade commander that is over 350 men!)
Thoughts???
Dave -
Thanks for the replies guys. Haven't been on here much lately and missed em. OK, I already had a light ket that I had bought a while back so I went ahead and used that. They worked the first time I plugged them in. Of course I should have enough practice with that light kit! It's the third time I've wired one. (stock trailer, boat trailer, and now this!) Anyway, that's done! I also mounted the vice. I did not go with any of the suggestions given, but let me explain. I have waited until two days before the first event so I just did the quickest option. I welded a piece of the 2x4 chanel to the frame that the axle mounts on and I have a bracket on the end of that to recieve the leg. I got to looking at it and if the leg was just a little shorter I could leave it mounted on the trailer all the time! That would be wonderful. So, and I still can't believe I actually did this, I cut the leg off short!
 It was a mental battle of making things SOOOOOO much easier at an event, and cutting the leg off a 100 year old vice. My reluctance was overcome though and practicality won out. I'll get plent of pictures at the event. I still like Frosty's idea about using it as a jack. Right now it's plenty solid but his idea is really nice sounding. I like the latest idea as well as it would be easier to get to if it was by th tongue.
I do not usually use rubber boots, having some tie ups that I wear. That's a good point though!
Thanks for the pict. That lools like an interesting set-up. I would like to eventually add at least a forge hood to the trailer but an entire shade would be really nice.
Reenactment this weekend will have plenty of photos to share of her in action for the first time!
Dave -
I set my items where I make an average of $20-$25 an hour.
For instance, when I make leaf neclaces I make $50.00 an our because I can forge the faster. With a fire poker I make $15.00 an hour. It varies from piece to piece but on average it's about $20.00 an hour.
Dave -
I picked up a locksmith's card today and will use it for future reference! Thanks all!
Dave -
Copper works too but takes higher heat. The really cool thing about using copper is when it cools it matches the color of steel if you don't pickle it.
Frosty
The demonstrator tried copper but since he was working off a small number of tools, borrowed forge, and jewlry anvil he was unable to braze his lock properly. Then he went to brass. I kind of like the look of the brass mixed in the steel. And since there is an if in "if you don't pickle it" I'd pickle it! LOL:rolleyes:
Dave -
The blacksmith that I saw at the fest this past weekend specializes in historic locks. A lot of them are brazed together with brass filings. He just dumps some borax and filings on, melts it, and cleans off the extra. I was just wanting some, to do that with so I don't need specific sizes. If there was a supplier somewhere that sells the shavings that would be great. Right now I am collecting the wires that come off my brass brush but that is very slow accumulation.
Dave -
Where should I get brass for traditional joinery? Is there a place where I could buy ingots or something?
Thanks
Dave -
I like those! The handles are neat. Mind if I steal the design?:D
-
We went to the ECD event this past weekend. It was simply beyond expectation! Friday evening was a folk dance with a mixture of Contra and English Country dancing. Mostly Contra! Saturday morning was a practice session of about 2 hrs. and then an afternoon session of another two hours. They all went very well; there seemed to be one dance each time that I just could not do! Saturday evening, everyone got dressed up in, primarily colonial dress, and we had about three hours of ECD. I have pictures, but my sister has the camera that has the pictures, and she is in Tennessee again today. :mad: She'll be back tomorrow.
I was surprised at the similarities between Contra, EC and CW dancing. The ECD is by far the most complicated, Contra comes in second ,and CW is the easiest. However the steps and turns used in CW are the same but they are done in a different, much more complicated manner. The terms used to desribe the steps are different in some instances too.
During the weekend, I tried to pair up with people who knew what they were doing, and most of them complimented on how quick I cought on. Wether they were just saying that, or they really meant it is for you to decide!
I'll have full details on my blog ASAP.
Thoughts???
Dave -
I have fabricated some white/stine colored knee breeches out of some old dress pants. It took about 30 minutes!

I'll wear them with my green colonial shirt and grey vest. I'll post pics when I get em.
Thanks. -
My sister figured out that it is rather informal and has no set time period. Most of last years attendance were dressed in Sunday-go-to-meetin' clothes. Some attempted colonial dress. (Like one guy rolled dress pants to the inside and duck taped knee socks above the pants! OUCH!
) I do have some knee breeches but I do not have any socks yet.
What about hats? I like hats. -
At least I think it's called ECD. (English Country Dance)
My sister is on a homechool forum thing and a lot of the people from the forum are going to an ECD ball in Nashville TN. this Saturday. She wants to go and so I'm going too. (If everything works out and we end up going) I'm sure somebody on here knows more about that than I do. What would be proper to wear? I have an 1800's double breasted gentlemans sack coat that I know I could wear. I have a gray, fine leather vest, grey wool trousers, blue broad cloth trousers, tan coarse cotten trousers, and a green colonial formal undershirt. (I.E ruffles and stiff colar) Other than that I just have dress pants. Somebody help me out here!?
Thoughts???
Thanks!!!
Dave -
Finally got back to working on my knife. I ground the tang down but decided against bending it down. This, I think, will put the handle at a slight angle to the back of the blade. I annealed twice and hardened. Unfortunately, I had no other quenchant than the veg. oil so I used it. I did a blade quench in the oil for a few seconds then dropped the whole thing in for another couple seconds. After that I took it out and chunked it in the quench tub. Don't reckon that was the best way of proceding, but when I tested it with the edge of a file it laughed so I suppose that's good!
I reshined it with 220 and 400 and it's in the oven at 350 degrees F. now. After I finish with the temper I'm going to rub on it with the old 400 some and then sharpen and attach a handle. Shoot, maybe it'll work!:D -
Civil War is my time period too. That's why I did the side boards to look something like a wagon. I know it falls WAY short (authenticity wise) but it's as close as I could get and still have it highway-worthy.
Frosty gives more credit to my lot than I deserve. It took me 2 1/2 years! Is that quick? I had thought about making a sliding stand like that. For now I am going to make a "step-in-the-ground" one that is the correct hight. I'll look at the trailer and see if I can put the vice next to the blower there. I think the angle iron supports that are welded to the tongue will be in the way though. Primarily the vice will be used for twisting. I do little and light hammering in the vice. Time to eat. I'll be posting some updates on the sucker rod knife in the knife makein section soon. -
I don't know anything about wiring something with that many wires! Ask the guys who were on chat a while back. We were trying to figure out how to hook up a light set that came with another sets directions.
I ended up retuning the light set.
I'm wanting to build a permanant hood for the top of the forge, but that will have to wait. I'm running low on the green stuff and I still need the burlap to cover the tires, a tent to set up under, and steel to build my stock for events. I want to get it on before the event in May, but that depends on how much I make at the first event this year!
I'd like to eventually do what your doing with the authentic setup on top of a trailer! That would be nice. As it is I'm going to have to dodge authenticity specs with burlap!:D -

This is some 1/8 x 2 that I heated up. It took about ten minutes from the time I lighted the match to that picture.
Close up!
Making hand guards for cudgels there.
I'm very satisfied with the way it works; it's the first forge I've made where it worked right the first time I ever fired it up.
I like the idea of putting the vice on the tongue but I don't know how it will work as far as the spectators view. I want to be at least standing at a side view to the spectators, preferably facing them. To do that with the tongue I'd have to go all the way around the tongue to get to the vice. It's still closer than my vice is now; distance isn't the worry here. I don't want to be demonstrating and I hit my leg on the tongue while I'm b-lining towards the vice! Just dissapear behind the other side and CRY!
Now I have to wait untill the third weekend of May to use it at an event!:( -
Here are some pictures of the first fire in the trailer!

Starting the fire!
Oh yea, In the picures the trailer looks too tall on me. I parked it on top of a mound of dirt so I'm standing in a hole. I need to move all my stuff around and park it in a better spot.
FIRE! With that flame it looks like I must be blowing myself to death. Actually, I'm blowing a good steady, aprox. 3 seconds to each turn of the handle, speed. This creates a fire ball about 6 inches deep. I'f I blow much harder I end up with a volcano! This thing heats FAST!
-
Alright, Got lots of photo's!

This is the right hand side of the trailer. I still have to put a few more bolts on to attach the wood to the frame. (I ran out of bolts.)
This is the left hand side of the trailer with the forge. It's finished!
COAL!
This is where the vice will mount. I still have to do the light too!
I have more poics coming later but I have to get ready for company. I fired it up and it works great!!! Particullars later. I don't know when I'll be back as I'm spending my extra time preparing to teach at church this Sunday! -
I think I got it Frosty. It's a good idea and I wouldn't mess up the paint when I welded either!
I don't have a tongue jack. I'm going to forge a by-pod with feet. It's what the artillery cassions use. (Chock the tires with 4x4's)
I filled the coal box a little over half way today. I thought the box would hold about two five gallon buckets worth of coal. Well, it actually holds about 8-10five gallon buckets full! Shouldn't run out of coal! I know I promised pics. but I'm gona have to wait till tomorrow. Probably round lunch or so. Were having a family of 12 over (at least I think it's 12:rolleyes:) so it'll be pretty busy!
Till then! -
I'll post pictures later. I'm working on bolting all the boards down and then I will screw the boxes down. I'm going to try to fire it up tomorrow!
Go ahead and send the scetch. I like the idea of having a stableizer and I'm going to cary a jack in case of tire trouble. (Although I don't have a spare!)
IH baler knotter
in Problem Solving
Posted
Thanks for the advice! We are completely new to the baler hay making stuff so we have no idea how any of it works. The guy that we bought the baler from said the knotters were bent. However, upon furthur investigation it seems that they might be ok after all! PRAISE THE LORD!
Dave