

Sanderson Iron
-
Posts
158 -
Joined
-
Last visited
Content Type
Profiles
Forums
Articles
Gallery
Downloads
Events
Posts posted by Sanderson Iron
-
-
36 minutes ago, Daswulf said:
Zeeko, on a side note I love the salmon you made further down the first link.
I second that! That's a great salmon.
-
Got it. Duh. Not the brightest computer fellow here. Thanks.
-
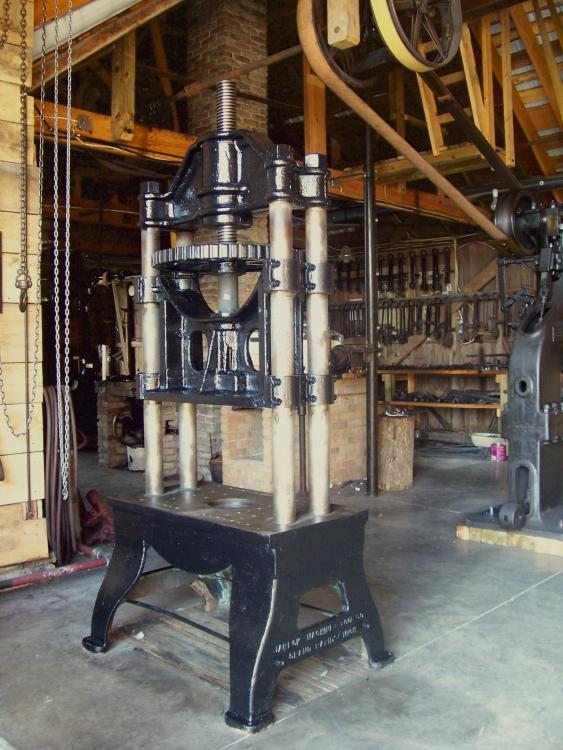
This is a 35 ton screw press, or try press, made in Grand Rapids, Michigan by the Jereki Company. If I remember right, the date on it is 1910, but I could be wrong. It's not intended for hot work. It's very slow. It's made to try your dies (therefore a "try" press) before you put them under power and heat. It has one large hole in the table and many 3/4-10 holes in the head and the table for bolting dies in position. I use this all the time. It's particularly nice for fitting embossing dies--where the punch enters the die--using copper test pieces to gauge the relief needed. Cold copper behaves a bit like hot iron, so if you test your dies with copper, cold and slow, you can tell what areas are still contacting too much and need more relief. Anyway, I thought somebodies might like to see this. I picked it up in 2010. Great tool.
Is anyone else here using a screw press?
Joel
-
I could be wrong, but I think you copied and pasted the wrong links, Daswulf. Those go to Zeeko's.
-
Zeeko, Cutting openings in a die, or working internally, is always harder than cutting the outside of the die, right? I'm thinking of the heart die on your Facebook page. Drillng and chiseling away the negative space is limiting. There are a couple other methods to go about that that could save you a lot of time and let you get more detail. One way is to carve (or forge) a hob and use that to form the cavity. Heat the die stock, and sink the hob into it; then, in the case of the heart, cut away everything but the thin outline you want. The hob doesn't have to be anything special in the way of material, because you're only going to use it once (or twice if you mess up) so it can be soft and easy to work. Another method is make the die in halves, so you're always working on the outside, where you can do most of the work with a grinder; then you can weld, bolt or collar the two halves together. Either method keeps the inside work to a minimum.
The split die method works with sheering dies too. Let's say you're making a die to knock out hearts. It's pretty tough to get down into the point of the heart, right? The punch is easy, but the die is difficult, because it's hard to make a small, pointed cavity with the proper relief. Well, split the die in half so you no longer have to work inside. I have an example of that on a leaf die, but I can't seem to find a picture of it at the moment. Maybe I'll snap a picture of it tomorrow when I'm in the shop.
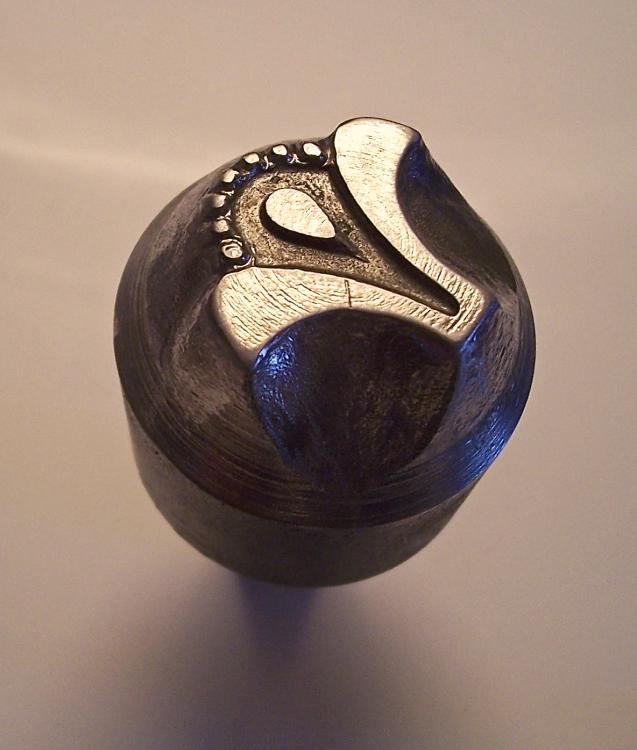
I am including a picture of another die though. This is a die I made using a hob to get the negative space and then cutting away the outer area to leave a raised portion--the same idea as your heart. In the picture, the sunken area in the center was forged into the die with a hob, so first I had to make that. I started by sinking a teardrop into it and then carved the rest. (It was essentially a negative teardrop in a positive teardrop with concave sides.) The initial small teardrop stamp (a positive) made a negative impression in the hob, which turned it into a positive impression on the die, which turned the teardrop back into a negative impression in the work. (!!) After using the hob on the die, I ground most of the rest of the shape of the die and finished it with files and sand paper. I used this die in my toggle press. It is cut from 1 7/16" diameter annealed 4140 (and left annealed). The die image is probably about 7/8" tall. It was a custom die for a client, and I've promised never to use it again.
Joel Sanderson
-
Not sure how much I'm gonna add here, but I think there are a few things that haven't been said.
Whenever I teach someone to forge weld, I always start them by taking a single piece of iron and folding it back onto itself. Take a piece of 3/8" or 1/2" round hot rolled about a foot long or so, and fold it over onto itself a couple inches or so on the end. This way, it's held together, and it's the same alloy with the same melting and welding point.
Heat your folded bar evenly in a neutral fire. A neutral fire is harder to make if you're using the popular clinker maker firepot, but do your best. Somewhere between red and orange, bring it out of the fire and sprinkle it with borax. Put it back in the fire when you've got a good coating.
Now it gets more critical. Heat it fairly quickly in a hot, neutral fire, without an excess of oxygen. Probably the most important thing is to be sure it is heated EVENLY--both sides of the fold, which you're about to stick together, need to be the same temperature or you're gonna have troubles. As the temperature rises, you'll start to notice a green flame coming out of the fire. That's the borax burning. This means you're really close. Bake it some more so it's all nice and even, turning it over occasionally to add to your confidence. Welding is more about fire control and temperature control than it is hitting it together. Remember that, and you'll figure it out. If you see sparks, it means you have an excess of oxygen in the fire. Go more by the flames' color than anything. With time, you'll know how hot your iron is by reading your fire, but for welding, the green flame is a pretty obvious clue.
Bring it to the anvil quickly and hammer it together. I'm not going to tell you to hit it lightly or hard, because that means different things to different people. You've gotta work them together, and you have to be sure to keep them the same temperature (again, it's about fire and temperature) by not sucking the heat out of the bottom by pressing it against the anvil.


Screw Press (Try Press)
in Presses
Posted
The press I showed a picture of, Thomas, is a much different animal than the percussion presses popular in blacksmiths' shops. People sometimes call those screw presses, but really they are percussion presses or fly presses. The percussion press has a double or triple screw, and the ram is propelled downwards by the momentum of the flywheel. (I know you know that--just explaining the difference here.) The press I use has a single thread, and a relatively fine one at that. It is very slow. It is not intended for forging. There is a handle that fits into a ratchet that clicks in and out of the teeth around the wheel, (which you can see in the picture) rotating the wheel either downwards or upwards.
It is hand powered, Kevin. And yes, my shop is all line driven, powered by a Reid engine made in 1898.