Sanderson Iron
-
Posts
158 -
Joined
-
Last visited
Content Type
Profiles
Forums
Articles
Gallery
Downloads
Events
Everything posted by Sanderson Iron
-
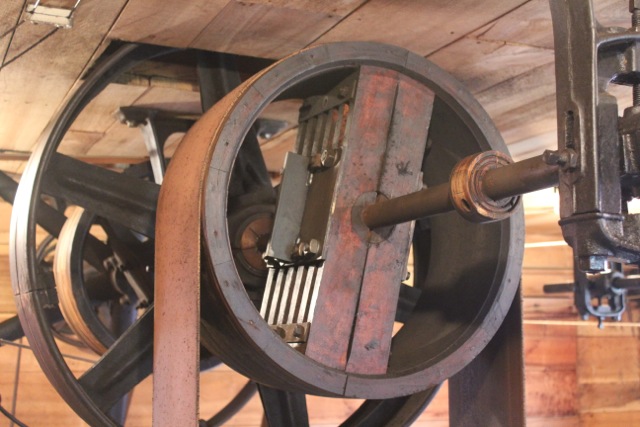
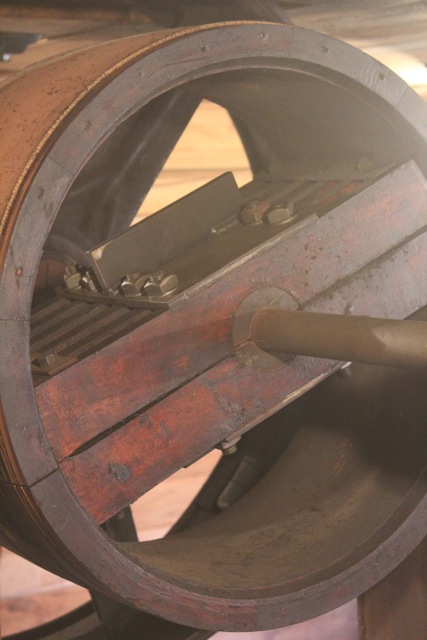
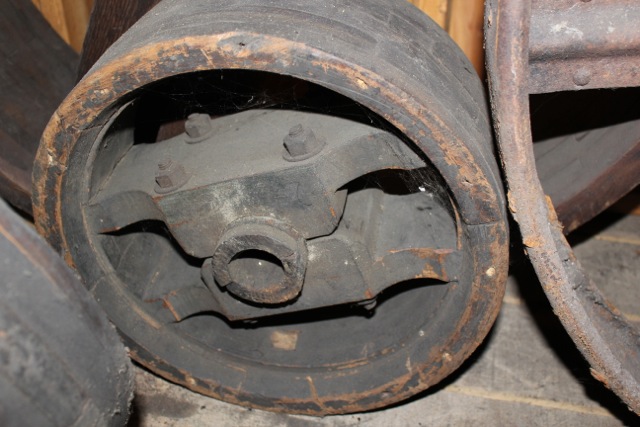
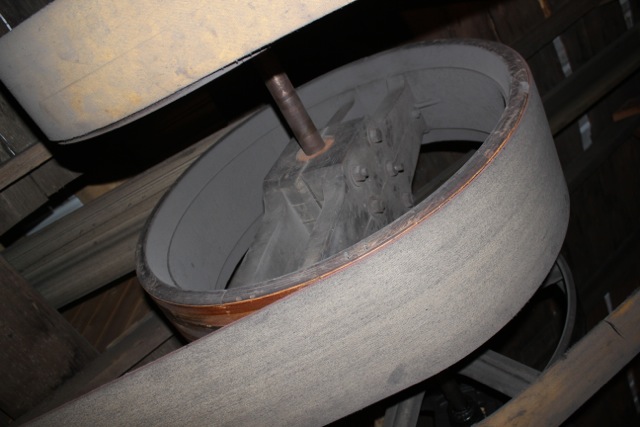
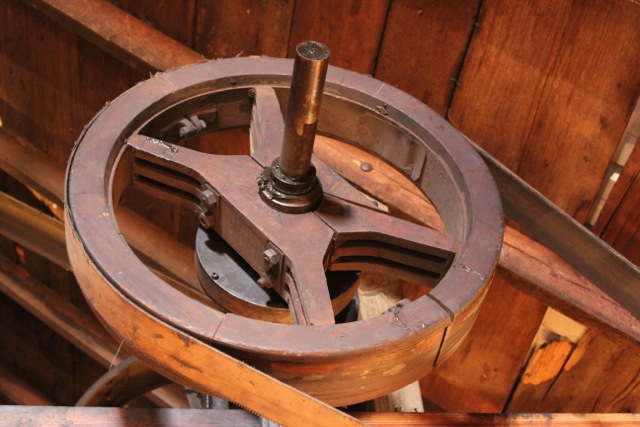
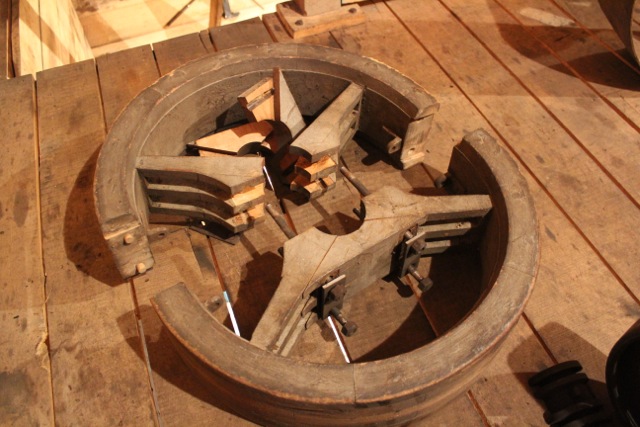
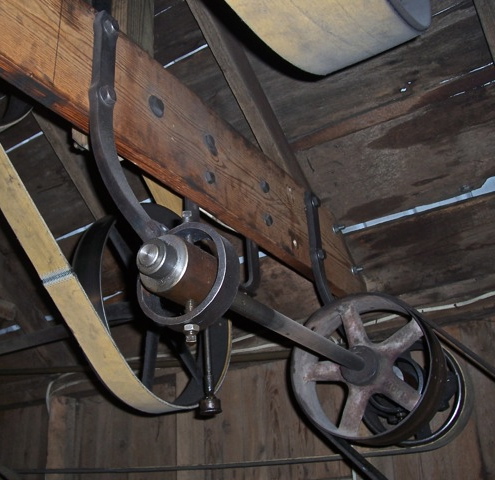
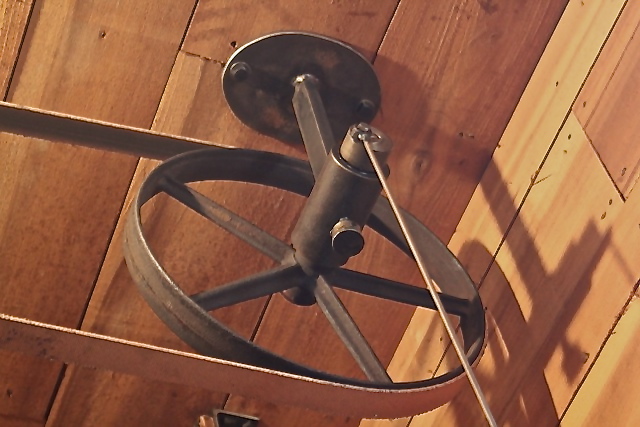
There are three companies whose pulleys are most commonly found in my part of the world (Michigan, USA), and there's quite a difference between the power they'll transfer. The first and second pictures below show a pulley made by the Reeves Pulley Company of Columbus, Ohio. This is a very strong design. (It also is simple to replicate, which I plan to show in another post.) If you have to use a wooden pulley, these are about the strongest. It still won't carry as much as a metal pulley, but it's close if you put a metal insert against the shaft. They're made of hard maple, and they must have used better glue than other companies, because they rarely come apart. My entire shop is run by a Reeves pulley, directly over the Reid. I added a 3/8" plate with a web down the middle to give it more strength to squeeze the shaft, where the wood would otherwise collapse. When that Ried leans into a load with its 750 cubic inch determined pulses, it's asking a lot out of a pulley. The third and forth pictures show another pulley with basically the same construction. I don't know where these were made, but they're old. One of the mills I got a lot of my pulleys and hangers from burned and was rebuilt in the 60's (1860's). These pulleys were some of the oldest there, so I'm guessing they were made about that time. These are made of whitewood, also called tulip popular. They are not as hard or as strong as the Reeves, but they're made big enough to compensate. They'll carry a good load if they're clamped right. Another other type of pulley that's common around here (and they show up on Ebay, so they must have been sold all over) is one made in Saginaw Michigan. These things are terrible. The glue is bad, they come apart, and the structure is so poorly thought out that the action of the grip breaks them apart. Their spokes and hub are made of little triangular pieces that just don't stay together. They're only fit for light loads. The last picture is of one which once drove my shop with the small engine (now sold), and you can see how well it handled the load. I had another one over the 250, and when I took it down, you could rotate the hub a good 20º without moving the rim. The belted one in the second-to-last picture below is driving my big grinder, and you can see it's coming apart now too. Hope this is useful to someone. joel
-
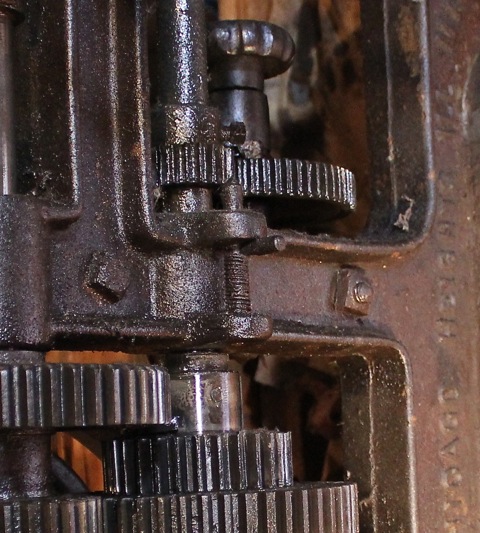
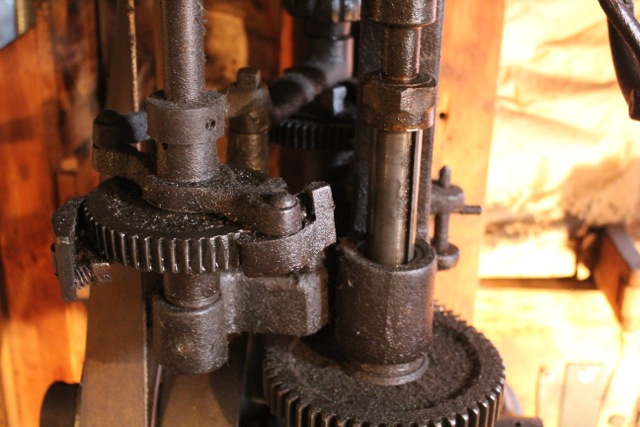
Oh thanks, Bud. Actually, I do give group tours, though I try to limit it to one group a month. Nowtownkid, that's in nice shape! Your hand lever do-hicky is in one piece, and the bevel gears that lift the table are there too. I say, that's a fine specimen. You're gonna like it. The table on these things is kinda lame though, especially since it doesn't revolve to align your drill. I put a drill press vise with X Y on it, and that helped it a lot. That is a nice motor. In your second picture, just to the right of the pulley on the frame there's a little spring-loaded peg thing. What does it do? Any idea? Mine has the same thing. I'd guess it's a shield latch, but I can't see where one was mounted. Here's a close up of my mystery thing.
-
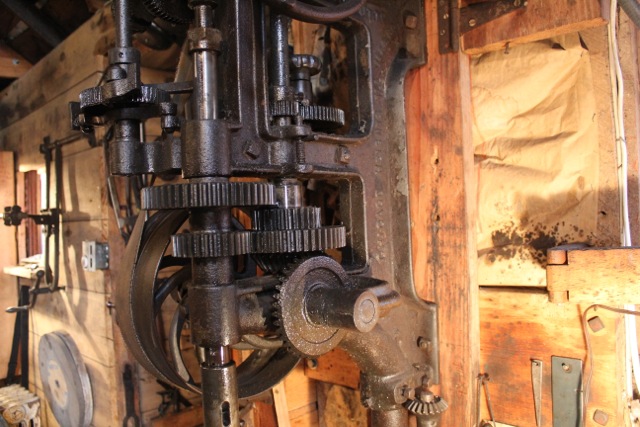
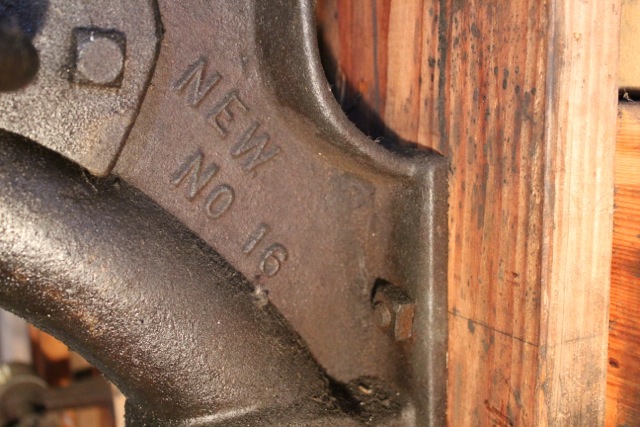
That's new to me, Yahoo2. I sure appreciate the links. I'm gonna look into this. I looked at the number, Notownkid, and sure enough, it's a 16. Now why didn't I know that? Hmm…. I guess drill presses aren't hammers, and I'm a blacksmith, huh? Here're some pictures of it. This was the very first machine I bought. I think I was still in high school or just recovering from it. I first ran it on the electric motor that's still on it. When I added the countershaft with the clutch above, I just left the motor, since it didn't make sense to start a big old engine to drill an itty-bitty hole. The motor's reversible too, which is nice for tapping holes. I take the motor's belt off when I use the line and just let the motor spin the countershaft. This is the only machine in the shop that can be driven by a motor. The belt coming down is crossed in order to miss the handle on the left, but it needs to run that direction anyway. Canedy Otto must have made a lot of these, because I've seen them around here and there. It's a decent design, with two gears for a high and a low speed; you just shift that double rear gear up for low and down for high. I actually have four speeds, because the line shaft drives it quite a bit faster than the motor. High with the motor is about 400 rpm, which is pretty slow, and high on the line is about three times that if I recall. I'll have to look it up if it matters to anyone. This machine has a ratchet down feed. For anyone who hasn't run a drill press with power feed, it's really nice and drills holes more accurately than you can hand feed. The controls on this are all quite high up, so my wife has trouble running it. I could mount it lower, I suppose, but then the table would be low too. She prefers the Rockford anyway. I hope you get yours running, NotownKid. It'd be worth it. If you find it has any missing parts, let me know and I'll send you pictures to make them. I had to make a dog and part of the feed mechanism for this one. That feed wheel on the right isn't original either. Originally there was a big three handled thingy, which was missing, so I put this on it. Joel
-
Interesting, Yahoo2. Thanks. I really appreciate it. I'll take those numbers to the oil company and see what's available here. When I first got this engine I was given some very stale gasoline (and I mean VERY stale!) that smelled like varnish and burned at a rate somewhere below kerosene when I lit the forge with it. It was something else. But the engine ran better on that stuff than anything I've ever had! The ports plugged in about a year's running, so I know it wasn't burning clean. I wish I could duplicate it though. I have some little bottles of samples, and I've tried to have them analyzed, but nobody seems to want to make gas stale these days, so I've not found an answer other than through my own mixing experiments. Anybody know how to make gas stale and smell like varnish?? I've been meaning to take pictures of the different kinds of pulleys and insert combinations and show them. Since you mentioned the wooden pulleys, Yahoo2, I'll do that today if I get time in the shop.
-
You're welcome to stop in any time, Kubiack.
-
I'll see if I can send it. I see I have only 13 tests on the computer file; the rest are hand written, so I'll send the 13. If you have any suggestions or see any patterns, please let me know. Not sure I explained that this engine is started on propane, is warmed to 100º and then switched to the kero-mix. On the mix, the ignition is shut off, and it compression diesels for its run. The fuel mixture determines the ease with which it diesels and therefore determines the timing. Some mixes didn't diesel at all and won't run. The notes on the sheets were for myself, so I hope they make sense to you. I don't think I included any cuss words. Please forgive me if i did. If anyone else wants to see them, I'll try to post them. Just let me know. Nothing secret going on here. Joel
-
I have experimented with something like nineteen different fuel mixtures, Kubiack, including E10 and straight gasoline. Mixtures included various amounts of diesel, diesel and oil, kerosene, kerosene and oil, and so on, mixed with either straight gasoline or gasoline with 10% ethanol ("E10") . The kerosene/ E10 mixture is the most flexible under varying loads, while the kerosene/gasoline tends to flood more easily under heavy loads. There is one supplier around here that still sells straight gasoline, but it's sold bulk to farmers and not to gas stations. I had it delivered for awhile. This engine has a drip oiler on both the charging and main cylinder, and this oil gets into the combustion chamber through the crossover valve, so I doubt the drier E10 is any problem at all for this engine's mechanics. In fact, the smoother running E10 is almost certainly better for it. There is no rubber or plastic in this engine, of course. The main gasket is a metal gasket. Originally, this gasket was 1/8" square copper, but I make my own out of brass channel filled with graphite packing. It seals better for me. I'd be happy to post my fuel experiments, but it's probably too technical and off track for this thread. If you want me to send them to you though, I'd be happy to. Joel
-
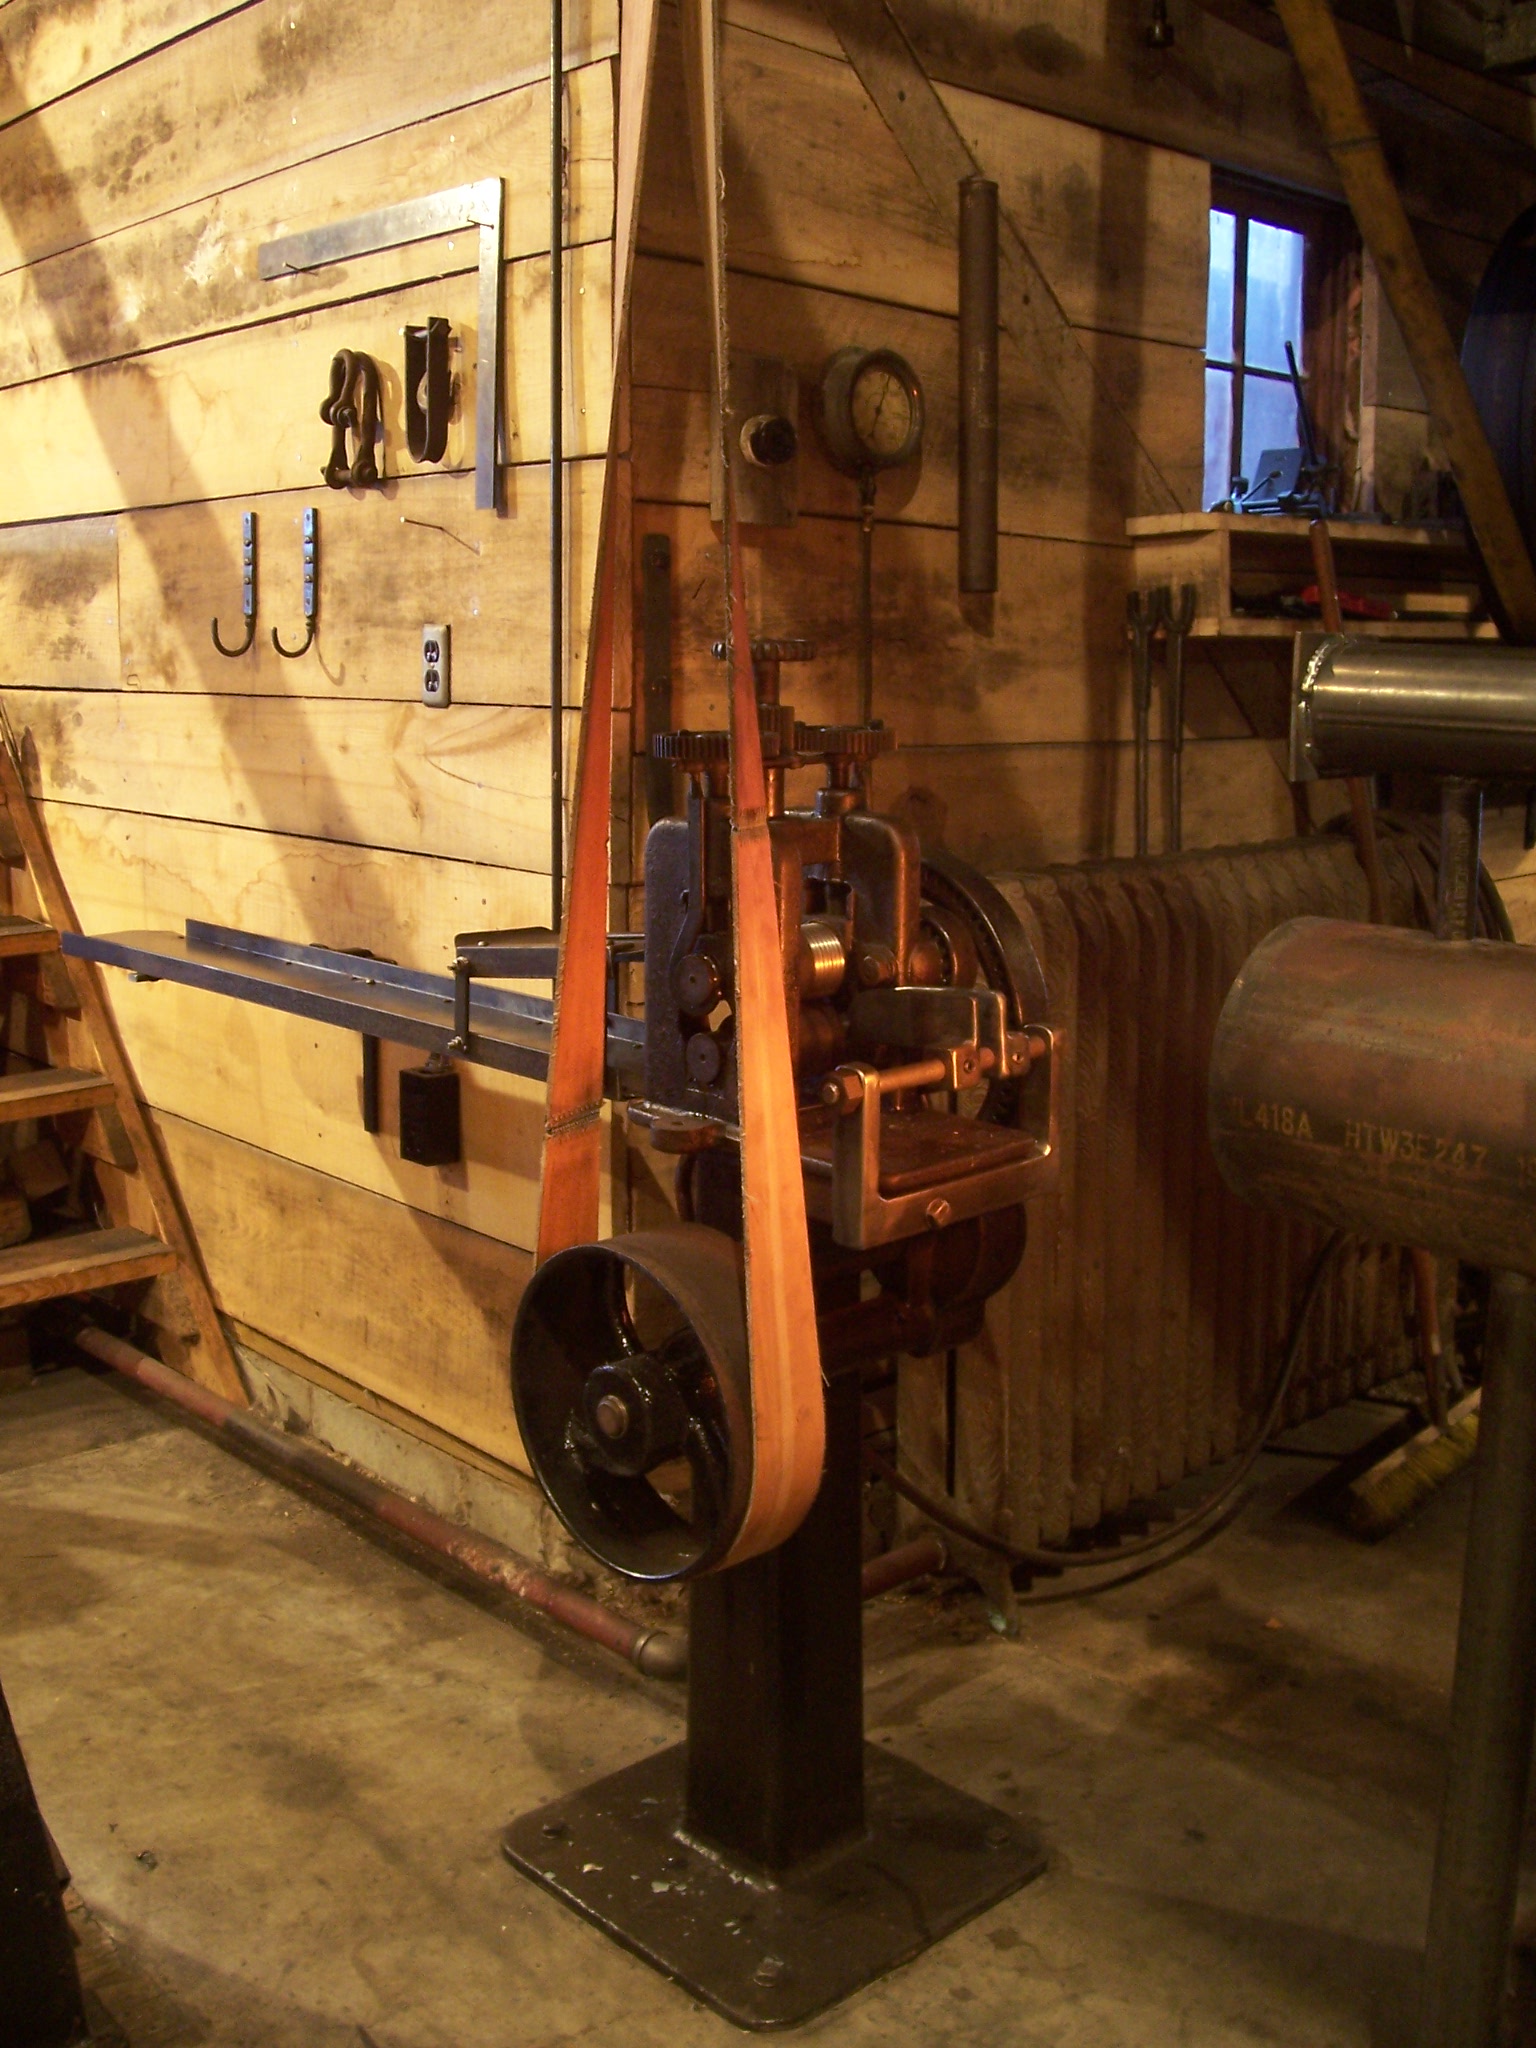
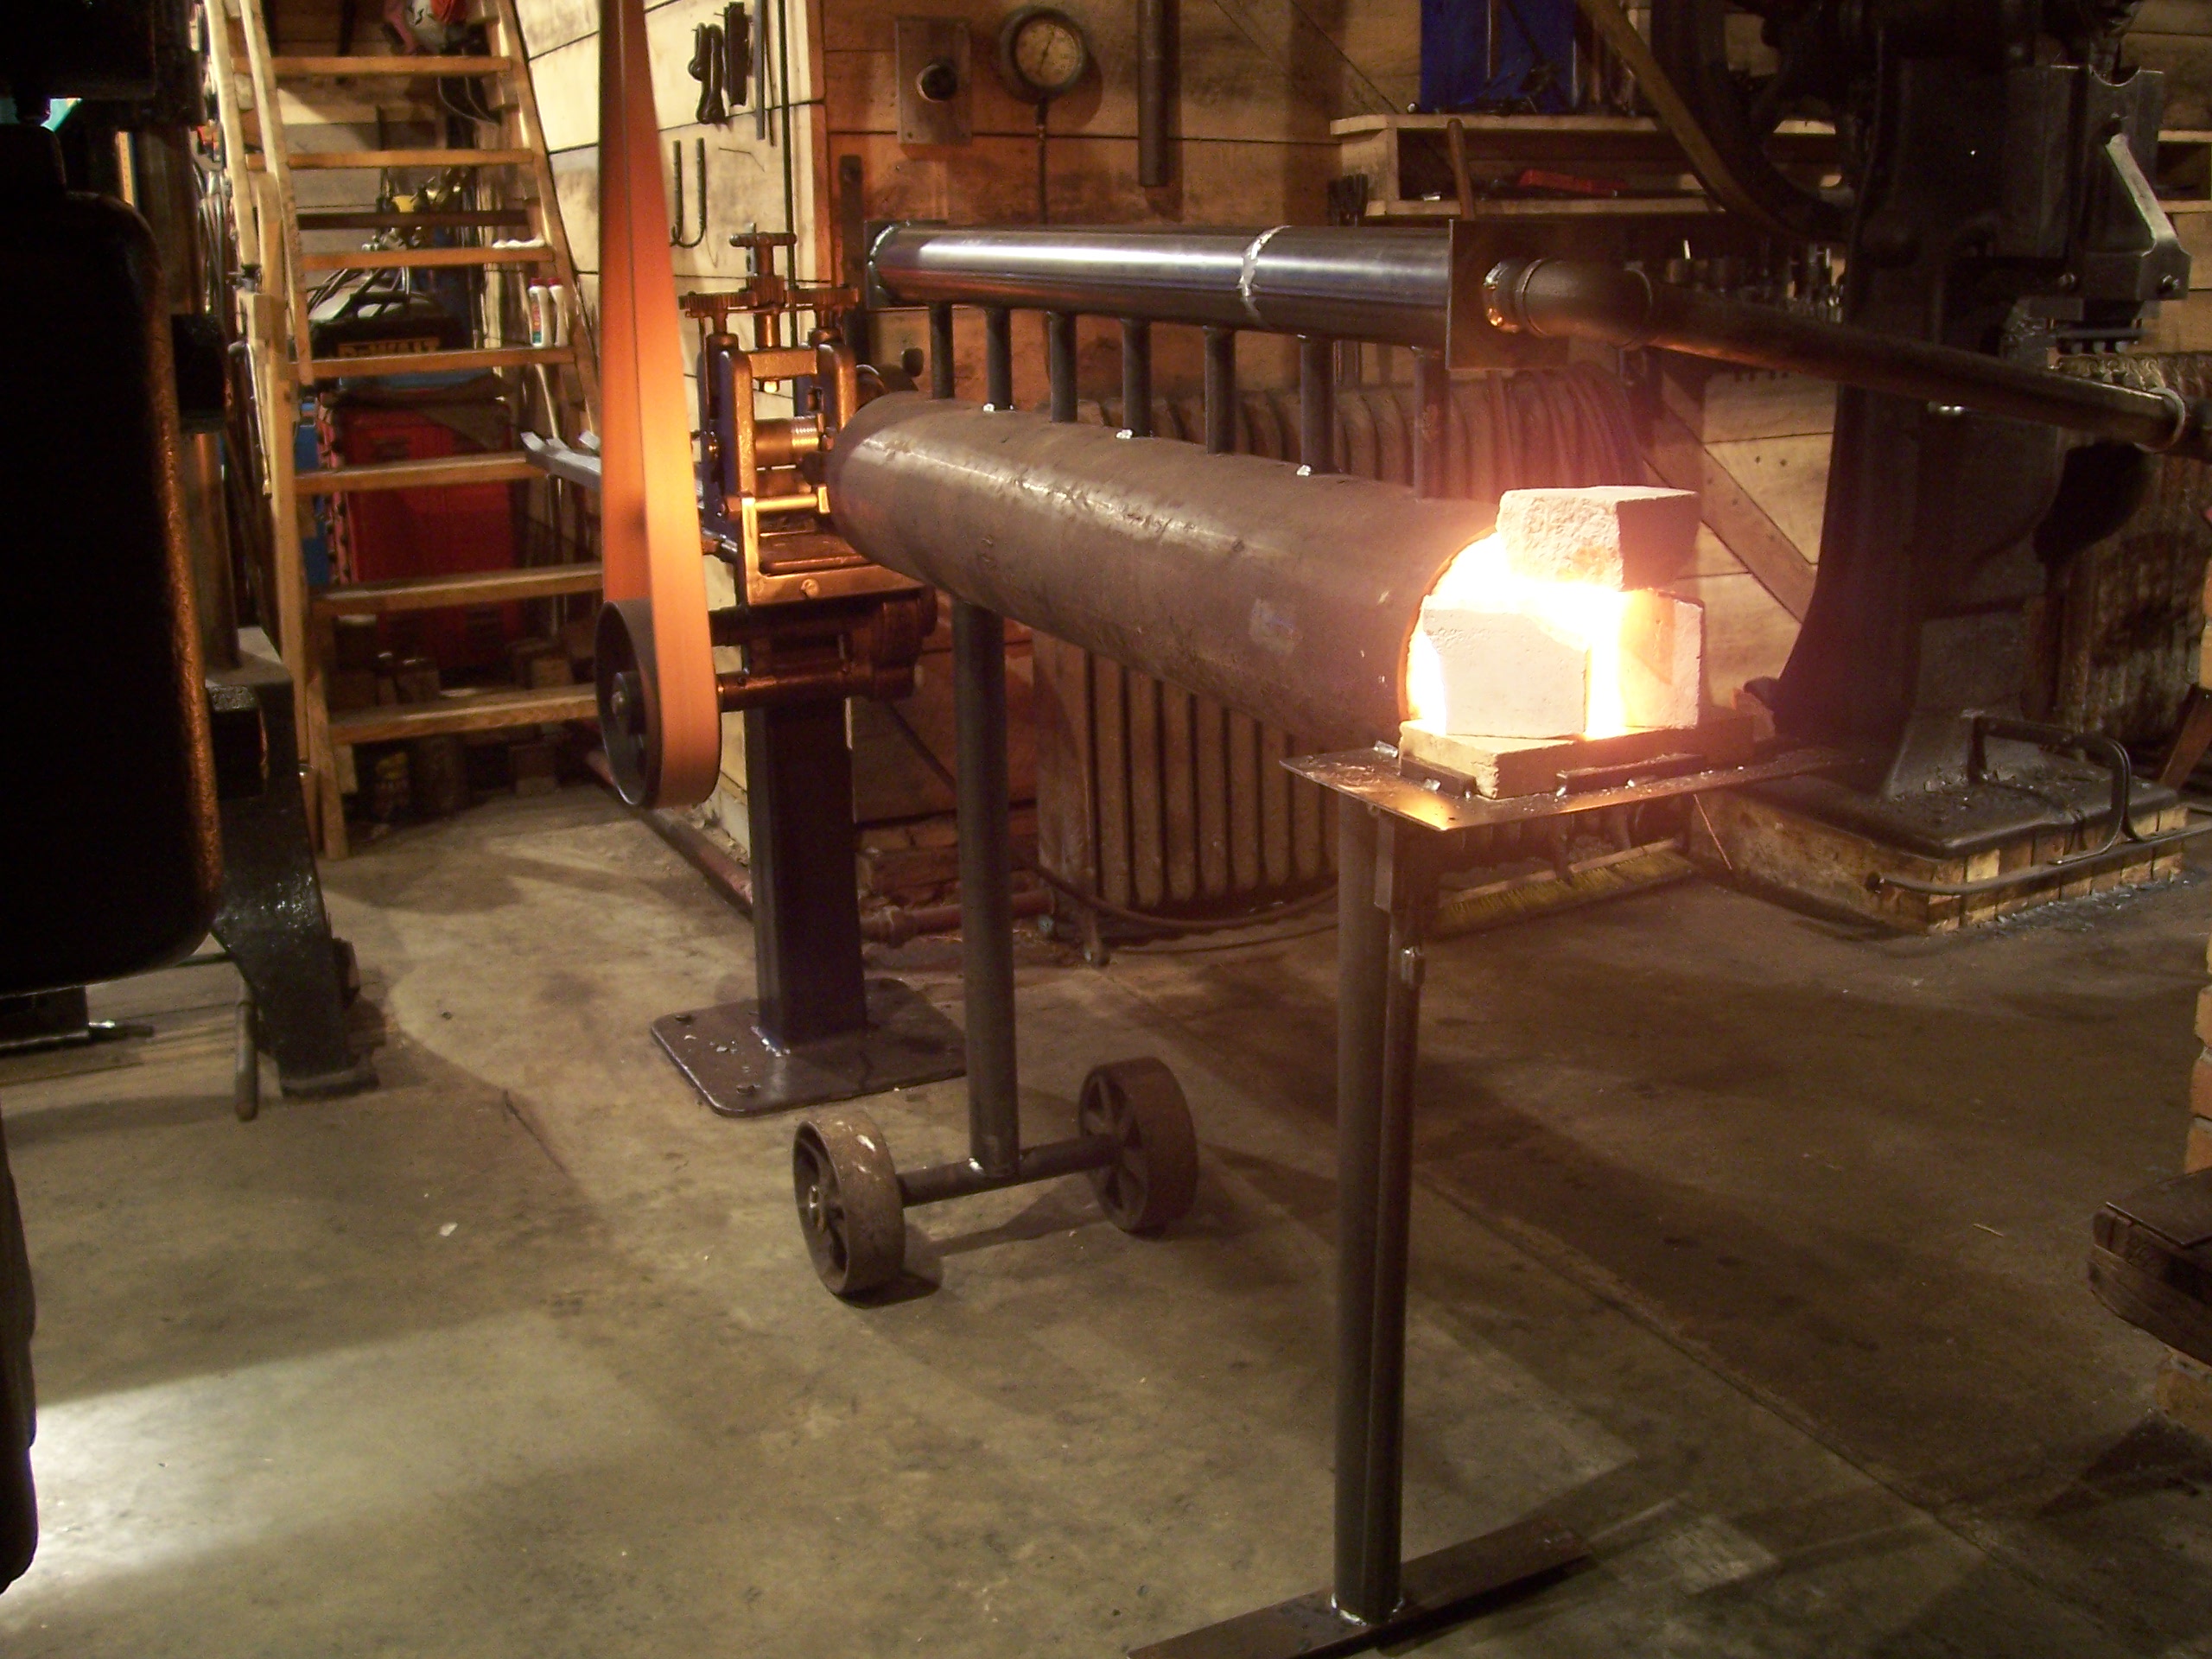
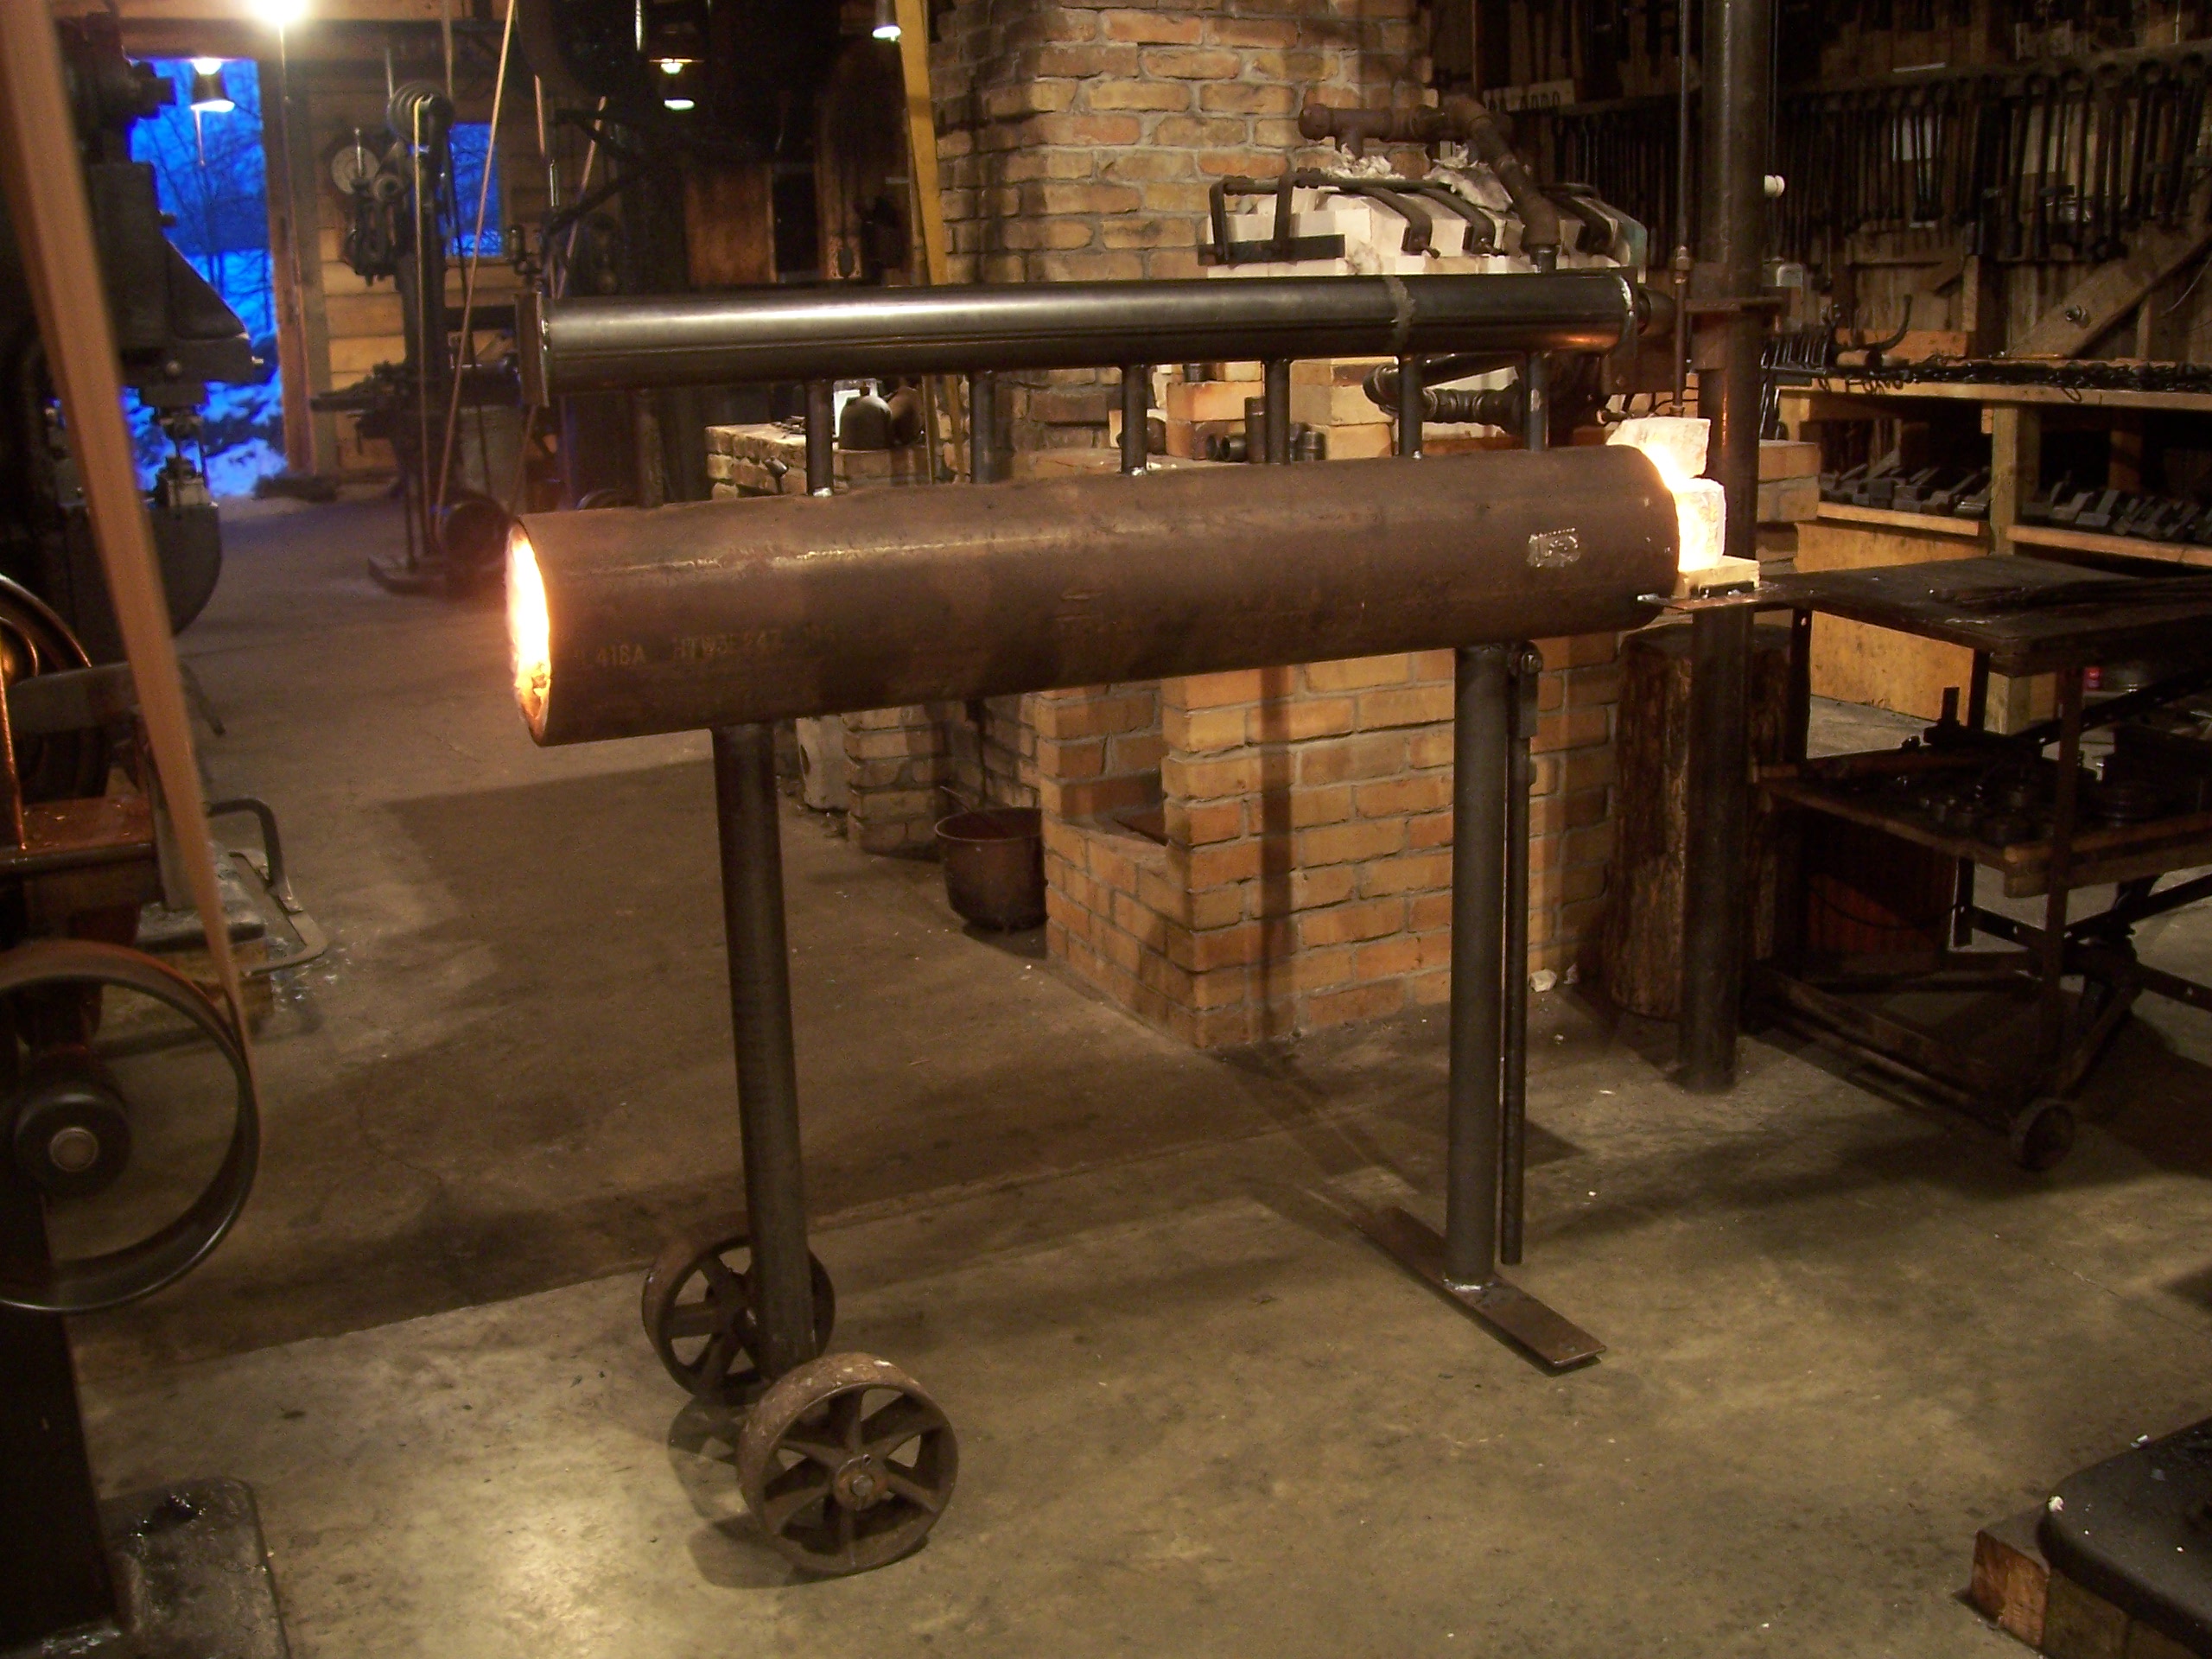
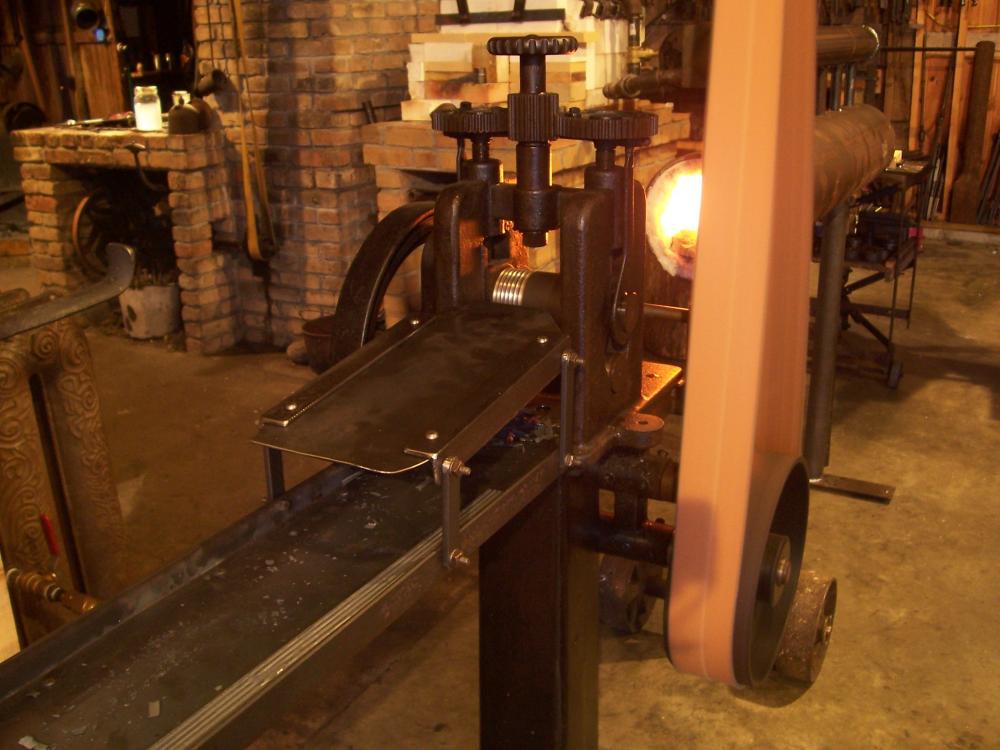
On the other side of the forge is the rolling mill, which dates from the 1870's. This is a little 3" X 4" mill, which means the rolls are 3" in diameter and 4" long. I've rolled up to 3/4" thick, but I usually stay under 1/2". That's pretty small for a blacksmith shop. The rolls are connected by helical gears which power both rolls to pull the iron through. There is a hand wheel on top which adjusts the height of the upper roll, while the lower roll stays in the same place. The rolls that came with this were plain rolls, but I've cut three patterns in the upper roll. I'll soon be turning a new roll with new patterns. One of the difficult things to do with a hammer, press or any single blow system, is to put continuous pattern lengthwise down a bar. It's difficult to line up the marks, even with a negative impression. Try that with a positive impression, and it's getting close to the impossible; but the rolling mill does that nicely, because the die never leaves the work, so it doesn't have to reconnect with a previous mark. There is a guide on the front of the mill to keep the stock in line with the pattern, and there is a tray on the back to catch the stock coming out. I've already talked about this furnace, but I'll say a little more here. This furnace has seven burners made from 3/4" pipe with a single restriction ring in the ends. The large pipe on top, to which the burners are connected, is the manifold, and there is a pipe from there to the NoCoal blower that feeds the other two furnaces. (One blower, three furnaces, valves to control where the fuel goes.) The manifold is large enough to be somewhat pressurized by the blower to give equal fuel to each burner. The body of the forge is an 8" schedule 40 pipe, 51" long lined with Kaowool and has a hard split brick floor. This heats nicely. I can heat two or three bars at a time. I pull a bar's end out, put it in the rolls in the mill, and the mill draws the iron through while the other end is still in the fire. The last picture shows a frame with a pattern that I rolled.


-
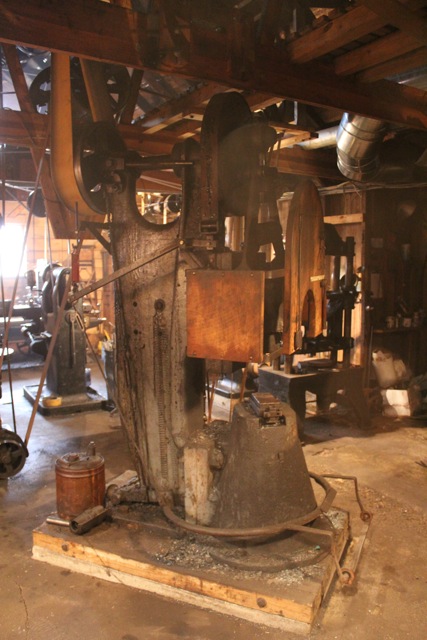
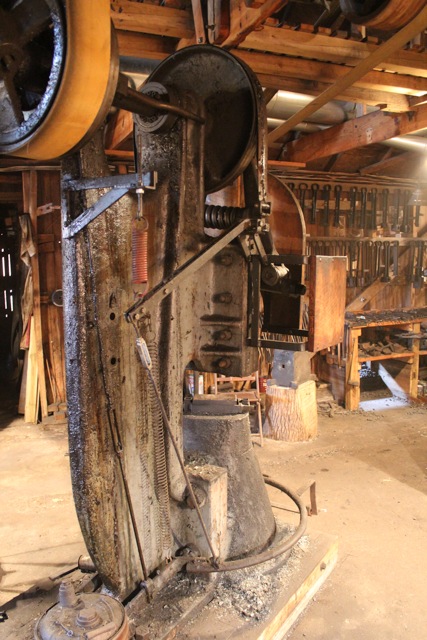
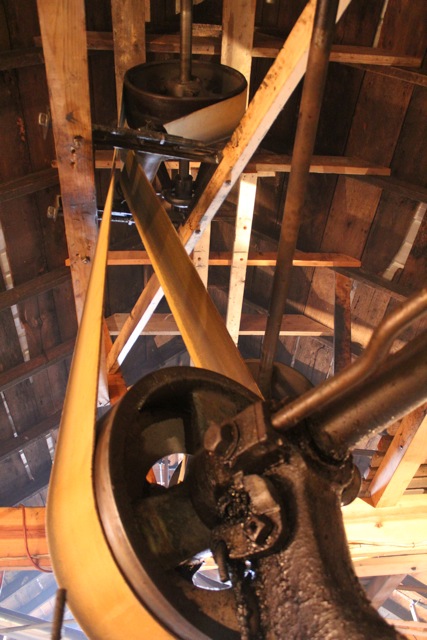
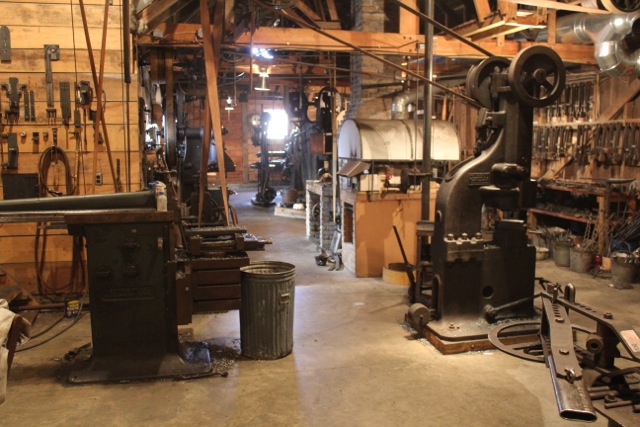
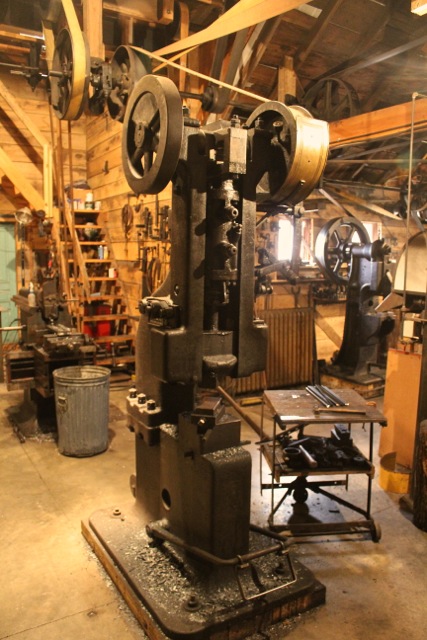
I'm gonna move back to the forging area, since that's where I left off. Like I said, the machines are arranged around the forge. I put in the Murray (the 250) before I added to the shop, so at that time there was no "around" the forge, because there was hardly room for a vise on the other side. Anyway, that's why the bigger hammer is in such a tight spot and the smaller hammer, the 100, is in the open. It would be better if it were the other way around so I could have a crane to the big hammer, but that's not how it worked out. I made a mistake by placing this hammer at an angle to the shop and not in line with the shaft. This means the belt coming to it has to be contorted to make the trip, and that's really hard on it. (The belt in the picture is the third one I've had on it.) The countershaft above is positioned so that the center of the rim of the driving pulley is directly above the center of the rim of the hammers' pulley--so the belt going upwards (the drive side) has only to twist on its centerline to make the journey. On the return side, the slack side, there's an idler pulley positioned at an angle, pulling one side of the belt inwards. An idler pulley is really hard on a belt, because it bends it backwards and delaminates it over time. The advantage is that the belt has more wrap around the pulleys, so you can get a bit more power out of it, especially with sudden loads like on a hammer's start. This idler also serves as a belt tightener. It's mounted so that two threaded rods draw it tight. Since idler pulleys are small, their shafts turn fast, making noise and requiring attention. I mentioned earlier that the engine runs the same speed as this hammer. This allows a 1:1 ratio between the hammer and its drive, giving the belts maximum power and torque. This is a good hammer, with good control and enough power to handle stock bigger than I can lift. Plus it has a nice long stroke and lots of ram adjustment for tall tooling. Ram height, more than power, is usually the reason I turn to this hammer. It can deliver strong single blows, which is also very nice. But of the three hammers, I use this one the least.
-
Thank you, Jalopy. I really appreciate it. I don't know what number it is, to be honest, Notownkid. Wouldn't you know that's one machine I don't have pictures of other than's on my website? Figures. I'll take some for you so you can compare it with yours. It's a good machine. Sounds like an interesting planer. My guess about the DC drive is that it could run more slowly with more torque than with AC. Don't know much about electricity, but I've heard that's true.
-
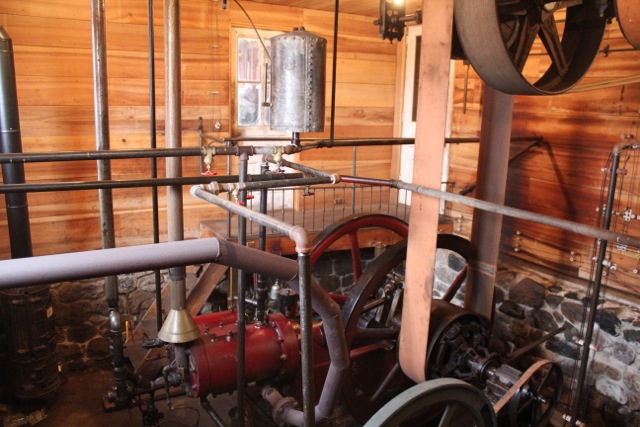
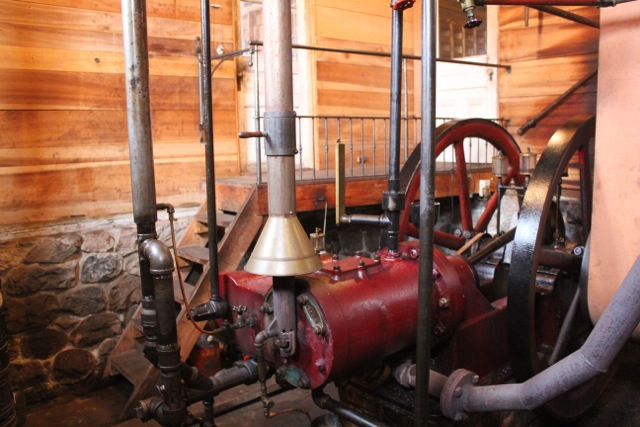
Whatever the engine, it needs to be separate from visitors. My engine room is lower than the shop and office, so there's an overlook with a guard and gate so people can pass through the room without being in danger. This guard is to code. Separating the engine is for your own safety too, of course. The engine is the most dangerous part of the shop, since it is raw power without any chance of a belt coming off. All the time the line is running, there is an exhaust blower running, circulating air through the engine room. Any open crank engine is gonna leak fumes, and if you have an exhaust leak, you'll be in trouble. This fan is about 36" in diameter, and it runs pretty slowly. I leave a window open whenever the engine is running. The engine room floor is also lower in order to get the line shaft and plumbing over head. I laid up the stones myself. I figured it'd make a more sturdy foundation than anything else, to handle the line shaft. That's probably true, but boy was it a job! Not gonna do that again. The small riveted tank at the top of the first picture is an expansion tank for the 200 gallons of coolant through the shop radiators. There's a sight gauge in the side to tell the level. I'm including a picture of an old water Ruud heater I picked up with 19th century patent dates. My plan is to use it as a space heater for the engine room and to heat water for a radiator in the office, but I don't have it plumbed yet. There's one just like this in remarkable condition in a John Wayne movie called The Shootist. I wish I knew where that movie was shot, because I'd like to visit and see one of these set up properly. It sure has beautiful castings. Kinda hard to get pictures in there with all the pipes and whatnot.

-
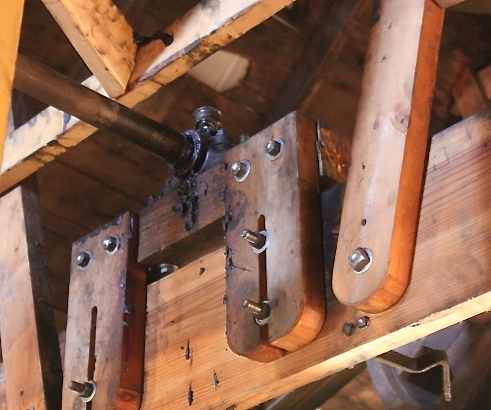
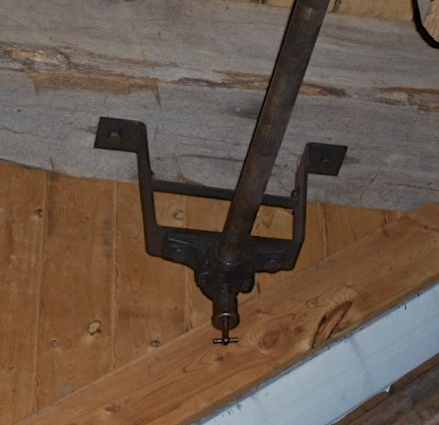
I know how that is, Adam. I didn't have the right things when I started putting mine up either. A lot of times, you never do. Like Jim said, we can't just go down to Home Depot and pick up what we need. I've made a lot of bearings and hangers that work, so I'll show them to you here. The first picture with the wooden mount shows how my main line shaft is mounted. I was just out of college and didn't have real line shaft bearings or much to work with--but I had pillow blocks and a band saw--so to get the bearings level and in line I made these adjustable wooden bases that could slide up and down for positioning. They're just 4 X 4's and 2 X 6's bolted together. (I ran out of money and never bought all the bolts! Ha ha! Still missing some!) I used a string to get the bearings in line and on the same level, and then I put the shaft in place. The bearings set on a rod 90º to the shaft so they can rock fore and aft. These are the bearings I mentioned that are fed with grease cups. It's been working for 20 some years, so I guess it'll keep on working. The next two pictures show other pillow block bearings, but here they have steel mounts. These are just 3/8" by whatever and riveted together. They look more in keeping with a line shaft, or at least like a real blacksmith made them (unlike the wooden ones). The first one is over my die filer; the second is over the rolling mill. Notice the grease cup on the rolling mill's? It's the kind with a T handle, so you can reach up with a stick with a notch in the end and turn it. Handy. The fourth picture shows the hangers I made for my Little Giant. I made these, bearings and all. The bearings are just thick walled pipe with babbitt poured inside. These are held by two vertical screws for adjustment and alignment inside a ring. The stem of the ring, mounted to the beam, is 3/4" X 1 1/2" if I remember right. The stem and ring are all one piece, riveted back onto itself. The fifth picture is a bearing and mount that holds the little shaft for the counter in the engine room. It's thick walled pipe with babbitt too. It's welded together. The last picture shows the bearings and mounts I made for my outside radiator. Same idea--thick walled pipe filled with babbitt, but these are pretty crude since they're outside. They work though. I hope this gives you some ideas. You've just gotta use what you've got. Joel
-
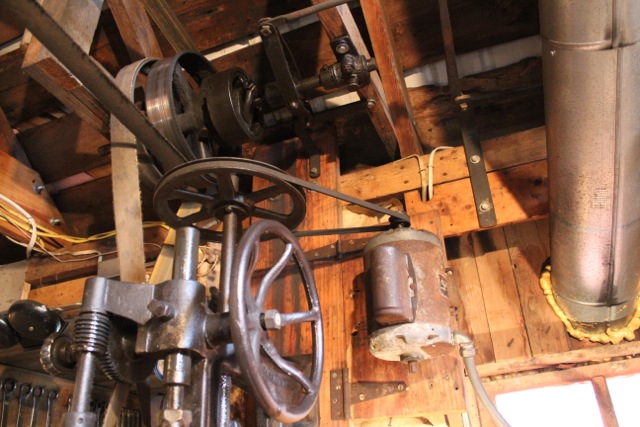
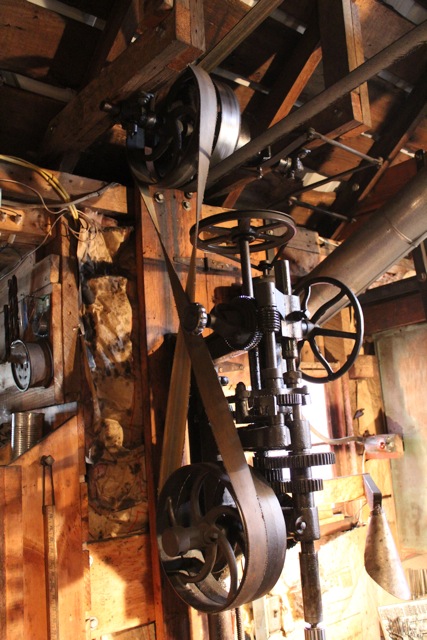
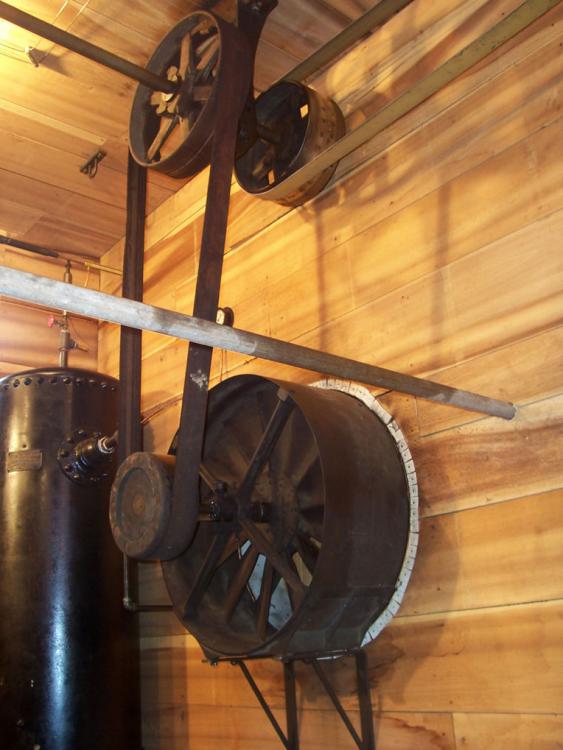
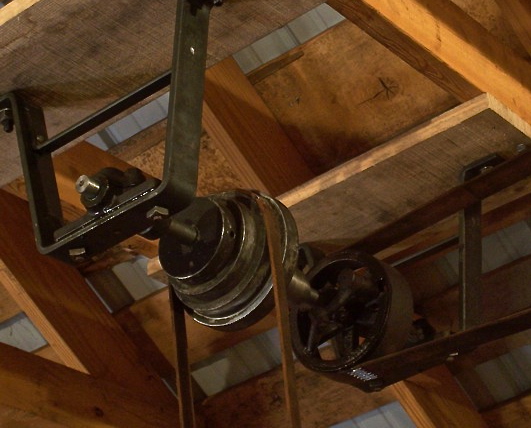
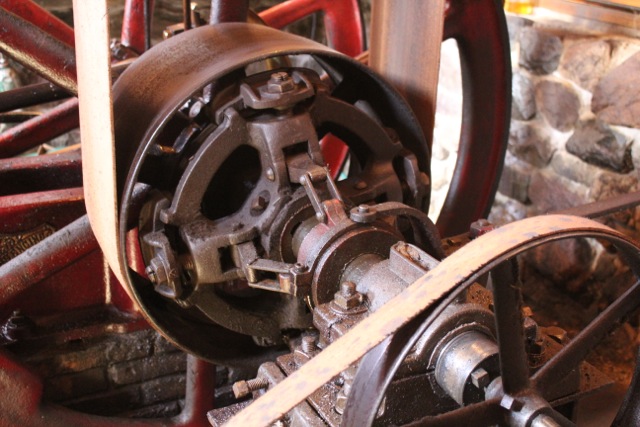
Aplater, it's hard to find the hangers and bearing wherever you live, though I'm told there is more old industry here in the midwest than in the west. Once you have the line running and belts flopping, people will tell you about all kinds of things you don't need now that you're set up. That's just how it works. I don't know how fast your Witte runs. If it's more than twice your Hammer and you are going to run the countershaft above the engine slower, put the clutch on the slow shaft, on the countershaft, above the engine and not on the engine where the smaller pulley would be. That lets your belt run without load before the line is engaged. If that belt and the pulleys are not turning when you engage the clutch, you'll have a hard time starting the line because the small pulley (on the engine) will slip its belt. When a belt starts out from a dead still, it has only half (or less) its circumference contacting the belt per minute, right? It has very little power. That's because there is no motion in the equation, of course. From the countershaft to the line shaft, use pulleys as big as you can find, twice the power of the engine if possible. With the clutch on that countershaft, they will be the pulleys to start the shop from a standstill, but since they're oversized, they'll be fine. This gets back to something I said earlier about looking for an engine that runs about the same speed as your line. My Reid runs 185, and so does the line in the engine room, and so does my 250. The Reid's clutch is on the engine, but being a slow engine, the pulley is big--24", 12" wide, with a matching pulley above it. But the new engine I'm installing runs quite a bit faster, so I'm putting the clutch overhead so the belt will have all its power available when the clutch is engaged. Did this make sense? In the pictures below you can see the difference between the two engines' pulleys and see what I mean. That's one beast of a clutch on that Reid. You know, I think I talked with you on the phone once. Did you call me? or email me? If it wasn't you, there might be a line shaft shop closer than you think. Joel Dave's on to it. Maybe you could save a steam engine or something and get everyone to help disassemble and transport it for you. Be worth a try.

-
Thank you, Jim, but I think that might be saying it a little strong. Well, I guess I'll let you believe it though. Shaft length really doesn't matter in my size shop, Jumbojack, but the distance between the bearings and the diameter of the shaft do. I have read that in the old, long manufactories, the shaft would get smaller as it left the power source. The old formula for finding the horsepower of a shaft is: diameter cubed X RPM ÷ 70 = HP In my experience, this is a little less precise than the formula to find the horsepower of a belt, and I think it's because line shaft pulleys grip the shaft rather than are keyed to the shaft. For example, a 1" shaft spinning at 500 RPM should be able to transfer 7 horsepower. I challenge you to put 7 horsepower through a pulley which only grips a 1" shaft, with no key. You see, a belt increases its contact area as the RPM goes up, because more belt comes into contact with the pulley, but the pulley is spinning with the shaft, so its contact with the equally spinning shaft remains the same regardless of RPM. That's my theory anyway. In practice, make the shaft bigger than you'd think, because your pulleys are only gripping it. Cutting a keyway in a line shaft is not recommended, and it is not practical either. It is not recommended because, if you are using cold rolled steel, removing material from one side of the shaft can reduce the rolled stress on that side, causing it to warp. It's not practical, because you never really know, when setting up your line, where all your machines will be belted to the line or even where there might be a bearing. I have put pins into shafts on really problematic pulleys, but I don't like to. The other factor is the distance between bearings. This too, is not so precise. The machinery handbook gives a formula for this, but I don't know it off the top of my head (and my book's in the shop). I will say that it will vary between the type of load the shaft will have. For example, the shaft over my engine is rated to handle the engine's horsepower, but that horsepower is pulsing, being from a one cylinder engine. This challenges the pulley overhead, and it bends the shaft. (I will be mounting another bearing soon, right next to the pulley, to give it more rigidity.) The rule of thumb is, don't put your hangers more than 8 feet apart. One thing to note, now that I'm on the subject of shaft sizes, is that line shafts were made on the 16th, and countershafts were made on the 1/8", 1/4", etc. So if you have a line shaft pulley and you measure the bore where the insert goes, and your tape measure says it's 3 1/2", don't believe it--it's really 3 7/16". Be aware of that, or your nicely turned insert won't fit, and your pulley won't come together at its perimeter. I hope this technical stuff is interesting to someone. I love it, but I'm sorta geeky that way. I think I'll wait for another time to answer you about the fire pot, Jumbojack.
-
It is unfortunate that people look and are afraid. If man had been so fearful two hundred years ago, where would we be today? Does anyone have any questions about the line shaft or anything else I have shown?
-
Sounds like a nice boss, Thomas. A lot of people look at the belts in a line shaft shop and think they're dangerous, but actually, they're a safety feature--and I am not trying to justify them. When a motor driven lathe or other machine is pushed past its limit, that motor keeps on trying until you kill the power or it burns out, locking the machine and anybody caught in it until help arrives. With a flat belt, once you pass the horsepower limit of the belt, the belt begins to slip and almost immediately falls off the pulley, and the power to the machine is instantly removed. It is a lot safer. You can even belt a machine to have a built in limit, by keeping a drive belt looser than you might. That lets you determine how much power is going to the machine. I do that with my rolling mill, because I don't want to hurt it, yet it has all the power I need if things are right. At the same time, a flat belt will carry everything it and the machine are rated for if you want it to. Again, the formula to determine the horsepower of a horizontal belt is: FMP ÷ 600 X Width in inches. This works several ways. If you have a machine come in and you don't know how much power it'll require, you can figure it out by the size, width and rpm of the drive pulley. Most companies didn't over power their machines. The other way to use the formula is, if you don't know how fast a machine should run but do know the size of the pulley and the power it should take, use the formula to determine its speed. I did that for my Niagra sheer by asking people with similar electric machines how big their motors were. Flat belts are safer. They just look scary to people who don't know.
-
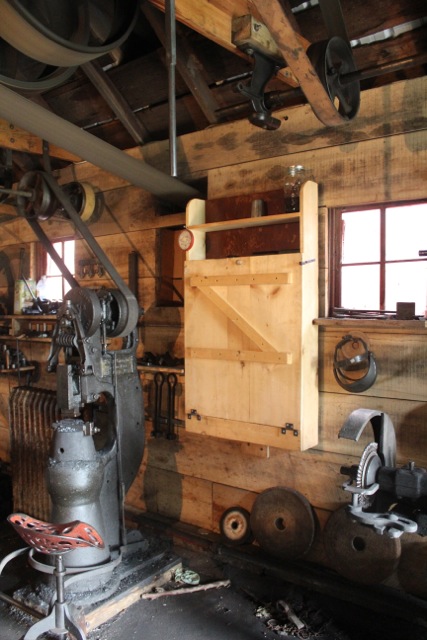
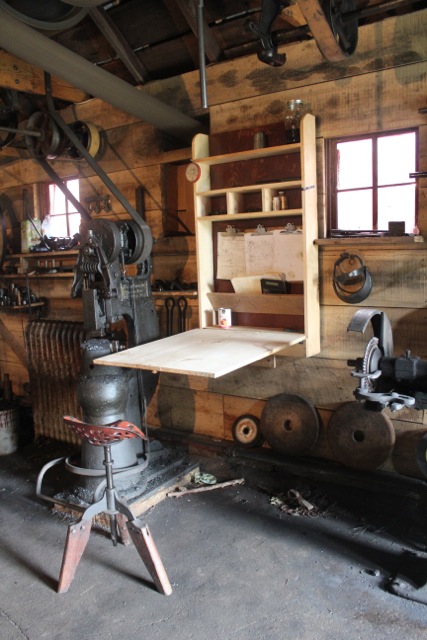
The worst is, they limit what we can do. That hurts the economy, progress, and individual happiness. The government is the reason my shop is not open to the public and does not have a sign out front. I am not zoned for that, you see. Stupid. In this economy, everyone but government workers (and that includes school teachers) are struggling to make a living, yet those government workers--who are paid for by the rest of us--continue to limit our abilities to make a living. I have two fire extinguishers in the shop: one going into the furnace room, the other in the engine room. One of the biggest threats of fire in a blacksmith shop is things laying around, like rags, shirts and papers, which can hold a spark. That's why there are no workbenches in the downstairs of my shop. I had one, and I caught it on fire too many times. I'm always careful to put rags where it wouldn't matter if they catch fire, like on metal stands or on machines. (You can see a rag on a stand behind the universal grinder in the second picture above.) My office is in another building, the engine house. Still, I need to have papers and books on hand in the shop, so I had a wall desk made. This closes when I'm working, and it opens when I need a desktop. It's a real saver, and it doesn't take up much space. Above and behind it you can see the belt going through the wall to the engine house.
-
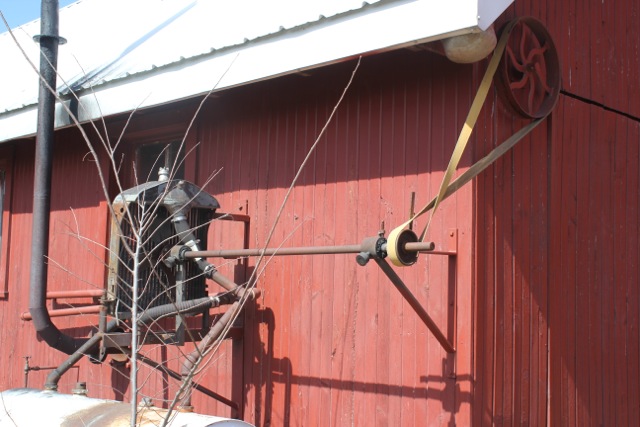
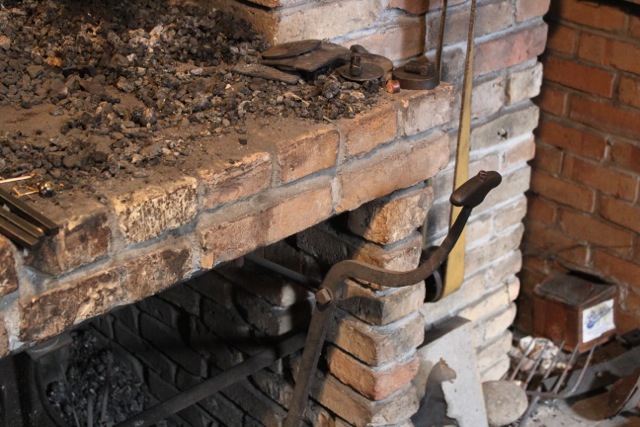
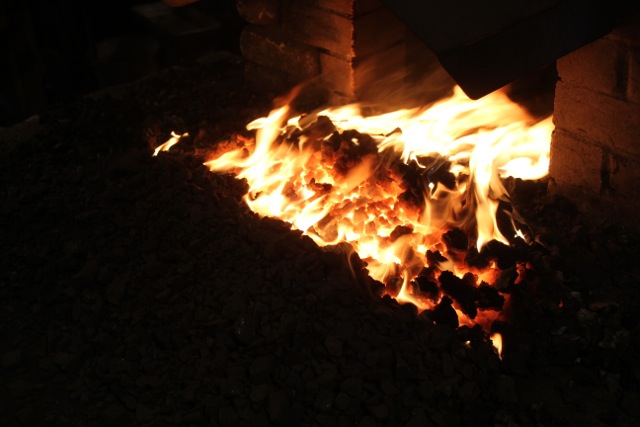
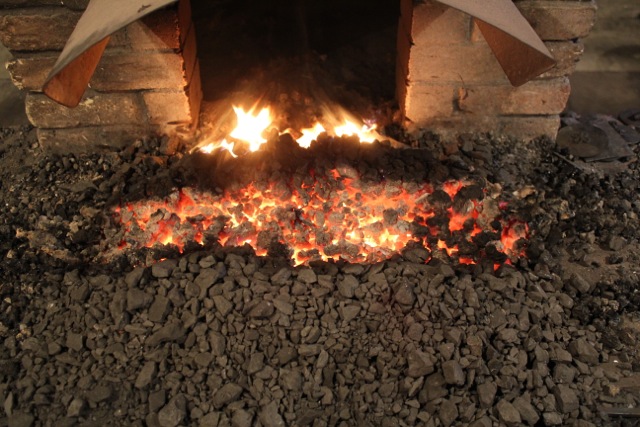
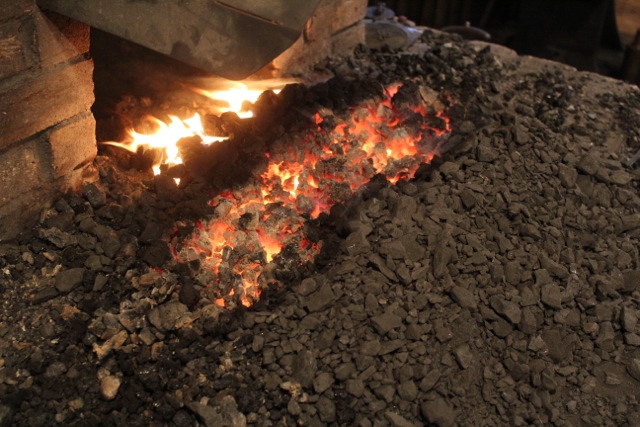
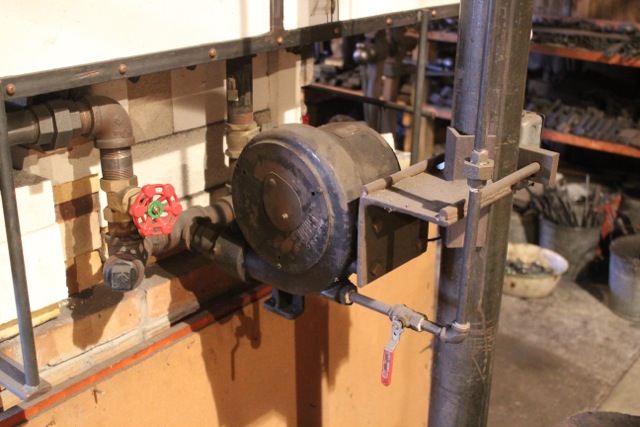
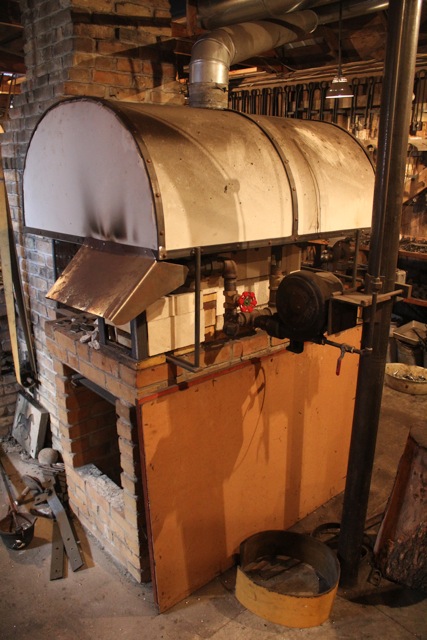
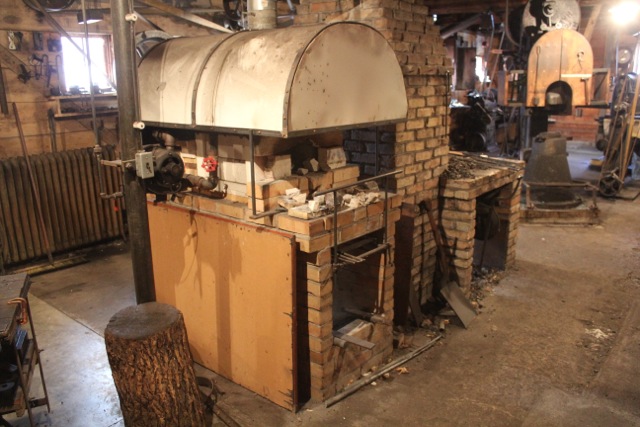
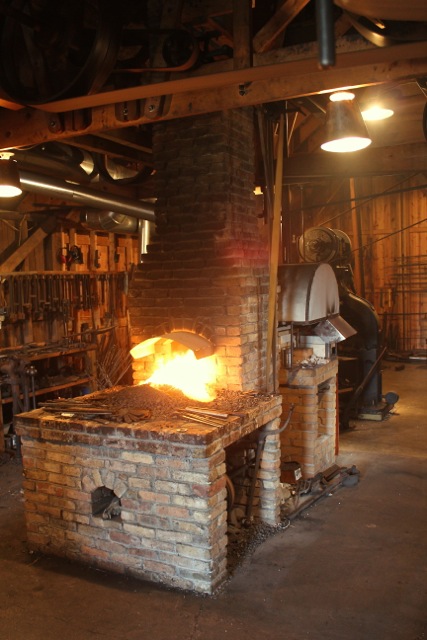
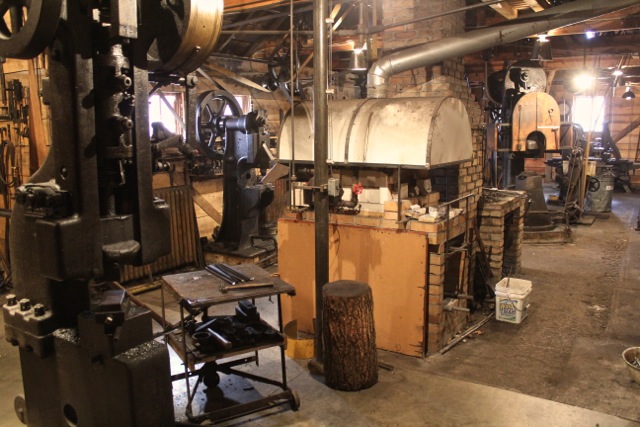
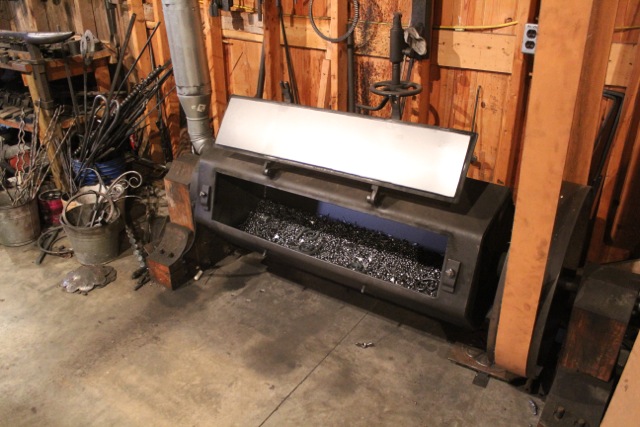
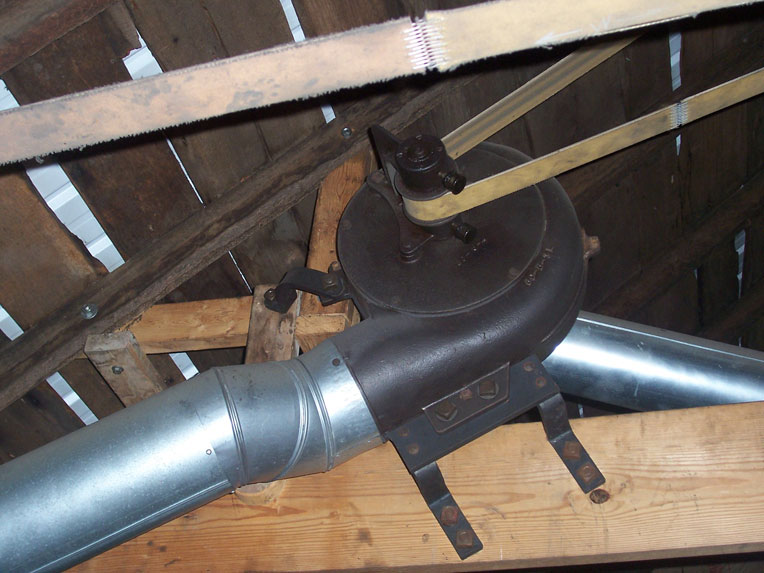
I mentioned the coal forge briefly. The blower for it runs off the line shaft too, with two handles, one on each side of the forge, connected to a blast gate to control the airflow. When I put this in, I was amazed how much more control I had. A lot of people use variable speed motors, which I had in Ohio, or crank blowers or whatnot, which take awhile to wind down and stop the airflow. Having the ability, with a blast gate, to instantly cut the air from the fire is really nice. Let's say you're running a little too hot and you see some sparks. With a gate, you can cut the air to the fire, leave the work in it, and the iron quits burning. By leaving it there a minute where there is no oxygen, you're okay. My coal fire is built on a fire pot of my own design and construction. This is a side draft pot which makes a fire 16" long and 6" wide. This is large enough to keep my 250 happy, and it's even enough to heat several small bars simultaneously. Awhile back my assistant was heating five little bars in the fire so he could pick one out after another to work continually. They were 3/8" bars tapered to 1/8", and he worked all afternoon without loosing one to the fire. A good coal fire has better control than a gas furnace. Unfortunately, the clinker makers on the market do not make a good fire, and as a consequence, people are turned off by coal. That is not to say a gas furnace does not have its place. I have three. These are forced air furnaces, and they all are driven by the same blower with different pipes with valves to each furnace. I use gate valves, because they are all metal and can take the heat, and there really is insignificant pressure downstream of the blower. (Of course, I use a ball valve on the gas line.) To run the main furnace, I close the valve going to the small furnace and open the valve to the large one. It's really simple. When I use the long forge for the rolling mill, I roll it in position, attach the pipe, and close both valves to the other furnaces. The blower I have is an antique blower called a NoCoal, and it was given to me by Fletcher Coddington when I worked for him at Arrowsmith in New York. It's a little 1/10th horsepower AC motor. Unfortunately, being AC, I can't feed it with the dynamo. Beneath the gas furnaces is an opening in the bricks which is filled with ashes for annealing. A support rack pulls out to hold the ends of long bars in the fire. It can be put on either side.

-
It is unfortunate that we even think about the government looking over our shoulders and stopping what we're doing. We have come to accept that as normal. That is so damaging to society. We can't even add to our own homes without paying for permission. It's really troubling to me when I look at old pictures and documentaries of our nation's past, because I look at them and see all the great things that people were doing and how many of those things, which were a part of life, would be illegal today--from no porch railings to cars with low economy, Edison's light bulb, kitchen wood stoves, the fire trucks in use at the time and so on. If our government had been in existence as it is in 1800, we never would have entered the industrial revolution and been given a chance to contribute to man's great achievements. Factories never would have been built because the technology of the time was unsafe; tall ships would not have been allowed; steam locomotives never would have been built and therefore no rails would have been laid; the Wright brothers never could have invented the airplane; the copper mines in upper Michigan never would have been opened. The list of things today's government would have prevented goes on and on and on. In America today, we blacksmiths are not allowed to make the great iron railings for staircases which can be designed and installed in other countries and which once were made here, because we are now told there can be no openings greater than 4 inches. Our building code prevents it. Even our art is restricted. Fortunately, so far at least, OSHA does not apply to what a person does on his own property until a certain number of employees is involved. At this point, that number is greater than three. It was 30 awhile ago, but I don't know what it is now. My cousin was an OSHA inspector, and my shop is not in violation. Thanks for bringing this up, Notownkid. I think a lot of people are concerned about it.
-
It's okay to get a bit off track, Kubiack. I just didn't intend this to be a how-to thread, that's all. I haven't had the shaper all that long--just a couple of years--so I haven't really explored its potential yet. My shaper was made by Smith and Mills in Cincinnati, Ohio. They quit making this model in 1910 in favor of the more efficient (for machining) crank shaper. This one is a geared shaper, which means it's rack driven. A geared shaper has the same amount of power anywhere in the stroke, forwards or backwards, regardless of stroke length. For what I'm doing, that's better. Crank shapers have a fast return, and their power is different depending on where in the stroke it is. I really don't know what the potential of your machine would be. Just play with it and see. I tried to put a link to my video of the shaper you mentioned, with my wife bending arches, but every time it seems to want to embed it instead of just give the link. Then, when I submit my reply it all just disappears. Can anyone help me out here? I sure wish someone would make a belt driven computer! I'm including some picture of the shaper doing things other than just cutting flat surfaces. The last one is of the arch bending form in the video, but it's not too clear without seeing it in action. On the die plate to the right of the form, you can see an allen head screw. This is to eject the arches on the return stroke if they stay in the form.


-
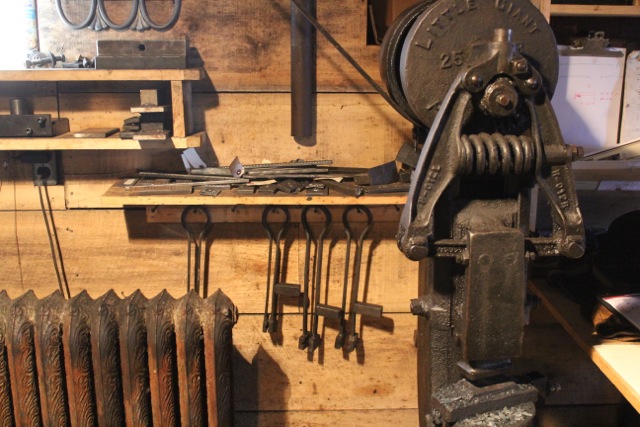
Thanks, Kubiack. Actually I use the 25 pounder at least 10:1 over the 250, which I've gone months without using. I like the 25 pounder for swaging, because it hits light and fast, and for drawing little things. The Hackney has amazing control, so it's rarely a control preference but more of a different animal kind of thing. The bulk of my hot work is with the Hackney, the press and the shaper.
-
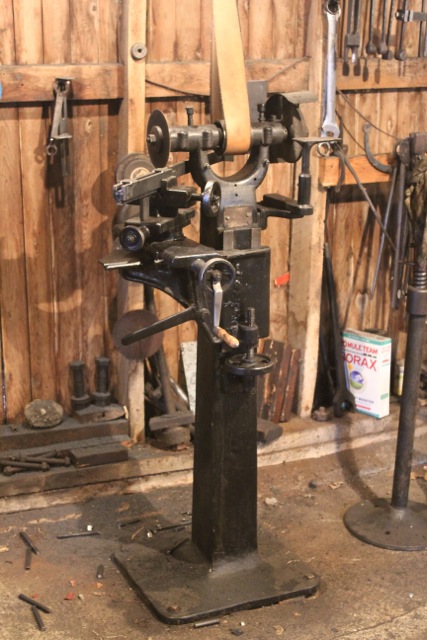
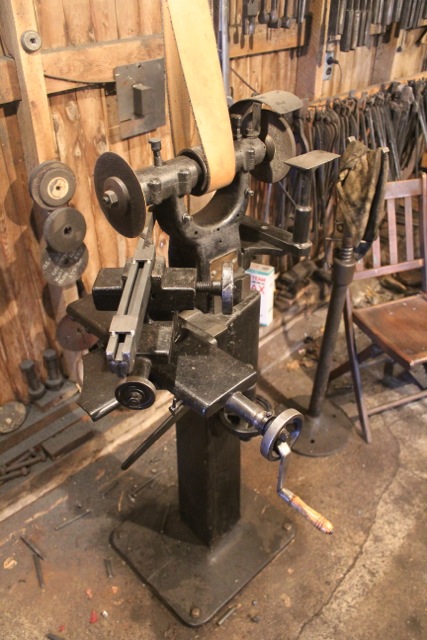
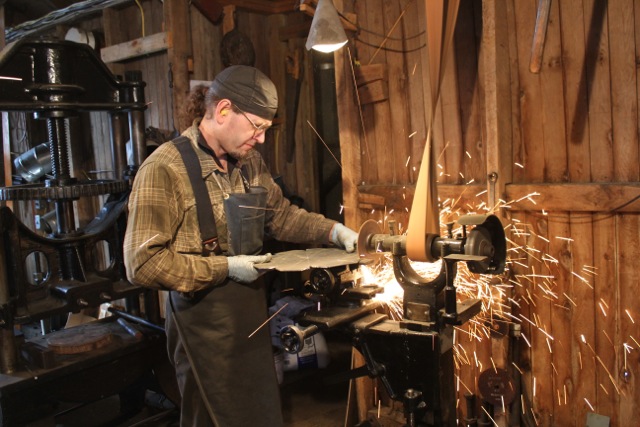
I'm gonna back up just a minute and almost leave the forging area to talk about a very important machine I use daily. It is a universal grinder that Patrick Nowak found for me up in Wisonsin. It has a table on one end with X Y Z and a vise built onto the top. To the X axis handle I have added a crank so that I can turn it quickly for cutting off bars with a cut-off wheel. Being able to cut with it is invaluable. It is very precise, able to cut at an angle, and it can cut hot material. Let's say you need to forge a bunch of short tapers from 3/8" stock, maybe 2" long. It's not practical to precut all the stock and be able to hold it and not lose the iron in the fire, so it's easier to forge the taper on the end of a long bar, cut off the finished taper, put the bar back in the fire and keep going. This machine, which is right near the fire, is perfect for that. I made a simple table that clamps in the vise so I can use it for sheet too. If you ever have a chance to find one, get it. Unfortunately, this is the only one I've ever seen, but there must be others out there too. It also can double as a surface grinder, though since I have one, I don't use it for that. The first three pictures show it with a 45º cutting jig for 3/8" square. In the second-to-last picture I'm using it to cut out a chandelier base from 1/8" sheet, which you can see in the last picture. I like a rubber snagging wheel on the right end for deburring. Joel


-
That's hilarious, Buzzkill! Thanks for saying so. I've been accumulating these machines for years, and they've come from all over the eastern US. It has helped that each one has a purpose, which keeps the focus, so it's not quite the same as a collection. I don't get things that don't contribute to my forging, and it's a good thing, because I'm running out of space anyway.
-
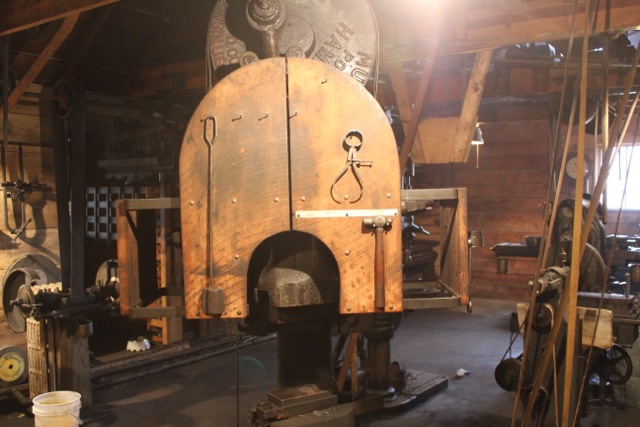
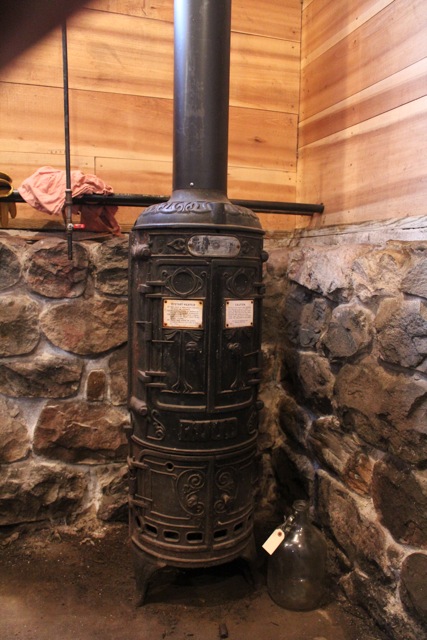
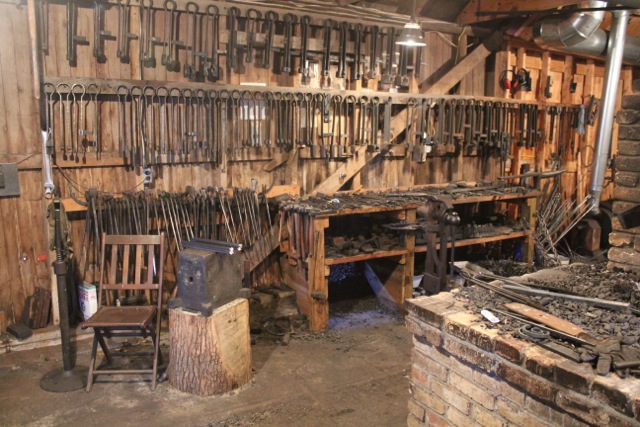
In the center of the shop are my forges. The main one, which I use the most, is a coal forge. This forge has a blower which runs off the line shaft at a continual speed. There is a blast gate to control the airflow, with two handles to control it: one on each side of the forge. My hot working machinery is located around the fire. These machines include: a 25 pound Little Giant, a 100 pound Hackney, a 250 pound Murray, a 25 ton toggle press, a 3 X 4 rolling mill, and a 24" shaper. There is also an anvil nearby, but I hardly ever use the thing except as a table. I think anvils are ridiculous and belong in the same basement as clinker makers. Even my center punching is done mostly with the Hackney. But that's another subject. I have three gas forges, or furnaces, too: one is a tiny single burner for itty-bitty stock, a biggish one for general forging, and a long one for the rolling mill. The long one heats up to 50" long, the general one is about 14" by 20", and the little one is just 4" by 8". I have not fired the general gas forge in two years--that's how much I prefer coal, which is cheaper and more versatile. There is a hood over the gas furnaces with an exhaust pipe connecting to a blower at the other end of the shop, run off the line. This gets the fumes outside, of course. The same blower also connects to my tumbler to suck the iron oxide dust outside. The tumbler is behind the Hackney, so I can drop parts into it when they're done. The Little Giant and the press are both 90º to the line, so there is a gearbox to get the belts to them. I forgot to take a picture of that. In one picture you can see the anvil on the left and, behind it, the wall of spring tools for the power hammers. The table beneath them is covered in single tools, and the lower shelf of the table is covered in swages and kiss blocks for the hammers. Beneath the left end of the bench is the coal shoot from the bin outside. On the right end of the table is a large stake. You'll notice the anvil is a saw maker's anvil. I do not like combination anvils. If I want a stake, I'll use a stake. Anvils don't make good stakes. I'll never understand the appeal of the double horned anvils people buy. They take up too much space and are always jabbing you in the thigh. But as I said, I don't use an anvil anyway.

-
The noise inside the shop is not much at all, Al. It makes a big difference if you have new belts or old ones, because the new ones just run nice and quiet and don't flop around. I wear ear plugs all the time I'm in the shop anyway, but visitors don't mind it at all and often comment how quiet it is. Now outside, it's a different story. That engine makes some music. I start it up on propane, and I switch back to propane when I shut down; and for some reason, when it runs on propane, it's several times louder than on liquid fuel. Don't know why. On propane, it can be heard for miles. I live about a mile away, on the other side of the block, and I have a little donkey at home, and he's learned that when that engine gets louder I'm gonna be home soon to feed him. He starts honking and braying just before I come home. He's a funny little guy. Of course, I can hear him all the way to the shop too, doggone thing. Maybe he's calling to my road horse, because they're best friends. I've tried different mufflers on that engine, but 750 cubic inches each blast is hard to tame.