
Everything Mac
-
Posts
1,299 -
Joined
-
Last visited
Content Type
Profiles
Forums
Articles
Gallery
Downloads
Events
Posts posted by Everything Mac
-
-
5 hours ago, SpankySmith said:
I am so insanely jealous of this work space. Can I come and visit for a while, just to drool over it? LOL, not gonna happen but a girl can fantasize can't she?!
You'd be most welcome Spanky.
I visited a local building site today and asked if I could rummage through their scrap wood pile. Came away with a full car load.
") Enough to build two work benches and begin a little mobile cabinet. Pics to follow next week.
Enough to build two work benches and begin a little mobile cabinet. Pics to follow next week.
All the best
Andy
-
Hi John, cheers for the comments.
I've sealed the join around where the pipe and the silicon meet, it rained today and I didn't notice any leaks. I'll just have to keep an eye on it.
I plan on making some wedges for the wheels but the front legs dig into the floor quite well so it will take a decent knock to move it. I don't wish to lower the forge as it was just too low for me unfortunately.
That's right there's no other support on the chimney other than the seal and the top of the canopy, this was an incredibly tight fit so I don't foresee any problems but that will be just another thing to keep an eye on.
All the best
Andy
-
Cheers gents.
Daswulf, there was a ladder to the left just out of shot. I had to climb that and shimmy over.
Cheers Frosty. The blue barrel is just a water bucket. The water level is just out of sight sadly. It's worked quite well so far but I have a buddy that works in a brewery that is getting me a stainless steel barrel.
The rubber bit was sealed down with screws and silicon just after that picture was taken. We had rain today and there was no leaks. It's supposed to be the "High temp" version but we shall see how it performs. It's rather closer to the fire than I would like but the building is quite low. Beggars can't be choosers eh?
I searched high and low for a metal flashing kit but had no luck at all. As ever it seems rather easier to get these things in the USA... :/ Oh well, we shall see how it goes. If it fails I'll have to get creative with some sheet metal.
All the best
Andy
-
So it was rather empty when you lot last saw it.

This is before I even really started to be honest.
I got the chimney fitted just a few days ago.


Which works just fine!

Put up my hammer rack:

Built a rather heavy if small welding table. This has wheels at one end so I can move it about easier when I need to. I actually put wheels on the forge too both to raise it up higher and to make moving it easier.


Every Englishman needs a cup of tea occasionally.


Theres an absolute mountain of things left to do but it's getting there slowly. I've been meaning to take my main anvil over but just haven't got round to that yet. My little 100lb Fisher anvil has been really earning it's keep the last few days.
I'll be building a mobile trolley/ stand / general shelf for bits and bobs at some point and I'll also be building a stand for my hornless anvil which will become a striking anvil for making tooling as it has the same size hardy as my big german anvil.
All the best
Andy
-
On 20 January 2016 at 10:33 PM, MrDarkNebulah said:
These have been really helpful. Great Job with the Videos. I made a fire rake using your video and it was a big help.

I'm so sorry it has taken so long to see this reply. MrDarknebula I am very happy to see you've made your own. That really is great! You've made my day.
I hope it's serving you well.
Things have been ridiculously busy for me recently but I'm hoping to make a new video some time in the next few days. Once things settle down again I can get back to the basics series.
All the best
Andy
-
That's looking good bud.
I'd like to see more pics of it running.
Andy
-
You could always put long material across the forge at a 45 degree angle - its not contacting the angle iron that way...
Andy
-
I can't comment on the tax to be honest Artfist. I guess ultimately if it's not worth it financially then it's not worth it.
What is the rate of tax?
Andy
-
I'll throw in my 2p.
Frankly gents who ever came up with the idea than anvils should be sold at a dollar value per pound was a genius. And he should be shot, as he has done nothing but screw over an entire nation and many generations of smiths.
Every time I see a thread like this, here and on Facebook, I am reminded that I am very lucky to be British. We have yet to attribute a value per unit of weight - I've seen 1cwt anvils sell for more than 6cwt anvils. Here an anvil is simply an anvil. The average price has risen in the last 5 years, almost doubled in fact, but I can still go out an buy several anvils for less than many in the US will spend on just one rough, delaminated anvil. These aren't rare bargains, but simply the run of the mill anvils I see on ebay and gumtree (UK version of CL) every day.
I've said it on here several times - people in the USA should seriously consider shipping an anvil from Europe to the US. Even with shipping it will still be cheaper.
Not so long ago I bought a German anvil, from Germany. It was £300 + shipping which was £130 once you included £20 for insurance. - so for £430 I have a pristine, high quality German anvil delivered to my front door within a week of buying it on ebay.de
So to put that in dollar terms - I paid $431 for a 250lb South German anvil + $186 to have it shipped. = $617
Granted shipping costs will be higher to the US, but I'm willing to be they won't be as high as many would think. I found the process to be quick and easy and I'd happily do it again.
Personally I'm happy to put money into decent equipment, but then I've been at this nearly 10 years and I know I can justify the cost. I also fully appreciate that most folks are on a budget and simply can't afford to throw thousands at a hobby they might either not enjoy or might not be able to do very often. As said above the idea that you need a London pattern anvil is incorrect and a simple block of steel will do 99% of what most people require from an anvil. And yet there is the overwhelming burning desire to get a "Real" anvil. Something we should all really move to rectify. Though it has been said here before that it is very easy to say a beginner doesn't need a real anvil whilst the majority of us personally own three or four anvils and simple let two sit in a corner just because...
My advice would be to accept the fact that the anvil market is not what it used to be. That you will be paying several hundreds if not thousands of dollars for an anvil. And that the chances are you will not find one for some considerable time. If I'm after a particular item then I have a price in mind and anything above that just gets ignored. Moaning that this anvil or that anvil is ridiculously priced gets you no where. Time to put on the big boy pants and move on.
Check ebay and CL, your local paper, auctions etc etc - check them every day to see what is around in your area. Get a tin and stuff $10 bills in it as often as you can afford to. Write anvil fund on that tin and don't touch it for anything (unless of course you seriously need to - who hasn't been there) and soon enough you'd have more than enough money to buy any anvil you wanted.
But what do I know, I'm just some British guy....
All the best
Andy
-
I'd still have a go at fabricating a cone if you can. I used the pipe / pie slice method which worked well enough though my maths were way off and the slices I made were too big. So my advice would be to cut very small slices to start off with.
John, it just occurred to me that cast iron tue's are conical for a reason. I had always assumed this was because it helped to circulate the water better, but is it simply because that shape would have been easier to cast?
Andy
-
We used centimetres mainly at school but I was lucky enough to use feet and inches when playing tabletop war-games so I'm quite happy to use both.
Anyway we digress.
Broads - I'm interested to know whether you will be fabricating a cone or just using thick walled pipe as it is?
Andy
-
9 minutes ago, Charles R. Stevens said:
Beg to differ, it's 212 degrees, what is this 100 degrees bunk?! ;-)
glad you jumped in Mac.

I'll start using centimetres if you're not careful.
 - That's a lie I only use millimetres when it's under an inch. Big stuff almost always gets measured in inches.
Cheers Charles. Part of me wants to complete that side blast build when I get time. Ended up buying a proper side blast forge though.
Andy
-
On 5 May 2016 at 8:33 AM, turbo7 said:
It looks to me as if the bottom of the chimney is surrounded by the bosch? If that is the case wont this heat your cooling water? To a point where the water wont be doing any cooling at all. Why not just go with a sacrifical tuyere instead of a water-cooled one?
Not true. Water boils at 100 degrees as we all know right. You can't take water beyond that temperature as it will just boil off and become steam. Therefore your bosh never goes above 100 degrees, which is still pretty hot but it is so much cooler than the centre of your fire. So as it circulates around the tue, it will cool it to 100 degrees or so. So in effect the water is always cooling the tue.
Have you considered making the design modular? I enjoy having a design that is easy to dismantle / reassemble. You could have a bolt together frame for your hood that you can strip down quickly and easily for example.
All the best
Andy
-
Have you considered making the tue iron longer so you can put the chimney in front of the bosh? That seems easier than trying to fabricate a U shaped bosh to me.
But of course that means a bigger overall foot print. - pros and cons.
Looks to me as though you have done your research, the plan looks good. If you are able I'd fabricate the bosh out of stainless. Or consider getting it galvanised. Burning it won't be an issue as it will never get over 100 degrees.
")
Failing that I'd planned on painting mine with a cold galvanising paint called Galvifroid. Then I picked up a "proper" forge with a cast iron tue and bosh so the self build went out the window.
Best of luck. I look forward to seeing it finished.
Andy
-
That's a down draft style forge if I'm not mistaken. Seems like a good price. I'd try and get both.
Andy
-
As Frosty says you don't "need" to have a side blast water cooled. It's not essential. Just get a thick pipe and accept you'll have to replace it every so often.
Using threaded pipe and short sacrificial nipple at the end will be just fine.
As for using anthracite, I found a standard hair drier would keep it running just fine. You'd struggle to keep it going for long with a hand cranked blower. You really need a constant airflow.
All the best
Andy
-
Sorry chaps been rather busy with a few things recently.
First coat of paint is up.


I need to figure out where the forge is going, fit the flue and then I can start putting in my tools.
All the best
Andy
-
Cast steel JB = John Brooks. Decent anvils, just watch the edges for chipping.
All the best
Andy
-
Cheers Dale.
I can't wait to get my hands on it properly when I get ashore.
Just agreed to buy this

Which rather scuppers my side draft build thread but I think I might continue with the build anyway just to show the process.
All the best
Andy
-
On 28 February 2016 at 2:45 PM, notownkid said:
- Super find after a long hunt. You find it or did it find you? As much time as you are away a new super HD frt. door might be on your list. Picture of the door isn't all that good.
I've never had luck painting a concrete floor that had been used any length of time, sealing has been decent usually.
Good luck on the new digs and a Wedding, Honeymooning at the Shop?

Well as you know I've been on the look out for a while but I fired out some emails to a few local farms and got a response back from the owner of this place. He liked the idea of having a blacksmith on site. The unit is certainly not without it's flaws but it's much bigger than my shed and at a reasonable rent rate so it's worth a go. It will mean I can get a good portion of the tools I have not previously had space for. A decent sized forge and a fly press for a start. If I can squeeze a power hammer in there I will at some point.
Honeymooning in the Maldives... in the wet season. :/
All the best
Andy
-
On 21 February 2016 at 1:43 PM, Kevin_Olson said:
That space is going to be awesome. Im curious as to how that odd sized building with cement block walls no less came to be. Why was it built like that.
The building is situated on the very edge of the property. Directly behind the angled wall is a short drop of maybe 6ft. Beyond that is a few houses.
Currently watching a couple of forges on ebay so that's a start. I can't wait to get in and get things started though.
All the best
Andy
-
I'm sat there thinking "Freon" that's interesting.
Looking good mate. Best of luck with the build.
Andy
-
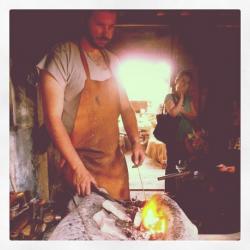
My apron was made from a whole goat hide I picked up on ebay about 8 or 9 years ago. It's only now starting to show the abuse it's been put through. I've changed the straps on it a few times though. Still a good few years life left in it.
The leather is quite thin, but has held up well. I'm not sure if I'd want to have thicker leather on my next apron or not.
All the best
Andy
-
6 hours ago, NickOHH said:
Now try to do it by yourself and that won't have seemed so bad.
")
Lol. We need power hammers eh!
All the best
Andy
New workshop
in Building, Designing a Shop
Posted