Melchior
Members
-
Joined
-
Last visited
Everything posted by Melchior
-
I will post a video, and also some pics of course. :)
-
Oh, the KA75 seems like a really nice hammer. I was also thinking about the pressure. I have a max of 16 Bar from the compressor. But need to check if the hammer needs less. I will also build a small room for the compressor, tank and propane bottles outside. Much nicer without a compressor roaring away in the smithy. But that is a later stage. Firstly I need to get up and running. Ahhh, dreaming about all the nice project to be forged in that hammer. ;) /E
-
I am very giddy. :) But as always it is difficult to get free time that can be invested in the smithy. I will try.. as always. :) /E
-
It surly is difficult... So many prioritized things that needs to be done before... but sooon... :)
-
I have waited for over 2 years to put the hammer inside the smithy. Family situation prevented the work to be done. It seems like it did not get too damaged under the plastic cover... 2 Swedish winters outside takes its toll. The red cylinder is an extra air chamber so I can run the hammer for longer periods. I am really looking forward to start working some steel. :) If you are interested, the hammer is a Swedish Sönnerviken, approx 40 kg of hammer weight. It weighs about 600 kg. More photos will be posted when it is time to put the hammer in the upright position. Need to figure out how first. Cheers /E
-
-
-
-
Here is a good introduction and how to. http://www.fredeenblades.com/patternwelding.htm
-
He will have a nice piece of steel to work with. But he will start out learning to grind on some mild steel first. :)
-
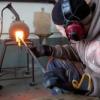
Did a pattern welding session with a friend that is just starting up and wanted to learn a bit. Started out with 8 layers (25x24x120 mm), used a large sledge hammer, sure missed the machine hammer. :) Did two folds (even though only 16 layers are visible in the pics). Interesting to do welding in ejector gas forge instead of a forced air. The heat areas are a bit different from my own. But it worked really well, and did not use much gas (judging from the ice on the tank (P45) ). I hope that he will make a nice knife out of the bar that we made. Here are some pictures:
-
That is really nice!
-
Understood. I think I understand the general idea regarding efficiency and tuning. So I will start with properly insulating the forge using the refractory cement and also try to change the bottom protection plate to something that does not absorb so much energy. Thank you for the information. /E
-
Good point Thomas! I would like to run the burner at the optimal efficiency, eg. as much heat per kilo of propane as possible. Forging knifes. I need as little scales as possible so I want to run it a little rich. Is is so that I need to change how a perceive the efficiency of the burner, it is already efficient in almost all the settings (except when I am reducing the air intake to much and no "jet" stream is formed)? So the most "savings" would be a result of running the burner on as low pressure as possible? /E
-
Ah, great information. Just what I wanted. But one thing eludes me, what do you actually want to call this type of burner? Ejector burner seems to be the closest name for it if I understand the information that you have given. Here is a video of when I am tuning the burner. Notice how to burner sounds different and the flame changes. What would you say is an ideal setting for this burner? Can you note the time in the video where it runs as "it should"? Slightly rich mixture to prevent oxidation.
-
-
Hello, a college of mine wanted me to make an olive tree cutter. This is the result after grinding. I am a bit uncomfortable with the lines. It is ready for hardening. He wanted a rough forged surface, that is why I have kept the peening strokes on the back for the "axe" part. I am going to make a handle for it in oak and soak it in linseed oil. I am going to rivet the handle. I will see how that goes. :) First time.
-
Hello, The T-Rex came unassembled with instructions on how to assemble and tune it. The flare setting did not make much of a difference at 10PSI. So I set it to the recommended setting. Then I tried to see changes in the burn when moving the nozzle back and forth, but this did not make any noticeable difference, so I also set it to the recommended setting. My forge volume is about 300-350 cubic inches. So it is working nicely without any indications of back pressure. It did weld at 5 PSI so I do not think I am much off on the settings, but I am not sure. So the correct term for this kind of burner is "Ejector type" or "Naturally aspirated burner"? Why is it not a Venturi burner? I am curious, I have googled it and it seems like the Venturi effect is achieved when the tube has a "waist" in it to force a change in the pressure. I will post pics and better videos tomorrow when I am in the shop again for another go at the tuning. The first video I made did not get the brightness correct so I could not see the flame characteristics. Thank you for all the input.
-
I will add some refractory to get the efficiency up a bit. Then add a door using soft bricks as you recommend. I do not want to open up the back door right now. I prefer a bigger front door. But as you say, it may be necessary to add an opening. The Kast-0-Lite is really interesting, I will try to get my hands on it here in Europe. Many Thanks! /E
-
Hello, I just started up my new T-Rex burner from hybrid burners and tried to tune it. I am new to venturi burners, I have a blown burner setup for welding. How am I to attack this new resource in term of tuning and control? What is your experiences? I tried to tune it yesterday, but I did not see so much difference in the flame that I expected. Moving the flare and MIG tip does not really change the flame and sound much at all. I could not really see any "sweet spot". The T-Rex is an amazing piece of burner, I ran it at 40 PSI for a short period of time and it dug a big hole in my insulation blanket. So I need to reline it already... :) It also seems like the bottom firebrick I am using is absorbing a lot of heat so I need to change it to something better. Also I need to add the refractory stuff and sort out a front door of some kind. Everything to save fuel and heat.
-
-
-
Hello all, thanks for your replies. Dodge, you are correct, it would have been much better to run with a tested design. I built it because a friend in a swedish forum had successfully built one similar and when I saw Daves howto movie I thought it would be safe to build one. Phil: I centered after that picture was taken, so it was as dead center as possible. I am using 3/4 inch pipe. 0.8 mm nozzle. I had the impression that I needed a smaller tip.. but that may be wrong. Fatfudd: I have not tried to move the nozzle, I positioned the tip 1 cm over the last hole because the burner that I used for a reference had it there. But it also had one of those sliding chokes that I do not have. So I will change the position as you say and mark the max and min. Do you think it will be dangerous to pull the nozzle out to much? I do not want it to start burning outside the burner... Should I do this test outside the forge or with the burner positioned inside it? timgunn1962: It is as you say in the video. I restrict the airflow, unrestricted it and the burner burns just fine until 15 sec. I do not think the flame went up into the tube when it started to stutter. Dave: Nice of you to post here, it was your video that made me go for this design. I have been planning to build a burner for several years, and when I saw both my friends build and your tutorial I thought that I need to start testing and not keep on just planning and reading up on burner designs. The big problem here in Sweden is to get all the proper parts for a burner. The parts are dirt cheap but the access to it is crap. I think I will try to tweak according to your recommendations and then if it does not work, either buy a T-Rex, shorty or a z-burner kit. I need this small forge to be my "workhorse" when I forge the shape of the blades. I will not do any welding in it. So I may remove the shelf and only use wool for saving heating time. Thanks again for your help. I will post more test results after I been on vacation for a week. /E
-
Hello, thank you for your comments. I have read almost everything on that site, but the amount of information is massive. :) I have built it by combining the information from different types of burners. Not exact plans. The problem is that in Sweden we are metric and not all the different bushings and assemblies are available, so I had to make some changes to the different plans that are available. This is how the burner looks: This is the air intake: And I am running the burner at about 19 PSI, approx 1.2 Bar. I use a P45 (45 Kilo) propane tank. I have a adjustable regulator. When I turn up the PSI it does not stop stuttering. It only starts doing this when it is hot enough. This a movie of it running in free air. http://www.youtube.com/watch?v=EslQd7DamLg&feature=plcp I forged the flare, so it is not a scientific 1:12 ratio. But the flare "sticks" properly to the burner even on high PSI. Thank you for your help. /E
-
Good luck with the forging. I think you are doing the right thing. Btw. Just as a tip, try to implement a gallery function on your home page (example Highslide), I tried to look through the gallery and it takes a bit of time clicking on each thumbnail and then "back", instead of having a gallery slideshow function. Cheers /E