
metalmangeler
-
Posts
685 -
Joined
-
Last visited
Content Type
Profiles
Forums
Articles
Gallery
Downloads
Events
Posts posted by metalmangeler
-
-
I started making integrals this winter and have been experimenting with making them with guards. I am pretty happy with this one though it does have issues. Mark

-
I have just recently changed the way I am dressing the flat side of my rounding hammer, or some of them anyhow. On the flat side I have used square faces for about 20 years and I still use round faces as well, the square are better for drawing as Brian stated and the round are better for freeing punches and I like them better for vaning leaves. I am now grinding some like this, It makes a hammer definitely a right or left handed. So far I really like this but it will be years before it could ever be my most used hammer.

-
I would only go if the instructors were very experinced. I mean 15-20 yrs. Some schools use just graduated students as instructors. I normally expect a new farrier to not be able to see medial/lateral balance or imbalance for about 4 years I would not expect someone with less time than that to be able to teach. Although they may know how the nail will travel, and some of those types of things. You are investing both time and money in your future do it right.
-
Hi Brian, I'd be glad to try making one that size, I think I should be able to do it. I will look into getting the right size steel. If I send you something I could get some real feed back as you will be able to see it much better. Mark
-
The largest one is just over 4 1/2#. I did make my tooling. I use a power hammer most of the time and I don't have a striker, so some things needed a little modification from their tools, but not much I should have made a new punch like Brians, but I used one that I already had, but it has a flat end. I could bring some to the meeting.
-
Brian and Lyle were up here last summer teaching and I finely got around to making some rounding hammers. They put on a really good clinic, I highly recommend them. Mark

-
Looking at her tool box and the nail ends on her stand magnet I think she is likely a farrier holding the hoof with her hand as much as she does I would guess not that many years of practice.
-
A62rambler I am just impressed that Lyle is using such a hammer. I am confident that he is moving metal in style. He and Brian were up here last summer really a great team, I finely got around to makeing some hammers like they demonstrated I will post a picture soon, if you get a chance be sure to go to one of Brians clinics, the only thing I would recommend more would be to go to 2 of them.
-
Lyle it looks like you need as longer handle on that hammer to ballance it out some.
-
I tried a tip jar last summer at the fair for a few days, for me I think that giving up the space on the counter did not pay as well as having more product there. Maybe if one of my girls were forging it would work.
-
With a lot of the tooling I use I need to make a setup die that is used before the finished die which is what I think you are talking about. Often the setup die is more work than the finish die although few people would appriciate that. If you have the finish die in hand I would try it and see what you get, then I would hand forge setups to put in the finish die when you find the right setup make a die that will make that. That is backwards to how you should do it, the normal way would be to have an element you are making by say hand, then make dies that make each step you want to forge under the hammer. I think this is what Finn mentioned only it was a complex spring tool.
-
Ciladog thank you for your post I tried to post some pictures of more power hammer options to speed up the process, my last attemp failed so I won't bother with so much written info on this one. Hopefully the pictues if they work will be self explanitory. I use 2 hammers which helps to get more done in each heat.
Wild sheep have short upright faces.
I use a wedge to taper the horns as the first step.

then a double swedge to start divideing the horns the example is poorly done.


I bend my face without cutting or welding and try to keep the face short. and narrow nose
Then I use a face swedge, this needs to be made for each size stock that will be used, it is just a well made face driven into a hot block.


I texture my horns with a set chisle only I swing it as this speeds up the process, it is not as exact as what you are doing though
In addition to the scrolling tongs I use some tongs that reach across the curl of the horn to help close straight sections. I do this out of the gas forge rather than with a torch.
-
Your shop looks great, well ventilated.
 We have been a little colder than you lately but my shop is not that open. It looks like you are useing a coal forge, I use gas and that heats my shop, even with ventilation. I am not sure how coal would do but if you just put canvas around the open areas above the pannels I would think that it would heat up enough to be pretty nice in there. I do use a fan to blow the air down from the cieling during the winter. I have it wired in with my lights for the winter. Then unplug it when it warms up. If you do not have lights use white canvas it lets lots of light in.
 -
I also would look at a topic just to see what Grant had posted. I will pray for his family.
-
They look pretty good for a first pair to me. You will no doubt get better as you go.
-
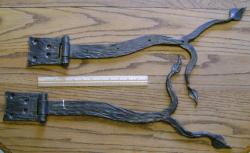
Hey Dave hinges always take longer than I think that they should. It always looks so simple anyhow you want to be sure to rotate your hinges to make sure that they swing true, otherwise sometimes they can bind when mounted on a door and door frame. In my oppinion having a little slop helps as well. I normally wax mine this helps with the lubrication, but since they want them to rust you might just put some oil so they move nicely. They will move better when they mount them to a lever, I mean door. It looks like they are coming out pretty well. I hope you are getting enough for the job.
-
I too am sorry to hear of your loss Glenn. I will pray that the Lord will comfort and carry you. Mark
-
If you have a thread that only states what is for auction and people state that they are bidding on such and such item it could draw to the auction and if someone did not want to bid against someone else that is thier perogitive. Seems like it could go both ways. Normally the more people that know about an auction item the higer the price will end up.
-
I think that the reference to nails is how many penny weight they weigh per nail. I am sure that it does not completely corrolate now as it seems to only be a reference to length now.
-
Hi Dave
I haven't been around for awhile, but I just saw this. You should have a regulator between your compressor and your hammer normally just before your oiler. If you adjust the pressure to less than your compressor kick on presure you should get consistant blows rather than having hard blows when your compressor is fully charged and weaker ones just before it recharges. When this is adjusted that way then your roller can be adjusted to the right hight as it should be consistant unless you are drawing and exceed the capabillity of your compressor. Maybe this will help some. I am glad to hear that you are using your machine some, if it were here and I were making S hooks from anything from 3/16 on up I would use the air hammer. You can make a wedge and draw a consistant taper on that small stock. That wedge can be held in place like I showed you with the tool holding dies or you can just trap it in a box and hold it under the flat side of your combination dies. Flat dies are much more versitile than comb dies. -
Hey Teeny if you work off the far side of your anvil the hardy will not be under your hammer hand and it will be safer. I am assumeing that you are working on a London pattern anvil. Show me a few nails at our next meeting. Mark
-
Right the advantage being that instead of buying a chunck of toolsteel 2-3 inches thick for $$$$ you can now use a much thinner chunck which you likely can find lieing around disguised as a truck axle, or what ever. Shoot if you had crossed the road at a worse time you might have some extra ones now. Though I must say I am glad you don't have those particular ones available. Become a friend of the heavy equipment repair guy or the farm implement guy and you should be set. Some junk steel really needs no modifications only weld it on and go, and of course the reason I brought it up to begin with you can weld it on to your base at whatever angle you like, I just would prefer to add to my tools rather than sacrifice one to get another.
-
 Hello Dave after looking back through part of this post I see that you have combination dies on the hammer so you certainly did not get one turned around. Sorry I just was not paying close enough attention. Anyhow here are the pictures of basically a booster seat for putting very short dies on the advantage is that they are much less expensive to make and you can weld them to a different angle if that ends up being what you deside to do in the future, you can make the booster from mild steel. make it as large as is practical so that you can make your mounting holes more spaced out. I will also attatch a picture of a few die ideas.


-
Hi Dave after reading through this I am wondering if your die alighnment could be corrected by rotating the top die 180 degrees like John said?
If you deside that you want to have your dies at an angle reather than square to the machine I would think about making a base that you can make dies for that bolts on to the present mounting system that way when you are finished with your work you end up with more options not just different ones, if I don't forget and I can remember how to post pictures I will take some tomorrow so you can see what I mean. This system really only helps if you are doing fairly large runs of the same item rather than one offs.


integral with guard
in Knife Making
Posted
The wood is just stuff I had here for other purposes. It is walnut I have left over from a gunstock that I plan to make but haven't and an end of hickory that was from a board that I used for hammer handles that was to long. When I make less mistakes and am more consistant in my handle making and fitting I will upgrade that aspect. I have some carabou and moose antler that I will start useing soon, and some nicer wood as well.