Torin
Members
-
Joined
-
Last visited
Everything posted by Torin
-
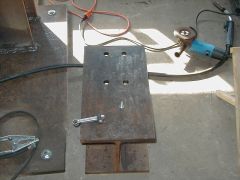
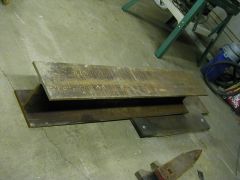
Ok, I was able to get the 27" long chunk of H-beam cut down to 18" using the big 20" saw at work. Also cut off some from the 4" square ram. 2" of it for the air cylinder adapter and two 1/2" plate for the dies to be welded to. And the ram guide got 2" cut off of it. However when I was welding nut onto the ram guide it finally hit me that I've been spending too much time with the welder. I didn't need to weld them on, I should have just drilled at tapped the holes. Given the size they are now, I can probably go with 9/16"-18 bolts, but given that they are $3 each from McMaster and I can get 3/8"-16 bolts for nearly free, I figured I'd order another 10" chunk of tubing for a new ram guide and do it right. I got the H-beam spacer drilled for the 4 bolts that the ram guide will have on that face. They are 7/8" so I should have plenty of room to adjust for ram placement. I then welded a small chunk of rod onto the H-beam and lifted into place with the engine hoist. Once in place I clamped it, but left the hoist hooked up, just in case. Then I stitch welded it in place. However I still need to work on my vertical welding, as I kept having the weld bead drop to the floor. So I still need to get more welding done on the spacer to build up the initial weld. Also, I need to get the square cut out on the U-channel for the air cylinder mount. And I need to start working on the anvil sleeve for the anvil die plates.
-
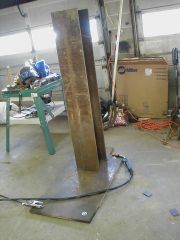
More detailed information tomorrow, but I did get a fair amount of work done this weekend. All the cuts that were needed to be made were except for a square cutout on the u-channel. When all you have is a screwdriver, all your problems look like screws. Figured out an error in my thinking. And here are some photos.
-
-
-
-
They are called oil skimmers. There are belt styles and wheel styles. You can go to MSC Industrial Supply and type in "oil skimmer" in the keyword search box and have a bunch pop up...
-
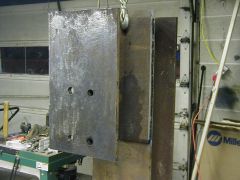
Steel arrived today. Ram, U-channel, sleeve and two plates. Got all the steel now. Just need to put it together.
-
-
Well, it looks like all the steel is due to arrive today. I'll take pictures when I get home. I'll be able to get all the cuts but one done this weekend. I'm still looking for a good local plasma cutter though. I'm thinking of calling the one place I know that does waterjet cutting and see if they will do it.
-
Well, I think I'm going to get the switch and the 5-way valve from The Blacksmith's depot. I'm not sure if it is the best deal out there, but it seems to be reasonable. The 3/4" NPT version fo the Versa valve I see out there with a few hammers is $435 from my local distributor. Given that I hope to be buying a new hammer in about 5 years, I think I'll go with this level. I think I can probably get the rest of the parts from McMaster Carr.
-
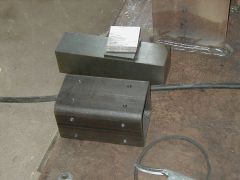
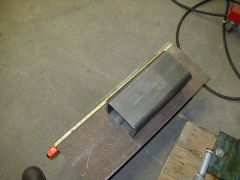
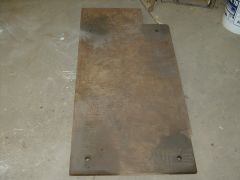
Well, it looks like I messed up by an inch on one dimension. Not a big deal, but it means I'm not going to be able to line the top of the two pieces up flush. Not a major problem, but annoying. The picture is of the ram spacer and the ram guide. I think I'm going to cut 2 inches off the top and leave it with 10" of ram guide. That should give me enough room to move the roller switch around for tuning the hammer blow. The ram guide is going to be lined with UHMW polyetheylene, in 1/2" thick sheets. It will be 4" wide and have 4 screws holding it into position. I'll drill holes about 1/2 way through the UHMW for positional holding. I'll be drilling corrosponding holes in the guide so that I can weld nuts in place for the screws. I should be able to get that done tomorrow. I'll also need to drill holes on the spacer so that I can get to the screws on the backside. I'm still trying to get a Versa VPP 5602. The dealer I called said the switch doesn't show up in their inventory s he would call the factory. I hope I get an answer tomorrow. BTW, does anybody know if the 5 way switch with 3/4" NPT ports listed by the Blacksmith's Depot is any good? Well, I should be getting to bed soon. Oh, and the part of the H-beam to the left/below the ram guide is getting cut off as well.
-
-
If I've got my mind wrapped around how it works properly, too fast would be a disadvantage. You want a slight delay in the action. Because when the ram moves up past and activates the roller switch, it is telling it to send the ram down. Once it goes down enough to let the switch move back into the open position, it is telling the cylinder to move up. So, a slight delay is actually a good thing.
-
I would definitely appreciate that. You can send it to [email protected] I can open most cad drawings. Thank you!
-
You can take exit 78, or 81 depending on which way you are going. About Us
-
No problem. I'm planning on taking pictures of the construction stages. I'm kind of leaning to the standard Kinyon control system. It took me a little bit of thinking about it to get it down as to how it works. This was from watching the video of the Coleman controls and how fast the switch works there. However it looks like there is a moderate amount of extra work with the Coleman system. I'm also going to be using a square tubing (with 1/2" wall thickness) for the ram guide, so I may have to cut down the 12" long section of it to have enough extra room for the control switch to work on the ram. I also need to track down somebody with a plasma cutter so I can cut out a square out of the U-channel that I'm mounting the air cylinder on. That way I can pull the ram out once it has been assembled, as I would like to be able to welding the U-channel on top of the H-beam spacer. Edit: Also think I'm going to run the dies at 90
-
It isn't that close to you, but Humphrey Charcoal is in Western PA, and they make quite a lot of it. Their website is: Humphrey-Charcoal and you can order pallets of charcoal for not that much. 600 pounds for $225. Their charcoal is good for forging, and they let us pick up from the factory when I was helping out on Flaxy's iron smelting runs.
-
Working out the dimensions now. Still not sure on how I'm going to do the control system yet though...
-
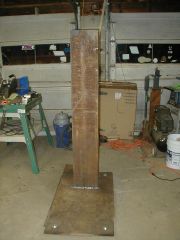
Well, I think I can get my Kinyon hammer finished in the next 30 days, so this is my thread to hold my feet to the fire. I've got the baseplate bolted down and the main upright welded. I've got a few more chunks of steel on the way, and almost no air plumping parts except for the cylinder and the compressor. Here is what I have done Suggestions for how to do the plumbing and controls cheerfully accepted.
-
-
-
-
-
-
Hey, if you find any, I'd be interested in one. I managed to get my hand on about a 3-4 ounce sample of DU, but I'm looking for something larger to go with my 4# chunk of tungsten alloy. And yeah, the dust is nasty, so no grinding or cutting without proper protection. The radiation is just alpha, so as long as you don't eat it or breath it, your skin stops it.