Torin
-
Posts
214 -
Joined
-
Last visited
Content Type
Profiles
Forums
Articles
Gallery
Downloads
Events
Everything posted by Torin
-
-
-
-
-
-
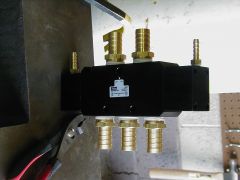
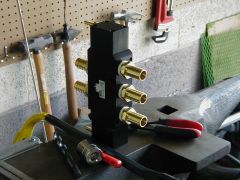
Well, the local Parker rep hasn't been able to get the 5-way 2-position valve in yet, they are still trying to get it expedited. However Blacksmith's Depot does have it in stock now (probably got the only one in the warehouse) and reopened my order and will have it to me by Friday. This means I'm still on track. (Even though I didn't get any work done last night...watched a movie with my wife.)
-
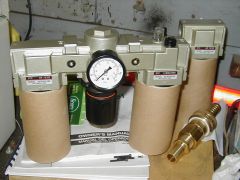
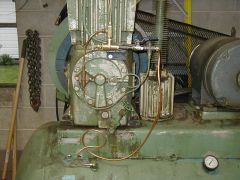
Then I wound up spendng most of the day today working on the compressor. The problem with the compressor is that I need it to run continuously, and it didn't have everything it needed to run unloaded. I ordered the parts in , and after some juggling, I got them all. Well, the drawing of how to hook them up included some pieces on my compressor that were from later models. So I wound up making a mounting bracket for it. In the picture, everything that is shiney or unpainted grey is what I added on. So far it seems to be working ok, and I don't seem to have any leaks. This was the part I was worried about most. But it is now done. Oh, I finally took a look at the power meter while it was running...pretty scary...
-
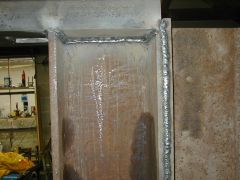
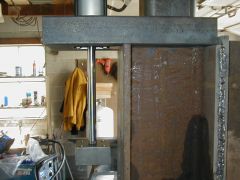
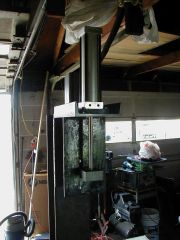
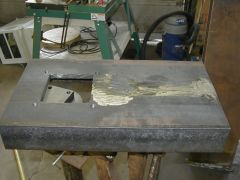
Sorry it has been so long since the last update. I've gotten the pass-through hole cut for the ram, but it took forever using cut-off disks on a die grinder. Then after it was cut, I had to grind down the ridge on the u-channel. But it is good now. It is starting to look like a real hammer now. However, I had to widen some holes I'd drilled because they didn't quite line up right. I probably should have done them on the mill at work with the DRO, but I didn't want to spend that much time at work. Then I found out that the top of the H-beam spacer wasn't as much of a perpendicular cut as I thought it was. Looks like the rod tapers 1/8" towards the spacer. But the nice thing is a 1/8" spacer under the U-channel makes it parallel again. I'll just weld it in place.
-
-
-
-
-
Black hot is still hot.
-
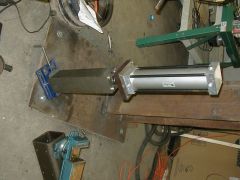
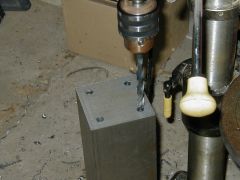
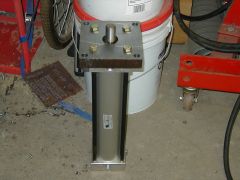
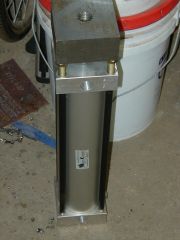
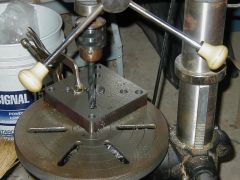
And here they are with the cylinder, and a picture of the ram being drilled. Oh, and the parts for the compressor arrived, and the vital part was the wrong one... :(
-
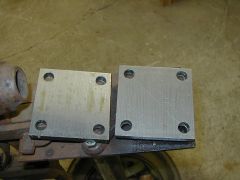
Well, here are the die plates And the mounting plate for the air cylinder.
-
-
-
-
-
-
Hole saw. And I got it most of the way with the HF press, and then moved on to a regular electric hand drill to finish with the saw so it wouldn't mark up the table. I should be getting a few picture tonight to update with.
-
Well, the drilling is going well. However, the belt on my cheap HF drill press was wearing out. It was literally about half gone. And my experiences with ordering spare parts from HF meant it was probably going to be at least six weeks for a replacement. But I was able to find a replacement belt at a nearby auto parts store. Even though the staff was sure they didn't have anything that would work. Drill isn't really slipping anymore. However, I'm working my way down on hole sizes. The 1 1/2" hole is done and I'm just about through with the 9/16" holes. Then I've got 27/64 for the 1/2"-13 tapped holes. Plus whatever I need to do to drill out the corners for the ram pass-through hole. I'll be cutting it with 3" cut-off disks using a die grinder. Amusing fact of the day. Home Despot will sell you the disks, but they don't have an arbor for it. Also, just called and the local air tools place has 3 of the 4 parts I ordered in. They are still waiting on the 5-way valve.
-
Well, this weekend has been one stumbling block after another. Mainly dealing with trying to borrow a tap wrench from work big enough to tap the 1"-8 hole for the cylinder rod. Well, that is done now, and in a few minutes I'll head back out. Boy it takes a bit of effort to hand-tap a 1" hole. I think I'm going to use the big cut-off wheels used with a die grinder to cut the pass-through for the 4" ram. The pass-through is so I can take the ram off once it is all assembled. Without it, I'd have to weld things so they wouldn't be removable. But I'll drill the corner and then use the cut-off wheels to connect them. Also, for the cylinder rod, I'm going to go with a 1 1/2" hole saw. I've been using a lot of cutting oil already on this. The ram guide is drilled and tapped an ready to weld in place, though I'm going to wait until I can mock it up in place to make sure of the alignment. Well, I'd better get back out and drill some more. Thanks for the interest everbody.
-
I was thinking about doing the drilling and then the slabbing off, but 2 things worked against that. 1, the time to be able to use the saw came up faster than I was going to have time to do the drilling. 2, I'm going to want more than 1, or even 3 sets of dies, so I figured I would go ahead and just try and do a good job of drilling from a template. Plus the drill press I have only has about 3" of travel, which makes drilling deep holes really hard if I also want to get any precision as well. I also appreciate the heads up about only needing 2 bolts. That will let me make sets of 45
-
Well, I'm still hoping to have it done by the end of this month. That was the deadline I've set myself. The pumbing has starting coming in and I hope to have it all by the end of next week. At least that was what I was quoted. Also, for those that wanted the part number for the 5-way valve. It is a Parker brand, and the number is: B844000XXA I really haven't gotten anything done in the last 3 days due to the heat and recovering from not being able to sleep well durring it. We have no A/C in our house.