2703adam
Members
-
Joined
-
Last visited
Everything posted by 2703adam
-
Ok, here goes.... This is my first shot at forge welding. I love san mai knives and wanted to do one of my own so this is what I did. I started with a rail road spike, cut the head off of it. Then I stretched it and widened it a little. Then I hot split it length wise and made it like a V. My piece of 1095 I heated and beveled one side then put that in the V shaped railroad spike and forge welded it together. Man I must have tried 3 times before I got it to take. I didn't let it get hot enough at first, so I put the spike in first and after a while I put the 1095 in so they would get to temp the same time. After that, success. Well here are the specs: OAL 13" Blade length 8.5" Scales White Corian (like for counter tops) pins Stainless tubing. ps. I am by no means a photographer, so I apologize in advance. ;)
-
Hi guys, Well, after spending six and a half hours forging out a san mai 9 inch Chefs knife, I realized I need a forging press. Since money is tight I think I'm going to either build one or make something work. Now comes my question... Sears has an electric hydraulic 7 ton log splitter for around $398. This is much more feasable than $1000 and up, so do you guys think 7 tons would be enough to do some light pattern welding and drawing out and such? If not, why, and what is the minimum tonnage I would need. Thanks, Adam
-
looks Amazing! I can't wait to see the finished product.
-
Thanks for the tips guys, I'll definitely keep that in mind on my next one.
-
This is the first high carbon blade that I have forged out. I have done several rail road spike knives and forged out other stuff, but not a high carbon knife. It was for a friend of mine. The blade is 1084 steel, that I quenched in oil and tempered to a medium straw color (almost 400 degrees by my oven) in three seperate one hour intervals. The black ring on the handle is water buffalo horn, followed by some kind of oak that I got from a cabinet maker friend of mine. Finally, the brass at the butt is some bullet casings that I "recycled" (melted them down and then cast a billet). I hammered the bevels in and they looked pretty good until I started sanding the blade...Oh well, you live and learn I guess. I also soldered the butt cap onto the tang, I'm not sure if this is the best way to keep it on or what. I didn't get the gap all the way filled too so you can see a little bit of a gap. I guess filing it to fit tighter would also work... Thanks, Adam P.S I would love to hear any hints, tips or suggestions you guys have.
-
Thanks guys, That plistix looks very inviting for the price. I'm gonna read up on it a little more but I think that is what I'm gonna go with. -Adam
-
hello everyone, I am in the process of building a small freon tank propane forge. I am trying to keep costs as low as possible on this thing. The forge is basically done, I just have to insulate it. I have the kaowool already and I now need some itc 100. I was just wondering if you guys know the best place to buy it for the best price. Also, how much do you think I'll need? Oh and if anyone has enough left over from one of their projects I would be glad to buy it from you, if you can take paypal. Thanks, Adam
-
Great job on the handle, that's going to turn out sweet!
-
Hello everyone, I have a question, but before I state it please remember that I am still buy a lowly noob. I have seen some impressive knifes on this site, some of which have WIP either in the title or description. My question is what does wip mean? Is it the metal composition or style or what? Thanks for your answers, Adam
-
Has any one tried to crush sheet rock and use that in a recipe? I put my torch to a piece of it and it seemed like it was somewhat insulating. Just an idea...
-
I finished up my third knife tonight so I wanted to post it to see what ya'll thought. I was just experimenting with the serrations. The main reason I made this knife was just to test out my home made micarta and home made mosaic pins. By the way it slipped out of my hands twice while I was buffing it, so it got kind of nicked up. Oh well, its character :)
-
They are just caps over some pins and everything is epoxied together.
-
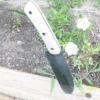
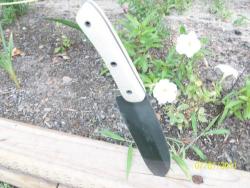
Hello everyone, this is my first post on here. I have only been making knives for a few months now and I have to say that this site helps a lot. I read the posts all the time but have never posted. Anyways, here are my first two knives. The folder is one that I copied from a guy I saw on line, it is supposed to be a primitive friction folder minus the screw I had to use as the pivot pin. The handle is deer antler and it is now polished to a gloss finish. The second knife is one I made for a friend of mine who went to Afghanistan. The scales are cumaroo a.k.a Brazilian teak. the pins are .40 cal casings. I am currently working on my third knife that will have home made micarta scales and some mosaic pins that I made.