mammooth
Members
-
Joined
-
Last visited
-
I'll chime in just because I rarely see people from PA on the forum- I'm in New Cumberland- if anything local is being organized. Also- I'm looking for a new anvil in the vicinity of #200 or so- love to find one local!
-
Thanks, irnsgn. I don't see any pins, and I don't see any way to grab the shaft to unscrew it. The ends of the shafts at the gear end seem peened. I realize I may just have to leave them on. Any other ideas? Thanks!
-
Hi all, I'm refurbishing a post drill, seems to be unmarked. I'm having trouble removing two of the gears for cleanup. I don't see a way to take them off, so I've attached some pics... Any ideas would be greatly appreciated! Thanks!
-
Here's a link to the 3D warehouse where my model is posted to be shared: Two-Way Guillotine Tool by mammooth - Google 3D Warehouse If that doesn't work, go to the 3D Warehouse and search for "guillotine tool:" 3D Warehouse Mammooth
-
Hi all, Just in case someone is interested in using 3D (and free!) software for smithing plans, I've been using Google Sketchup for months now. It's totally free at: Google SketchUp - Download I've attached a guillotine tool I designed, borrowing from several other designs. I'll see if I can attach the Sketchup file. If you open it in the free version, you can rotate and pan around the model. In case that doesn't work, I've also attached a jpeg. Mammooth
-
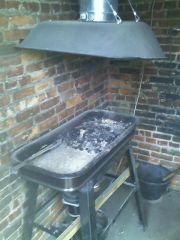
Thanks, Glenn.. you're right on about the smoke. I can set the height of the wheelbarrow by adjusting the cables that hold up the hood. I'll check out that anvil, thanks!
-
Ted, It's 90" X 90" outside, 73" square inside. I have a bit of room, I would be more comfortable with more space, but I installed a split door so I could keep the bottom closed without feeling cramped. I also just haul the anvil outside sometimes.
-
-
-
-
-
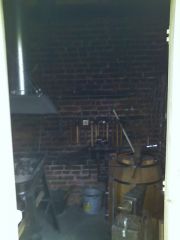
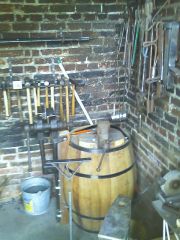
Hi all, I've been a member of the site for a few months now, and am enjoying all of the resources and discussions. I just thought I'd introduce myself. I've been a woodworker for many years, but just recently started smithing. I'm in New Cumberland, in central Pennsylvania (still waiting for my pin to pop up on the member map for the site), and am a high school and college history teacher. I've attached a few pix of my humble shop. It was originally a smoke house, so the dirty bricks on the inside lend a nice atmosphere I think. My forge is constructed out of a heavy old child's wagon with a layer of firebrick mortared in with fireplace mortar, a cast iron basement drain from Home Depot as a firepot (with a little removable cast iron grate), a few 1-1/2" pipe fittings for a tuyere, a paint roller handle with a hunk of steel riveted on as a clinker breaker, a wood stove blower housing refitted with the motor from an old kitchen juicer, and a standard Sears shop stand. The hood, as you can probably see, is an old wheelbarrow. Most of my other tools I've made myself (like the spring swages hanging up) or bought on eBay or at antique shops. I'm still in the market for a new anvil, as the one I have in the picture is one of the old cast steel harbor freight specials. Thanks, any comments, suggestions, etc. would be appreciated.
-
Thanks, Thomas Is medium carbon useful for forge tools like punches, etc? (still new to this)
-
I realize that there are a million out there, but are old digging irons (or digging bars) generally tool steel? Or just mild with tool added to the cutting edge? How about picks heads? I cut a few of the irons up and the sparks looked to me like tool steel or higher carbon steel, even when I cut far from the tip. Thanks, Mammooth
-
For nail and rivet headers, the hole underneath should be larger than the hole on top. So, if this makes sense, you should start with a 3/8" hole through the 1/4" piece of steel, and them drift the hole from the bottom side with a tapered punch, making the bottom hole 1/8" or so larger than the top hole. That way, you can pund on the top of the rivet without it getting jammed. Just in case... be sure to hold the rivet header over a pritchel or hardy hole. That will keep the rivet shaft from being upset. (maybe you already knew this). Good luck.