

ofafeather
-
Posts
311 -
Joined
-
Last visited
Content Type
Profiles
Forums
Articles
Gallery
Downloads
Events
Posts posted by ofafeather
-
-
Easy lube options:
charcoal, even briquettes that are pulverized are good for this!
Salt lube take a 1pint container, add 2 tablespoon dish soap, hot water, and table salt to saturate the water (about 1/2 cup), dip your tools and let dry. Makes 1 pint. (thanks for the recipe Mr.Hofi) They dry quick in dragon breath and after the tool is warm from use. Caution this solution can act like superquench and cause good steel to crack if the metal is too hot.
Those are what I have used with good success.
Phil
Phil, thanks. Will try that. Any idea if I can should quench this punch or not? With the limited punching that I've done so far I've just let it air cool. -
Okay, here's a feeble attempt to make a 1/4" punch. It started life as a larger flat bottom punch. I shaped it on the grinder giving it a slight point, trying to copy Brian's. I tried to make a straight shaft and then have it taper after a bit. I tried it out and encountered some trouble. I was punching thin stock and it really didn't work out that well. Guess I need a bolster. Tried it with some thicker stock (1/4" I think) and it worked better but I could get the plug to drop out. It just kind of hung on. I poked it an pulled it off with pliers.
I have questions about this:
1) Does the shape of the punch make sense? It's not the best grind but it's my first attempt.
2) Can I quench this punch? I don't know what kind of steel it is, obviously tool steel of some kind. You can see in the pick that there was some color running from using the punch
3) What can I use for lube? I use a gas forge so don't have coal dust. Can I used regular copper anti seize compound?
I think that's it for now. Make think of some more.
Thanks.
Eric

-
Yeah, guess tongs really need to specialized to some degree. Thanks for your input. Think I'll buy those two and try to make some for other square stock sizes. See how that goes.
-
Both my wife and I tried it yesterday. Fantastic. Feels great to hand and is wonderful to forge with. Haven't tried the rounding side yet. Will use it some next time and see what that's like.
-
Hi, All. Received my new Brent Bailey hammer today. It's in what I believe he calls the Modified style. Fit and finish is fantastic. Can't wait to try it out. Brent was great to deal with. He took a lot of time discussing the hammer with me and blacksmithing in general. He sent me a center punch with the hammer for no extra cost. For those of you that recommended Brent, I heartily thank you and can add my sincere recommendations to yours. Here are a couple of pics. Oh yeah, that hammer is ~2 1/4 lbs. I'm not sure of the exact weight. With the handle it comes in at about 2 lb 10 oz. Off to the smithy to try it out shortly. Thanks Brent!


-
Those are for flat bar and are limited to the width (not thickness) of stock you are working. So if you get a 2" pair, you can work from 2 x 1/8 the way up to 2 x 1/2. Square stock won't go at all. The ones with the smaller reigns are indeed "springier", and are great.
Thanks for your reply Nuge. In rereading the description on the site I realized that I misread it originally. It's up to 1/2" thick and I read that as 1 1/2"! Sigh.
That said, how much flexibility is there in the range of width? Can the 2" tongs handle 1 1/2", etc? I was thinking of getting the 1" and 2" to hand a range of stock. In your experience how would that be? Thanks. -
Make your pintle however you choose and then tenon it and fit to your backplate, picture should illustrate what I mean
Second from left
So the pintle was a separate piece from the back plate in this case? Is it unrealistic to forge it from one piece? -
Hi, Grant. I am considering picking up some duck bill style tongs for flat stock. On the Blacksmiths Depot sight it says that they can handle up to 1 1/2" thickness, and depending on the size tong, up to 3" wide. Does that mean it would also work for larger square stock? Would a 1" tong handle 1" square?
Also, what's the range that the tongs can comfortably handle? For example, can that 1" handle 3/4 and 1 1/4?
Lastly, 16" vs 18". I would guess that the 16"s are lighter and springier?
Thanks.
Eric -
Fciron thank you for your explenation and suport
when Frank Turley said before asking me how I control and maintain the length of the point my my full answer was ''some knoledge in geometry and experience''
the squar steel is having 21.5 % more matirial then the round in the same dimention . means that if you round a piece of squar steel it will be longer 21.5 % 1/5 but while rounding the steel after forging squar it swels a bit there for practicaly we calculat 13-15 % longer in this operation.
In every rond steel a cone is hiding and in the squar steel a piramid is hiding .The proportion in both of them between the full matirial and the cone and the piramid is 1 to 3 that means that if one leavs a ''blob'' of 1''
and start the forging from the behind towerds the point or with the hammer tilted or put the blob on the far end of the anvil you will always get a 3'' point !!!
The beuty is that geometry is working in All diameters the same 1-3 many people thinks that if the steel is thicker you need a smaller blob to start with and this is wrong.
and why did I start with the proportion between the round and sqar ?
if you forge the point on a round steel there is 20 % less matirial and you forge squar piont you will get the point shorter but when you will forge to octagon and round you will get it to the right designed length.
If one is forging a point from squar steel then one will have to start the blob a bit sorter 15% to get to the intendent length
After having this geometry knoledge one needs some experience to master it.
the longest point I forged in one heat was 10'' IN 5/16 AND 3/8 with my trick system
Hope I made it clear enough
Hofi
Geometry is good! Thanks Hofi for that in depth answer. -
Thanks for the guidance, folks. Can we talk about pintles? If I want to make a pintle that bolts on, what is a good way to go about it? Can I make a small strap and form an eye around the pin but make it tight to hold the pin? Is there another way to get the pin to stay in the eye of the pintle? Or do I somehow forge the pin from the same piece as the strap (pintle)? Would it make sense to use 1" flat stock and draw down the end the end to 3/8" round to form the pin, bend it vertical?
Just some thoughts. For now, simple is good. Any ideas, thoughts suggestions? -
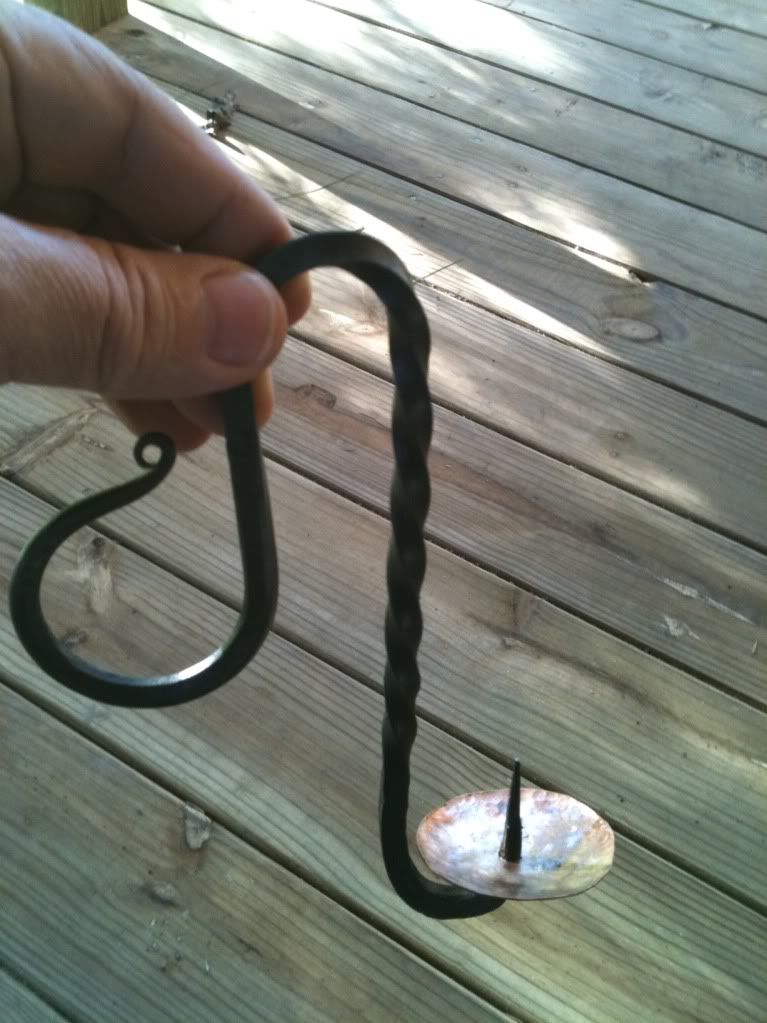
Details: 1/4 inch square stock. Forged short "spike" on one end. Then set down shoulder on spike with monkey tool. Drew out and scrolled other end. Spike end bent 180 degrees. Pan forged from copper disk cut from water pipe. Drilled under-size hole through pan and forced it down over spike with monkey tool. Use "votive" size candle. After two hours jar was only slightly warm not hot. Seems to get plenty of air to burn.
Recently added 10 x 30 porch to my house. My wife asked me to forge three candle holders for the porch. This is what I came up with. Two more to go. May do a leaf for the handle of one May omit the spike from the other two and just rivet the pan on. This is because the votives have a metal base attached to the wick which must be removed in order to use the spike. Hope this clarifies. Sorry to be so long. Bart
Bart, Many thanks for the details! My wife and I both love it and will try to make one. We appreciate you sharing the idea. Great design!~Eric -
Bob, I admire your work ethic! So dedicated! ;)
-
Nice clean dimple? I'm not clear on what you're asking.
Frosty the Lucky.
Guess "dimple" really wasn't the right word. -
Nice clean dimple? I'm not clear on what you're asking.Frosty the Lucky.
Hi, Frosty. As Brian shows in this post
Rotate the bar/rod after each blow, getting deeper as you form a groove around the periphery, then break off the last bit, that will give what you describe on a round or square barIf you angle the workpiece, you can also control the angle produced on the bar end, from square to the angle of the hardie.
John, Thanks. I think that's what I'm looking for
For hot cutting, you need a much more acute angled edge or you will deform the bar while trying to force a cold hardy through.
Sam, I think I'm following you. If the cutting tool has to steep an edge, as with a cold cut, the bar will deform. Would you ever use that type of cutting to form almost an upset at the end as you're cutting? I realize though that cutting hot metal with a "cold" tool could mess with the temper. -
Very cool! Think I will try one myself! What does the bottom part holding the candle look like?
-
Hi, All. Anyone know of any videos on-line showing how to use the Hot Cut Hardy to get that nice clean dimple on the end of a cut rod? Is it hard to do?
-
I suppose, in America you could grip a vice with them but in the UK, I bet they'd make a mess of a mole.
Too funny! :lol: -
Have any of them complained?
I'm not trying to start a row, and certainly no one has complained in this thread. I'm simply suggesting that sometimes what seems harmless from one person's perspective isn't from another. It's merely a suggestion, but it comes from personal experience. Many times on forums things are said without due consideration to all that will "hear" them. While I don't think any of the comments here were made with intentional disrespect I don't think they are particularly considerate of our female members. They may never read them and may never complain if they do but that doesn't mean that we shouldn't consider them when we post. Just my point of view. Take it for what it's worth. -
Hi, guys. Maybe I shouldn't say this, I don't mean to be a party pooper, but we do have lady smiths on this forum and maybe we should end this line of banter. :(
-
ofafeather,
Here are some older discussions on punches and design.
There is a few to start you. Do a search on punches and you will find more.
Brian, Thanks for the links. I just read through the 8 pages of the first thread you linked to. Fantastic! Thanks. I'll read the others later.~Eric -
Just found this thread over a year later but it's such a great one I thought I'd give it a bump.
-
Thanks for the great replies. Details are always appreciated!
-
Don, John, thanks again. Great info. I appreciate the detailed explanation and pictures. I'll see how things go and keep you posted.~Eric
-
Brian, just want to say THANKS! I find your work very inspiring and appreciate the chance to see it through your videos. Also, your in depth explanations and patience with questions really go a long way in helping this newbie understand the craft better. Thank you! If I were closer I would love to take a workshop with you.


Forging flat to round
in Blacksmithing, General Discussion
Posted
I did a bit of experimenting in trying to make a pintle. I wanted to see if I could take 1/4 x 1 flat stock and use that to make a 1 piece pintle for a strap hinge. I left the stock long so I wouldn't have to use tongs. I made a fuller using the edge of the anvil a few inches in from the end of the stock. I then went to work reducing the stock to square from the fuller notch to the end. In form, it work out fairly well but the top and bottom edges if the stock seem to thicken more than the sides. The problem is that going to octagon then round left recessed cold shuts legnthwise in the stock. Is there a way to avoid this? Also, I would like to make a 90 degree bend and then have a shoulder from the pin. While I was able to form the 90, I can't get it sharp and didn't manage to come up with a good way to make a shoulder to have a smooth bearing surface for the bottom of the barrel of the strap to pivot on.
Any input would be greatly appreciated.
BTW, I was moderately successful. I did forge it down to ~3/8" round to fit the barrel of the strap I made.
Thanks.
Eric