Toolshed
Members
-
Joined
-
Last visited
Everything posted by Toolshed
-
Chad, this was my VERY first real project. They deform at the slightest pressure, as Billy says. Again, just testing if I could make metal move. Billy, the boss part is SO WRONG as to not even count as tongs. The thin metal deformed so badly I almost didn't even try a pin, but I forged ahead....Pun intended.
-
Made tongs this past weekend. To correct myself, I attempted to make tong shaped objects. Just playing with metal movement at this point. Finding out that A36 moves like butter, and spills all over everything in the process like butter. Every single thing is wrong with these, except I made them, they open and close, and I am ecstatic that I can actually forge metal. I ended up cutting off the rest of the length of the reigns I didn't heat and will use them in other projects. These will live in infamy above my shop door alongside my first deer antlers. I like to think they'll inspire me to do better and better. Since this picture I have also sewn a real neck onto my apron, I was testing this out for the first time as well. 3/8" round A36 1/2" single forced air burner coffee-can forge 3# double square head hammer 3# square head crosspein hammer 2# Round head ballpein The 3# hammers were just making foil of the metal, but I wanted to test multiple different ones.

-
That was actually a great thread hijack. I did kinda take into account what the FINISHED forge would be inside. I had wanted 2" kaowool (down to about 5" since 9"-4"=5")and then various thicknesses of various refractories reducing to about 4" square inside. I was hoping to end up with a chamber with movable end caps so I could do longer sections. This is all moot at this point because I don't want something that large taking up space in my shop.
-
Excellent! Recording yourself doing a test instruction probably helped greatly. Adore that storyboard. Very easy to follow, and know what the next step is. Rob
-
This is all fantastic stuff! For my first magic trick, I plan on making leaves with tapered stems and also making nails. I think that's a good way to figure out my hammer techniques, and to use different hammers. Neither of which needs tongs, at least to begin. Leaves I think can be done without extra tools....Nails need a hot cut and a header block, which I do not have yet. Well, honestly, I don't have much more than a pile of 3/8 rod and a half made forge, but I'm diligently learning every day I can. Reading and watching as many resources as I can.
-
WOW. That's a story indeed. The more of your posts I read the more the LUCKY part comes out. So, here's the trick with the reading 95 pages of the Forging 101....90 pages of rambling for 5 pages of real material. Yeah, I have time, but that's not how I like spending it. I'm collecting gems into a text document when I find them. I call them the I Forge Iron Gold. And back to the thread! hah Yup, I have done the rigidized kaowool over the perlite before and ran a pretty good amount of heats through it. I think I put satanite or something similar on it in a REALLY thin coat. I really don't think it ever failed actually, I just had to move. and leave stuff behind. I started dabbling in "refractories" (yes, that is vague on purpose) about 5 years ago, and stopped dabbling about 4 years ago, so basically, I'm picking up where I left off before moving to Michigan. Funny you advise on the smithing club, because I just signed a waiver and a check to become a member of the Michigan Artist Blacksmith Association today. I interested me more because the person I am writing to is a little over an hour from me, so I know folks are probably closer than that to me. Great minds think alike? Actually, I have already done research into ABANA, but not sure they held my interest for some reason. Maybe if I get to making things to sell/trade/whatever. I didn't get down to the shop today so no more work on the pig, I'm gonna find some high temp pink paint now.
-
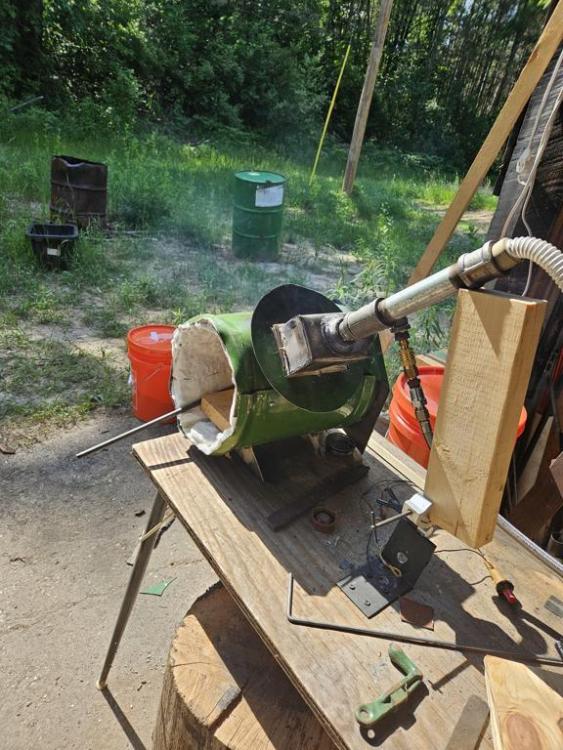
I'm semi retired (Meaning full time job but an empty nest), I have a lot of time for testing stuff out (SAFELY Mind you, hearing protection, eye protection gloves and all). I may have to go back to just lurking until everything is done. You are gonna worry yourself to death over all the little fiddly stuff during my testing posts (Like probably wondering why I didn't add APRON to my safety list above....). Yessir, I know quite a bit about what kaowool can and cannot do. I use what I have on hand, with the bankroll I have. If it fails, I'm out 10bucks....I don't go buy 100bucks of kaowool to test with. (Notice I didn't have to resort to the perlite, which would have still worked in my case, I've used it to melt aluminum without it slagging) I know quite a bit, but not everything, about refractories, mixes, and whatnot. I like experimenting. I am an experimenter, it's what I do all the time. I test stuff to failure, kinda like Elon Musk, but with less bankroll. ;-) I wanted to see what that burner could do. It wasn't strong enough, YET, I'm testing. I didn't measure the external temp of the shell, but the paint burned off the bare metal endcap/cover I was using. Just because you didn't see a cover on the end doesn't mean it wasn't there. I was testing. With cover, without cover. Oh, next test I added some refractory to the end cover, to test it. I will also be rigging up some kind of front door/porch as well. The burner was placed at the 1:00 position for testing. It will be moved to the 12 position now that I know more (from testing) about the flame pattern. The "refractory" I put over my massive 1" kaowool, will be in testing, just to see what it can do. I'll chip that off, or cover it with something else if it lives. The inside of this particular forge will shrink....Lots as I add more layers of stuff I will be testing. Everything is drying now, next will come some kiln wash and drying that for a day or so....It's gonna fall apart, and I'm still out like 10 more bucks....cut off from the drum, 5-6 Screws, wire mesh, maybe pound of the "refractory", couple cups of water....OK only about 7bucks....
-
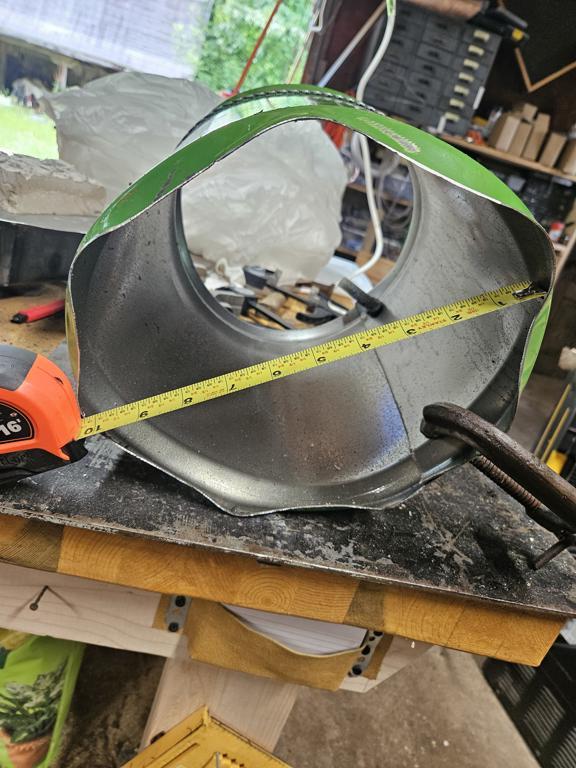
Yup, one look at the final dimensions in real life and I immediately started a new build. Cut one whole section, node-to-node, of a 55gal drum. The nodes left on I think really help the thin metal hold the shape. Cut crosswise about 32 inches long. Bent that into a circle with the ends overlapped and put some bolts through. Had just enough kaowool to cover the inside with about 1" thick and rigidized. Ran with that for about an hour just to see what might happen and it did an OK job. Burner in this orientation did get a piece of 3/8" red hot, but I think having it point more directly down on the workpiece might do me a bit better. There was zero forge scale on the workpiece the couple times I brought it out. This will be my testing forge from here out. I coated the kaowool with some refractory and let it sit overnight. Will kiln wash that today and see what difference that makes. I did a dumb thing and put refractory on the hard kiln brick I used as the floor, so will probably try to pry that out so it can be a movable floor I can rotate the forge around to test different burners and angles. I still have enough of the cut off to make another this size. I'm going to order more kaowool and some good refractory in the coming weeks to build one of these for real.

-
Started posting in other sections before I did the logical thing and introduced myself to the group. Rob here, The Toolshed ; Name given to me way back at a new job I was way overqualified for, I referred to myself as nothing more than a tool....Supervisor was kind enough to call me other.... I live on 150 acres of Michigan woodlands and have five distinct "shops" not including the garage or tractor barn, not to mention other areas I tinker in. Professionally I am an I.T. Analyst with over 35 years experience. Unprofessionally (the other 16 hours of the day I am very unprofessional), I am someone who loves playing with woodwork, metals, fiber arts (knotwork and crochet), leatherwork, leather tanning. I have been a metal caster for 10+ years. As well as playing around with "beating on hot billets", certainly not blacksmithing. I took vocational drafting classes back in high school , which is why you'll see me drawing a lot of things out. I enjoy testing things out, so you'll also see a lot of my projects made from foamboard mockups first before I ever make a cut in material. Foundium, Dumpsterium, Givemium, Trashium, these are all some of my favorite construction materials. Hoarding things that might be useful....Yeah, I'm using materials I scrounged back in the 80s. However, Frosty gave me this crazy idea that NEW A-36 might be a good addition to my hoard, so I got 100' of it yesterday. I was surprised that 20' was 51 bucks, and 100' was only 30bucks more....CRAZY!! Anyhoo, BANG ON!!
-
I got this crazy idea last night. Yeah, this was after buying 100' of 3/8" A-36 last night. I wanted to make a new forge that would allow me to turn my ribbon burner directionally as needed. In other words, I can have the full length of the burner down the length of whatever is being heated, or turned so only the smaller width of the burner heats only a small section. I have metal sheet cut out 9" wide by 16" long for all 4 sides. I plan to clean and weld those tonight. This little model doesn't have the panels all correct, but it is a functional model. The insides will be covered with insulator (Kaowool or similar) then coated with castable refractory and kiln wash. The burner assembly will be built into a plate that is also insulated. I know there will be some flame escape at the crack, but there shouldn't be any real chance of that doing harm. Enjoy the musings of a guy who invents insanity at will..... Happy forging! The Toolshed - Rob


-
Oh, my friend, no need to apologize, That's on me for being flippant with my words. You were absolutely correct in dressing me down in that instance. This is no game, and the new folk need to know that. Just because I have learned how to NOT get hurt, doesn't mean I get to flaunt it. Now, back to our regular programming. As I said, I stopped in to my new toy store, they also have cutoff material for sale in the main office, just walk in and grab-pay-go. Price list attached. Last night I cut off another section of a 55gal drum to make a forge body. The sections are approximately 9" wide. I'm cutting them 16" long for this first try. I am probably going to home-brew the insulator with perlite and some waterglass (sodium silicate) I made a few years ago. Then coat with a castable refractory and kiln wash. The drawings show a round section on top. I am hoping to be able to have the ribbon burner on a plate that can be rotated to put heat either lengthwise or crosswise as needed. My thinking here is that I don't always want to heat a long bit, sometimes I will just want a couple inches hot. With materials this inexpensive, I can dream and invent at will. Plus if it doesn't work out I still have the material to repurpose.


-
I hear ya, brother. No more line skirting! Safety first and foremost! As an aside, I went by my Alro Steel supplier and bought myself a load of A36 3/8 rod. Yes, I put the cart before the horse. Now I MUST build that forge so I can use that metal. The salesperson was really nice, and super helpful. One 20' section was $51, FIVE 20' sections was $85....Had them cut into thirds for easy transport in my Highlander. Heading down to the shop now to see about that forge for my ribbon burner
-
I would love to get the forge built for this (and it's brothers) soon. I need to get more kaowool and probably another bag of castable refractory. Still waffling on the shape, but will likely go with round and a hard firebrick floor for now. I dont' see myself using fluxes at this time so should be good for now. Understood on the steels. I would love to work with known+dirt cheap. Researching steels to forge always brings me the odd numbers I had no clue about, and were freaking EXPENSIVE to boot...Hence the Findium. 3/8ths huh? Hadn't thought of that. Was searching for half and larger. You brought one piece of information I really needed that not one google search has provided. Did you know A-36 doesn't exist? Unless you know to type in that PRECICE thing....I've researched forging for a long while, and this is honestly the first time I have ever heard of it. I can tell you that by the UNS categories that should be aluminum. hahaha Really, the reason I got on this site specifically is because all roads lead here (as they should) I read a LOT of posts here, granted not all yet, but months worth. You've now seen me for a couple days, and I have spent as much time for months reading. Also granted a lot of that time is getting rabbit-holed, like steel grades. I have looked up A-36, and Alro steel near me should have what I need. Looking like $700 for a 20foot section, delivered, $130 steel alone. Not bad if you're a zillionairre. Truly I have seen that price from $25 to now $700. Idiot computer algorithms don't look at zip codes, even though it asks for it.... I have been casting aluminum about 10 years now. I have always had a solid respect for anything involving tools all my life. I have not been the recipient of a steam explosion yet (knocks on wood). I learned after a few pains to be really cognizant of where things are and what 'state' they're in. Most times, if I've been working with "a substance" it IS GONNA BE HOT. Cutting, drilling, it gets that respect. I can play the flippant guy because I take a minute to think about how things can go badly, and how to avoid, and then I remove the guards. Always expect the worst thing to happen and sometimes it doesn't because you've already envisioned how to NOT make that thing happen, even without the guards. Hopefully y'all realize I'm half kidding. I remove the guards until I get a faceful of sparks, then I put them back on. Yeah, Frosty, we would talk each others ears off if we ever met.
-
Oh, that is only the test fit set. I would never trust a crucible to something I could bend with bare hands. I must learn the types of irons/steels/metals you anvil bangers refer to. That will be on one of my near-future rabbit holes. I honestly couldn't tell you even the slightest information with regards to aluminum either. 100% of the metal I cast with is Foundium/Dumpsterium/Gavemium/Watavium. I am a tinkerer, a workshop rambler. I don't do this for any more than kicks and giggles. Granted, I would love to make simple trinkets for sale, but that's a stretch goal. hah 61 north, wow, I've visited family in Anchorage, Fairbanks, Juneau before. Loved it up there, but I only saw it in the summer....As for taming weeds....Yeah, I don't play by the rules much. I grew up in a time when learning was followed by dad saying "Hurt, don't it?" Here I am derailing my own thread! haha At least the first part was on track.

-
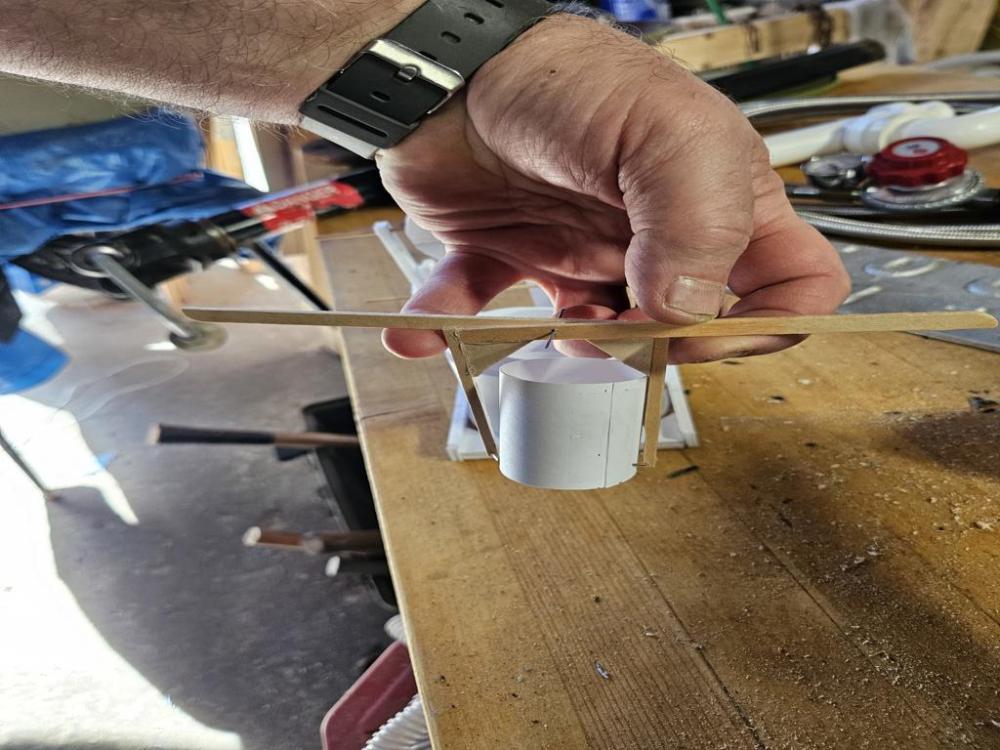
Thank you much! I absorb as much knowledge as I can, and boy-howdy this forum will have me going for a long time. I haven't even gotten a forge built and already have a thousand steps ahead of me. I love drawings, I also love making scale models as it lets me test and measure easily. See pics of scale model lifting tongs and a full size test. The domed feature is from a wish to make both a forge and a furnace. Forge for billet work, furnace for melting work. On it's side for forge, on its end for furnace. I have mostly abandoned that idea, but I still draw like that so I can see from a different perspective. In casting, you want the furnace round so it swirls the flame and keeps in contact with the crucible. I was wondering about billet work and having a similar thing, where the flame impinges on the SIDE near the metal, but doesn't directly hit the metal. I bounce back and forth with that wasting energy heating the refractory, but then I remember most of that is being radiated back anyway, and the forge will be pretty well insulated and coated with good refractory as well as kiln washed and all kinds of crazy stuff to retain the heat. Oh, I also figured a ribbon burner would not be really good for casting, since the upper flame ports are almost as tall as one of my crucibles it likely loses more heat UP than allowing it to swish around. I too can go on and on about certain topics, and if there was one person I want to noodle on all he wants, it's you! In just this one post I've re-thought multiple things, and redesigned my kit multiple times. Now I just need to draw them out and see which ones "speak" to me.


-
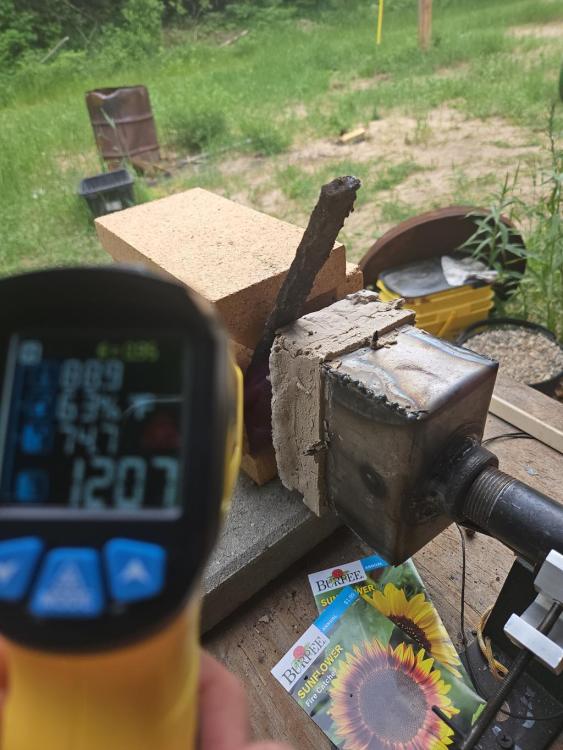
Oh, believe me sir, I wholly perused your NARB thread. It also stands for Not ANOTHER Reil Burner. hahaha It has been months I have been "lurking". Before I realized Steve had approved my sign in so I posted the above. I hooked it up last night, Air supply was my old CPAP unit so a very steady 20 (cm H2O) air pressure, I was able to achieve 1200 F with nothing more than a few refractory bricks as a 'forge'. I wanted to test it with back pressure and it ran fine. Until I turned the propane up instead of off, then it started burning back into the plenum area. What a racket. Next one I make will be offset 90degrees as you suggest. I have all the cutoff 55 gal drums I need (at $10 each, I feel like a king!!) to build them with. PLUS I love the idea of having the port coming DOWN the side of the furnace as opposed to coming straight OUT the top. Anyone have REAL DATA on tangent burner placement? i.e. having the burner at say 45deg off side? Does direct impingement on the metal help or hurt? I can see the 45deg not heating quite as well, but will also heat more evenly. I would love to take time in one of our shops for real talk.... Yeahhhhhh, Windoze, Windoesnt.....Been IT tech for 35 years having to put up with the shenanigans of those goofballs. Just bring back Win7 and make us all happy again! I have a program called resize image that makes really small files from the gigabyte oversize stuff the phone produces.


-
Built my first ribbon burner. Not perfect, but doable. I am a metal caster generally, but am looking to get into making billet/hard metal objects as well. I have a few small knives made, and wish to do many more. My goal now is to make a variable burner forge with ribbon burners in a row, so you only use how many you need. Knife, use one. Machete use two, etc The idea was to use something that didn't need burning out so I found dowel rod that fit in latex tubing to hold it straight. I needed to leave it to dry for a few more days than I did, but in the end it was good and solid. I didn't get a pic of the baffle I put inside it, but it lets too much unmixed through the central holes. Very little modification was needed after pulling the latex tubes out. It fired up well but I found was a pain to keep lit outside without something (like the cut off from a 55gal drum) creating a bit of back pressure/wind shield. The refractory barely got hot (metal housing wasn't even warm) running below a pound of propane and my little amazon blower going full tilt. I do have a feeling the 1 inch port is keeping the blower from doing its best work. I feel it's got a lot more air it could mix with a larger pipe.