
Jarunga
Members
-
Joined
-
Last visited
-
If I do more tapping I'll definitely pick one up alongside an actual guide, thanks for letting me know!
-
If you're referring to the most recent image of the 3/8" Flare x 1/8" MIP, that is because I am still hoping for clarification on the quote I put in the last post from your reply a few messages back. If not and the elaborate mill setup is what you mean, T style tap wrenches have a hole at the top for a reason and they can be used in both Lathes and Mills with a tap guide. I searched a bit and found a video that shows the method I used. It works for sizable taps but if you go real small it loses SOME precision. https://www.youtube.com/watch?v=25MvOH4GdBI&t=130s At the end of the day a threaded hole is a threaded hole, if it's aligned with the burner tube for proper mixing then I don't think we need to tire ourselves out over which method for tapping to use/is best?
-
That spring punch method is actually what my machinist friend told me to do and it got the threads perfectly straight first try. He wanted me to avoid doing power tapping without experience. It was the prior attempts by hand without moving the chuck that got me bad results, I should have worded that better in the earlier posts. The real problem was how cheap the 1/2" capacity wrench is and I'm already sourcing a vintage to replace it. I'm surprised they're allowed to sell them on amazon with how bad it ended up being, can't even properly hold the tap in the jaw. To recap a bit on the tapping, I misused the 1/8-27 pipe tap and went a bit too deep so the flare adapter doesn't fit in the tee quite right, I just need to tap a new tee and be careful not to go overboard with the depth since the 1/8-27 tapers. 1/4-28 worked great for the mig tip, tweco brand threads. Replace the elbow then connect propane hose directly to the elbow? I sent an image of the only fitting that makes sense from this quote.

-
The thing attached to the top is a center punch that has a spring in it, uploaded another photo of that. I bring the table up until the tap wrench is tight and the spring is compressed keeping pressure on the wrench whilst letting me spin it by hand. It would work FAR better with a real "Tap Guide" since this one has a lot of slop and unnecessary length being a hand held center punch and all. I'll try using the weight of the spindle instead tomorrow it should work pretty good for the 1/8"-27 pipe tap. That piece of copper tubing you see is from a 1/4" Brass Female Flare Swivel. So what you're saying is I should get a 3/8" Flare (Hose connection) to 1/8" MPT which will be tapped to accept the mig tip making it the only brass fitting piece? I'm looking at the SKU F40-067 from supplyhouse. It's a lot of weight from the hose on the tee but I could weld supports to it, really no different than what I'm currently doing except it's a ton less parts. Thank you

-
Thanks for the in depth explanation Frosty, going to read through it once again when assembling. The forge shell can be any thickness I have a ton of sheet metal and plate though my idea was to make the main shell or the "cylinder/D shape" 14 gauge and the front/back parts where the doors are 1/8" plate. The doorways were intended to be 3/16" plate, you were very close. Fire brick will work perfect for closing the back end since they're going to be similarly sized openings, this can be changed however. I thought over the twine idea in my head and you're right, it won't work well so not going to bother attempting it. Taps finally arrived, even with a Mill (which I don't ever use) my ability to tap is god awful, good thing I bought a couple of extra pieces of the 1/4" adapter and tees to take my time with and get them aligned just right. Unfortunately one of the wrenches I bought is not very good quality wise. It holds the tap but wobbles loosening it up with the slightest of pressure. The small one is actually pretty ok which is nice, I included a pic of the setup. The heavy vise was pretty good in not crushing the threads, they appear ok but I may swap over to the flange idea since the Bridgeport has hit max depth on the table with the larger wrench. If I used a real tap guide in the Bridgeport it would be even better but couldn't find one anywhere so a half disassembled center punch will do the job. Wanted to use some refrigerator copper tube per the Frosty suggestion but couldn't get my hands on a small enough amount that wouldn't break the bank. Since this is a test burner I think it'll be ok to use what I have at the moment, though if I get time this week I'm going to head over to a plumbing store and check a couple different fittings since I'm not very impressed with the swivel connector.


-
Glad the drawing works better. I feared the doorways would warp, now I wonder how Chile forge gets away with theirs? Don't quite get what you mean by extra piece of kaowool, trying to wrap my head around that still. Do you mean 3 inches of the stuff total on the floor? The kastolite will accumulate in the corners of the floor rounding them off significantly which is crudely sketched on the left side of the drawing in a light color. If the Kaowool is that much harder to keep rigid as a D compared to it being crunched into a tube shape then maybe some pieces of twine tied around it and the body would work until rigidized. Or maybe a solid form resembling the finished chamber shoved into it is better, probably a bunch of ways to do it with decent results. The stand I'll do different when the forge body is constructed alongside adding a shelf for firebrick. I have a couple of ideas in my head on how that could work. Still in no rush to create this as some of important bits are delayed in shipping. Going to write this down in the shop so I remember. Makes me even more curious with how the Chile Forge is designed
-
If you're referring to the original first forge design for "Changing lots of things" that is because the 1/2" T burner is far more... powerful than the Atlas one so I had to change it up. A cylindrical forge to a D happened because I didn't see a desirable increase in chamber size using the ~350 cubic inch rule of thumb with an assumption that a really well tuned 1/2" T burner can maybe heat ~150-200 cubic inches reliably, you might have a better idea on that. If we think of the burners as engines, I don't see it being unreasonable to re-design a vehicle (forge) to fit a much larger engine. The old design would have worked fine surely but it was meant for a very small burner. I don't see your question relating to the "long steel tunnel for the doorway" ... Did my eyes miss it? To answer, it looks nice, that's really about it. For the "somehow arranging the floor below or level with to keep the flames in" thing I probably worded it wrong, I was talking about the chamber walls since the doorway entrances are smaller giving at least 0.5-0.75" of play on each side including the top of the chamber. The last bit is rather unfair, I'm not a CAD worker or draftsman so I cannot give you good 3 way views. 3D stuff is my medium. If you ask a painter to design something he would probably do it with brushes on a canvas since he is familiar with the process and can "envision" the end result. So with that said I spent a bit of time to draw flat views with some sketchy measurements, maybe it's more appropriate.

-
I'm glad you pointed this out, my legs were really stupid and kind of a rushed sketch. Your bean can idea is much better. I did mock up a model of the drawing to get a feel for it in a 3D space and think I may have incorporated what you said well? The bottom right image has a concern for me with the door corners at the top basically being flush with the actual chamber, I may round them significantly in the main build. Orange cube is one inch for representation. Quick note on the brown area too, that's the kastolite floor thickness, not hard firebrick. I used a poor choice of color (The entire chamber will be slathered in the stuff after rigidizing.) I laughed quite a bit at the stacked forge idea swede, we'll pocket that idea for later. I "think" the designs of the original forges from Chile don't necessarily need doors because of the internal chamber being a bit larger than the entrances creating something of a vacuum/keeping the flame vortex in with minimal dragon breath. I could be completely talking nonsense but I read somewhere that it is a bit dangerous to close off their designs and to keep at least one side open. I have no source for this and I swear it wasn't a fever dream, glad to be proven wrong! Worst case I plan on the center rectangle tubes holding the legs having slots in them to fit stock holders, I can make one specifically designed to hold firebrick up.

-
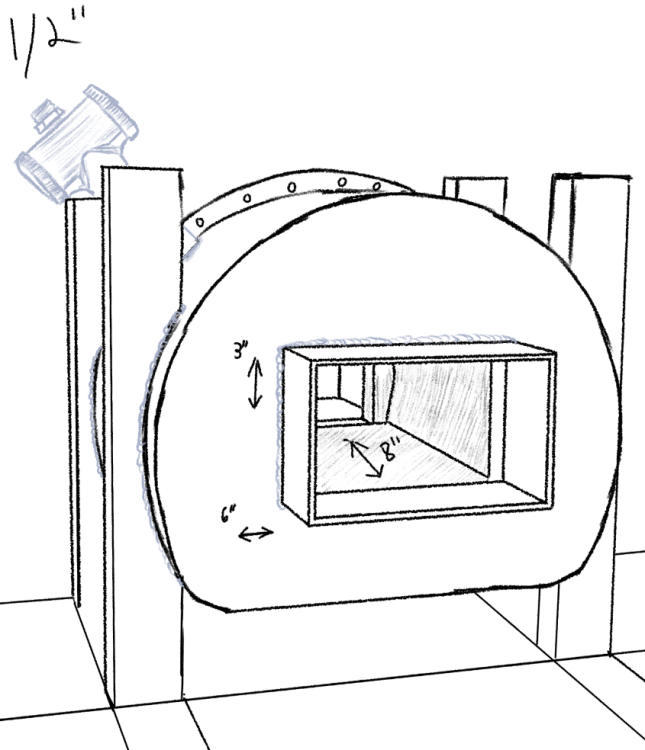
Mikey no questions remain, thank you. I included a pic of my sketchy forge design, ~155 cu in. Shamelessly a near copy of a Chile forge. Floor is lower than the "doors" to allow a nice thick kastolite floor not present in the example. It will certainly change a little bit or even be simpler but I got the steel cut up. Not quite set on the bolted halves for the shell.
-
Do you have an example of improving an atlas burner? I'm digging through the burners thread looking for something similar right now. With that said I completely agree with you on liking them for being small, we need more small burners! For my T burner, most of the stuff has arrived just waiting for a couple more things, especially some parts for my old mig welder that stopped working so I can actually fab the body up, which the design changed again to something a bit more resembling a Chile forge. Will be neat to see if it works well.
-
Decided on skipping the Atlas burner for now and going for a 1/2" T Burner build, this means my chamber size can be increased to a very nice 6"W x 4"H 8"L oval. If I did the calculation right the 1/2" should easily heat ~158 cu in, maybe even shy of 200 cu in but that might be pushing it. I looked into some commercial forges and figured it'd be best just to fabricate my own since I have the time, steel and equipment. The Chile forges look nice but the price tag not so much... I'll be sure to update once I begin the burner and forge stuff, probably in this thread.
-
Hi swede, thanks for reminding me about the importance of notes, I should actually start taking some written down rather than just bookmarking a copious amount of links or writing something I learned in a random notepad labeled something incoherent, never to be opened again. I checked the shop and do not have any of the taps needed for the T Burner, one of the most annoying things is finding out you have a lot of something in varying sizes but the one or two things you actually need you don't have. Luckily they aren't expensive.
-
Everything you said makes sense and I'm ordering the Fumed Silica, over engineering a forge and safety first above all else. Frosty, I'll gladly take you up on the PM'ing offer for at least the parts (Nice and tidy in a spreadsheet to save our eyes valuable time) of the T-burner when I get around to making one. Of course though I didn't dig super deep into finding the best deals. Truthfully, some of the fittings boggle my mind a bit, I don't normally tinker with adapters and their ilk. Speaking of PSI, since this is technically a thread for the Atlas Burners, the 30K one is supposed to run at 15-17 PSI in the original Atlas forge chambers according to a youtube short comment or else sputtering can occur. This will most certainly vary in a different chamber size but a good thing to write down for future search engine explorers.
-
No harm at all Frosty, I do like your burner design and I certainly will build one, or hopefully find someone upgrading from a 1/2" burner so I can avoid spending about $100 to make it, I checked locally and on amazon for the stuff but maybe not hard enough. The rigidizing part is actually something I had a couple questions for. Some say you can skip the rigidizing process if you plan on putting a thick layer of a refractory over it (Like Kastolite in this instance for me) whilst others say to do it anyways. The same thing goes for rigidizing between each layer of kaowool added which itself seems unnecessary to me. My plan was to butter the layers a good amount and start slathering 2.5lbs worth of the Kastolite 50-25 into and outside the chamber then slowly cure it with a mix of my blow torch and air drying. The 3D render I sent only shows a thin layer on the inside but I plan on it fully encapsulating the fibers a generous amount. The floor will be a lot thicker and honestly the shape of the forge might end up being a bit more like a D.
-
Frosty, I did plan on building a 3/8 - 1/2" T burner originally before stumbling upon the Atlas burners and seeing how economical they are. With that said, I will need to build one at some point since I have plans for a forge specific to armoring. I should have probably posted the question in Burners 101 instead of making a new thread, odd choice by me. For a bit of info on my forge design, it's an oval shaped chamber with a volume of about ~85-95 cu in. Some other projects might come up in it but I will mainly be focusing on tongs and 1-2lb hammers. Dimensions are 4" wide, 3.5" tall, 8" depth. Lining will be two pieces of layered 1" thick Kaowool and plenty of Kastolite 50-25. I can make a thread during the construction or just post it all here, not sure yet. Unfortunately I have 3,000 feet of 1"x0.75" rectangle tube so the overall construction is going to look a bit nefarious. With all that said I'm Interested in what Mikey will have to say about Atlas, looking forward to that.


