Buford
Members
-
Joined
-
Last visited
-
Nothing to report at the moment. Kids’ schedule got crazy lately. Son’s archery team made it to the state tournament and daughter’s colorguard team is competing every other weekend. Good times, but busy. Been continuing to read on the forum and taking notes in order to consolidate the nuggets I come across for quick reference. I recall reading something but can’t remember who made the comment and in which discussion. Basically, the company had already sent a brand new forge to replace the first. Therefore, I’m gonna treat the fabric utilizing the tips and products you guys have mentioned here. If I still run into issues then I’ll scrap it and purchase a better, smaller forge. Next step is to get it measured up so I can order the supplies. Thank you for the follow up!
-
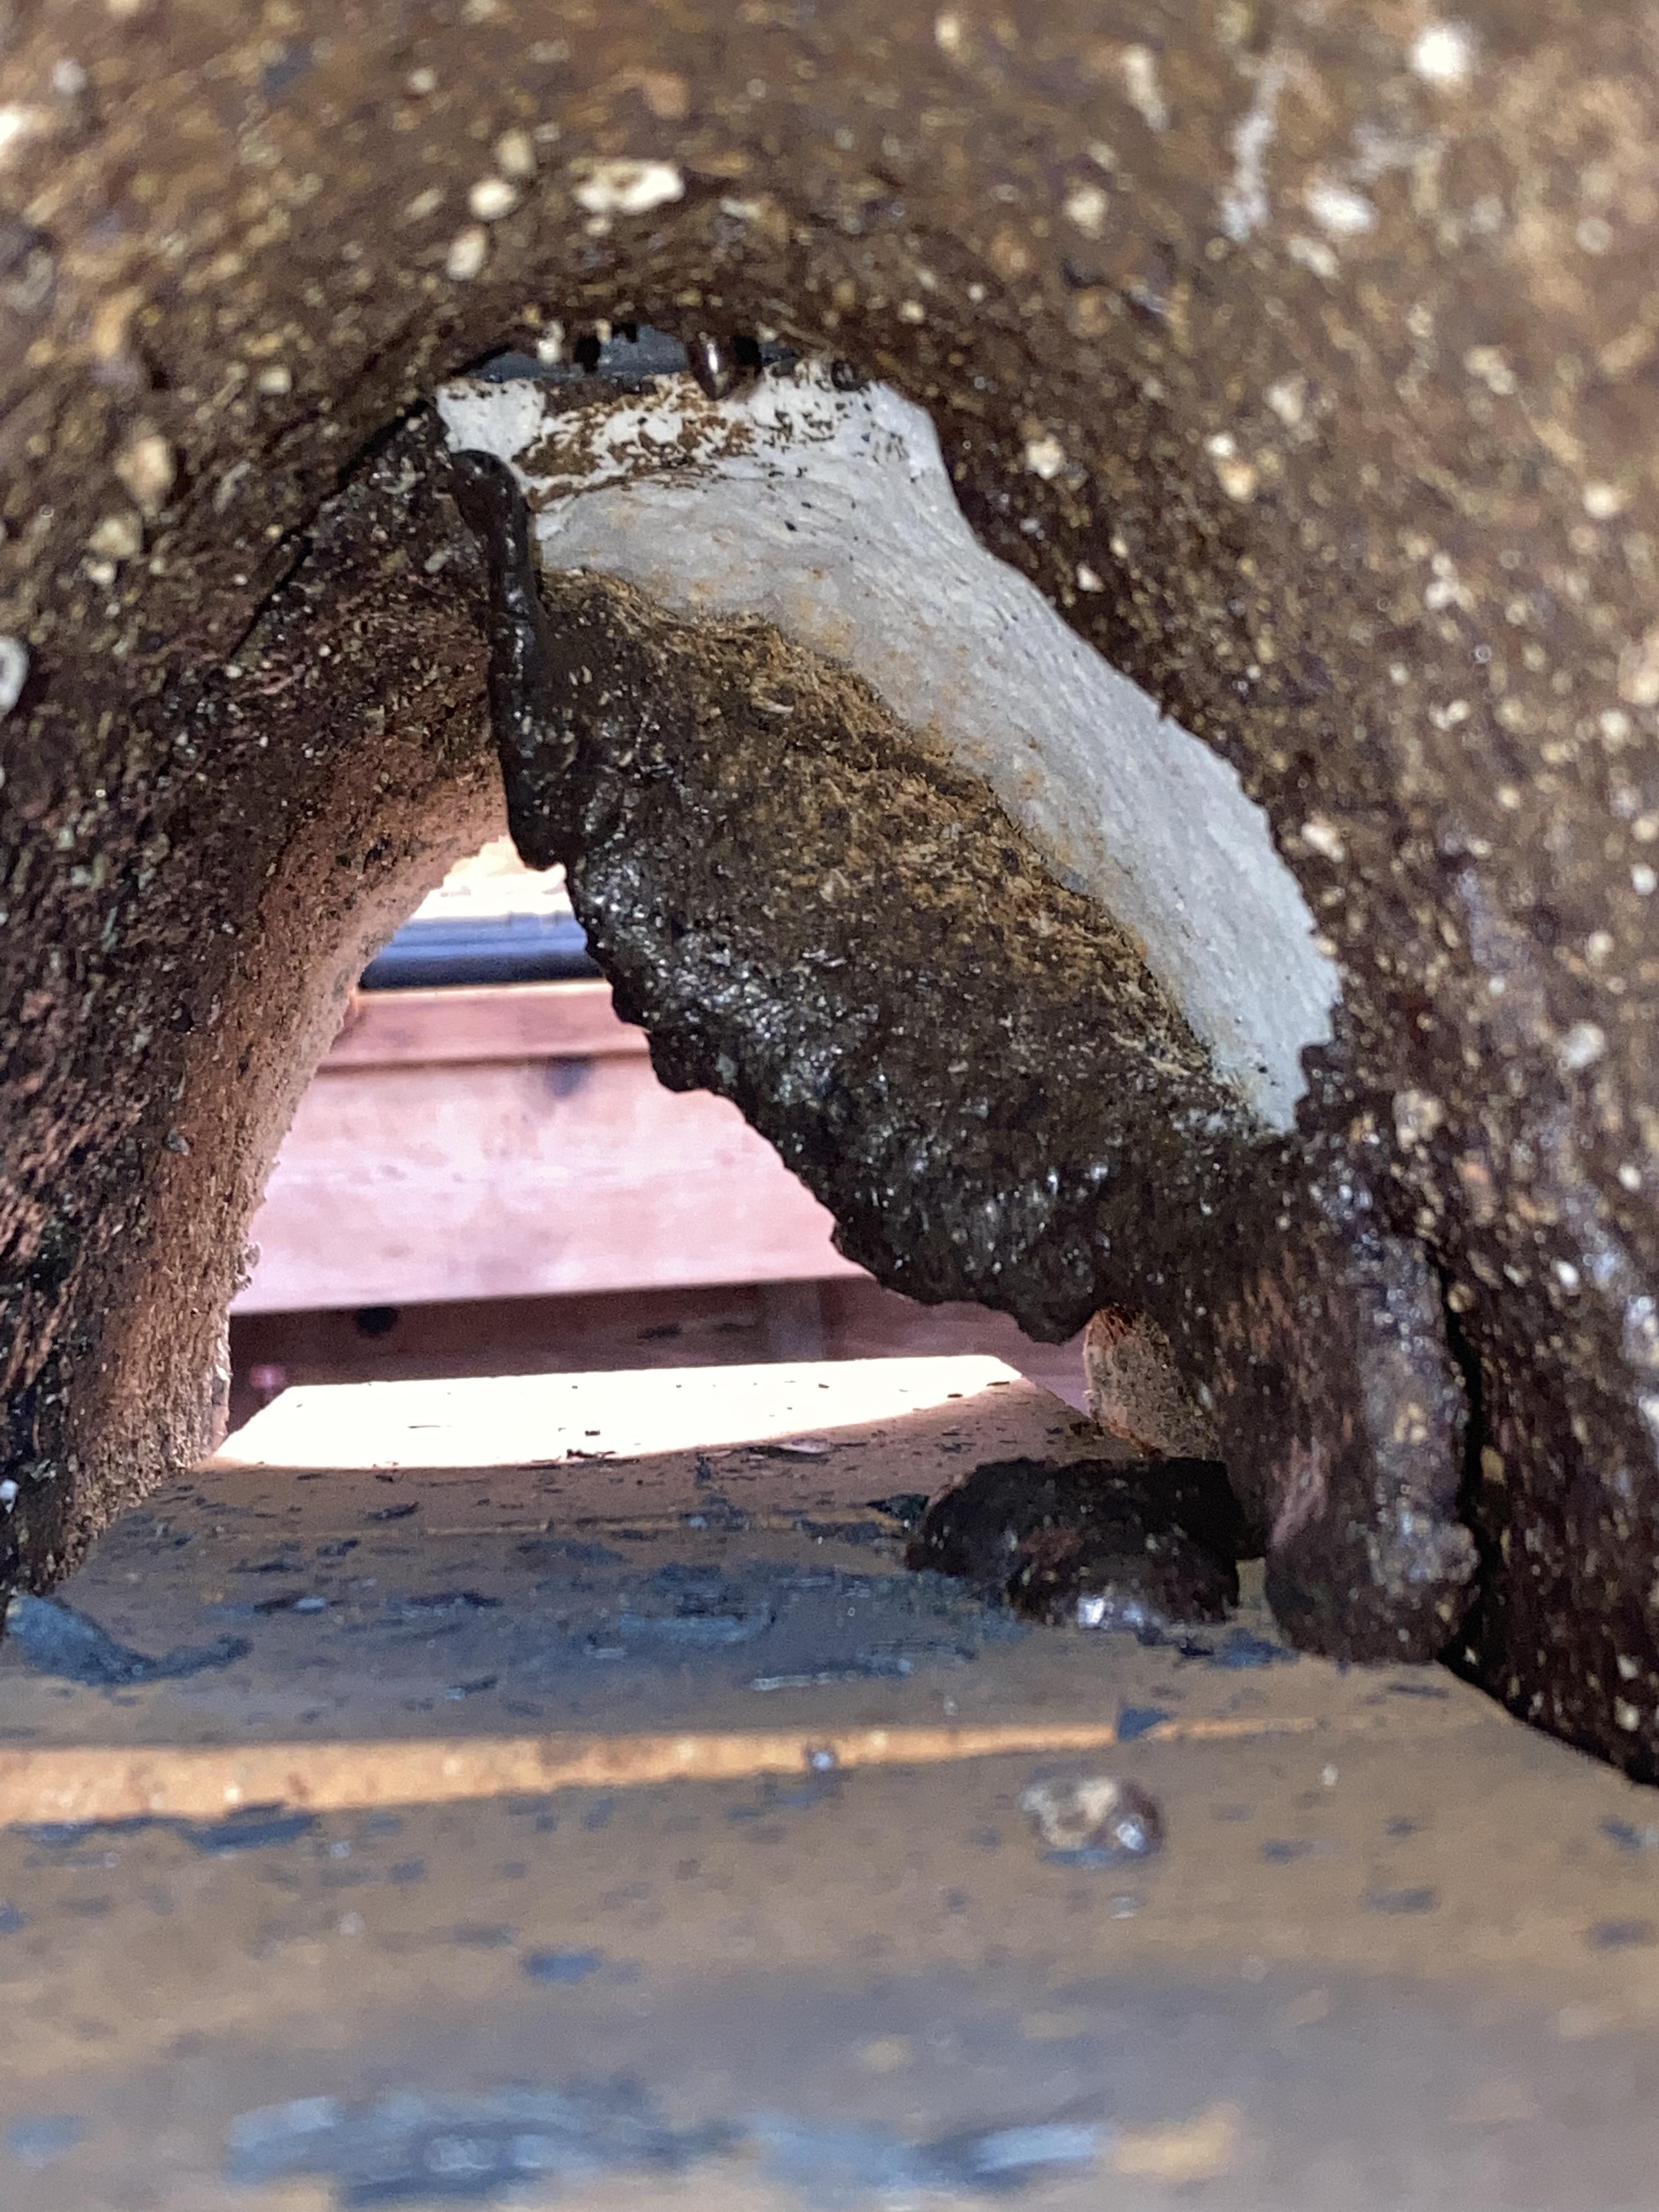
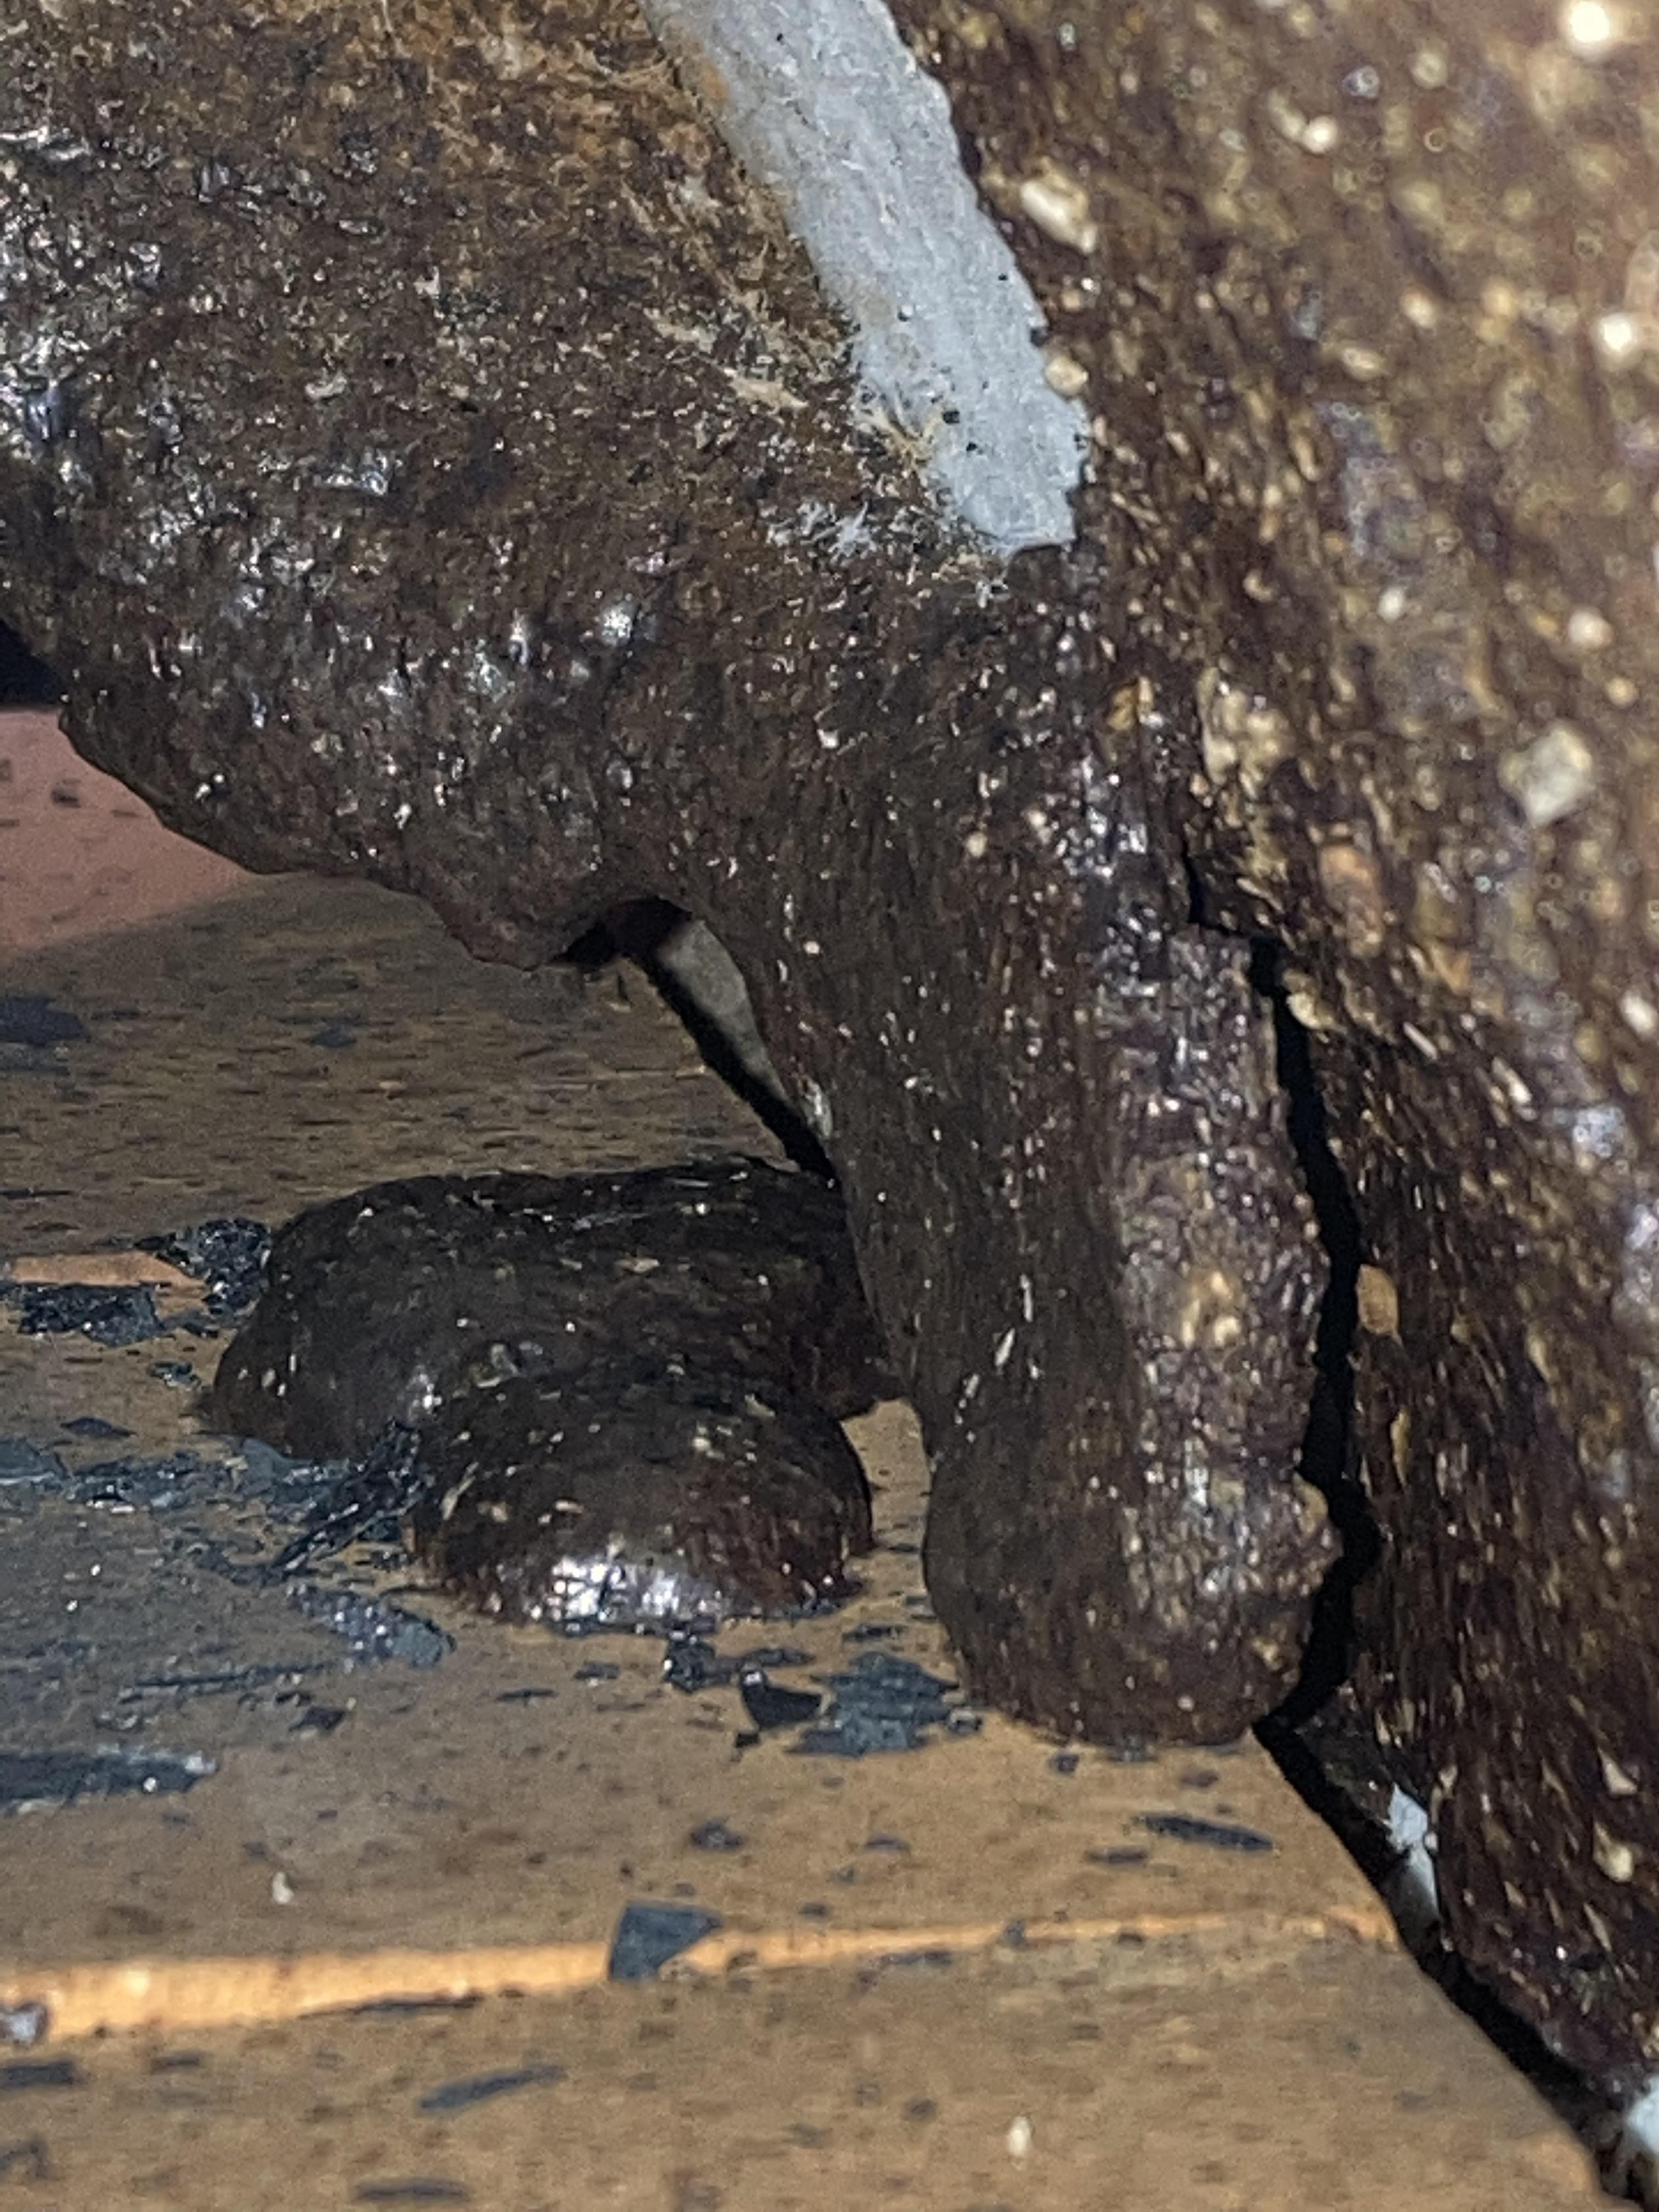
It definitely has aggregate in it.
-
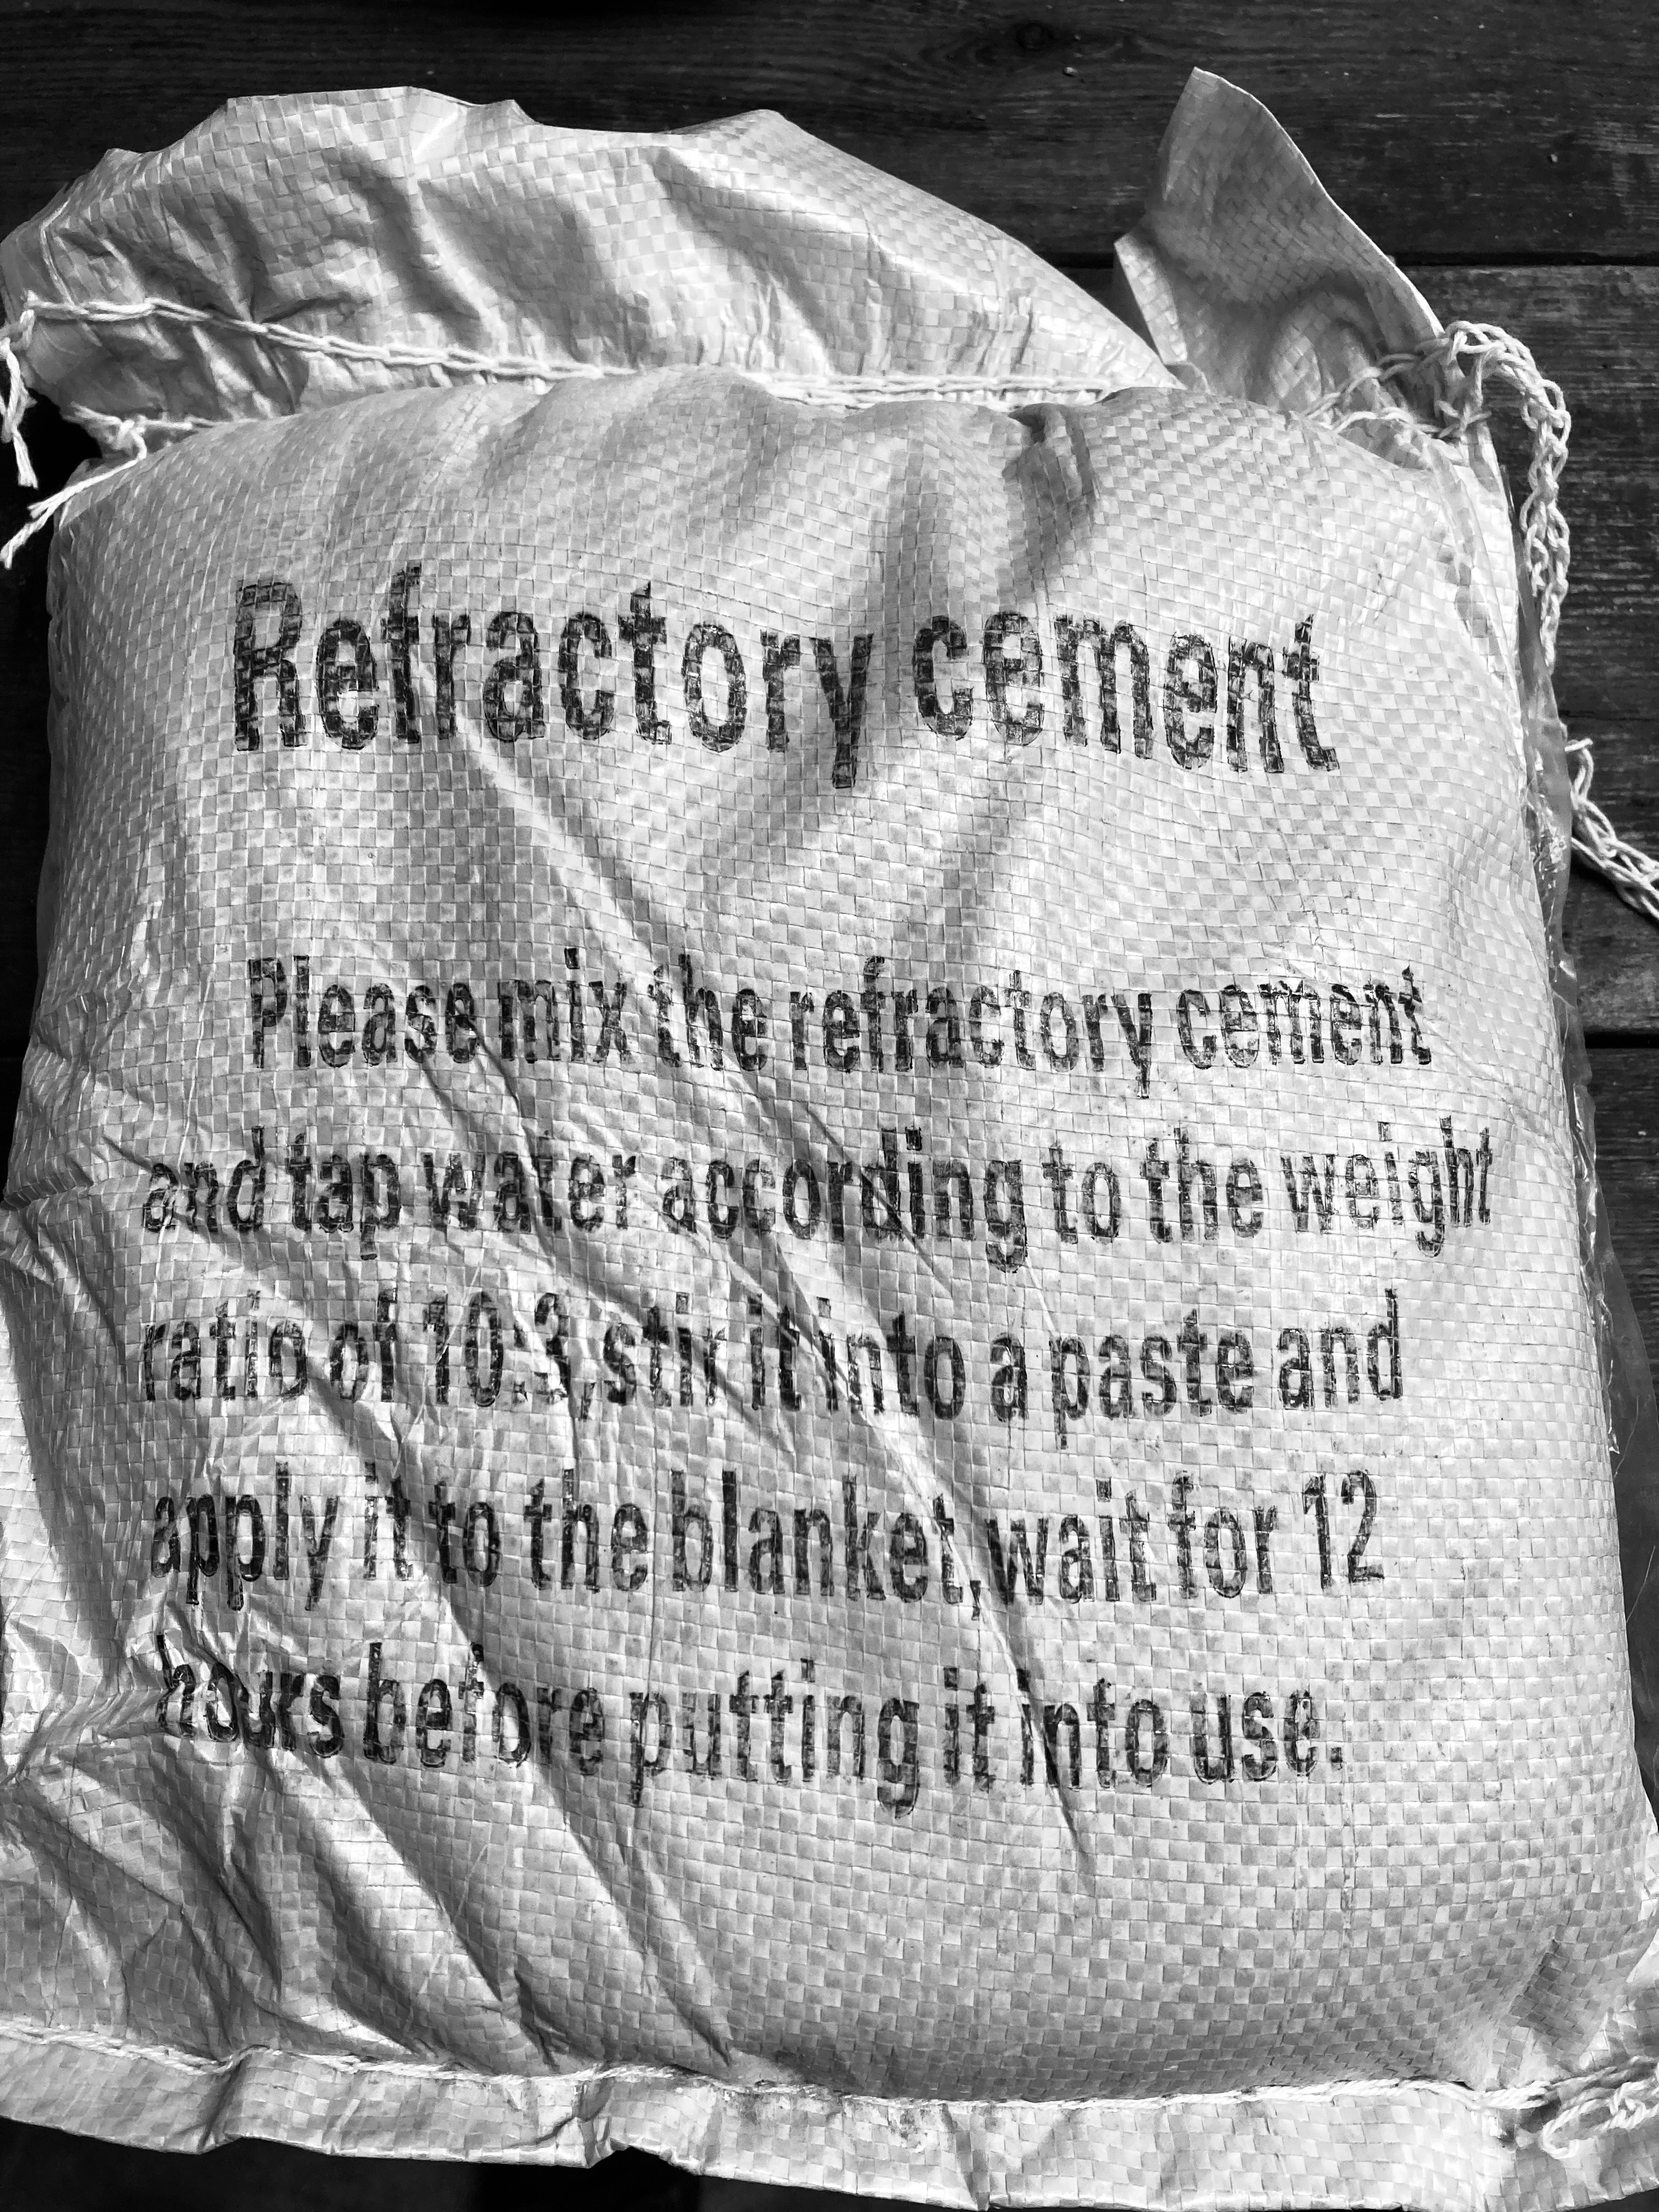
Thank you. I will read that section next… thank you. That’s why I’m here… to learn and do it better this time. For the record, I referred to the supplied product as refractory cement because that was what was written on the bag in the box. I didn’t know what Satinite was until I found this forum. I think someone else may have mentioned/ inferred that it was Satinite.
-
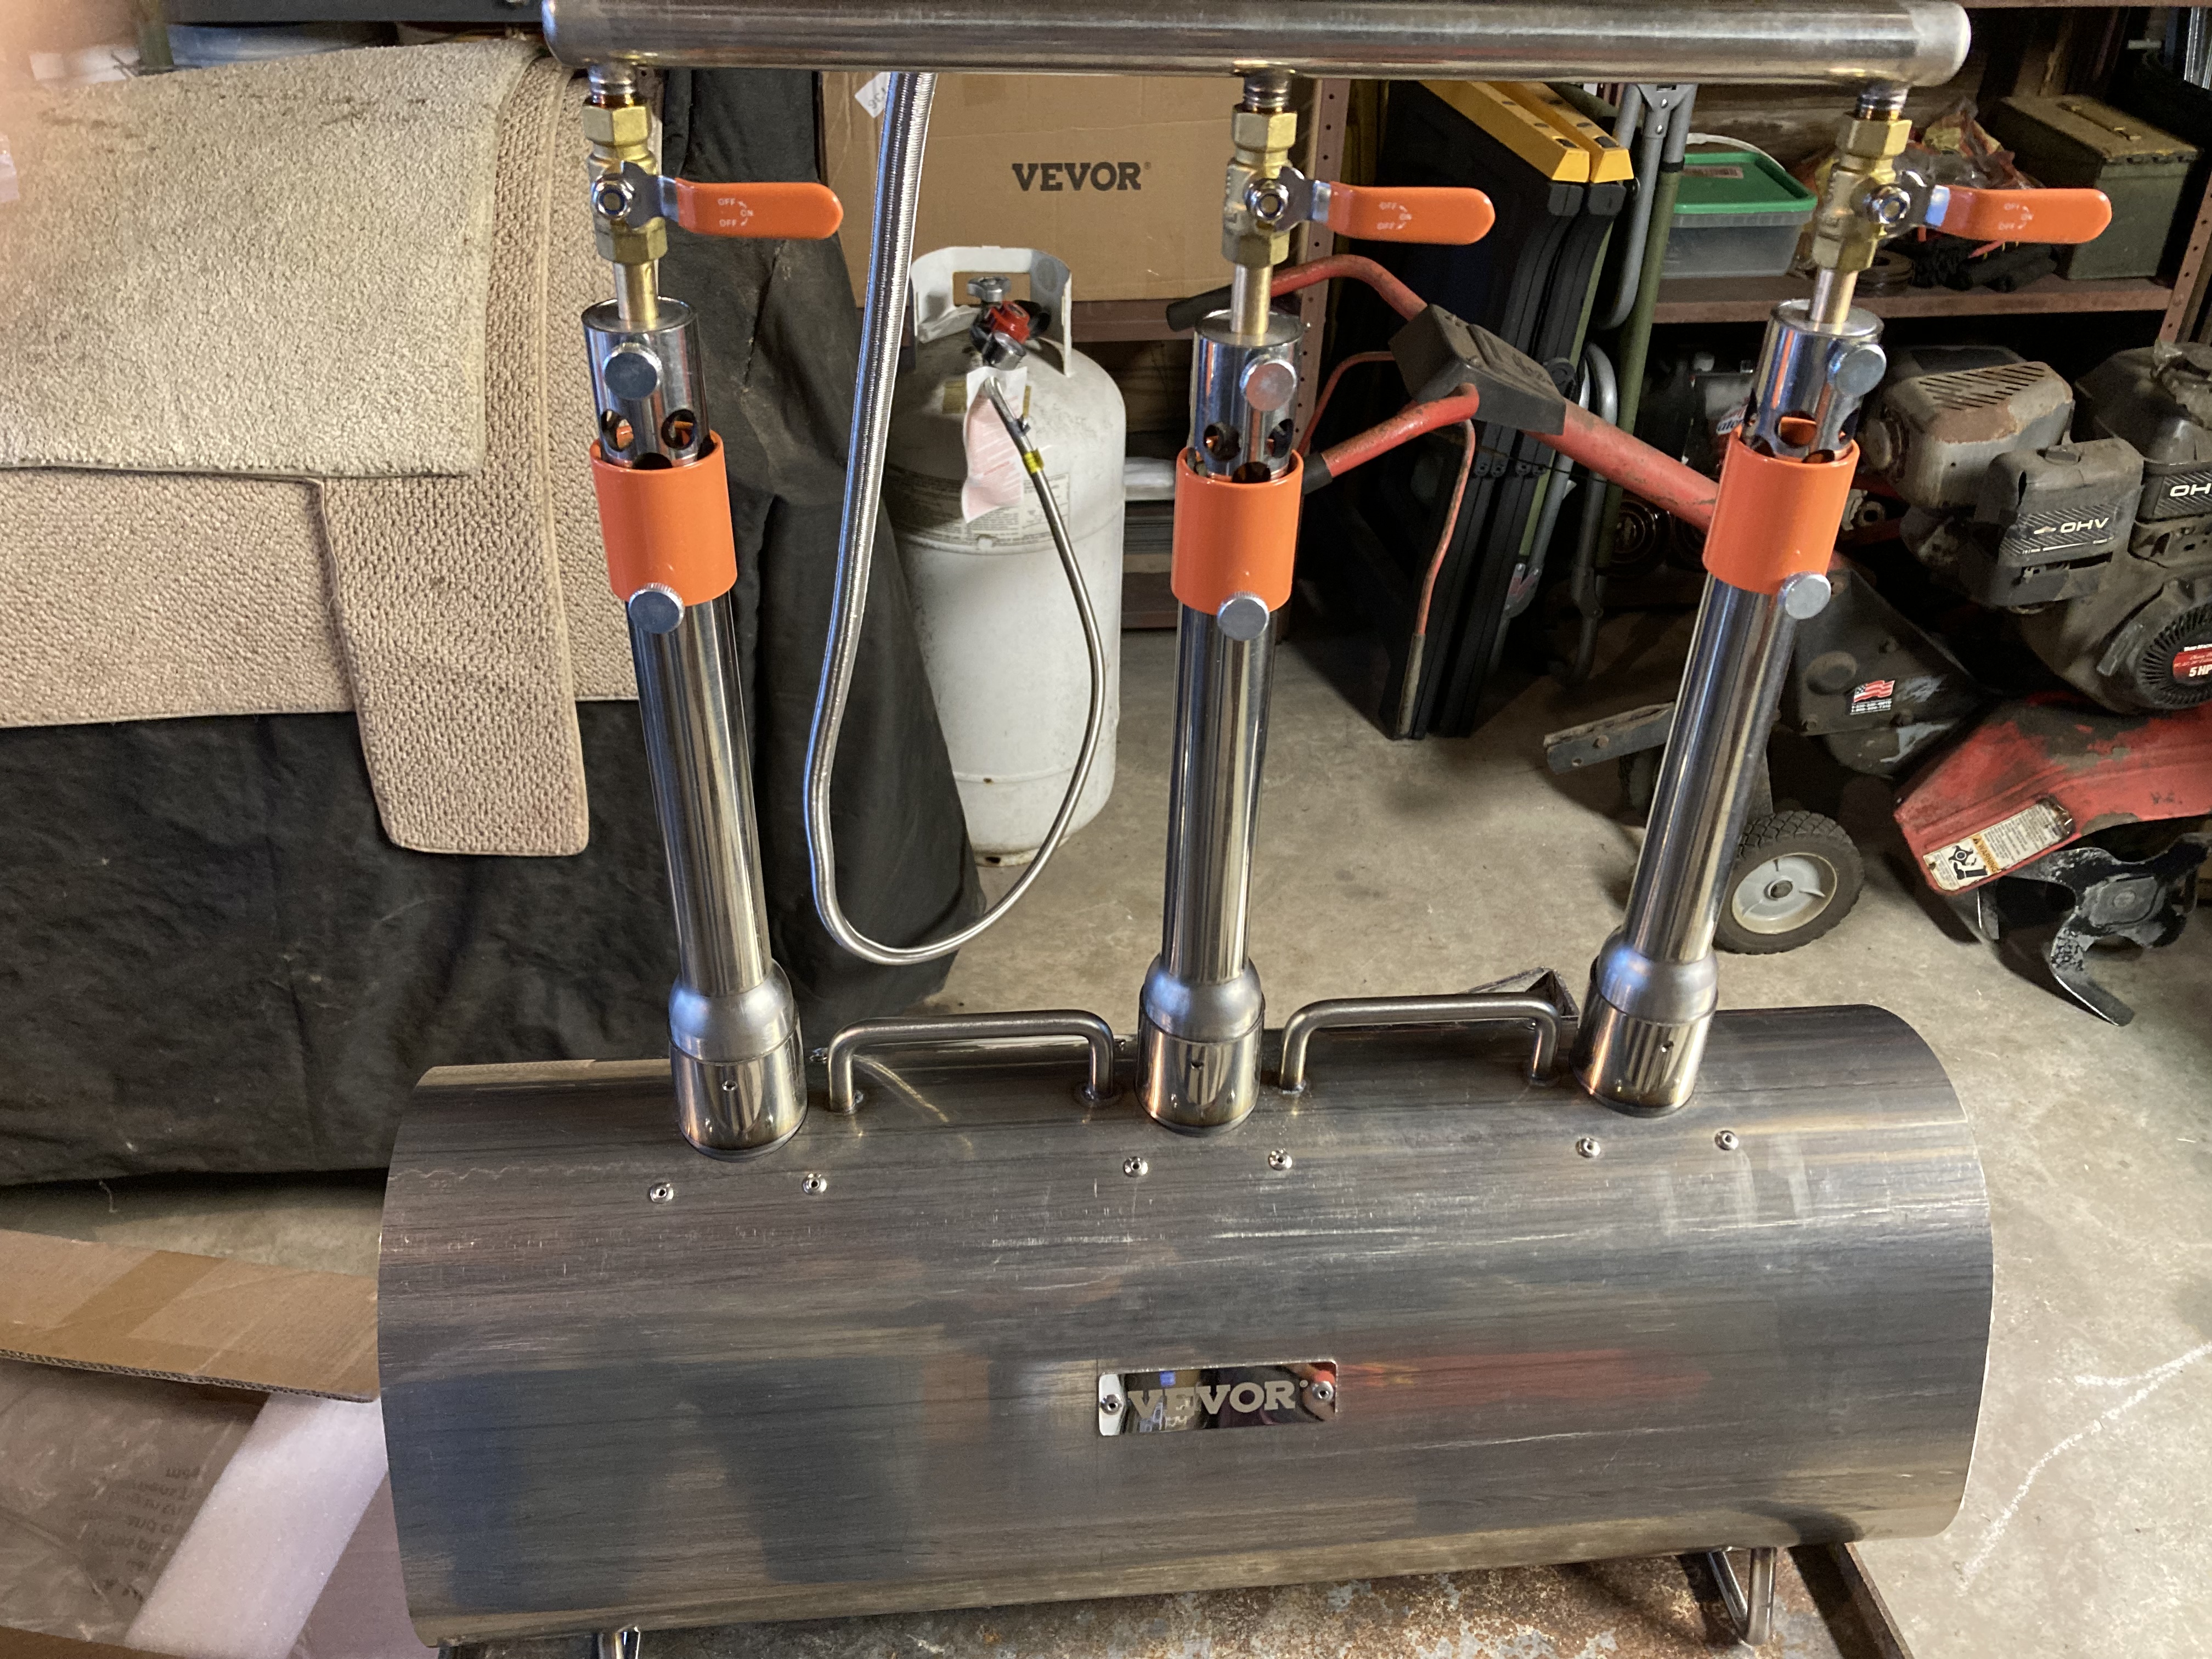
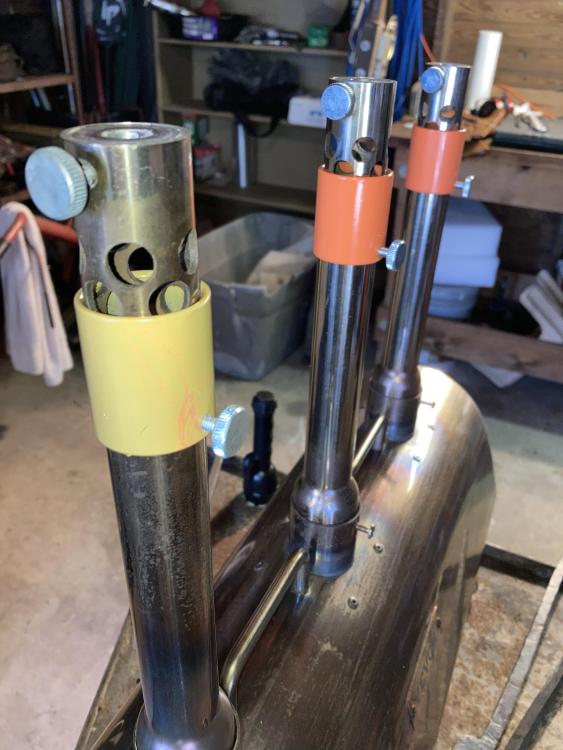
Thank you all the insight. For a beginner all this is quite confusing… I know this might be a dumb question, but why wouldn’t these forge manufacturers send these types of BEGINNER forges with the “proper/tested” materials already installed inside the forge body? I purchased on the lower end because I’m not pretending to be a professional. I’m essentially dipping my toe into the blacksmithing waters as a hobby and more importantly a way to spend quality time with my son. Where it goes from there…who knows…time will tell. We are genuinely excited about getting into smithing. As with every trade there are entry level products up to commercial grade. I understand that some more advanced folks would want to tinker with different types of burners, coatings, washes, etc. No disrespect intended but it also sounds like everyone has 5 differing opinions. LOL But for a brand new guy, it’s a little overwhelming. As a result, I’ve been spending the last month since Christmas trying to figure out what I did wrong to jack up the forge, how to get restarted, and keep my boy from getting discouraged on the whole things before we have a chance to even get our feet wet. I was reading some of the forum discussions on the Kastolite. Is it really supposed to be submerged in water for up to 7 days in order to cure? Then 30 hrs of ramping up the temp by 100deg an hour? That seems crazy! Does more gas equal higher temp? I’ve just turned all three burners on wide open from the get go. I guessing from all the discussions, the primary goal is to seal the ceramic fibers in so we don’t die. Is a ridgidizer necessary prior to the refractory then a final kiln wash coat? I’m also guessing that if I just put a bunch of coats of kiln wash that it would create a weak ‘skin’ and I would run the risk of poking holes into the ceramic fiber. Is Plistex and ITC 100HT both kiln washs? I had my fire bricks under each burner per the instructions manual (see number 5 in the pic below) Again no mention in the manual of coatings of any kind… just a bag of refractory cement thrown in the box. I’m guessing the bricks would help to protect the ‘skin’ created by multiple layers of kiln wash but then I read that the fire bricks are a heat sink and should not be in the forge if I want to maximize my heat efficiency. Sorry for the ignorance, just trying to wrap my head around all this while sucking on a firehouse of information… I do sincerely appreciate the information. Thank you all for your time!

-
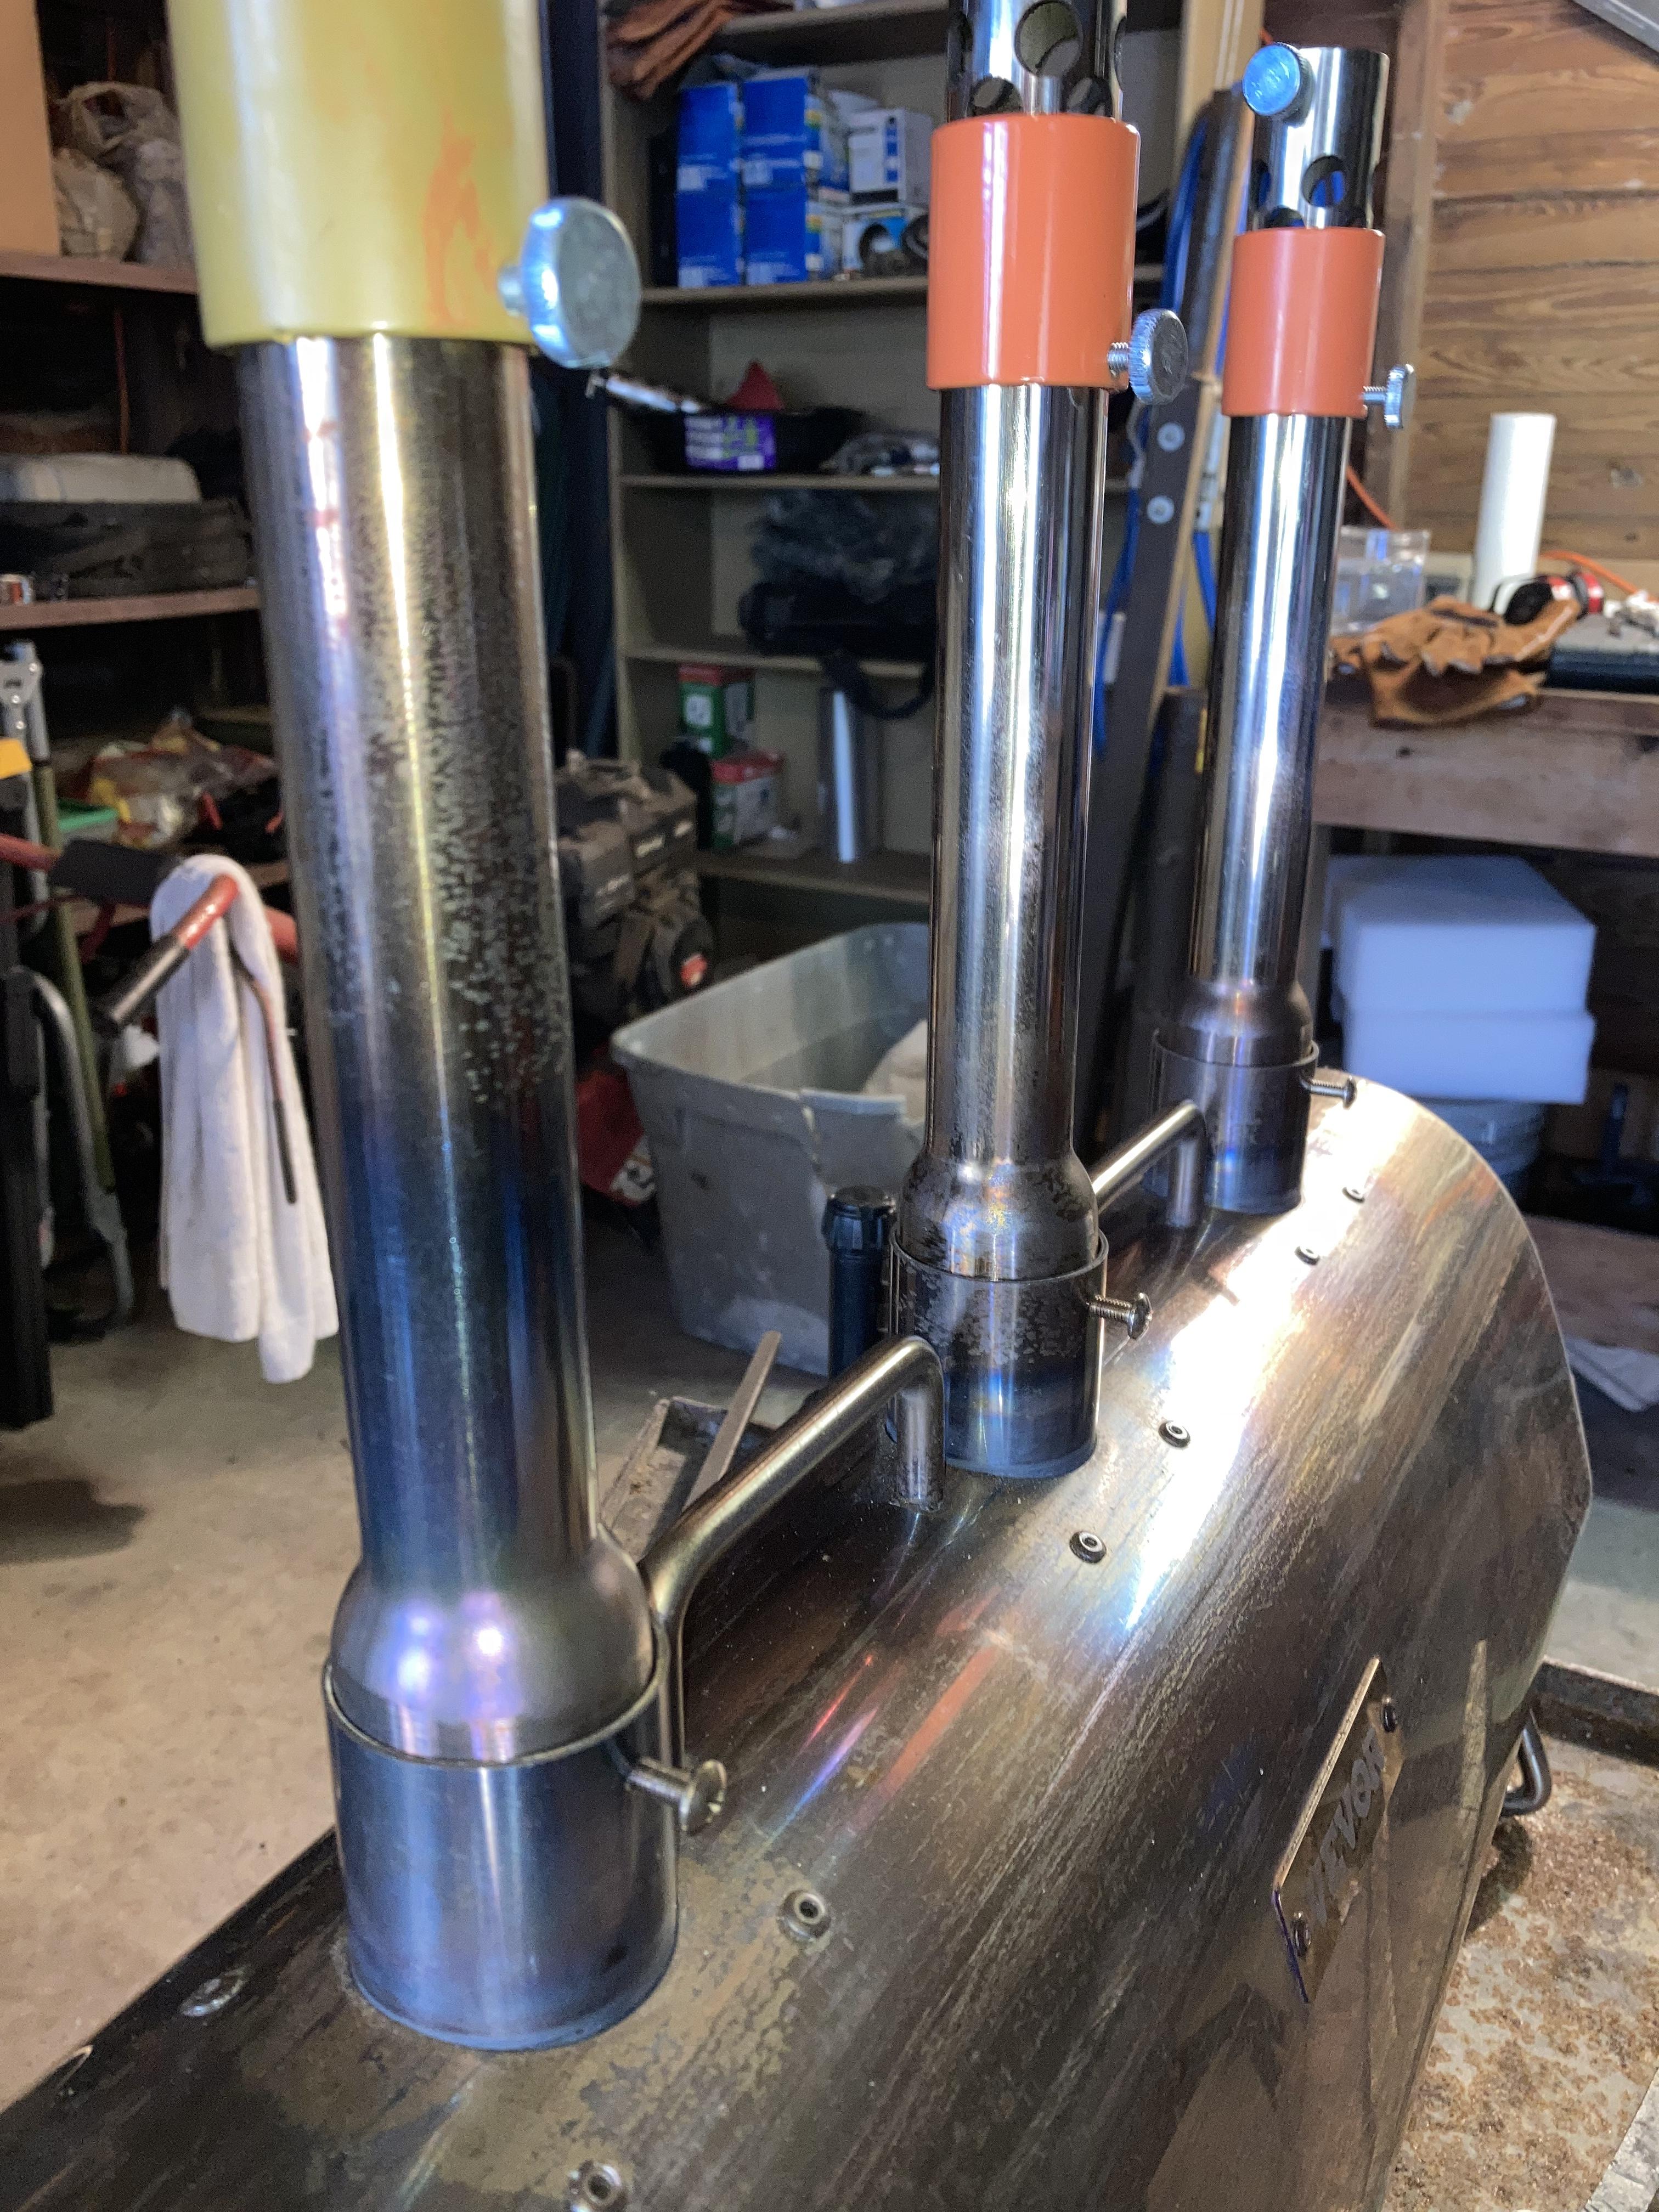
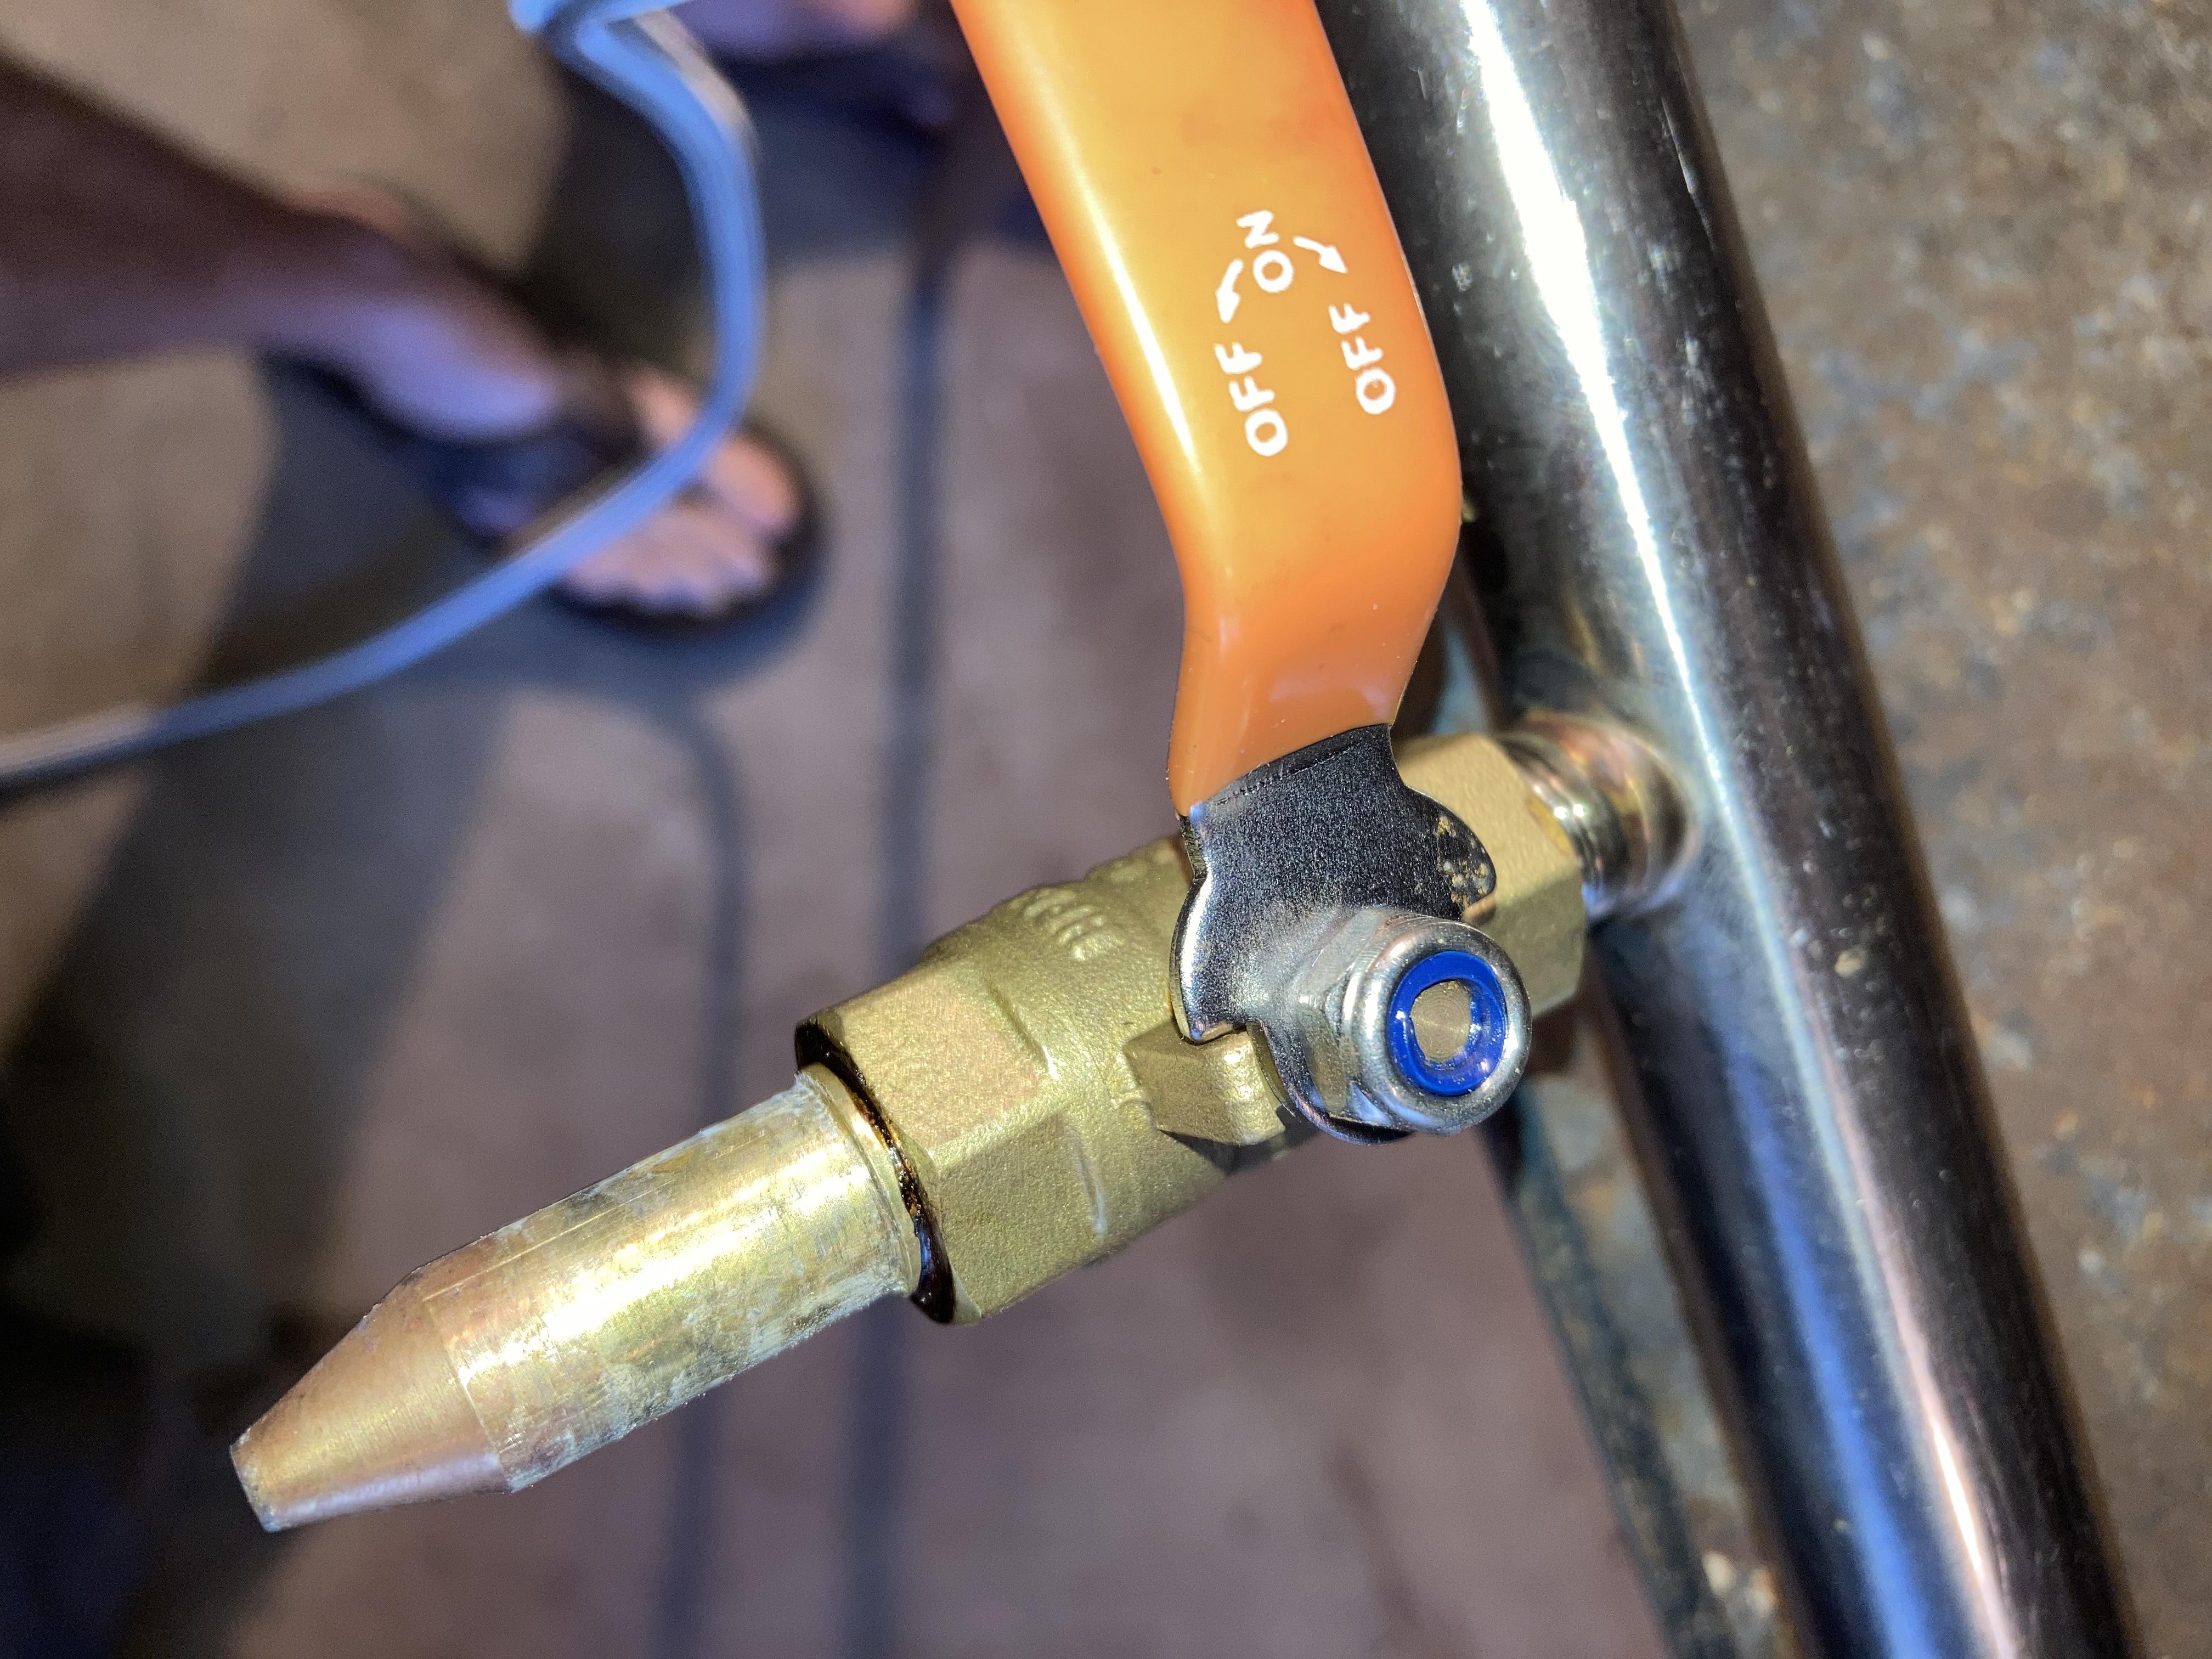
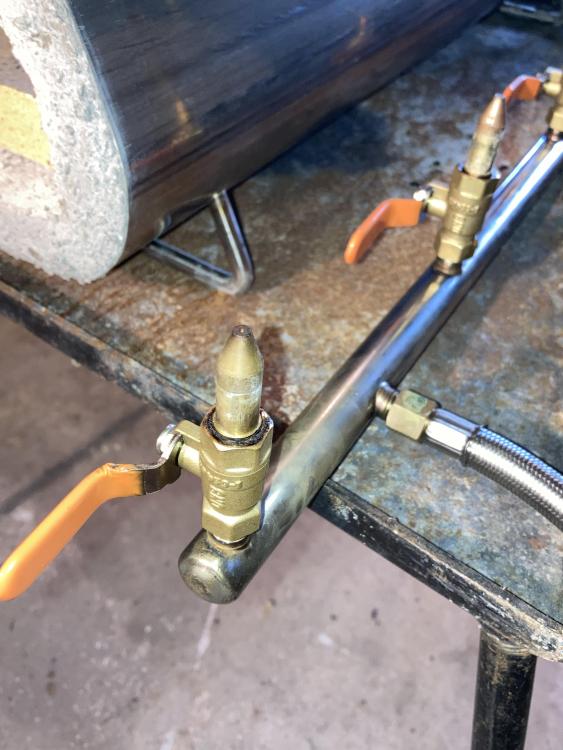
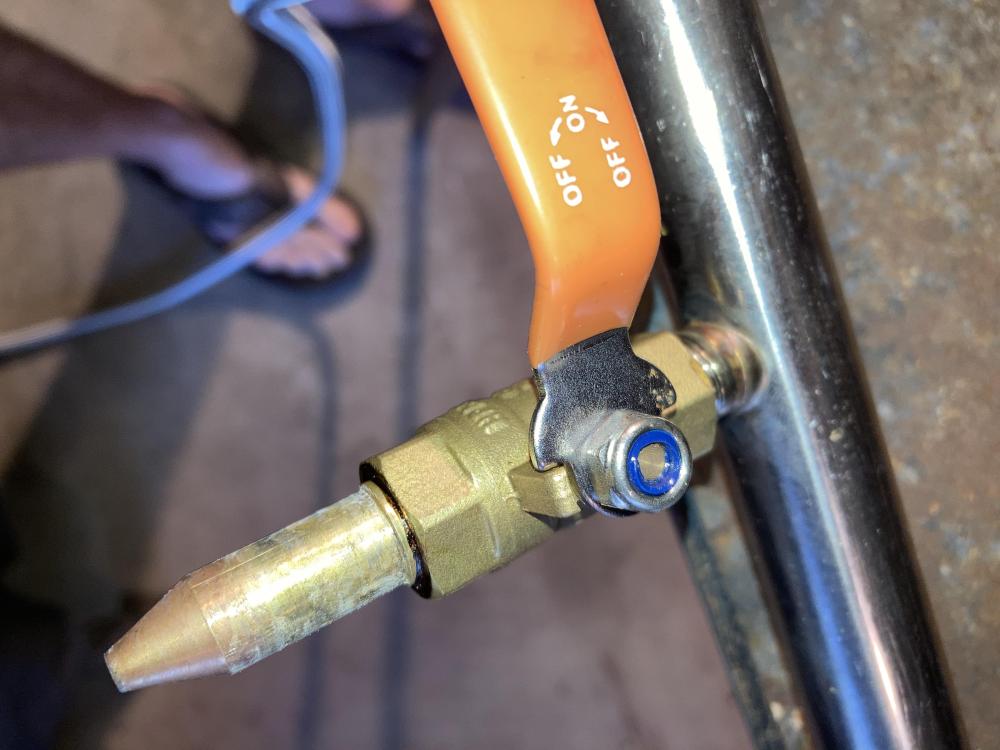
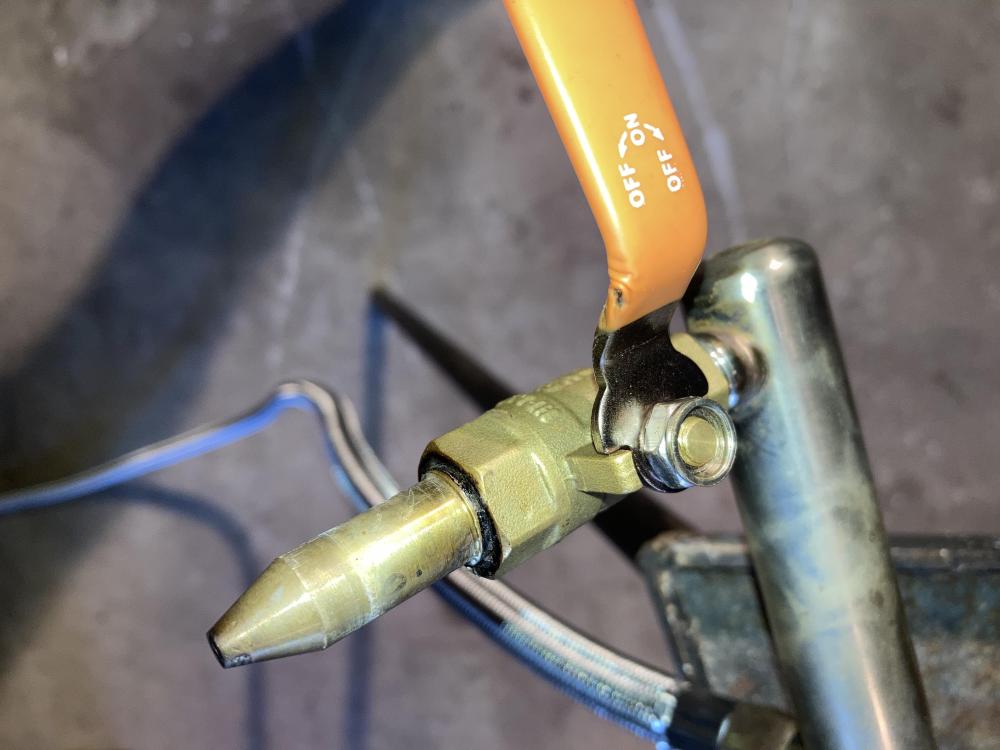
Good afternoon. Thank you for your responses. Yall mentioned castable refractory. Is satinite refractory a brand name of castable refractory or a different product all together? Also, after applying castable refractory and allowing it to dry; should I slowly introduce the heat as was mentioned earlier for cooking off moisture out of the cement or does it need a totally different process? If so, would I do that before or after applying ITC 100HT? I definitely did not “ butter” the blanket prior to applying the refractory cement. Would that process be advisable when working with the castable refractory as well? As for the third burner issue, I turned the gas completely off to that burner and I still had the choke set to halfway open as the instructions suggested. When the forge was running with all 3 burners set to half choke, the flames were coming out of both ends about 2 inches which seemed acceptable based on a few videos I saw. After shutting off the gas to the third burner, after a little while I began to smell burning plastic. That’s when I realized that the plastic choke sleeve had discolored as well as the rubber handle on the gas value above that burner was beginning to melt. At that point, I shut the forge down completely. After everything cooled down, I noticed that the handle on the gas value was now very loose and sloppy when at first it was fairly tight upon opening and closing. Not sure if there might have been some sort of rubber seal inside the ball valve itself?? On the other 2 burners there is blue ring in the nut holding the valve handle on. That ring is gone from the third burner. At first I was frustrated for making a bonehead move that simply messed up the aesthetics of a brand new product. It wasn’t until later while demonstrating the forge for a friend when I realized that a LOT of gas was leaking all around the valve at the top of the third burner. I shut down immediately. I don’t know if there was enough heat to cause all the connections to expand too much?? My guess is that the manufacturer used a glue/rubber substance on the threads of the connections when assembling the valve and connecting it to the bridge. When it got hot all that stuff liquified thereby compromising the connections. Again just a guess… I’ll attach some pics at the bottom. I definitely like the ideas of simply removing the third burner and using brick to close that area off when I don’t need it. Sounds like an easy fix all around. I’m starting to wonder that if I had simply closed the choke completely on the third burner like a chimney flue, I might have eliminated the draw and forced the heat out the sides of the forge. Just a thought… Finally, as for the company’s response; at first they offered to replace the missing parts. I explained that there were no missing parts and that I had a performance issue. They said the cement melted because I ran the forge before the 12 hr drying time was done. After I told them I waited 5 days to run they simply offered to send a new ceramic blanket. Being a absolute beginner at all this, the thought of rebuilding a brand new forge didn’t sound appealing and definitely beyond my current knowledge base. They never addressed the gas leaks or the lack of instructions. We were asking for a complete refund. However, when they offered to send a complete new replacement forge, I felt it would be a little greedy to refuse. However, I don’t want the same issues to happen again which had landed me on this forum. Thanks again for your expertise and insights.

-
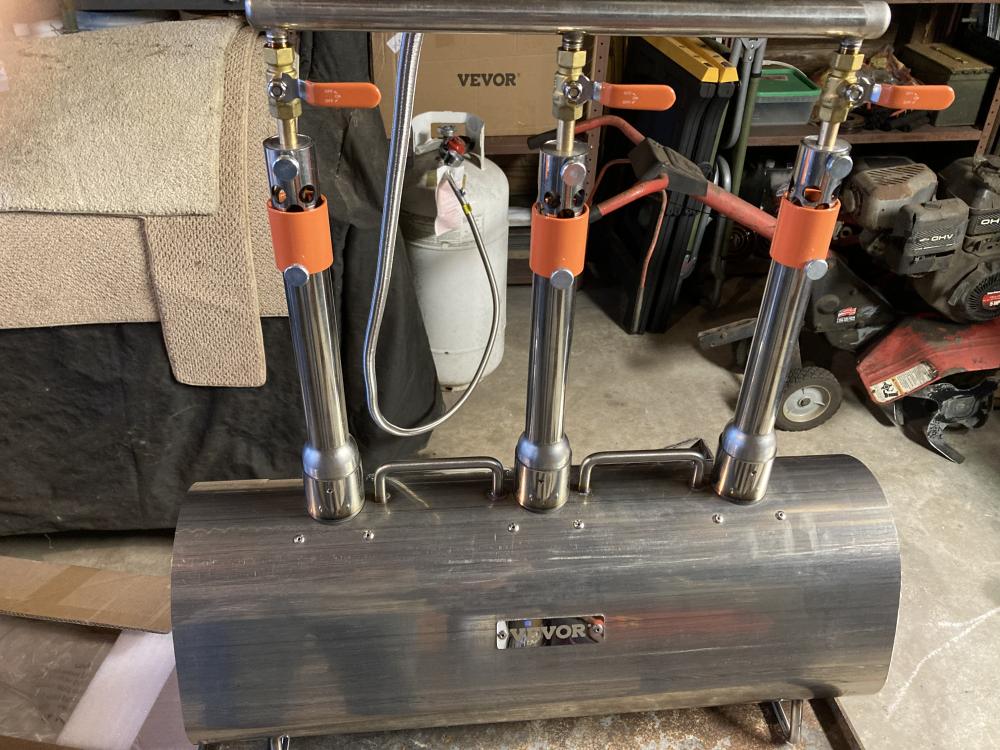
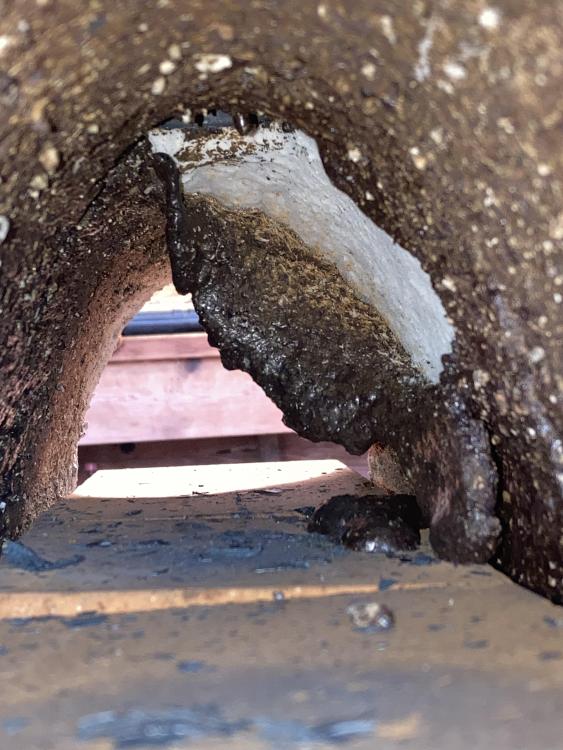
Please forgive my ignorance and the long description. I’m brand new to this forum, to smithing, and to all things dealing with a forge. I bought a Vevor 3-burner propane forge for my 13 year old son as a Christmas present this year. He expressed an interest in forging and I was all for anything that would help transition his heart from playing computer games to getting outside and using his hands to create. Also, thought it would be a great way for us to spend time together. The forge came with a bag of refractory cement. After reading the instruction manual several times, I began assembling the forge. The instructions didn’t mention what to do with the cement as if it had been thrown in the box as an afterthought. After trying to do a little research on what the cement was for, I mixed the refractory cement by slowing adding water until creating a paste like I would for concrete. I covered up all of the ceramic fiber in the forge body. The bag said to wait 12 hrs before using the forge which didn’t seem like enough time. I put a box fan on it for 5 days. Probably overkill but I wasn’t in a hurry seeing as it was a Christmas present and it wasn’t Christmas yet. Everything looked great so I finished assembling the forge, checked for leaks, and fired up. All seemed to be working great. After Christmas my son and I went out to ‘play’. We fired it up and started working on a pre-cut set tongs that I bought that required a little forging to put together. Thought that would be a good first project. We ran the forge for maybe an hour and a half. At that point, I noticed that a portion of the refractory cement had melted down from the top of the forge underneath the middle burner. There was a small puddle of cement on the brick under that burner. All that to ask: What did I do wrong? I didn’t know that cement could melt like that. Am I running the forge too hot? At one point, I even shut off the third burner because I was only using the front portion of the forge. To conserve gas… I now know that the heat will travel up the unused burner like a chimney and melt all the seals which created a lot of gas leaks. That probably would have been an important safety tip to mention in the instruction manual. Needless to say, we haven’t fired up since. After quite a bit of back and forth with the Chinese manufacturer, they agreed to send a new forge. Same model. Obviously, I’ll be keeping all the burners lit while using the forge to avoid that part from happening again. That’s the easy part. However, I have no idea what happened to the refractory cement. I want to learn from my mistakes. Do you have any suggestions as to what I should do differently to avoid melting the cement? Attached are some pictures.