ODaily
Members
-
Joined
-
Last visited
Everything posted by ODaily
-
It might stil, but cash is squeaky tight right now.
-
Seems newer and better built than most post vices I encounter. The mini anvil on the back was a nice touch too. No point to this, just cool to look at.

-
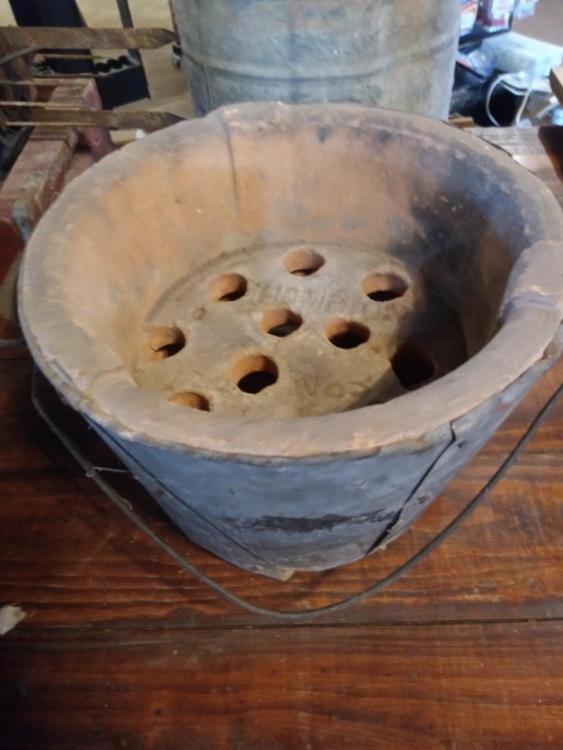
3 months later... Thought I'd drop a few pictures in here. The same buddy came up with a second bucket / brazier and gifted it to me. Looking this one over, I'd say the bottom was clearly formed inside something very much like a 5 gal bucket. The raised floor / grate section was added afterwards and blended into the clay. (based on how it looks) Overall a cruder example in the grate area, you can definitely see where it was worked by hand. Also, does not appear to have been used / fired. The interesting part is the lack of the champion branding. I'm gonna go out on a limb and say it's likely made by individuals in a cottage industry style. The tinwork certainly reflects that too. Which means to me that the first unit was probably a cast of a cast of a champion fire grate (to account for mirroring) by some enterprising individual. None of which means much of anything, I just thought it interesting enough to share.


-
Lee for the win! Big thanks. Pretty sure you just put a few new wiskers in your Beard of Wisdom.
-
Having seen this in person, I'd say the tin portion could either be homeade or just an indication of how crude manufacturing was then when compared to today's standard. But the Ceramic portion just seems to well made to be homebrew. Too smoothly done, too well formed. Just my opinion. I still haven't a clue what it's for though.
-
I like the ramble. Listening to more viewpoints and a broader swath of knowledge can only make me more informed. Viva la Ramble!
-
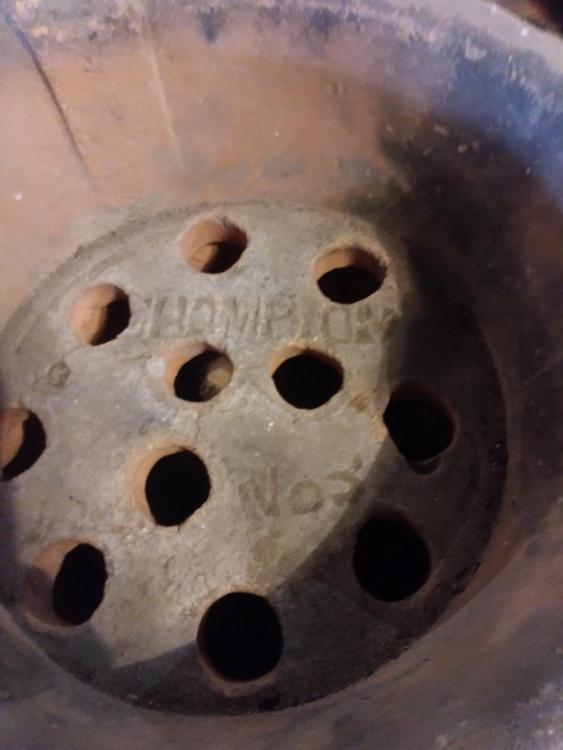
O.K. So... Not made of cast iron. Not molded from a standard iron grate (letters not mirrored). I'm inclined to say not homemade. There are 3 ribs molded into the inside wall. But look how smooth and regular they are. Could be homemade, but that's a bit too well done for most home brews. Also, and again not conclusive, who would go to the trouble to cast in "Champion No3" on something like this.
-
There's no cast iron. Just a tin shell, wire handle, and ceramic. I did have the thought maybe it's for transporting hot rivets? But then I figured they'd heat them close to point of use. Wait... Quick thought. Is the Cast Fire Grate from Champion done with raised lettering? I ask because this is recessed lettering. Maybe someone made this by casting it around a champion fire grate? Or a whole Firepot?
-
A buddy had this, and I'm curious. Appears to be a bucket, made of VERY light galvanized tin, and completely lined with a heavy ceramic(?). The "floor" of the bucket is elevated to half height( so there's a lowr area below it), has multiple holes leading into the lower area, and the lower area has an adjustable door or gate on the side. It has a clearly cast " Champion No3" visible on the floor on the inside of the bucket. Just totally guessing, but something to put a fire in, and adjust the air flow coming from the bottom? But why? Guess I'm just really wanting to know what it's called and what it's used for.

-
And the lack of markings / stamping. Also, possibly the weird 3 piece casting. If it's all cast iron, then... thud. Good call. Still would've liked to have it. Just for size bragging rights. Not enough to pay that much though.
-
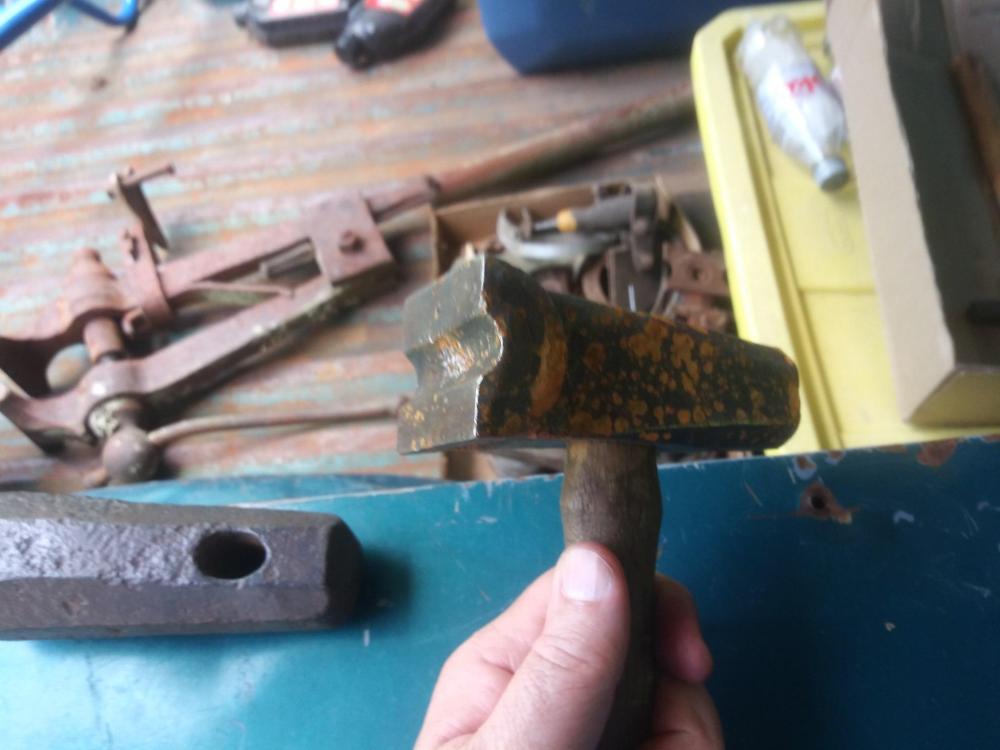
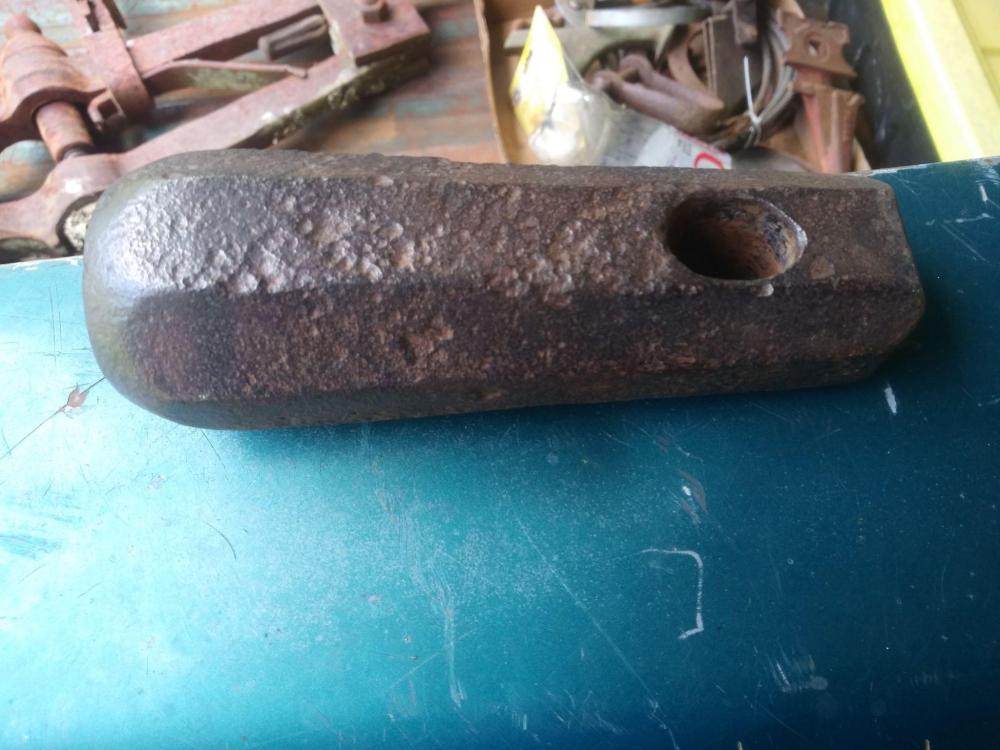
Picked up these two hammers at auction. The guy had a lot of tools and blacksmithing stuff, but I don't have a clue what these are for. The first is just a head, and one end is crazy long compared to the other, along with a wedge shape, that's going to make it super heavy on one end. It is drifted for a handle. The second one has a roughly 1/2 semi circle groove made into the face. Looks like the previous owner peened the center area with a center punch for reasons unkown. So... What'd I get, and what are they for?
-
Everyone is always asking about anvil pricing, so I thought I'd share what I saw today at an auction near Kirby, Ar. First anvil: Was billed as 250lbs, had a 2 2 2 marking on it, which I'm interpreting to be 282lbs by the hundred weight system. Used a 1" ball bearing, good rebound, pretty good ring to it. Sold for 1050 dollars. (painted orange in picture) Second anvil: Was billed as 400lbs, no visible markings. Auctioneer said it was 40" in length, I did not measure. Ball bearing had good rebound, but the worst sound I've ever heard on a anvil that I didn't know was a harbor freight. I can only describe it as a "thud". Waist was welded, looks like electric arc. It may have had a weld line about 2-3 inches back from the cutting area, across the face that ran all the way down and through the upper casting. If so, it was a 3 piece construction, which I find weird. Or maybe I'm just reading too much into barely visible details. Sold for 2400 dollars. I was told the purchaser was going to display it outside his automotive shop. Also, the family told me this anvil had been passed down inside the family from a man who originally was a lifer at a railroad yard down in Texas. Possibly around Marshall Texas.


-
I'm in SW Arkansas and looking for some refractory. Satanite, or Kastolite30 both come highly recommended. Anybody know where I can buy some? REALLY trying to avoid massive shipping charges. I did find FS Perry in HotSprings, but they only advertise Plibrico brand, which I'm not familiar with. May have other options, but I'm gonna have to talk to them to find out. OR maybe someone is familiar enough with Pilbrico products to steer me? There's a RAB in Texarkana, but it looks more like a service than supplies.
-
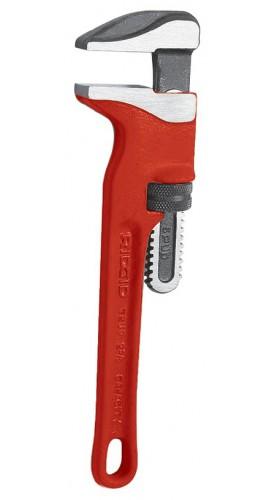
First off, I've found everybody has different names for these, but Rigid calls 'em a Spud so I will too. Secondly, that means a smooth jawed pipe wrench, but without most of the built in "rocking" in the jaw. I see quite a few people using these to Twist metal with, usually while in a vice. Most of them I see are old timey wooden handled antiques. I also always see them with a welded on second handle, usually quite crude. I need something like this, and I've gotten a newer manufactured Rigid 12" Spud wrench and a Rigid 12" pipe wrench. My plan is to cut down the pipe wrench until it can be grafted to the back side of the moving jaw of the spud wrench. It's not perfect, the handles won't actually align with the center of the work, but it's close enough for careful twisting to keep it pretty straight. It helps to think of this as tap handle with one open side. While I'm sure I can do this, I can't help but think someone, at sometime surely had something better. A factory made double spud, perhaps? Something else? Has anybody seen this addressed in another way? Just how did the wise men of yesteryear go about hot twisting?
-
Isn't that something? Thanks!
-
Pretty much just curious what the heck this would be used for. Unique design to me. Best guess, = Saddle / leather work? Also, it's A: not mine, and B: on C/L in Camdenton MO, USA. I just found it whilst browsing.

-
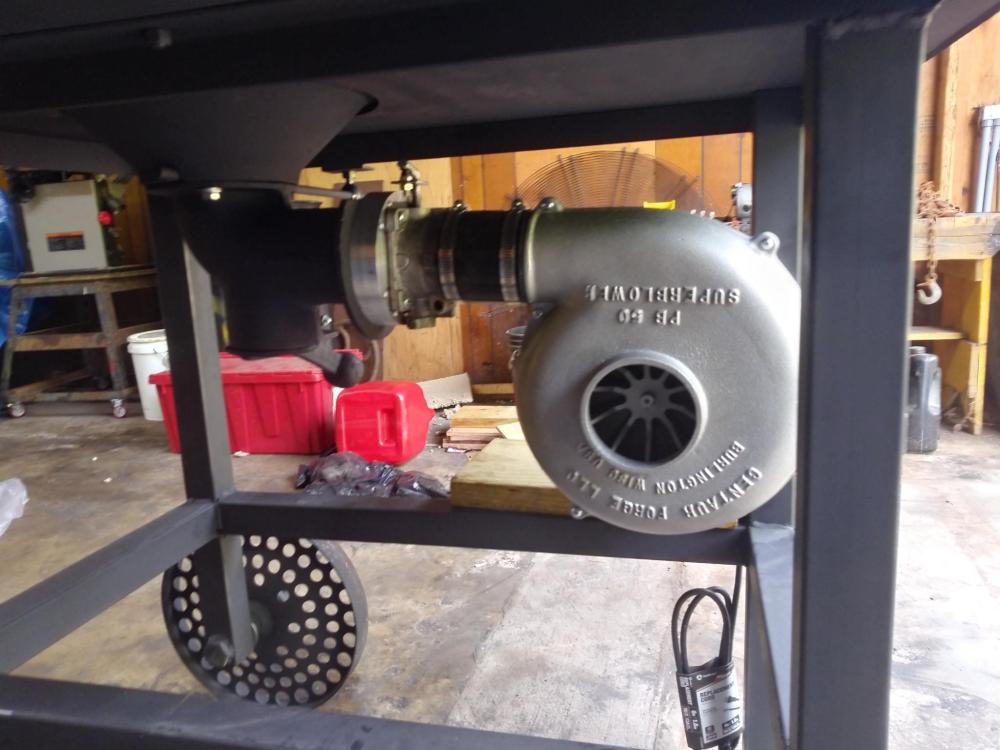
I needed to choke off the air intake. I used a shell of a mower muffler. The perforated holes let just the right amount of air in to put the valve in a useable range. By useable range, I mean from this is pretty hot to surface of the sun temps. Just flat wow. Everything I've learned to this point was on bitumenous with a handcrank. Anthracite with electric is a much different beast. I really wish I would've built a diverter style valve. The blower is capable of insane for a newby heat, but can be ticklish to dial in as a result. Maybe I'll redo it at some point. Anywho, pictures.
.thumb.jpg.f33a889348f70ad300df2ef1b3c0e734.jpg)
.thumb.jpg.43ec6f2161bf2843e02dc7b7a3525528.jpg)
-
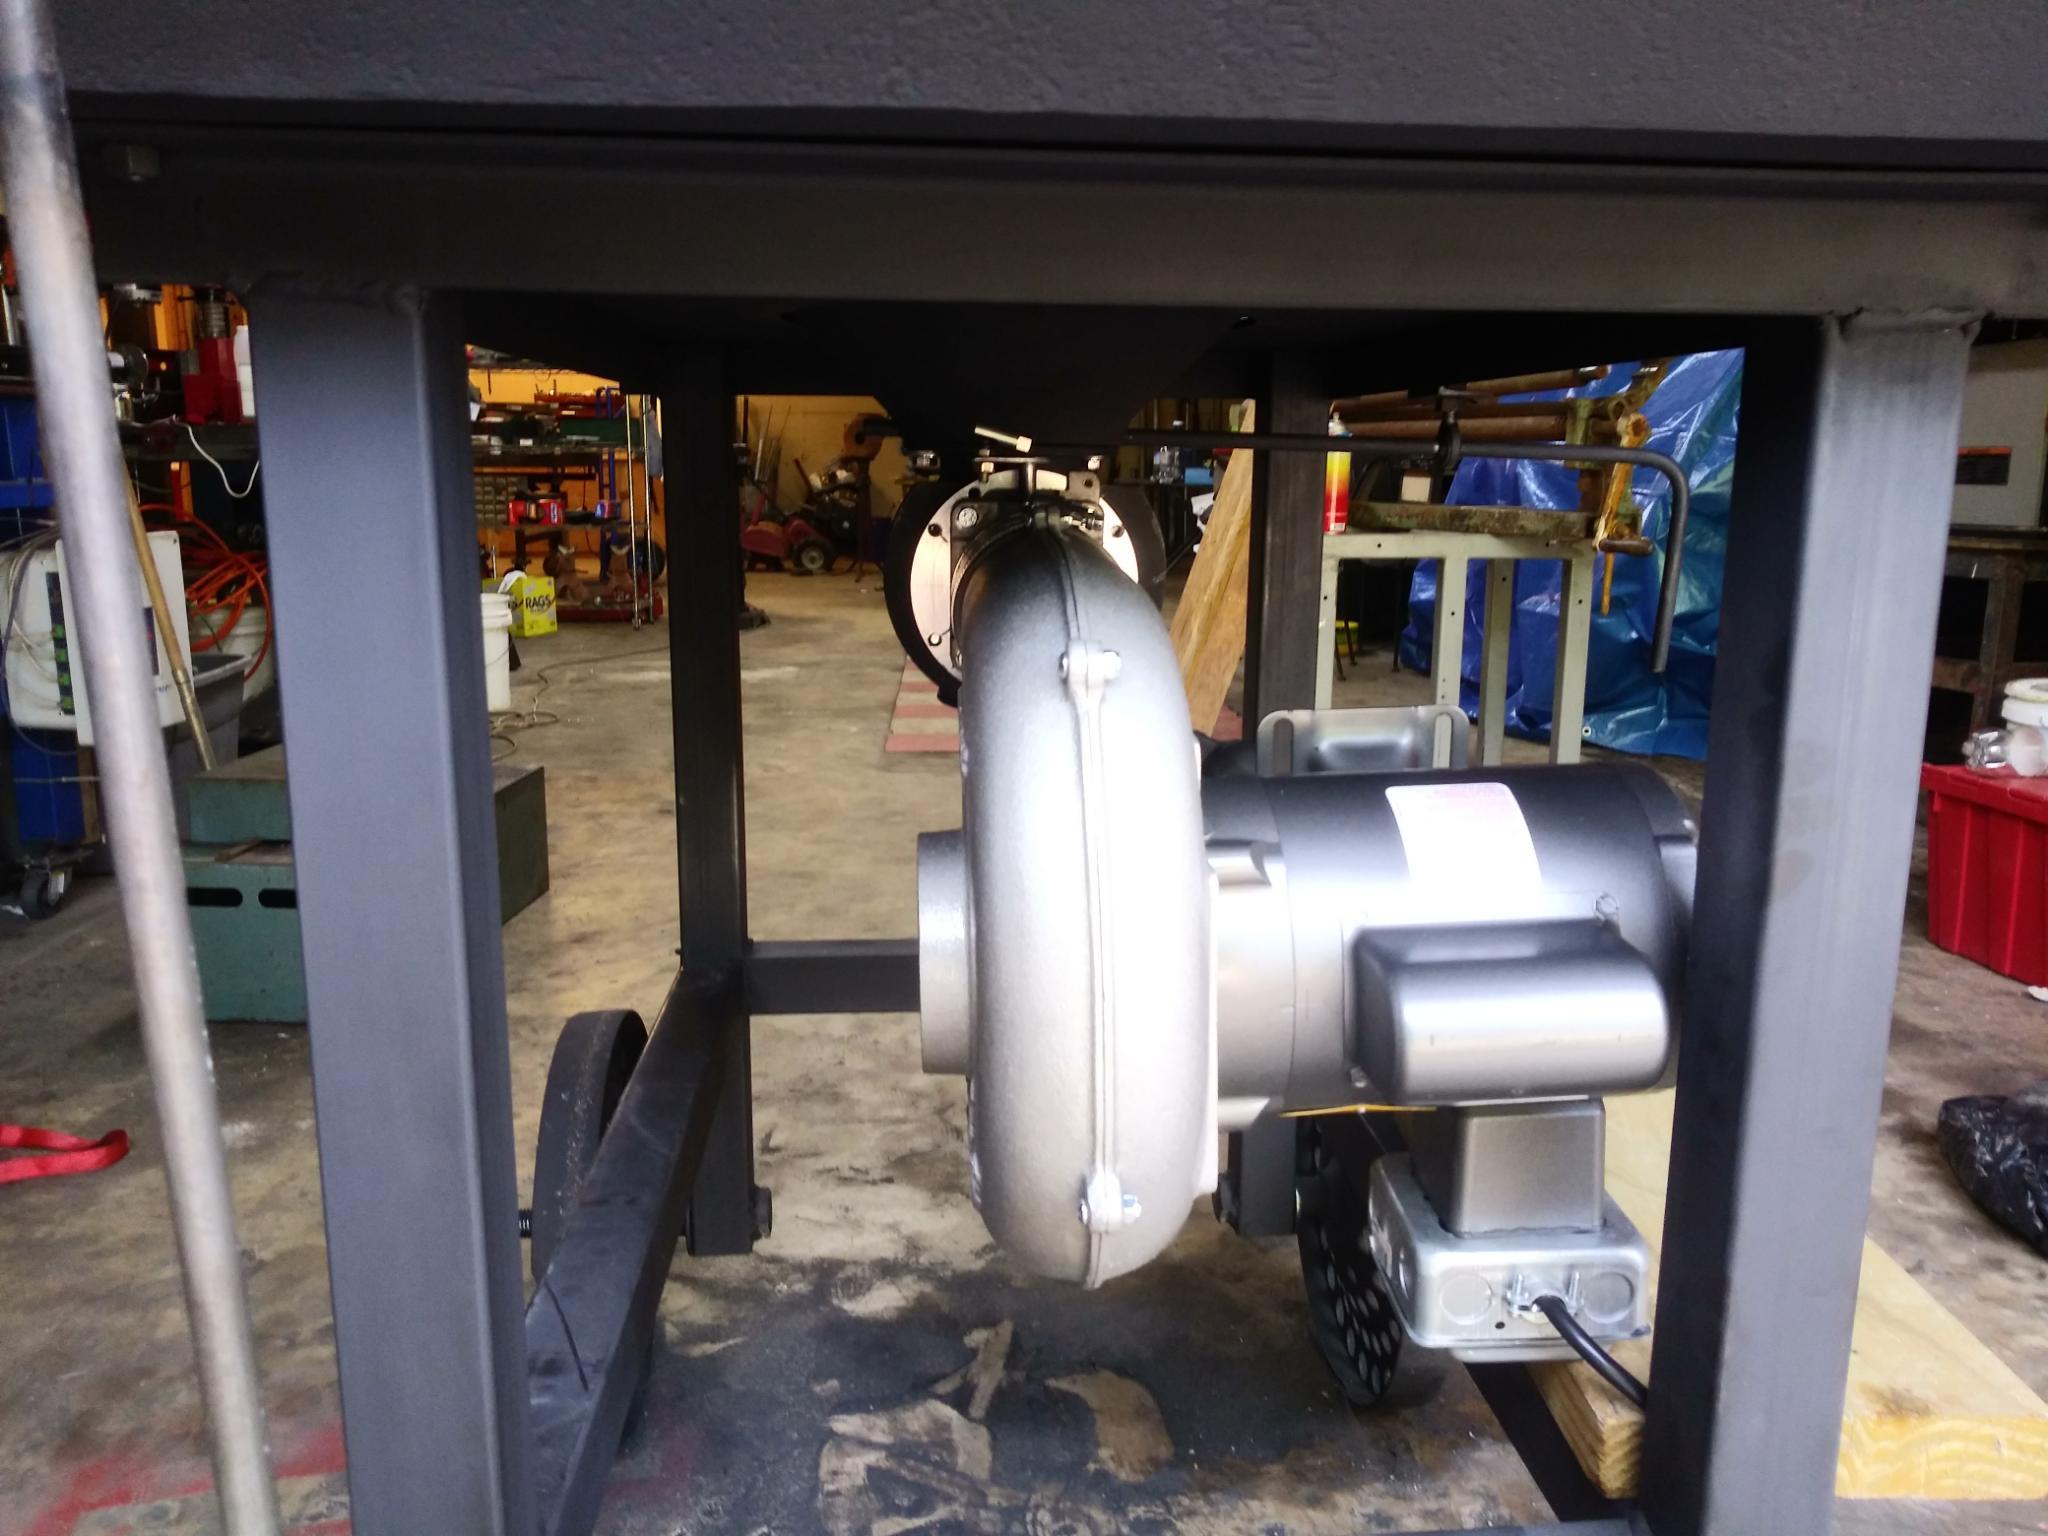
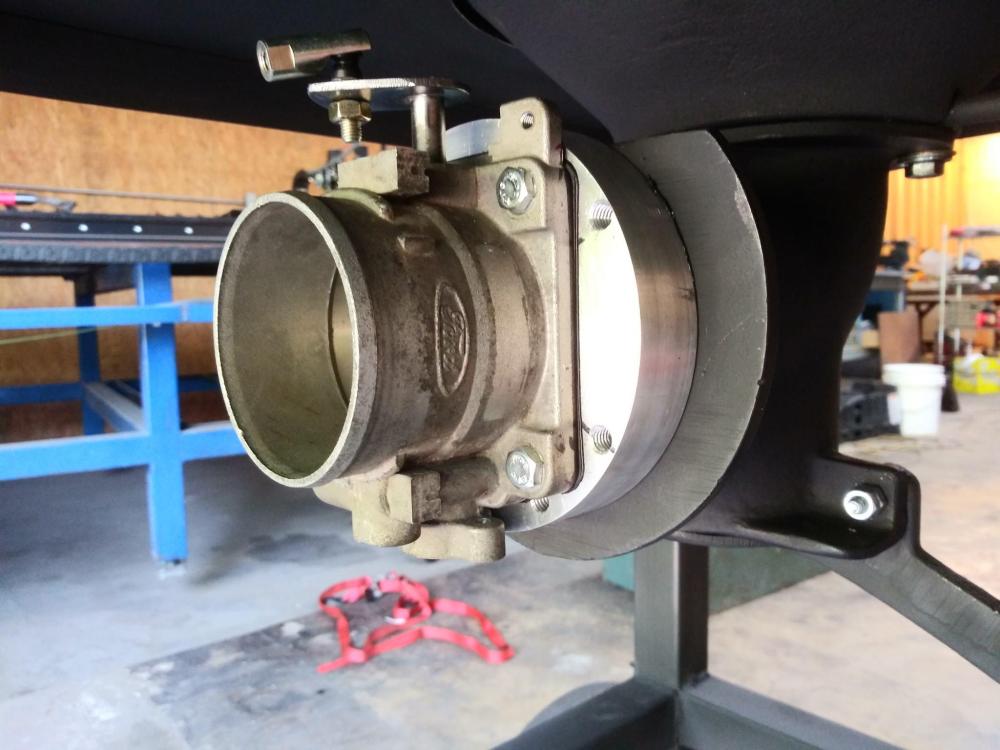
Thanks! But.. Forge isn't working yet. The blower is attached by 3" silicone hose, and is seting on a scrap of wood. Next step, mount the motor on a plate, move the control / switch to a more convenient location, and fabricate a control rod / lever for the valve. Then I can fire her up. Also, I forgot to mention, I cut the adapter out of 5" round, but that's the absolute minimum that can be used with the bolt holes on the CF unit. It uses a 4" x 2-3/8" bolt pattern, assumably the same as the dayton blowers. If I had a bridgeport, I could be more accurate. I guess I need a bridgeport.
-
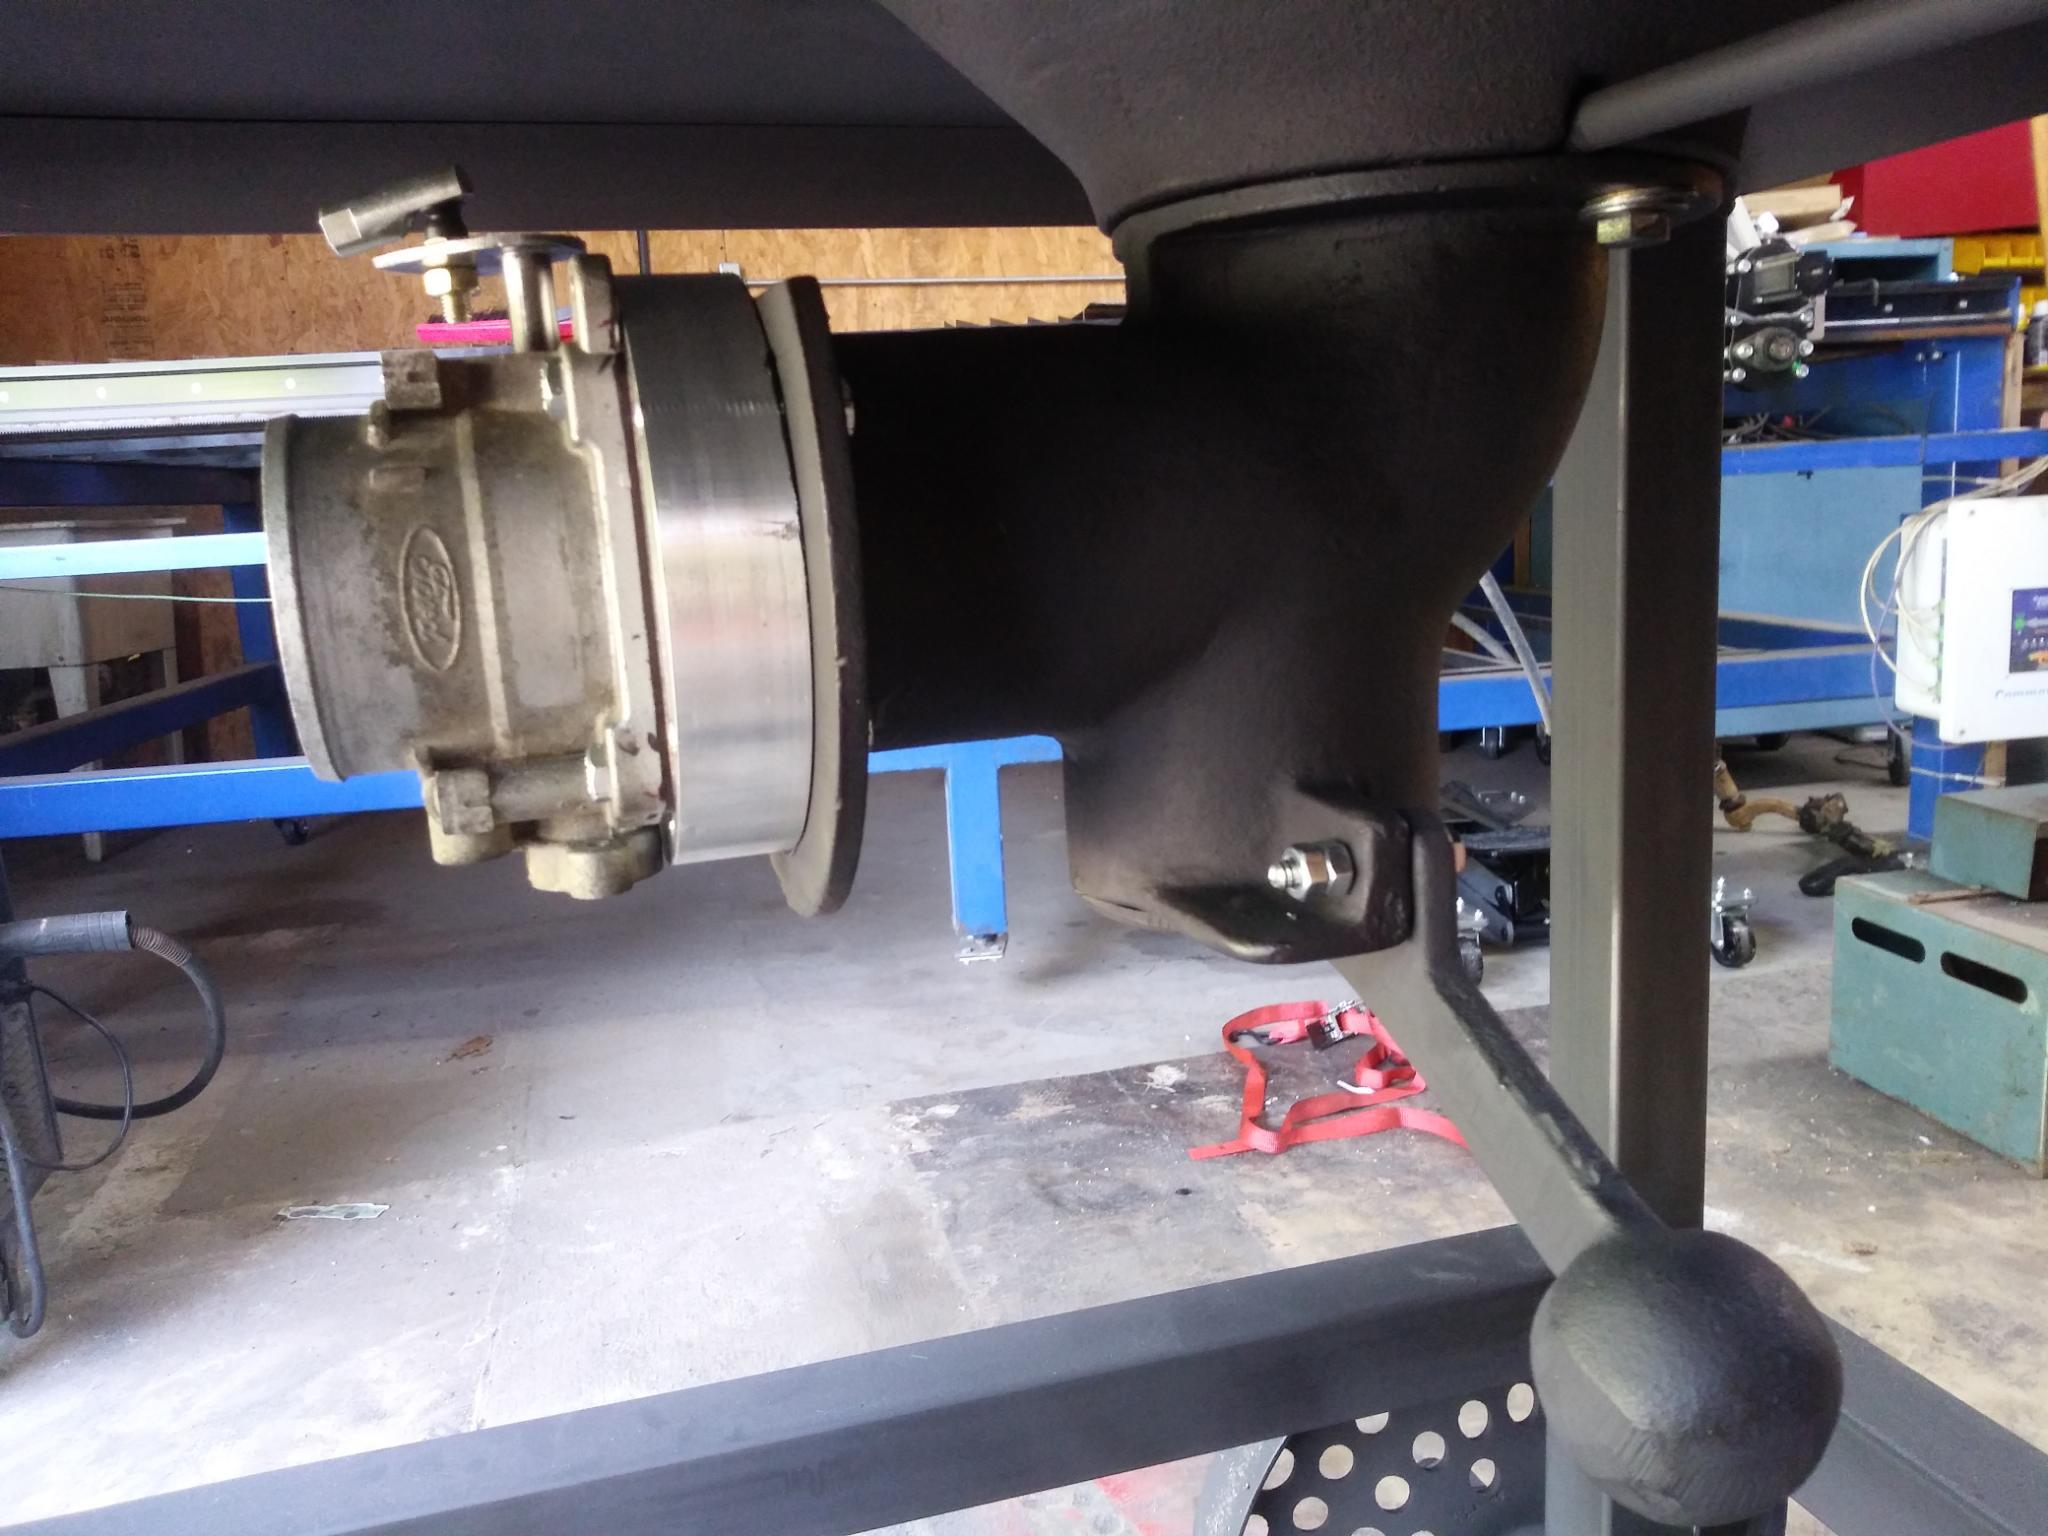
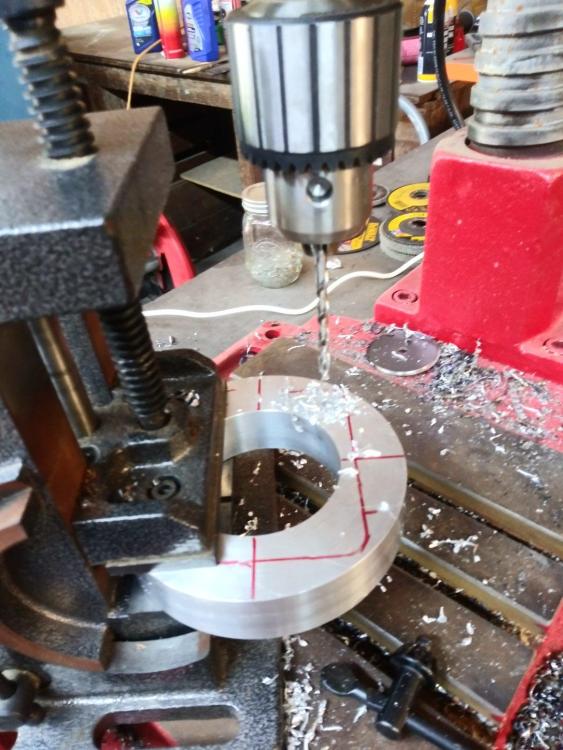
I made an adapter from a piece of 5" diameter, 1" thick aluminum. I could just as easily have mounted it directly to the tuyere if I drilled holes in it's mounting flange. I didn't want to. I could also have made two flat steel plates and welded them to a piece of 3" pipe to make an adapter. I had aluminum, I used it. I matched the through hole to the TB at 2.85" diameter and beveled the backside out to match the tuyere at 3.1". (Does NOT need to be that precise.) Then I messed up drilling hole patterns, and had to turn everything 90 degrees and redrill to the correct dimensions. Measure once, cut twice, ya know. Mounted it up and started on the fan. I still need to build a rod to control the valve (push/pull style). I'll also need some friction on the rod so it doesn't just randomly move. But, that's tommorrow's problem.


-
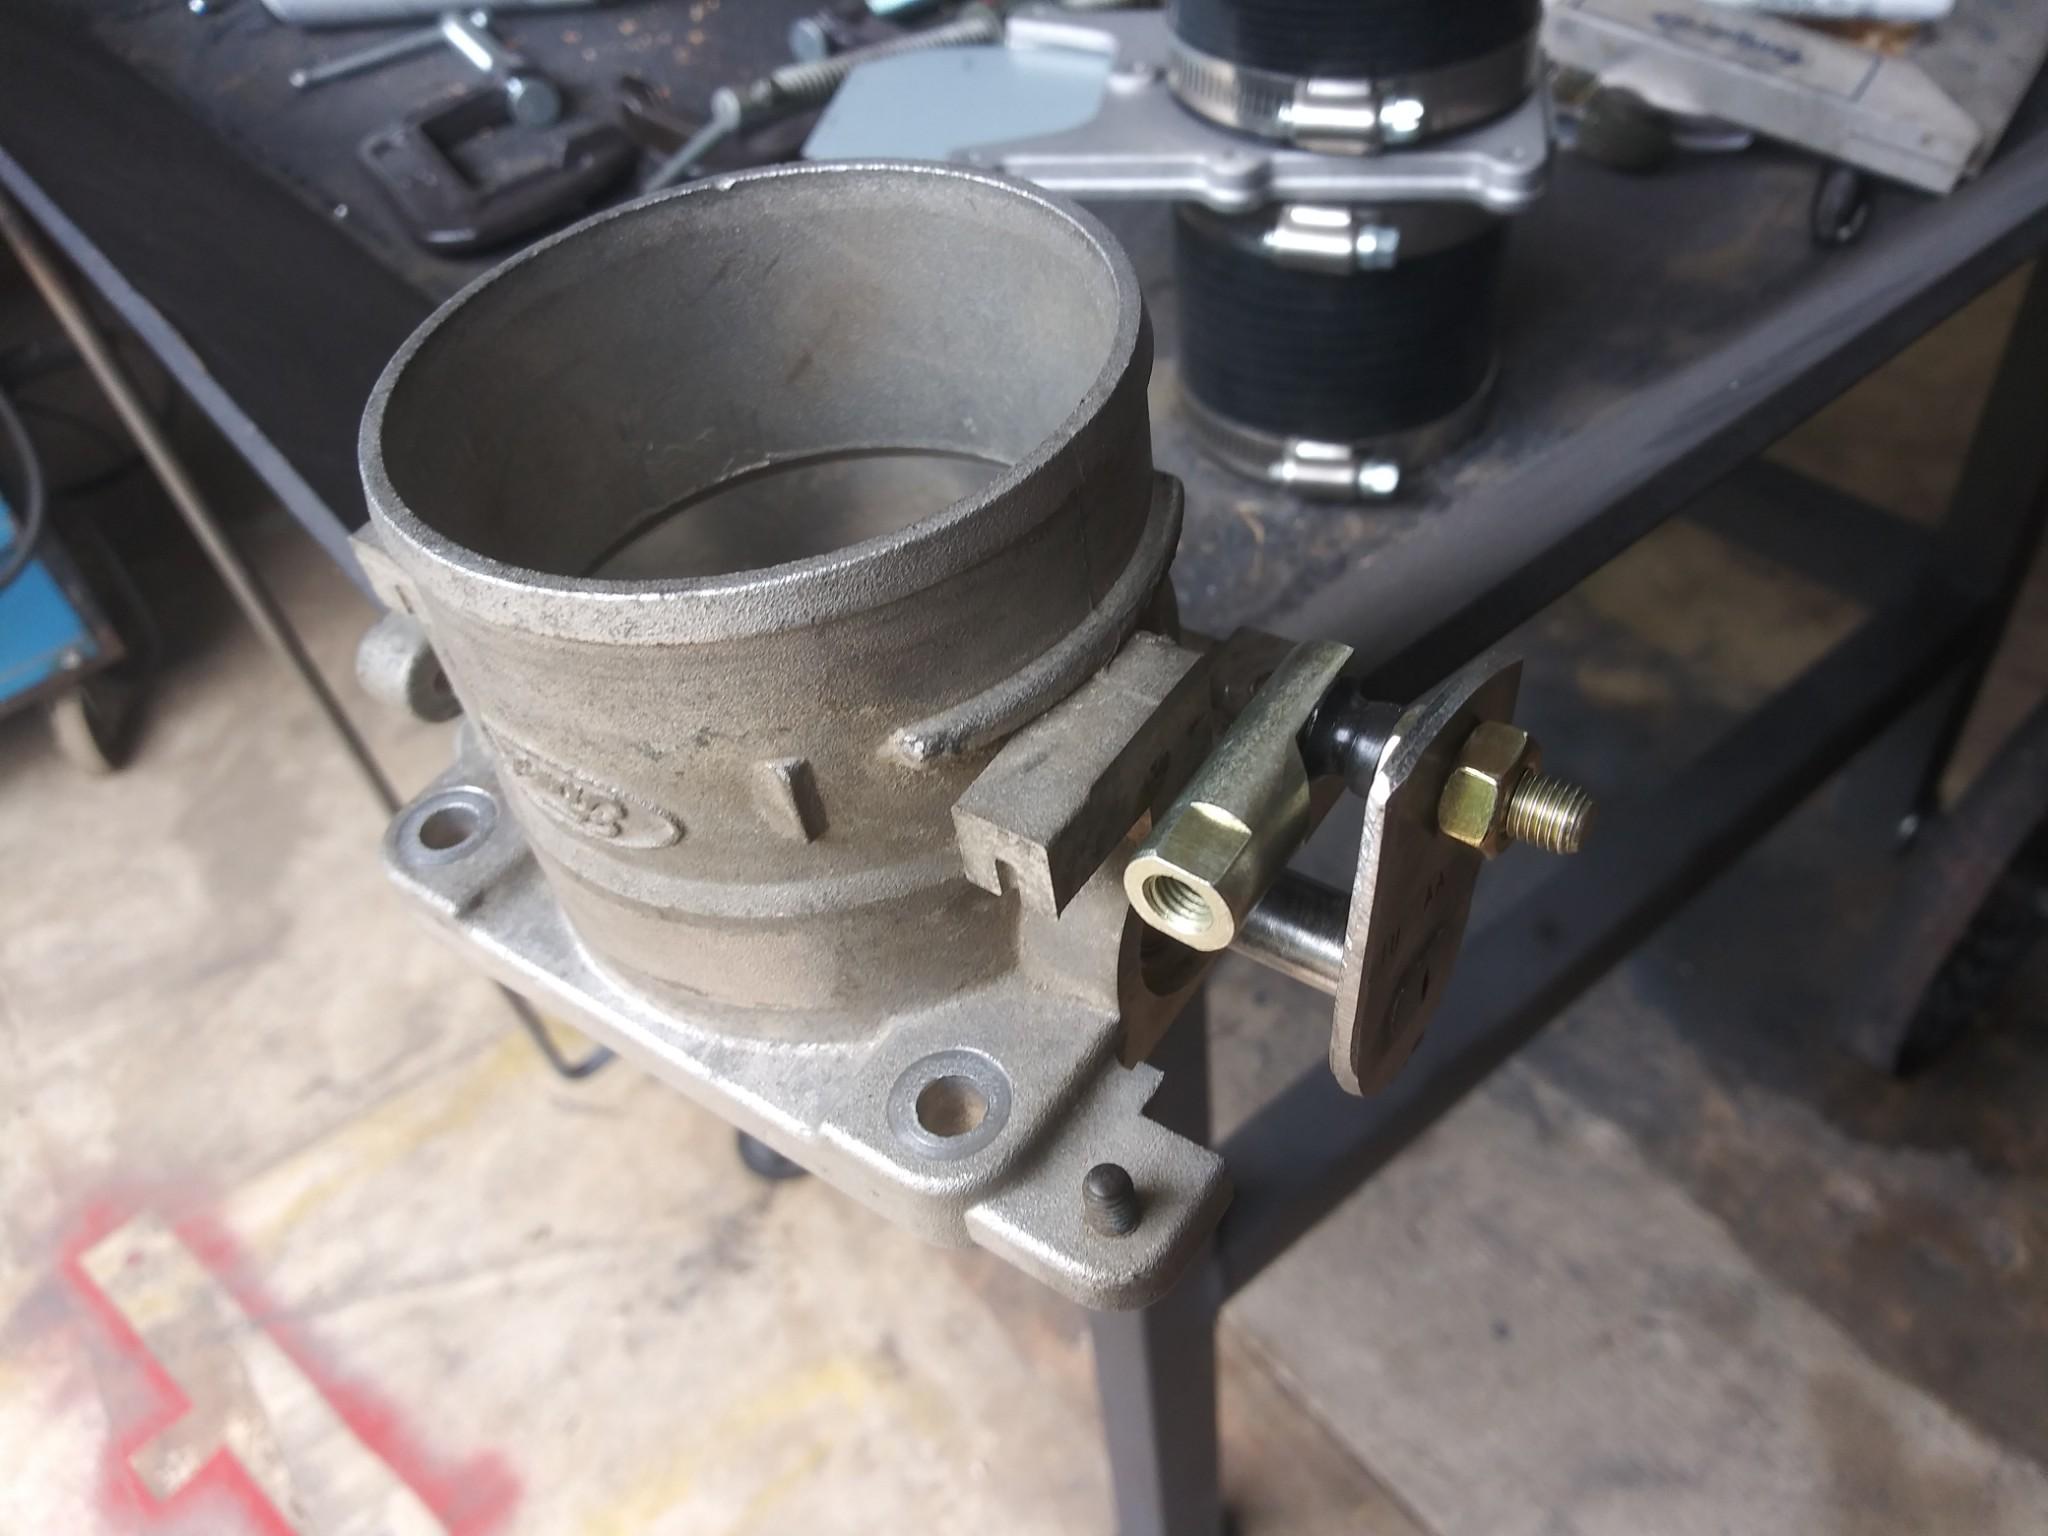
This came up in a different thread and I thought I'd start a new one to document what I've done in case anyone else wants to try it. Basically I'm modifying a Throttle Body of of a 5.4L Ford engine found in various trucks in the early 2000's. This was selected for it's 3" hose attachment, and being the simplest available with the fewest sensors, valves, and passageways to deal with. First you'll need to snag one off of the previously mentioned engines. There are cable operated and fly by wire types. You'll want the earlier cable type. Also be careful not to get one off of a v6 as they look the same, but are smaller. Step one, unscrew and discard the throttle position sensor. Next remove the two screws in the throttle shaft that hold the blade on. Rotate the shaft so that you can pull the blade out of the shaft. It only comes out one way because of two stamped bosses in the blade itself. Make sure you not which way the blade is oriented with regards to the housing, it has beveled edges that are hard to see, but you want to put it back the same. You should now be able to tap the shaft out of it's bore. You'll want to unhook the spring as you get it moving, it just clips onto the housing. Discard the spring. Remove the O-rings from the throttle shaft. Now clean everything. Good quality carb cleaner is a must to remove the carbon sludge, particulary inside the throttle bore. Now that it's all clean, we can modify. I chose to trim the end of the shaft back where the Throttle position sensor was. I just ground back the "blade" looking part that sticks out. This is optional. There's a hunk of molded plastic on the other end of the shaft. You can remove it from the metal part with a wire wheel on a grinder. This should not hurt the steel bracket. The bracket on the throttle shaft sticks out far enough that it will hit if you mount the valve on a flat surface. You can either: A, make a small riser block to go under the valve, or B, turn the valve shaft 180 degrees and cut most of it away. I chose B, see pics below. I chose to drill out the one remaining hole for a 1/4" connector to bolt to. I'm going to use a rod linkage, but you may want to use a mower throttle cable / choke cable / PTO cable. Re-assembly time. Put new O-rings on the shaft and tap it back in. Double check that you've got the shaft oriented where you want it, and slip the blade in place. A. Do not screw it down yet. B. double check that it's oriented correctly. It should be exactly the same as when you removed it, whether or not you rotated the shaft 180 degrees. Now close the valve. That will line the blade up exactly on center. Install screws, and it's all locked in place. I'll be making an adapter plate to get it bolted up to my forge, but you should know the bolt pattern on the TB casting is 3" x 2.6" and the holes are sized for 1/4" bolts. Once I've got that done, I'll get some more pictures up.


-
Are you familiar with PWM (Pulse Width Modulation)? It's basically rapid switching on/off with the length of the off time varied to adjust the duty cycle. 1/2 power is off 1/2 the time. 1/4 the power is off 3/4 of the time and so on. I searched for "120v ac pwm" and the second unit listed was 6.59 Just be careful, lots of mis listings. Looks like a few are trying to sneak rheostats in a fancy case off, so read before you pay your money. There's a 4 pack for 10.99, for that kind of money you could probably take the risk?
-
I can do simple. It's just gotta be elegantly simple.
-
This is a little long and messy, so bear with me. Also there ARE broad holes in what I'm going to say, but it's close enough to understand without a need for perfection, so if you're an electrical engineer, try not to flinch and please forgive me. The speed of an AC motor is controlled by the number of poles and the AC hertz. In the U.S. it's 60hz and motors have 2 or 4 poles. Which is why you always see 3600 rpm or 1750 rpm motors. The correct way to change the speed of an AC motor is to change the supplied hertz with a variable frequency drive. Those however are Very expensive and pretty complicated. They do however give PRECISE control of the motors rpm. That said, not really suitable for a blacksmith's shop. The above all assumes that the motor in question is rated for a workload greater than the work it's trying to do. So basically not overloaded. The contol on this motor is a rheostat (light dimmer -easy cheap common solution) that is just a variable resistance. It's basically used to reduce the available power level to derate the motor. As the motor's rating decreases it should be dragged down by the load to a slower rpm. And for the most part, it is. But It's a kinda mushy control. As the rpm decreases, so does the load, which reduces the effectiveness of the derating via the rheostat / dimmer. A motor with no load at all, would still be moving at nearly the full rpm, and fans don't really create a whole lot of load. The solution is to increase the load at the same time you derate the motor. Hence the valve and the variable speed. They work together to deliver better control than either could by itself. If you have just the rheostat / dimmer, then the load is the clinker breaker, coal pile, and whatever clinker has formed. The last two are constantly changing as it burns, and the setting on the motor is to hard to find much of a sweet spot with. You'd mostly end up with too much or too little. If you have just the valve, then as the load increases, the pressure goes up, allowing more air through the smaller opening, defeating the effectiveness of the control to a significant degree. This is why people with constant speed motors like the bouncy castle use a diverter to blow off part of the air, basically derating the air supply by "leaking" it off. That is perfect. And 250 dollars. Nice dumpster diving though. Yeah, it sounds like you get me. Full throttle or nothing. I tend to aim high. I miss alot, but when I connect, I like to knock 'em out of the park. A day at the junkyard yielded a nice valve off of a 2000's Ford 5.4L The 4.6 has the same valve. I need to ditch the TPS, and create some linkage, but it looks like a very simple and workable piece otherwise. I may need to make a riser block for it, so it doesn't hit the control arm while rotating. Also if anybody else tries this, the later models had a drive by wire electrical motor instead of a throttle shaft. The V6s had a very similar valve, but about 1/4" smaller. Avoid both.
-
Got a pic? I did recently find some sealed metal gates that are the same design as an RV dump gate. 360 dollars. It's two hours to the nearest steel supplier. I usually just deal with the local hardware store, or scrounge. Speaking of which, I'm off to make the trip to Little Rock and see what the junkyard holds. You never know.
-
Most of me knows the standard blast gate will work fine, leaks and all. My inner perfectionist however is howling at the thought of putting it in the middle of everything else that's so much better built. Besides, exploring options sometimes opens up new better ideas. Never thought of it that way. And I like it. It might just be very practical for an electric, and so so satisfying to watch work.


.jpg.5fb7397a6593fac0a971313187a040db.jpg)
.jpg.e20b3676ee6425c1e852965c4c1e80c0.jpg)