oldnewprobs
Members
-
Joined
-
Last visited
Everything posted by oldnewprobs
-
Haha a kindred spirit. I couldn't for the life of me decide which way to interpret these charts. I know final moisture is not too hard to establish empirically so I'm not like planning on weighing it out, but it lets me know that my starting moisture is about 4x what I need, since I started with chips and needed to get them in solution to be able to combine them with the sand, which I dried thoroughly to have a decent starting reference. Actually here's the relevant section, I'm curious about anyone on here's opinion

-
So I'm using c w Amen 's casting book as a reference, and he suggests a few green sand ratios in it. Most are close to a lot of what I see online, but his recipes for aluminum calls for nearly twice as much clay,19%, 8% moisture, which implies 19:73 clay to very fine sand ratio. His light brass suggestion is 13% clay and 8% moisture, which is more like most recipes I see. Heavy brass is 9 and 7. Most recipes I see online are more like that, generally 1:9 clay to sand. This is close to double and I'm struggling to manually combine this stuff evenly. I'm tempted to cut it with some sand to ease mixing, or should I stay the course?
-
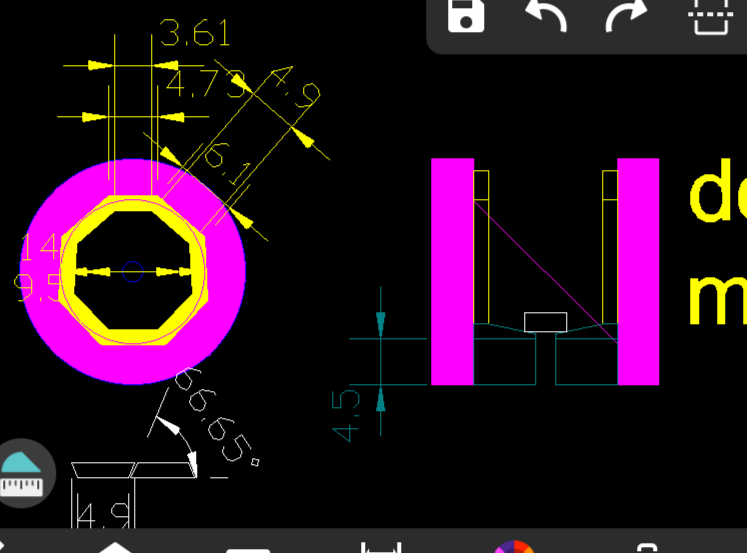
Thank you whoever fixed my thread! I also got a new app on my phone for looking at and edit dxf, so I'm trying to figure it out, but here's a dimensional sketch
-
overkill it until it's dead, right? regardless, I suspect I will only be casting aluminum and copper alloys for the first year or two, I just want to know the thing will be ready for iron when i am. I don't want to re-line it or anything dumb like that.
-
did I say steel? I meant cast iron. I plan on melting aluminum and copper right now (I have a collection of ingots I've made on my electric furnace) but at some point in the future I want to have the option of cast iron without building a new furnace. I also know cast iron is very hard on crucibles, and I'm not looking forward to replacing them regularly, so right now I'm only worried about the easier metals, mostly aluminum becasue of all my scrap VW parts that need a new life. honestly I have no need for any of this, it's just something I've always wanted to do haha. I'm bad at impulse control. but your input says my gut feel that more insulation is gonna be more better will be used as guidance. a 12" internal diameter is nice, but would need some thin insulation, so I think 10.25" is more reasonable target. that lets me have 3" of firebrick, and 8.75" of insulation
-
also ignore the dimensions in that photo, they are close but wrong, I was trying to figure out the geometry of an 8 sided shape where 1 side was a different size than all the rest, I figured it out later but forgot to re-print apparently. anyways the materials will be 8# ceramic HTZ 3200 firebrick for the liner versaflow 70 plus castable refractory I think it will be about $500 for the materials. I think all the steel i have lying around in form of misc junk in the basement and yard. the refractory is to seal the fiber at the top, as well as make the lid and floor. in the lid it will be backed with even more ceramic wool insulation. big question for the viewers, should i stick with my 4" of insulation, 1.5 inch of firebrick, or should i go bigger and just use 3" of insulation? it seems most folks only use 1-3" of insualtion/castable, but the castable is not much of an insulator, so i think i'll surpass that easily. either way the gap between the walls and the crucible will be larger than is a great idea, but the fuel will be waste oil so i'm not too worried about cost, but it needs to work. I hope the extra insulation makes up for the bad optimization.
-
so thats a sketch i made at work because I work way faster in real cad, but now I'm home and need to re-do it in much worse free software. It's very not clear there what the floor looks like, but its a few insulating bricks on edge, cut into small pieces, with ceramic wool filling up the rest of the space, with a 1-2 inch latyer of castable refractory on top of it. it is sloped towards the center with a drain mostly for "in case my crucible shatters when i drop it like a dummy" and possibly so i can use it as a cupola in case i want to make ingots out of akward scrap without needing it to break it down before hand, as all my crucibles are actually quite small currently.
-
Well I couldn't figure out how to change the title of my thread so I'm starting a fresh one now. The plan is to build a quite large melting forge (possibly melting cupola) for doing all kinds of metal casting. I've done tons of metal work before and I'm very handy, but I only ever melted metal in my electric furnace (separate thread later!) And a few times in highschool in a very unsafe charcoal metal drum furnace with uncoated ceramic insulation. So I found two large metal pressure vessels I was going to use as forms, which set in my mind I want a large furnace. I also don't want to do the whole "hmm I should build a larger one now" I have some left over 55 gallon drums from my grill and tandoor builds, so I'm going to use my failed charcoal oven to make this burner. The plan is above average insulation compared to most builds I've seen, as I think that will make everything easier in use, as well as managing water ingress so I can leave it outdoors while not in use. A 55 gallon drums has about a 22" diameter, so I settled on 2 wraps of 2 inch insulation. I was in on the fence between castable lining vs fire brick. I think cutting fire brick is something I'm better at than working with cement (my driveway will back me up on that) so I've decided to line it. I hope that that also means it will be easier to fix if damage happens down the road . At the last second I went to 1" insulation, so I can either do 3 or 4" of insulation, since fire bricks are hard to predict what I can find locally. Attached are my sketch ideas, I'll put up some annotated ones later when I figure out how to do that more easily.

-
thats good to know, might be able to just get the nozzle for one of those etc. regardless even if hte thing doesn't really work, i'll have a blower assembly with igniter to start from at least.
-
All of this will be done outdoors with a short chimney to keep fumes away from me. Yes I've googled it and watched some stuff, but some sources are clearly wrong, and some are very vague, I was hoping to find a breathing human with some experience who might want share what they've done that's similar. My biggest concern using a furnace burner with waste oil is clogging it ever 15 seconds, so if I do use that as my starting point I will start with fuel oil or diesel instead of filtered waste oil, but ultimately I want my furnace to run on waste oil
-
So that's the whole topic: if I got used oil burner from a home boiler/furnace, could I use it to run a melting foundry on home oil/diesel? If I filter and pre heat, think it could run on waste oil as well? Possibly just with a larger jet orifice? I'm gonna try it regardless
-
I have their cnc mini mill and love the thing, I've almost bought the lathe a few times now lol
-
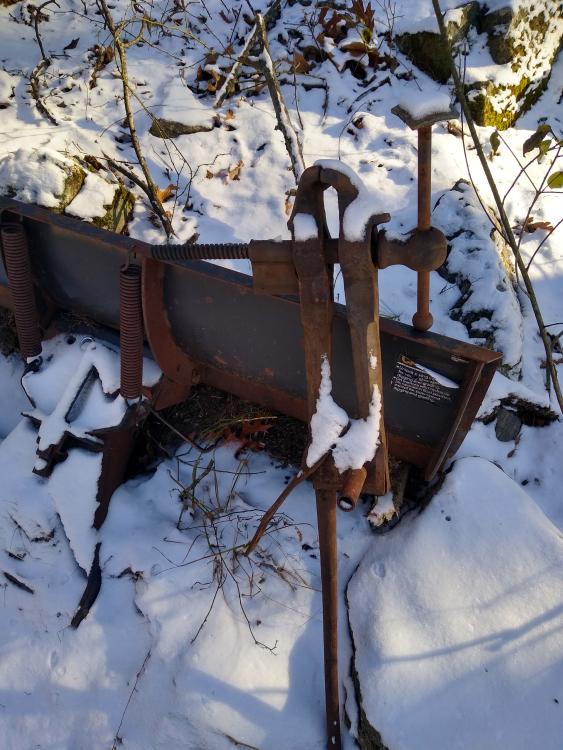
Does the nut always float in these things? The baby railroad track looking bit is actually the acme nut for the rod. It just jams into the frame, definitely scavenged from somewhere. Also the lower pivot bolt is a bolt with no nut, and weirdly the hole in the pivot and frame are different sizes, but it clamps, and I had to cut the last inch off the screw due to damage as well as the nut, but it's working good enough now.
-
Bought this off a coworker sight unseen, regretted it when he first showed it to me, felt better when he named his price of $5 Clearly the screw and nut are from a different vice, and the mount should be flattened and it has no spring BUT it clamps, so I have an outside vice now. I think I'll try to sleeve the threads with some plumbing pipe that fits to protect it a bit from the elements and mount it on the edge of my outside table and call it good
-
Haha my plan is to do 90% of my melts in a crucible, melting directly in the furnace is a last ditch I'm feeling lazy approach. So I'm not going to design around that too much but I like having the option. And honestly if I ever get a bandsaw hopefully all my melts will be in crucibles.
-
So maybe I should start a build thread for this thing... The design goals are waste oil burning, not too loud, useable with no crucible, ie drain hole in the bottom so I can melt down large awkward scra without cutting it up too much and just put a mold under the thing. Also it will be well insulated because it bugs me when things like this aren't. Final requirements it lives outside in the elements year round, so water ingress control will take front row seat in design.
-
Oh sorry those dimensions are of my electric kiln, it's a commercial frame that I built heaters for so I was working with the dimensions I had. For my new melting furnace (what's the right word for that btw?) I plan on picking the height based on the dimensions of the fiber I use to build it.
-
I didn't consider the expansion issue. Since my fuel is free I'm not super concerned about efficiency, plus my walls will be better insulated than most furnaces I see online so that should help out. My electric kiln is good to 1000-1200C, and gets there pretty quick and with perfect control, but it's a little expensive to run and always a little up small. Inner dimensions are 14x10 8 high, and it's just always a bit too small lol. So I figured I'd be better served just going as big as is practical. I may just do fiber insulation with cut inner bricks, rather than pouring a refractory. It seems like it would be the same price or cheaper, but much easier to do well.
-
So I'm planning out my first fuel powered melting furnace in years. Built a simple one 15 years ago with a friend, ceramic wool I'm a steel bucket, shop vac and coal etc. I built an electric kiln a while ago that I melt aluminum in from time to time and it got me hooked again. I have several metal forms to make a furnace from, and I'm thinking I'll build as big as I can do I don't need to do it twice when my ambition grows. It will be waste oil fired as my town stopped collecting it and I've got gallons of the stuff. My question is, if I do a 55galb body, 4" ceramic wool insulation, and then instead of refractory casting (always hard to do well) why can't I just use a steel liner inside? Sure it will corrode over time, but maybe a skim coat of refractory material could slow that down, and then a "cap " of refractory to seal the top of the insulation and the two metal walls. A typical cast reinforced lid and I think I have a simple furnace built in a few days. The only reason I didn't start building already is that I've never seen one like this before. I like innovating, but so many people have built furnaces before me I feel like I might just be missing something here. Any input? Should I just go for it?